Watch the Video Tutorial
💡 Pro Tip: After watching the video, continue reading below for detailed step-by-step instructions, code examples, and additional tips that will help you implement this successfully.
Hey there, automation enthusiasts! Boyce here, your friendly neighborhood self-taught automation consultant. You know, I’ve been down the rabbit hole of trying to get cool tech to work, and trust me, it can feel like you’re trying to build a spaceship with a LEGO instruction manual that’s missing half its pages. That’s why I’m super stoked to walk you through setting up N8N, a seriously powerful workflow automation tool, right on your own turf. We’re talking full control, no weird cloud limitations, and all the privacy you could ask for. Let’s get this party started!
Table of Contents
Open Table of Contents
- Essential Prerequisites for N8N Deployment
- Installing N8N with Docker
- Accessing Your N8N Instance
- Required Resources and Cost-Benefit Analysis
- 💡 Critical Best Practice Tips
- Key Takeaways
- Conclusion
- Frequently Asked Questions (FAQ)
- Q: Why do I need a domain name for self-hosting N8N?
- Q: What if I don’t want to expose my N8N instance to the public internet?
- Q: My
docker compose up -dcommand failed. What should I check? - Q: Why did we set
TLStono TLS verifyin Cloudflare? Is that secure? - Q: Can I use a different proxy instead of Cloudflare Tunnels, like Nginx Proxy Manager or Traefik directly?
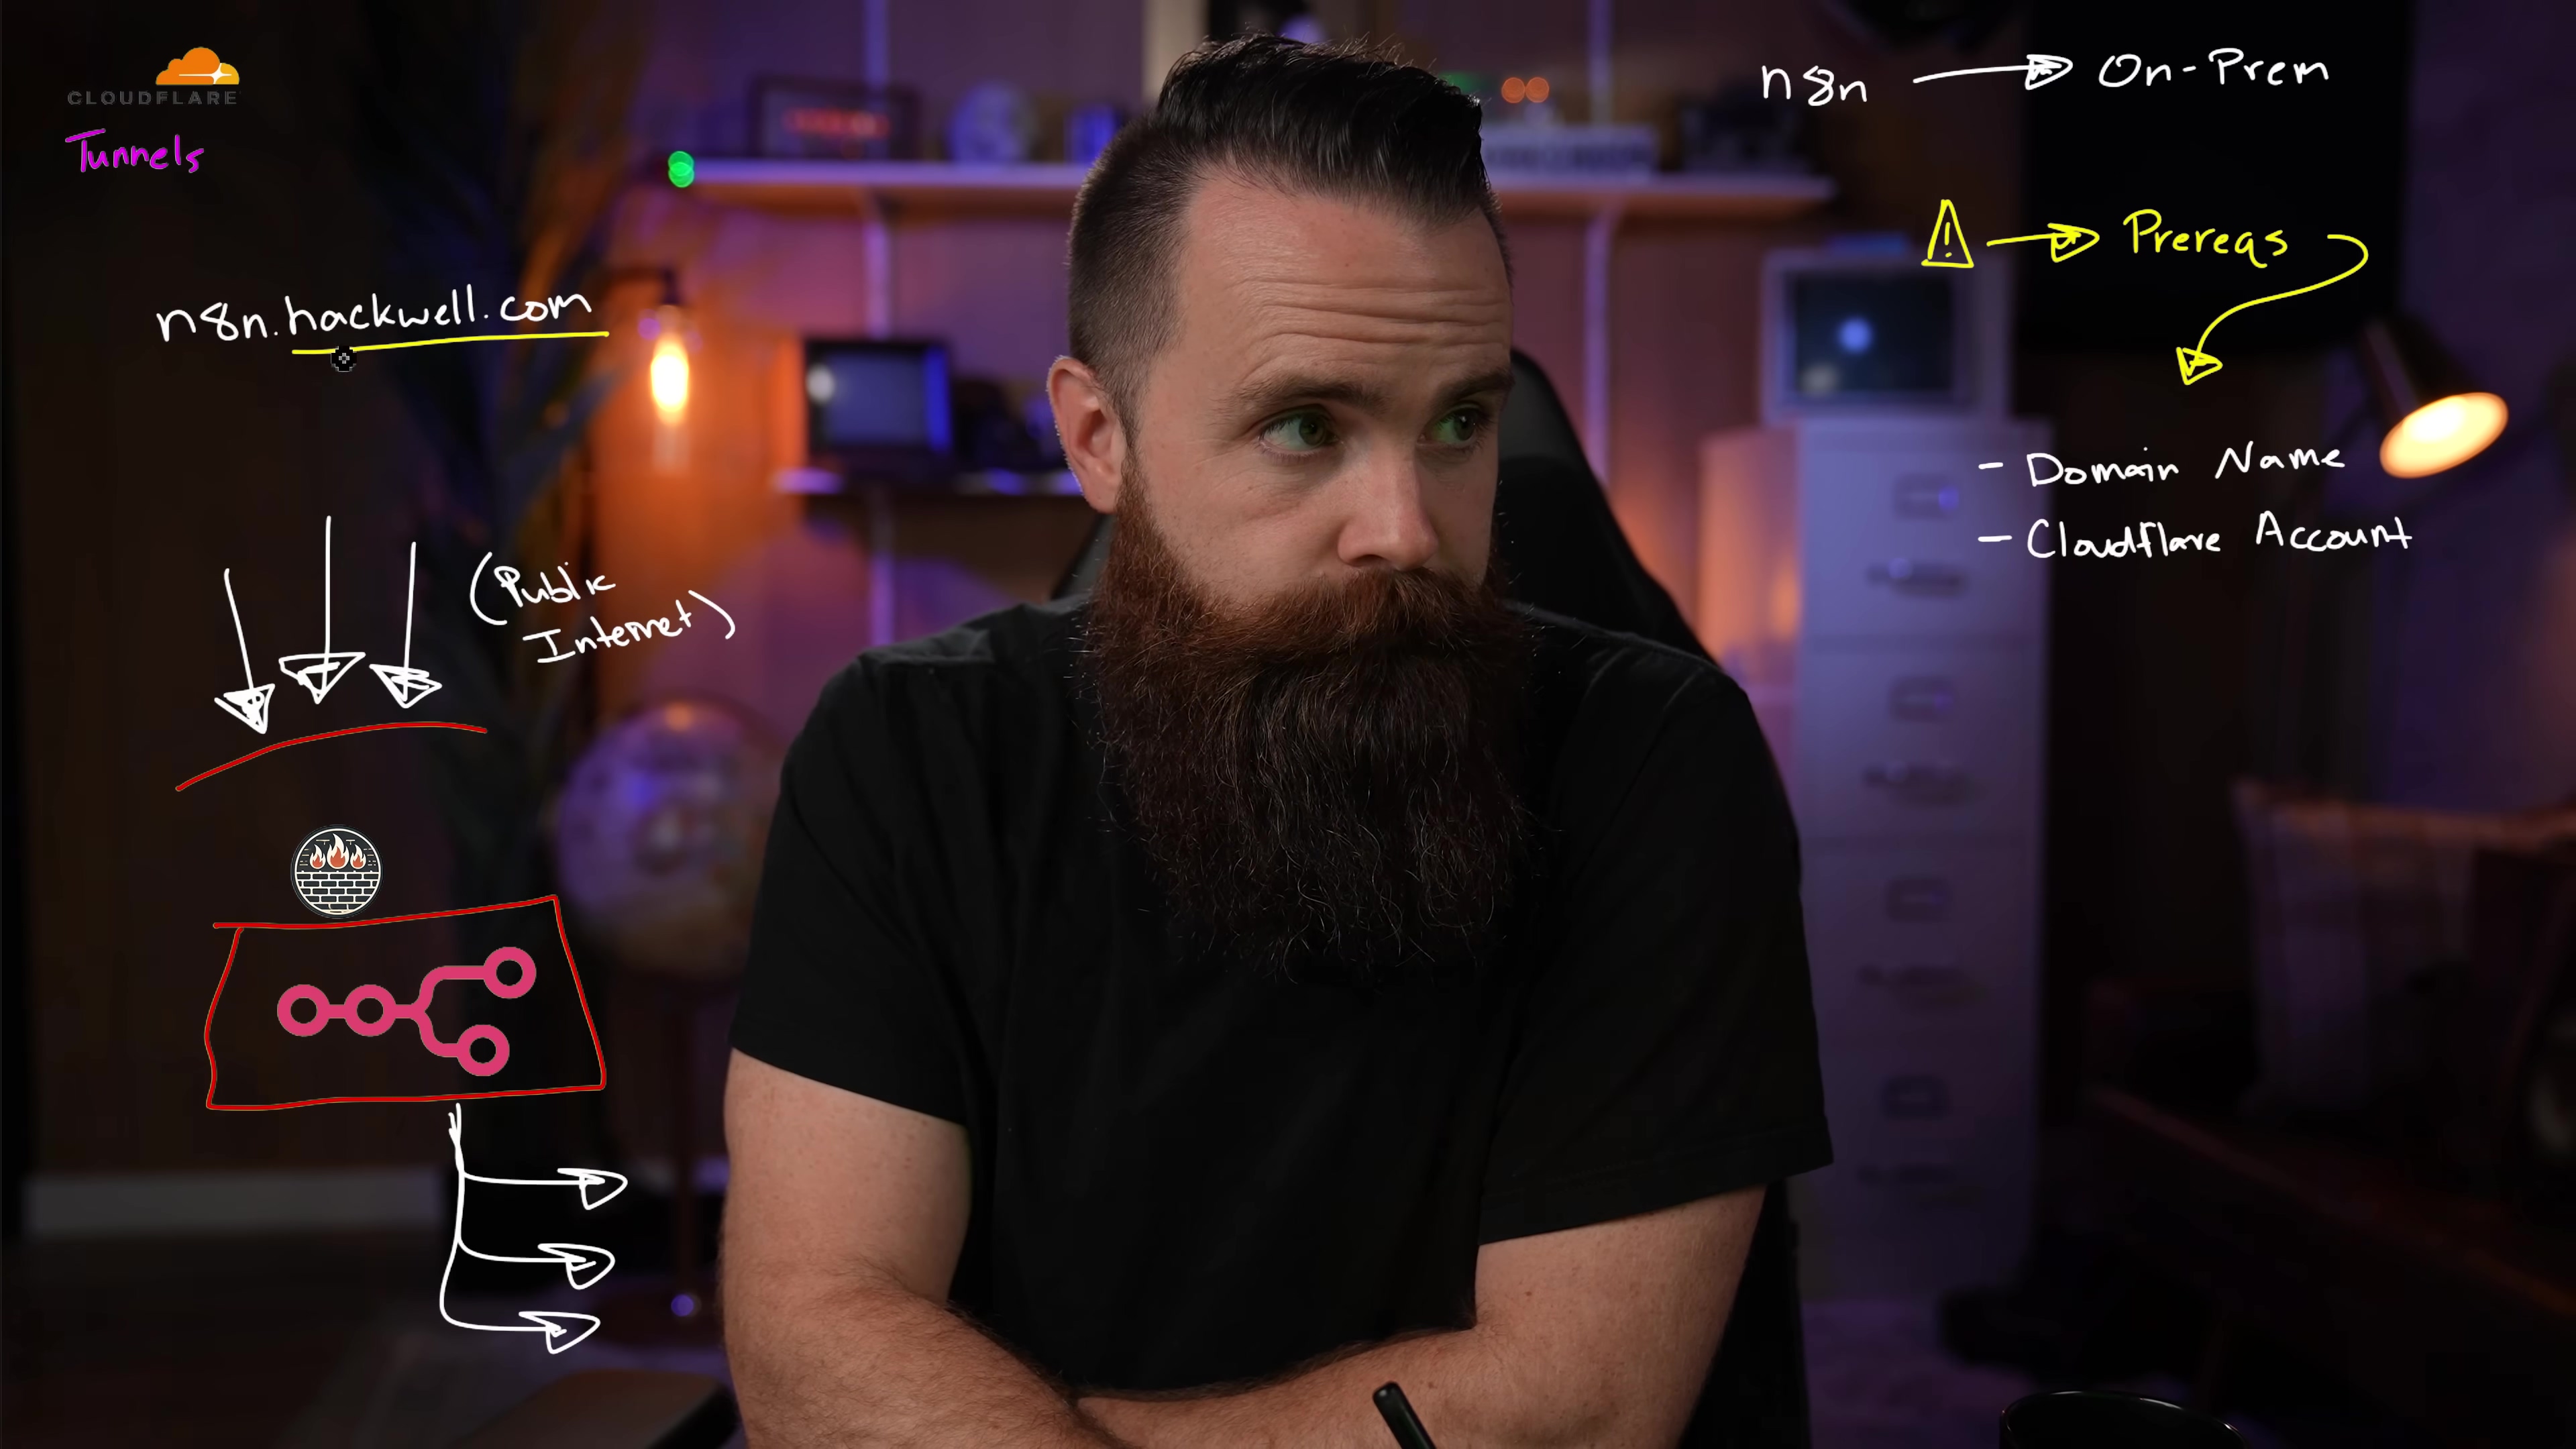
Essential Prerequisites for N8N Deployment
Alright, before we dive into the fun stuff, we need to lay some groundwork. Think of these as your mission-critical supplies. Without them, our N8N spaceship isn’t going anywhere, especially if we want it talking to the public internet.
Domain Name Acquisition
First up, you’re going to need a domain name. What’s a domain name? It’s basically your N8N’s unique address on the internet, like n8n.yourdomain.com. You can grab a brand-new one, or if you already own a domain, you can just create a subdomain. Don’t sweat the cost here; these are usually super cheap, like a fancy coffee once a year, typically ranging from $3 to $15 annually. This little piece of digital real estate is how everyone (or just you!) will find your N8N instance.
Cloudflare Account Setup and Tunnel Configuration
Next, you’ll need a Cloudflare account. And here’s the best part: their Cloudflare Tunnels product, which we’ll be using, is completely free! This is where the magic happens. Cloudflare Tunnels create a secure, encrypted connection directly from your public domain name (that one we just talked about) straight to your N8N instance, even if it’s tucked away behind your firewall. It’s like having a secret, super-fast wormhole that bypasses all the usual internet traffic jams and security checkpoints. Plus, Cloudflare can even help you register that domain name, making it a one-stop shop. Super handy, right?
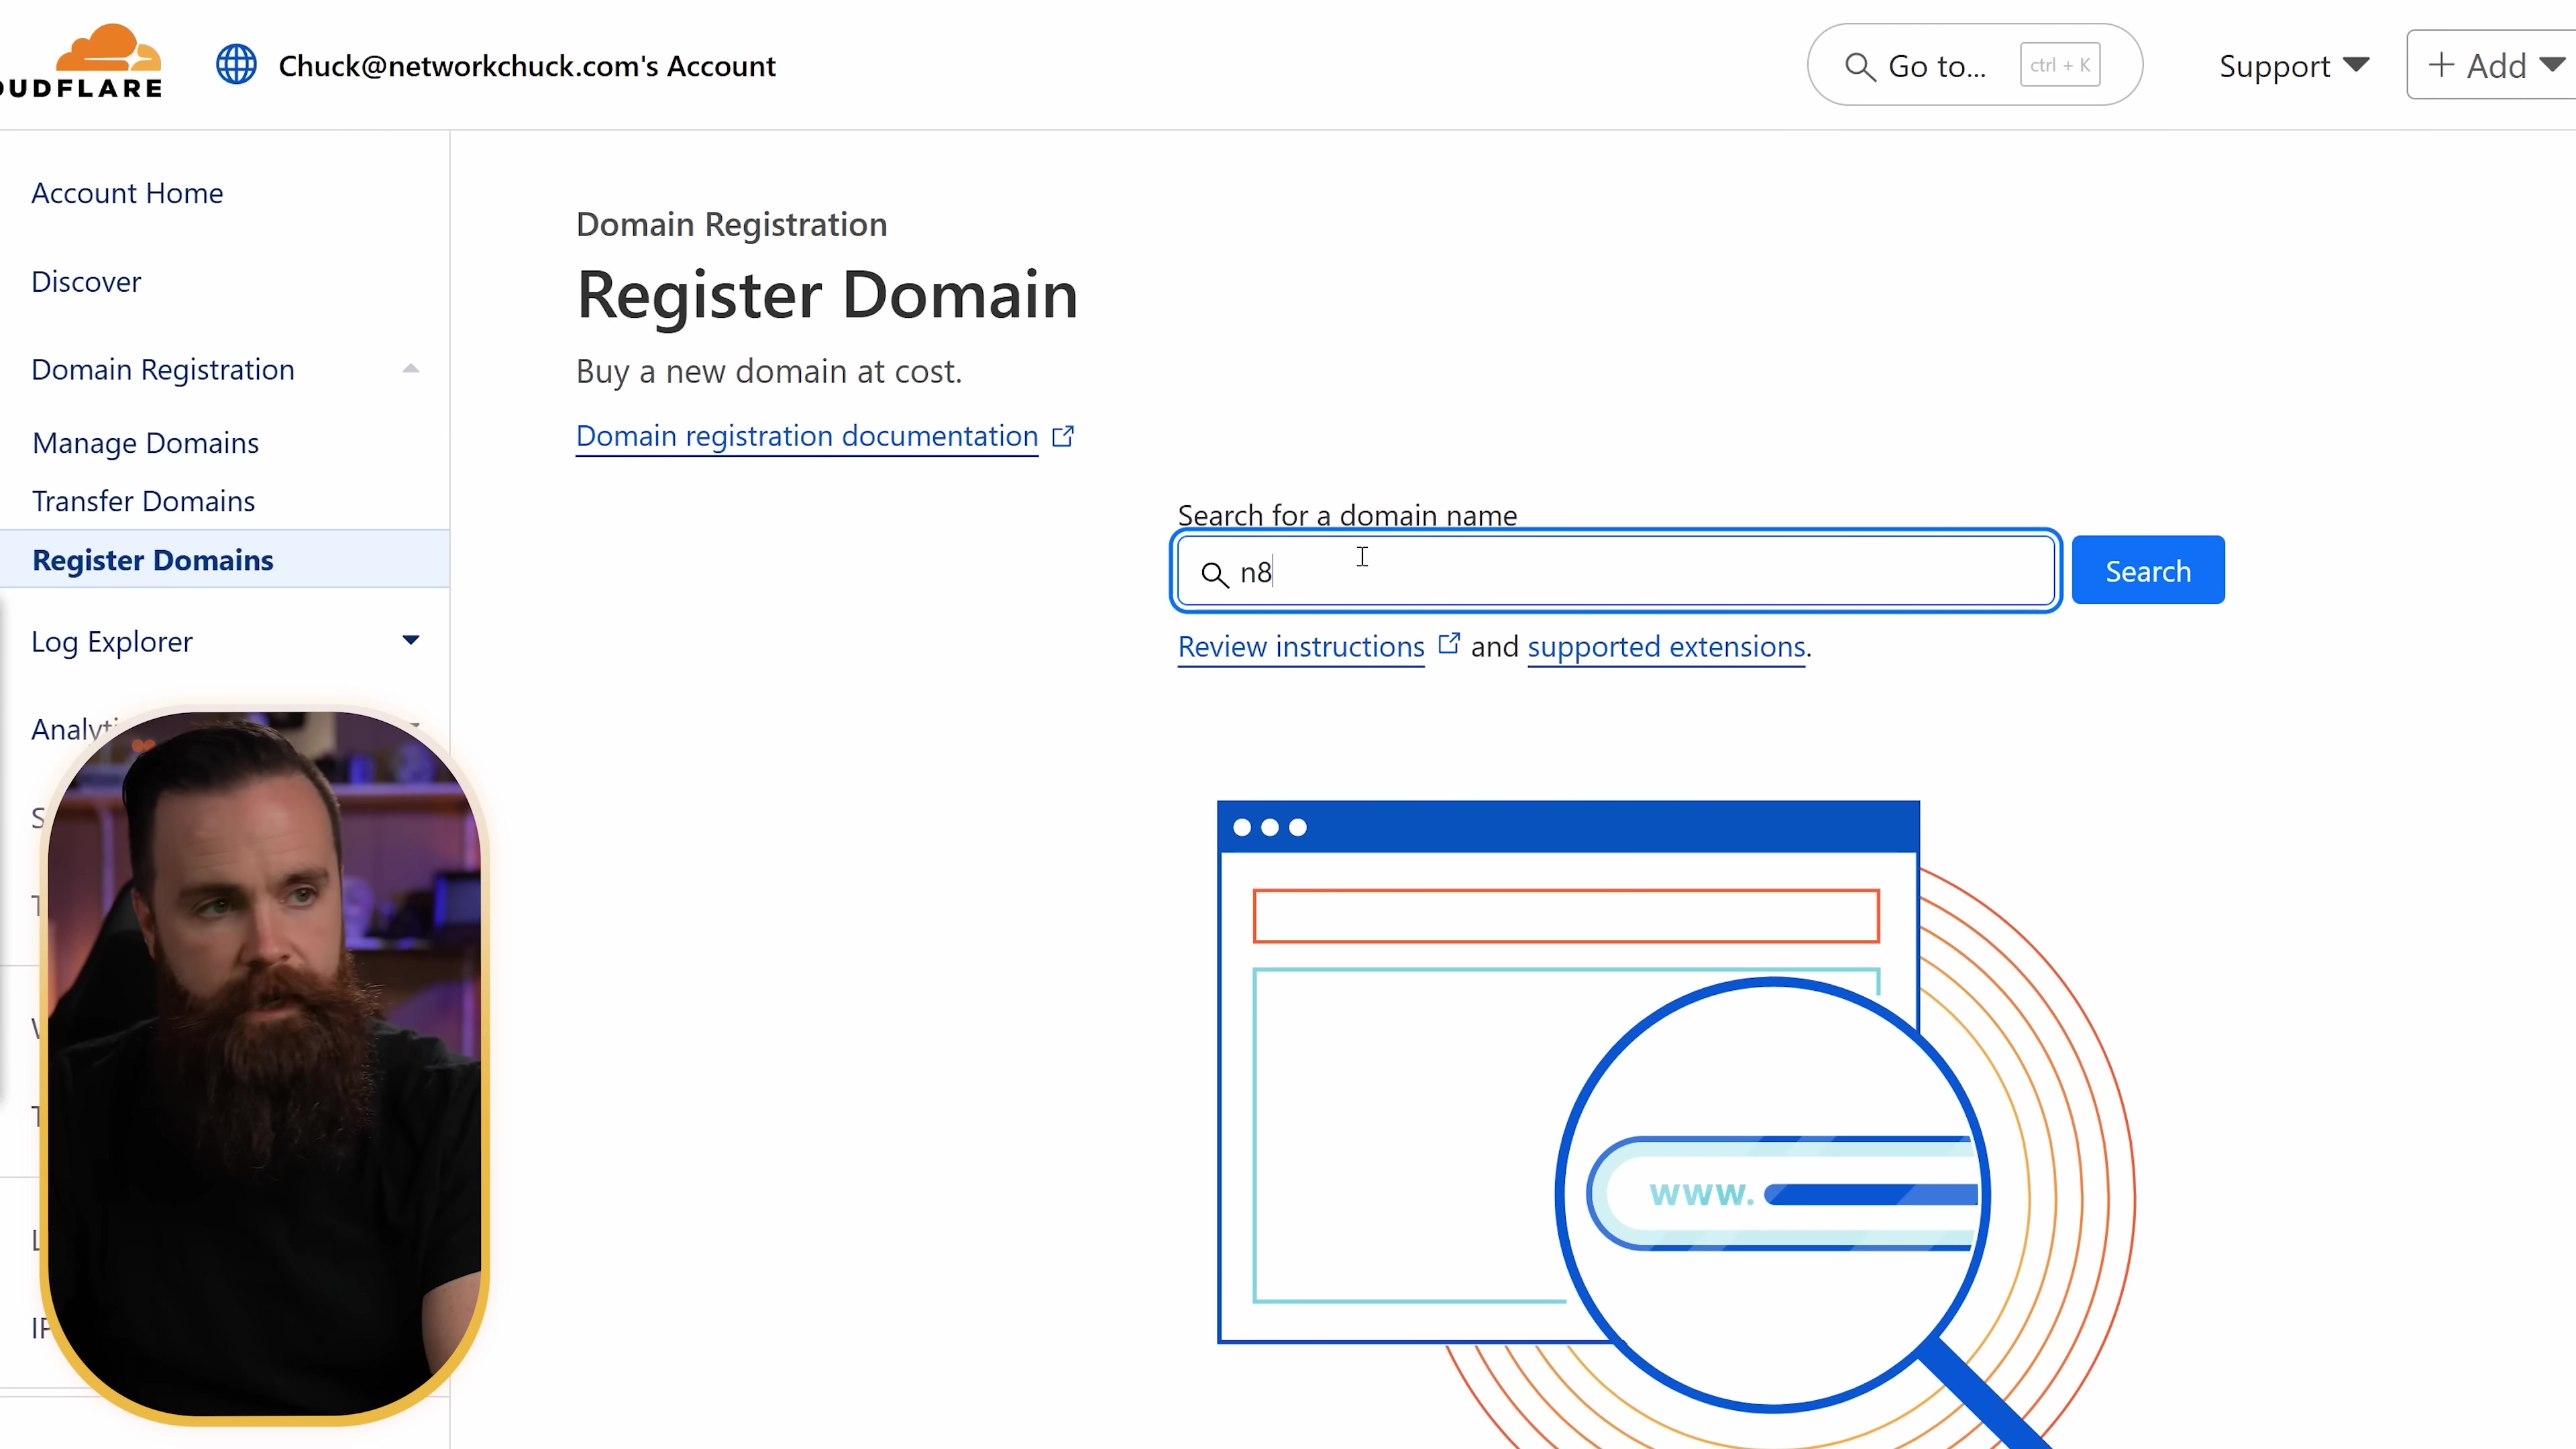
Registering Your Domain with Cloudflare
Ready to get started? Head over to Cloudflare’s website and sign up for a free account. Once you’re in, you’ll have the option to either connect a domain you already own or register a brand-spanking-new one directly through them. Their interface is pretty intuitive, so just follow the prompts. It’s like signing up for any other online service, but way cooler because it’s for your automation empire!
Setting Up Cloudflare Tunnels
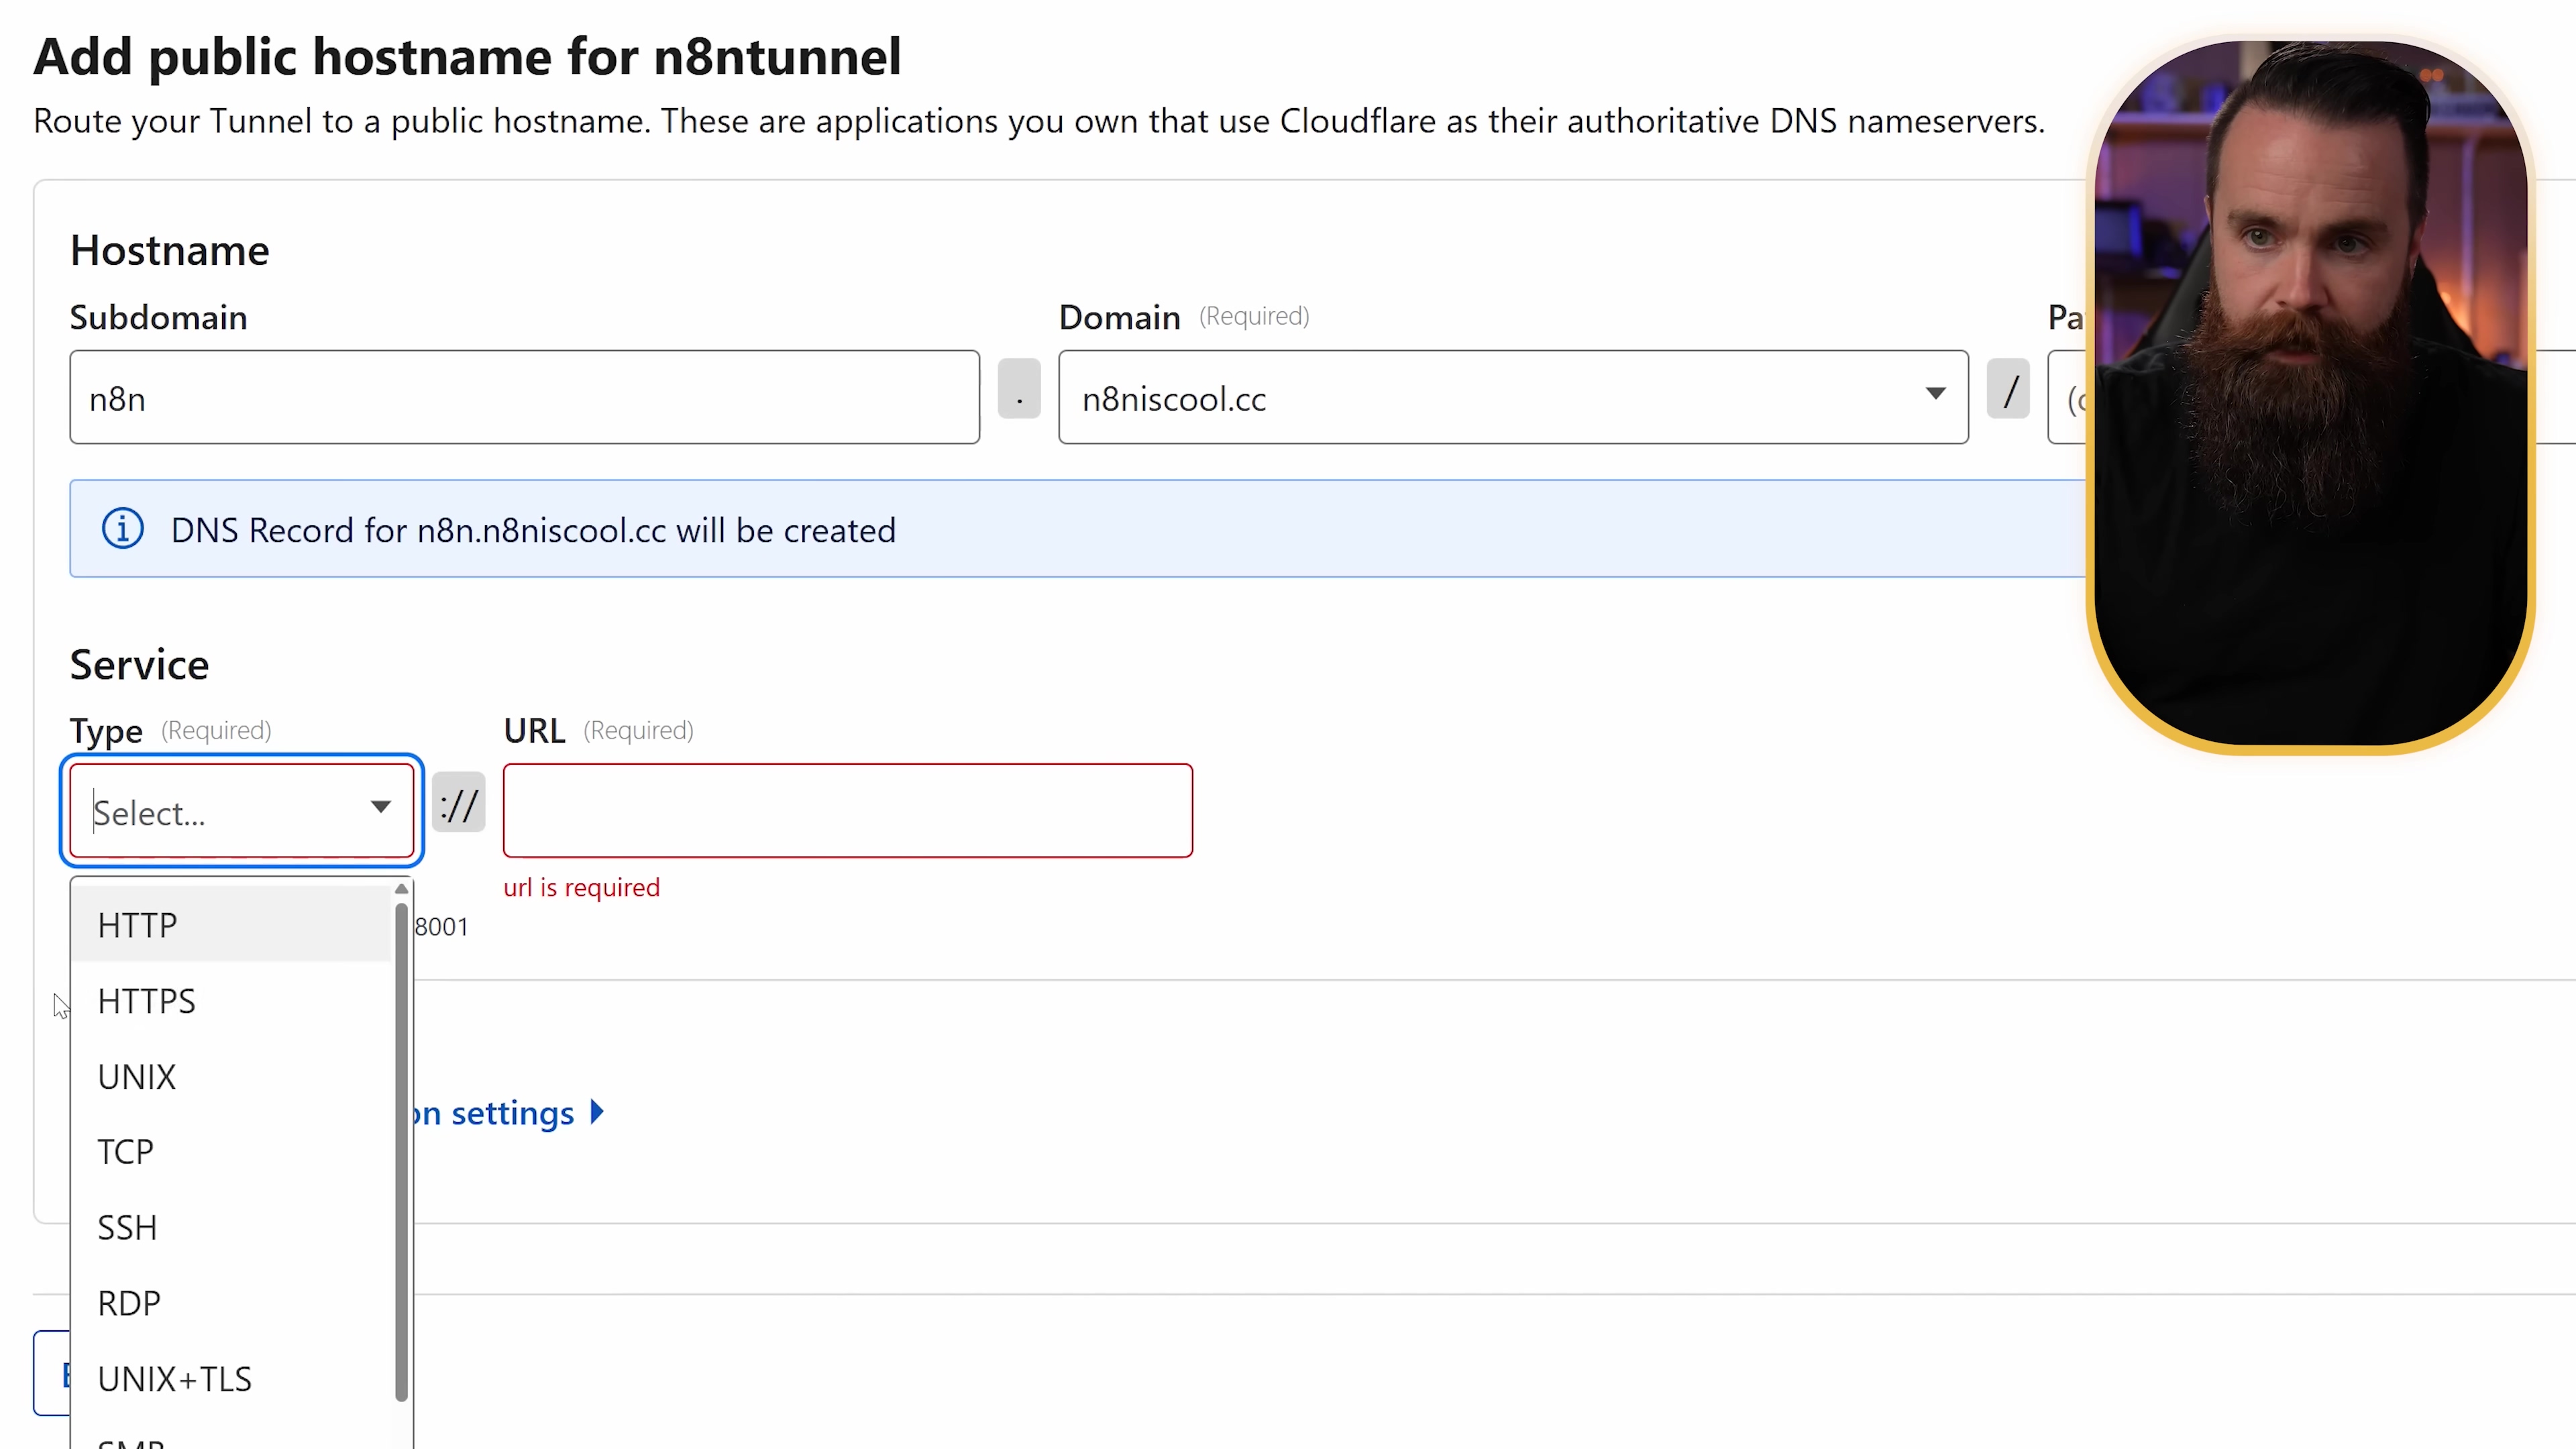
Okay, domain’s registered? Awesome! Now, let’s get that secure tunnel dug. Log into your Cloudflare dashboard and look for the ‘Zero Trust’ section. It sounds fancy, but it’s just where all the cool security stuff lives. Once there, navigate to ‘Networks’ and then ‘Tunnels’. Click on ‘Create a tunnel’ and select ‘Cloudflared’. Give your tunnel a memorable name, something like ‘n8ntunnel’ – easy to remember, right?
Cloudflare will then give you some commands to install a tiny piece of software called cloudflared on your server. This little agent is what actually creates and maintains that secure tunnel. You’ll see options for different operating systems like Windows, Mac, Linux, or even Docker. My advice? Install cloudflared on the same machine where you plan to host N8N. This keeps things simple and ensures it can easily talk to your N8N instance.
After cloudflared is installed and running (Cloudflare will show you how to verify this), you’ll go back to the Cloudflare dashboard to configure the N8N connection. Here’s what you’ll do:
- Set the subdomain: This is the part before your main domain, like
n8nif you wantn8n.yourdomain.com. - Select your newly registered domain: Pick the domain you just set up.
- Service type: Choose
HTTPS. - Enter the IP address of your N8N server: This is the internal IP address of the machine where N8N will be running. For example,
192.168.1.100or10.0.0.50. - Additional application settings: This is important! Under ‘TLS’, change the setting to ‘no TLS verify’. Why
no TLS verify? Because Cloudflare is handling the public-facing SSL certificate, and your N8N instance might be using a self-signed certificate or no certificate at all internally. This setting tells Cloudflare to trust the connection to your N8N server without needing to verify its internal certificate. It’s like saying, “Hey Cloudflare, I trust my internal server, you just focus on the outside security!”
Once you’ve done all that, you’ve successfully established that secure tunnel from Cloudflare straight to your N8N server. High five!
Installing N8N with Docker
Alright, with our domain and Cloudflare Tunnel all set up, it’s time for the main event: installing N8N! And trust me, Docker is the way to go here. It makes installing and managing N8N super easy, whether your server is sitting next to you or chilling in a data center far, far away.
Docker Installation on Ubuntu
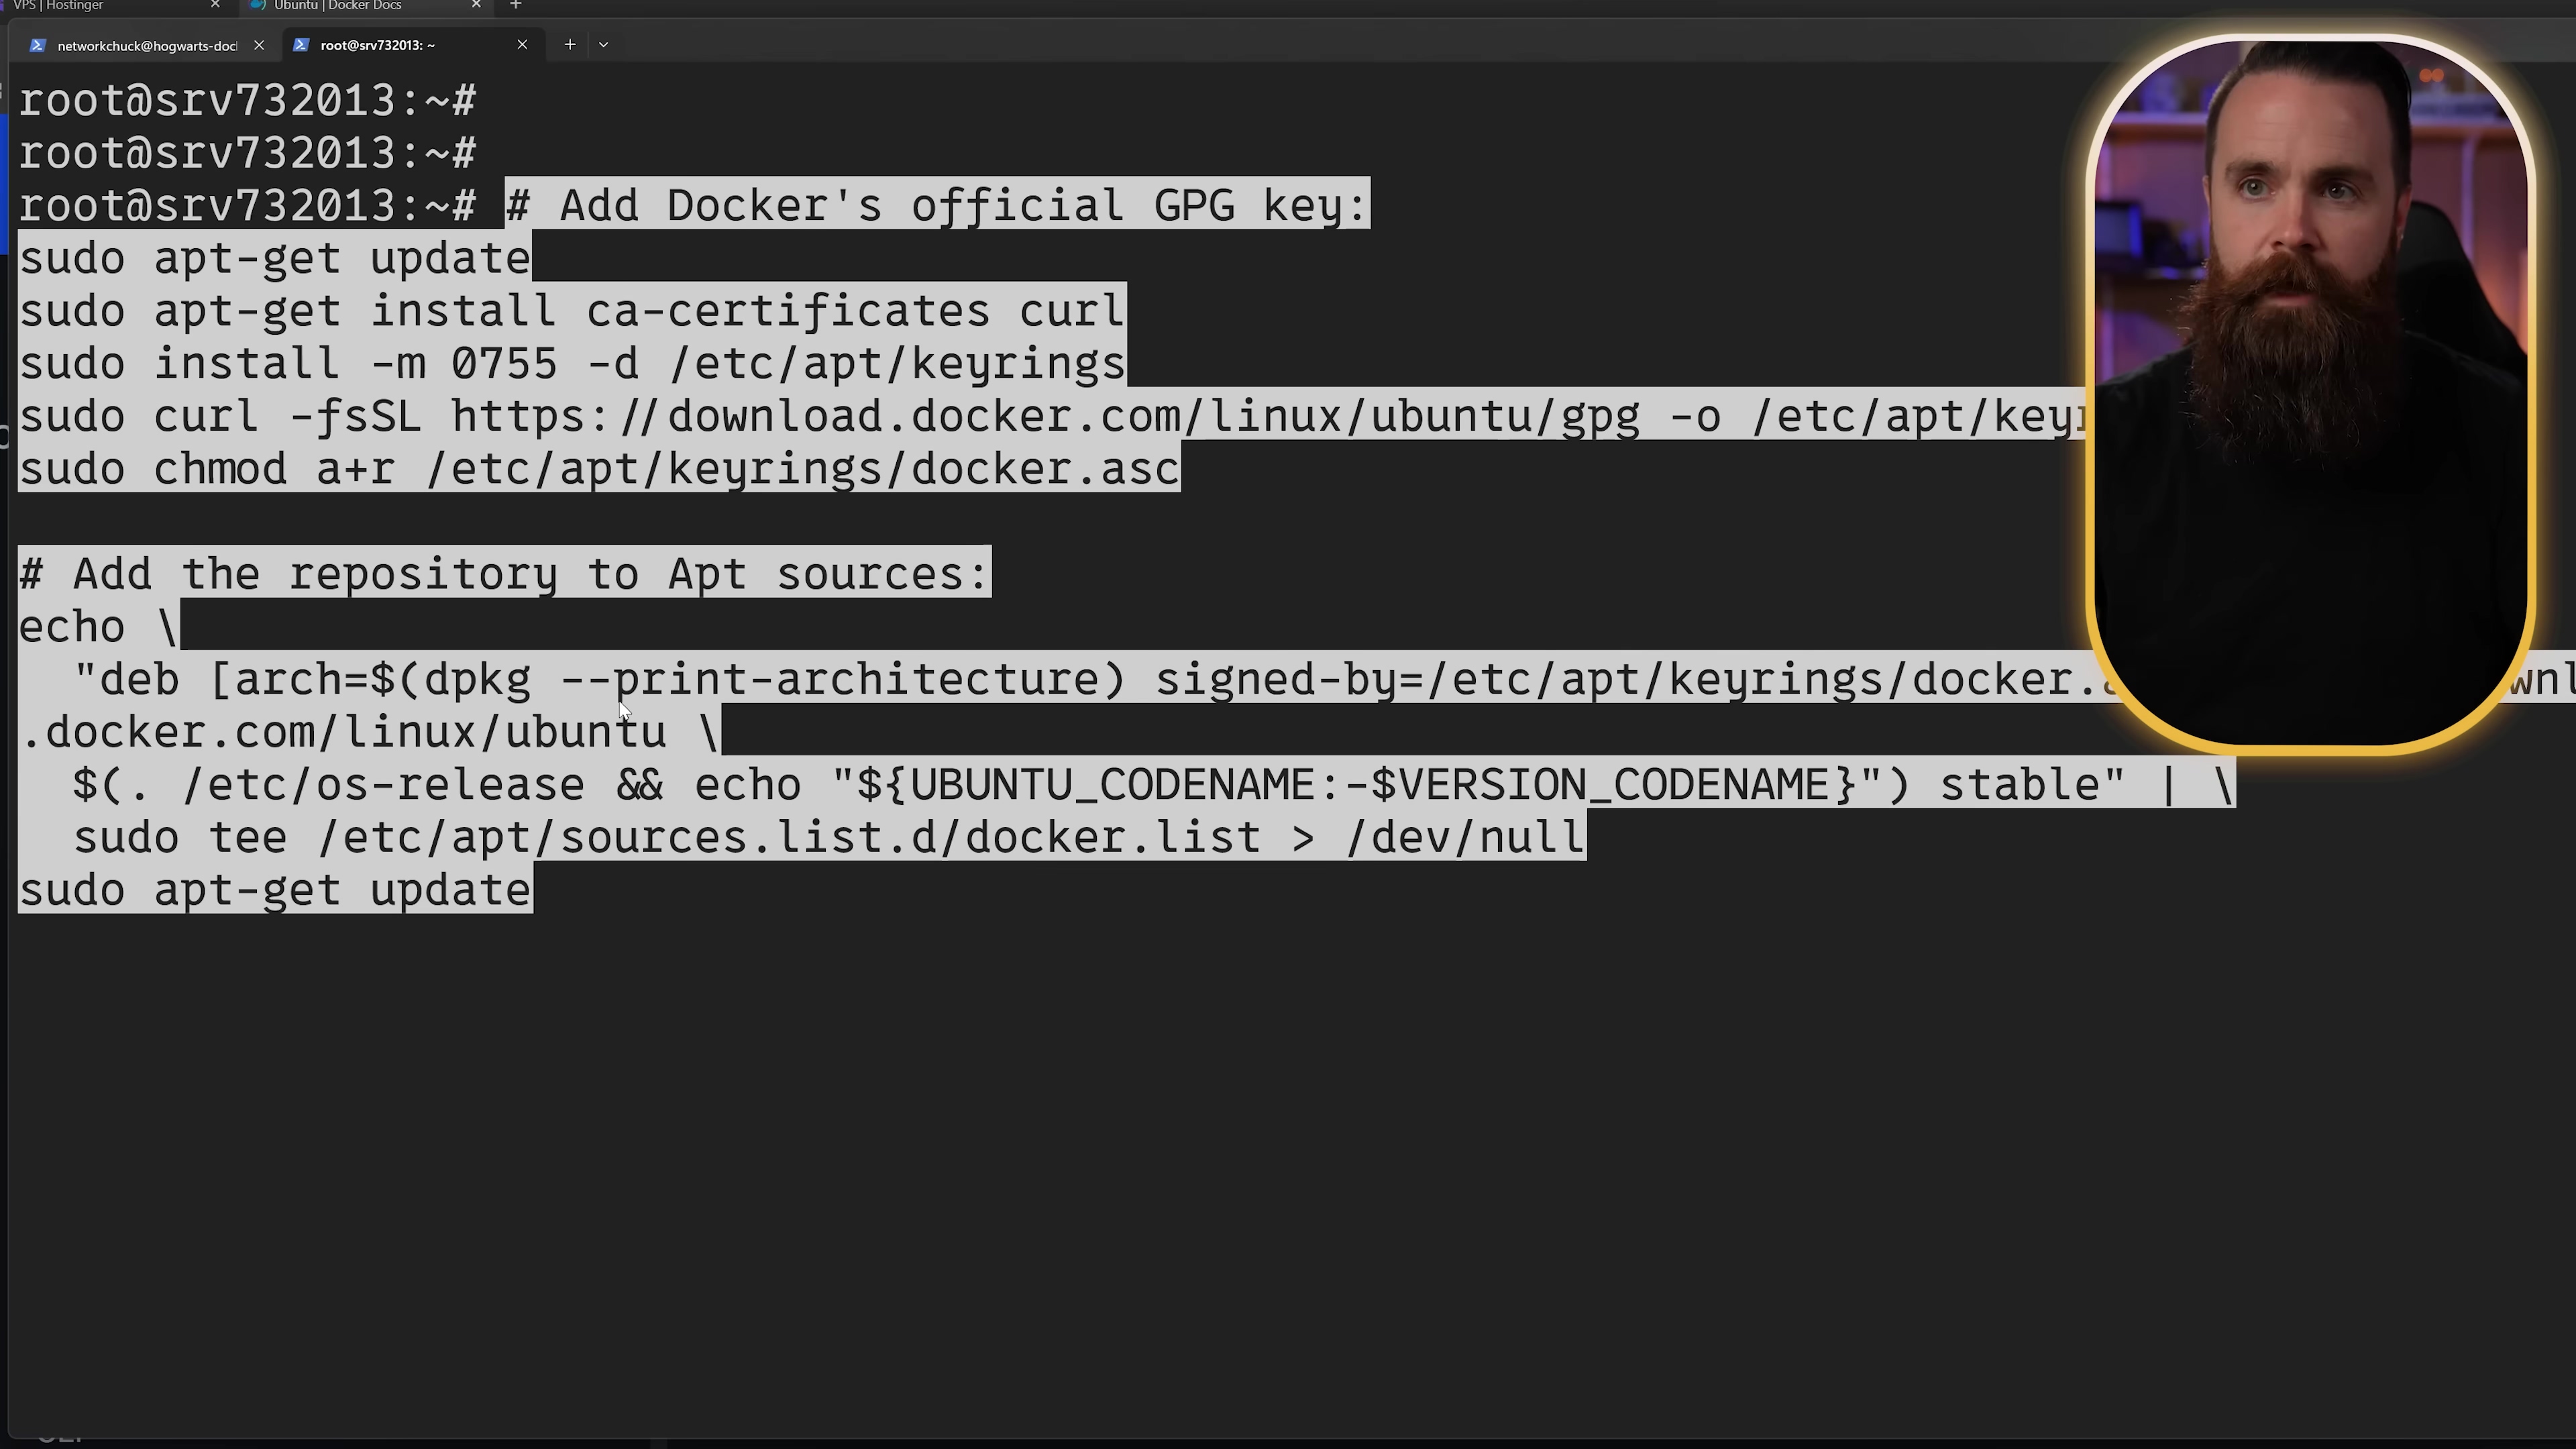
First things first, you need to get Docker onto your server. If you’re using Ubuntu (which is a great choice for servers, by the way), here’s how you do it. You’ll need to log into your server using SSH. If you’re not sure what SSH is, it’s basically a secure way to control your server from your own computer using text commands. Think of it as a remote control for your server.
Once you’re logged in (make sure you have root or sudo access, which means you have administrator privileges), you’ll run a few commands. These commands essentially tell your Ubuntu server where to find Docker’s official software, add a special key to ensure it’s legitimate, and then install it. It’s a standard process for adding new software repositories.
sudo apt update
sudo apt install ca-certificates curl gnupg lsb-release -y
sudo mkdir -p /etc/apt/keyrings
curl -fsSL https://download.docker.com/linux/ubuntu/gpg | sudo gpg --dearmor -o /etc/apt/keyrings/docker.gpg
echo "deb [arch=$(dpkg --print-architecture) signed-by=/etc/apt/keyrings/docker.gpg] https://download.docker.com/linux/ubuntu \
  $(lsb_release -cs) stable" | sudo tee /etc/apt/sources.list.d/docker.list > /dev/null
sudo apt update
sudo apt install docker-ce docker-ce-cli containerd.io docker-compose-plugin -y
Expected Feedback: You’ll see a lot of text scrolling by as packages are downloaded and installed. If everything goes well, you won’t see any big error messages. To verify Docker is installed, you can run docker --version. You should see something like Docker version 24.0.5, build 24.0.5-0ubuntu1~22.04.1 (the version number might be different, but that’s okay!).
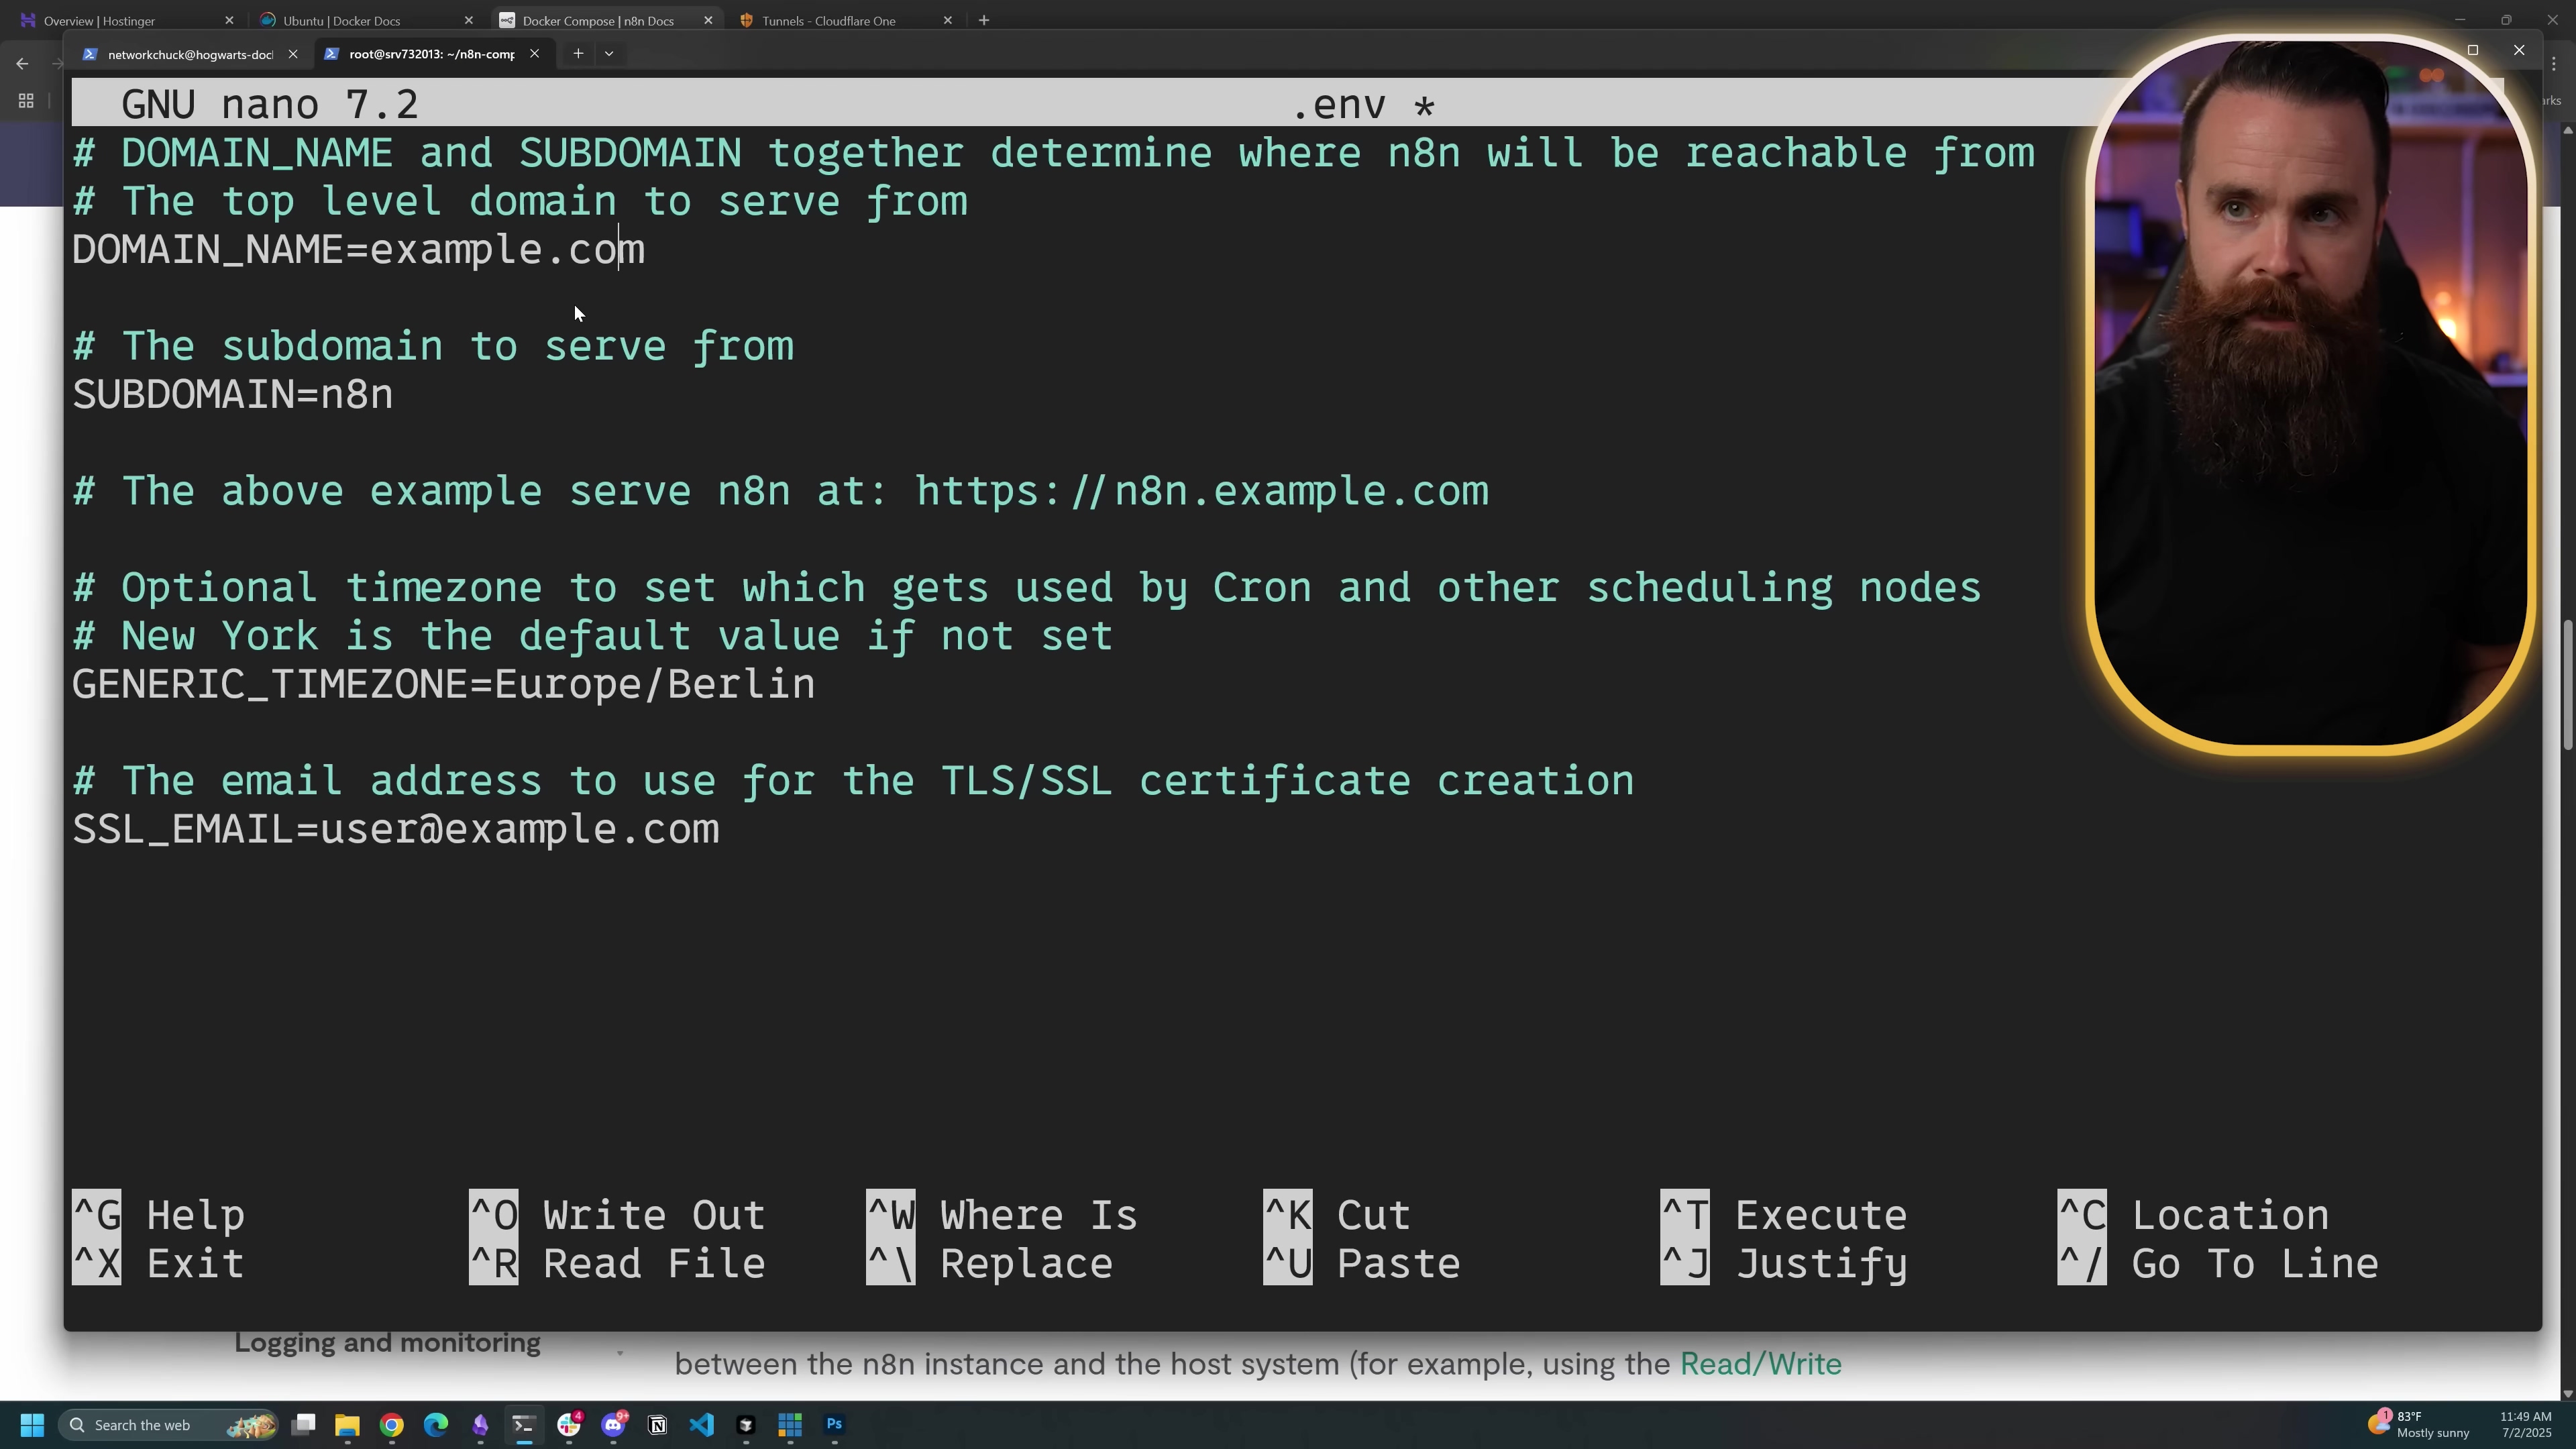
Configuring N8N Environment Variables
Now that Docker is chilling on your server, let’s tell N8N how to behave. We do this using a special file called .env. This file holds all the important settings, like your domain name and timezone. It’s like N8N’s personal instruction manual.
First, let’s create a dedicated spot for our N8N setup. I like to call it n8n-compose. Then, we’ll dive into that directory and create our .env file using a text editor like nano (it’s a super simple, command-line friendly editor).
mkdir n8n-compose
cd n8n-compose
nano .env
Once nano opens, you’ll type (or paste) the following lines. Make sure to replace the placeholder values with your actual information!
DOMAIN_NAME=n8niscool.cc # Replace with your actual domain, e.g., n8n.yourdomain.com
SUBDOMAIN=n8n # This should match the subdomain you set in Cloudflare, e.g., n8n
GENERIC_TIMEZONE=America/New_York # Find your timezone here: https://en.wikipedia.org/wiki/List_of_tz_database_time_zones
SSL_EMAIL=[email protected] # Important for SSL certificate generation (especially for cloud users)
A quick note on DOMAIN_NAME and SUBDOMAIN: If you’re setting this up purely for local use (no public internet access), you can use a local domain like mycoolwebsite.local. But remember, you’d need to add that as a DNS entry on your local DNS server (like a Pi-hole) so your local devices know where to find it. For public access, stick to your real domain!
Once you’ve entered those lines, save the file in nano by pressing Ctrl+X, then Y to confirm saving, and Enter to confirm the filename. You’ll be back at your command prompt.
Docker Compose Setup for N8N
Next up, we’re going to create a docker-compose.yml file. Think of this as the blueprint for our N8N setup. It tells Docker exactly which pieces of software (containers) to run, how they should talk to each other, and how they should use our .env file. We’ll create this file in the same n8n-compose directory.
nano docker-compose.ymlNow, paste the following content into the docker-compose.yml file. This setup includes N8N itself and a proxy called Traefik. While Traefik is often used for handling web traffic and SSL, in our case, Cloudflare Tunnels are doing most of that heavy lifting. However, it’s often simpler to just use the official N8N Docker Compose setup as-is, even if you’re using Cloudflare Tunnels, to avoid breaking things.
version: '3.8'

services:
  n8n:
    image: n8n/n8n
    restart: always
    ports:
      - "5678:5678"
    environment:
      - N8N_HOST=${SUBDOMAIN}.${DOMAIN_NAME}
      - N8N_PORT=5678
      - N8N_PROTOCOL=https
      - NODE_ENV=production
      - WEBHOOK_URL=https://${SUBDOMAIN}.${DOMAIN_NAME}/
      - GENERIC_TIMEZONE=${GENERIC_TIMEZONE}
      - N8N_EMAIL_MODE=smtp # You might change this later if you set up email notifications
      - N8N_SMTP_HOST=your_smtp_host # Replace with your SMTP host if using email
      - N8N_SMTP_PORT=587 # Replace with your SMTP port
      - N8N_SMTP_USER=your_smtp_user # Replace with your SMTP user
      - N8N_SMTP_PASS=your_smtp_pass # Replace with your SMTP password
      - [email protected] # Replace with your sender email
    volumes:
      - n8n_data:/home/node/.n8n

volumes:
n8n_data:Important: Notice the N8N_HOST and WEBHOOK_URL lines? They use those SUBDOMAIN and DOMAIN_NAME variables directly from your .env file. That’s why setting up the .env file correctly was so crucial! Also, I’ve included some placeholder SMTP settings. You can leave them as is for now, but if you want N8N to send emails (like for notifications), you’ll need to fill those in with your actual email server details later.
Save this file (Ctrl+X, Y, Enter).
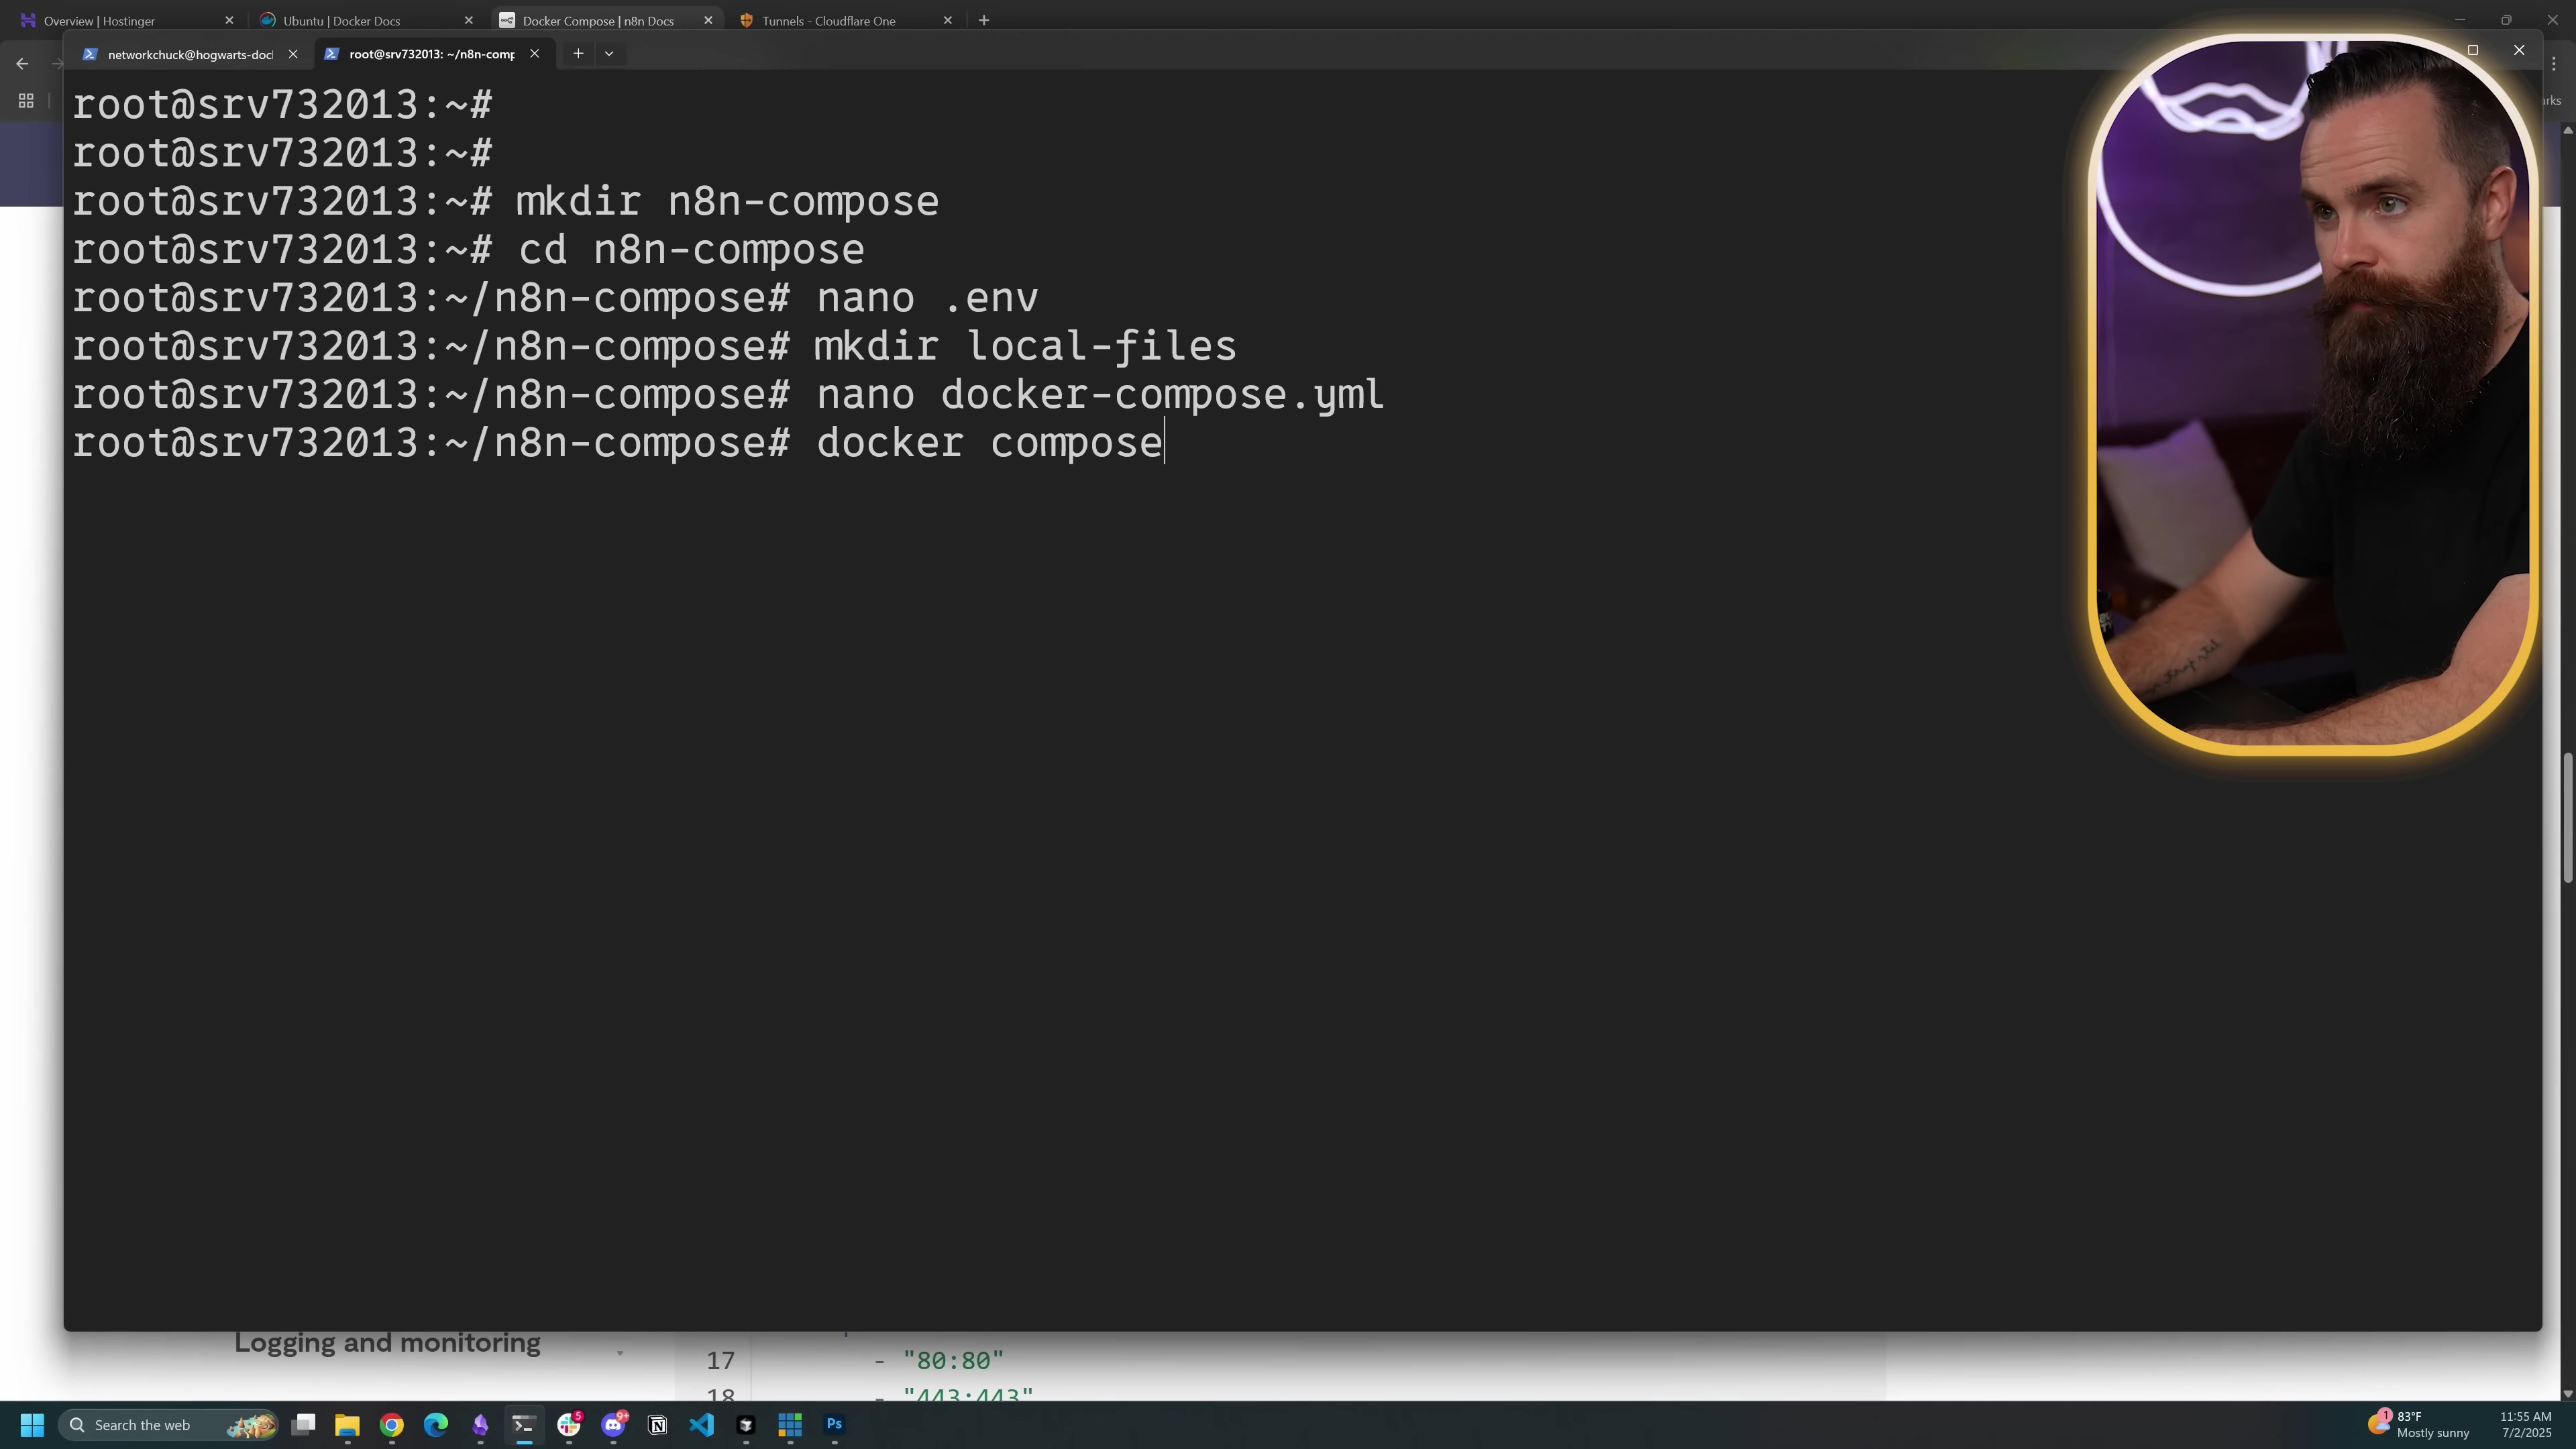
Finally, the moment of truth! With both our .env and docker-compose.yml files ready, we just need to tell Docker Compose to bring N8N to life. Run this command:
docker compose up -dWhat’s happening here?
docker compose up: This command tells Docker Compose to start all the services defined in ourdocker-compose.ymlfile.-d: This is super important! It means “detached mode.” It tells Docker to run N8N in the background, so you can close your SSH terminal without stopping N8N. It’s like launching a rocket and then going back inside while it flies itself.
Expected Feedback: Docker Compose will download the necessary N8N image (if it hasn’t already) and then start the containers. You’ll see messages like [+] Running 2/2 or similar, indicating that the services are being created and started. To verify that everything is running smoothly, type:
docker psExpected Feedback: You should see output similar to this, showing your n8n container (and possibly a traefik container if you kept it in the compose file) listed with Up status, meaning they are running:
CONTAINER ID   IMAGE        COMMAND                  CREATED         STATUS         PORTS                    NAMES
xxxxxxxxxxxx   n8n/n8n      "tini -- /usr/local/b…"   2 minutes ago   Up 2 minutes   0.0.0.0:5678->5678/tcp   n8n-n8n-1
If you see Up next to your N8N container, you’ve nailed it!
Accessing Your N8N Instance
Congratulations, you’ve done it! Your N8N instance is now humming along, ready for action. You can access it directly through the domain name you set up earlier. For public access, it would be something like https://n8n.niscool.cc (using my example domain). If you went the local-only route, it would be https://n8n.mycoolwebsite.local.
Open your favorite web browser, type in your N8N URL, and prepare to be amazed. You’re now ready to dive into the world of automation and build some truly incredible workflows. The universe of possibilities just opened up!

Required Resources and Cost-Benefit Analysis
Before you go full steam ahead, let’s talk brass tacks: what do you need, and what’s the financial picture? I’ve put together a handy list of resources and a quick comparison between doing it yourself (DIY) and opting for a commercial N8N cloud plan. It’s all about finding what fits your needs best.
Resource Checklist
| Category | Item | Description | Estimated Cost (Annual) |
|---|---|---|---|
| Hardware | Server/VPS | A Linux machine (Ubuntu is my go-to recommendation) | ~$50 - $200 (for a decent Virtual Private Server) |
| Storage | Enough disk space for N8N’s data (workflows, credentials, etc.) | Usually included with your server/VPS | |
| Software | Docker | The containerization platform we just installed (free!) | Free |
| N8N | Your awesome workflow automation tool (also free!) | Free | |
| Cloudflared | The little agent that creates our secure tunnel (yep, free!) | Free | |
| Network | Domain Name | Your N8N’s public address on the internet | ~$3 - $15 |
| Cloudflare Account | For tunnels & DNS (their free tier is perfect for this) | Free | |
| DNS Server (Local) | Only if you’re doing a fully local setup (like with a Pi-hole) | Free |
Cost-Benefit Analysis: DIY vs. Commercial N8N Cloud
| Feature | DIY Self-Hosted N8N | Commercial N8N Cloud Plan |
|---|---|---|
| Initial Setup Cost | Low (just your domain and server/VPS) | None (it’s subscription-based, so you just pay monthly) |
| Monthly/Annual Cost | ~$5 - $20 (for a basic VPS + domain) | ~$20 - $500+ (depends on the tier and features you need) |
| Control & Customization | Full control over everything – your environment, your data, how you integrate things. It’s your playground! | Limited to what the provider offers. You’re playing in their sandbox. |
| Security | This is on you! It depends entirely on your security practices and how well you maintain your server. | Managed by the cloud provider. Generally very high, as they have dedicated security teams. |
| Scalability | You’ll need to manually upgrade your server’s resources if you need more power. | Automatic scaling handled by the provider. They deal with the heavy lifting. |
| Maintenance | You’re the boss! You’re responsible for updates, backups, and troubleshooting. | Managed by the cloud provider. Less headache for you. |
| Accessibility | Via your Cloudflare Tunnel (public) or your local network (private) | Publicly accessible URL, usually managed by the provider. |
| Best For | Tech-savvy users, folks with privacy concerns, those with very specific custom needs, or anyone looking to save some serious cash. | Beginners, people who want a super quick setup, those who hate maintenance, or big enterprises. |
💡 Critical Best Practice Tips
Alright, you’ve got N8N running, but let’s talk about keeping it healthy and happy. These are some pro tips I’ve picked up along the way:
- Regular Backups: Seriously, don’t skip this! Your N8N data (all your amazing workflows and credentials) lives in that
n8n_dataDocker volume we set up. Make sure you regularly back it up. Docker volumes make it pretty straightforward to copy that data. Set up a schedule, and stick to it. Future you will thank you! - Security Updates: Keep your server’s operating system (Ubuntu, in our case), Docker, and N8N itself updated with the latest security patches. This is like putting on fresh armor; it protects your self-hosted environment from nasty vulnerabilities. Don’t be that person who gets hacked because they ignored updates!
- Firewall Configuration: Even though Cloudflare Tunnels are doing a lot of the heavy lifting for external access, make sure your server’s local firewall (like
ufwon Ubuntu) is properly configured. Only allow necessary inbound connections. It’s an extra layer of defense, like a moat around your digital castle.
Key Takeaways
So, what did we learn today? A few big things, if you ask me:
- Cloudflare Tunnels are a game-changer: They’re like a secret passage for your N8N instance, securely connecting it to the internet without all the usual firewall headaches. And they’re free! How cool is that?
- Docker simplifies deployment: Using Docker and Docker Compose is like having a magic wand for installing and managing N8N. It keeps everything neat, tidy, and easy to update.
- Full control over your data: Self-hosting N8N means you own your data and your automation workflows. No one else has access, which is a huge win for privacy and security.
- Flexibility for local or cloud environments: Whether you’re running N8N on a spare Raspberry Pi in your garage or a powerful server in the cloud, this setup works beautifully for both.
Conclusion
Phew! We’ve covered a lot of ground, haven’t we? By following these steps, you’ve successfully brought your N8N instance to life, whether it’s chilling in your local lab or soaring in a cloud VPS. And the best part? You’ve securely exposed it to the internet using Cloudflare Tunnels, giving you unparalleled control over your automation workflows while keeping things super secure.
For those of us who love tinkering, crave absolute control, and want to truly understand what’s happening under the hood, self-hosting is incredibly rewarding. It might require a bit of a learning curve with networking and Docker, but the long-term benefits in terms of customization, cost savings, and sheer satisfaction are huge. Of course, if you just want to click a button and have N8N ready to go, commercial cloud plans are there for convenience. It’s all about what works for you.
Now that your N8N instance is up and running, the real fun begins. Go forth and automate! What amazing workflows will you build first? Share your ideas, I’d love to hear them!
Frequently Asked Questions (FAQ)
Q: Why do I need a domain name for self-hosting N8N?
A: A domain name acts as your N8N instance’s unique address on the internet. While you could technically access it via an IP address, a domain name (like n8n.yourdomain.com) is much easier to remember, looks more professional, and is essential for services like Cloudflare Tunnels to properly route traffic and handle SSL certificates for secure connections. Think of it as giving your N8N a proper street address instead of just GPS coordinates.
Q: What if I don’t want to expose my N8N instance to the public internet?
A: No problem at all! If you only need N8N for internal automation within your home or office network, you don’t necessarily need a public domain name or Cloudflare Tunnels. You could access it directly via its local IP address (e.g., http://192.168.1.100:5678). However, many N8N workflows benefit from webhooks or integrations that require public access, so consider your use cases. For a fully local setup, you might still use a local domain (like n8n.local) and configure your local DNS server (e.g., Pi-hole) to resolve it.
Q: My docker compose up -d command failed. What should I check?
A: Oh, the dreaded command line errors! Don’t worry, it happens to the best of us. Here are a few common culprits:
- Syntax Errors in
docker-compose.ymlor.env: Even a tiny typo (like an extra space or missing colon) can break YAML files. Double-check yourdocker-compose.ymland.envfiles for any mistakes. Use a YAML linter online if you’re unsure. - Port Conflicts: Is something else already using port
5678on your server? You can check withsudo lsof -i :5678. If so, you might need to change theportsmapping in yourdocker-compose.yml(e.g.,"8080:5678"). - Docker Not Running: Make sure the Docker daemon itself is running. You can check its status with
sudo systemctl status dockerand start it withsudo systemctl start dockerif it’s not active. - Insufficient Resources: Does your server have enough RAM and CPU? N8N can be a bit resource-hungry, especially if you plan complex workflows. Check your server’s resource usage.
- Check Logs: The most important step! Run
docker compose logs(without-d) to see the output from your N8N container. This will often tell you exactly what went wrong.
Q: Why did we set TLS to no TLS verify in Cloudflare? Is that secure?
A: That’s a great question, and it’s smart to be cautious about security settings! When we set TLS to no TLS verify in Cloudflare, we’re telling Cloudflare’s cloudflared agent not to validate the SSL certificate presented by your N8N server internally. This is generally secure in this setup because:
- Cloudflare handles public SSL: Cloudflare itself is providing the valid, trusted SSL certificate for
https://n8n.yourdomain.comto your users. So, the connection from the user’s browser to Cloudflare is fully encrypted and verified. - Internal network trust: The connection from Cloudflare’s edge (via the
cloudflaredagent) to your N8N server is over your internal network or a highly controlled path. In many self-hosting scenarios, your internal N8N might use a self-signed certificate (which browsers don’t trust publicly) or no certificate at all.no TLS verifysimply tellscloudflaredto proceed with the connection despite this, as the primary security is handled by Cloudflare at the public-facing end. It’s a common and accepted practice for this specific tunnel setup.
Q: Can I use a different proxy instead of Cloudflare Tunnels, like Nginx Proxy Manager or Traefik directly?
A: Absolutely! While Cloudflare Tunnels are fantastic for their simplicity and free tier, you can definitely use other reverse proxies. Tools like Nginx Proxy Manager or setting up Traefik directly (without Cloudflare Tunnels) are popular choices. These would typically require you to open ports on your firewall (like 80 and 443) and configure DNS A records to point directly to your server’s public IP address. You’d also need to handle SSL certificate generation (often with Let’s Encrypt) yourself. Cloudflare Tunnels simplify this by not requiring open ports and handling the SSL for you, but other proxies offer more granular control over routing and advanced features if you need them.