Watch the Video Tutorial
💡 Pro Tip: After watching the video, continue reading below for detailed step-by-step instructions, code examples, and additional tips that will help you implement this successfully.
Table of Contents
Open Table of Contents
- Why Automate WhatsApp for Business?
- Essential Tools & Resources
- Step-by-Step Integration Guide
- 1. Setting Up the WhatsApp Business Cloud Trigger in n8n
- 2. Obtaining Meta Business Account Credentials
- 3. Creating a New App ID in Meta Business Manager
- 4. Retrieving App ID and App Secret
- 5. Configuring WhatsApp Node for Replies
- 6. Generating Access Token and Obtaining Business Account ID
- 7. Selecting Your Business Phone Number
- Critical Security & Best Practice Tips
- Key Takeaways
- Conclusion
- Frequently Asked Questions (FAQ)
- Q: Why do I need a Meta Business Account and an App ID just to use WhatsApp Business API?
- Q: My temporary access token expired. How do I get a permanent one?
- Q: What if my n8n workflow stops receiving messages? How do I troubleshoot?
- Q: Can I use my personal WhatsApp number for this integration?
- Q: Is n8n the only automation tool I can use for this, or are there alternatives?
Why Automate WhatsApp for Business?
Alright, let’s kick things off with the why. In today’s crazy-fast digital world, if you’re not communicating efficiently, you’re falling behind. Imagine your customers sending you a WhatsApp message and getting an instant, helpful reply, even if it’s 3 AM. That’s not magic; that’s automation!
By hooking up WhatsApp with a powerful workflow automation tool like n8n, you can literally transform your customer service, nurture leads without lifting a finger, and free up your human team for the really complex stuff. We’re talking about setting up automated triggers and responses that work around the clock, giving your business a superpower. It’s like having a super-efficient, tireless assistant who never complains about overtime!
Essential Tools & Resources
Before we start building our WhatsApp automation spaceship, we need to make sure we have all our tools ready. Think of this as your pre-flight checklist. Don’t worry, most of these are either free to start or have very friendly pricing models.
Required Resource Checklist
| Tool/Resource | Purpose |
|---|---|
| n8n Platform | This is our command center, the workflow automation builder where we’ll design our robot’s brain. |
| Meta Business Account | Since WhatsApp is part of Meta (Facebook, Instagram, etc.), we’ll need this to manage our business presence and create the ‘apps’ that connect everything. |
| WhatsApp Business Cloud API | This is the secret sauce that lets us send and receive WhatsApp messages programmatically. It’s how our n8n robot talks to WhatsApp. |
| Client ID & Client Secret | These are like the username and password for n8n to securely connect to your Meta App. Super important! |
| Access Token | This is your temporary pass to tell the WhatsApp Business Cloud API that you’re authorized to send messages. It’s like a VIP pass that expires, so we’ll talk about keeping it fresh. |
| Business Account ID | This unique ID identifies your specific WhatsApp Business Account within Meta’s system. |
| Business Phone Number | This is the actual phone number your customers will message. You can use your official one or a test number for practice. |
Cost-Benefit Analysis: DIY vs. Commercial Solutions
Now, you might be thinking, “Boyce, why go through all this DIY stuff when there are ready-made solutions out there?” And that’s a totally valid question! I’ve been there, weighing the pros and cons. Here’s a quick rundown of why I often lean towards the n8n DIY route, especially for businesses that need serious flexibility.
| Feature/Aspect | DIY WhatsApp + n8n Automation | Commercial WhatsApp Automation Platform |
|---|---|---|
| Initial Setup Cost | Low (n8n has free/self-hosted options, Meta Business Account is free) | Moderate to High (subscription fees, potential setup costs) |
| Ongoing Monthly Cost | Low (n8n cloud subscription or self-hosting costs, WhatsApp API usage fees) | Moderate to High (recurring subscription fees based on usage/features) |
| Customization | High (fully customizable workflows to fit specific business needs) | Limited (constrained by platform’s pre-built features and integrations) |
| Integration | High (integrates with hundreds of apps via n8n) | Moderate (integrates with popular CRMs, but less flexible) |
| Technical Expertise | Moderate to High (requires understanding of APIs, n8n workflow logic) | Low to Moderate (user-friendly interfaces, less technical knowledge needed) |
| Scalability | High (scales with n8n’s capabilities and cloud infrastructure) | Depends on platform’s tiers and pricing models |
| Data Control | High (you control your data within your n8n instance) | Moderate (data typically resides on the vendor’s servers) |
See? With n8n, you’re the master of your domain. You get to build exactly what you need, without being locked into someone else’s idea of what your automation should look like. Plus, it’s often way more cost-effective in the long run. Who doesn’t love saving a buck?
Step-by-Step Integration Guide
Alright, let’s get our hands dirty! This is where the magic happens. We’re going to set up n8n to listen for messages and then send replies. It’s a two-way street, just like any good conversation.
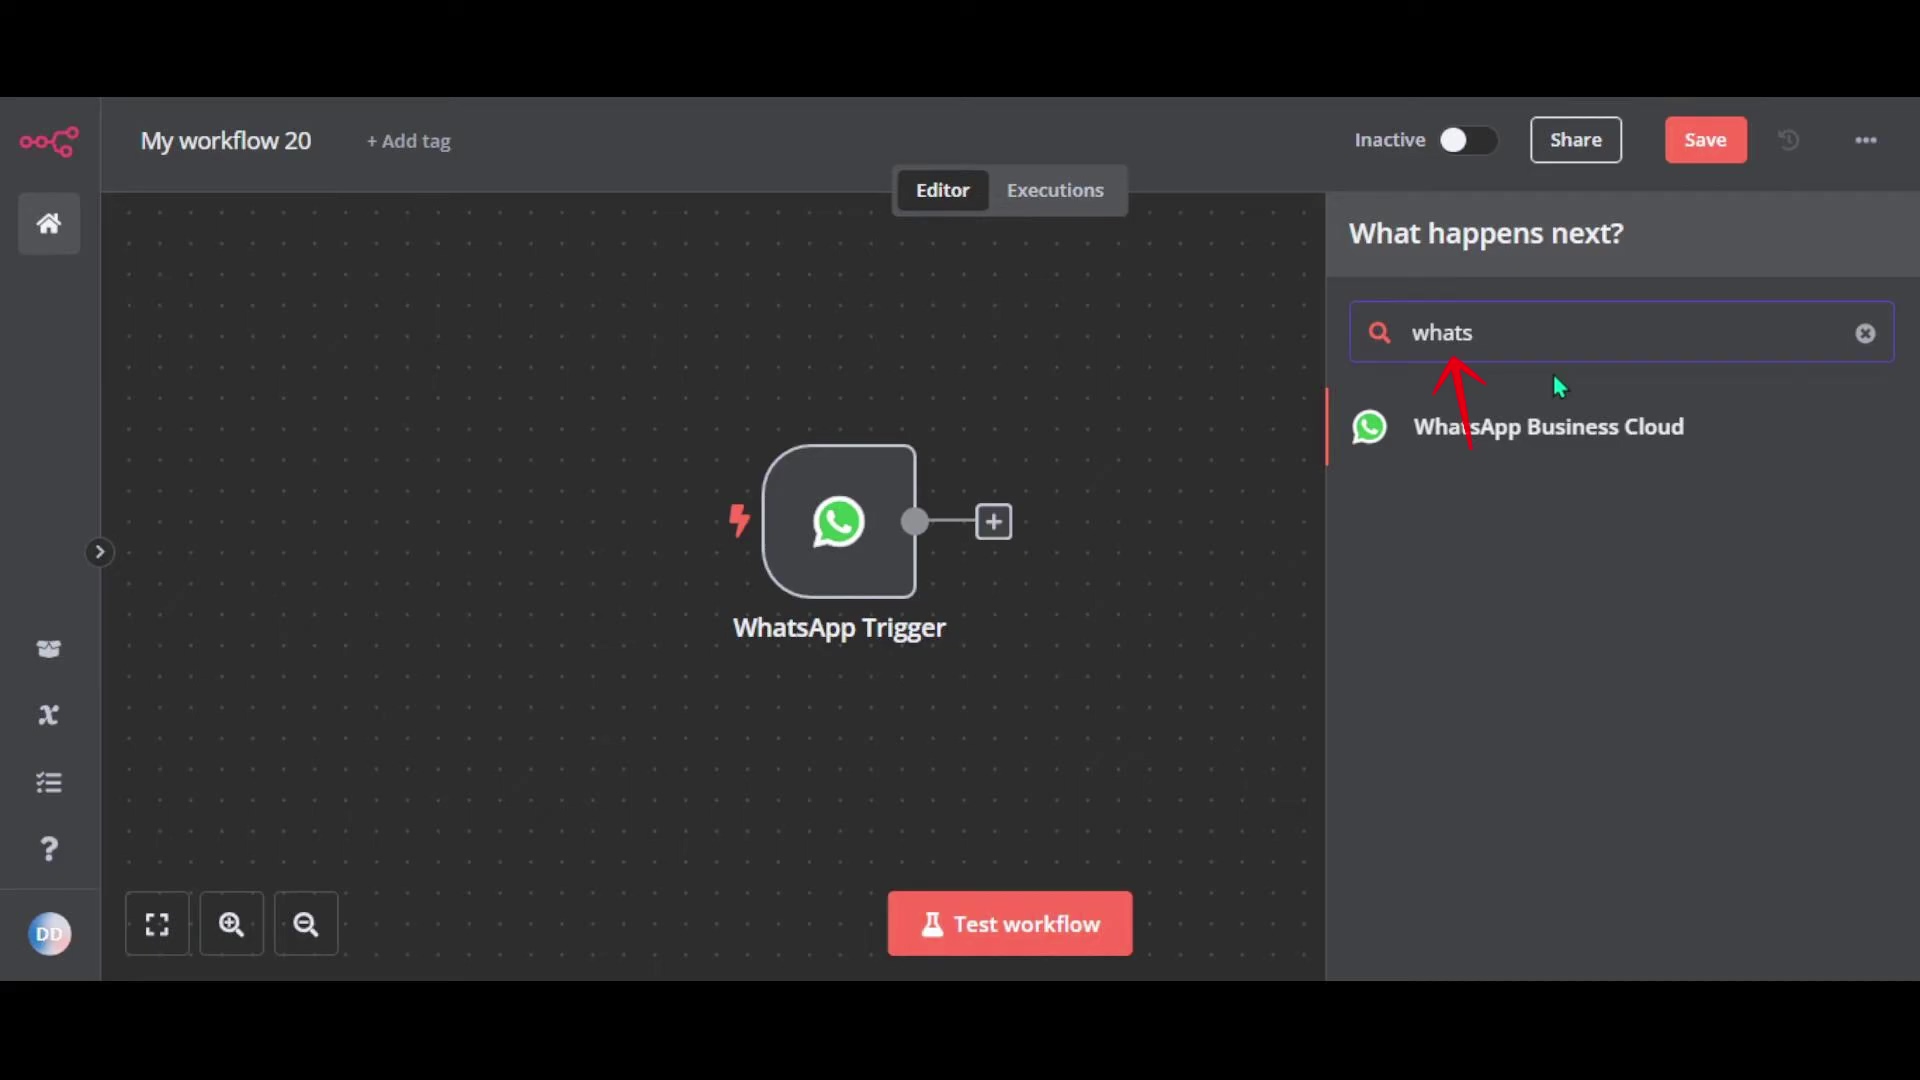
1. Setting Up the WhatsApp Business Cloud Trigger in n8n
Every good automation starts with a trigger, right? This is the “if this happens, then do that” part. For us, the trigger is an incoming WhatsApp message. We need to tell n8n to be on the lookout for these.
First, open up your n8n instance. If you’re self-hosting, make sure it’s running. If you’re using n8n Cloud, just log in. Once you’re in, create a new workflow. You’ll see a big plus sign or an “Add first node” button. Click that!
In the node search bar, type “WhatsApp Business Cloud”. You’ll see a few options. We want the one that says “WhatsApp Business Cloud Trigger”. Select it.
Once added, you’ll see its configuration panel. Under “Operation”, make sure “On messages” is selected. This tells n8n, “Hey, whenever a message comes in, kick off this workflow!” This node will be the very first step in your automation journey.
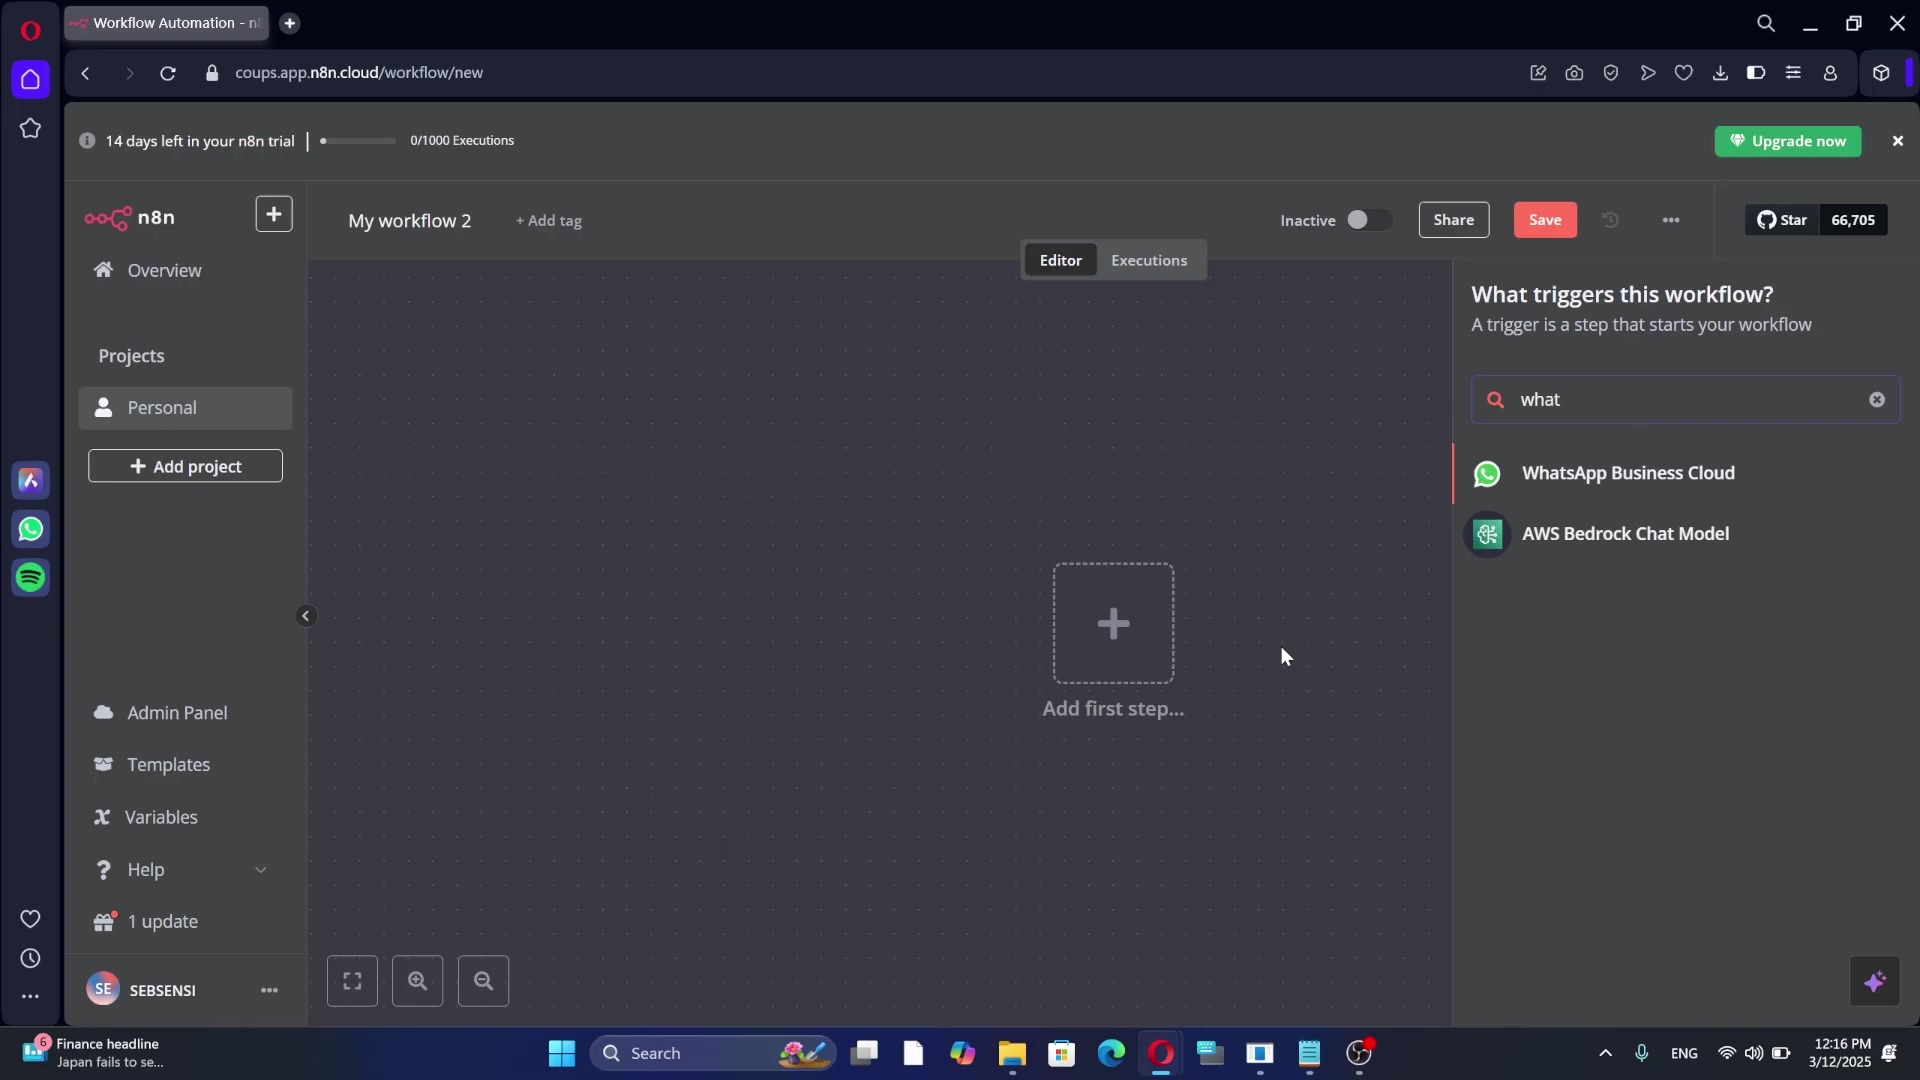
Expected Feedback: After adding the node, you’ll see it appear as the starting point of your workflow. It might have a little red dot indicating it needs credentials, but don’t worry, we’ll get to that in the next steps.
2. Obtaining Meta Business Account Credentials
Now, for the slightly more administrative part. To let n8n talk to your WhatsApp Business account, we need some special keys: a Client ID and a Client Secret. Think of these as the unique handshake between n8n and Meta. Since WhatsApp is under the Meta umbrella, we grab these from your Facebook Business account.
Head over to business.facebook.com and log in. If you’re new to the Meta Business Manager, you might need to create a business portfolio first. It’s pretty straightforward: just provide your business name and email, then hit ‘Create business’.
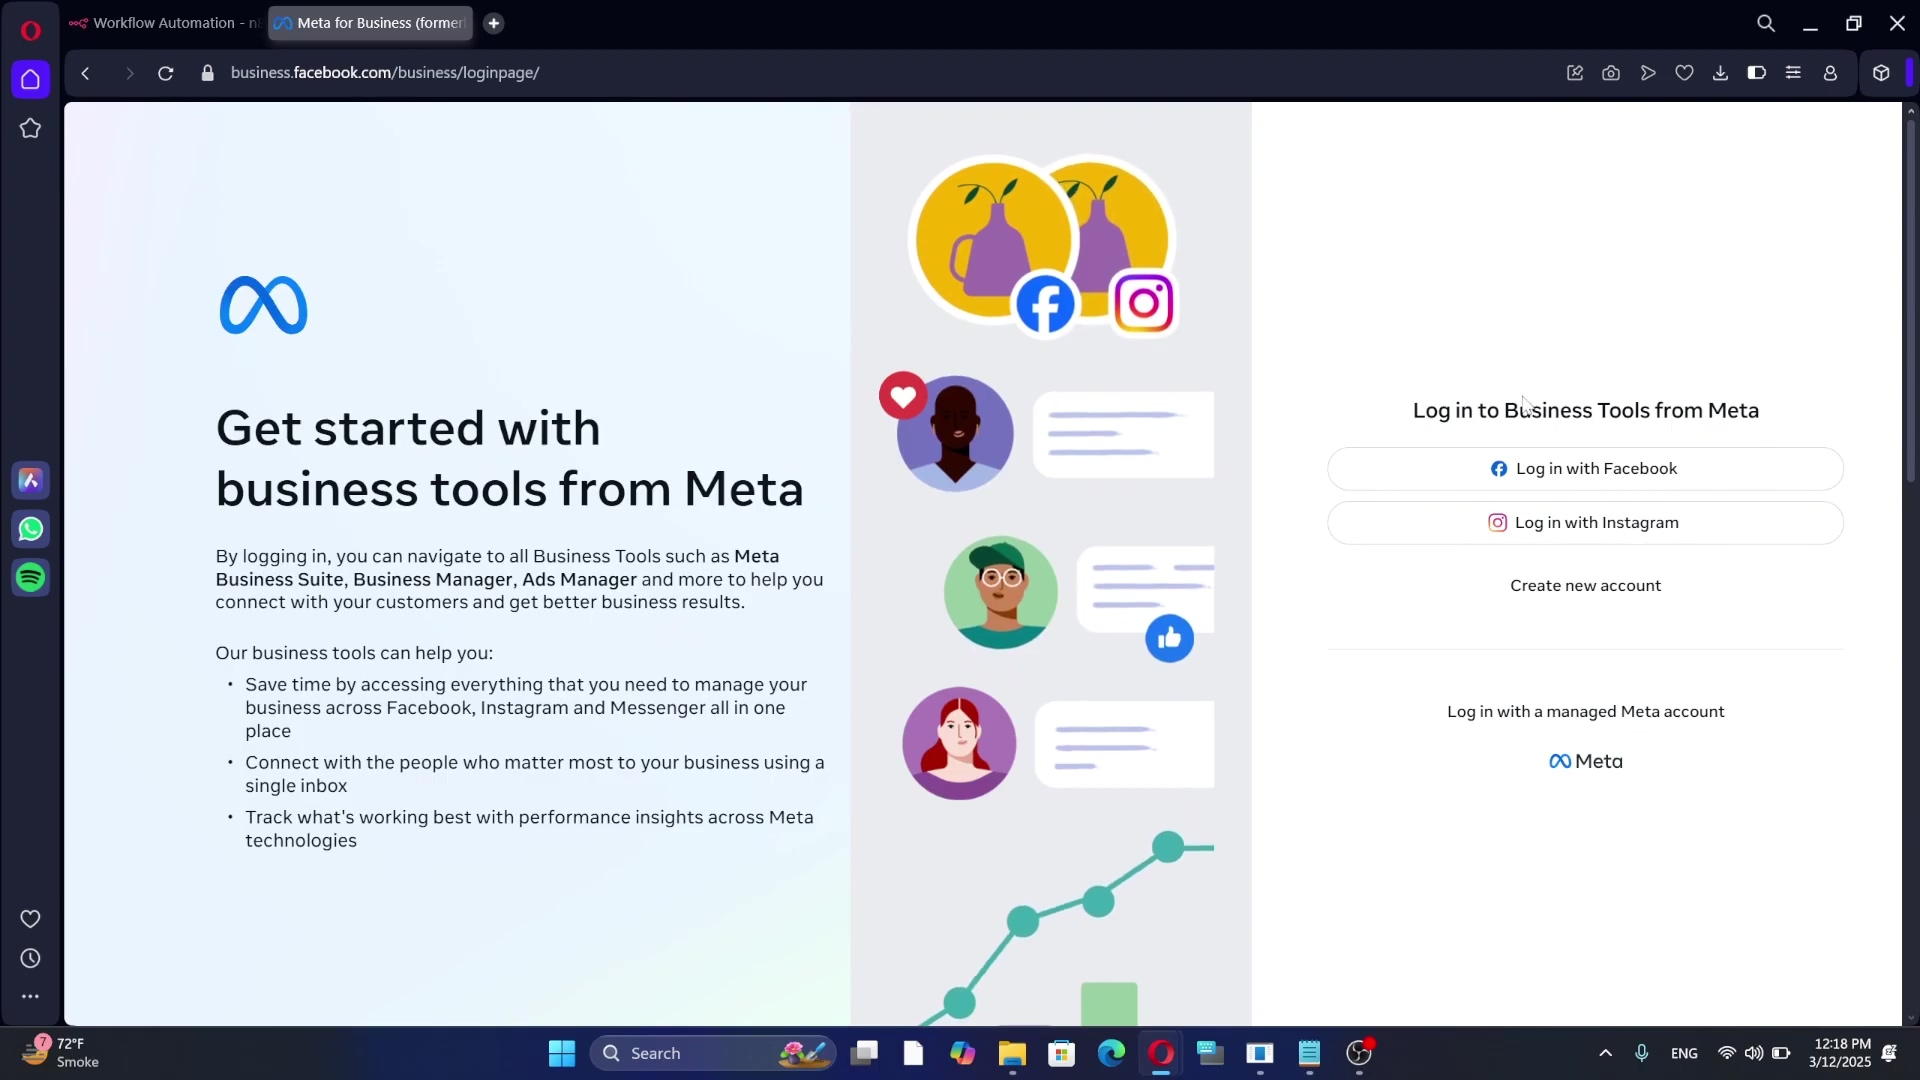
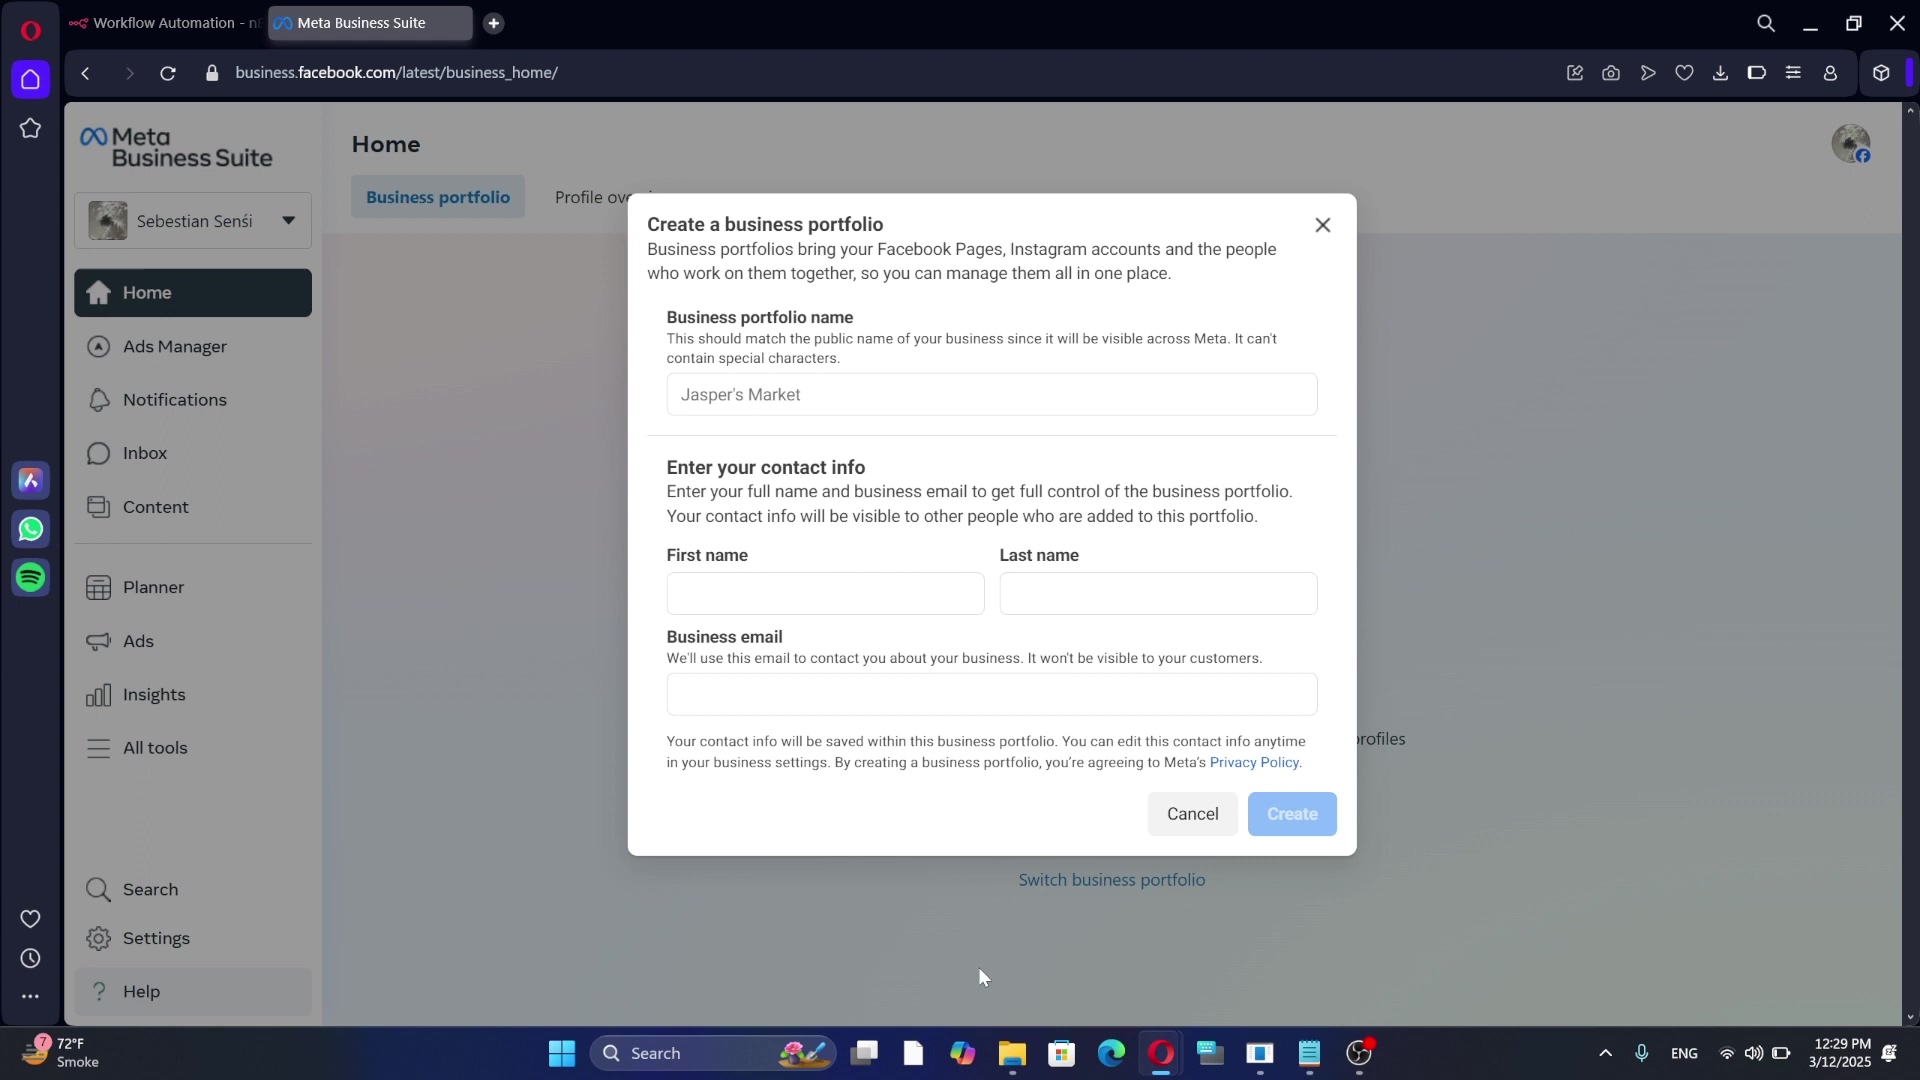
Expected Feedback: You should land on your Meta Business Manager dashboard. If you’re creating a new portfolio, you’ll see a confirmation that your business account has been set up.
3. Creating a New App ID in Meta Business Manager
Once you’re in your Business Manager, you might have multiple business accounts if you manage several. Make sure you select the correct one from the dropdown menu at the top. Then, look for the ‘Account’ section on the left-hand menu. It might be under ‘All tools’ or ‘Business settings’. Click on ‘Apps’.
This is where we create a new ‘App ID’. Don’t let the word ‘App’ scare you; it’s just Meta’s way of organizing connections to its services. Click the ‘Add’ button or ‘Create App’.
When prompted, choose the app type. For WhatsApp Business API, you’ll typically select “Business” or “Other” and then specify “Business” later. Give your app a memorable ‘App name’ (something like ‘N8n WhatsApp Integration’ or ‘My Awesome Automation App’). Add your contact email, and then follow the prompts to continue and create the app. You might need to confirm you’re not a robot or enter your Facebook password again.
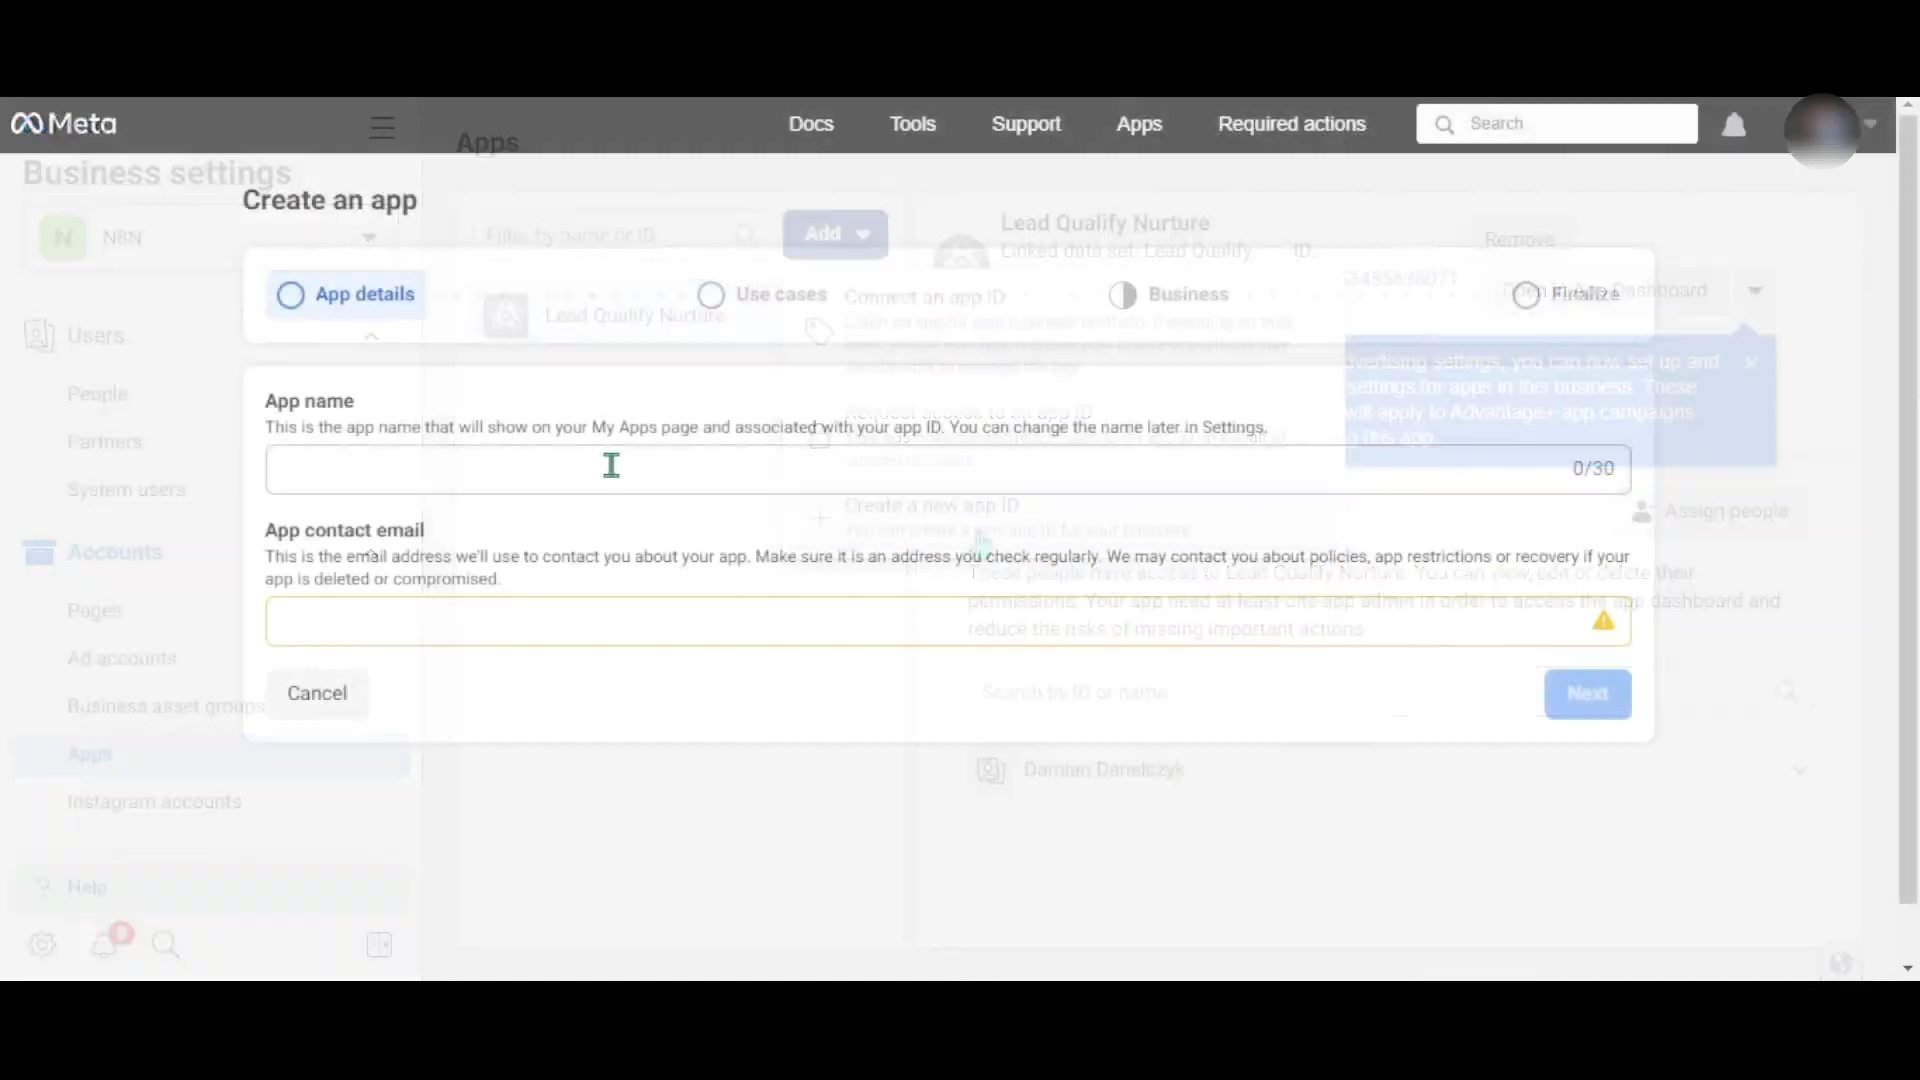
Expected Feedback: After creating, you’ll be redirected to your newly created app’s dashboard or settings page. You should see its name at the top.
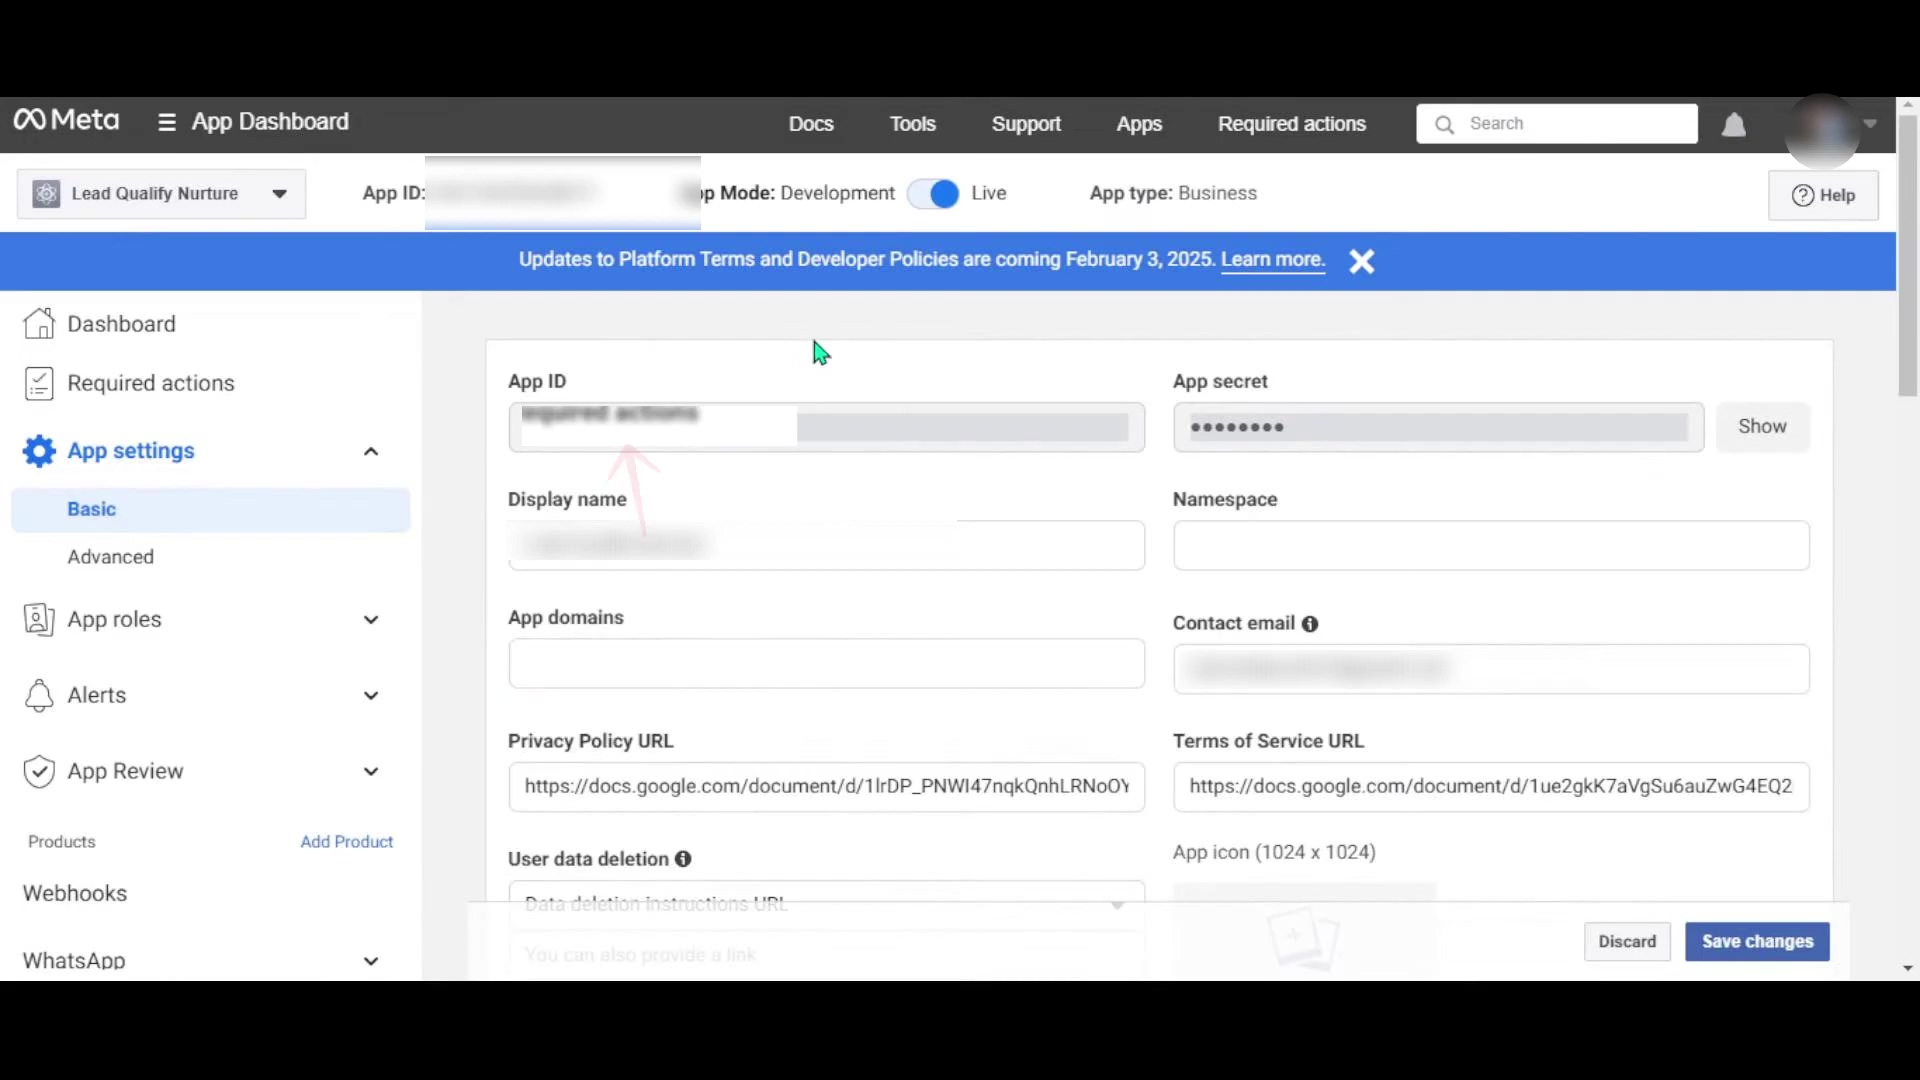
4. Retrieving App ID and App Secret
Okay, this is a crucial step! Once your app is created, you’ll be on its dashboard. Look for ‘App settings’ on the left-hand menu, and then click on ‘Basic’.
Boom! Right there, you’ll find your ‘App ID’ and ‘App secret’. These are your golden keys. Copy both of them carefully. I usually paste them into a secure temporary note or a password manager for safekeeping. Remember, never share these publicly!
Now, head back to your n8n workflow. Click on your ‘WhatsApp Business Cloud Trigger’ node. In its configuration, you’ll see fields for ‘Client ID’ and ‘Client Secret’. Paste the ‘App ID’ into ‘Client ID’ and the ‘App secret’ into ‘Client Secret’.
After pasting, there should be a “Connect” or “Test Connection” button. Click it! This tells n8n to try and establish a link with Meta using those credentials. If it works, you’re golden!
Expected Feedback: A successful connection will usually show a green checkmark or a “Connection successful” message in n8n. If there’s an error, double-check your copied credentials for typos.
5. Configuring WhatsApp Node for Replies
We’ve got n8n listening for messages. Now, how do we make it talk back? That’s where the ‘Send message’ node comes in. This is how your n8n agent will respond to those incoming WhatsApp messages.
In your n8n workflow, after your ‘WhatsApp Business Cloud Trigger’ node, click the plus sign to add another node. In the search bar, type “WhatsApp” again. This time, select the ‘WhatsApp Business Cloud’ node, but for its “Operation”, choose “Send message”.
This node needs a couple more pieces of information: an ‘Access Token’ and your ‘WhatsApp Business Account ID’. Don’t worry, we’re about to grab those from Meta too.
Expected Feedback: The ‘Send message’ node will appear in your workflow, connected to the trigger. It will likely show a warning about missing credentials, which is normal at this stage.
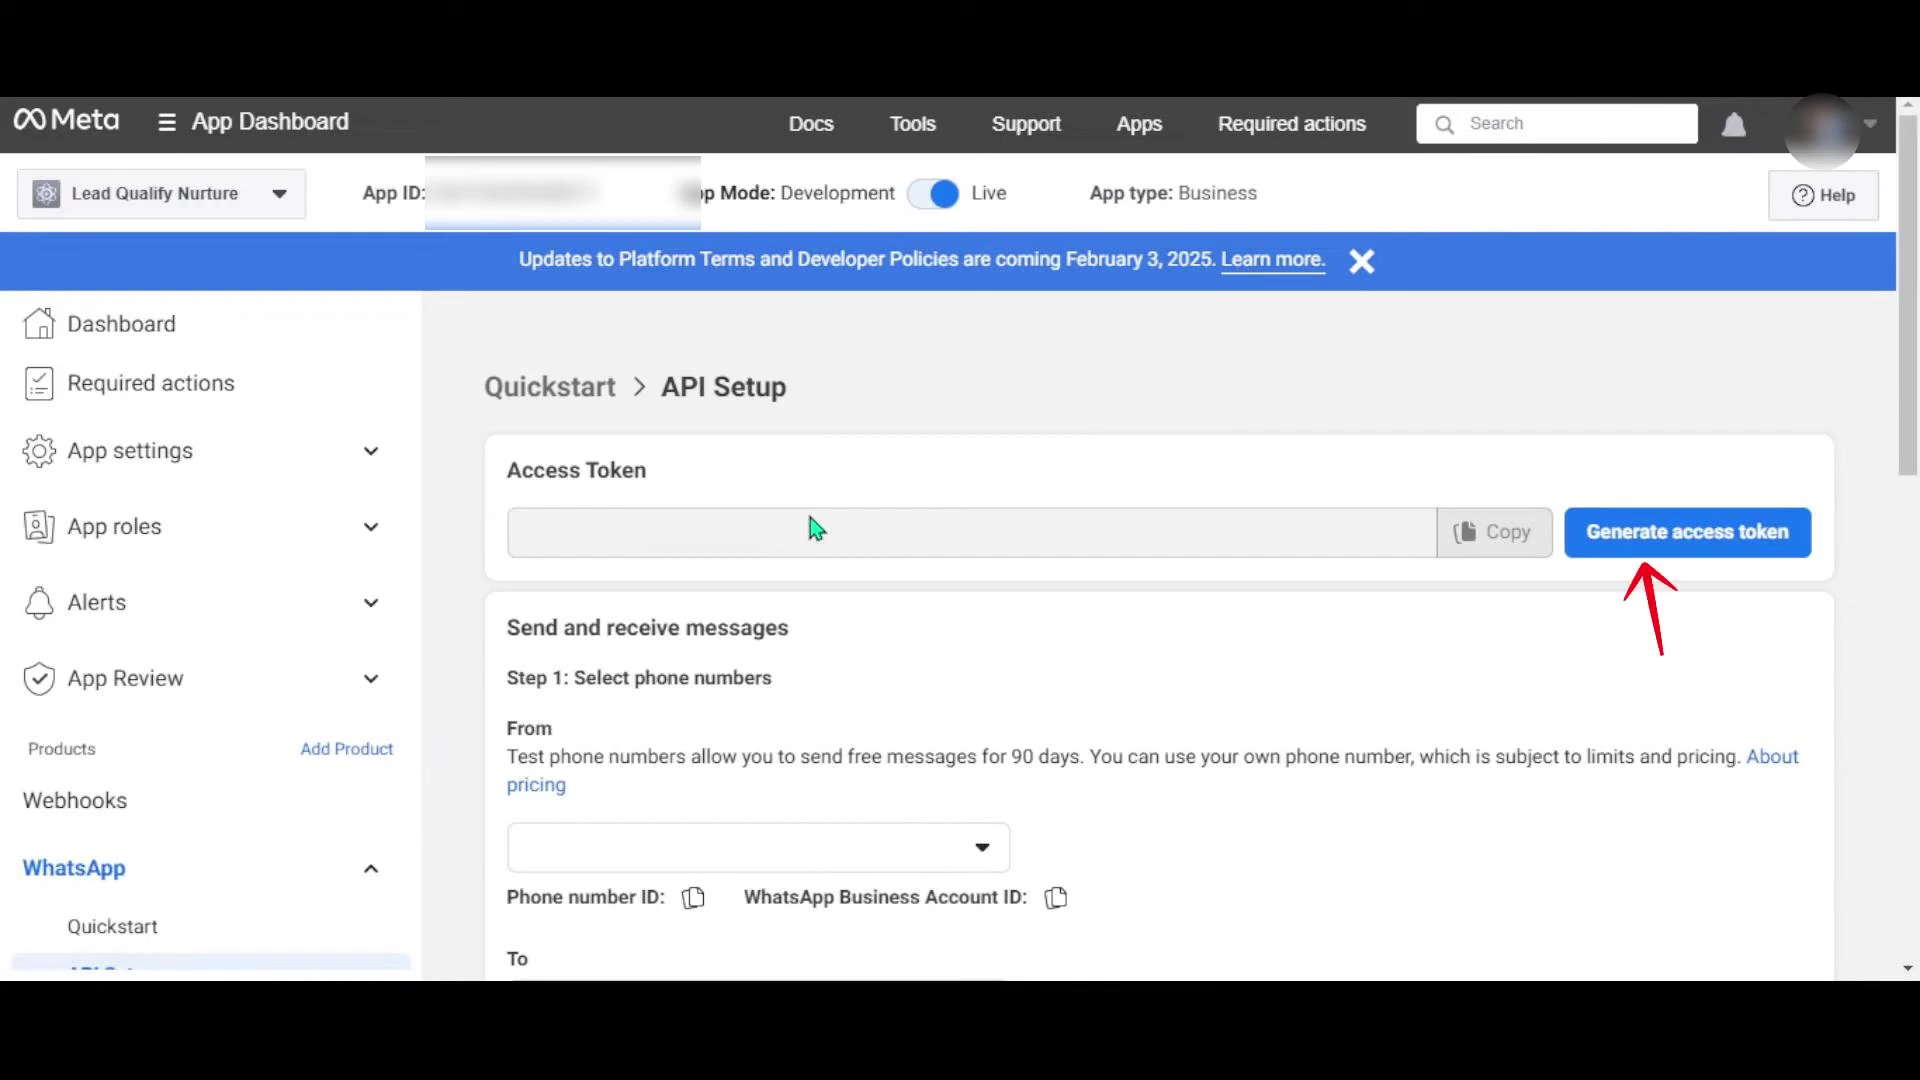
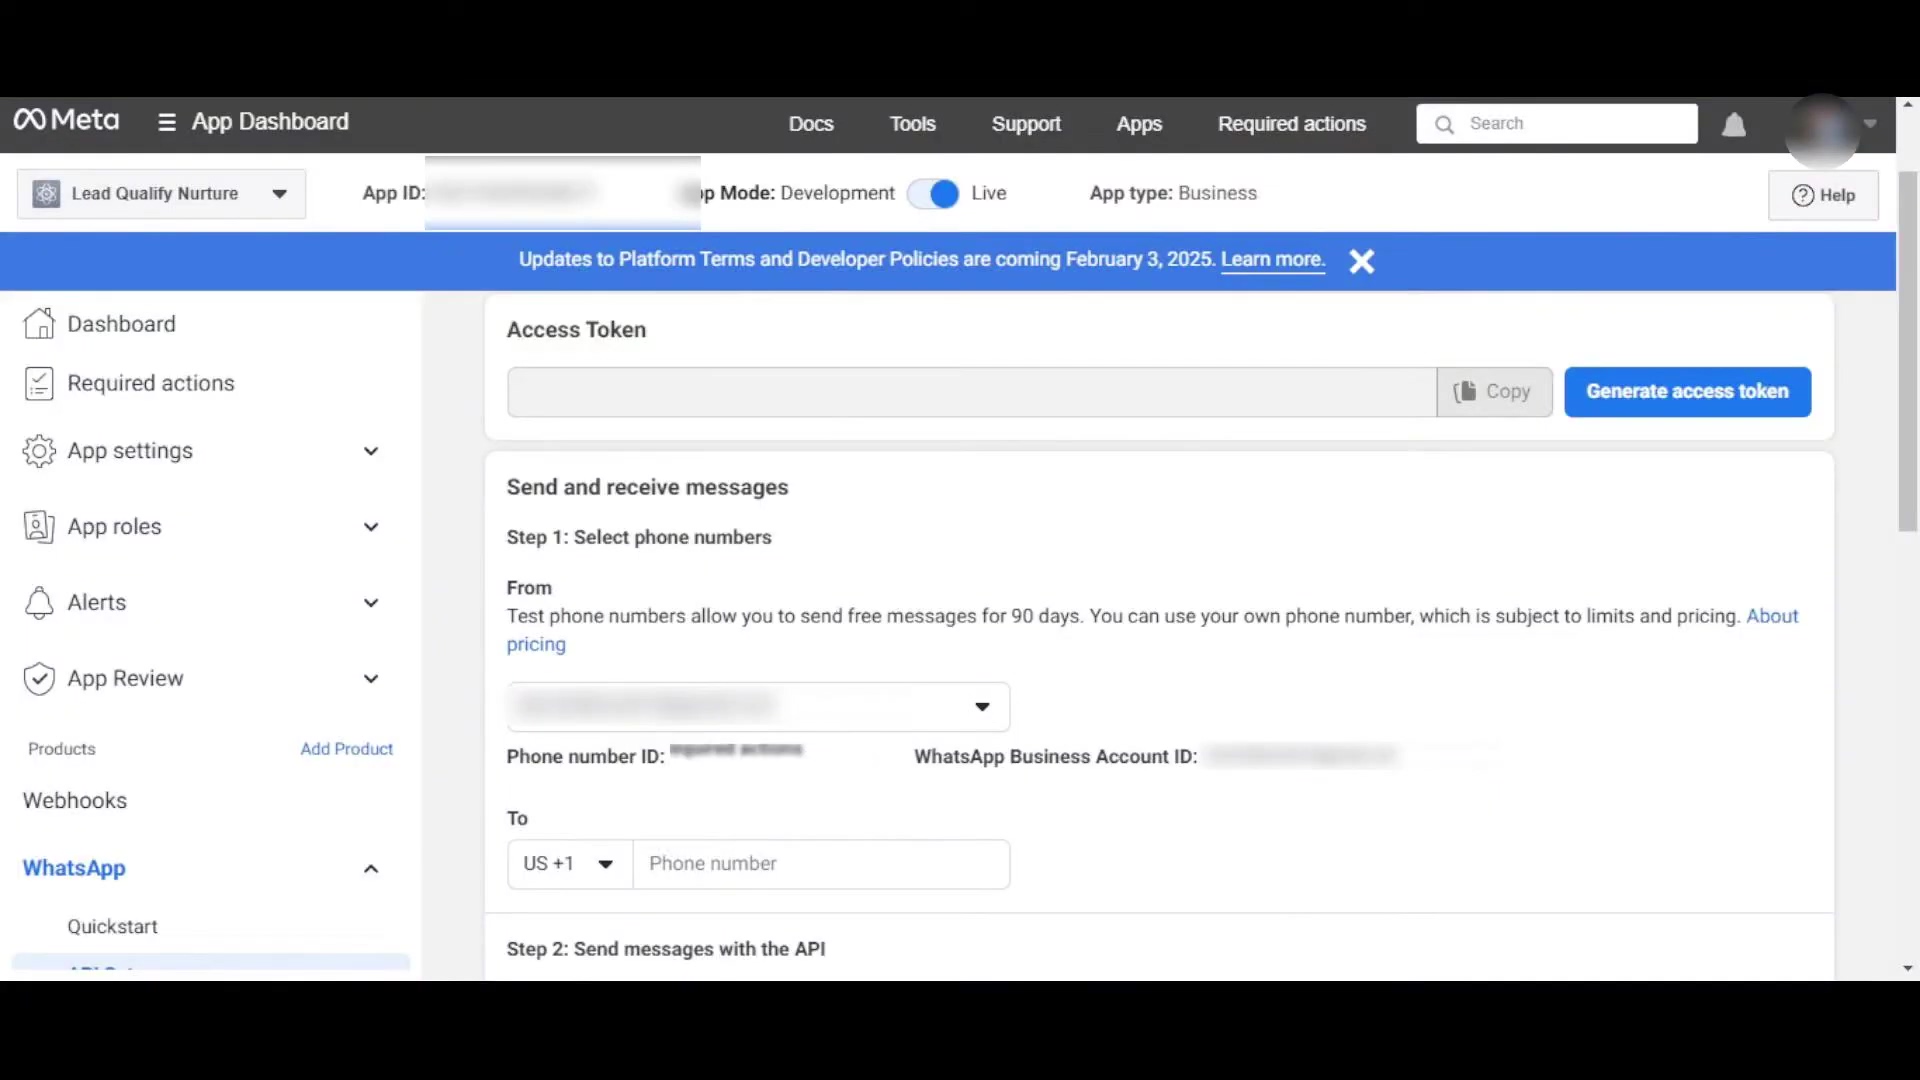
6. Generating Access Token and Obtaining Business Account ID
Back to your Meta Business Manager! This time, within your app’s settings, you’ll need to navigate to the ‘WhatsApp’ section. It might be under ‘Products’ or ‘Integrations’. Once there, look for ‘API Setup’ or ‘Getting Started’.
Here, you’ll find a section to generate a ‘Temporary Access Token’. This token is what authorizes your n8n workflow to send messages. Copy this token. Be aware that these temporary tokens usually expire after 24 hours, so for a production setup, you’ll want to generate a permanent access token later. But for testing, this is perfect!
On the same page, you’ll also see your ‘WhatsApp Business Account ID’. Copy that too. It’s a long string of numbers.
Now, jump back to your n8n workflow. Click on your ‘WhatsApp Business Cloud’ (Send message) node. Paste the ‘Access Token’ into the ‘Access Token’ field and the ‘WhatsApp Business Account ID’ into the ‘WhatsApp Business Account ID’ field. Just like before, hit that “Test Connection” button to make sure everything’s linked up.
Expected Feedback: A successful connection will again show a positive confirmation in n8n. You’re almost there!
7. Selecting Your Business Phone Number
Last but not least, we need to tell n8n which phone number to use for sending and receiving messages. In your n8n ‘WhatsApp Business Cloud’ (Send message) node, there will be a dropdown or field for ‘Phone Number ID’.
This dropdown should now be populated with the phone numbers associated with your WhatsApp Business Account. You can either select your official business number or, if you’re just testing things out, Meta provides a test number you can use. Using a test number is super handy because you can send messages to it without spamming your actual customers while you’re still building and refining your workflow.
Expected Feedback: The phone number will be selected in the node’s configuration. Now, your workflow is fully configured to both receive and send WhatsApp messages! Give yourself a pat on the back – that wasn’t trivial!
Critical Security & Best Practice Tips
Okay, we’ve built our awesome WhatsApp automation! But with great power comes great responsibility, right? When you’re dealing with credentials and customer communication, security is paramount. Here are some pro tips I’ve learned the hard way, so you don’t have to:
- Secure Your Credentials: Your Client ID, Client Secret, and Access Tokens are like the keys to your digital kingdom. Never, ever expose them publicly (e.g., in client-side code, public GitHub repos, or unencrypted files). Use environment variables in n8n or a secure credential manager. Treat them like your personal PINs!
- Regularly Rotate Access Tokens: Remember that temporary access token we used? It expires! Even permanent ones should be rotated periodically. Why? Because if an old token gets compromised, rotating it minimizes the damage. It’s like changing the locks on your house every now and then. For production, definitely look into long-lived access tokens and how to refresh them.
- Implement Error Handling: What happens if Meta’s API has a hiccup? Or if a message fails to send? Your n8n workflow should be designed to handle these situations gracefully. Use n8n’s error handling features (like the ‘Error Trigger’ node or ‘Continue On Error’ settings) to log errors, send you notifications, or retry failed operations. This prevents your automation from just silently breaking.
- Test Thoroughly: Before you unleash your WhatsApp automation on your actual customers, test, test, test! Use that test phone number Meta provides. Send different types of messages, try edge cases, and make sure every trigger and response works exactly as intended. You don’t want your robot sending out gibberish or, worse, not responding at all!
Key Takeaways
So, what did we learn today? Let’s recap the big wins:
- Two-Part Integration: Connecting WhatsApp Business to n8n isn’t just one step. It involves setting up a ‘WhatsApp Business Cloud Trigger’ for incoming messages and a ‘WhatsApp Business Cloud’ (Send message) node for sending replies. It’s a conversation, after all!
- Meta Business is Key: All the crucial credentials – Client ID, Secret, Access Token, and Business Account ID – are managed and obtained through the Meta Business Manager and App Dashboard. It’s your central hub for all things Meta.
- Credential Security: Always prioritize the secure handling and storage of your API credentials. They are precious!
- Thorough Testing: Before going live, ensure comprehensive testing of your n8n workflows to guarantee seamless communication. No surprises, please!
Conclusion
Wow, you’ve done it! By following these detailed steps, you’ve successfully integrated WhatsApp Business with n8n. You’ve just unlocked some serious automation superpowers for your communication strategy. This isn’t just about sending messages; it’s about streamlining your entire messaging process, responding promptly, and ultimately making your customers happier. And who doesn’t want happier customers?
While this guide focused on the DIY approach, which I’m a huge fan of, remember that there are commercial WhatsApp automation platforms out there too. But, if you ask me, the n8n route offers unparalleled flexibility and customization. You get to craft highly specific workflows tailored exactly to your unique business needs, often at a much more controlled cost. It’s like having a bespoke suit instead of off-the-rack.
Now, armed with this knowledge, take the leap! Implement these strategies, build your own amazing WhatsApp automation, and watch your business communications transform. And hey, if you hit any snags or discover some cool tricks, share your experiences in the comments below. We’re all in this automation journey together!
Frequently Asked Questions (FAQ)
Q: Why do I need a Meta Business Account and an App ID just to use WhatsApp Business API?
A: Great question! Since WhatsApp is owned by Meta (Facebook), all programmatic access to WhatsApp Business features, including sending and receiving messages, is managed through Meta’s developer platform. The Meta Business Account helps you manage your business assets, and the App ID acts as a container or identifier for your specific integration, allowing Meta to track and manage API usage for your business. It’s their way of keeping things organized and secure.
Q: My temporary access token expired. How do I get a permanent one?
A: Ah, the classic 24-hour token dilemma! For production environments, you absolutely need a long-lived access token. You can generate these by extending a user access token. The process involves exchanging a short-lived token for a long-lived one, which typically lasts 60 days and can be refreshed. You’ll find detailed instructions on how to do this in the official Meta for Developers documentation. It’s a bit more involved than the temporary one, but totally worth it for stability.
Q: What if my n8n workflow stops receiving messages? How do I troubleshoot?
A: That’s a common concern! First, check your n8n workflow’s execution history to see if any errors occurred. Then, verify your Meta App’s webhook configuration (in Meta Business Manager, under WhatsApp > Configuration) to ensure the URL points correctly to your n8n webhook URL and that the webhook is subscribed to ‘messages’ events. Also, confirm your access token hasn’t expired. Sometimes, simply restarting the n8n workflow or refreshing the connection in the WhatsApp Business Cloud Trigger node can resolve minor glitches.
Q: Can I use my personal WhatsApp number for this integration?
A: Unfortunately, no. The WhatsApp Business Cloud API is specifically designed for WhatsApp Business Accounts and requires a phone number registered with WhatsApp Business. You cannot use a personal WhatsApp number for this integration. Meta provides test numbers for development, or you can register a new number (or migrate an existing WhatsApp Business App number) for use with the Cloud API.
Q: Is n8n the only automation tool I can use for this, or are there alternatives?
A: While n8n is fantastic for its flexibility and self-hosting options, it’s definitely not the only tool. Other popular automation platforms like Zapier, Make (formerly Integromat), or even custom code can integrate with the WhatsApp Business Cloud API. However, n8n often stands out for its visual workflow builder, extensive node library, and the option to self-host, giving you more control over your data and costs. It really depends on your specific needs and technical comfort level.