Watch the Video Tutorial
💡 Pro Tip: After watching the video, continue reading below for detailed step-by-step instructions, code examples, and additional tips that will help you implement this successfully.
Trying to figure out how to use Nano Banana in n8n? You’re in the right place. This guide is your complete blueprint for integrating Google’s powerful Gemini 2.5 Flash Image model with n8n. We’ll show you step-by-step how to harness its incredible speed and character consistency to build fully automated, no-code User-Generated Content (UGC) workflows.
TL;DR
- Access Google AI Studio: Navigate to ai.google.com and log in with your Google account to utilize Gemini 2.5 Flash Image (Nano Banana).
- Generate/Edit Images: Use the text-to-image or image-to-image editing features, primarily focusing on character consistency and rapid generation.
- Automate with n8n: Integrate Nano Banana via Kai AI’s API into n8n workflows for automated content generation, managing API keys securely.
- Build Workflows: Configure n8n nodes for Telegram triggers, image retrieval, Kai AI (Nano Banana edit, VO3 fast), prompt enhancement via LLMs, and Telegram notifications.
- Verify Automation: Confirm successful image and video generation through Telegram responses and verify video quality to iterate on prompts.
Table of Contents
Open Table of Contents
- Unveiling Nano Banana: Google’s Gemini 2.5 Flash Image Explained
- Mastering Google AI Studio: Your Gateway to Nano Banana
- Practical Applications of Nano Banana: Revolutionizing UGC and Beyond
- Introducing n8n: The No-Code Automation Powerhouse for AI Workflows
- Building Your First Nano Banana to Video Automation with n8n
- Final Summary
- Frequently Asked Questions (FAQ)
- Q: What exactly is “Nano Banana” and why is it called that?
- Q: How does Nano Banana compare to other AI image generators like DALL-E?
- Q: Do I need coding skills to use Nano Banana with n8n?
- Q: What if my generated images aren’t consistent? What should I check?
- Q: Can I use Nano Banana to generate videos directly?
Unveiling Nano Banana: Google’s Gemini 2.5 Flash Image Explained
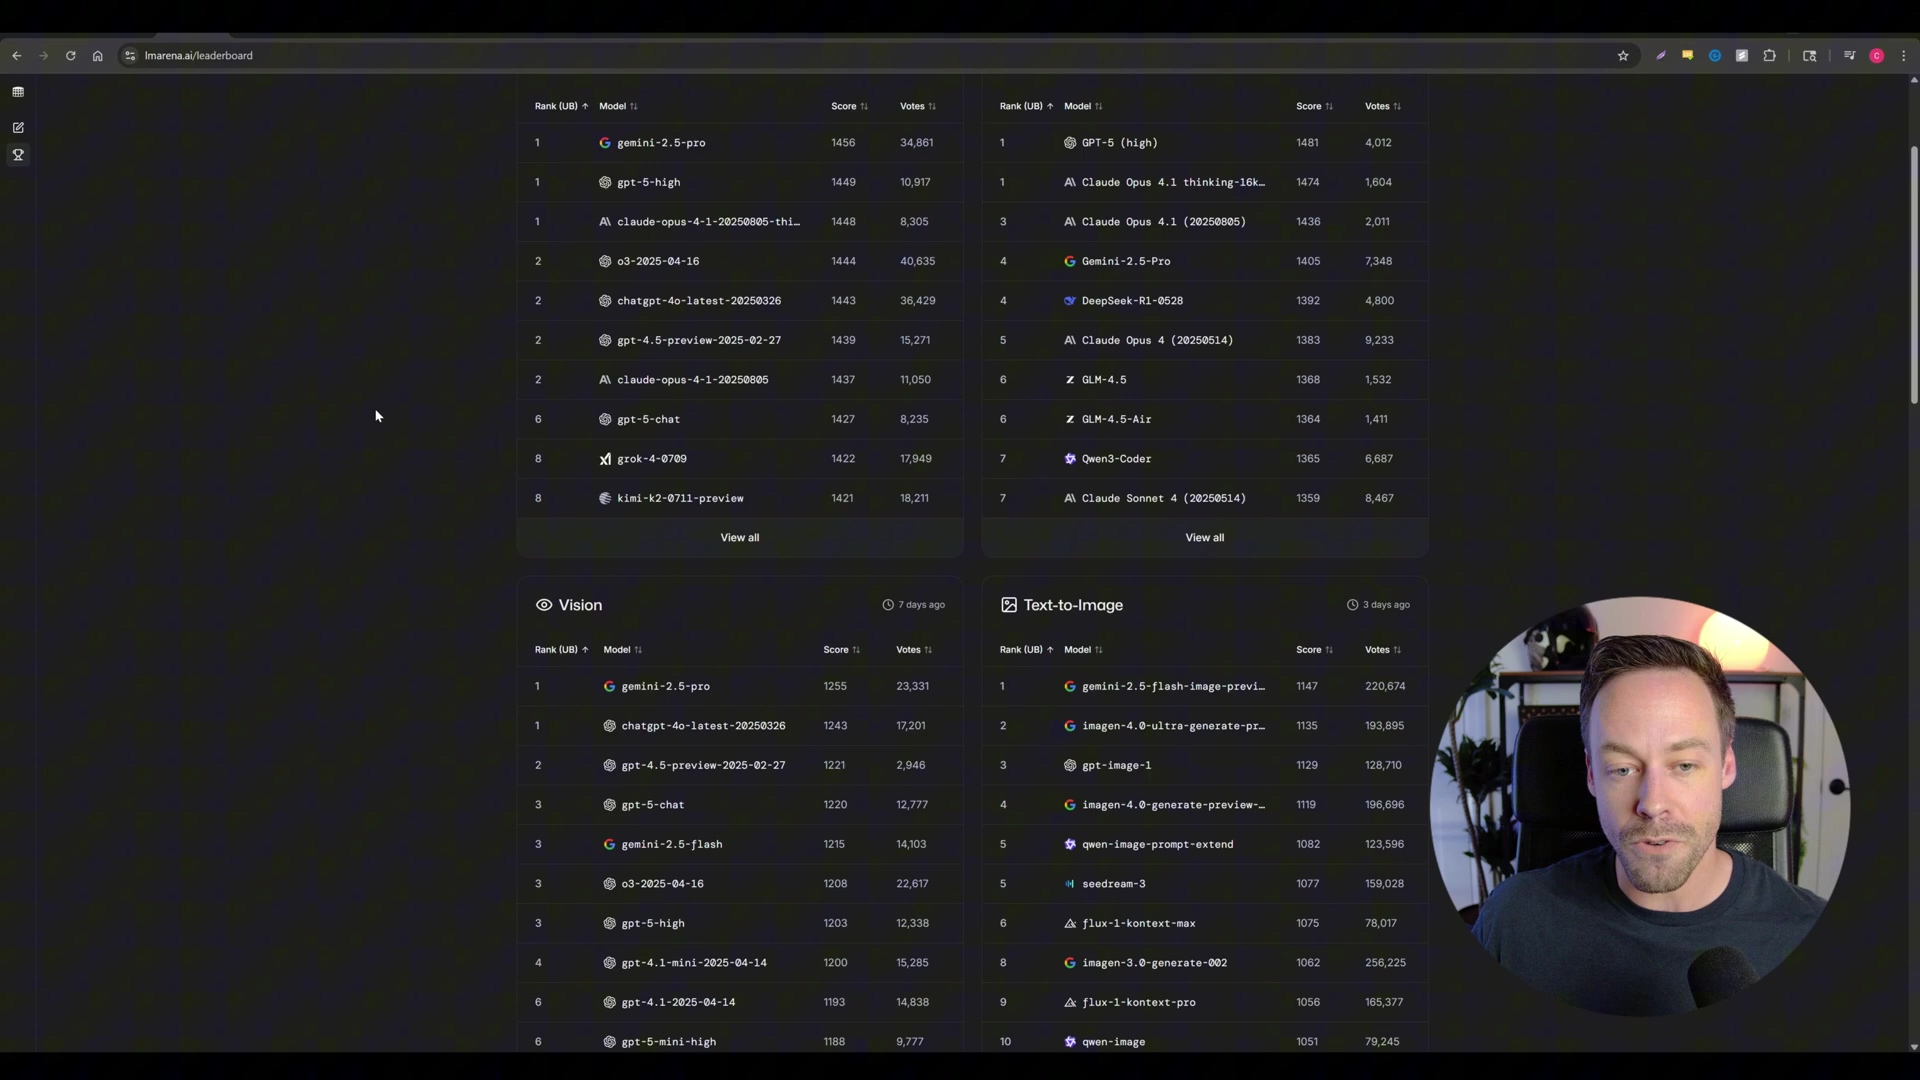
Alright, let’s talk about the star of our show: Google’s Gemini 2.5 Flash Image, or as the cool kids (and secret testers) call it, “Nano Banana.” This isn’t just another AI image generator; it’s a game-changer. The “Nano Banana” moniker actually started during its secret testing phase on platforms like LM Arena, where it totally crushed the competition in blind taste tests for image edits and text-to-image generation. It was like the underdog that came out of nowhere and won the championship! If you’re curious about LM Arena and how these models are benchmarked, you can check out their work here.
Core Strengths of Nano Banana
So, what makes Nano Banana so special? Well, it boils down to two superpowers: speed and unparalleled character consistency. Imagine you’re trying to create a comic book or a series of marketing images with the same character. With most AI models, your character might look a bit different in each shot – like they had a sudden growth spurt or a wardrobe malfunction. But not with Nano Banana! It keeps your character’s identity and features consistent across multiple images or edits. This is a huge deal, especially compared to models like OpenAI’s DALL-E (which you might use via ChatGPT). Nano Banana generates images way faster, too. This consistency and speed open up a whole new universe of possibilities for content creation, especially when you need your subjects to look the same every single time. It’s like having a super-efficient, super-consistent digital artist at your fingertips!
Dispelling Misconceptions
Now, some folks out there are calling Nano Banana a “Photoshop killer.” And while it can do some pretty advanced image manipulations with just a few words, I’d say that’s a bit of an overstatement. Think of it more as a powerful augmentation tool rather than a direct replacement. It’s not going to replace a seasoned graphic designer, but it will make their lives a whole lot easier.
Nano Banana absolutely shines at specific tasks, like changing outfits on a consistent character (hello, e-commerce!) or moving objects around in a scene while keeping all the critical details intact. But, just like any rapidly evolving AI tech, it’s not perfect. It still needs a bit of finessing for pixel-perfect precision and super complex artistic direction. Its real value, to me, is how it streamlines those repetitive or technically tricky parts of image editing. It’s democratizing access to professional-grade visual content creation, letting more people create stunning visuals without needing years of design school. How cool is that?
Mastering Google AI Studio: Your Gateway to Nano Banana
Alright, let’s get our hands dirty! Google AI Studio is where all the magic happens with Gemini 2.5 Flash Image (our beloved Nano Banana). This isn’t just some basic app; it’s a full-blown developer platform that gives you comprehensive access to Google’s AI offerings. While you could use the official Gemini app, AI Studio offers a much more granular and powerful environment to really unleash Nano Banana’s full potential. Think of it as the cockpit of a spaceship, giving you all the controls!
Accessing Google AI Studio
This is step one, folks. Super straightforward, but crucial.
- Navigate to AI Studio: Open your favorite web browser and type in
ai.google.com. Hit Enter. Easy peasy! - Log In: You’ll need your Google account credentials for this. Just log in like you normally would. This step is your VIP pass to the entire suite of developer tools and models Google has to offer. If you don’t have a Google account, you’ll need to create one first. It’s free and opens up a world of possibilities.
Basic Image Generation and Manipulation
Once you’re logged in, you’re ready to start generating and editing images. The studio is super flexible, letting you use both text prompts and reference images.
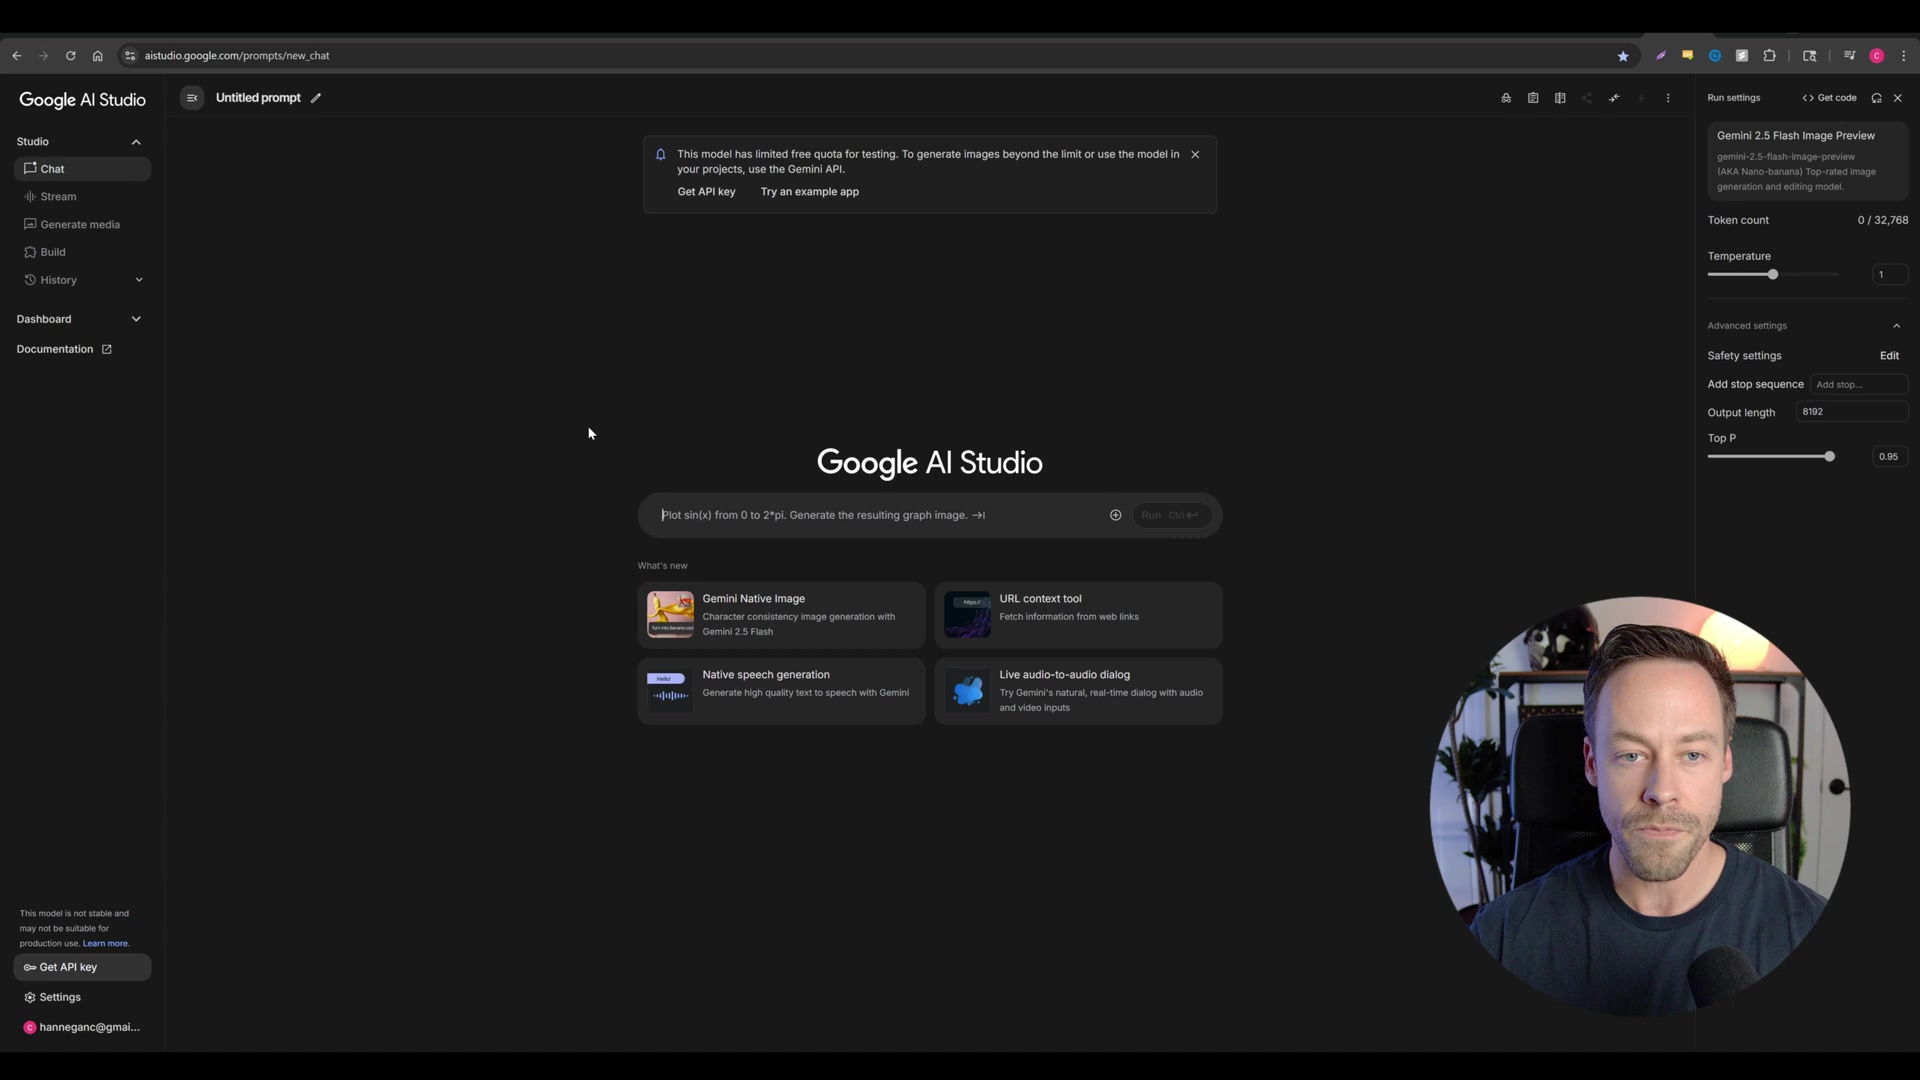
- Select Model: This is important! Make sure you’ve selected a model that can actually generate images. Look for something like “Gemini 2.5 Flash Image.” If you’re not sure, poke around the interface; it’s usually pretty intuitive.
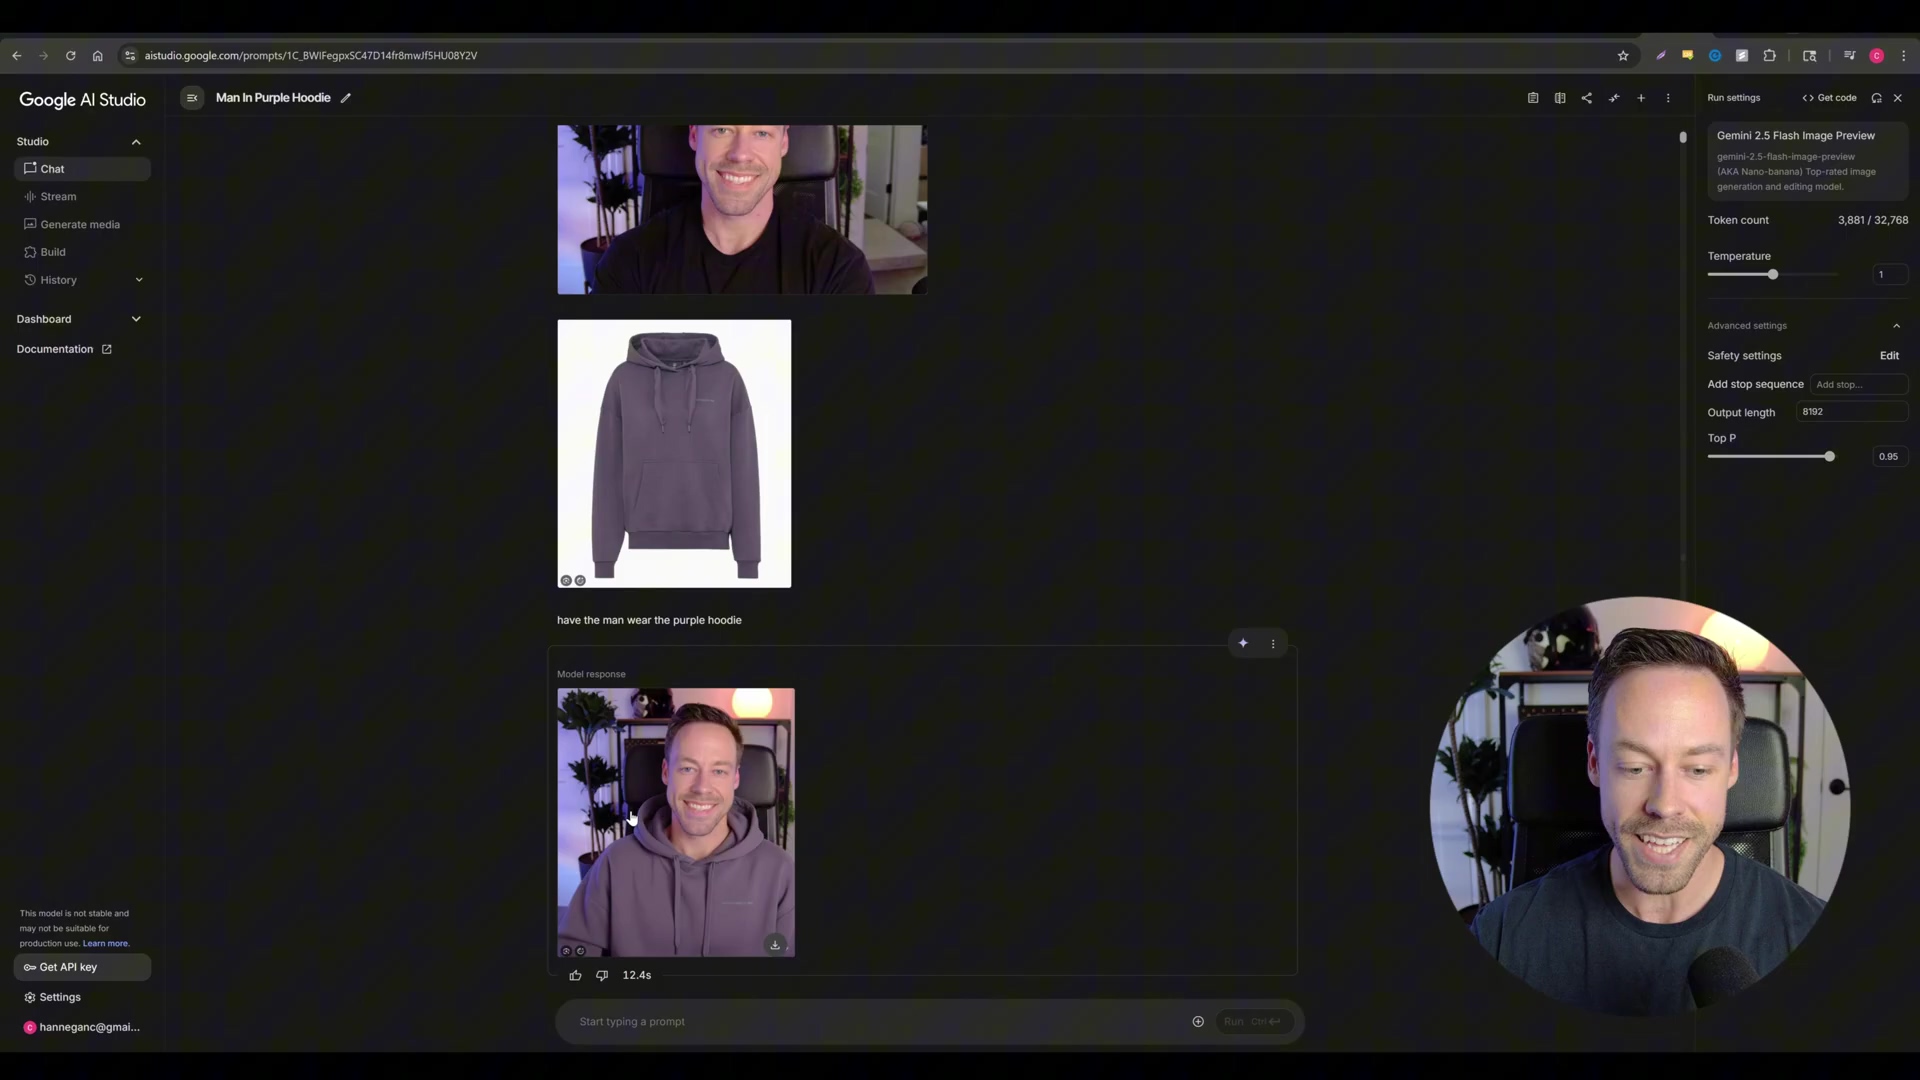
- Input Prompt and References: Here’s where the character consistency really shines. If you want a consistent character, upload a reference image of that person. Then, tell the model what you want! For example, you could say, “have the man wear the purple hoodie” and upload an image of the man and an image of the hoodie. The more context, the better. This is where you become the director of your AI movie!
- Generate Output: Hit that generate button! You’ll be amazed at how fast the model processes your input and spits out results – usually within seconds. Pay close attention to the character consistency; you’ll notice that facial features and background elements stay largely the same, even through edits. This is a huge advantage over other models like ChatGPT’s DALL-E, where your character might suddenly look like their long-lost twin.
Utilizing the Build Section for Advanced Prototyping
Now, if you’re feeling a bit more adventurous, the “Build” section in Google AI Studio is where you can really flex your creative muscles. It’s designed for creating and modifying pre-built AI applications, which is super handy for rapid prototyping and developing custom image generation tools. Think of it as a sandbox for AI apps!
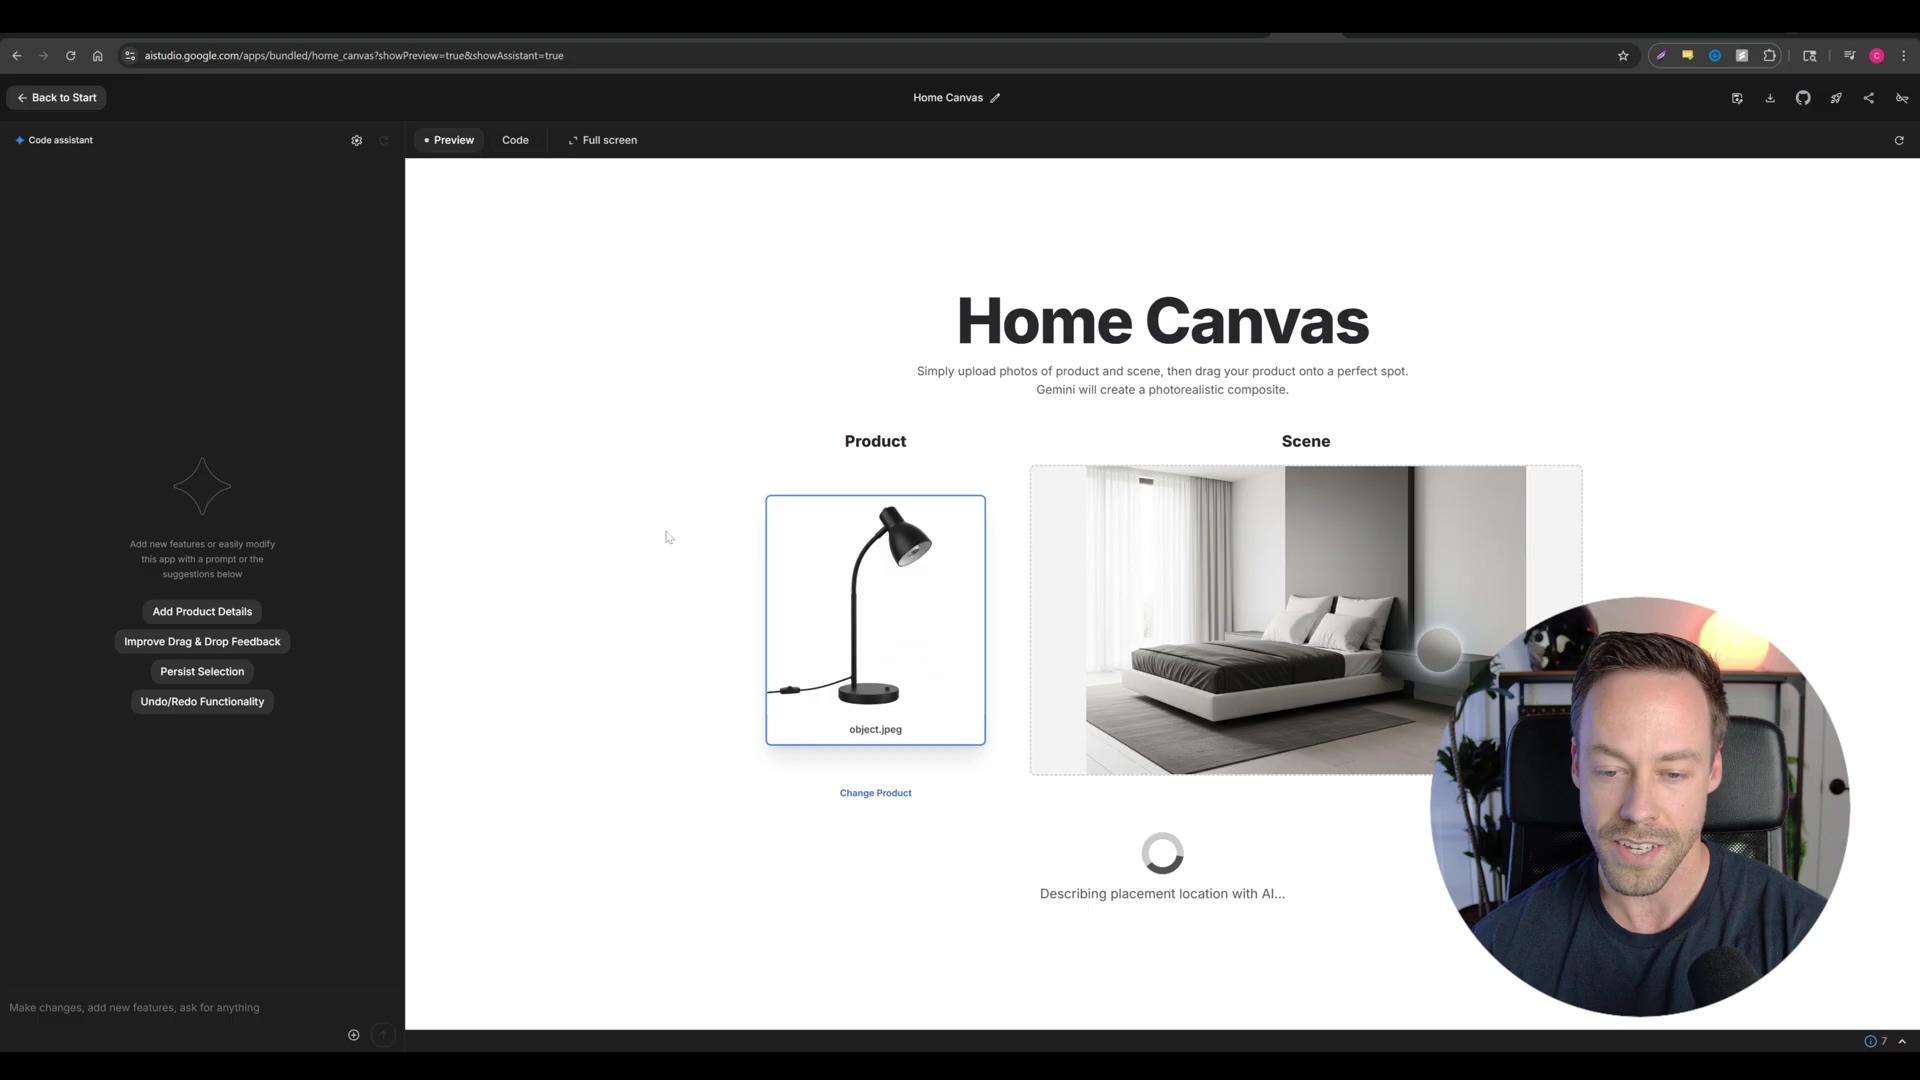
- Explore Pre-built Apps: Head over to the “Build” section. You’ll find various applications there, like the “Home Canvas” app. This one is pretty cool because it lets you drag and drop objects right into a scene. It’s like playing a video game, but you’re actually building an AI tool!
- Customize Applications: This is where it gets really powerful. You can modify these pre-built apps by simply telling them what new features you want. For instance, you could prompt the app to “add a feature where I can then prompt the final image to get another iteration of the scene.” Boom! Just like that, you’ve added new functionality for iterative design. It’s like giving your AI app a brain upgrade with a simple command.
- Prototyping SaaS Products: This feature is a dream come true for anyone looking to build custom SaaS solutions. You can quickly and freely prototype tools that leverage image generation APIs without getting bogged down in complex API integrations or needing external platforms. This iterative development environment seriously speeds up the process of bringing AI-powered visual tools to market. It’s like having a mini-startup incubator right inside Google AI Studio!
By really digging into Google AI Studio, you’re not just generating consistent images; you’re also rapidly developing bespoke vision-based applications. You’re exploiting Nano Banana’s capabilities for a huge array of creative and commercial applications. The future is now, my friends!
Practical Applications of Nano Banana: Revolutionizing UGC and Beyond
Okay, so we’ve talked about what Nano Banana is and how to access it. Now, let’s get to the fun part: how can we actually use this incredible tool? Nano Banana’s core capabilities – especially its amazing character consistency and lightning-fast image generation – unlock a ton of practical applications across different industries. We’re talking marketing, content creation, and beyond. It’s like having a Swiss Army knife for visual content!
Streamlining User-Generated Content (UGC) Modeling
Goal: Imagine you need to generate a bunch of different images of the same character or product for marketing materials or UGC. This is where Nano Banana shines!
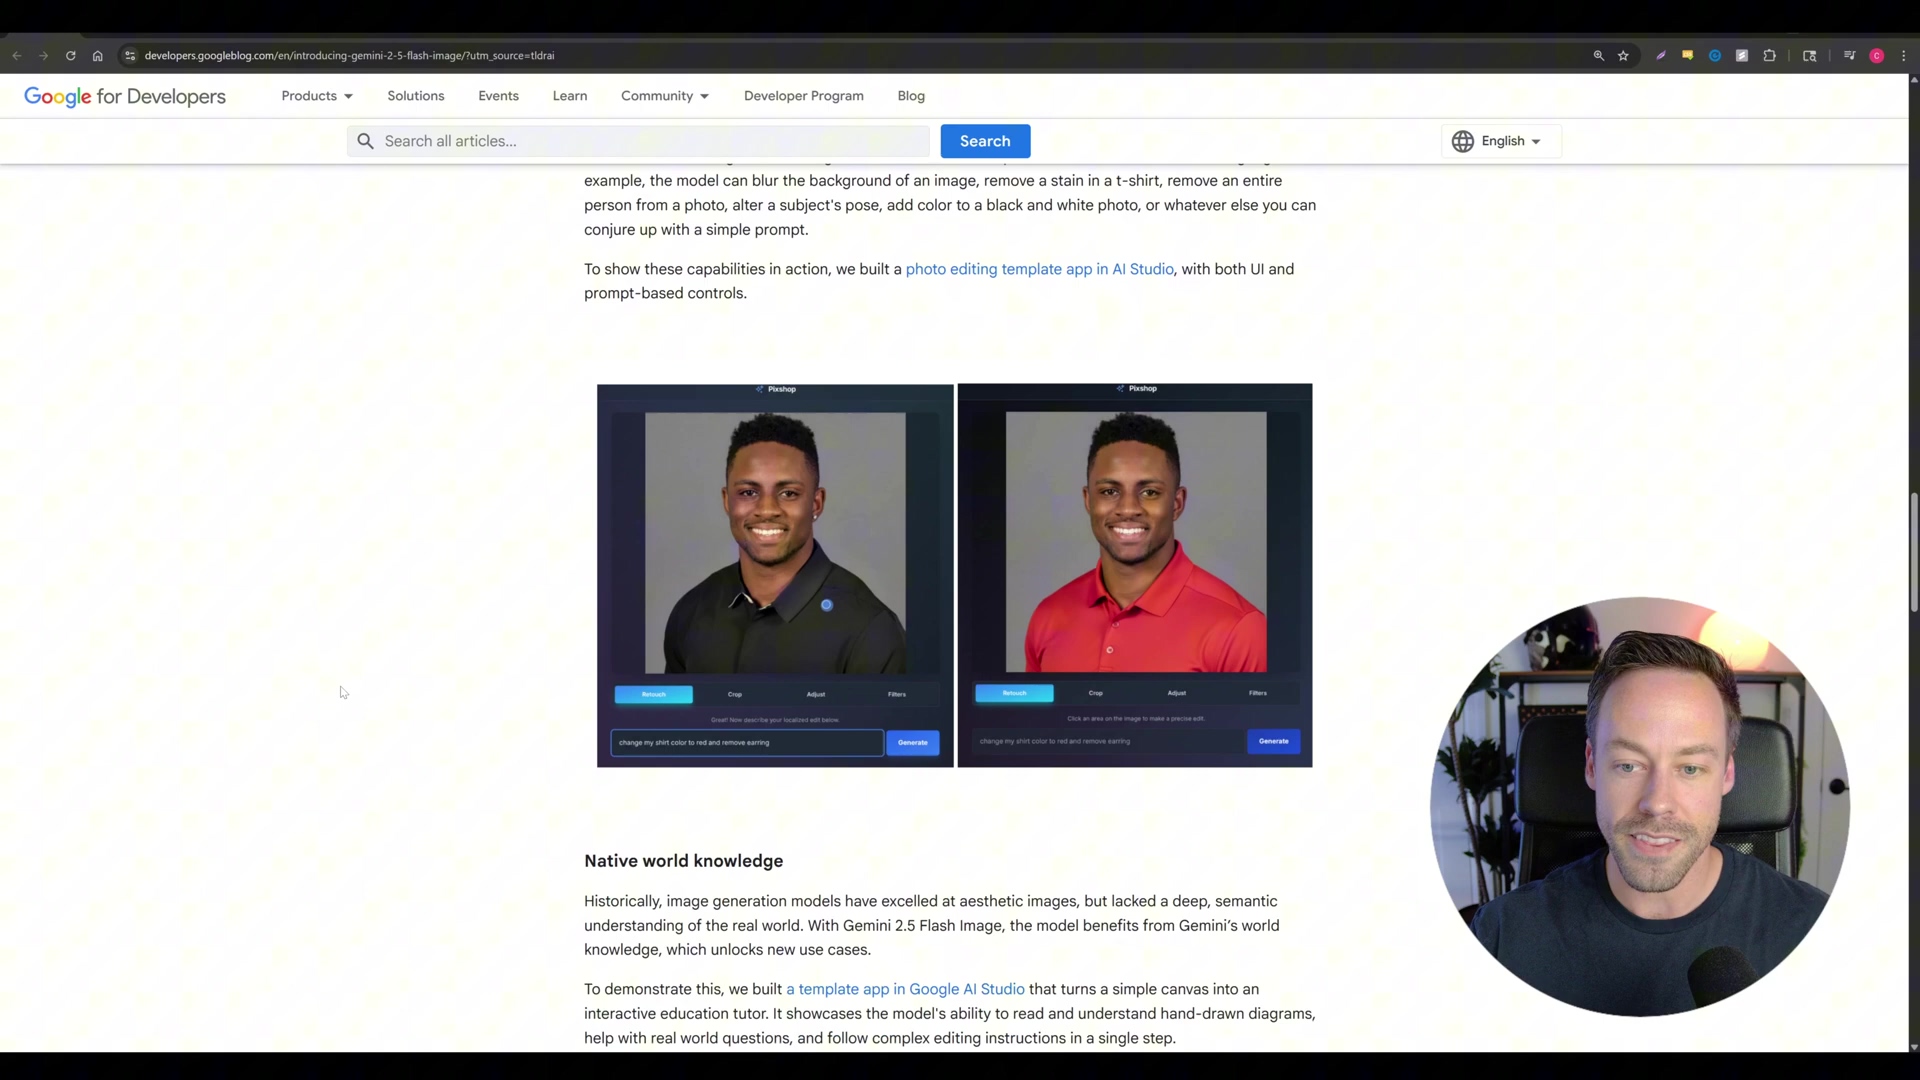
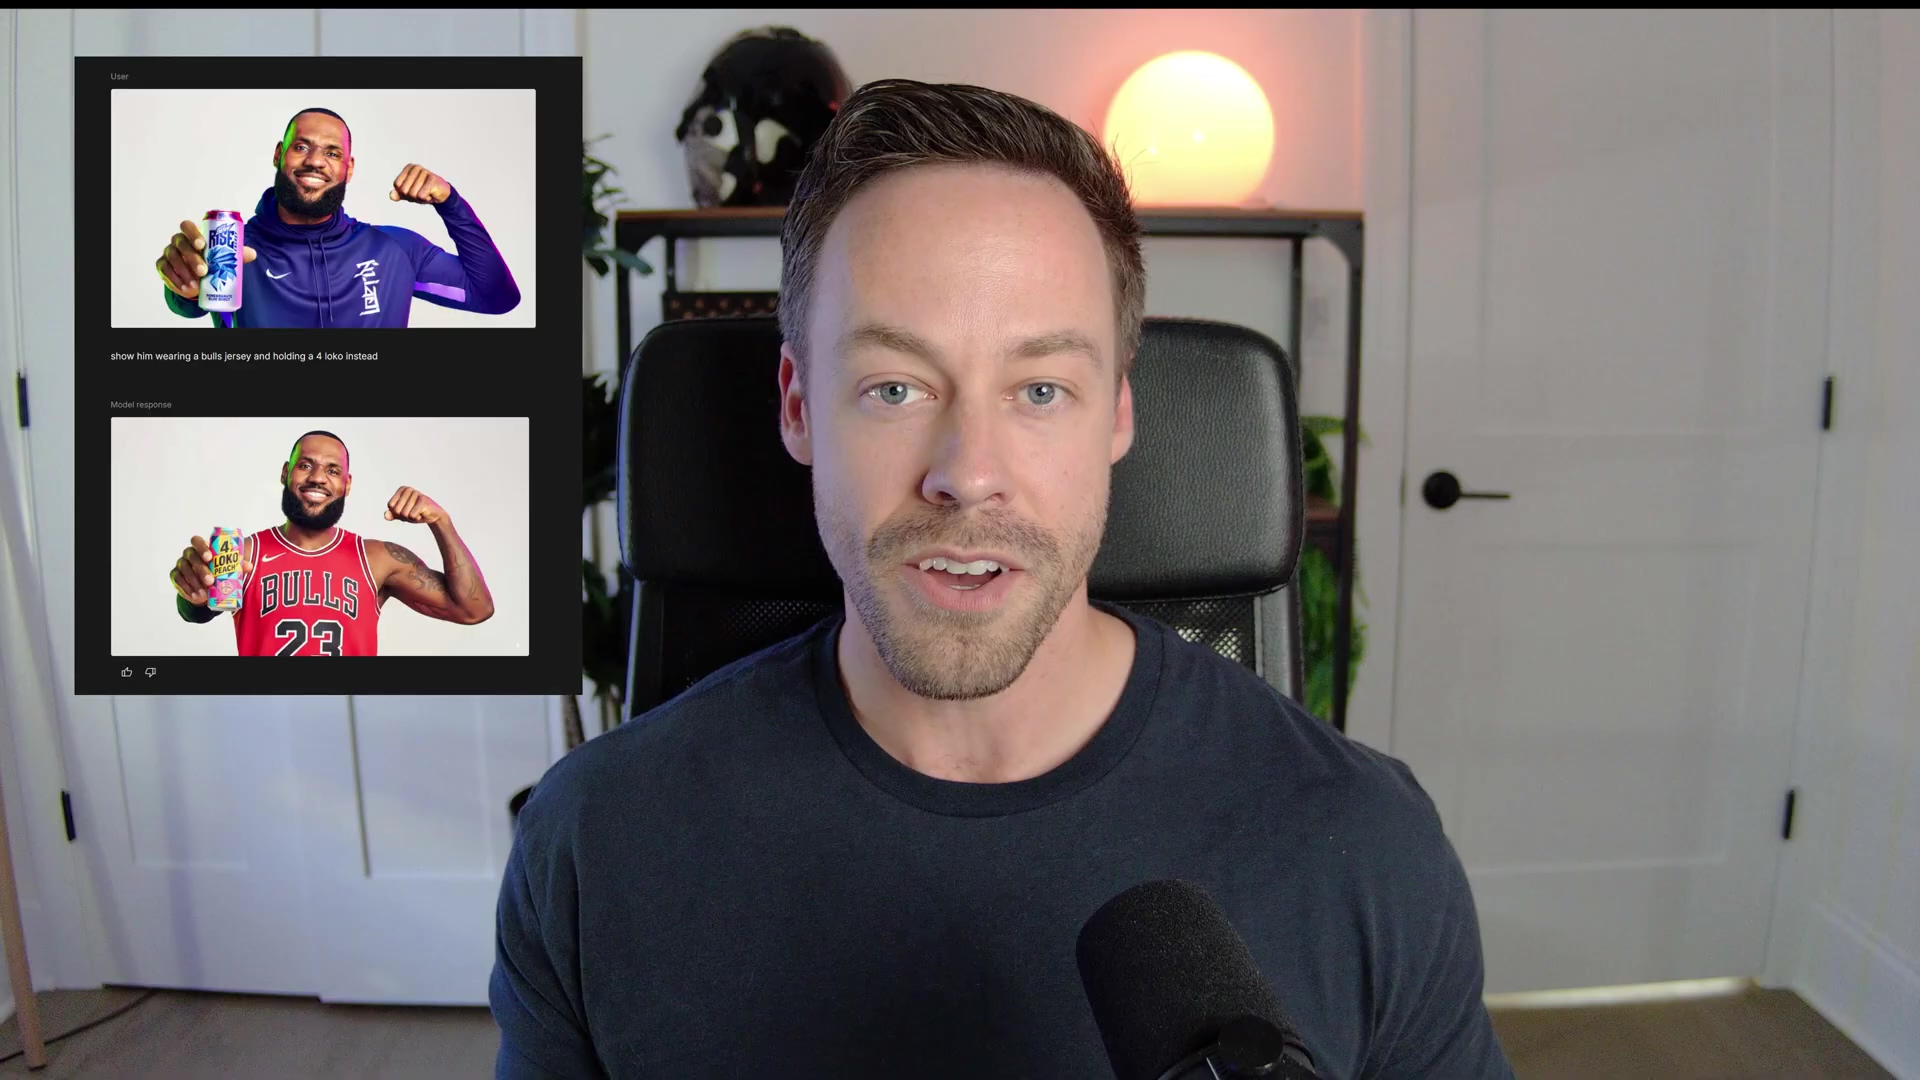
Path: You’ll want to use Nano Banana’s image-to-image editing feature. You can do this right in Google AI Studio or, even better for automation, via its API. Start by uploading a base image of your model or product. Then, use prompts to tell the AI what you want: change outfits, put them in different settings, or alter their poses. The magic here is that the core identity stays perfectly consistent. For example, a single model can be shown wearing a dozen different clothing items without needing a single extra photoshoot. This is a goldmine for e-commerce or influencer marketing! Similarly, you can seamlessly integrate a product into various lifestyle scenes without ever leaving your desk.
Validation: After you generate the images, take a good look. Do the facial features, body proportions, and any brand elements remain consistent across all the images? If so, you’ve nailed it!
Enhancing Image Editing Efficiency
Goal: Ever tried to move an object in Photoshop and spent ages trying to make it look natural? Nano Banana can make complex image manipulations, like object relocation or lighting adjustments, super easy.
Path: Head back to the “Build” section in Google AI Studio. Remember apps like “Home Canvas”? That’s your playground. It lets you drag and drop objects right into a scene. The AI is smart enough to automatically adjust the composition and lighting, making the object look like it was always there. This dramatically cuts down on the time and specialized skills you’d normally need for these tasks in traditional tools like Photoshop. It’s like having an expert retoucher working at warp speed!
Validation: When you move an object, check if it integrates naturally into the scene. Look for appropriate shadows and lighting, and make sure existing elements aren’t distorted. If it looks seamless, you’re golden.
Creative Possibilities: Iterative Design and Prototyping
Goal: Designers, listen up! If you need to rapidly iterate on visual design concepts – from product mockups to entire scene compositions – Nano Banana is your new best friend.
Path: Again, those customizable apps in the AI Studio’s “Build” section are key. By adding a feature that lets you re-prompt the final image, designers can endlessly refine their creations. For instance, after you’ve placed a product in a scene, a secondary prompt could change its color, add an accessory, or even alter the background. This fosters iterative design without ever having to start from scratch. It’s like having an infinite undo button, but better, because it’s always generating new ideas!
Validation: Make sure that when you give subsequent prompts, the generated output accurately reflects your new instructions. This quick visual feedback loop is crucial for rapid design changes and getting to that perfect visual faster.
These applications really show that Nano Banana is more than just an image generator. It’s a powerful tool that accelerates creative workflows and makes advanced visual content production accessible to everyone. It’s truly revolutionizing how we create!
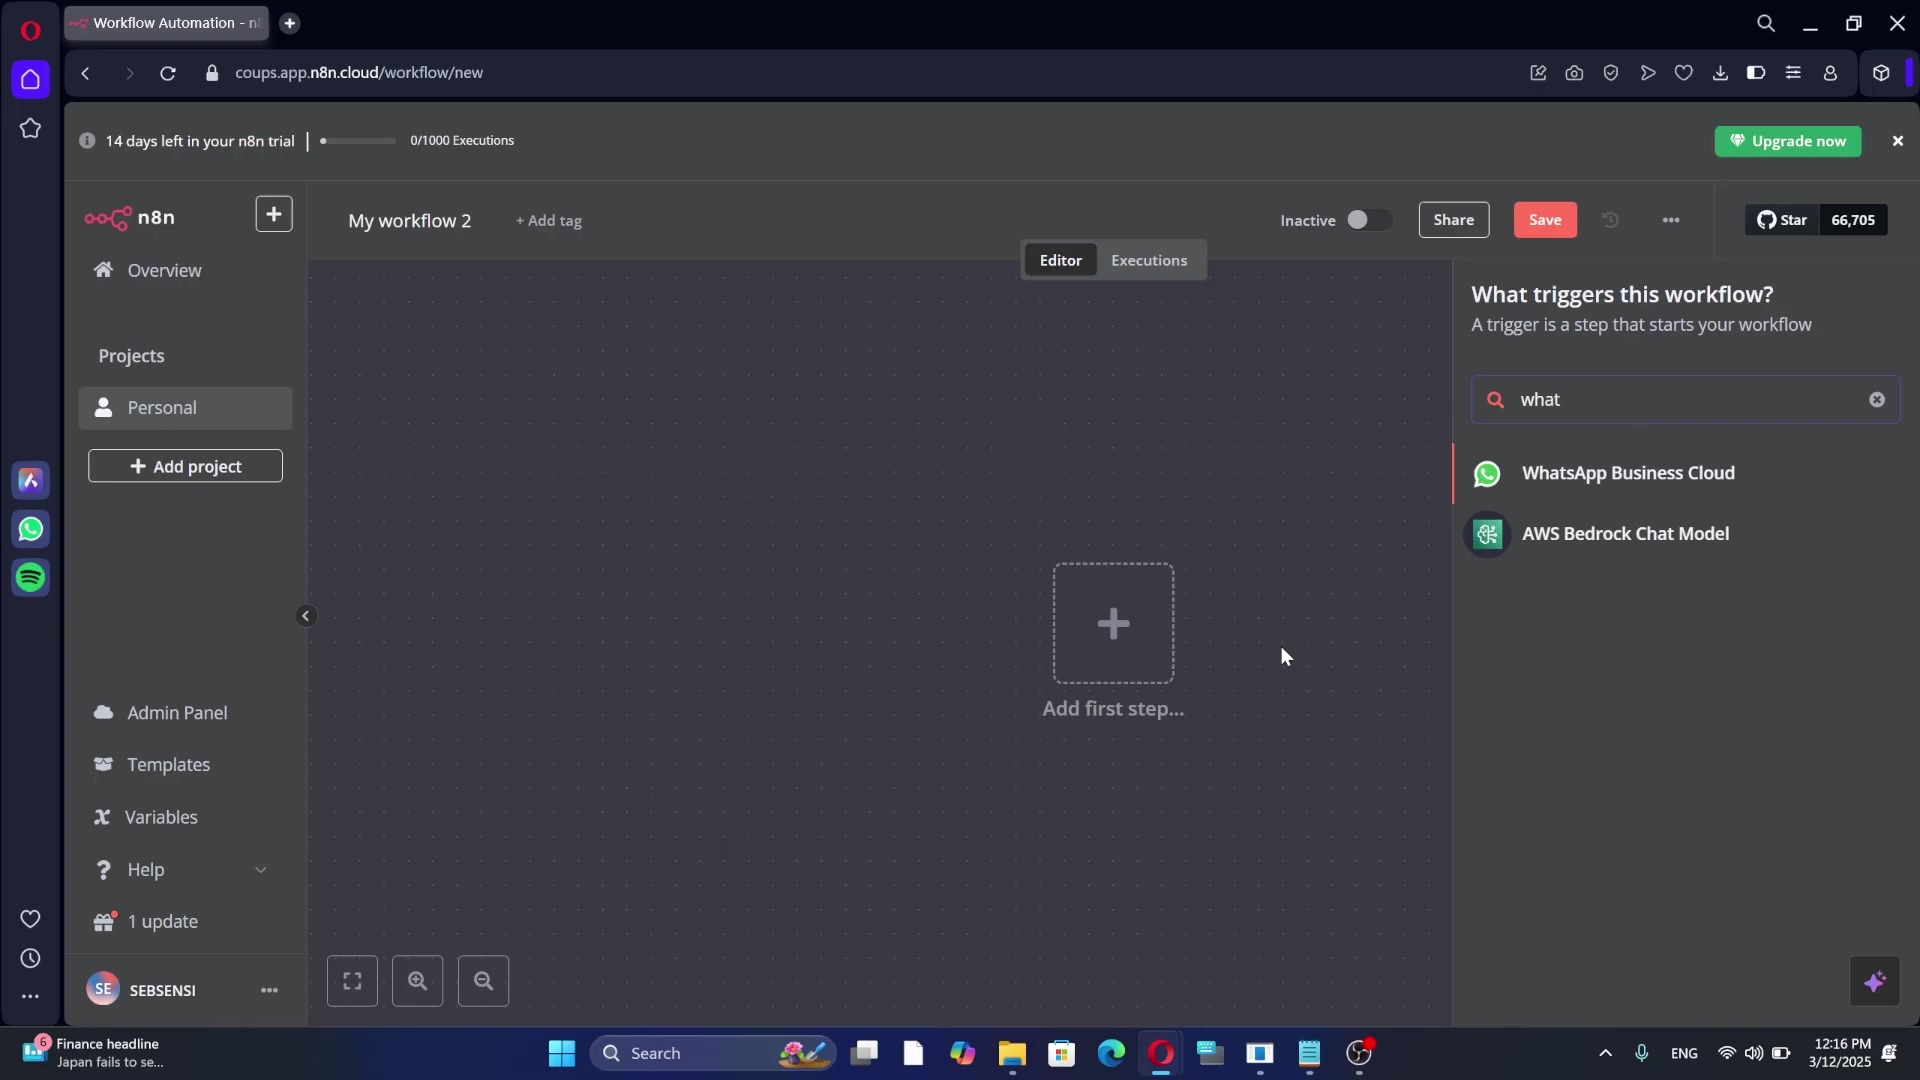
Introducing n8n: The No-Code Automation Powerhouse for AI Workflows
Alright, now that we’ve got our heads around Nano Banana, let’s talk about its perfect partner in crime: n8n. If you’re not familiar with it, n8n is an open-source, no-code/low-code automation platform. What does that mean? It means it makes building sophisticated workflows incredibly simple by connecting all sorts of applications, APIs, and services. Think of n8n as the central command center, orchestrating complex sequences of tasks without you having to write a single line of code. This makes it absolutely ideal for integrating AI models like Nano Banana into bigger content generation pipelines. It’s like having a super-smart robot assistant that connects everything for you!
Understanding n8n’s Functionality
n8n operates on a node-based system. If you’ve ever played with visual programming tools or even thought about how data flows, this will make sense. Each “node” in n8n represents a specific application or action. You literally drag and drop these nodes onto a canvas, connect them with lines, and boom – you’ve defined the flow of data and execution. This visual programming interface is incredibly intuitive, making powerful automation accessible to everyone, even if you’ve never written a line of code in your life. It’s like building a Rube Goldberg machine, but for your digital tasks!
Key Features for AI Integration
n8n isn’t just pretty; it’s packed with features that make it perfect for AI workflows:
- Extensive Integrations: n8n has a massive library of integrations. We’re talking webhooks, all the popular SaaS applications you can think of, databases, and custom HTTP requests. Why is this important for AI? Because AI models often communicate via APIs, and n8n makes connecting to those APIs (like Kai AI for Nano Banana and VO3) a breeze. You can find a full list of their integrations here.
- Flow Control Logic: Need your workflow to make decisions? n8n can do that! It supports complex logic like conditional branching (e.g., “if the image is approved, then generate a video; if not, then send it back for re-editing”). It also handles loops, which are super handy for dynamic, AI-driven processes that might need to repeat actions. It’s like giving your workflow a brain to think for itself!
- Data Transformation: Data rarely comes in the exact format you need. n8n can manipulate data between nodes, allowing for dynamic prompt generation (super useful for AI!), parsing API responses, and formatting data to meet the requirements of different services. It’s like having a universal translator for your data.
- Self-Hosted or Cloud: You’ve got options! You can deploy n8n on your own servers for maximum control and privacy, or you can use their cloud offering if you prefer a hands-off approach. This flexibility means n8n can fit into almost any operational need. You can learn more about their self-hosting options here.
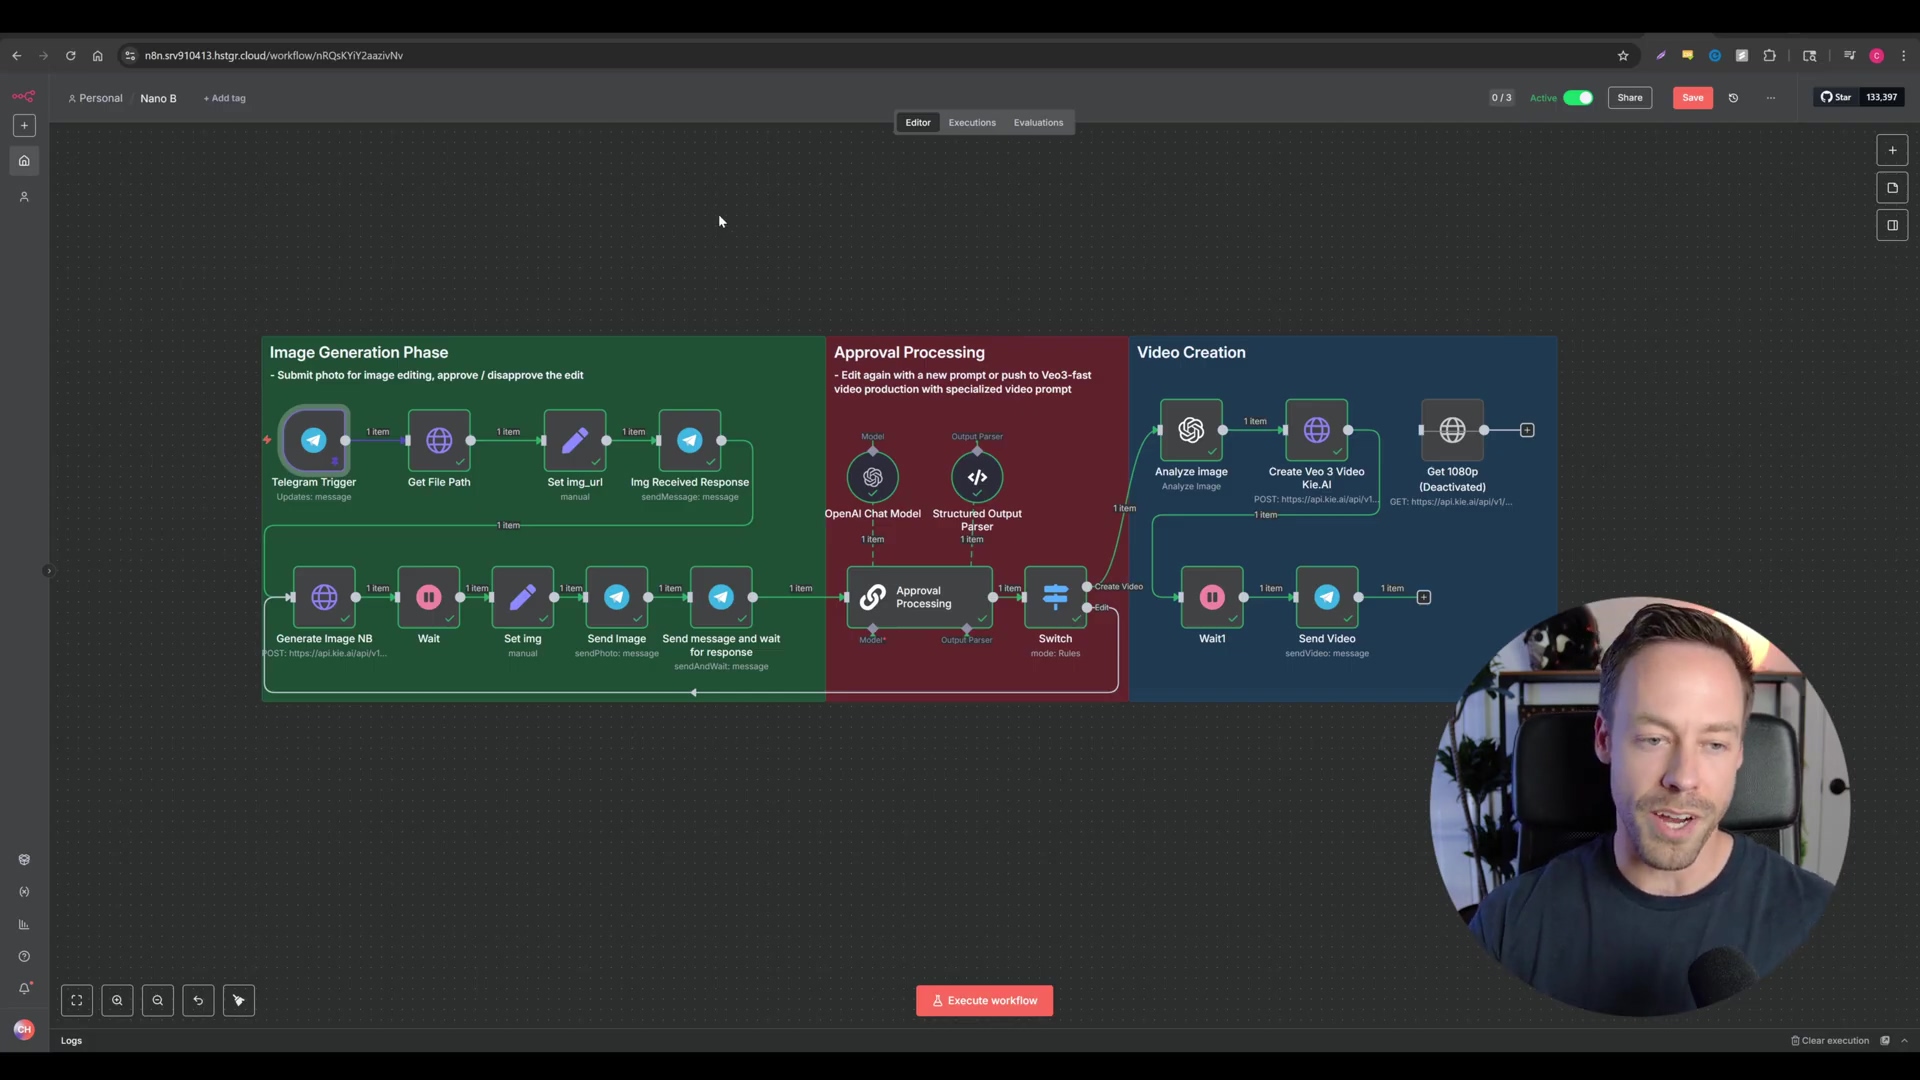
Building Your First Nano Banana to Video Automation with n8n
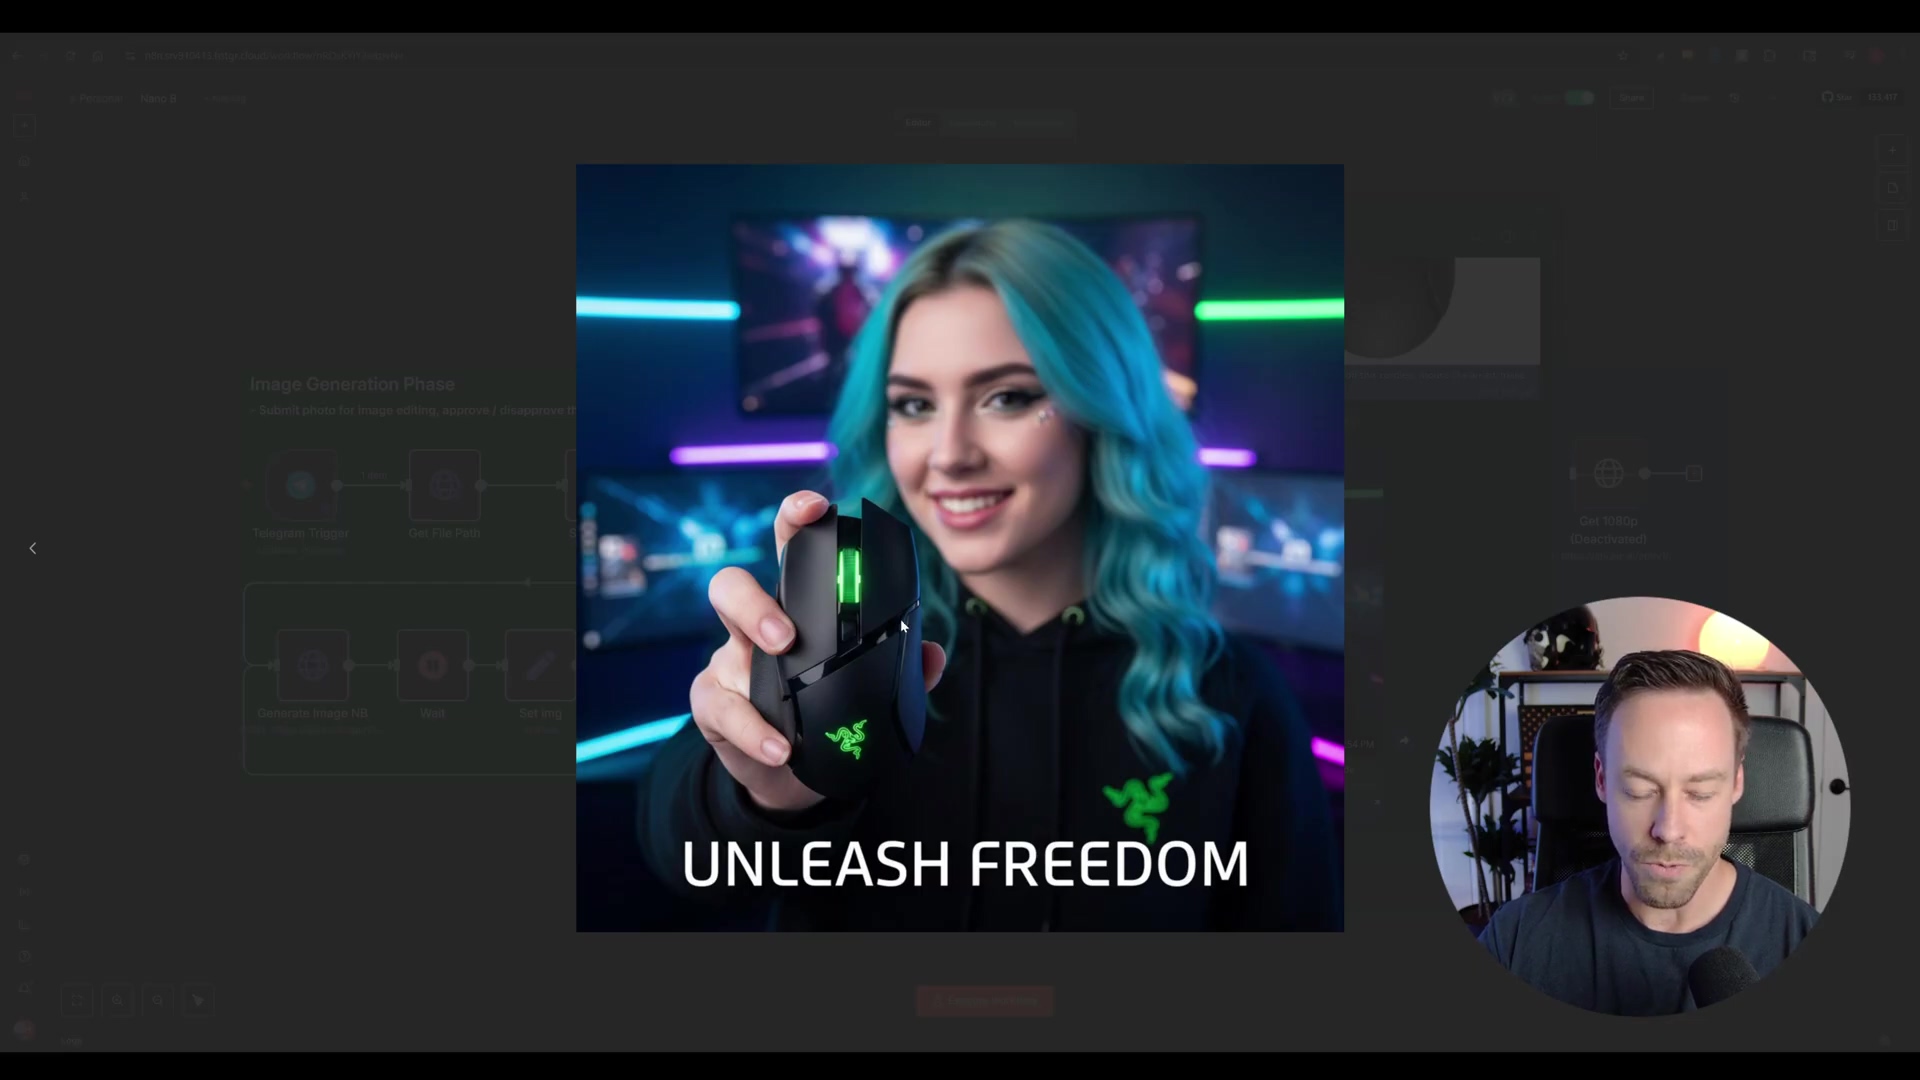
Alright, this is where we put everything we’ve learned into action! We’re going to build an n8n workflow that’s going to automate image generation with Nano Banana and then turn that image into a video using VO3. Our ultimate goal? A unified system where you send an image and a prompt via Telegram, approve the AI-generated image, and then automatically convert it into a video. How cool is that? It’s like building your own personal content factory!
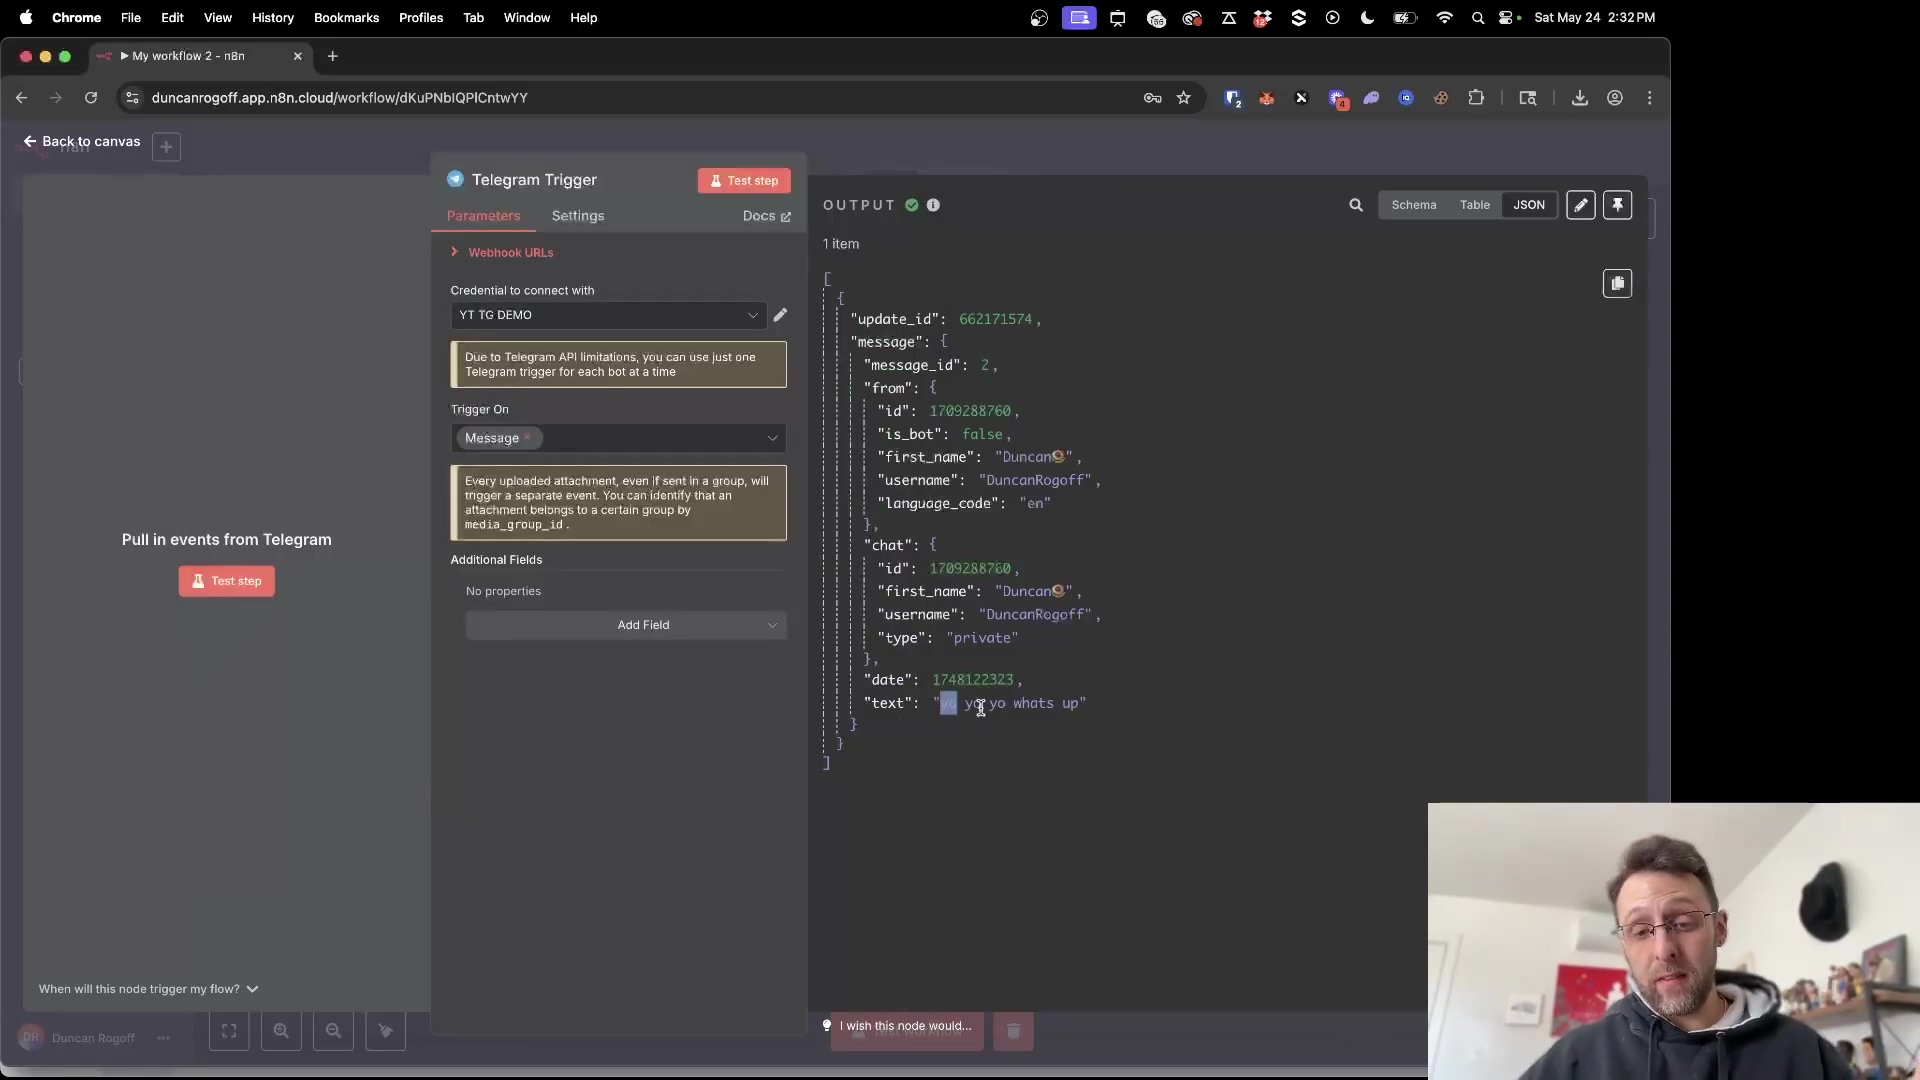
Step 1: Set Up the Telegram Trigger
Every great automation starts with a trigger. For us, it’s Telegram!
Goal: We want our workflow to kick off as soon as we send an image and some text (our prompt) to our Telegram bot.
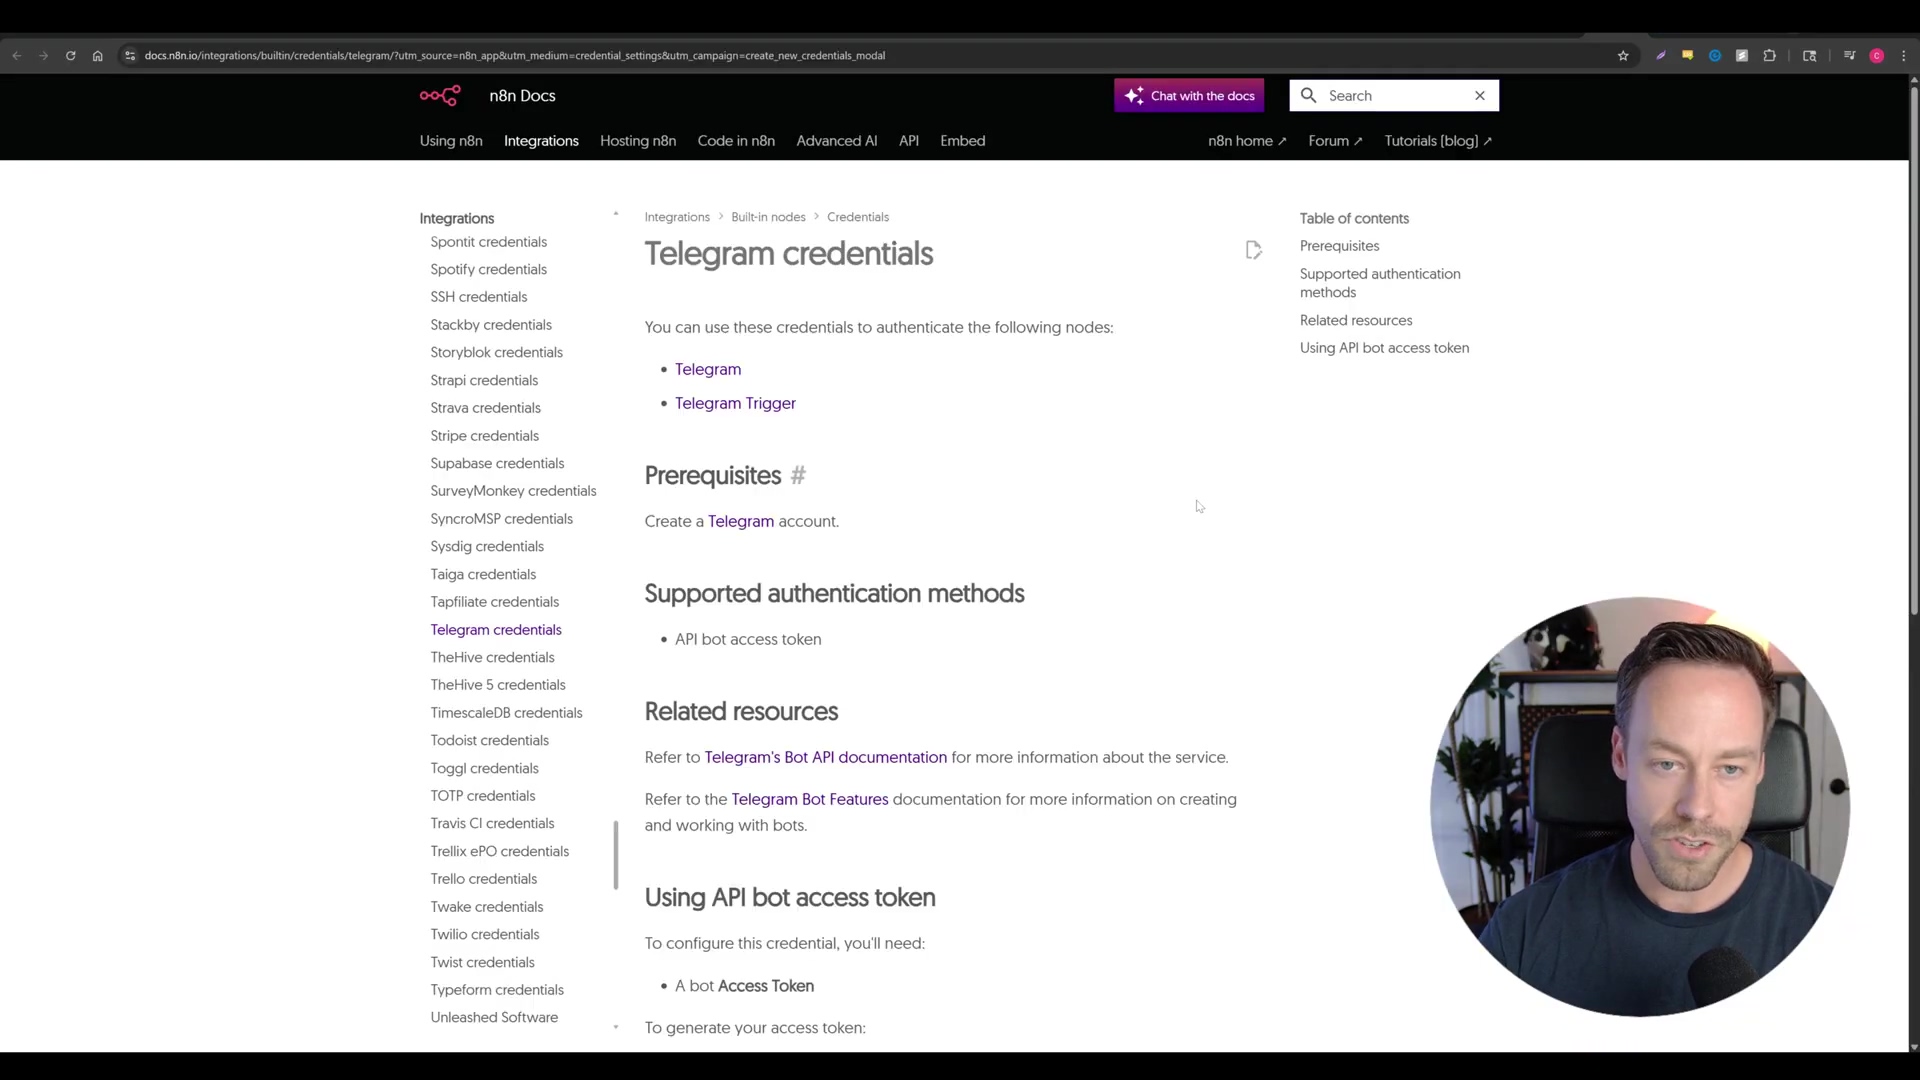
Path: First, you’ll need to add a Telegram Trigger node to your n8n canvas. Just drag and drop it! Next, you’ll connect your Telegram bot. This involves setting up credentials. If you’ve never set up a Telegram bot before, don’t sweat it! n8n has fantastic documentation for connecting your Telegram bot, which usually involves using a special bot called “BotFather” within Telegram to get a unique bot token. You can find n8n’s detailed guide on Telegram integration here.
Verification: To make sure everything is working, send a test message with an image and some text to your Telegram bot. If the Telegram Trigger node lights up or shows a successful execution, you’ve nailed it! It means n8n successfully received your message.
Step 2: Retrieve the Image URL
Our AI models need a direct link to the image you sent. So, our next step is to grab that URL.
Goal: We need to extract the direct URL of the image you sent via Telegram so our AI models can actually see and use it.
Path: Add an HTTP Request node right after your Telegram Trigger. We’ll configure this node to make a GET request to Telegram’s API. The URL will look like this:
https://api.telegram.org/botYOUR_BOT_TOKEN/getFile?file_id={{$json.file_id}}Important: Replace YOUR_BOT_TOKEN with the actual bot token you got from BotFather. The file_id part is super clever – it’s dynamic! It’s pulled directly from the output of your Telegram Trigger node. This first request gets us some file information. Then, you’ll follow this with another HTTP Request node to construct the full image URL. The URL for the second request will be:
https://api.telegram.org/file/botYOUR_BOT_TOKEN/{{$json.result.file_path}}Again, replace YOUR_BOT_TOKEN. The {{$json.result.file_path}} will come from the output of your first HTTP Request node. This two-step process is necessary because Telegram’s getFile method gives you a file_path, not the full download URL directly.
Verification: After running the previous step (sending a test message), inspect the output of this second HTTP Request node. You should see a valid and accessible file_path and, most importantly, a complete image_url that points directly to the image you uploaded. Try pasting that URL into your browser – you should see your image!
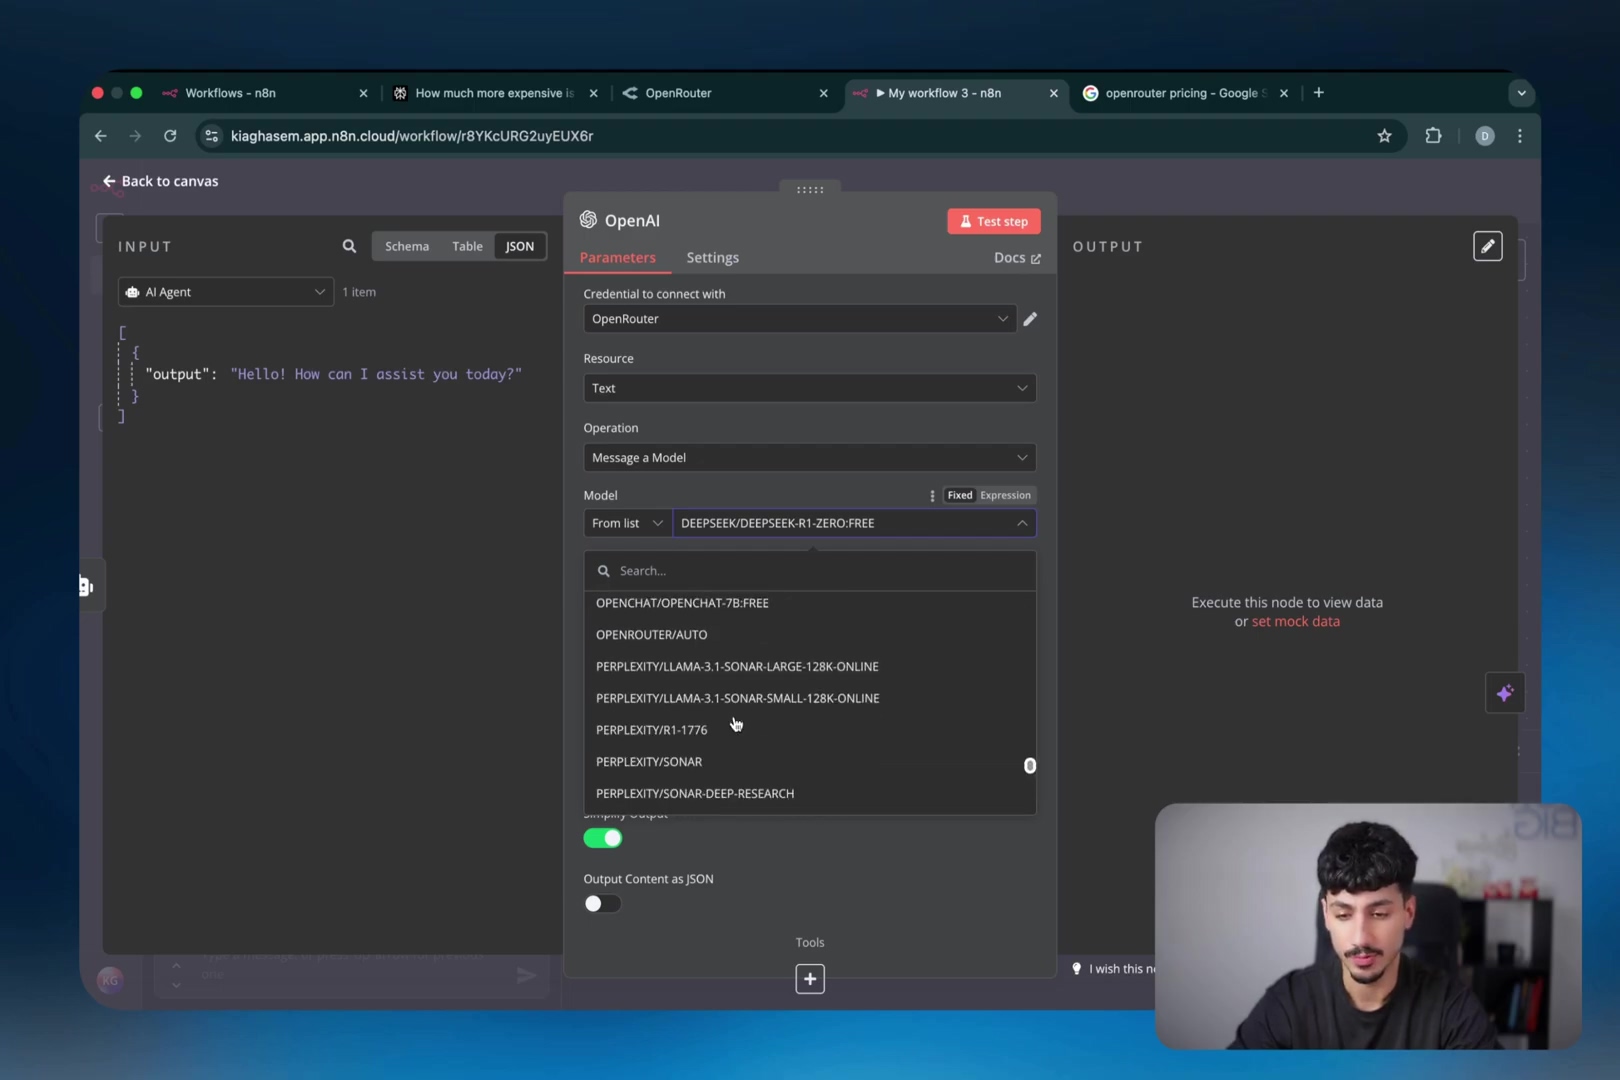
Step 3: Generate/Edit Image with Nano Banana (Kai AI)
Now for the main event! We’re going to send our image and prompt to Nano Banana via Kai AI.
Goal: We want to take the uploaded image and your text prompt, send them to Nano Banana (through Kai AI’s service), and get back an awesome, edited image.
Path: Add another HTTP Request node. This one will be for Kai AI’s Nano Banana service. Before you configure the request itself, you’ll need to set up credentials for Kai AI. This usually involves creating a generic credential type within n8n. You’ll use header authentication, so the Authorization header will be Bearer YOUR_API_KEY. Make sure to replace YOUR_API_KEY with your actual Kai AI API key. If you don’t have one, you’ll need to sign up for Kai AI and get your key. You can usually find this in your account settings on their platform. Kai AI acts as a bridge to Nano Banana, making it easy to integrate.
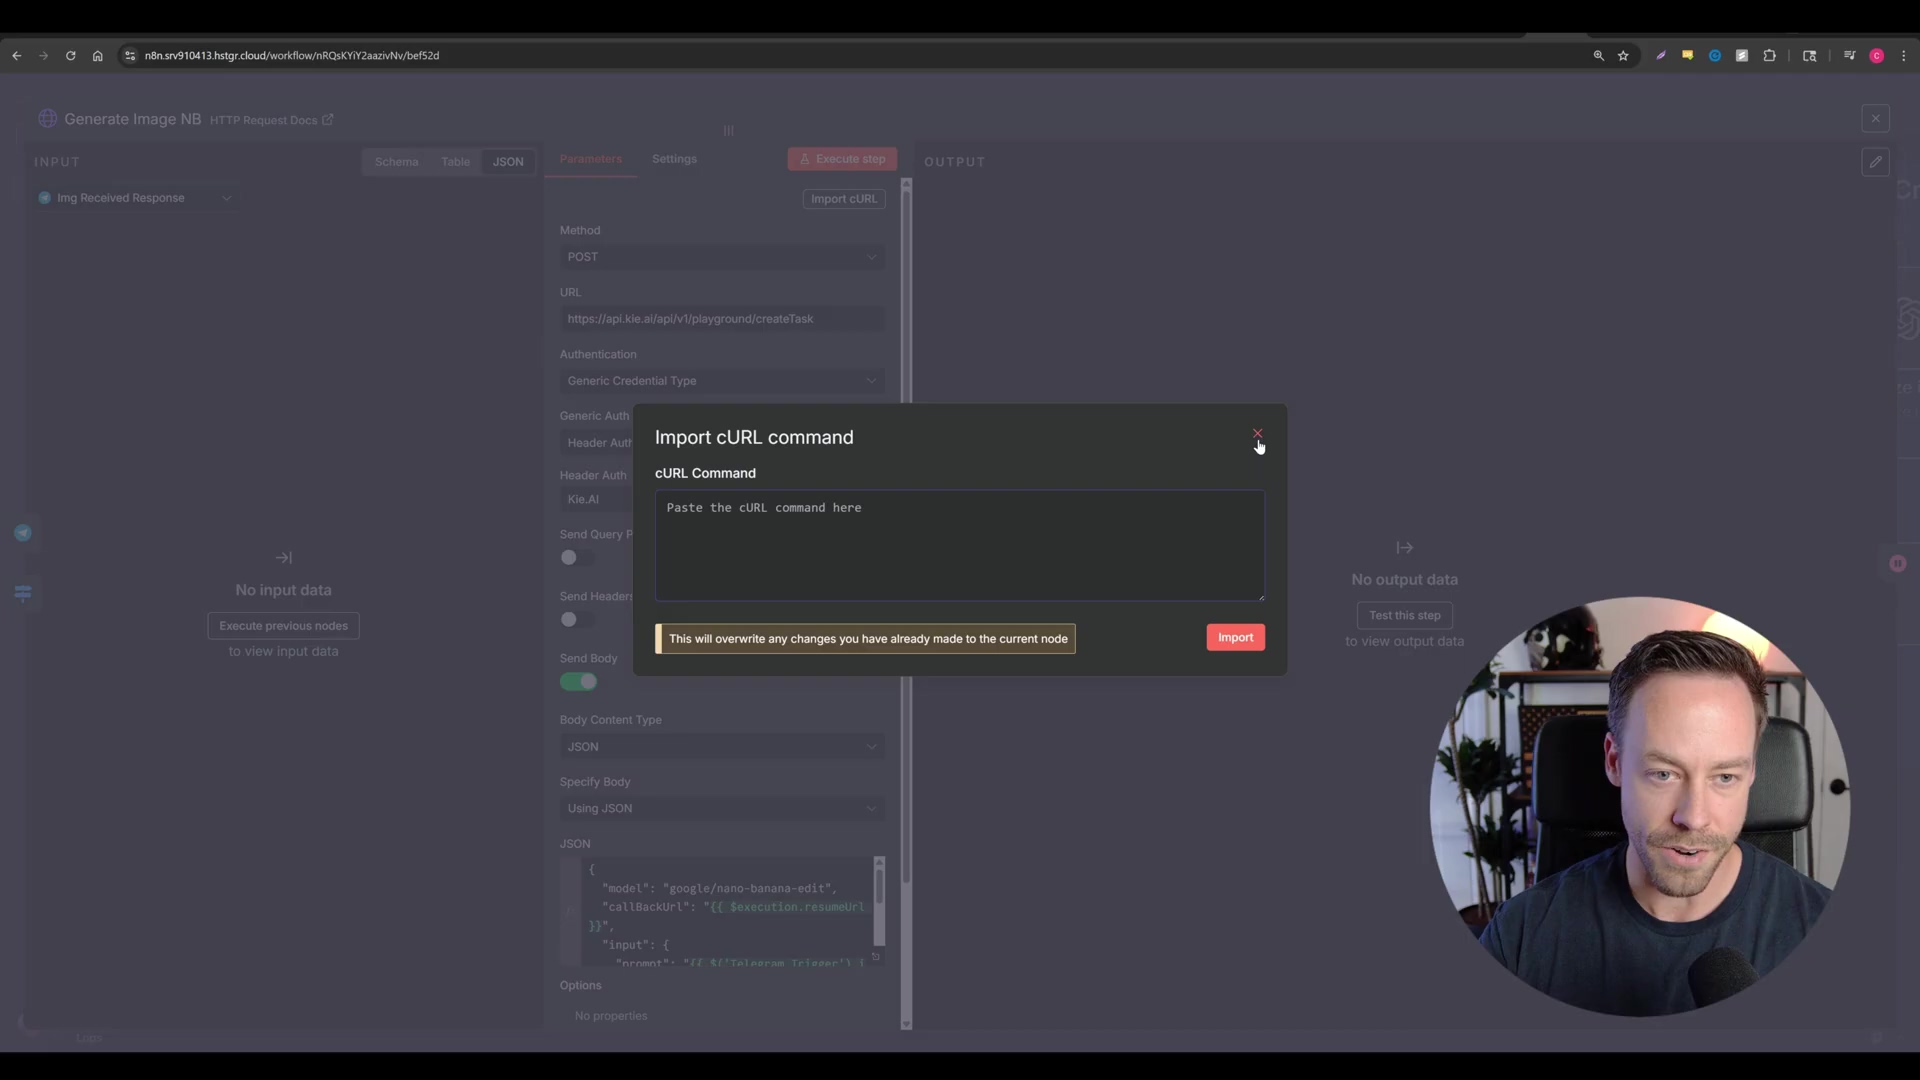
Now, configure the HTTP Request body as JSON. This is where you tell Nano Banana what to do. The structure will look something like this:
{
  "model": "nano-banana",
  "image_url": "{{$node["HTTP Request"].json["image_url"]}}",
  "prompt": "{{$node["Telegram Trigger"].json["message"]["caption"]}}",
  "edit_type": "image_to_image"
  // You might also have other parameters here depending on Kai AI's API documentation
}
Explanation of the JSON body:
"model": "nano-banana": This explicitly tells Kai AI which model we want to use. Super important!"image_url": "{{$node["HTTP Request"].json["image_url"]}}": This is where we dynamically pull the image URL we retrieved in Step 2. n8n’s expressions ({{...}}) are super handy for this!"prompt": "{{$node["Telegram Trigger"].json["message"]["caption"]}}": Here, we’re grabbing the text you sent along with your image in Telegram. This is your instruction for Nano Banana."edit_type": "image_to_image": This specifies the type of operation. Nano Banana excels at image-to-image edits for consistency.
Verification: Execute this node. The output should contain a response from Kai AI, hopefully with a URL to your newly generated or edited image! If you get an error, double-check your API key and the JSON structure. It’s like sending a command to your spaceship – every parameter needs to be just right!
Final Summary
Wow, what a journey! We’ve just navigated the exciting world of Google’s Gemini 2.5 Flash Image (our beloved Nano Banana) and integrated it seamlessly with n8n. We covered everything from accessing those cutting-edge AI capabilities via Google AI Studio, understanding Nano Banana’s unique strengths (hello, speed and consistency!), and then building a detailed n8n workflow for automated UGC. You’ve basically built your own content creation robot!
But why stop there? To truly elevate your workflows, consider adding another node after the “Send Video to Telegram” node. This new node could automatically publish your freshly generated video to multiple social media platforms like Instagram, TikTok, or YouTube. Imagine the time you’d save! This is the beauty of n8n and AI working together – you’re not just automating; you’re amplifying your reach and impact. Keep experimenting, keep building, and remember: the only limit is your imagination!
Frequently Asked Questions (FAQ)
Q: What exactly is “Nano Banana” and why is it called that?
A: “Nano Banana” is the development codename for Google’s Gemini 2.5 Flash Image. It gained this quirky name during its secret testing phase on platforms like LM Arena, where it consistently showed superior performance in image edits and text-to-image generation. It’s a powerful AI model known for its speed and ability to maintain character consistency across multiple generated images.
Q: How does Nano Banana compare to other AI image generators like DALL-E?
A: Nano Banana’s key advantages over models like DALL-E (often accessed via ChatGPT) are its remarkable speed and, more importantly, its unparalleled character consistency. While DALL-E is powerful, maintaining the exact identity and features of a character across different images is a common challenge. Nano Banana excels at this, making it ideal for workflows requiring consistent subject representation, like e-commerce or character-driven content.
Q: Do I need coding skills to use Nano Banana with n8n?
A: Not at all! That’s the beauty of n8n. It’s a no-code/low-code platform that uses a visual, node-based interface. You drag and drop components and connect them to build workflows. While understanding basic API concepts helps, you don’t need to write extensive code. Google AI Studio also offers a user-friendly interface for interacting with Nano Banana directly.
Q: What if my generated images aren’t consistent? What should I check?
A: If you’re struggling with consistency, first ensure you’re providing a clear reference image for your character or product. Nano Banana relies on this initial visual anchor. Second, refine your text prompts to be as specific as possible about the elements you want to remain consistent. Sometimes, adding phrases like “maintain the exact facial features” or “keep the same product design” can help. Also, verify that you’re using the correct model (Gemini 2.5 Flash Image/Nano Banana) within Google AI Studio or via Kai AI’s API, as other models may not have the same consistency capabilities.
Q: Can I use Nano Banana to generate videos directly?
A: No, Nano Banana is primarily an image generation and editing model. It excels at creating and modifying still images with high consistency and speed. To generate videos from these images, as demonstrated in this guide, you would integrate it with another tool like VO3 (via Kai AI) within an n8n workflow. Nano Banana provides the visual assets, and other tools handle the animation or video creation.