Watch the Video Tutorial
💡 Pro Tip: After watching the video, continue reading below for detailed step-by-step instructions, code examples, and additional tips that will help you implement this successfully.
Table of Contents
Open Table of Contents
- The Evolution of AI Agent Workflows: From Traditional to MCP
- Introducing MCP Servers: A Streamlined Approach
- Step-by-Step Guide to Building an MCP Server in n8n
- Required Resources and Cost-Benefit Analysis
- 💡 Key Best Practice Tips
- Key Takeaways
- Conclusion
- Frequently Asked Questions (FAQ)
- Q: What exactly is an “AI agent” in the context of n8n?
- Q: Why is reducing “failure points” so important in automation?
- Q: Can I use MCP servers with any AI model, or is it specific to certain ones?
- Q: What’s the difference between the ‘Test URL’ and ‘Production URL’ for an MCP Server Trigger?
- Q: How does n8n’s MCP implementation compare to other platforms that offer AI agent tools?
The Evolution of AI Agent Workflows: From Traditional to MCP
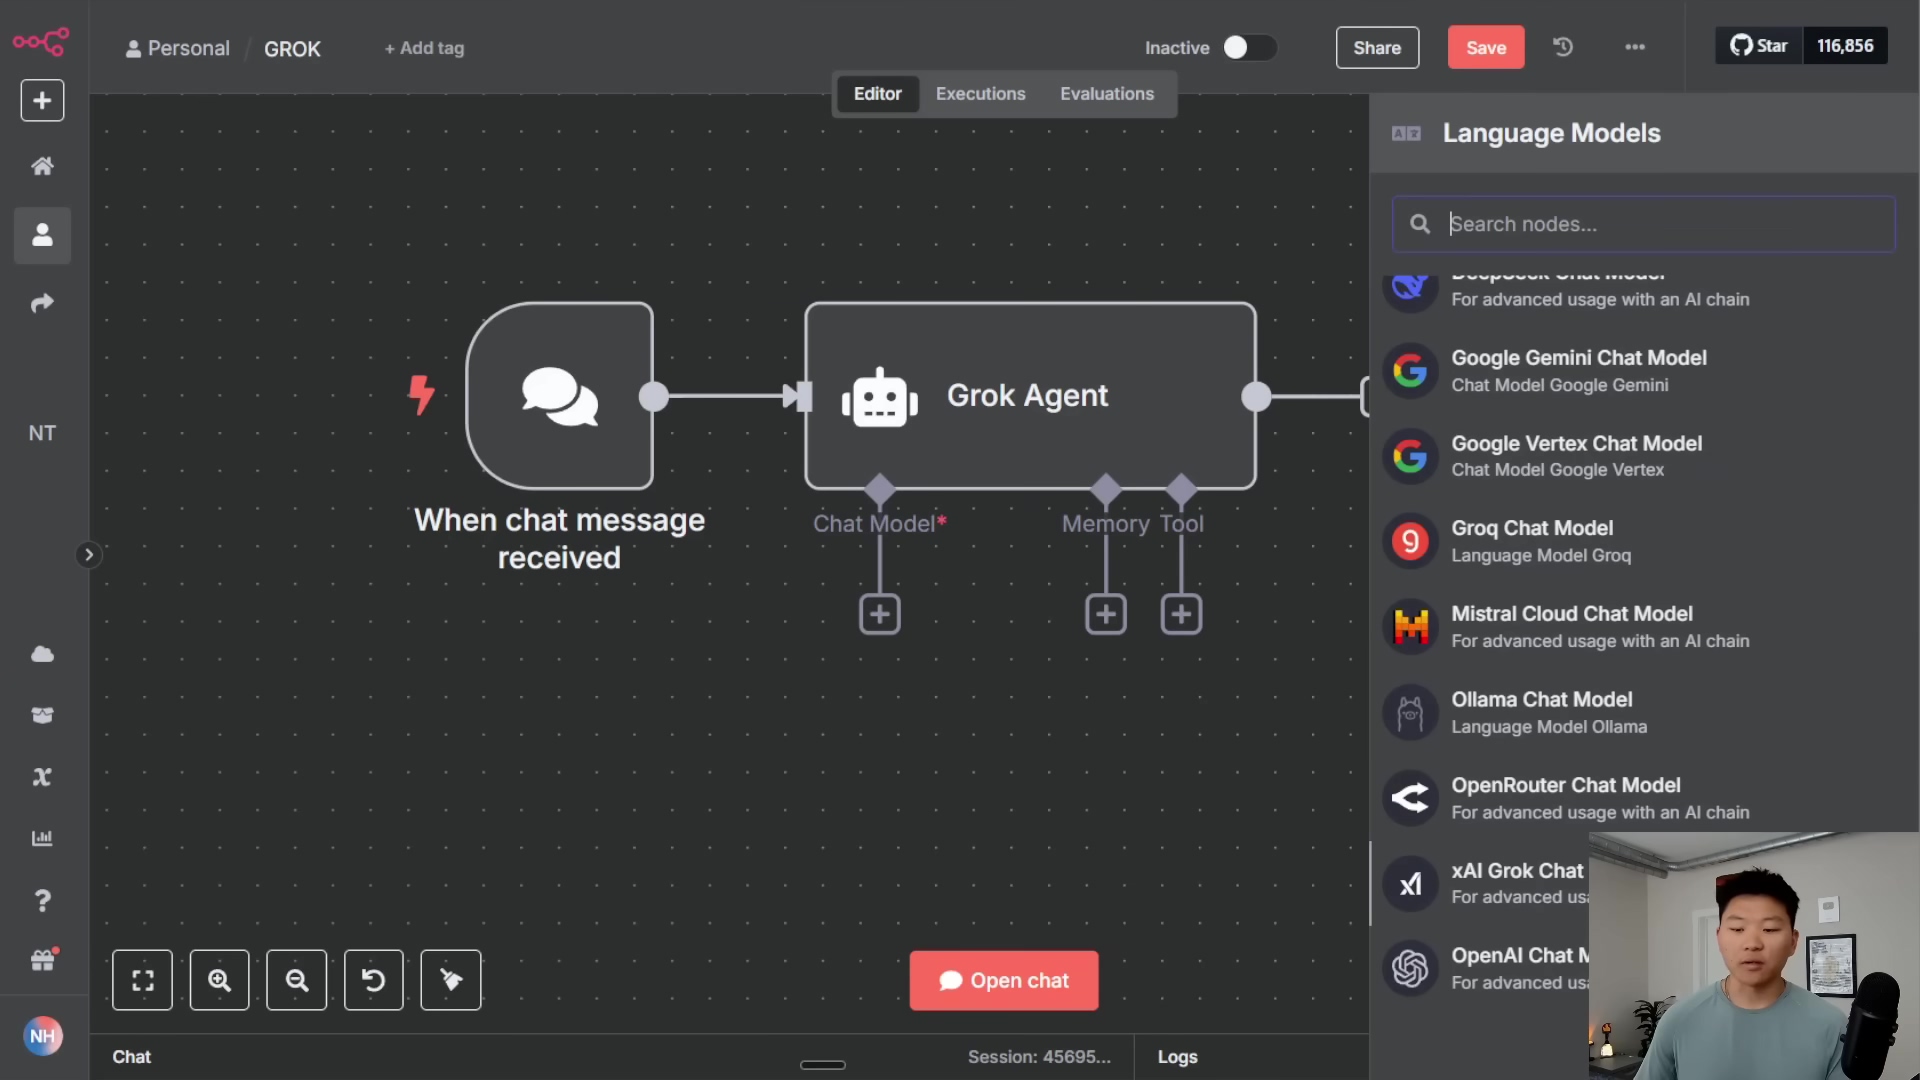
So, you’ve probably heard of AI agents, right? Think of them as your digital assistants, capable of making decisions and performing tasks. Traditionally, when you wanted an AI agent to do something complex, like manage your calendar and send emails, you’d build what we call a ‘parent workflow’. This parent workflow would have your chat input (how you talk to the agent), the agent itself (the brains), a model (like GPT-4, the actual AI), and memory (so it remembers what you talked about).
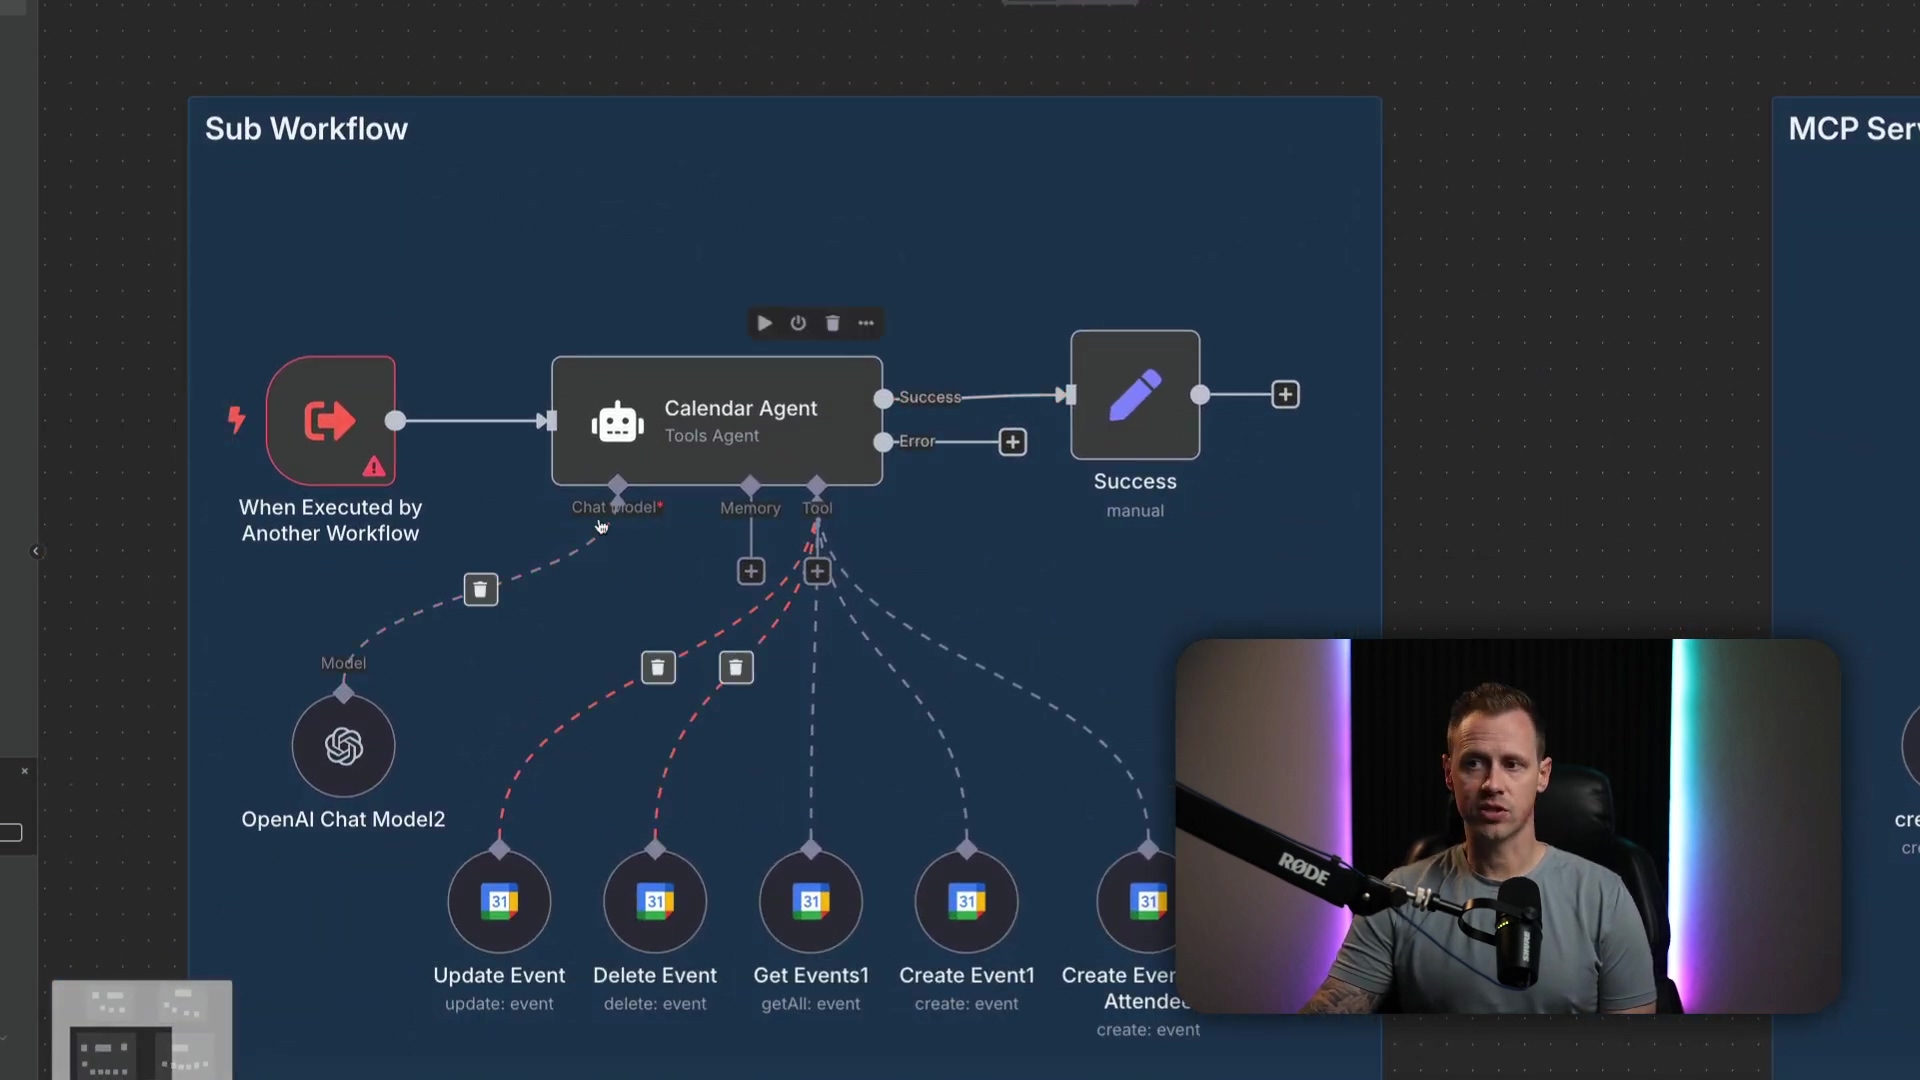
Now, here’s where it gets tricky. To perform specific tasks, this parent workflow would often call a ‘workflow tool’. What’s a workflow tool? It’s basically a little helper that triggers a sub-workflow. This sub-workflow is where the real action happens: the agent uses system and user prompts (think of these as instructions) to figure out which tool to use and then sends a response back to the parent. Sounds a bit like a game of telephone, doesn’t it?
Challenges with Traditional Workflows
Honestly, this traditional setup, while it works, can be a bit of a headache. Why? Because it introduces a couple of major ‘failure points’ – places where things can go wrong. And believe me, when you’re building automation, you want as few failure points as possible. It’s like building a LEGO castle; you want every brick to snap perfectly into place, not wobble.
- Sub-workflow Selection: First off, your AI agent has to be super smart about picking the right sub-workflow or tool. If your prompt isn’t crystal clear, or if the agent isn’t perfectly trained, it might pick the wrong one. Imagine asking for a hammer and getting a screwdriver – not ideal, right?
- Tool Execution within Sub-workflow: Even if the agent nails the first step and picks the correct sub-workflow, it then has to correctly identify and use the appropriate tool inside that sub-workflow to get the job done. It’s like getting to the right kitchen, but then fumbling around for the right pot. More chances for things to go sideways.
These complexities can lead to some unintended actions if the context or definitions aren’t super precise. And nobody wants their AI agent accidentally deleting their entire calendar, right? (Don’t ask me how I know.)
Introducing MCP Servers: A Streamlined Approach
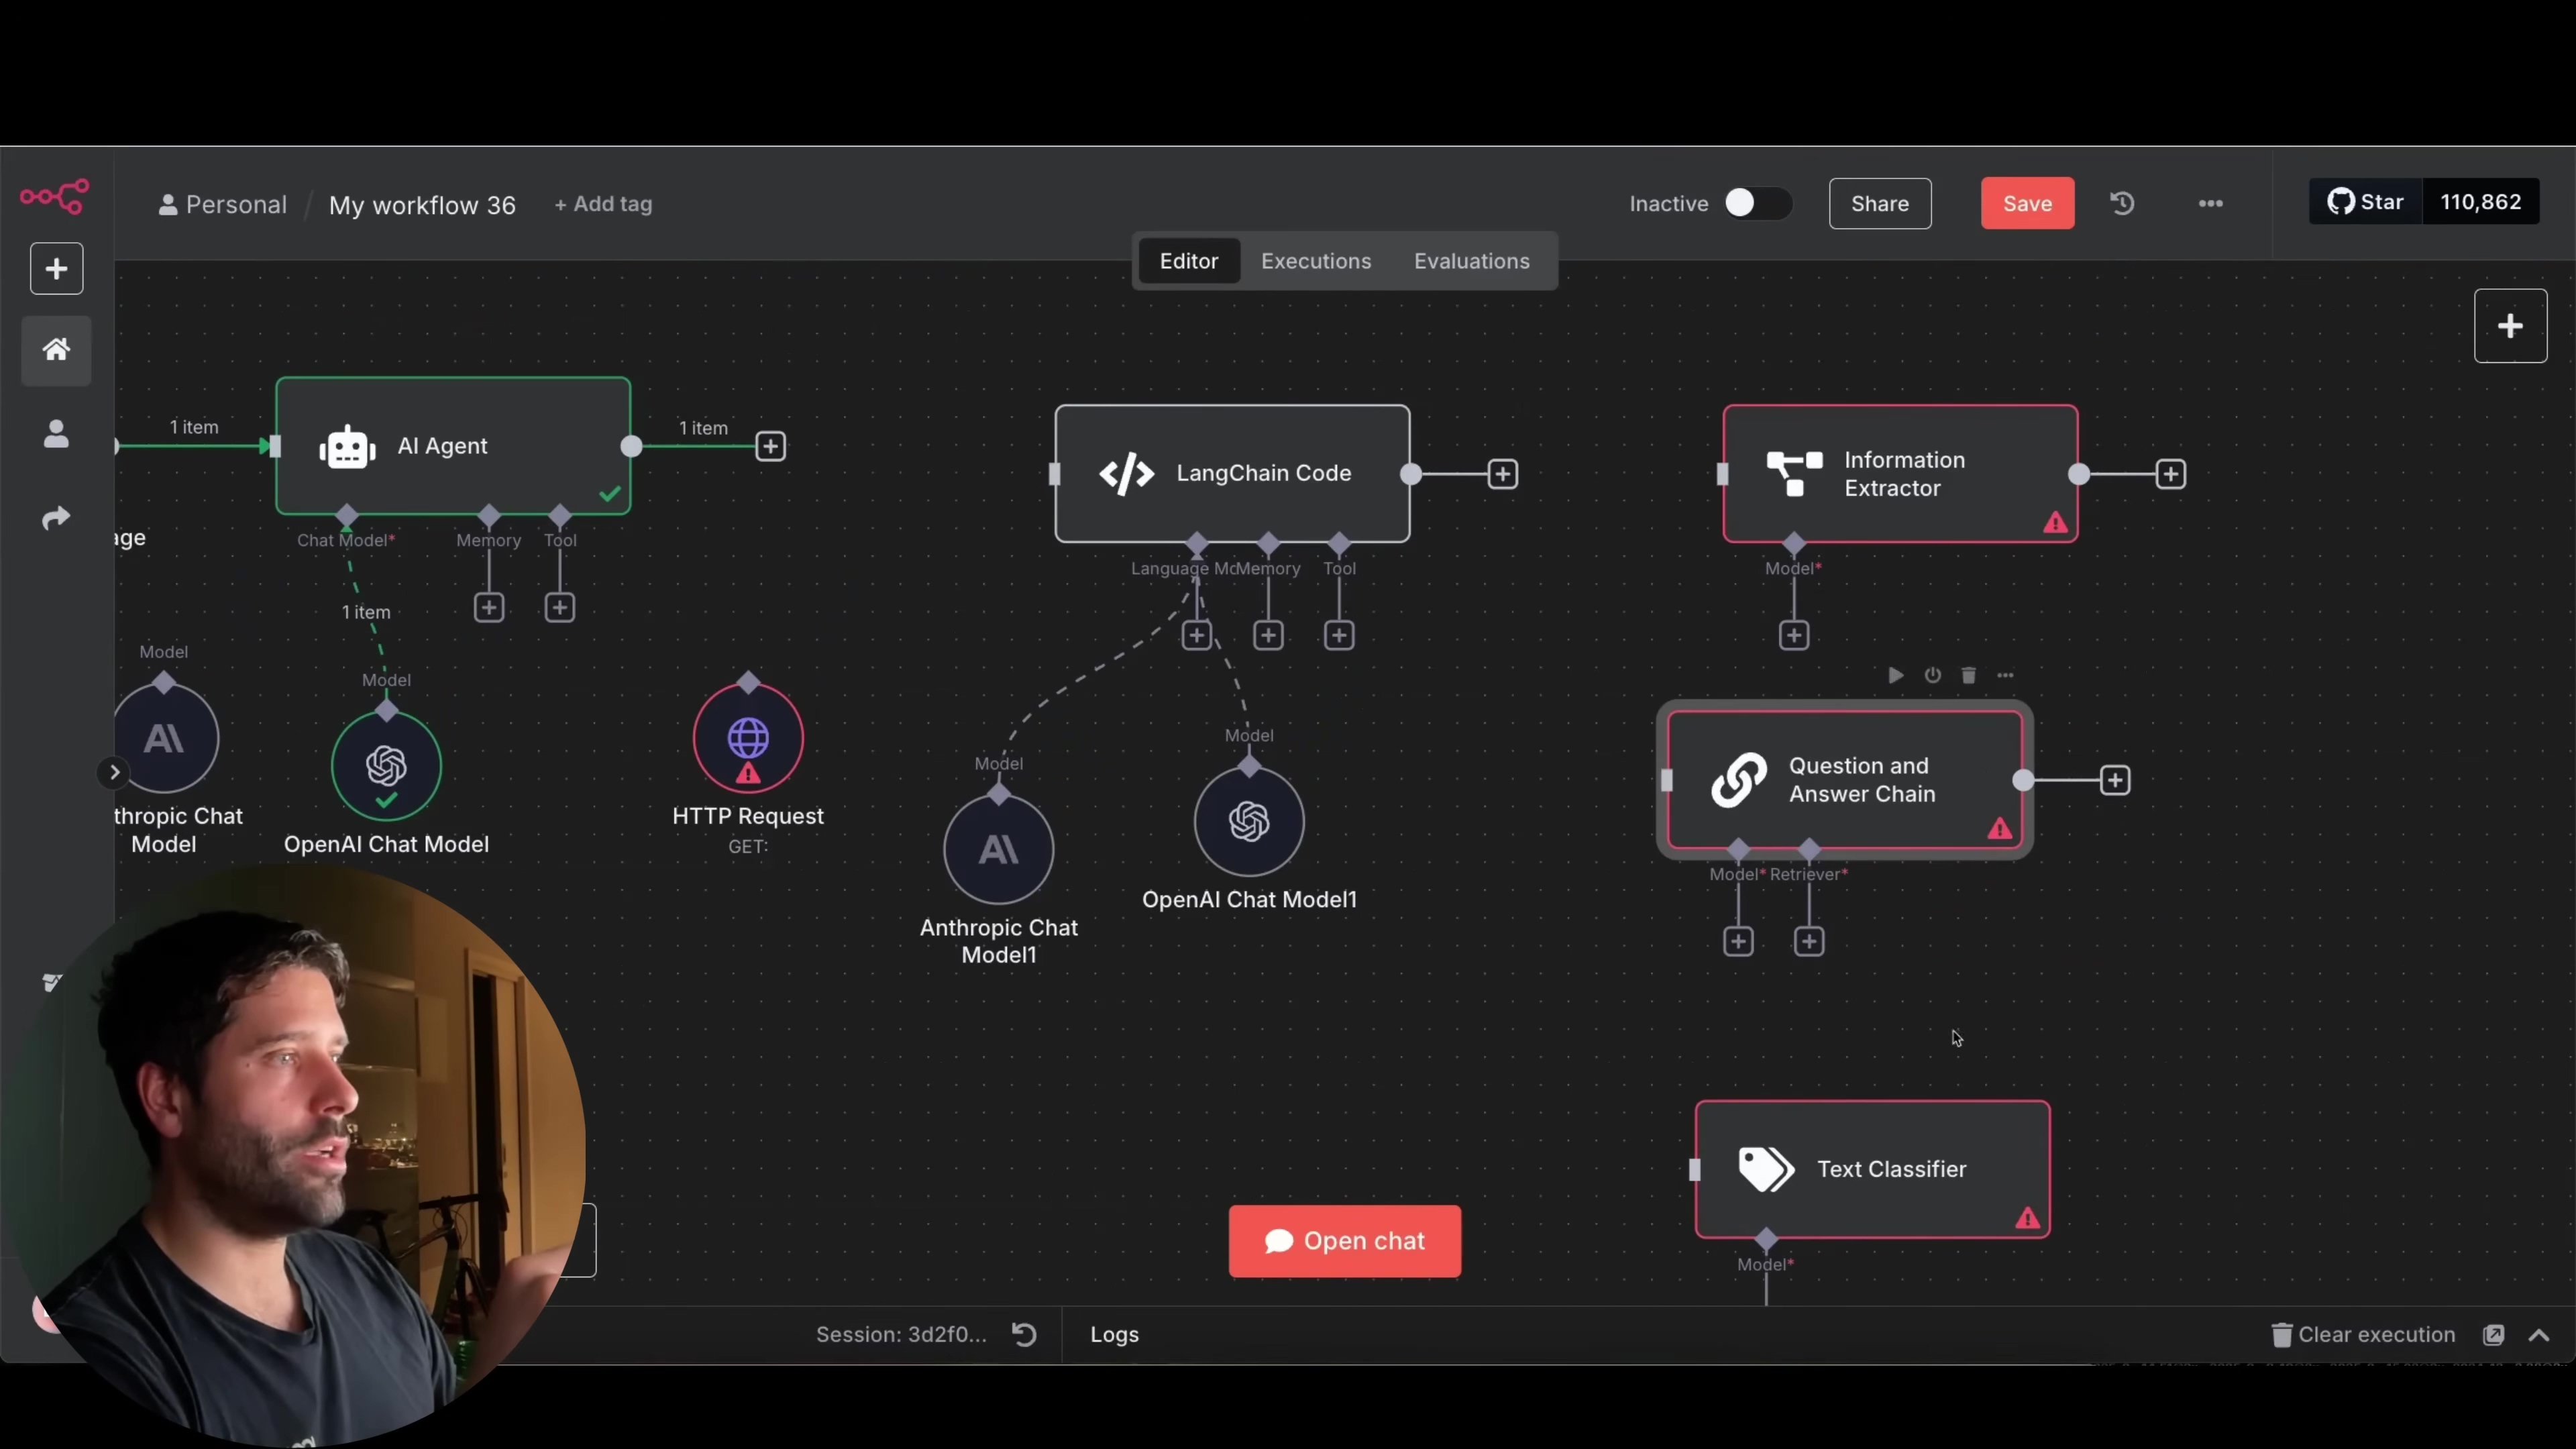
This is where Model Context Protocol (MCP) servers come in, riding in like a superhero to save the day! Think of MCP as a much more robust and efficient way to manage your AI agent’s tools. In an MCP setup, your parent workflow still has the agent, model, and memory – those are your core components. But instead of calling a generic workflow tool, it uses MCP clients. These clients are like direct lines of communication straight to an MCP server.
How MCP Simplifies Workflows
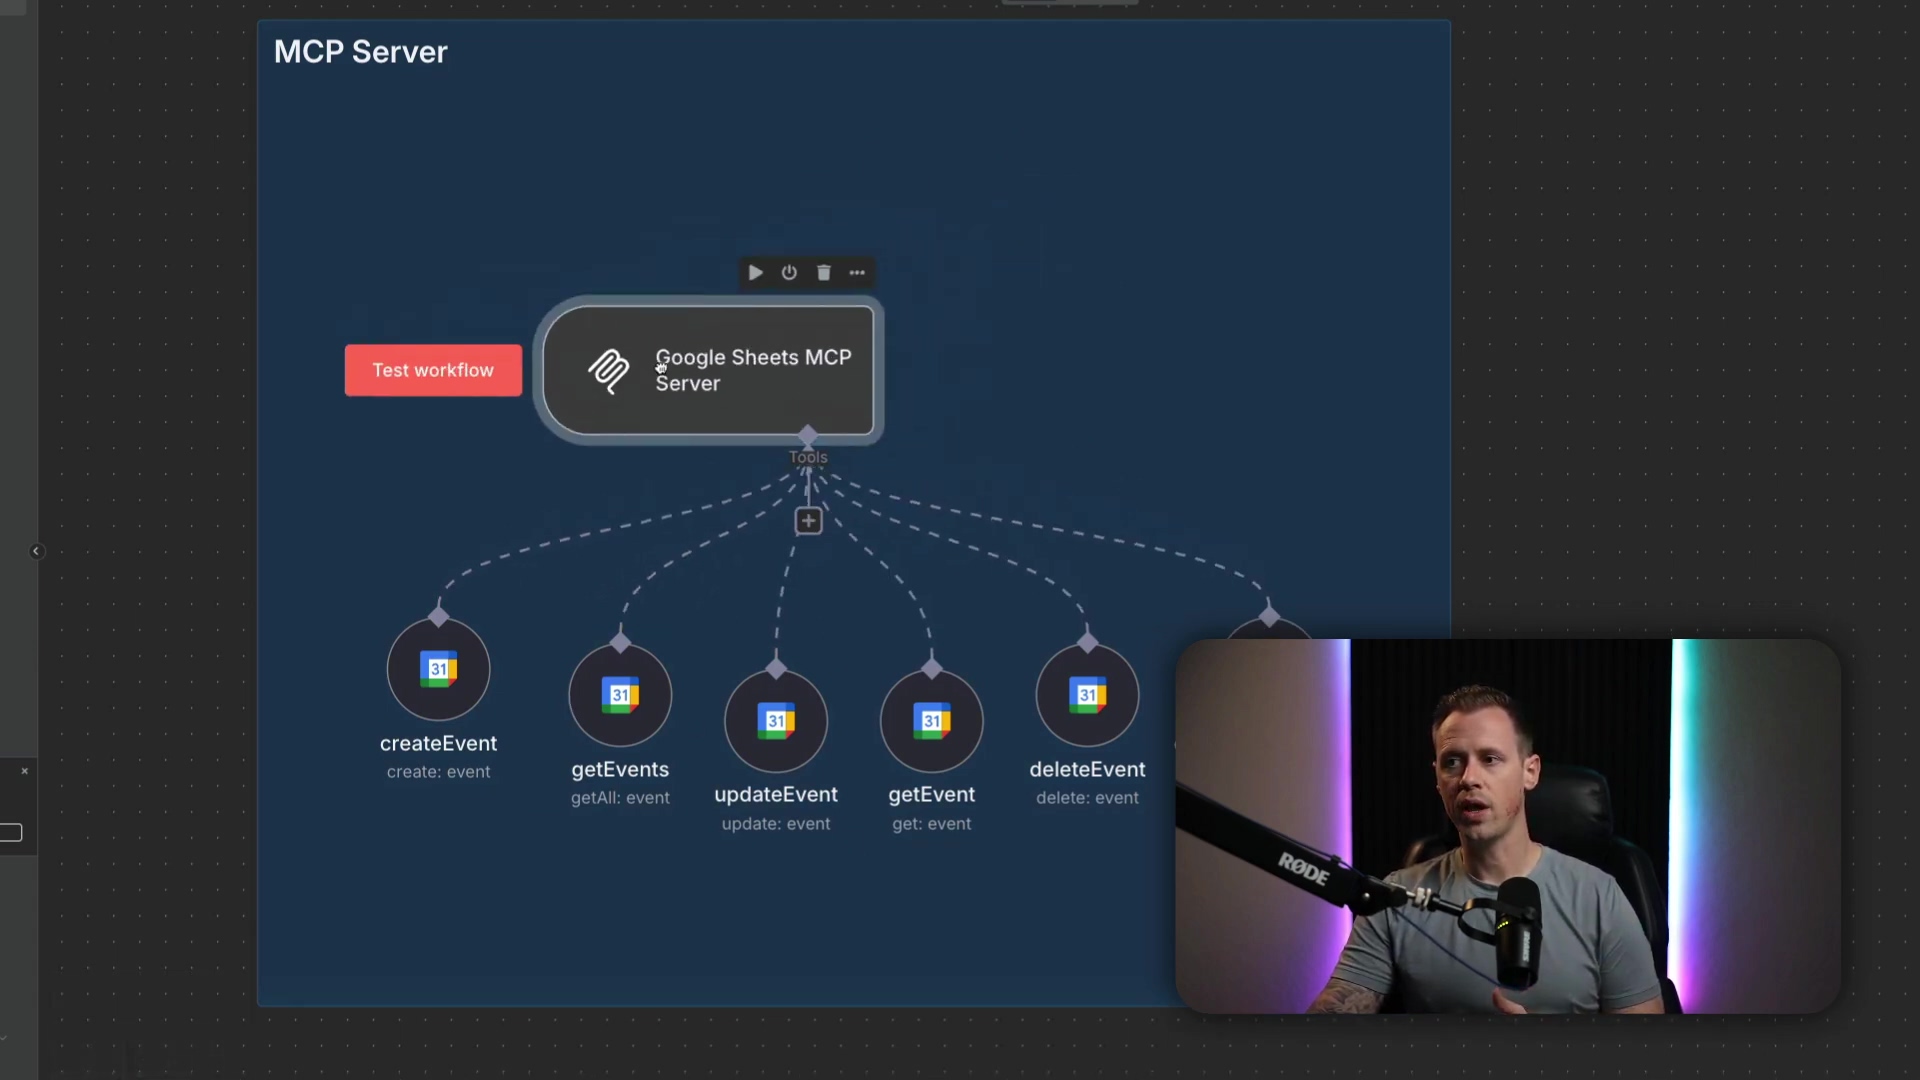
So, what’s special about an MCP server workflow? Well, it’s pretty neat. It starts with a single ‘MCP Server Trigger’ and then, here’s the magic, it contains all the related tools right there within it. For example, if you’re building a Google Calendar MCP server, it would house all the Google Calendar functionalities you need: creating events, getting events, updating them, deleting them – everything! Crucially, the MCP server itself doesn’t mess around with system or user prompts. It acts purely as a tool provider, like a well-organized toolbox.
When your AI agent needs to do something, the MCP client calls the server to ask, “Hey, what tools do you have?” The server then responds with a list of its tools, and then the agent decides which one to execute based on your query. This process is a game-changer because it slashes those failure points down to just one: the AI agent’s ability to select the correct MCP tool. Much simpler, right?
This modularity and reduced complexity make MCP servers super advantageous, especially for those complex agentic workflows. The agent’s prompt can be far simpler, focusing on which MCP client to use rather than getting bogged down in specific tool details. It’s like telling your assistant, “Go to the ‘Calendar’ department,” instead of, “Go to the ‘Calendar’ department, find the ‘Create Event’ form, and fill out these 10 fields.”
Step-by-Step Guide to Building an MCP Server in n8n
Alright, let’s get our hands dirty and build one of these bad boys in n8n. Don’t worry, I’ll walk you through every single step. It’s easier than you think!
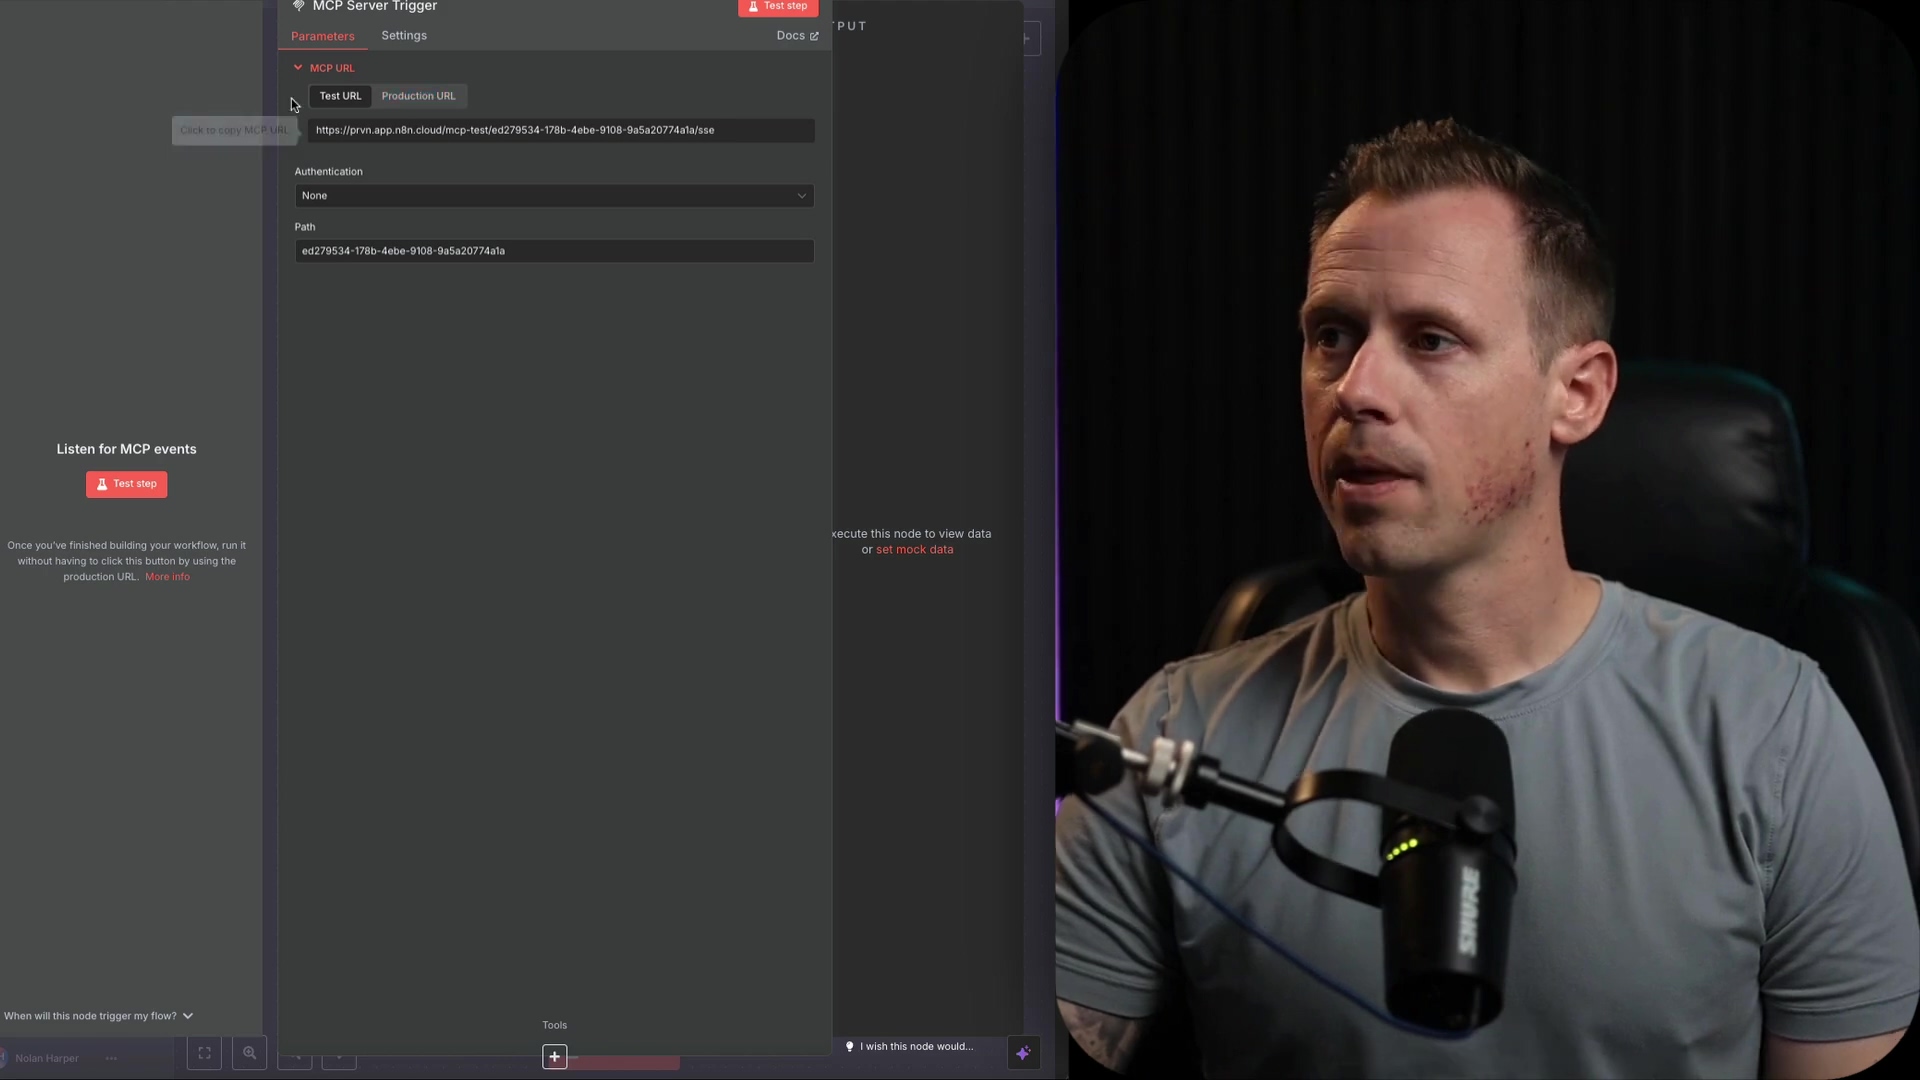
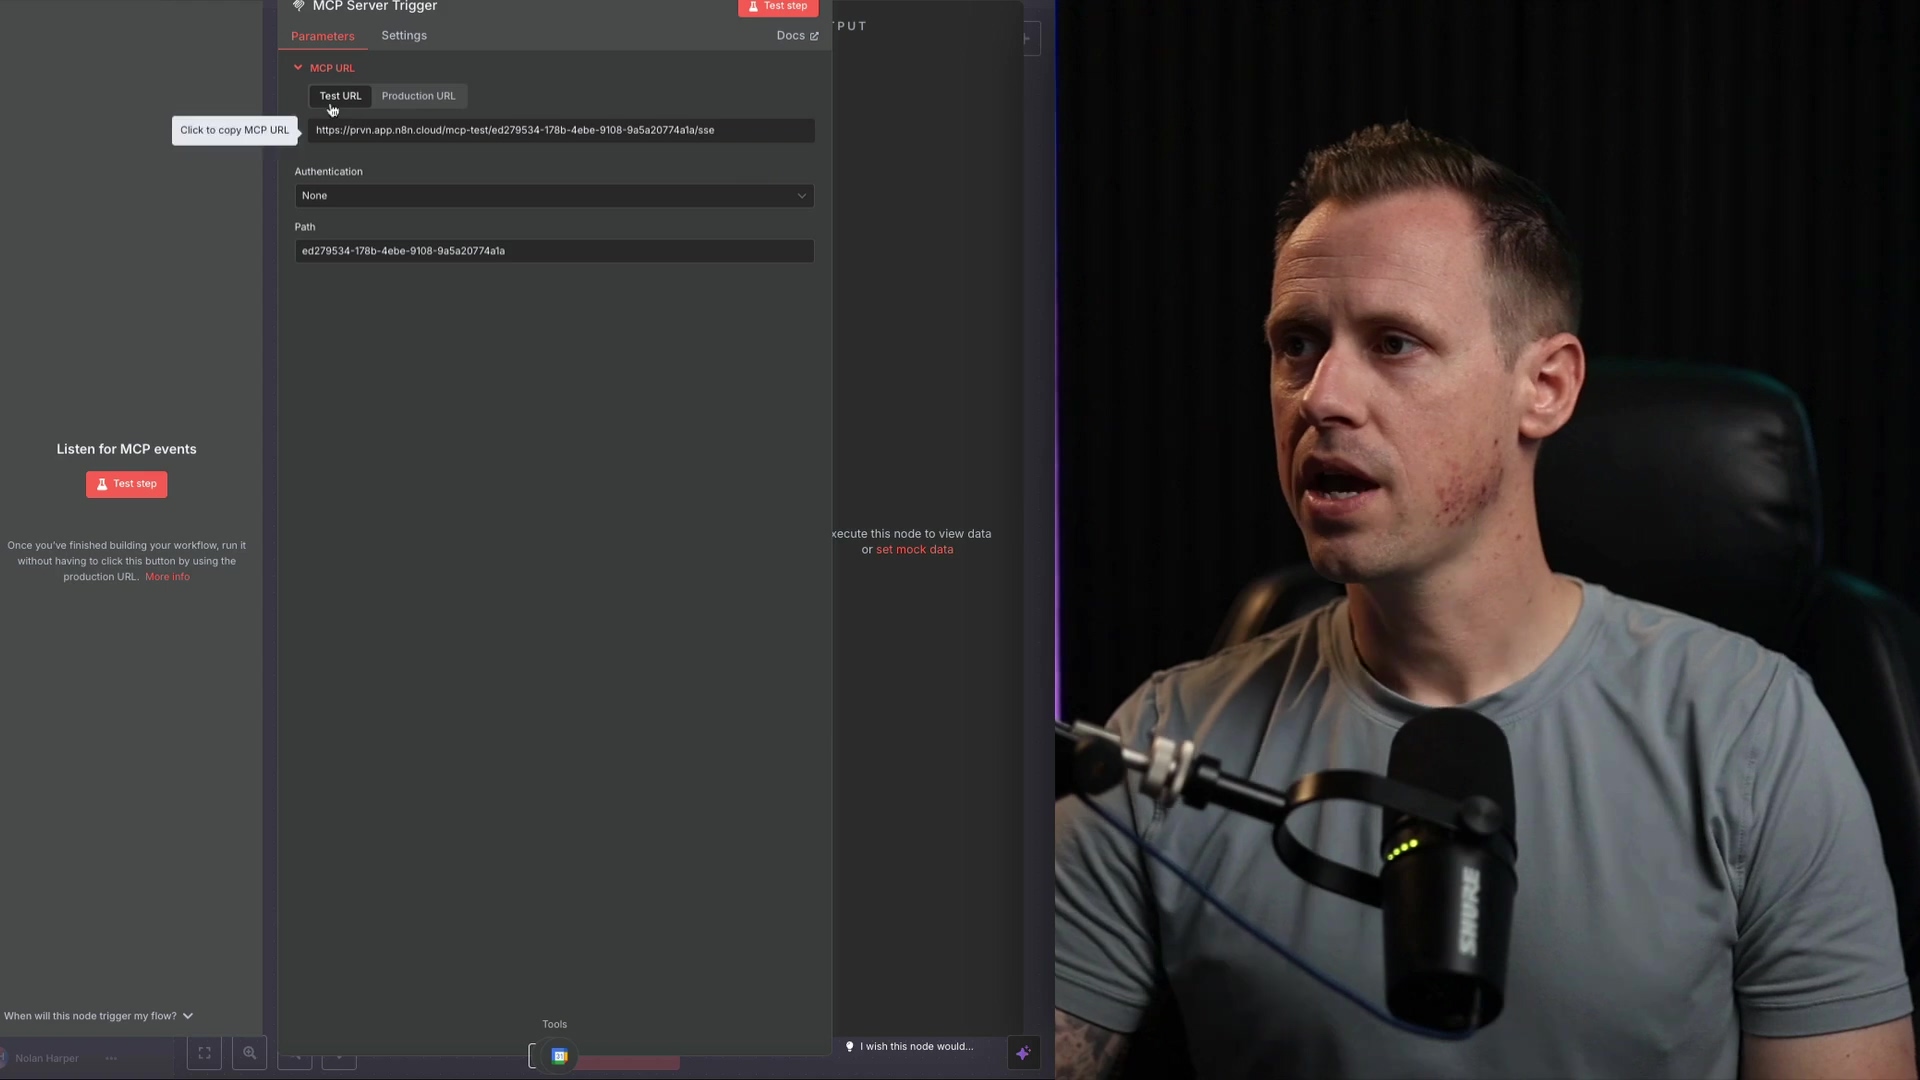
1. Initialize the MCP Server Trigger
First things first, open up your n8n canvas. You’ll want to add an ‘MCP Server Trigger’ node. Think of this as the front door to your MCP server – it’s where all the requests will come in. You can find it by searching for “MCP Server Trigger” in the node panel.
Once you drop it onto your canvas, you’ll notice ‘Test URL’ and ‘Production URL’ fields. These are super important! They’re the unique addresses for your server, and we’ll need them later to connect your MCP client. For now, just know they’re there.
2. Add and Configure Tools
Now for the fun part: adding the actual tools your MCP server will manage. This is where you define what your server does. Sticking with our Google Calendar example, you’d add nodes for ‘Create Event’, ‘Delete Event’, ‘Get Events’, and so on. Each of these nodes represents a specific action your AI agent can take.
Pro-tip: Make sure each tool node is configured correctly. For instance, if it’s a ‘Create Event’ node, you’ll need to tell it which calendar to use and define fields like ‘description’ and ‘summary’. These are the pieces of information your AI agent will be able to fill in when it uses this tool.
And here’s a best practice I learned the hard way: name your tools clearly! Something like ‘create event’ or ‘delete event’ is perfect. This makes it much easier for both you (when you’re managing them) and, more importantly, for the AI agent to understand exactly what each tool does and pick the right one.
3. Activate and Save the MCP Server
Once you’ve got all your tools in place and configured just right, it’s time to bring your MCP server to life! Simply activate your MCP server workflow (there’s usually a toggle switch at the top right of your n8n workflow editor) and then save it. This makes your server live and ready to receive requests from any MCP clients that come knocking.
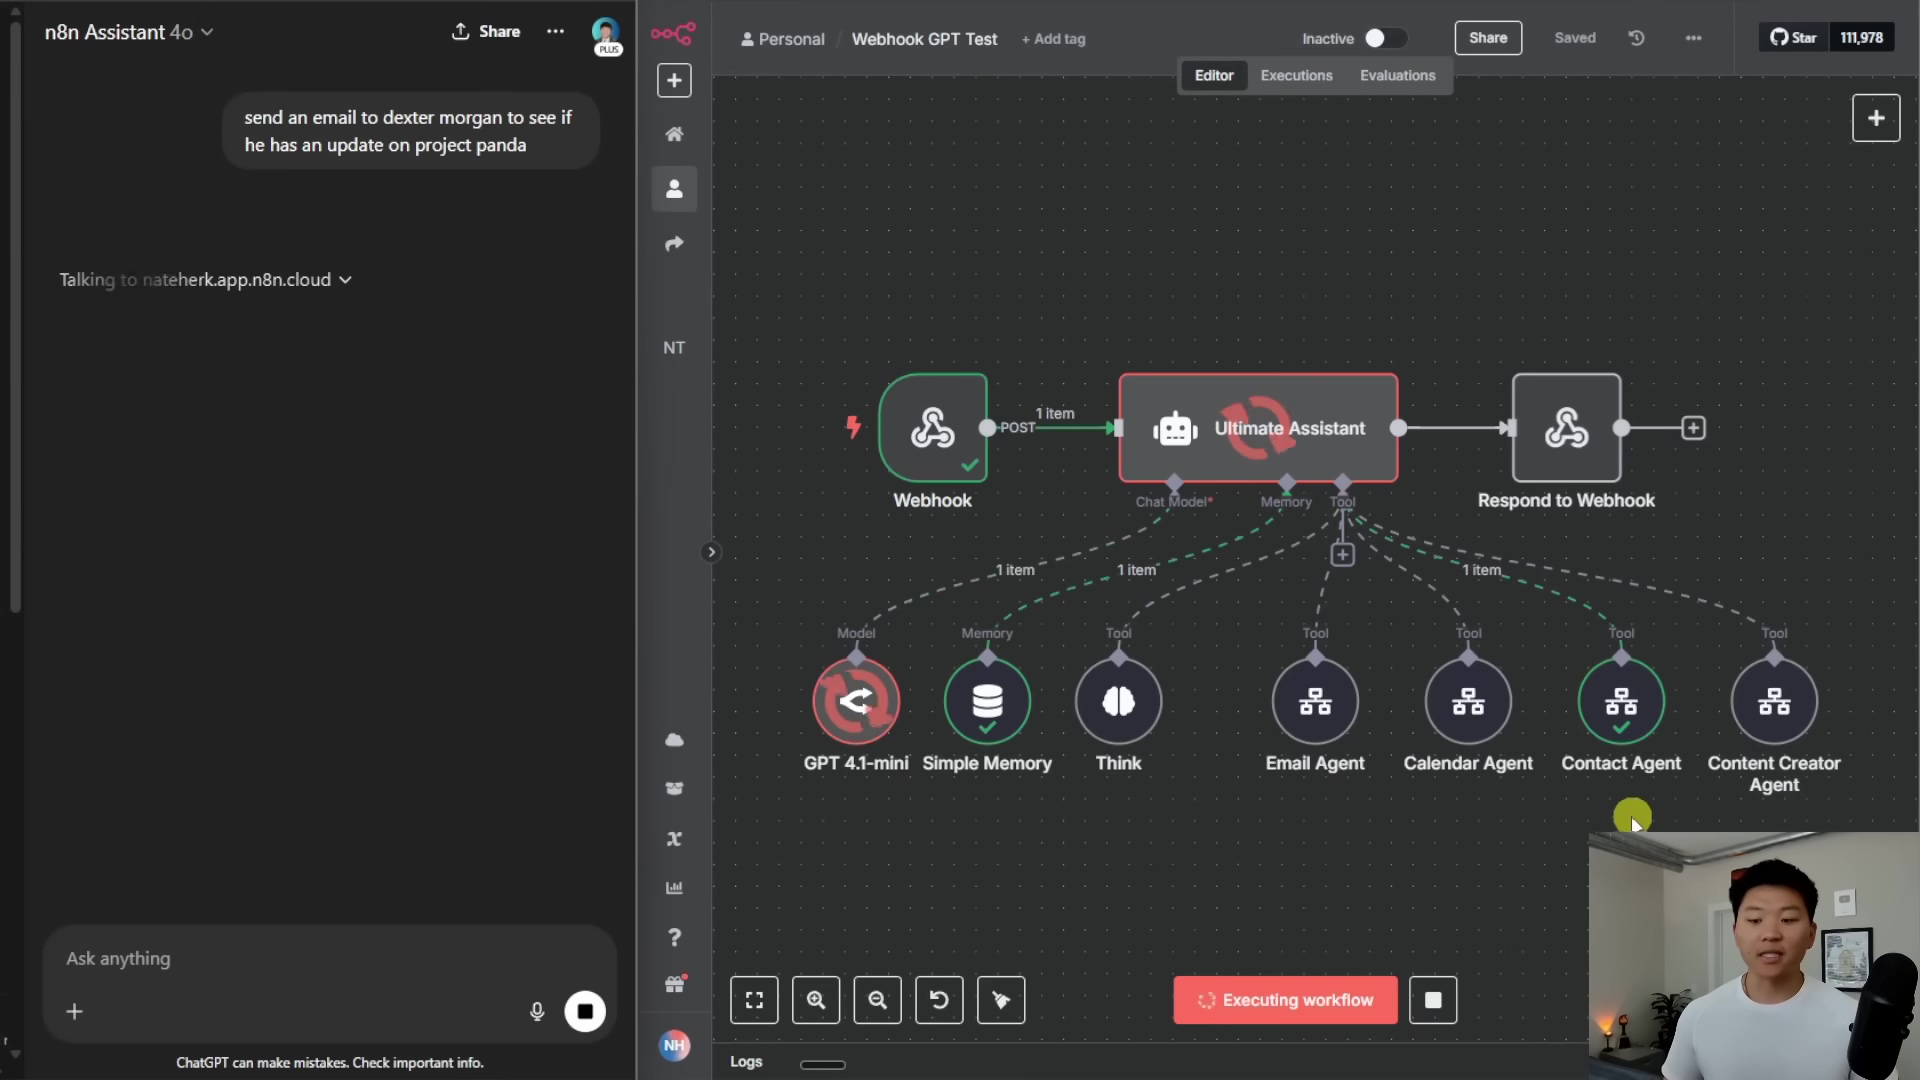
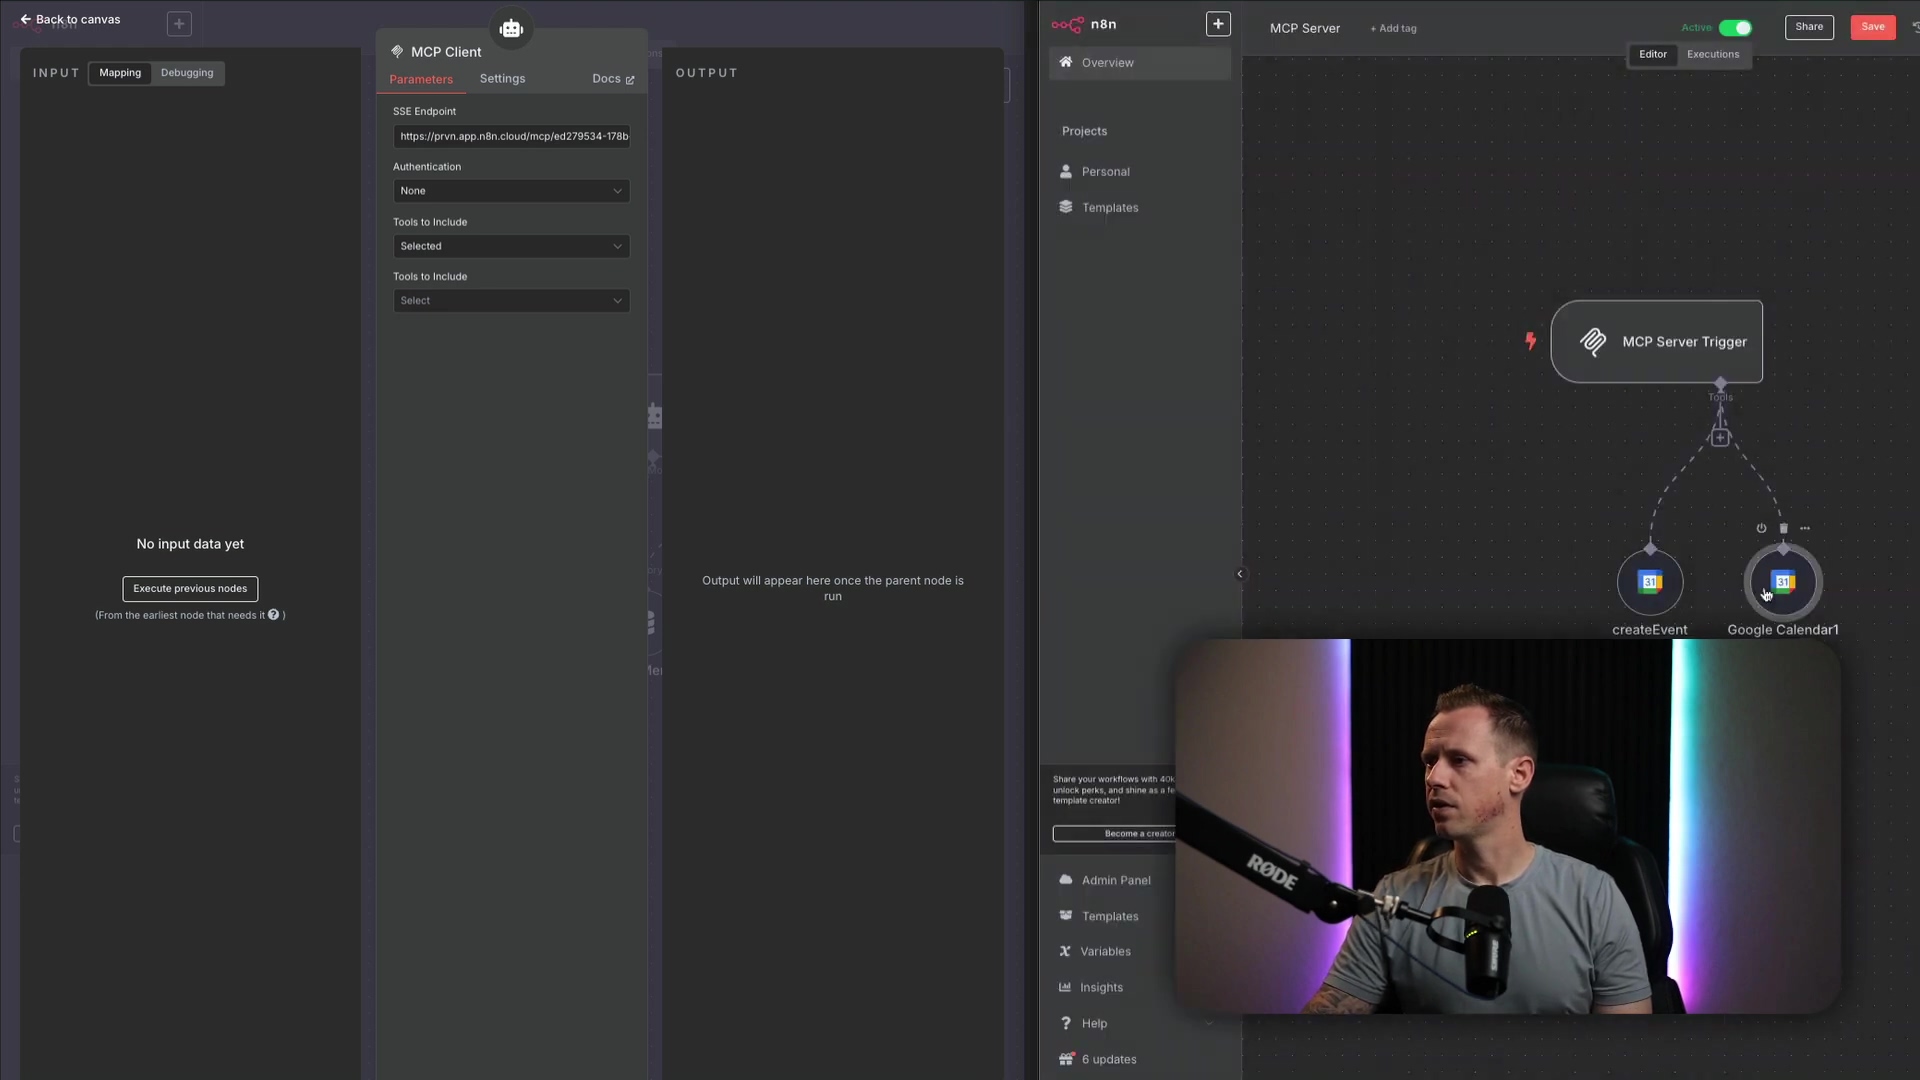
4. Configure the Parent Workflow with MCP Client
Okay, now let’s switch gears to your parent workflow – this is where your AI agent lives. You’ll start this workflow as usual: with a chat message input (how users talk to your agent), your agent node, and your model and memory nodes. These are the core components of any AI agent setup.
Next, you’ll add an ‘MCP Client’ tool node. This is the bridge that connects your parent workflow to your shiny new MCP server. To configure this client, you’ll need that ‘Production URL’ we talked about earlier from your MCP server trigger. Go back to your MCP server workflow, copy that ‘Production URL’, and then paste it into the ‘SSE Endpoint’ field of your MCP client node in the parent workflow.
A quick note on security: If you’re planning to use this in a real-world, production environment (and you should!), I highly recommend setting up authentication and a specific path for security. This is like putting a lock on your front door – you don’t want just anyone walking in, right? n8n’s MCP implementation is super handy here because it lets you select which specific tools the agent has access to. This is a huge advantage over some other platforms where all tools are just ‘baked in’ and available to the agent, whether you want them to be or not. Granular control, baby!
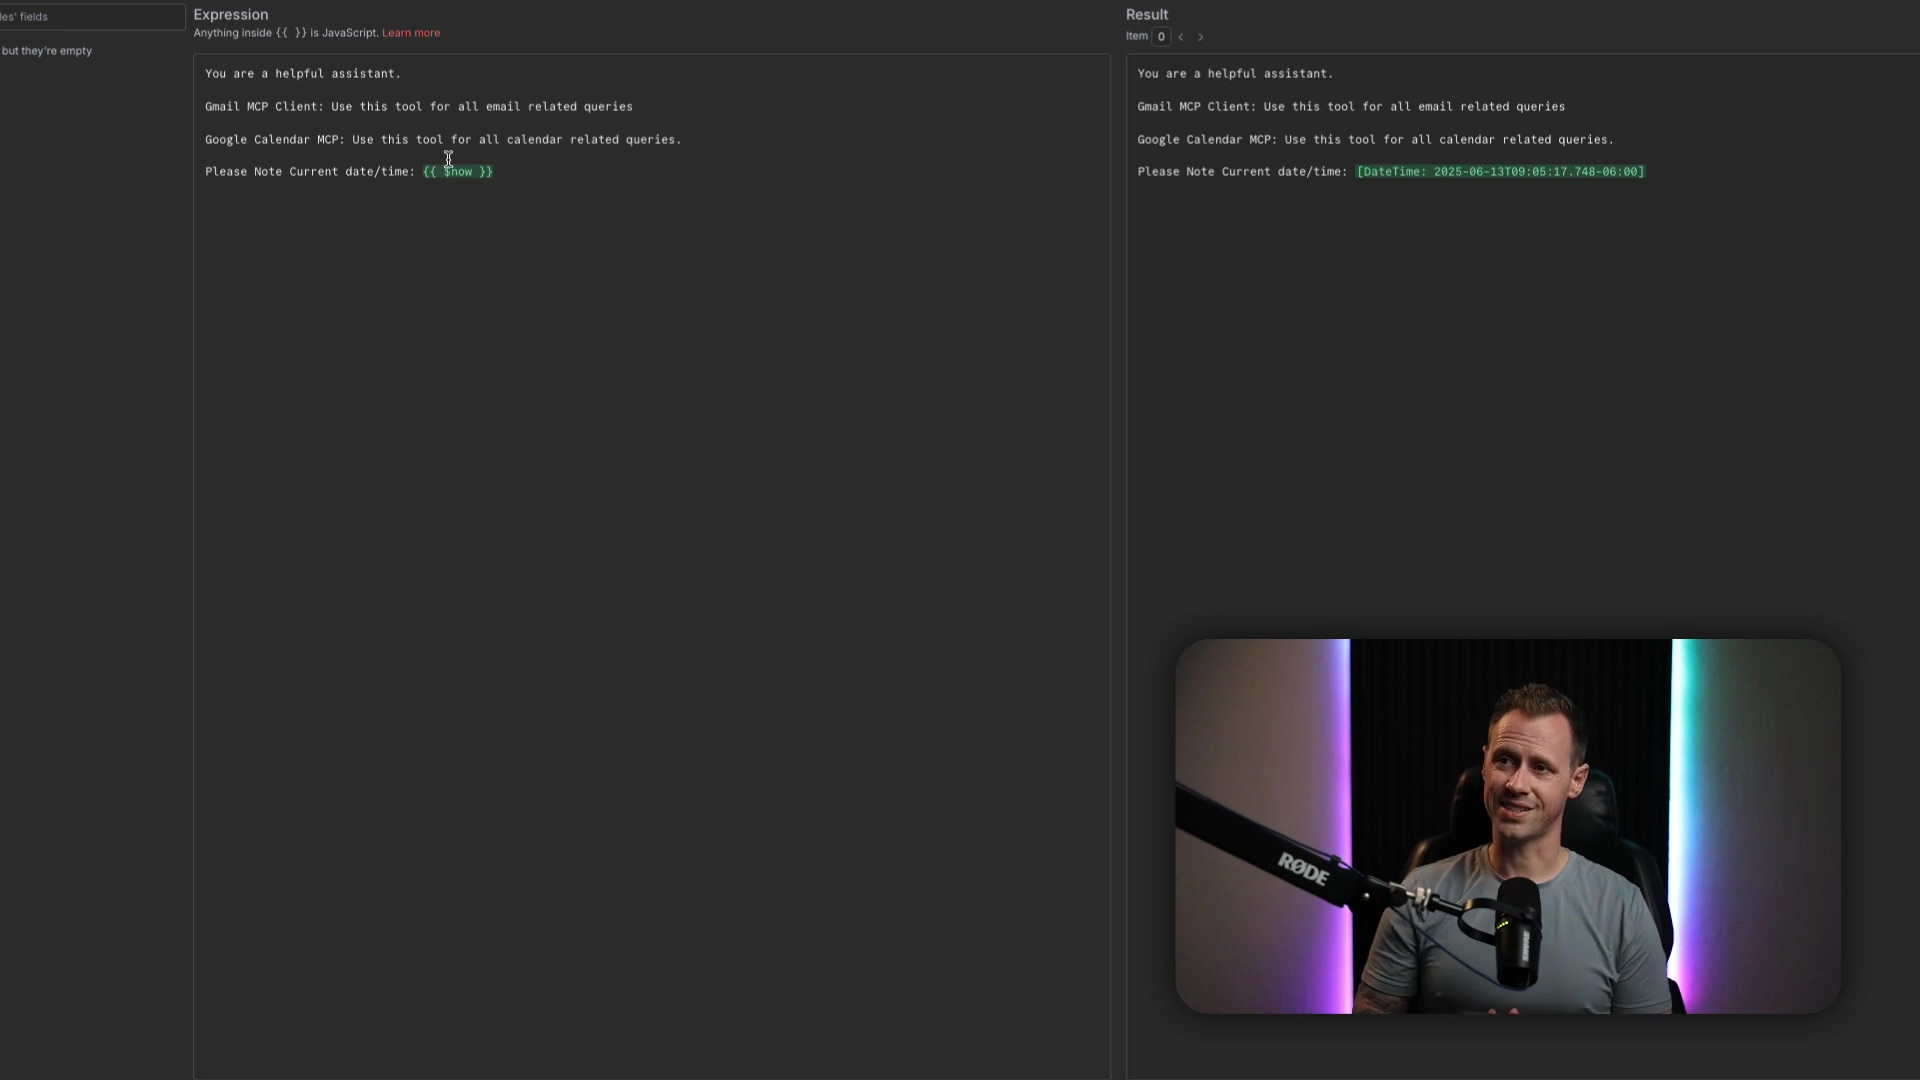
5. Define the System Message for the AI Agent
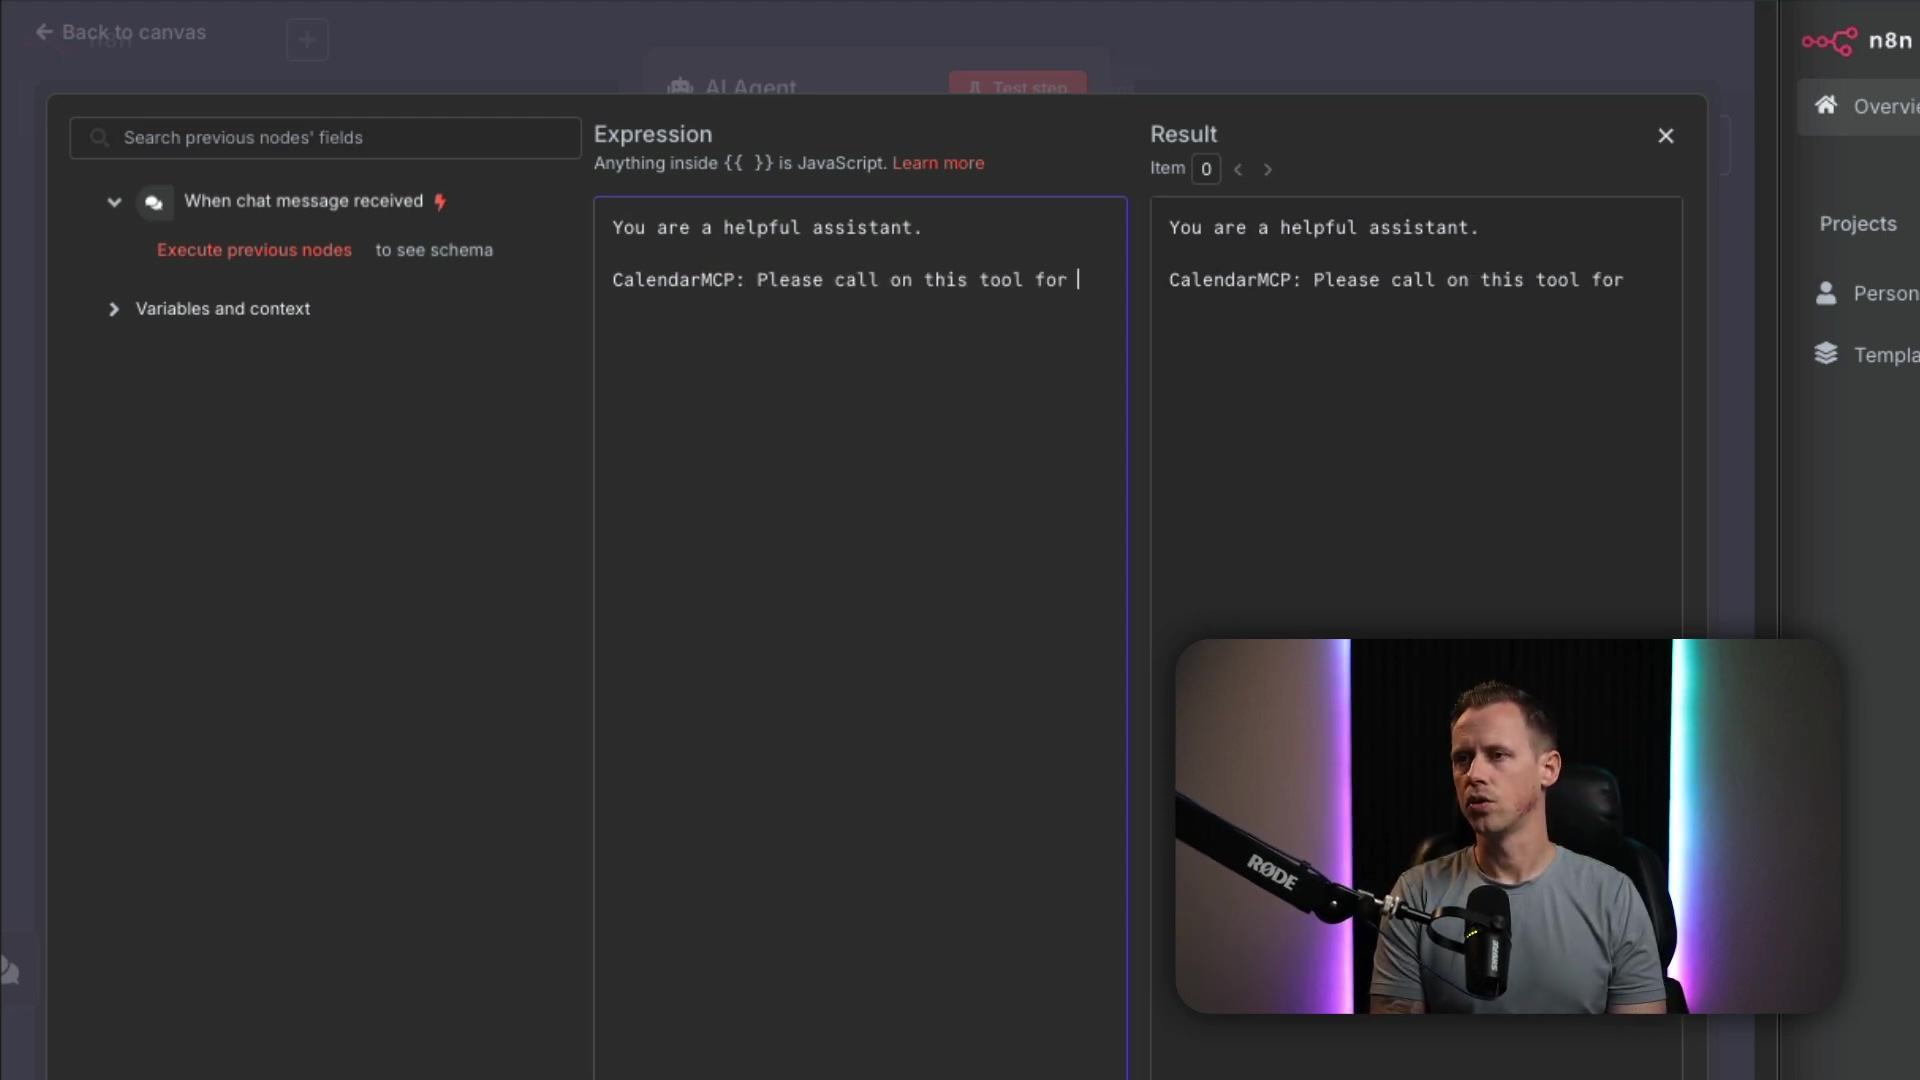
Last but not least, you need to tell your AI agent how to use this new MCP client. This is done through the system message – it’s like giving your agent a set of instructions before it starts its day. A simple, effective prompt might look something like this:
You are a helpful assistant. CalendarMCP: Please call on this tool for queries related to scheduling or the calendar. Please note today's date and time: {{ $now }}.See how we’re telling it to use “CalendarMCP” for specific types of queries? This guides the agent to the right MCP client, which then talks to the right MCP server. It’s all about clear communication!
Required Resources and Cost-Benefit Analysis
Building these powerful AI agent workflows does require a few things. Let’s break down what you’ll need and what the potential costs are. Think of it like planning a road trip – you need to know about the car, gas, and how long it’ll take!
Resource Checklist
| Item | Description | Estimated Cost (Monthly) | Notes |
|---|---|---|---|
| n8n Instance | Self-hosted or cloud-based n8n platform | Free (self-hosted) / $20+ (cloud) | Essential for workflow creation and execution |
| AI Model Access | API access to models like OpenAI, Anthropic, etc. | Varies by usage | Required for agent’s intelligence |
| Application APIs | Access to services like Google Calendar, Gmail, etc. | Varies by service | For integrating specific functionalities |
| Development Time | Time spent designing and implementing workflows | Significant initial investment | Reduced with MCP’s modularity |
| Maintenance | Ongoing monitoring, updates, and troubleshooting | Moderate | Simplified by MCP’s single failure point |
DIY vs. Commercial AI Automation Platforms
Now, you might be wondering, “Why go through all this when there are commercial platforms out there?” That’s a fair question! Let’s compare building it yourself with n8n’s MCP versus some other options. It’s like choosing between building your own custom PC or buying a pre-built one.
| Feature/Aspect | DIY (n8n MCP) | Commercial AI Automation Platform (e.g., Zapier, Make.com) | Commercial AI Automation Platform (e.g., Anthropic MCP) |
|---|---|---|---|
| Cost | Low (self-hosted) to Moderate (cloud) | Moderate to High (subscription-based) | High (API usage + platform fees) |
| Flexibility | Very High (full control over workflow and tools) | Moderate (pre-built integrations, limited customization) | High (powerful AI, but tools often baked-in) |
| Control | Granular control over tool access and agent behavior | Less control over underlying agent logic | Limited control over tool selection within the agent |
| Learning Curve | Moderate to High (requires understanding n8n & AI concepts) | Low to Moderate (user-friendly interfaces) | Moderate (requires understanding AI prompting) |
| Development Speed | Moderate (initial setup can be time-consuming) | Fast (drag-and-drop, quick integrations) | Fast (if pre-built tools are sufficient) |
| Scalability | High (can be scaled with infrastructure) | High (platform handles scaling) | High (platform handles scaling) |
| Failure Points | Reduced to one with MCP (agent tool selection) | Varies (depends on platform’s internal logic) | One (agent tool selection, but less control) |
💡 Key Best Practice Tips
Alright, before you go off and build your AI empire, here are a few golden rules I’ve picked up along the way. These will save you a lot of headaches, trust me!
- Clear Naming Conventions: I can’t stress this enough! Always, always, always name your tools and workflows descriptively. It’s not just for your sanity; it’s crucial for the AI agent to correctly identify and use them. Think of it like labeling your spice jars – makes cooking so much easier!
- Modular Design: Embrace the modularity that MCP servers offer. Design each server to handle a specific set of related tools. For example, all your calendar operations go into one MCP server, all email operations into another. This keeps them focused, manageable, and easy to troubleshoot.
- Production URL Security: When you’re ready to take your workflows live (into ‘production’), always set up authentication and a specific path for your MCP server. This is your digital security guard, protecting your workflows from unauthorized access. Don’t skip this step!
- Iterative Prompt Refinement: Even though MCP simplifies prompts, don’t just set it and forget it. Continuously refine your AI agent’s system message. Test it with different queries to make sure it accurately and efficiently calls upon the correct MCP client. It’s like fine-tuning a musical instrument – a little tweak can make a big difference.
Key Takeaways
So, what’s the big picture here? Let’s recap the most important points:
- MCP servers in n8n are like magic wands for your AI agent workflows. They significantly reduce complexity and potential failure points by centralizing how your agent manages its tools.
- Unlike those traditional sub-workflows, MCP servers boil down potential issues to a single point of failure: the agent’s ability to pick the right tool. This makes your workflows way more robust and reliable.
- n8n’s MCP implementation gives you awesome granular control over which tools an agent can access. This means better security and more precise actions – no more rogue AI agents!
- Building an MCP server is a straightforward process: set up a server trigger, configure your tools, activate the server, and then link it up using an MCP client in your main parent workflow.
Conclusion
By leveraging MCP servers in n8n, you’re not just building workflows; you’re revolutionizing them! You’re making them more modular, more reliable, and incredibly efficient. This approach doesn’t just streamline your development process; it drastically cuts down on errors, leading to automation that’s predictable and robust. It’s like upgrading from a bicycle to a rocket ship for your automation needs!
This method offers a powerful alternative to traditional workflow designs, giving you enhanced control and clarity, especially for those complex, AI-driven tasks. For anyone looking to build scalable and maintainable AI solutions, mastering MCP servers in n8n is, in my humble opinion, an invaluable skill. It’s a game-changer, plain and simple.
Now, armed with this knowledge, what are you waiting for? Take the leap and implement MCP servers in your n8n projects. Unlock that new level of automation efficiency. You’ve got this!
Frequently Asked Questions (FAQ)
Q: What exactly is an “AI agent” in the context of n8n?
A: Think of an AI agent in n8n as a smart, automated entity that can understand natural language queries, make decisions, and then execute tasks by calling various tools or workflows. It’s powered by an AI model (like OpenAI’s GPT) and uses memory to maintain context across interactions. Essentially, it’s your digital assistant that can perform complex actions based on your instructions.
Q: Why is reducing “failure points” so important in automation?
A: Reducing failure points is crucial because every potential point of failure is a place where your automation can break, leading to incorrect results, wasted time, or even costly errors. Imagine an assembly line: if there are too many places where a part can fall off, the whole line stops. By centralizing tool management with MCP, we minimize these weak spots, making your workflows much more reliable and easier to troubleshoot when something does go wrong.
Q: Can I use MCP servers with any AI model, or is it specific to certain ones?
A: MCP servers in n8n are designed to be flexible! While the examples often use popular models like those from OpenAI or Anthropic, the MCP client node primarily interacts with the MCP server based on its URL and tool definitions. As long as your AI agent node in the parent workflow can communicate with your chosen AI model, the MCP setup should work seamlessly. It’s about how the agent uses the tools, not which specific AI model is doing the thinking.
Q: What’s the difference between the ‘Test URL’ and ‘Production URL’ for an MCP Server Trigger?
A: Great question! The ‘Test URL’ is typically for, well, testing! It’s often a temporary or local URL that you can use during development to quickly check if your MCP server is working as expected. The ‘Production URL’ is the stable, public-facing URL that you’ll use when your workflow is live and handling real-world requests. Always use the ‘Production URL’ for your MCP client in the parent workflow once you’re done testing, and remember to secure it!
Q: How does n8n’s MCP implementation compare to other platforms that offer AI agent tools?
A: n8n’s MCP implementation stands out because it gives you granular control over which specific tools your AI agent can access. Unlike some platforms where all tools might be ‘baked in’ and available by default, n8n allows you to define and expose only the necessary tools through your MCP server. This enhances security, reduces the chances of unintended actions, and gives you more precise control over your agent’s capabilities. It’s about giving your agent exactly what it needs, and nothing more.