Watch the Video Tutorial
💡 Pro Tip: After watching the video, continue reading below for detailed step-by-step instructions, code examples, and additional tips that will help you implement this successfully.
Table of Contents
Open Table of Contents
- Introduction: Bridging ChatGPT and n8n for Advanced Automation
- Setting Up Your Custom GPT for n8n Integration
- Building Your n8n Workflow
- Demonstrating the Integration
- Frequently Asked Questions (FAQ)
- Q: What exactly is an OpenAPI schema and why do I need it?
- Q: My n8n webhook isn’t receiving data from ChatGPT. What should I check first?
- Q: Can I send more complex data types than just strings, like numbers or lists, from ChatGPT to n8n?
- Q: What are the security implications of exposing an n8n webhook to ChatGPT?
- Q: Can I use this method to trigger n8n workflows from other AI models or platforms, not just ChatGPT?
Introduction: Bridging ChatGPT and n8n for Advanced Automation
Hey there, fellow automation enthusiast! Boyce here, and I’m super excited to dive into something that feels straight out of a sci-fi movie: getting ChatGPT to talk to n8n. Think of it like giving your super-smart AI assistant (ChatGPT) a direct line to your personal robot army (n8n workflows). Pretty cool, right?
In today’s crazy-fast digital world, if you’re not automating, you’re probably leaving a lot of time and energy on the table. This guide is all about showing you, step-by-step, how to connect ChatGPT with n8n to trigger custom AI agents and workflows. Why? Because this combo lets you use ChatGPT’s awesome natural language understanding – basically, its ability to understand what you’re saying – and n8n’s powerful automation capabilities. This opens up a universe of possibilities, from sending emails automatically to processing invoices without lifting a finger. The secret sauce? We’re going to create a custom GPT that can “talk” to an n8n webhook. This effectively turns your conversational AI into the ultimate command center for all your automated operations. Let’s get this party started!
Setting Up Your Custom GPT for n8n Integration
Alright, first things first. The absolute foundation of this whole integration magic show is getting your custom GPT ready to chat with n8n. This means we’ll be defining some “actions” within your GPT that are directly linked to n8n webhooks. Don’t worry if “webhook” sounds like something from a spy movie; I’ll break it down.
Utilizing ActionsGPT for Schema Generation
So, for ChatGPT and n8n to understand each other, they need a common language, a sort of Rosetta Stone. That’s where an OpenAPI schema comes in. This schema is basically a blueprint that tells ChatGPT exactly how it should format its requests when it wants to send data to your n8n webhook. It’s like giving ChatGPT a very specific instruction manual.
Now, generating this schema from scratch can be a bit like trying to build a LEGO set without instructions. That’s why we’re going to use a super handy tool called ActionsGPT. It’s a custom GPT specifically designed to spit out these schemas for you. How cool is that?

Here’s how you use it: Start by asking ActionsGPT to generate an OpenAPI 3.1.0 schema in JSON format. Make sure you tell it this schema is for your custom GPT to send data to a webhook. Then, you’ll need to provide the test URL of your n8n webhook to ActionsGPT. (Don’t have one yet? No worries, we’ll get to that in the next section, but just know you’ll need it soon!) Next, you’ll specify the parameters you want ChatGPT to send over to the webhook. Think about what kind of data you’re trying to automate. For example, if you’re processing invoices, you might want to send details like the date, invoice number, amount, and so on. And don’t forget to tell it the data types – for simplicity, we’ll often just use string for everything to start.
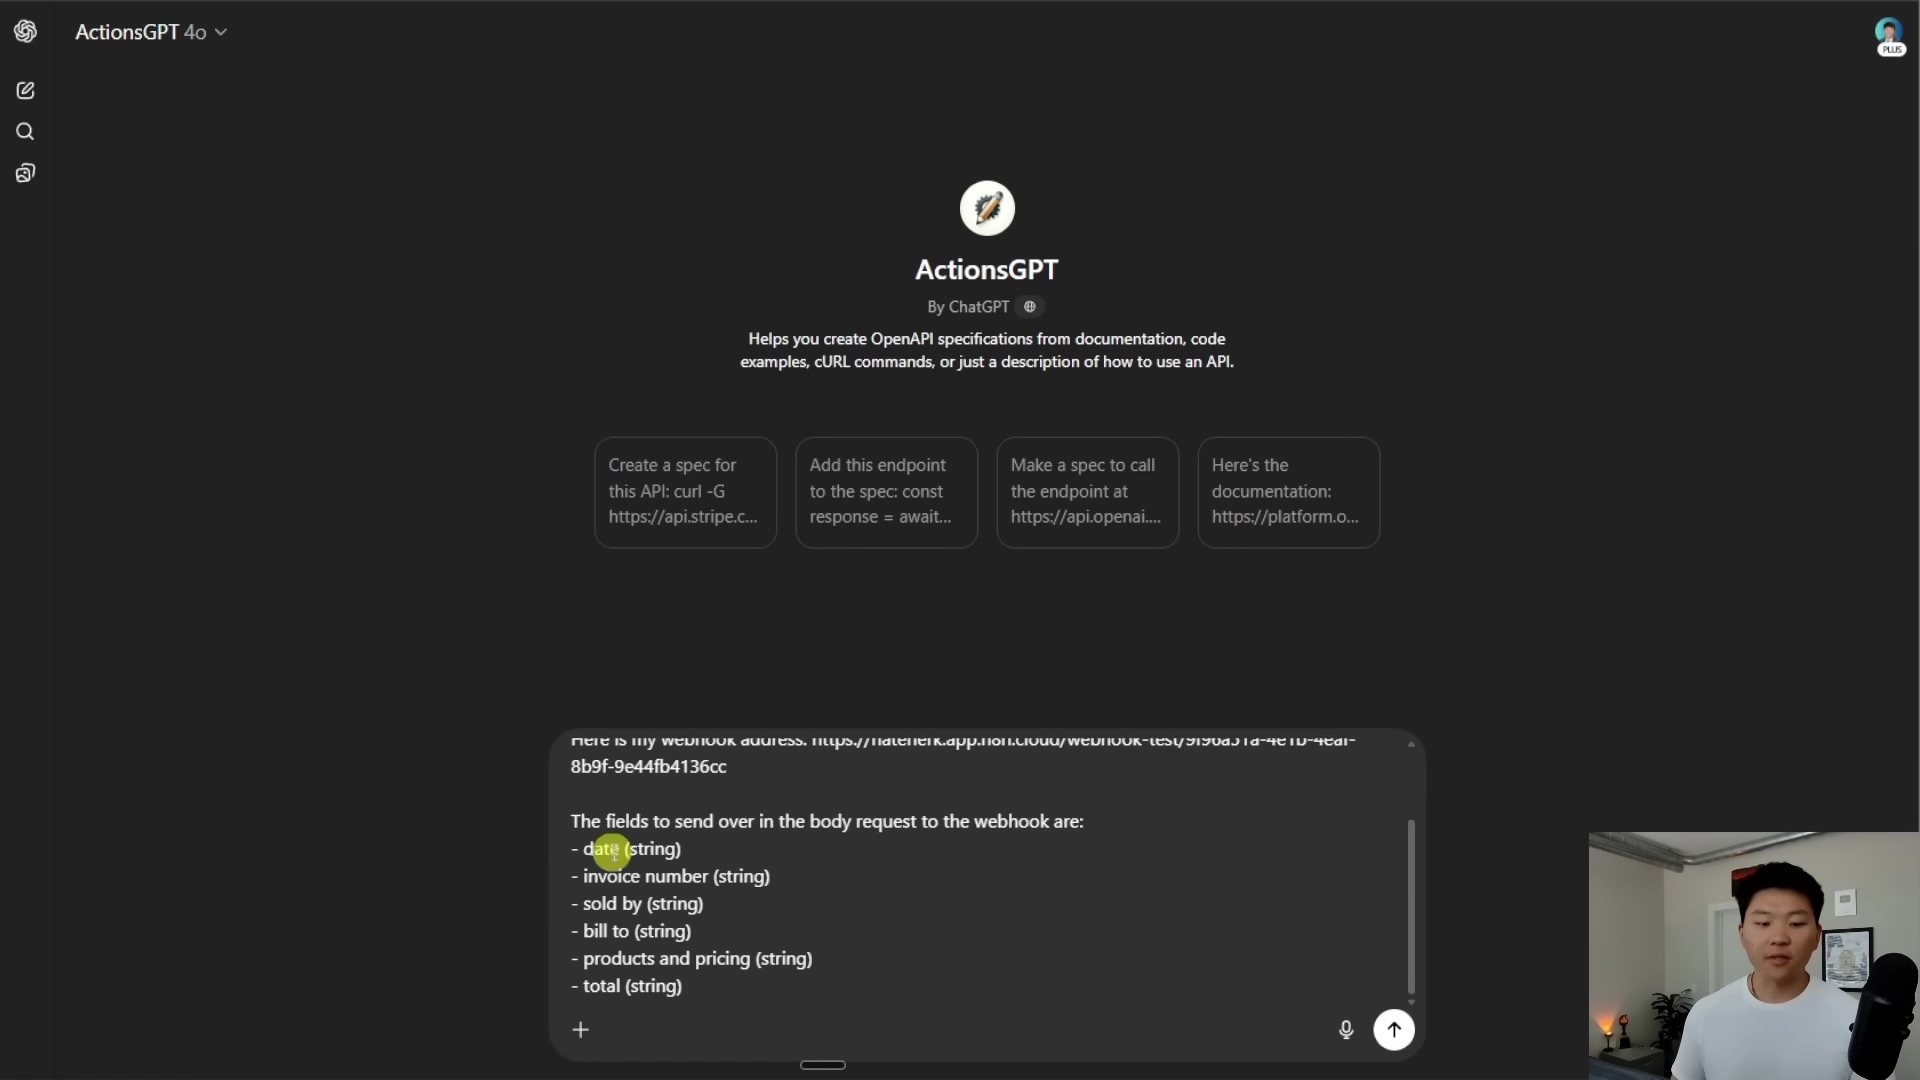
Once you’ve given ActionsGPT all that info, it’ll work its magic and generate the JSON schema for you. This schema will include your webhook URL and all the parameters n8n will be expecting. Copy that JSON; it’s gold!
Configuring Your Custom GPT with the Schema
Okay, you’ve got your shiny new JSON schema. Now, it’s time to plug it into your custom GPT. Head over to the custom GPTs section within ChatGPT. You can either create a brand-new GPT or edit one you’ve already got cooking.
This is where you’ll give your GPT a name, a snazzy description, and some clear instructions on what you want it to do. Think of these instructions as its personality and core mission.
Now, for the really important part: giving your GPT the ability to perform “actions.” Scroll down until you find the ‘Add actions’ section. This is where you’ll paste that JSON schema you got from ActionsGPT into the designated field. Once you paste it in, ChatGPT will automatically create a new “tool” within your custom GPT. This tool will have a name, like ‘send invoice data’, and it will know exactly how to talk to your n8n webhook, including the correct HTTP method (like POST – which means it’s sending data) and the webhook path.
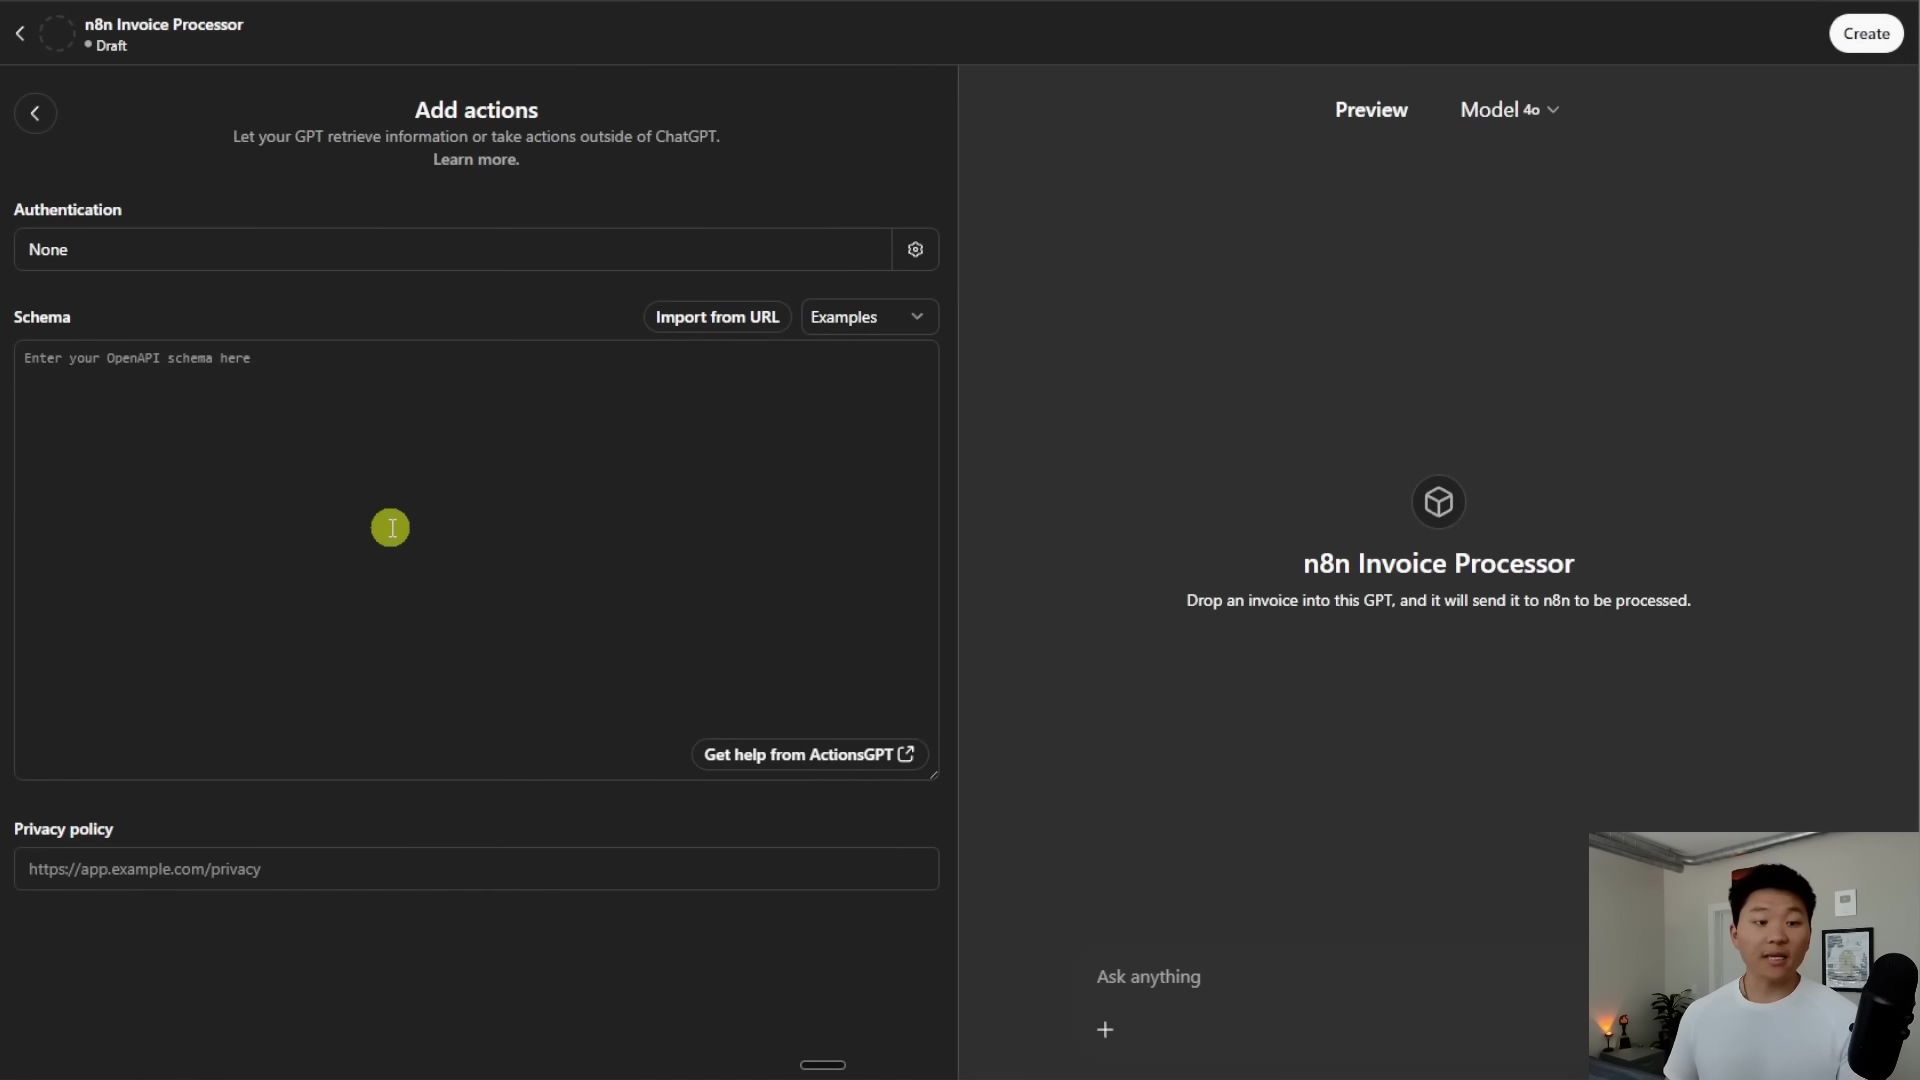
Boom! Your custom GPT is now officially equipped to send data to n8n. Feeling like a wizard yet? You should be!
Building Your n8n Workflow
Alright, we’ve got our custom GPT all jazzed up and ready to send data. Now, it’s n8n’s turn to get ready to receive it! This next step is all about building the workflow in n8n that will catch that data from ChatGPT and then do something awesome with it.
Setting Up the n8n Webhook
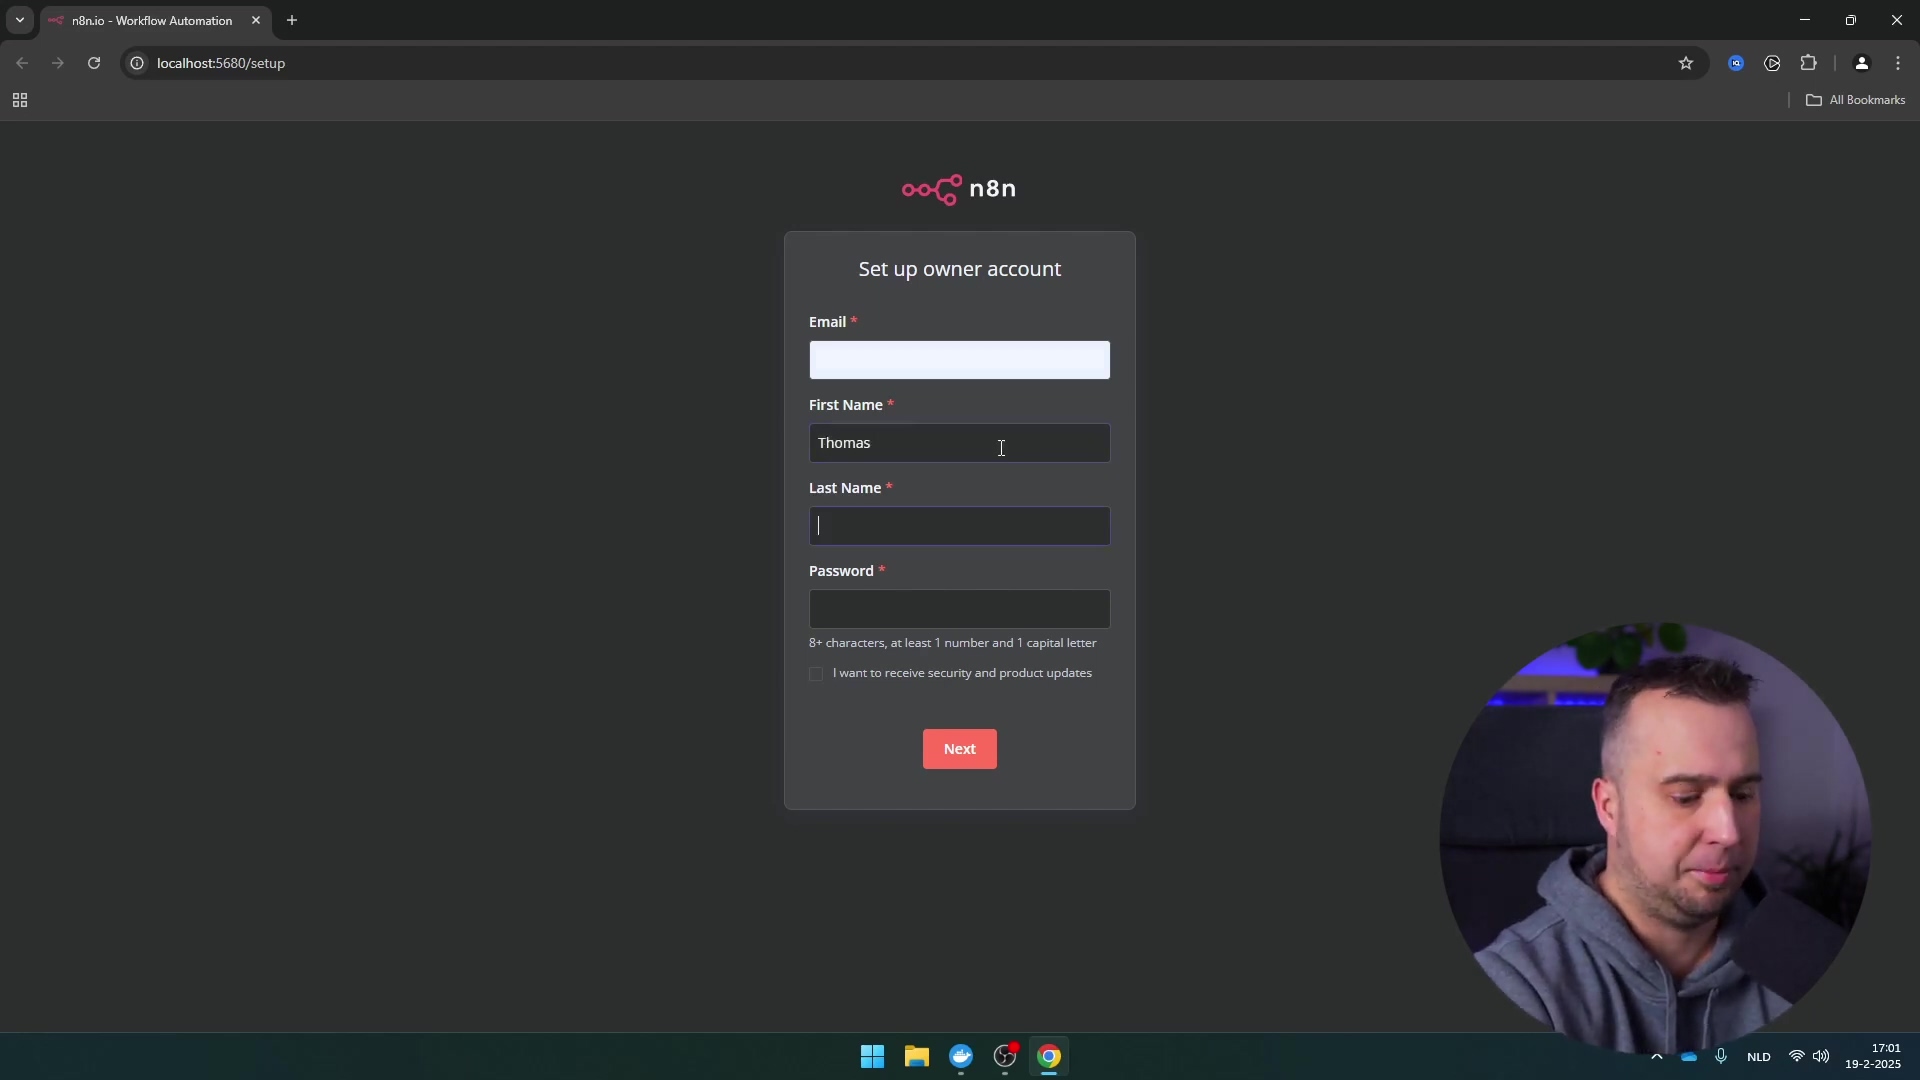
First things first in n8n: you need a ‘Webhook’ node. This is like setting up a special mailbox that’s just waiting for messages from your custom GPT. So, open up n8n and create a new workflow. Drag and drop a ‘Webhook’ node onto your canvas. This will be the very first node in your workflow.
Now, configure this ‘Webhook’ node. It’s super important to set its HTTP method to ‘POST’. Why POST? Because that’s how your custom GPT is configured to send data (remember that POST method we saw in the schema?). If they don’t match, it’s like trying to send a letter in an email – it just won’t work.
Once you’ve set the method, you’ll see an option to ‘Listen for test event’. Click that! This puts your webhook into a listening state, patiently waiting for that first bit of data from ChatGPT. It’s like putting your ear to the ground, waiting for a signal.
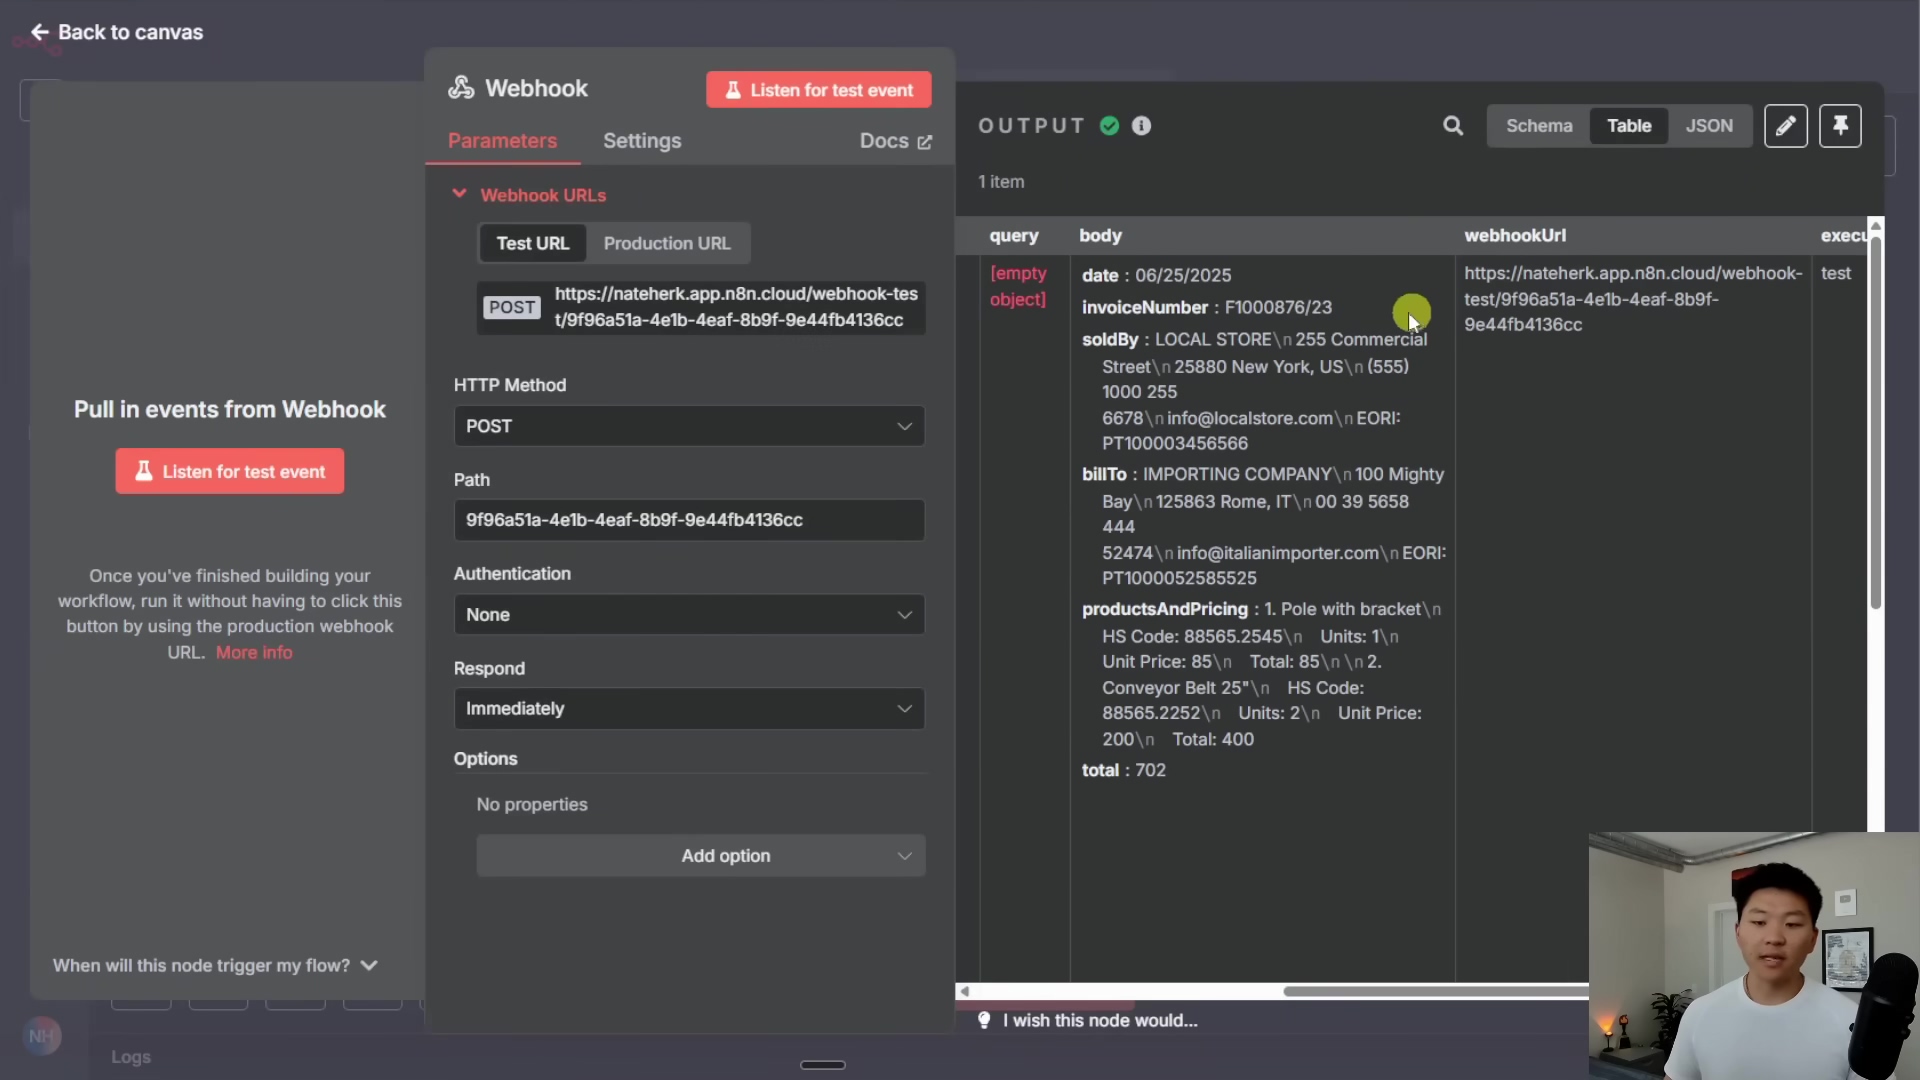
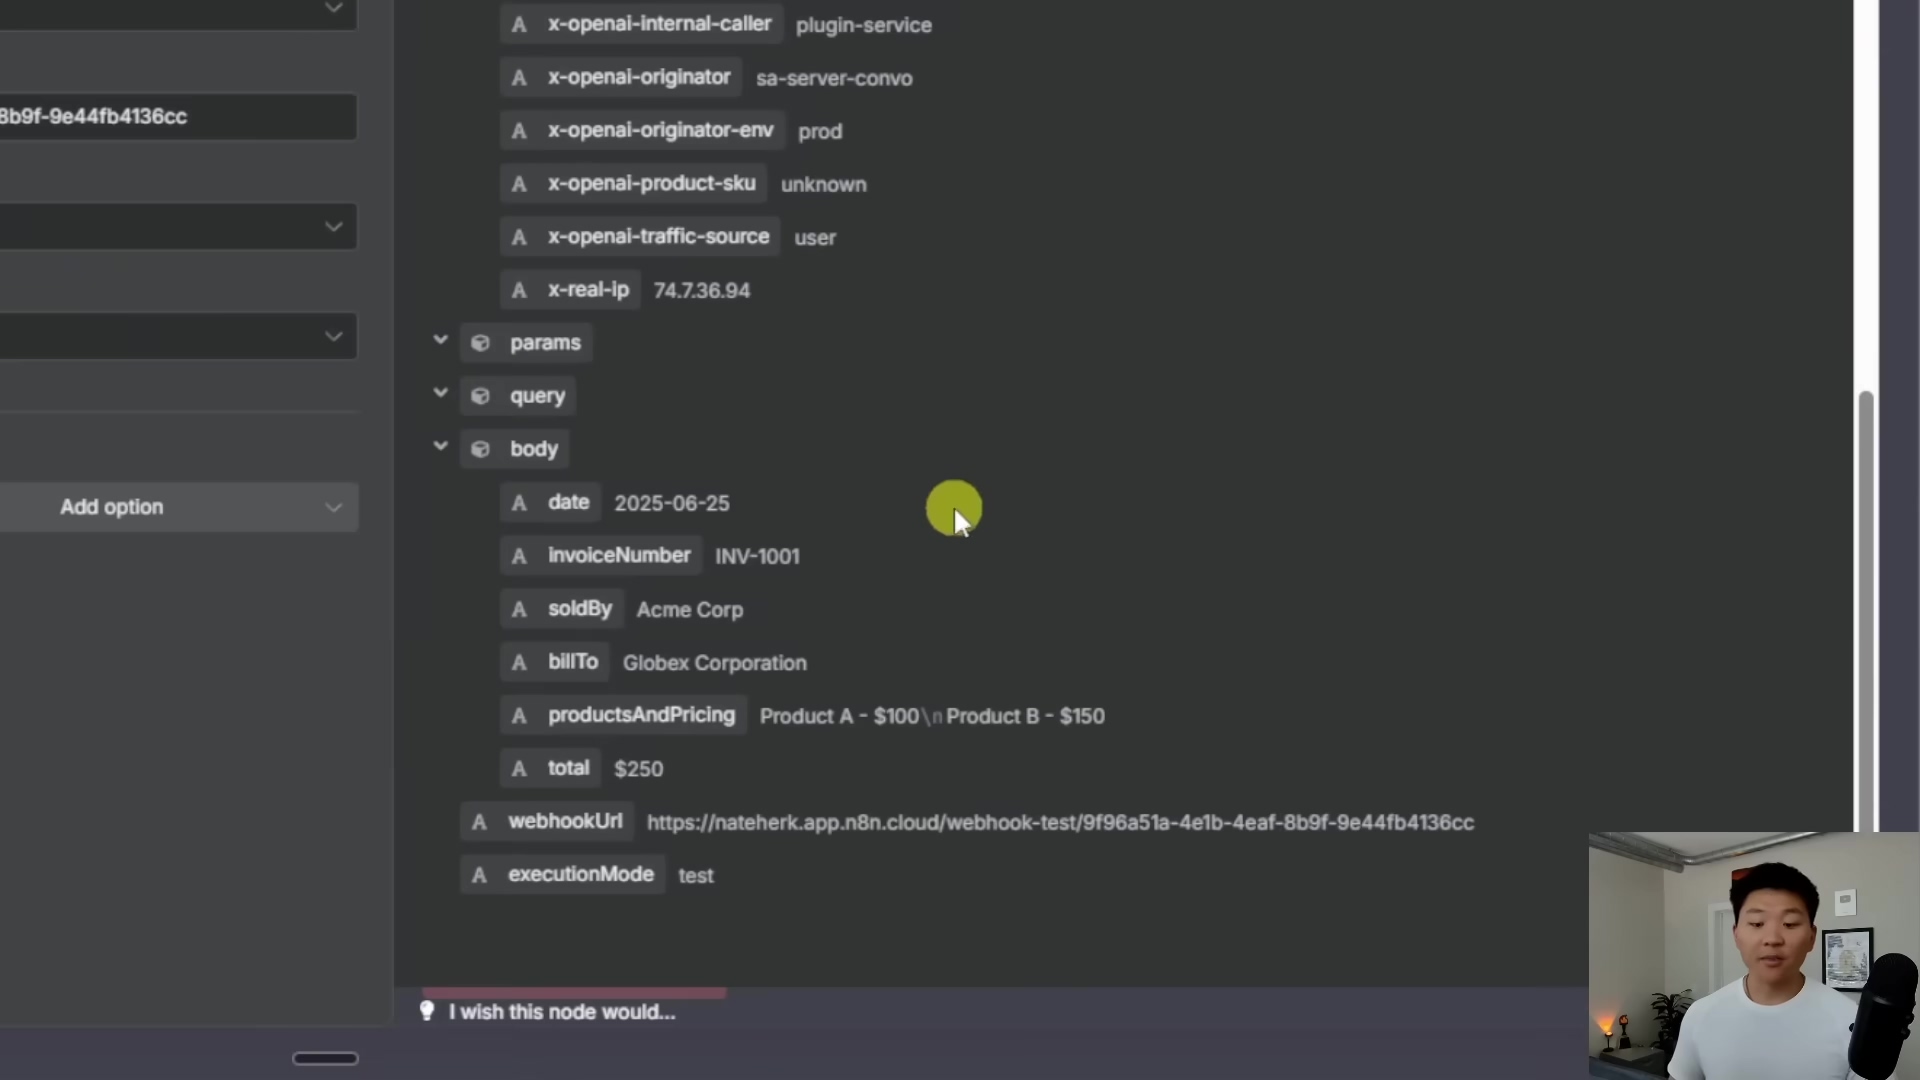
After you’ve set up the webhook and it’s listening, it’s time for the moment of truth: test the connection from your custom GPT. Go back to ChatGPT, open your custom GPT, and trigger the action you configured. For example, if you set it up to send invoice data, tell it to “send an invoice for $100 to John Doe.” When you do this, n8n should receive the data! You’ll see the body parameters (like date, invoice number, sold by, etc.) magically appear in the webhook’s output in n8n. This is your confirmation that the connection is solid. Nailed it!
Processing Data with n8n and Google Sheets
Okay, so n8n is successfully receiving data from ChatGPT. That’s a huge win! Now, what do we do with that data? This is where n8n’s true power shines. You can add subsequent nodes to process that data in countless ways. For our example, let’s say we want to record all that invoice data. A Google Sheets node is perfect for this.
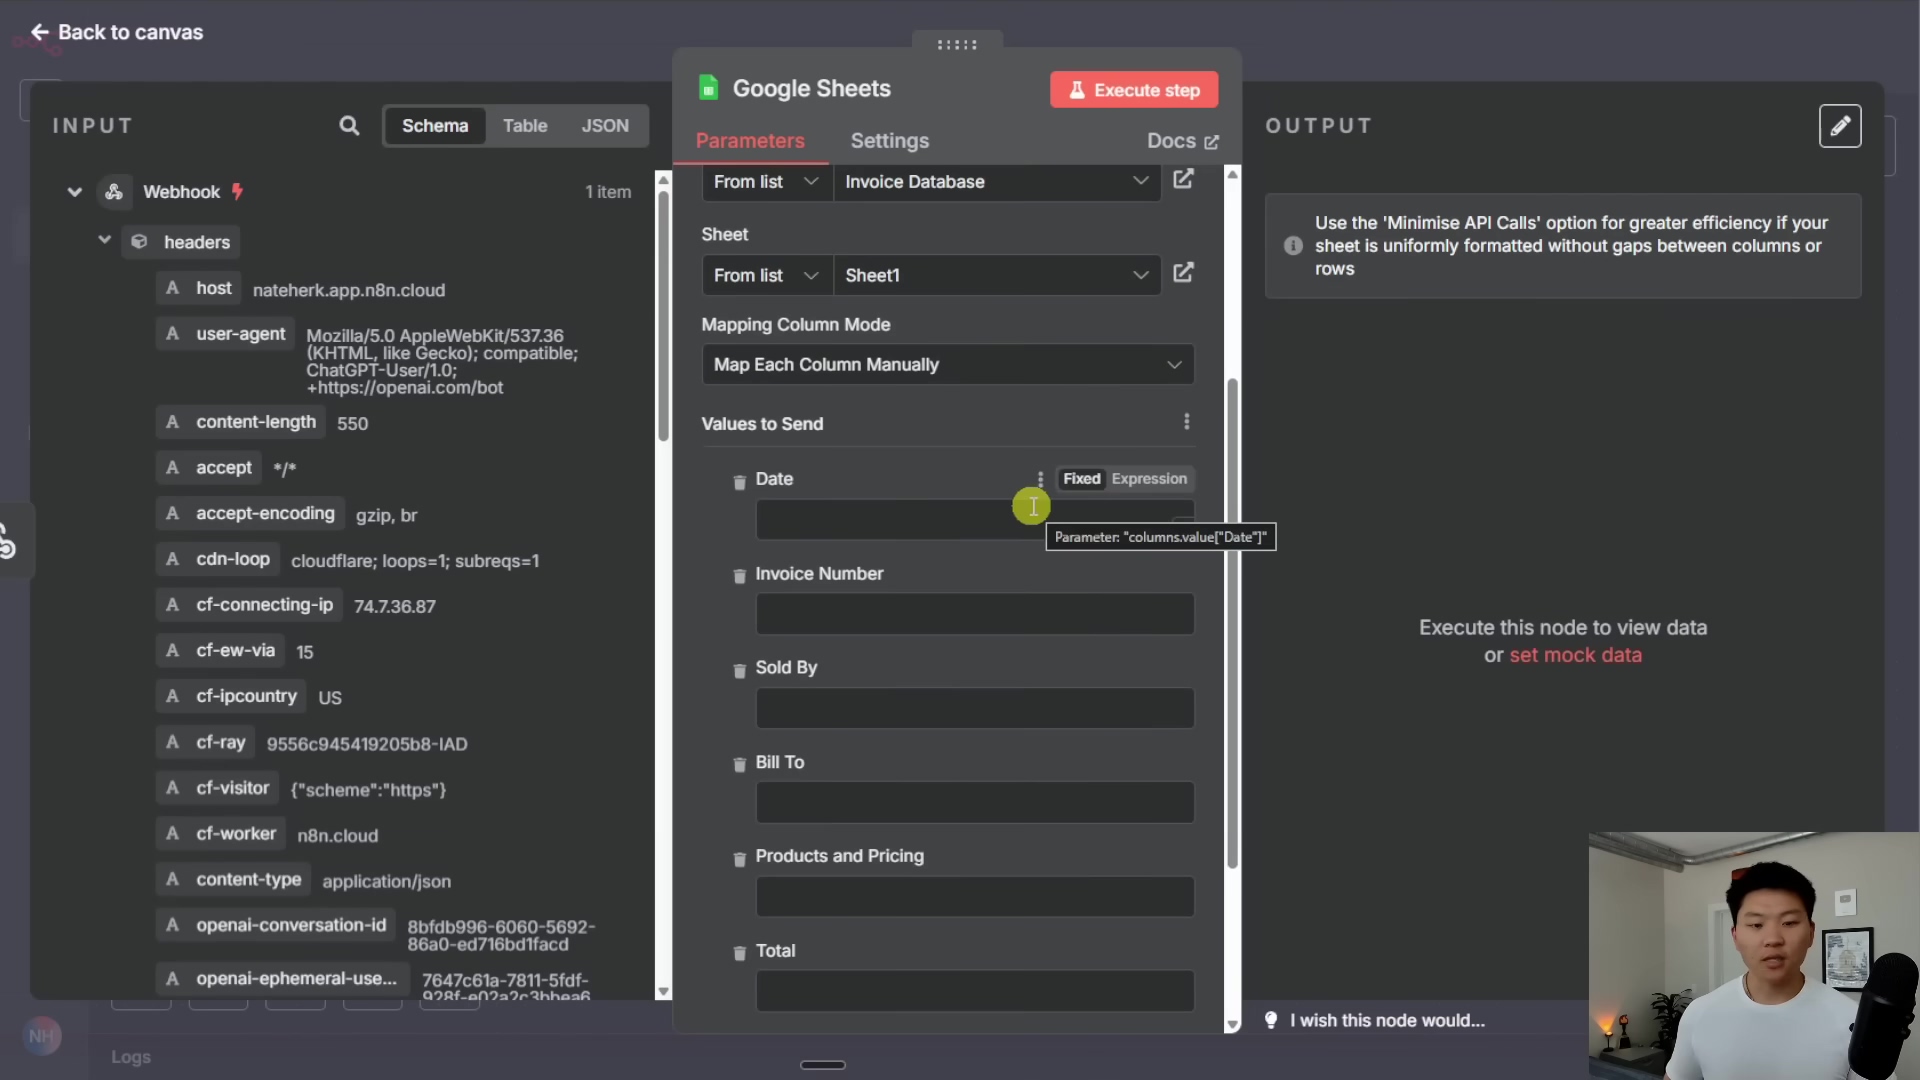
Connect the output of your ‘Webhook’ node to a new ‘Google Sheets’ node. Think of it as a pipeline, sending the data from one step to the next. Configure the ‘Google Sheets’ node to ‘Append Row’. This means every time new data comes in, n8n will add a new row to your spreadsheet. Then, select your desired spreadsheet (maybe you’ve got one called ‘Invoice Database’ ready to go?) and the specific sheet within it.
Now, the fun part: mapping the data! You’ll take the incoming parameters from the webhook (like date, invoice number, sold by, bill to, products and pricing, total) and map them to the corresponding columns in your Google Sheet. It’s like telling n8n, “Put the ‘date’ data into the ‘Date’ column, the ‘invoice number’ data into the ‘Invoice Number’ column,” and so on. This ensures your data lands exactly where it should.
And just like that, you’ve got a fully automated system for logging invoice data directly from a conversation with ChatGPT. How cool is that for efficiency?
Demonstrating the Integration
Alright, theory is great, but seeing is believing, right? Let’s walk through a couple of examples to really show off this integration in action. We’ll start with something simple, like sending an email, and then touch on our more complex invoice processing.
Example 1: Sending an Email via ChatGPT and n8n
Imagine you’re chatting with your custom GPT, and you just want to fire off a quick email. Instead of opening your email client, you can simply ask your custom GPT to send an email to a contact. For this to work, you’d have set up an n8n workflow with an ‘Email’ node, similar to how we set up the Google Sheets node. Your custom GPT would send parameters like recipient, subject, and body to your n8n webhook, and n8n would then use those to send the email. It’s like having a personal assistant who can draft and send emails just by you telling them what to do!
Frequently Asked Questions (FAQ)
Q: What exactly is an OpenAPI schema and why do I need it?
A: Think of an OpenAPI schema as a detailed instruction manual or a blueprint. For ChatGPT and n8n to communicate effectively, they need to speak the same language and understand what kind of data to expect and how it’s formatted. The OpenAPI schema provides this exact structure, telling ChatGPT how to package the data it sends to n8n, and telling n8n what to expect when it receives data from ChatGPT. Without it, they’d just be shouting into the void!
Q: My n8n webhook isn’t receiving data from ChatGPT. What should I check first?
A: Ah, the classic “no data” mystery! Don’t worry, it happens. First, double-check that your n8n webhook is set to ‘Listen for test event’. If it’s not actively listening, it won’t catch anything. Second, make sure the HTTP method in your n8n webhook (which should be ‘POST’) matches what’s defined in your custom GPT’s action schema. If they don’t align, it’s like trying to open a door with the wrong key. Also, verify the webhook URL you provided to ActionsGPT and then pasted into your custom GPT is correct and active. A tiny typo can break everything!
Q: Can I send more complex data types than just strings, like numbers or lists, from ChatGPT to n8n?
A: Absolutely! While we started with strings for simplicity, OpenAPI schemas support various data types like integer, number (for decimals), boolean, and array (for lists). When you’re defining your parameters in ActionsGPT, you can specify these more complex types. Just make sure that when you’re mapping the data in n8n, you’re handling these types correctly (e.g., converting a string to a number if you need to perform calculations). It’s all about telling the system exactly what kind of data to expect at each step.
Q: What are the security implications of exposing an n8n webhook to ChatGPT?
A: That’s a super important question! When you expose an n8n webhook, it’s essentially a public endpoint. While ChatGPT itself is secure, anyone who knows your webhook URL could theoretically send data to it. For sensitive operations, you should always add extra layers of security. This could include using n8n’s webhook authentication (like API keys or basic auth), implementing IP whitelisting if possible, or adding validation steps within your n8n workflow to ensure the data is coming from an expected source and is well-formed. Always think about what happens if someone else tries to trigger your workflow!
Q: Can I use this method to trigger n8n workflows from other AI models or platforms, not just ChatGPT?
A: You bet! The core principle here – using an OpenAPI schema to define how an AI model interacts with a webhook – is highly transferable. Many other AI platforms and large language models (LLMs) support similar “tool use” or “function calling” capabilities where you can provide them with an OpenAPI specification. As long as the AI platform can make HTTP requests based on a provided schema, you can adapt this method to trigger n8n workflows. It’s a universal language for AI automation!