Watch the Video Tutorial
💡 Pro Tip: After watching the video, continue reading below for detailed step-by-step instructions, code examples, and additional tips that will help you implement this successfully.
TL;DR
- Automate Google Sheets operations with n8n to save significant time and reduce manual errors, potentially boosting productivity by over 50%.
- Learn to seamlessly connect n8n with Google Sheets for essential CRUD (Create, Read, Update, Delete) operations, transforming repetitive tasks into efficient workflows.
- Master advanced data filtering using ‘AND’ and ‘OR’ conditions directly within n8n, enabling precise data retrieval without complex coding.
- Discover practical applications, from automating data entry for web scraping to dynamic data management, enhancing your data handling capabilities.
- This guide provides a foundational understanding and practical steps to integrate Google Sheets into any n8n workflow, making sophisticated automation accessible.
Table of Contents
Open Table of Contents
- Introduction
- Unlocking Automation Potential: Why Google Sheets & n8n Are Your Go-To Duo
- Setting the Stage: Preparing Your Google Sheet for n8n Integration
- Connecting n8n to Google Sheets: Your First Step to Automation
- Reading Data: How to ‘Get Row’ from Your Google Sheet in n8n
- Advanced Filtering: Precision Data Retrieval with ‘AND’ & ‘OR’ Conditions
- Updating & Appending Data: Keeping Your Google Sheets Dynamic
- Deleting Data: Maintaining Clean & Relevant Google Sheets
- Beyond the Basics: Expanding Your n8n & Google Sheets Workflows
- Conclusion
- Frequently Asked Questions (FAQ)
- Q: What is the main benefit of using n8n with Google Sheets?
- Q: Do I need to be a programmer to use n8n with Google Sheets?
- Q: What’s the difference between ‘AND’ and ‘OR’ logic in n8n’s Filter node?
- Q: How can I prevent accidental data loss when using ‘Delete Rows’ in n8n?
- Q: Can n8n trigger workflows automatically when my Google Sheet changes?
Introduction
Hey there, Boyce here! In today’s data-driven world, businesses and individuals often spend upwards of 30% of their time on repetitive data entry and manipulation tasks. Can you believe that? That’s a huge chunk of our precious time just… gone. This significant time sink not only reduces productivity but also introduces human error. And let’s be real, who hasn’t accidentally deleted a row or messed up a formula? We’ve all been there!
But what if I told you that you could reclaim a substantial portion of that time and ensure data accuracy with automated workflows? This guide promises to unlock precisely that potential. By integrating Google Sheets with n8n, a powerful low-code automation platform, you can transform mundane, time-consuming tasks into efficient, error-free automated processes. Whether you’re a data analyst, a developer, or simply an automation enthusiast (like me!), mastering this integration will empower you to streamline workflows, from web scraping to dynamic data management, without writing extensive code. We’ll delve into the foundational concepts, practical steps, and advanced filtering techniques that will make Google Sheets and n8n your ultimate automation duo. Ready to become a data wizard? Let’s dive in!
Unlocking Automation Potential: Why Google Sheets & n8n Are Your Go-To Duo
The Synergy of Google Sheets and n8n
Google Sheets serves as a ubiquitous, flexible, and accessible platform for data storage and organization. Its ease of use and collaborative features make it a cornerstone for many businesses. It’s like the trusty Swiss Army knife of spreadsheets, right? However, manual interaction with Google Sheets can quickly become a bottleneck as data volumes grow or as the complexity of operations increases. This is where n8n, a robust workflow automation tool, steps in. Think of n8n as your personal robot assistant, ready to handle all the tedious stuff.
- Efficiency Redefined: n8n automates the flow of data into and out of Google Sheets, eliminating the need for manual copy-pasting, data entry, and repetitive checks. No more endless Ctrl+C, Ctrl+V! It’s like giving your data wings.
- Error Reduction: Automated processes are inherently less prone to human error, ensuring higher data integrity and reliability across your operations. Machines don’t get tired or distracted, which means fewer typos and more accurate data.
- Scalability: As your data needs evolve, n8n workflows can be easily scaled and adapted without significant re-engineering, supporting growth and changing requirements. Your automation grows with you, not against you.
n8n’s visual workflow builder allows users to connect Google Sheets with hundreds of other applications, creating powerful, end-to-end automation solutions. From capturing leads from a website form directly into a sheet to generating reports based on real-time data, the possibilities are vast. It’s like building LEGOs, but for your business processes!
Common Use Cases for Google Sheets Automation
The integration of Google Sheets with n8n opens up a myriad of practical applications across various domains. These automations can significantly reduce manual effort and improve operational efficiency. Let’s look at some real-world examples, shall we?
- Automated Data Entry: Imagine a scenario where data extracted from PDF documents or web scraping initiatives is automatically populated into a Google Sheet. This eliminates manual transcription, saving hours of work and preventing errors. Think about all those times you’ve had to manually type out information from a document – n8n can do that for you, instantly!
- Real-time Reporting: Connect your e-commerce platform or CRM to Google Sheets via n8n to generate real-time sales reports, customer feedback summaries, or inventory updates. This provides immediate insights for decision-making. No more waiting until the end of the month for reports; get them now.
- Dynamic Content Management: Use Google Sheets as a lightweight content management system (CMS). Update product descriptions, blog post drafts, or marketing copy in a sheet, and n8n can automatically push these updates to your website or social media platforms. It’s like having a central control panel for all your content.
| Use Case | Manual Process | n8n Automation | Benefits |
|---|---|---|---|
| Data Collection | Manual copy-pasting from web/PDFs | Automated scraping/extraction to Sheets | Time-saving, error reduction, real-time data |
| Reporting | Manual data aggregation and chart creation | Automated data sync and report generation | Instant insights, consistency |
| Content Updates | Manual updates on multiple platforms | Sheet-driven content deployment | Centralized control, faster updates |
| Lead Management | Manual lead entry from forms | Automated form submission to CRM via Sheets | Faster lead processing, reduced lead loss |
These examples merely scratch the surface of what’s possible. The true power lies in n8n’s flexibility to customize workflows to your exact needs, making Google Sheets a dynamic component of your automated ecosystem. It’s like having a universal remote for all your apps!
To further illustrate the potential of n8n and Google Sheets, consider the visual representation of the presenter. The presenter, a young man with short, light brown hair and a teal t-shirt, is looking directly at the camera, conveying a sense of direct communication and expertise. This personal connection reinforces the idea that sophisticated automation is accessible.

This image of the presenter helps to establish a personal connection with the audience, making the learning experience more engaging. The setting, with framed trading cards in the background, subtly hints at the data-driven examples that will be used, such as baseball card values. (Yes, we’re going to talk about baseball cards, because who doesn’t love a good analogy?)
The Value Proposition of Automation
The decision to invest time in learning automation tools like n8n for Google Sheets integration is justified by the immense value it delivers. Beyond just saving time, automation fundamentally changes how businesses operate. It’s not just about doing things faster; it’s about doing better things.
- Strategic Focus: By offloading repetitive tasks to n8n, teams can reallocate their efforts to more strategic, high-value activities that require human creativity and critical thinking. Let the robots do the boring stuff, so you can focus on being brilliant!
- Operational Agility: Automated workflows enable faster response times to market changes, customer demands, and internal operational needs. This agility is crucial for maintaining a competitive edge. In today’s fast-paced world, speed is everything.
- Cost Efficiency: Reducing manual labor directly translates to cost savings. Furthermore, improved accuracy and faster processing minimize rework and associated expenses. Less manual work, fewer mistakes, more savings – it’s a win-win-win!
Consider a scenario where a small business processes 100 orders daily. Manually updating inventory in Google Sheets could take several hours. With n8n, this process can be automated to occur instantly upon order placement, freeing up staff for customer service or marketing. This shift from reactive to proactive operations is the core promise of n8n and Google Sheets integration, empowering users to build more resilient and efficient systems. It’s like upgrading from a horse-drawn carriage to a rocket ship!
Again, the presenter’s direct gaze in this image reinforces the message of empowerment and the tangible benefits of automation. The consistent visual presence helps maintain focus on the core message.

This image serves as a visual anchor, reminding the reader of the human element behind the technical guide and the clear, concise delivery of information.
Getting Started with n8n and Google Sheets
Alright, let’s get our hands dirty! Before diving into the practical steps, it’s essential to understand the basic setup. This guide assumes you have n8n loaded and ready for use. If you’re new to n8n, no worries! There are ample resources available to get you started with its installation and basic interface. Seriously, check out their docs – they’re super helpful.
- n8n Installation: Ensure your n8n instance is running, either locally or in the cloud. This is the foundation upon which all your workflows will be built. Think of it as powering up your automation spaceship.
- Google Account: A Google account with access to Google Sheets is required. This will be used to authenticate n8n’s access to your spreadsheets. If you’re reading this, chances are you already have one, right?
- Basic Workflow Knowledge: Familiarity with n8n’s node-based workflow builder will be beneficial, though we will cover the specifics of Google Sheets nodes in detail. Don’t sweat it if you’re a complete newbie; I’ll walk you through it.
This video series aims to cover the fundamental aspects of Google Sheets integration, setting the stage for more advanced workflows. While this tutorial focuses on manual triggers (which are great for testing!), n8n also offers Google Sheets triggers that can initiate workflows based on sheet changes, which will be explored in future advanced content. The basics are crucial, and mastering them will provide a solid foundation for any automation challenge you encounter. We’re building a strong foundation here, brick by brick!
The Power of Low-Code Automation
n8n exemplifies the power of low-code automation, making sophisticated integrations accessible to a broader audience beyond traditional developers. This approach significantly reduces the barrier to entry for creating complex workflows. It’s like giving everyone the ability to build apps, not just coders!
- Visual Workflow Builder: n8n’s intuitive drag-and-drop interface allows users to construct workflows visually, making the process of designing and understanding automation logical and straightforward. If you can drag and drop, you can automate!
- Extensive Integrations: With hundreds of pre-built integrations, n8n can connect Google Sheets to virtually any other application in your tech stack, from CRM systems to communication platforms. It’s like having a universal adapter for all your favorite tools.
- Flexibility and Customization: While offering pre-built nodes, n8n also allows for custom code execution, providing the flexibility to handle unique data transformations or API interactions when needed. So, if you do know how to code, you can still get super fancy with it.
This low-code paradigm means that individuals with varying technical backgrounds can leverage n8n to solve real-world problems. For instance, a marketing professional can automate lead nurturing sequences by linking Google Sheets (for lead data) with an email marketing platform, all without writing a single line of code. This democratization of automation tools is a game-changer for productivity and innovation within organizations. It’s truly empowering!
Setting the Stage: Preparing Your Google Sheet for n8n Integration
Structuring Your Google Sheet for Automation
Before integrating your Google Sheet with n8n, it’s crucial to prepare it correctly. A well-structured sheet ensures smooth data flow and prevents common integration issues. While n8n is flexible, adhering to best practices will simplify your automation journey. Think of it as organizing your tools before starting a big project – it just makes everything easier.
- Consistent Headers: Always use a single row for clear, descriptive headers. These headers will be recognized by n8n as data keys, making it easier to map data fields. This is super important! n8n uses these headers to understand what’s what, so make them clear and unique.
- No Merged Cells: Avoid merged cells within your data range, as they can cause ambiguity and errors during data extraction or insertion. Merged cells are the bane of automation; they confuse everything! Just don’t do it.
- Dedicated Data Ranges: Ideally, keep your primary data in a contiguous block without empty rows or columns within the dataset. Use separate sheets or tabs for auxiliary data or calculations. Keep your main data clean and tidy, like a well-organized closet.
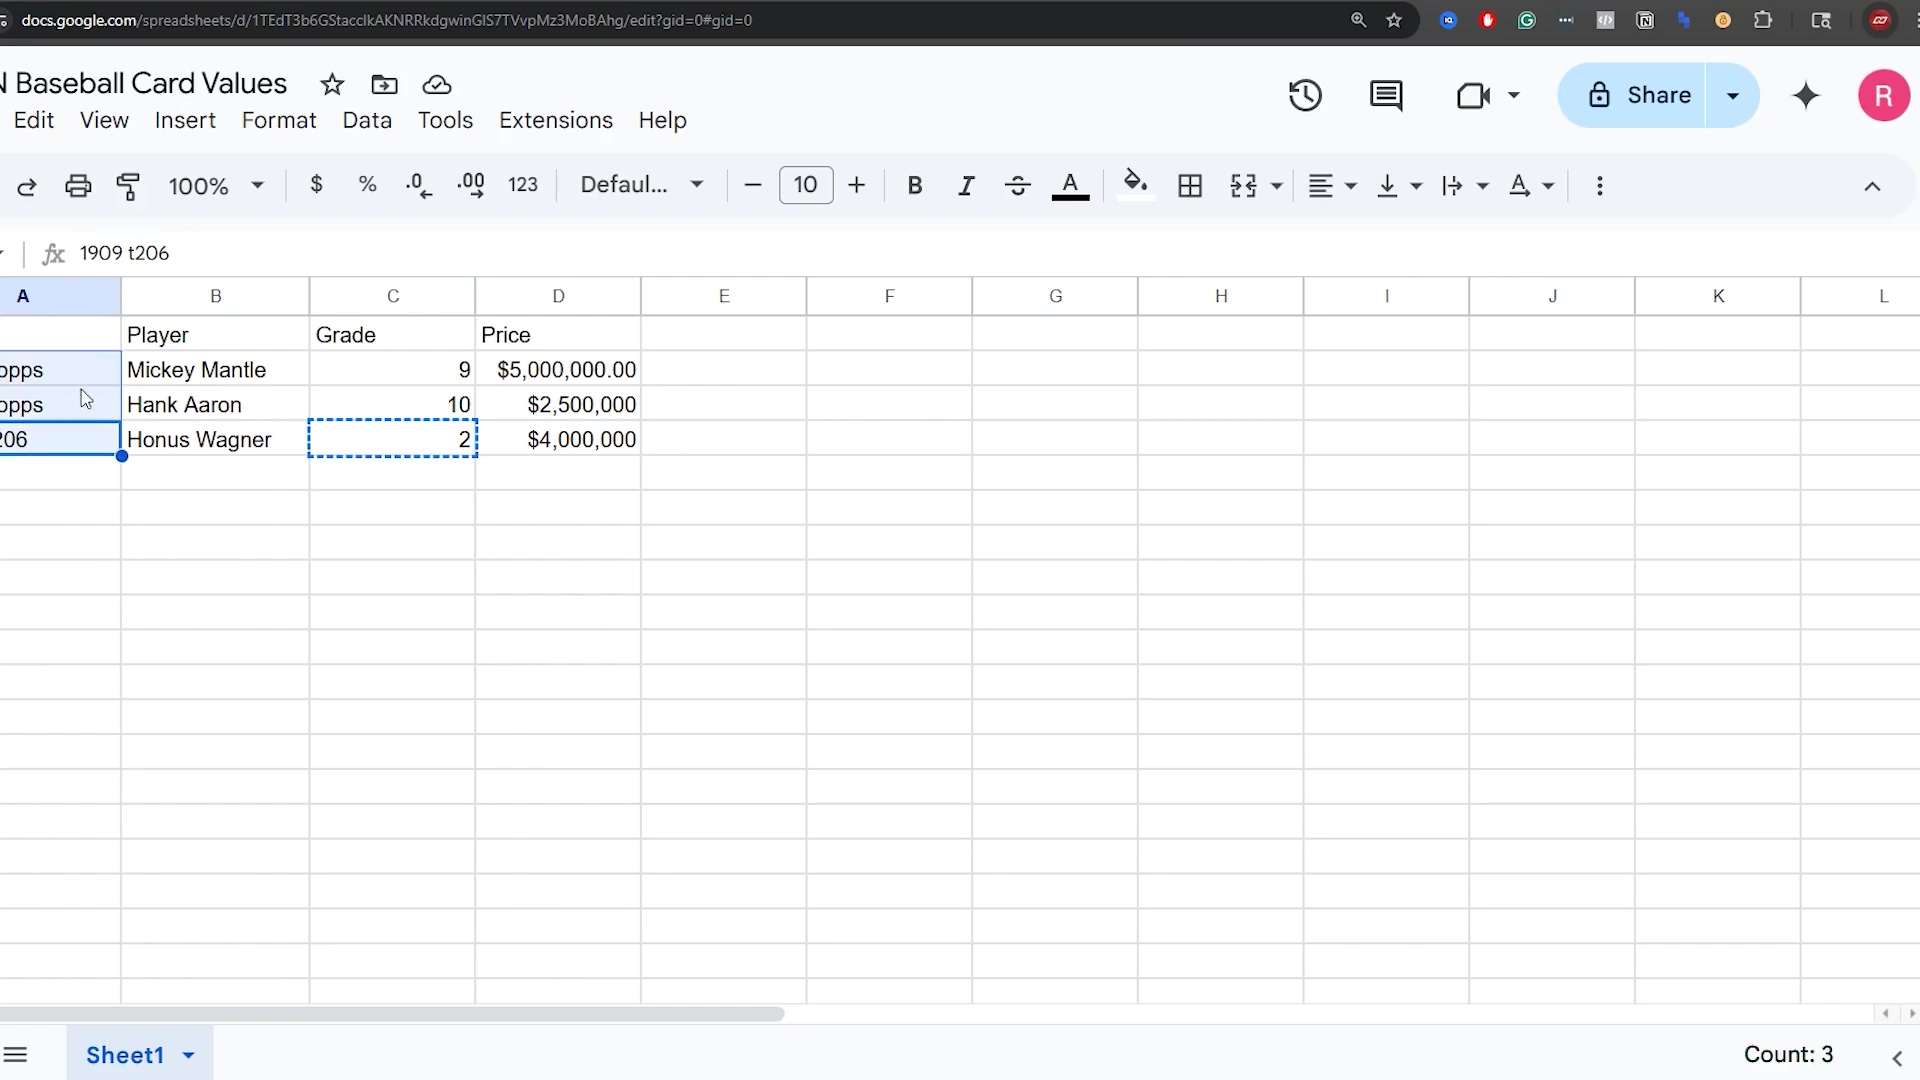
For this tutorial, we will be using a simple dataset related to baseball cards, including ‘Card’, ‘Player’, ‘Grade’, and ‘Price’. While this specific dataset is for demonstration, the principles apply universally. You are encouraged to use a spreadsheet that is relevant to your own interests or projects, as this often makes the learning process more engaging and directly applicable. Go ahead, use your own data if you want – it makes learning more fun!
This image shows a sample Google Sheet titled “N Baseball Card Values” with columns for “Player”, “Grade”, and “Price”. It visually demonstrates the structured data we’ll be working with, including entries for “Mickey Mantle”, “George Brett”, and “Hank Aaron” with their respective grades and prices. This visual helps to set the context for the data manipulation examples that follow.
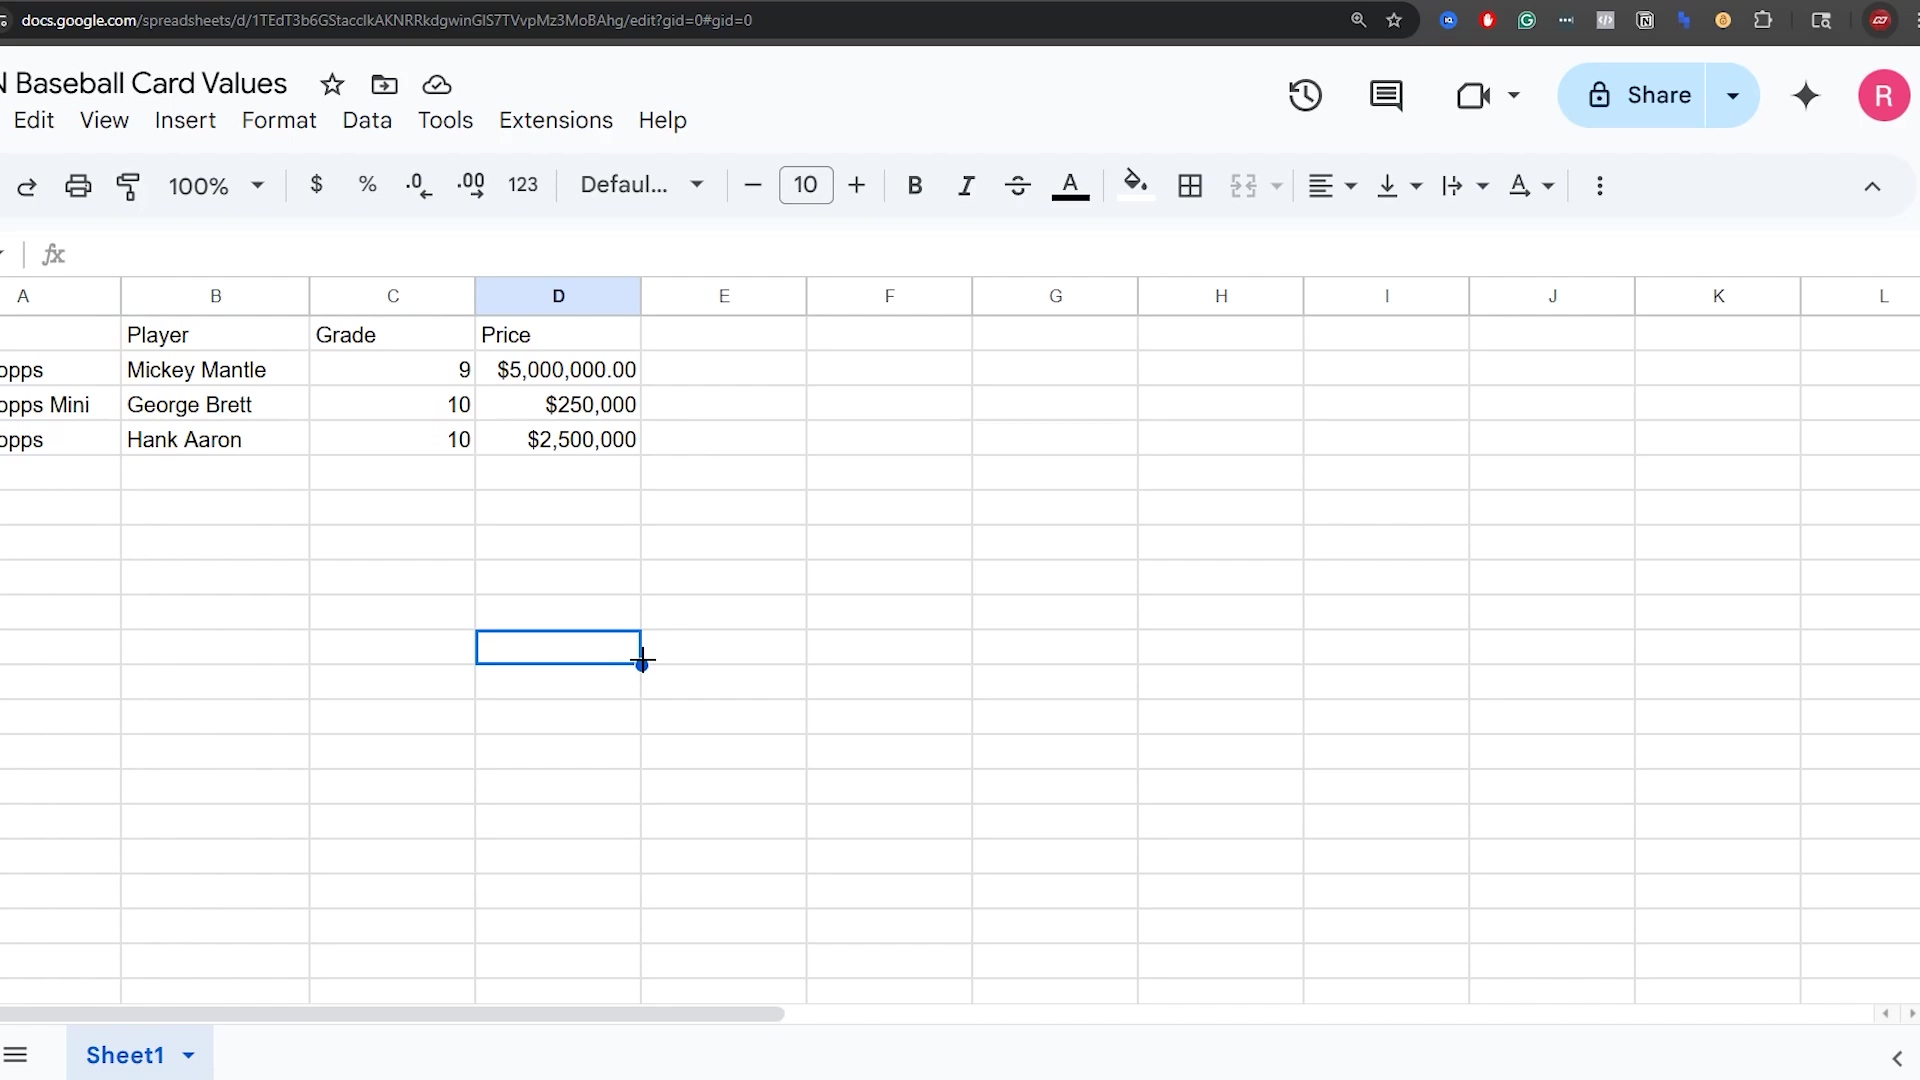
This initial view of the spreadsheet is crucial for understanding the data structure and the type of information we will be automating with n8n.
Sample Data Overview
Our sample Google Sheet contains basic information about collectible baseball cards. This simple structure allows us to demonstrate various n8n operations without unnecessary complexity. The key columns are:
- Card: Identifies the specific card (e.g., “1952 Topps”).
- Player: The name of the player on the card (e.g., “Mickey Mantle”).
- Grade: The condition grade of the card (e.g., “9”).
- Price: The estimated market value of the card.
While some price values are fictitious for demonstration purposes (don’t go trying to buy a Mickey Mantle for $5!), the structure remains consistent. For example, a ‘1952 Topps Mickey Mantle’ with a ‘Grade’ of ‘9’ and a ‘Price’ of ‘$5,200,000’ provides a clear record. This setup will allow us to perform read, update, append, and delete operations effectively. The simplicity of this dataset makes it an excellent starting point for understanding how n8n interacts with Google Sheets. Easy peasy, right?
Here, the Google Sheet is shown again, with the cell containing ‘George Brett’ highlighted. This emphasizes the individual data points we’ll be interacting with and the clear, tabular format of the data. The URL bar is also visible, showing the document ID, which is essential for n8n integration.
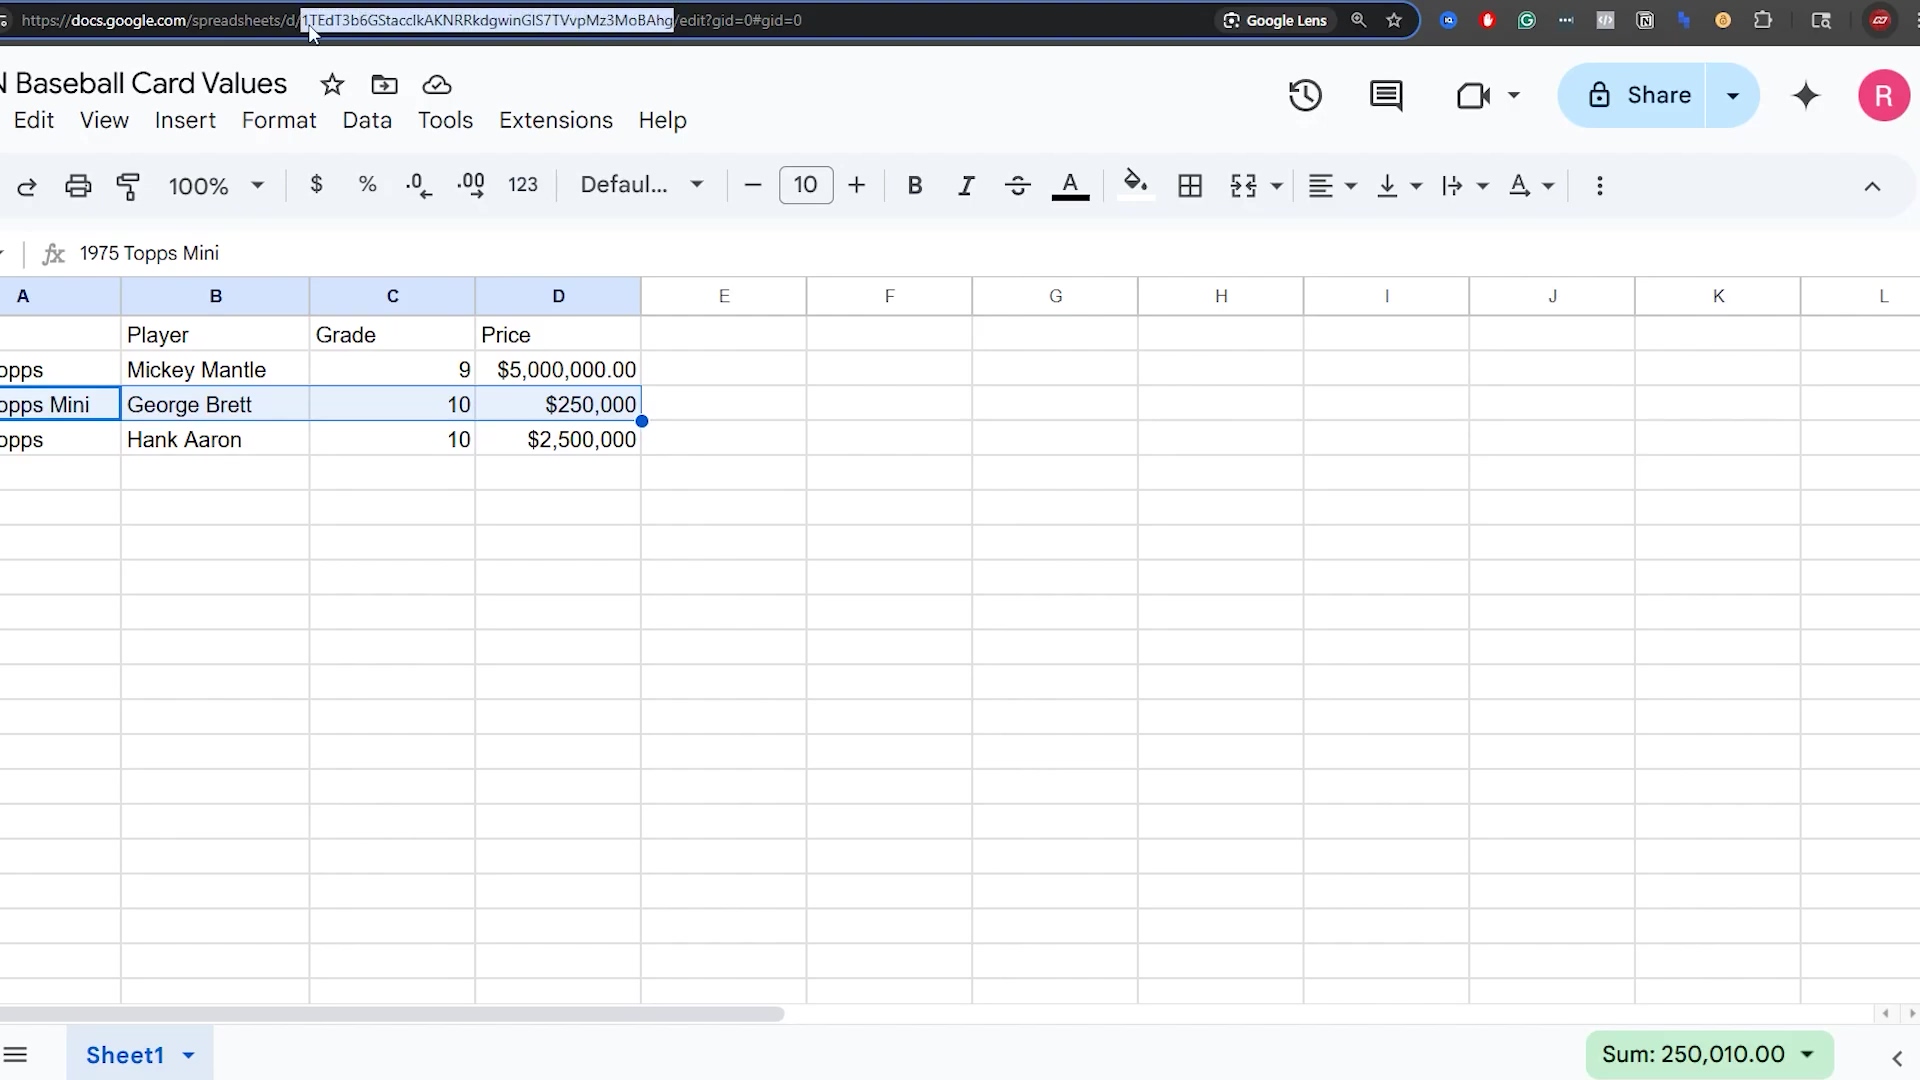
This image reinforces the structure of our sample data and provides a visual reference for the specific sheet we’ll be using throughout the tutorial.
Best Practices for Google Sheets in n8n Workflows
Adopting certain best practices when designing your Google Sheets for n8n integration can significantly enhance the reliability and maintainability of your workflows. These practices ensure that your automations are robust and future-proof. Trust me, a little planning now saves a lot of headaches later.
- Unique Identifiers: Whenever possible, include a column with a unique identifier for each row (e.g., an ‘ID’ column). This is crucial for operations like ‘Update Row’ or ‘Delete Row’ to ensure you’re targeting the correct record accurately. Think of it like a social security number for your data – it makes sure you’re talking about that specific record.
- Data Validation: Utilize Google Sheets’ data validation features to enforce data types and formats. This helps maintain data quality, which is vital for smooth automation. Garbage in, garbage out, right? Data validation helps keep your data clean.
- Small, Focused Sheets: For very large datasets or complex operations, consider breaking down your data into smaller, more focused sheets or tabs. This can improve performance and make workflows easier to manage. Don’t try to cram everything into one giant sheet; spread it out a bit.
By following these guidelines, you can minimize potential issues and build more efficient and reliable n8n workflows. For instance, if you’re updating a row, relying solely on a player’s name (which might not be unique) could lead to unintended updates. A unique ‘Card ID’ would guarantee precision. This proactive approach to sheet preparation is a cornerstone of effective automation. It’s all about setting yourself up for success!
This image provides a comprehensive view of the Google Sheet, including the newly added ‘1909 /206 Honus Wagner’ entry. It shows the full context of the data after some operations, which is helpful for understanding the state of the sheet before further automation. The presence of the sheet name ‘Sheet1’ and the standard Google Sheets menu options are also clearly visible.
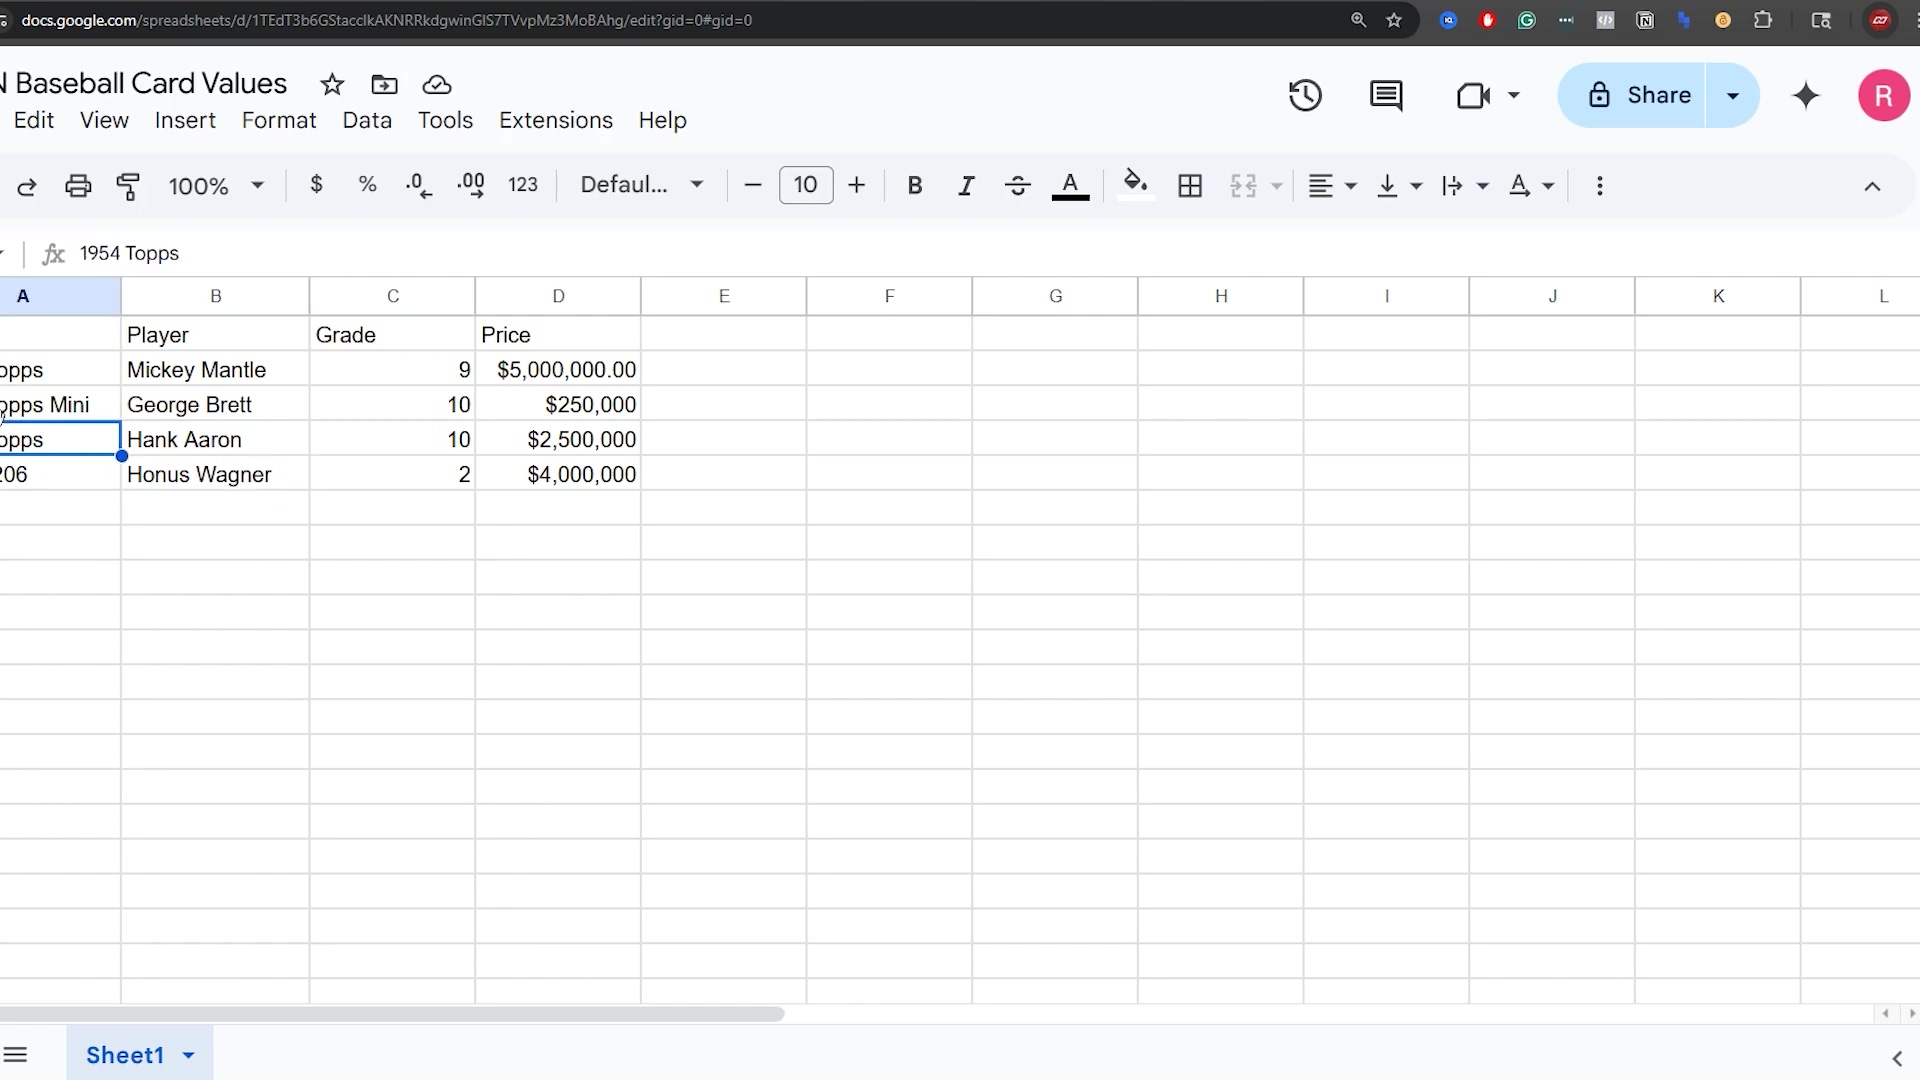
This visual confirms the data structure and content, which is essential for subsequent n8n operations like updating and deleting rows.
Connecting n8n to Google Sheets: Your First Step to Automation
Adding the Google Sheets Node
The first and most fundamental step in automating Google Sheets with n8n is to add the Google Sheets node to your workflow. This node acts as the bridge between your n8n instance and your Google account, enabling all subsequent data operations. It’s like building the first segment of a bridge – pretty important!
- Initiate Workflow: Start by adding a trigger node (e.g., ‘Manual Trigger’ for testing) to your n8n canvas. Just click the ’+’ button and search for “Manual Trigger”. This node is your workflow’s starting gun.
- Search for Google Sheets: Click the plus icon (+) to add a new node and search for “Sheets” or “Google Sheets.” Select the ‘Google Sheets’ node from the results. You’ll see a bunch of options, but we want the main ‘Google Sheets’ one.
- Node Placement: Drag and drop the selected Google Sheets node onto your workflow canvas and connect it to your trigger node. Just click and drag a line from the trigger node’s output to the Google Sheets node’s input. Easy peasy!
This initial setup is straightforward and forms the basis for any interaction you’ll have with Google Sheets in n8n. The visual nature of n8n’s workflow builder makes this process intuitive, allowing you to quickly lay down the foundation for your automation. You’re already building something awesome!
This image clearly shows the n8n workflow editor, with a search for “she” revealing the ‘Google Sheets’ node as a highlighted option. This visual guide is crucial for users to understand how to locate and add the necessary node to their workflow, marking the very first step in connecting n8n to Google Sheets.
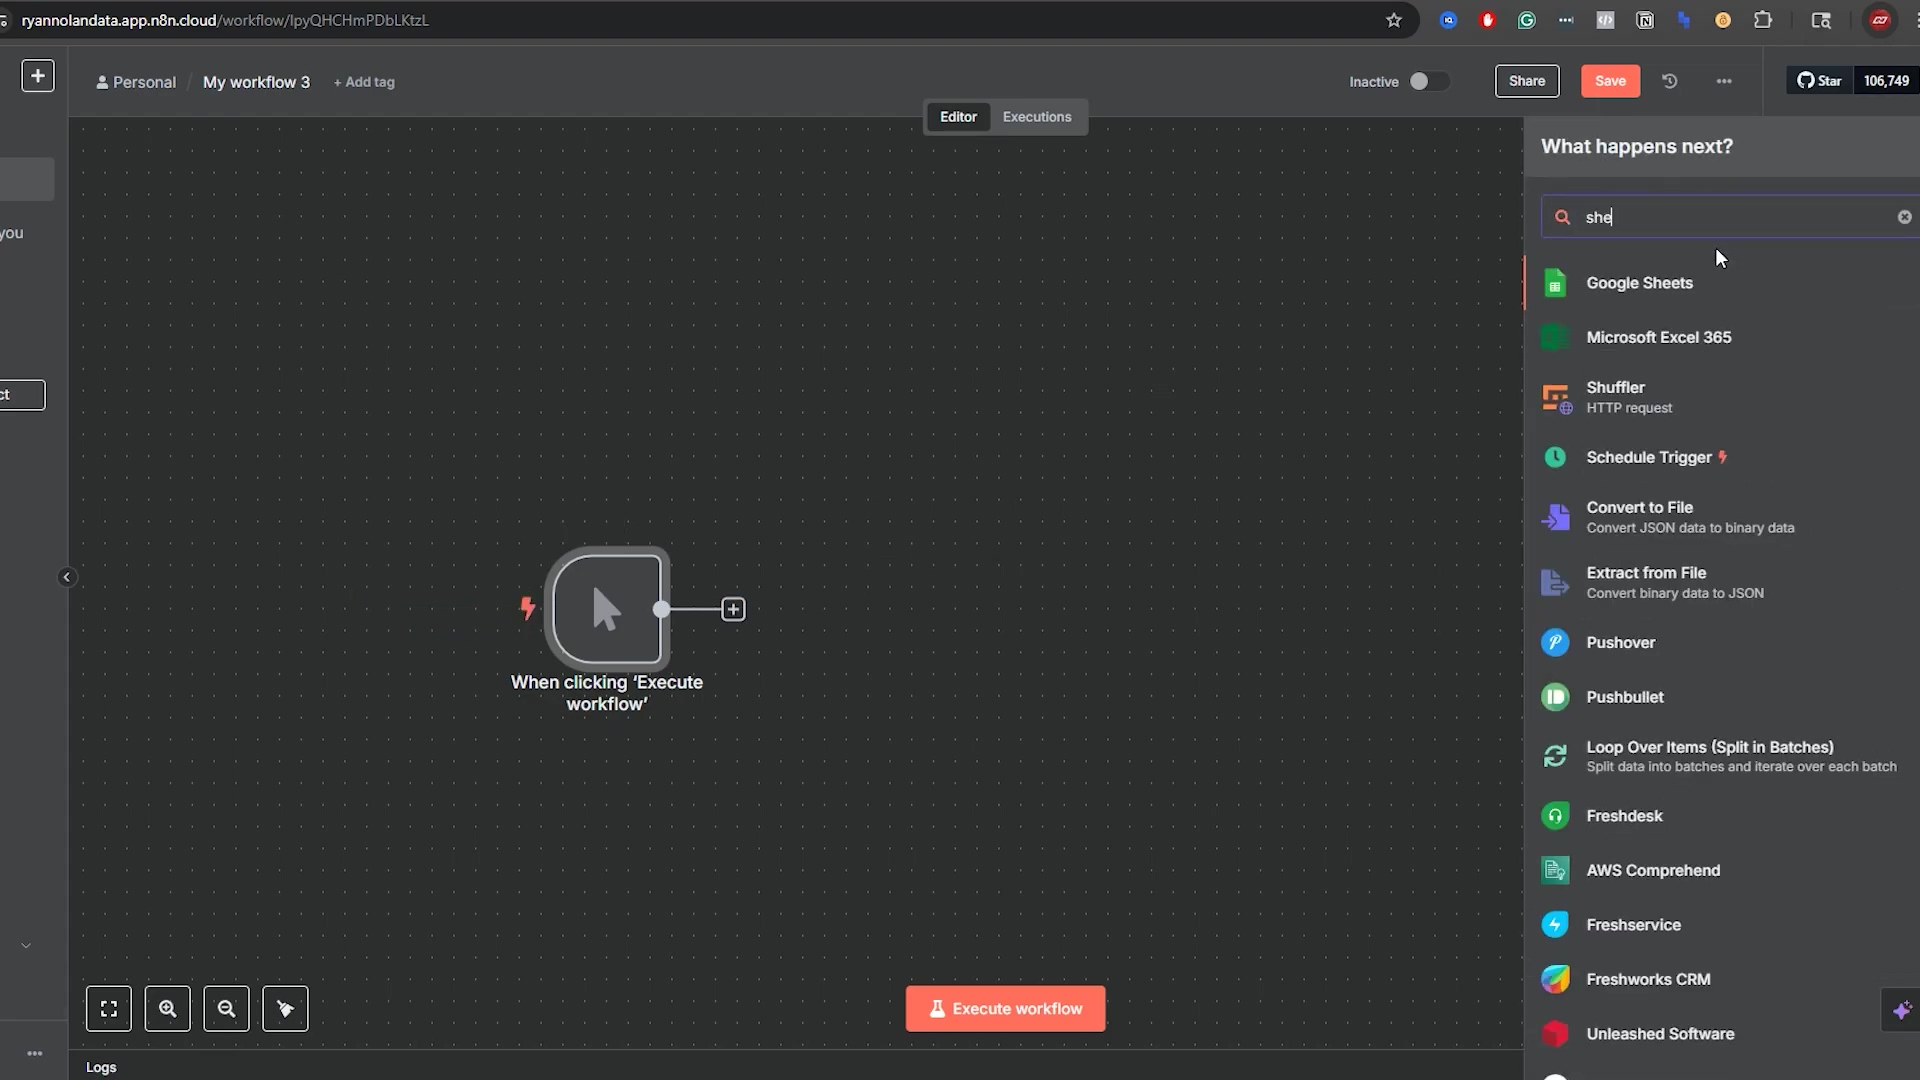
This visual step-by-step instruction is vital for beginners to successfully initiate their n8n workflow with Google Sheets.
Establishing the API Connection
Once the Google Sheets node is on your canvas, the next critical step is to authenticate n8n with your Google account. This involves setting up an API connection, which grants n8n the necessary permissions to access and manipulate your spreadsheets. This is a one-time setup per Google account within n8n. Think of it as giving n8n the keys to your Google Sheets kingdom (but only the rooms you specify!).
- Credentials Setup: In the Google Sheets node’s configuration panel (the sidebar that appears when you click the node), locate the ‘Credentials’ section. If you haven’t set up Google Sheets credentials before, click ‘Create New Credential’.
- Authentication Method: n8n typically guides you through an OAuth 2.0 authentication flow. This involves logging into your Google account and granting n8n specific permissions (e.g., ‘Google Sheets access’). Follow the prompts, and make sure you grant the necessary permissions. It’s Google’s way of making sure you’re you, and you approve of n8n doing its thing.
- Authorization: After successful authentication, n8n will save these credentials, allowing you to reuse them for all future Google Sheets nodes in any workflow. You only have to do this once per Google account, which is super handy!
It’s important to ensure that the Google account used for authentication has the appropriate access rights to the specific Google Sheets you intend to automate. This foundational step is paramount for the security and functionality of your n8n workflows. Without a properly configured API connection, n8n cannot interact with your Google Sheets data. No keys, no entry!
This image shows the Google Sheets node within n8n, configured for a ‘Get Row(s)’ operation. The ‘Parameters’ tab is active, displaying fields for credentials, document ID, and sheet name. A table preview of the data (Card, Player, Grade, Price) is also visible, confirming that the connection is established and data can be read. The green notification “Node executed successfully” further validates the successful connection and data retrieval.
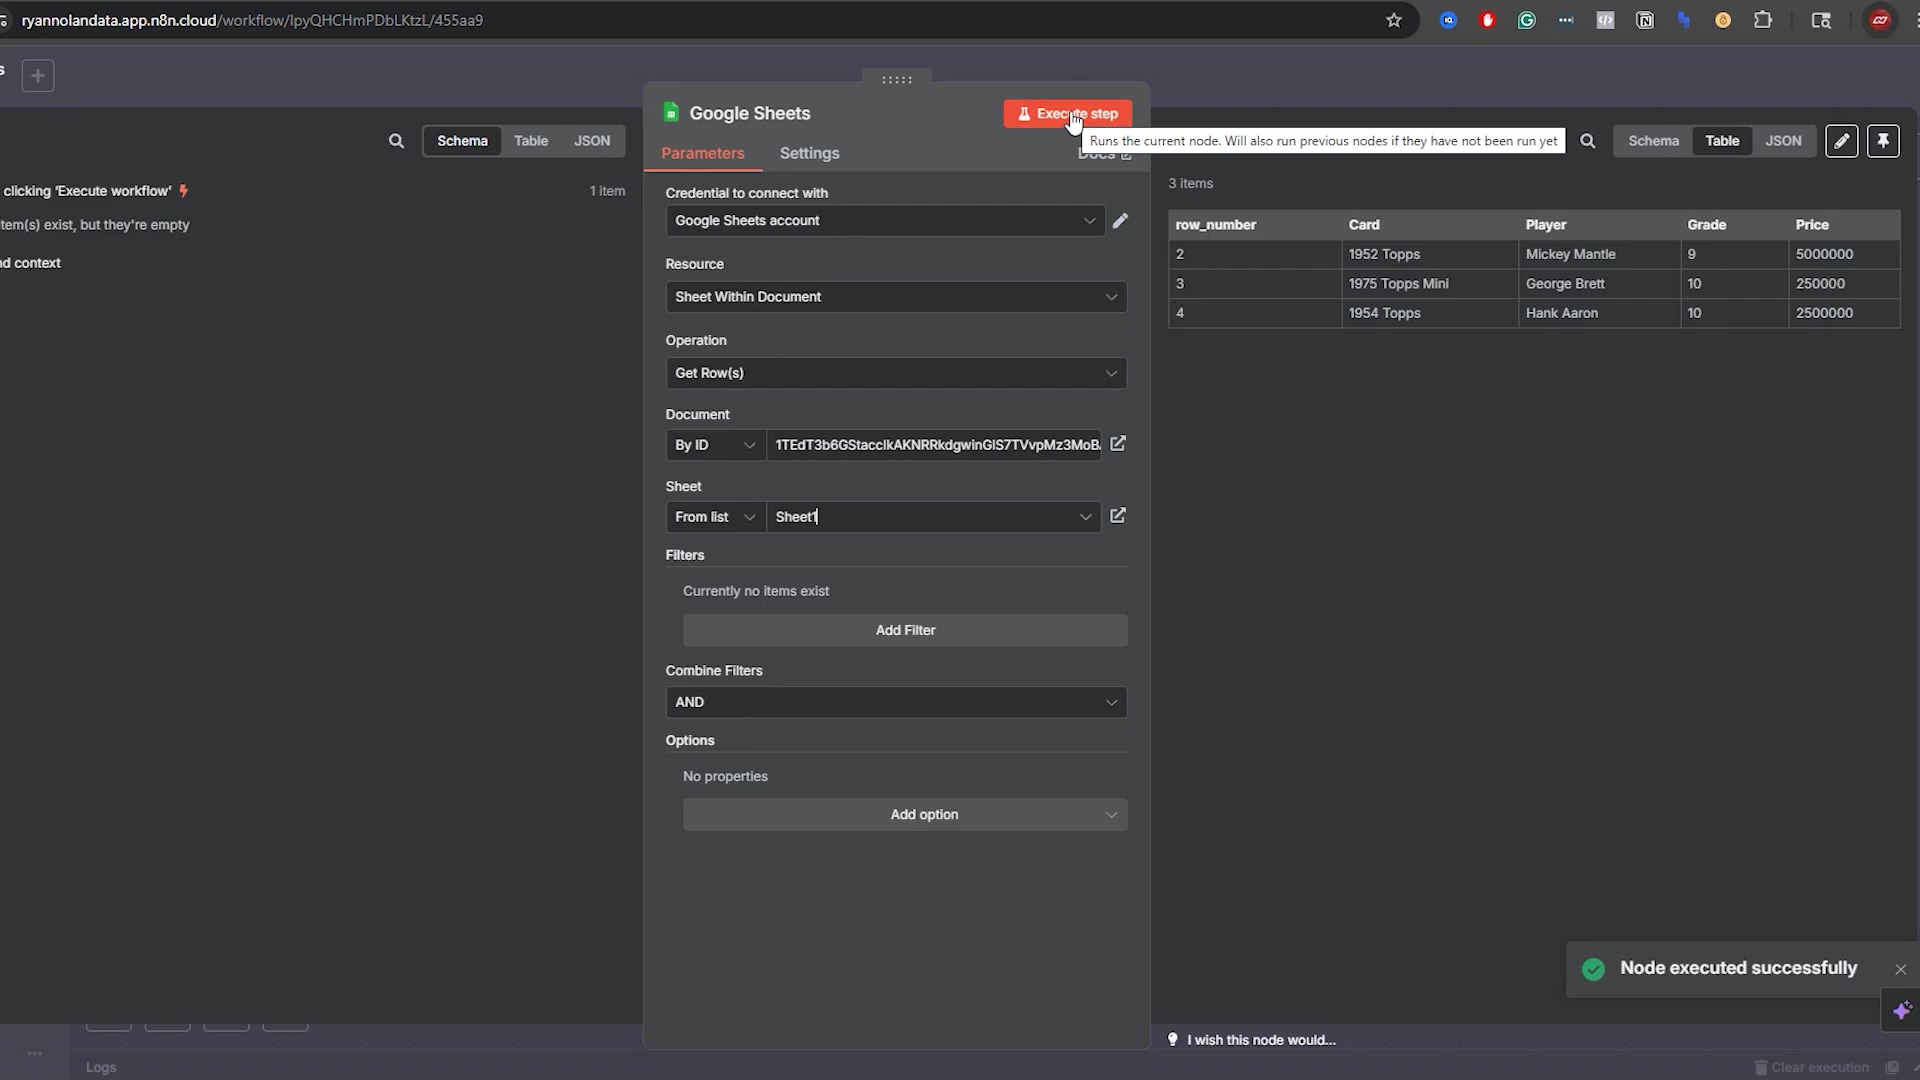
This visual confirms the successful API connection and the initial data retrieval, which is a critical milestone in setting up the automation.
Identifying Your Google Sheet
After establishing the API connection, you need to tell the Google Sheets node which specific spreadsheet and which sheet (tab) within that spreadsheet it should interact with. This is done by providing the document ID and sheet name. It’s like telling your robot assistant exactly which file cabinet and which folder to open.
- Document ID: The easiest way to identify your spreadsheet is by its ID. This ID is found in the URL of your Google Sheet, specifically the string of characters between
/d/and/edit(or the next/). For example, inhttps://docs.google.com/spreadsheets/d/YOUR_SHEET_ID_HERE/edit,YOUR_SHEET_ID_HEREis the document ID. Just copy that long string of letters and numbers! - Sheet Name: Most Google Sheets start with a default tab named ‘Sheet1’. If you have multiple tabs, you must specify the exact name of the sheet you want to work with. This is crucial for targeting the correct data within a multi-tab spreadsheet. Make sure the name is spelled exactly right, including capitalization!
- Selection Method: In the Google Sheets node, you can choose to select the document ‘From List’ (if n8n can discover it) or ‘By URL or ID’. Using ‘By URL or ID’ and pasting the ID is often the most reliable method. I usually stick with ‘By URL or ID’ to avoid any confusion.
For instance, if your sheet URL is https://docs.google.com/spreadsheets/d/1A2B3C4D5E6F7G8H9I0J/edit#gid=0, your document ID is 1A2B3C4D5E6F7G8H9I0J. You would then specify ‘Sheet1’ (or your custom sheet name) in the respective field. This precise identification ensures that n8n interacts with the correct data source, preventing accidental modifications to other sheets. We definitely don’t want n8n messing with the wrong sheet, do we?
| Parameter | Description | Example Value |
|---|---|---|
| Document ID | Unique identifier for your Google Sheet, found in its URL. | 1A2B3C4D5E6F7G8H9I0J |
| Sheet Name | The name of the specific tab within the Google Sheet you want to access. | Sheet1 or Sales Data |
| Operation | The action you want to perform (e.g., ‘Get Row’, ‘Append Row’). | Get Row |
This image further details the Google Sheets node configuration, specifically showing how to identify the sheet using its Document ID and Sheet Name. The ‘Operation’ is set to ‘Get Row(s)’, and a filter for ‘Grade’ is partially visible. The output panel shows the retrieved data, confirming that n8n is successfully interacting with the specified sheet.
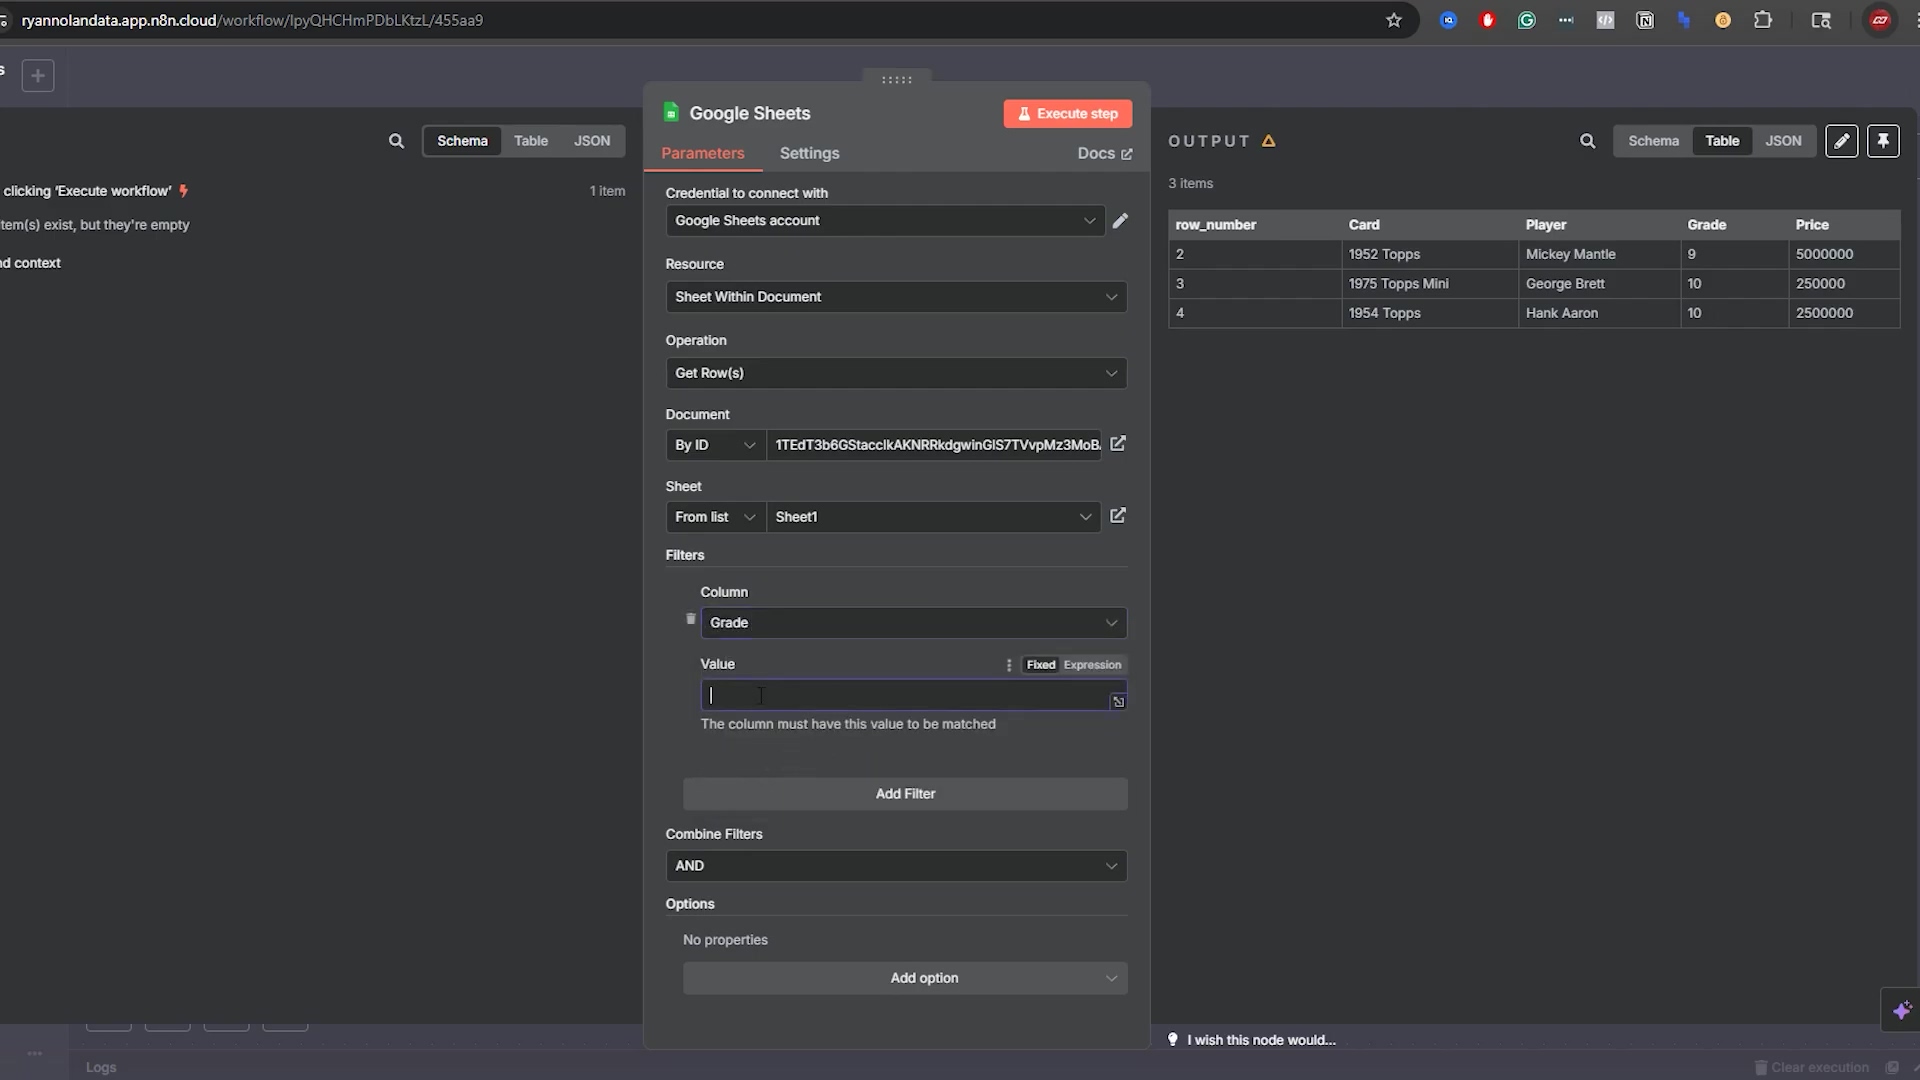
This visual reinforces the importance of correctly identifying the Google Sheet and its specific tab for accurate data operations.
Reading Data: How to ‘Get Row’ from Your Google Sheet in n8n
Basic Data Extraction with ‘Get Row’
The ‘Get Row’ operation in the Google Sheets node is your primary tool for retrieving data from your spreadsheets. This operation allows you to fetch entire rows, specific ranges, or even individual cells, providing flexibility in how you access your data. It’s like asking your robot assistant to go fetch a specific document from the file cabinet.
- Selecting the Operation: After configuring your Google Sheets node with credentials and document ID, select ‘Get Row’ from the ‘Operation’ dropdown menu. This tells n8n what you want it to do.
- Specifying the Sheet: Ensure the correct sheet name (e.g., ‘Sheet1’) is entered in the ‘Sheet’ field. Again, precision is key here.
- Executing the Step: Once configured, execute the node. You can do this by clicking the “Execute Node” button (it looks like a play button) in the node’s settings panel. n8n will then fetch the data from your specified sheet.
Upon execution, n8n will display the retrieved data in its output panel. By default, it often presents data in a table view, which is easy to read and understand. Each row from your Google Sheet will correspond to an item in n8n’s output, with column headers serving as keys. This initial data retrieval is the cornerstone for any subsequent data processing, transformation, or integration with other applications in your workflow. You’ve just pulled data from the cloud – how cool is that?!
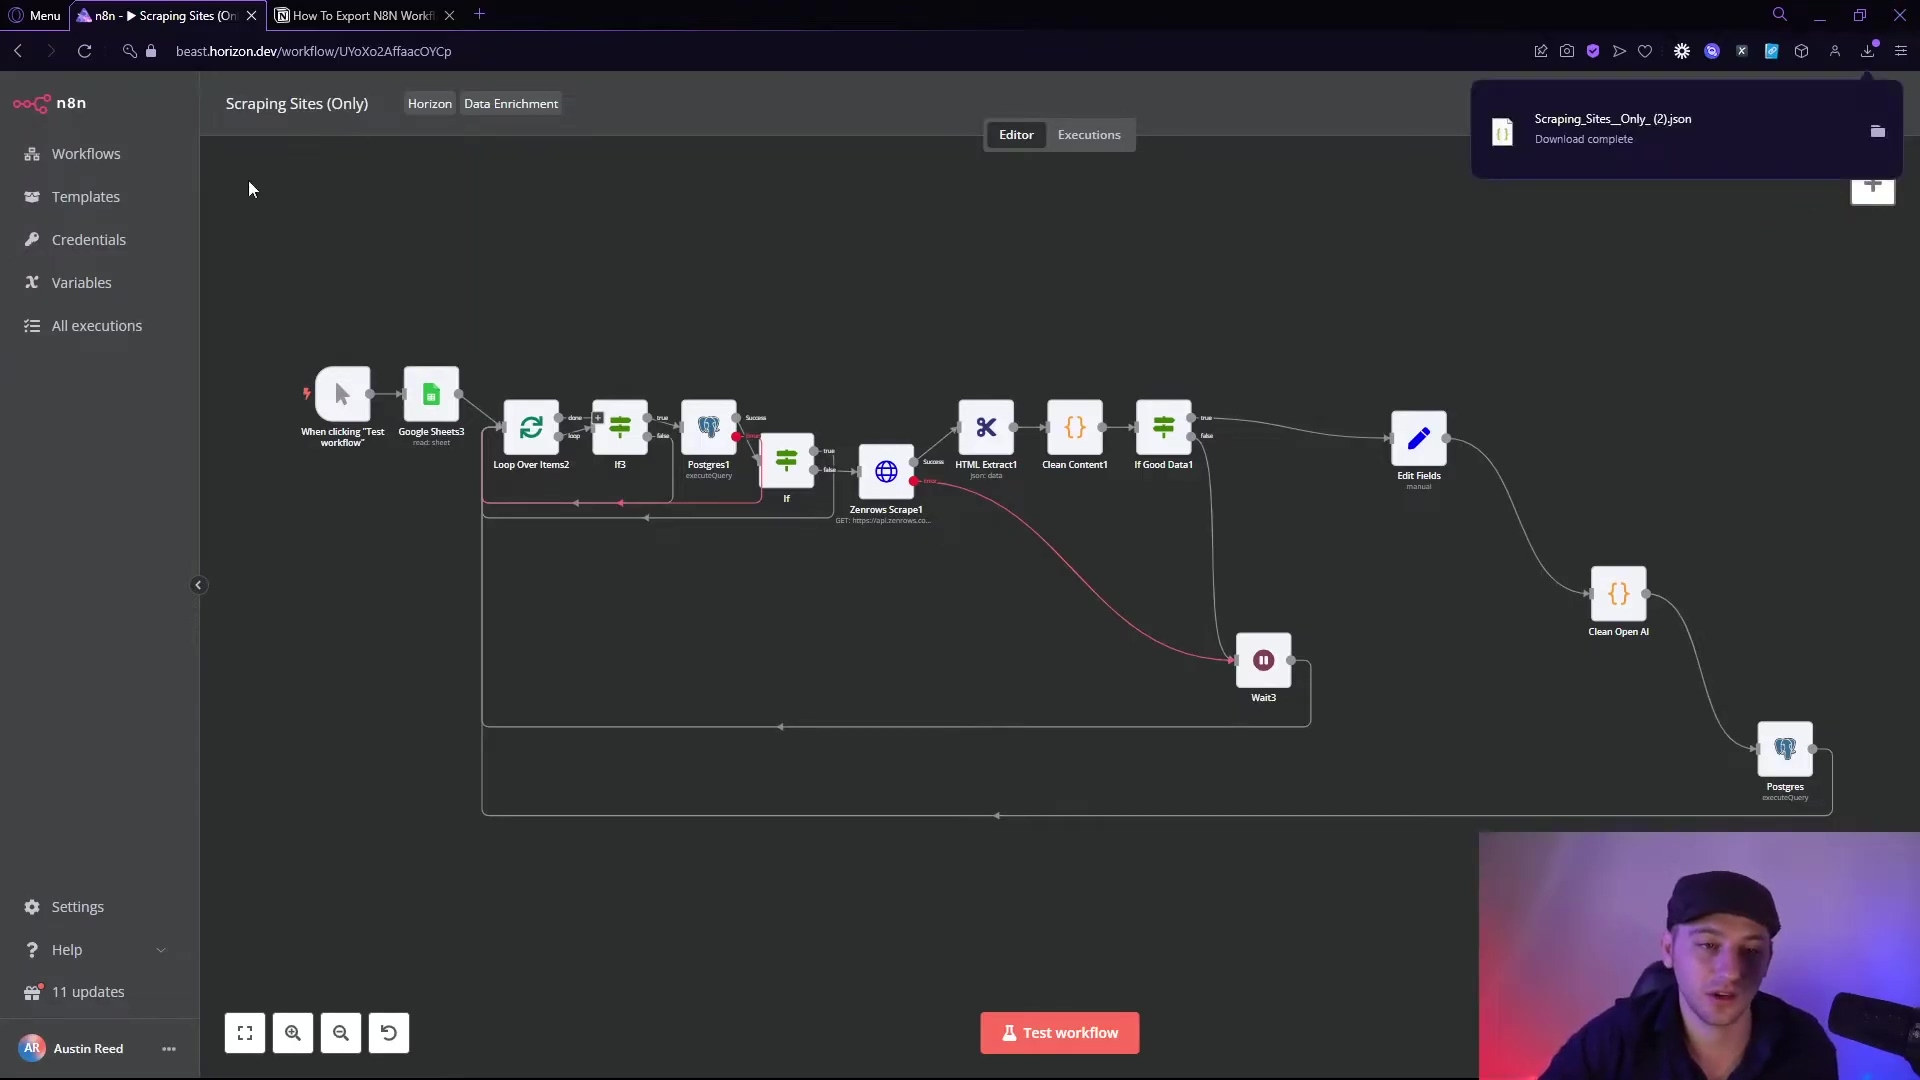
This image shows the n8n workflow with a ‘Google Sheets’ node connected to a ‘Filter’ node. The ‘Google Sheets Actions’ panel is open, highlighting the ‘Append row in sheet’ action. This visual context, while showing ‘Append row’, is placed here to emphasize that ‘Get Row’ is a foundational operation, and other actions like ‘Append row’ build upon this basic interaction. The error message at the bottom right indicates a common issue when a parameter is missing, which is a good reminder for careful configuration.
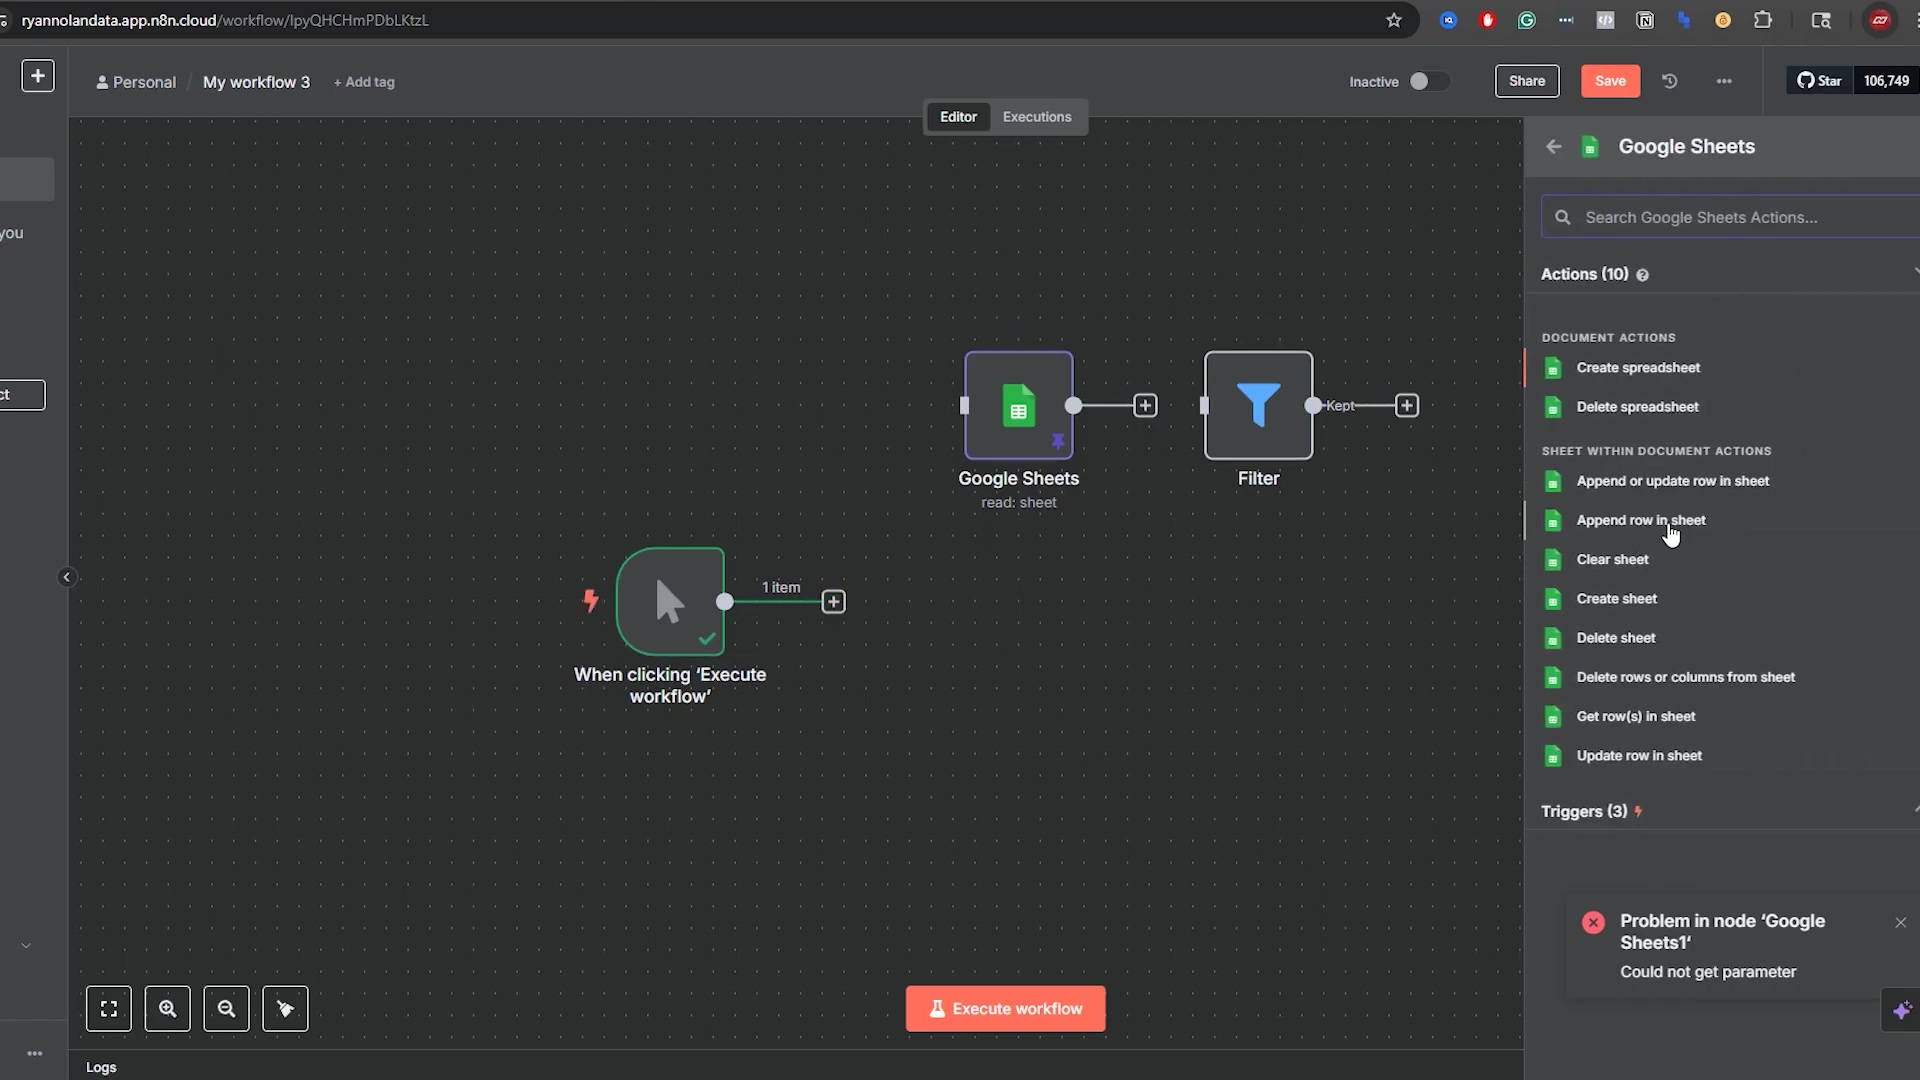
This image, despite showing an ‘Append row’ action highlighted, serves to illustrate the broader context of Google Sheets operations within n8n, where ‘Get Row’ is the starting point for data interaction.
Understanding the Output Structure
When n8n retrieves data from Google Sheets, it structures the output in a standardized JSON format, which is then often presented in a user-friendly table view. Understanding this structure is key to effectively manipulating the data in subsequent nodes. Think of JSON as the universal language that n8n uses to talk about your data.
- JSON Format: Each row of your Google Sheet is converted into a JSON object. The column headers of your sheet become the keys in these JSON objects, and the cell values become their corresponding values. So, your ‘Player’ column becomes a ‘Player’ key, and ‘Mickey Mantle’ becomes its value.
- Row Numbering: It’s important to note n8n’s row numbering convention. Unlike some programming contexts that start indexing at 0, n8n considers the header row as ‘Row 1’, and the first data row as ‘Row 2’, and so on. This can be a point of confusion for those accustomed to zero-based indexing. Just remember: headers count as row 1!
- Multiple Views: n8n’s output panel offers different views, such as ‘Table’ and ‘JSON’. While ‘Table’ provides a clear, tabular representation, the ‘JSON’ view shows the raw data structure, which is invaluable for debugging and understanding data flow. If you’re ever confused, switch to the JSON view – it tells the full story.
For example, a row like | Card | Player | Grade | Price | | 1952 Topps | Mickey Mantle | 9 | 5,200,000 | would be represented in n8n’s JSON output as {"Card": "1952 Topps", "Player": "Mickey Mantle", "Grade": "9", "Price": "5,200,000"}. This consistent structure allows for seamless integration with other n8n nodes, where you can easily reference these data fields using expressions like {{ $json.Player }}. It’s like learning the grammar of n8n’s data language!
This image shows the configuration for an ‘Append Row’ operation, where values for ‘Card’, ‘Player’, ‘Grade’, and ‘Price’ are being manually mapped. While this is an ‘Append Row’ example, it demonstrates the structure of how data fields are handled in n8n, which is directly relevant to understanding the output structure of ‘Get Row’ operations. The empty ‘Price’ field and the error message highlight the importance of complete and correct data input.
Understanding how n8n maps and handles data, as shown in this ‘Append Row’ configuration, is key to effectively interpreting the output from ‘Get Row’ operations.
Refining Data Retrieval: Options and Considerations
The ‘Get Row’ operation offers several options to refine your data retrieval, allowing you to fetch precisely what you need without pulling unnecessary information. This optimization is crucial for performance and efficiency, especially with large datasets. Why fetch a whole library when you only need one book, right?
- Row Range: You can specify a ‘Row Range’ to retrieve only a subset of rows (e.g., ‘2:10’ for rows 2 through 10). This is useful when you only need recent entries or a specific segment of your data. Remember, row 1 is your header!
- Column Range: Similarly, a ‘Column Range’ (e.g., ‘A:C’) allows you to fetch only specific columns, reducing the amount of data processed. This is great for when you only care about a few specific pieces of information.
- Value Render Option: This setting determines how cell values are returned. Options include ‘Formatted Value’ (as displayed in the sheet), ‘Unformatted Value’ (raw data), or ‘Formula’ (the actual formula if a cell contains one). Most of the time, ‘Formatted Value’ is what you want, but it’s good to know you have options!
While the Google Sheets node itself offers some basic filtering capabilities, it’s generally recommended to perform more complex filtering using n8n’s dedicated ‘Filter’ node after retrieving the data. This approach provides greater flexibility and control over your filtering logic. For instance, instead of trying to filter for specific grades directly in the ‘Get Row’ node, it’s often more efficient to get all relevant rows and then use a ‘Filter’ node to narrow down the results based on complex conditions. This separation of concerns simplifies debugging and makes your workflows more modular and reusable. It’s like separating your ingredients before you start cooking – much less messy!
Advanced Filtering: Precision Data Retrieval with ‘AND’ & ‘OR’ Conditions
Implementing Basic Filters with the ‘Filter’ Node
While the Google Sheets ‘Get Row’ node offers rudimentary filtering, n8n’s dedicated ‘Filter’ node provides a much more powerful and flexible way to refine your data. This node allows you to apply conditional logic to the data retrieved from Google Sheets, ensuring you only proceed with the relevant items. This is where you tell n8n, “Hey, only show me the good stuff!”
- Adding the Filter Node: After your ‘Google Sheets’ node (configured for ‘Get Row’), add a ‘Filter’ node to your workflow. Just like before, click the ’+’ and search for “Filter”.
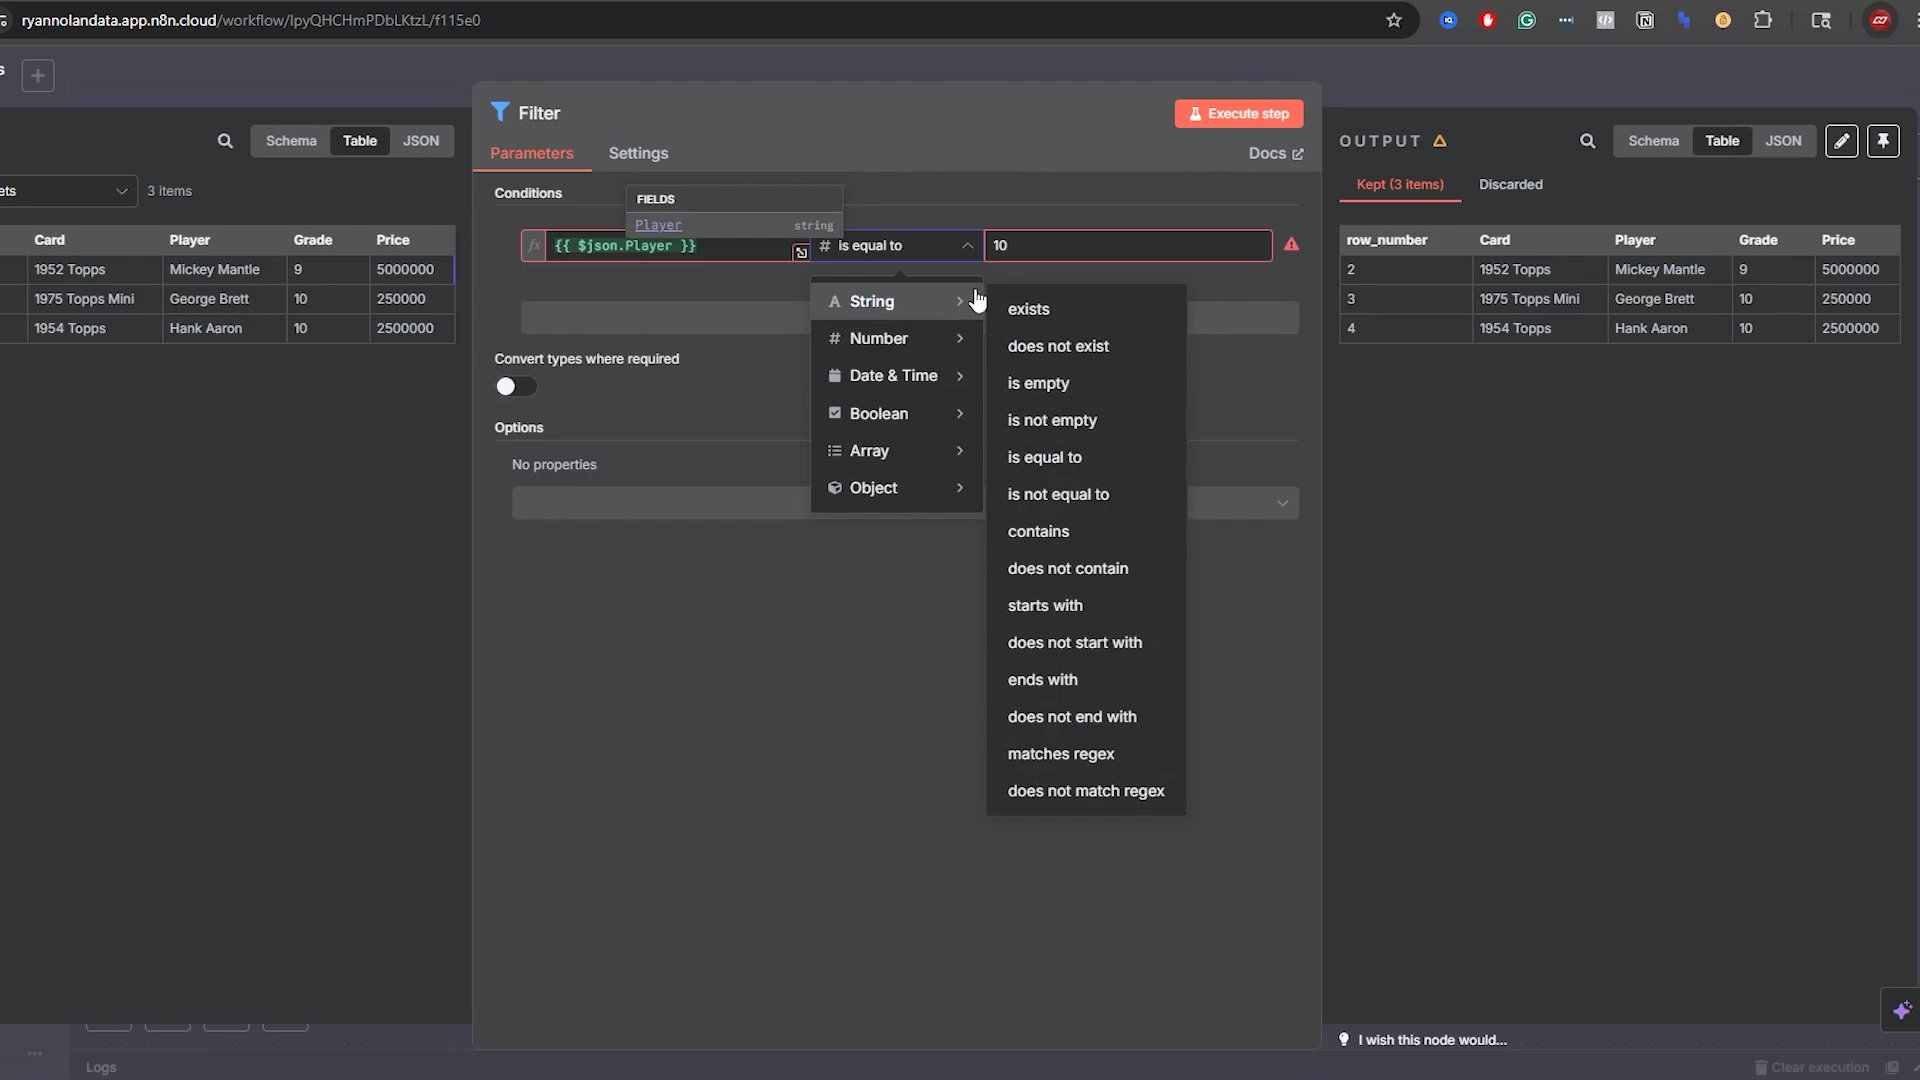
- Defining Conditions: In the ‘Filter’ node, you can specify one or more conditions. Each condition consists of a ‘Value 1’ (typically a data field from the previous node’s output, like
{{ $json.grade }}), an ‘Operator’ (e.g., ‘equals’, ‘greater than’), and a ‘Value 2’ (the value to compare against). This is where you get specific about what you’re looking for. - Data Type Consideration: Crucially, ensure you set the correct data type for your comparison (e.g., ‘Number’ for numerical grades, ‘String’ for player names). By default, n8n often treats values as strings, which can lead to incorrect comparisons if not adjusted. This is a common gotcha! Always double-check your data types, or your filter might not work as expected.
For example, to filter for cards with a ‘Grade’ of ‘10’, you would set ‘Value 1’ to {{ $json.grade }}, ‘Operator’ to ‘equals’, ‘Value 2’ to 10, and the ‘Type’ to ‘Number’. Executing this step would then only pass items where the grade is exactly 10, effectively removing any cards with different grades from the workflow’s subsequent execution path. This precision is vital for targeted automations. You’re basically telling n8n to be a bouncer, letting only the VIP data through!
This visual helps users understand how to configure basic filter conditions and troubleshoot common input errors.
Combining Conditions with ‘AND’ Logic
Often, you’ll need to filter data based on multiple criteria that all must be true. This is where the ‘AND’ logic within the ‘Filter’ node becomes indispensable. The ‘AND’ condition ensures that only items satisfying every specified condition are passed through the workflow. It’s like saying, “I want a red car and it must be a convertible.”
- Adding Multiple Conditions: Within the ‘Filter’ node, you can add multiple conditions by clicking the ‘Add Condition’ button. You can stack as many as you need!
- Default ‘AND’ Logic: By default, when you add multiple conditions, n8n applies an ‘AND’ logic, meaning all conditions must evaluate to true for an item to pass. So, if you add two conditions, n8n automatically assumes you want both to be true.
- Practical Example: To find cards with a ‘Grade’ of ‘10’ AND a ‘Price’ greater than ‘$1,000,000’, you would set up two conditions:
{{ $json.grade }}equals10(Type: Number){{ $json.price }}is greater than1000000(Type: Number)
Executing this filter would then yield only those items that meet both criteria. For instance, a Hank Aaron card with a grade of 10 and a price exceeding $1,000,000 would pass, while a George Brett card with a grade of 10 but a lower price would be filtered out. This precise targeting is crucial for workflows that require highly specific data subsets. You’re really narrowing down your search here!
This visual provides a clear example of how to implement and verify ‘AND’ logic in n8n filters.
Leveraging ‘OR’ Logic for Broader Data Retrieval
In contrast to ‘AND’ logic, ‘OR’ logic allows you to retrieve data where at least one of several conditions is true. This is useful when you need to include items that fit into one of several categories or meet alternative criteria. It’s like saying, “I want a red car or a blue car.” Either one works!
- Changing Logic Operator: In the ‘Filter’ node, you can switch the overall logic from ‘AND’ to ‘OR’ using the dropdown menu, typically labeled ‘Mode’. Look for that little dropdown, it’s important!
- Applying ‘OR’ Conditions: Once set to ‘OR’, any item that satisfies any of the defined conditions will pass through the filter. So, if even one condition is true, the item gets through.
- Practical Example: To retrieve cards that either have a ‘Grade’ of ‘10’ OR a ‘Price’ greater than ‘$1,000,000’, you would use the same two conditions as before but set the ‘Mode’ to ‘OR’.
In this scenario, a Mickey Mantle card with a grade of 9 but a price over $5,000,000 would pass the filter, as would a George Brett card with a grade of 10 but a lower price. The ‘OR’ condition significantly broadens the scope of retrieved data compared to ‘AND’, making it suitable for scenarios where flexibility in criteria is needed. Understanding when to use ‘AND’ versus ‘OR’ is fundamental to building effective and precise data filtering workflows in n8n. It’s all about choosing the right tool for the job!
This visual emphasizes the versatility of the ‘Filter’ node’s conditions, which can be combined with ‘OR’ logic for broader data selection.
Advanced Filtering: String Comparisons and Beyond
Beyond numerical comparisons, the ‘Filter’ node is equally powerful for working with string data, allowing for precise text-based filtering. This is particularly useful when dealing with names, descriptions, or categorical text fields. Because data isn’t always just numbers, right?
- String Operators: For string comparisons, operators like ‘equals’, ‘contains’, ‘starts with’, and ‘ends with’ are available. Remember to set the ‘Type’ to ‘String’ for these operations. These are super useful for finding specific words or phrases.
- Case Sensitivity: Be mindful of case sensitivity in string comparisons. If exact matches are needed regardless of case, you might need to transform the string to a consistent case (e.g., lowercase) before filtering using a ‘Code’ node or an expression. “Apple” is not the same as “apple” to a computer, unless you tell it otherwise!
- Regular Expressions: For highly complex pattern matching in strings, n8n’s ‘Filter’ node also supports regular expressions, offering unparalleled flexibility for advanced text filtering. If you need to find a needle in a haystack of text, regex is your best friend.
For instance, to filter for cards featuring ‘Mickey Mantle’, you would set ‘Value 1’ to {{ $json.player }}, ‘Operator’ to ‘equals’, ‘Value 2’ to Mickey Mantle, and ‘Type’ to ‘String’. This would isolate all items matching that specific player. The ability to perform such granular string-based filtering, combined with numerical and logical conditions, makes n8n’s ‘Filter’ node an incredibly versatile tool for data manipulation, allowing you to segment and process your Google Sheets data with high precision before it moves to subsequent workflow steps. You’re becoming a data detective!
Updating & Appending Data: Keeping Your Google Sheets Dynamic
Appending New Rows to Your Google Sheet
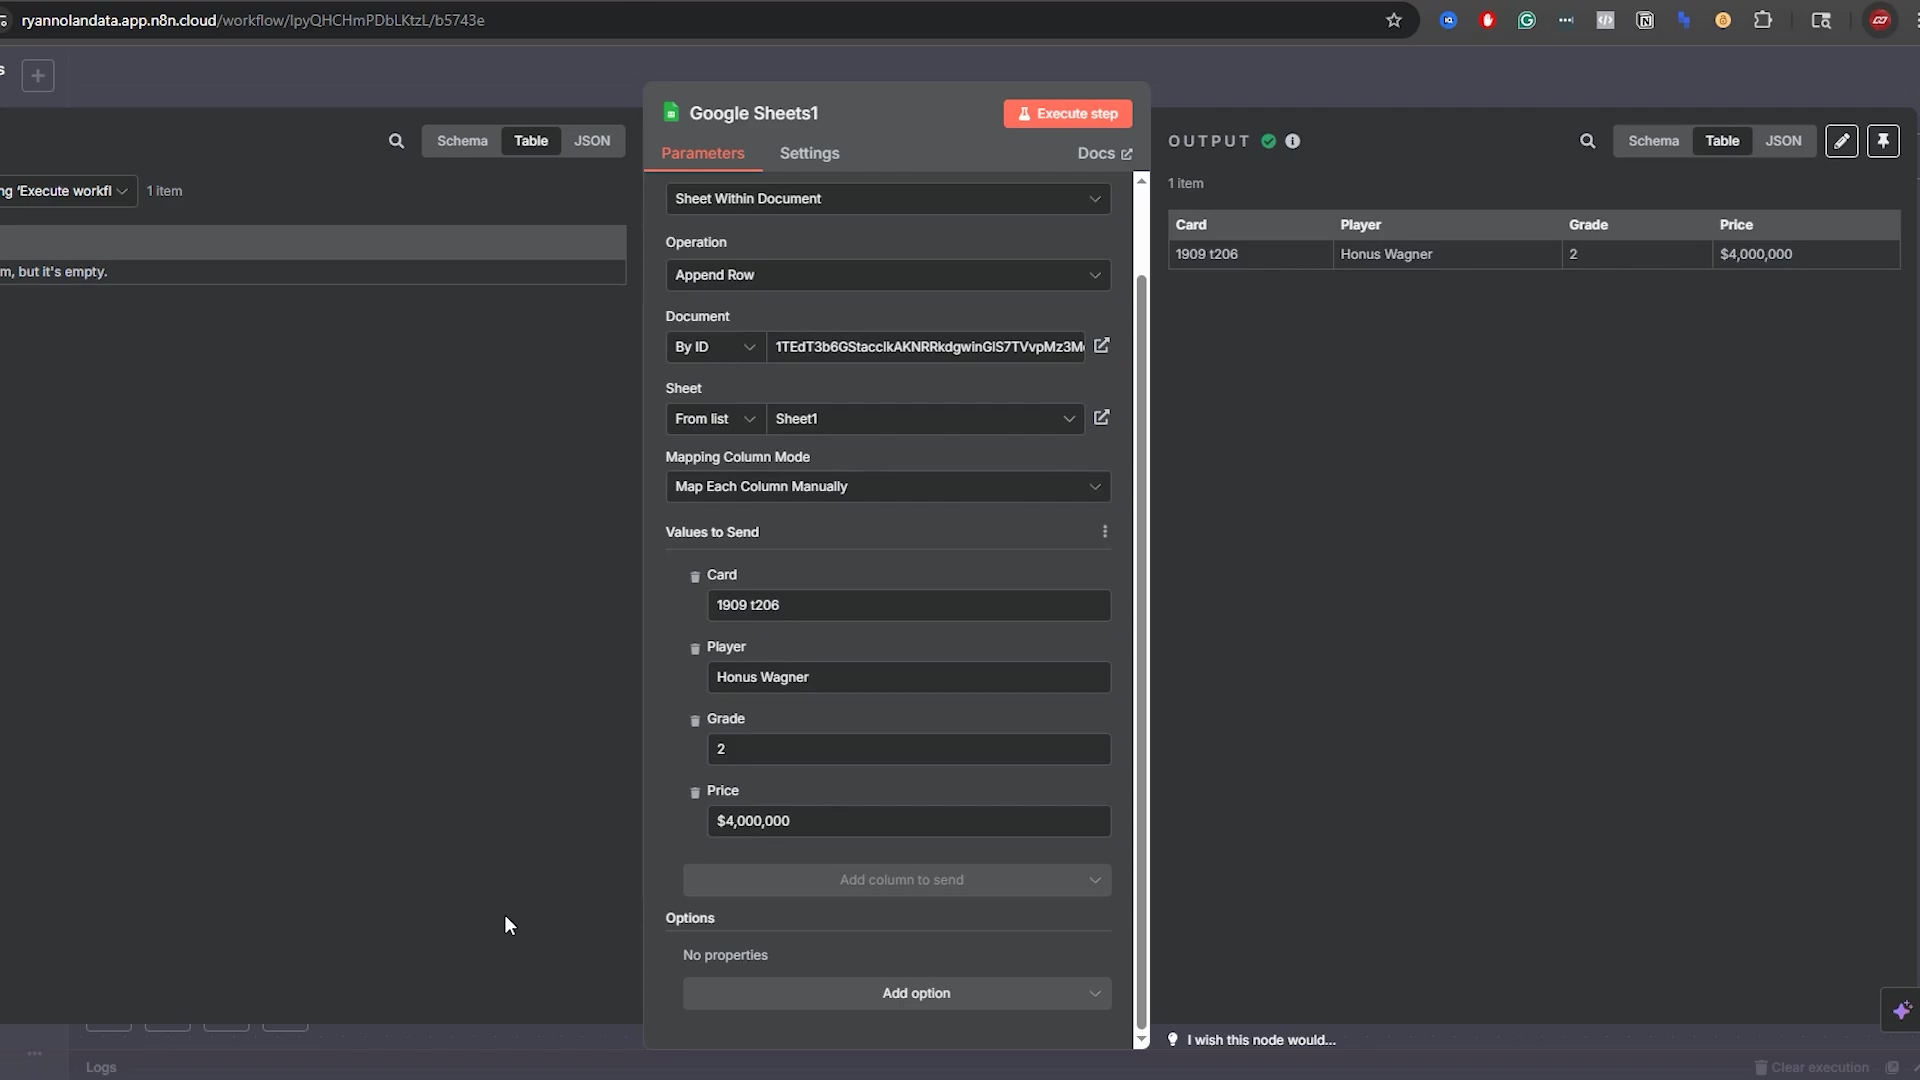
Adding new data is a common requirement in many automated workflows. n8n’s ‘Append Row’ operation in the Google Sheets node allows you to seamlessly add new entries to the end of your spreadsheet, ensuring your data remains current. It’s like adding a new page to your digital notebook.
- Selecting ‘Append Row’: In the Google Sheets node, choose ‘Append Row’ from the ‘Operation’ dropdown. This tells n8n you want to add new data.
- Document and Sheet Identification: As before, specify the ‘Document ID’ and ‘Sheet Name’ where the new row should be added. We’re always precise about where our data goes, right?
- Providing Values: In the ‘Values to Send’ section, you’ll map the data from previous nodes (or manually enter it) to the corresponding columns in your Google Sheet. For example, if you have a ‘Card’ column, you would provide the new card’s name. You’re basically filling out a form for n8n to put into your sheet.
Consider a scenario where you’re scraping real estate listings daily. After extracting new listings, you can use the ‘Append Row’ operation to add them to your master Google Sheet. This ensures that your sheet is always up-to-date with the latest information without any manual intervention. The process is straightforward: define the data to be added, and n8n handles the rest, placing the new row at the next available position in your sheet. No more copy-pasting new listings every day – n8n’s got your back!
This visual clearly illustrates the process of appending new data to a Google Sheet using n8n.
Updating Existing Data with ‘Update Row’
Modifying existing records in your Google Sheet is just as important as adding new ones. The ‘Update Row’ operation in n8n enables you to change specific data points within a row, ensuring accuracy and currency of your information. It’s like editing a specific entry in your notebook, not rewriting the whole page.
- Choosing ‘Update Row’: Select ‘Update Row’ as the operation in your Google Sheets node. This tells n8n you want to change something that’s already there.
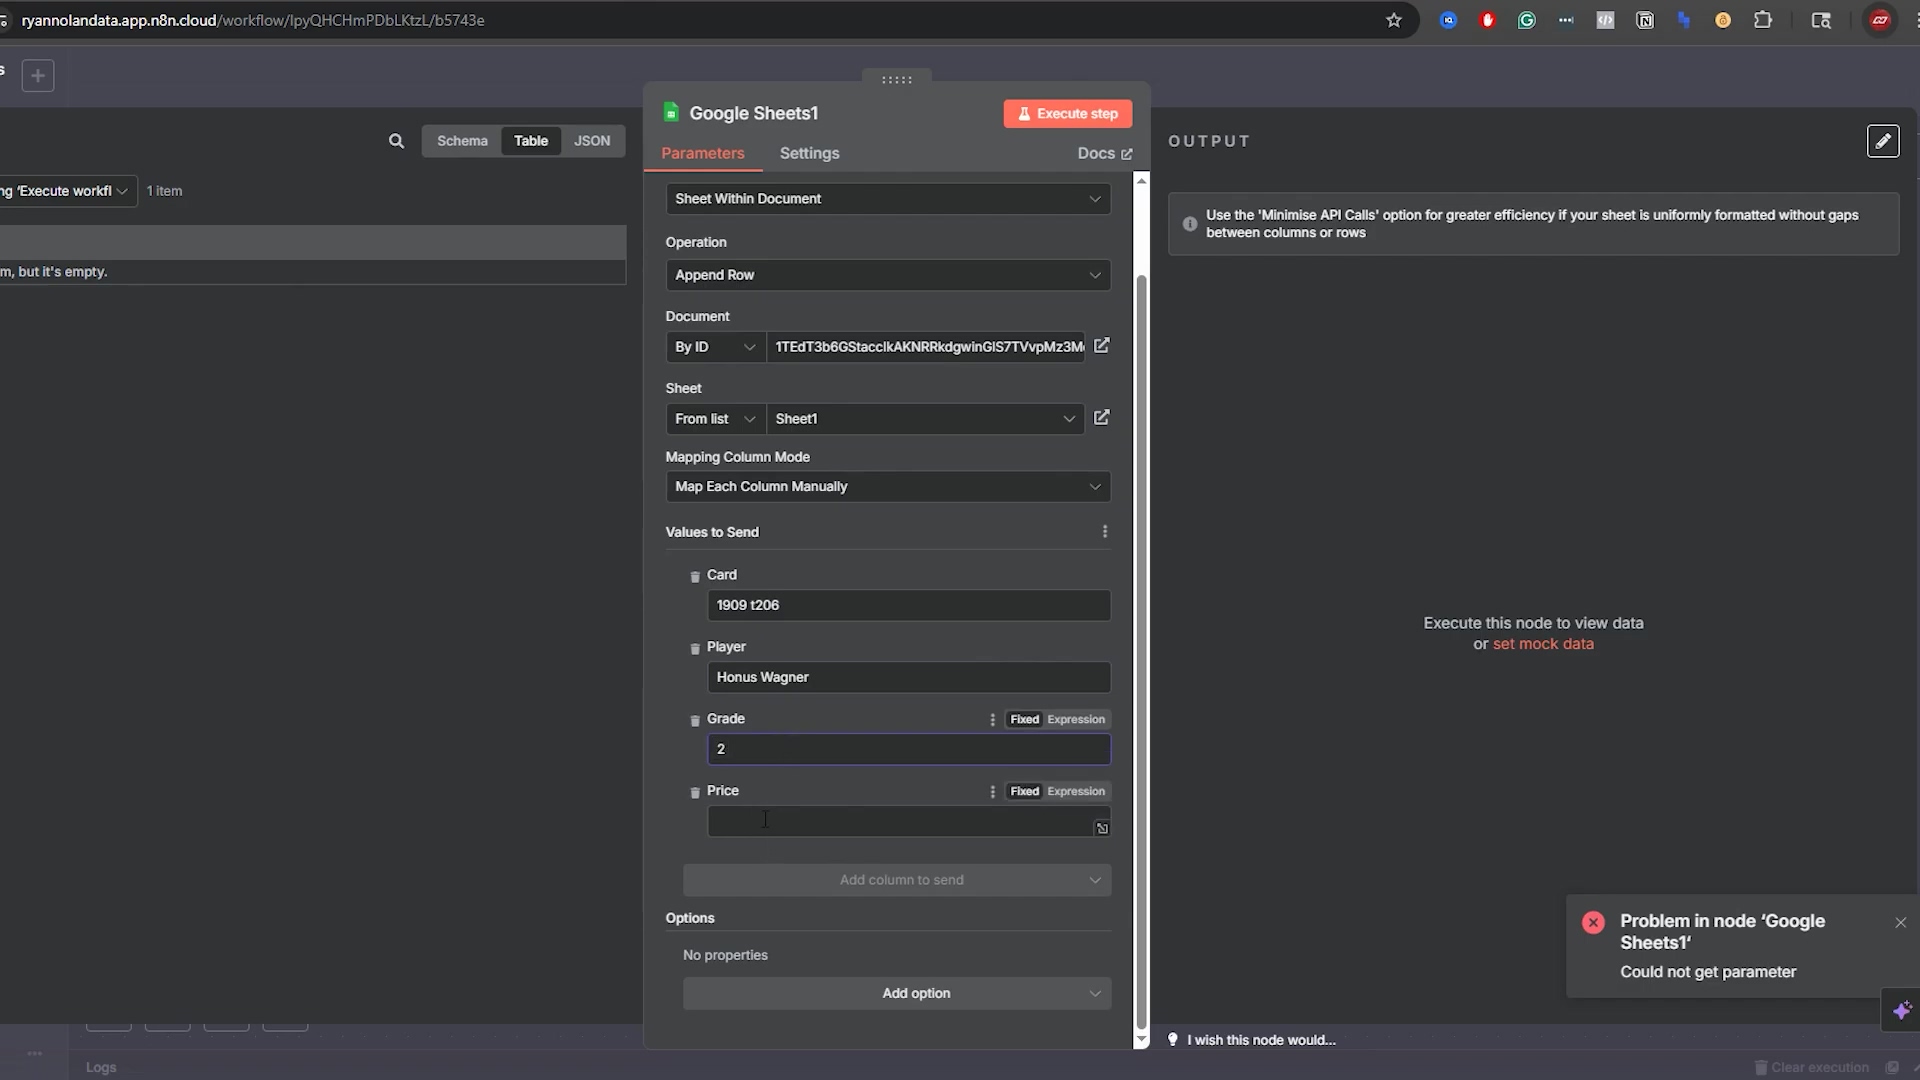
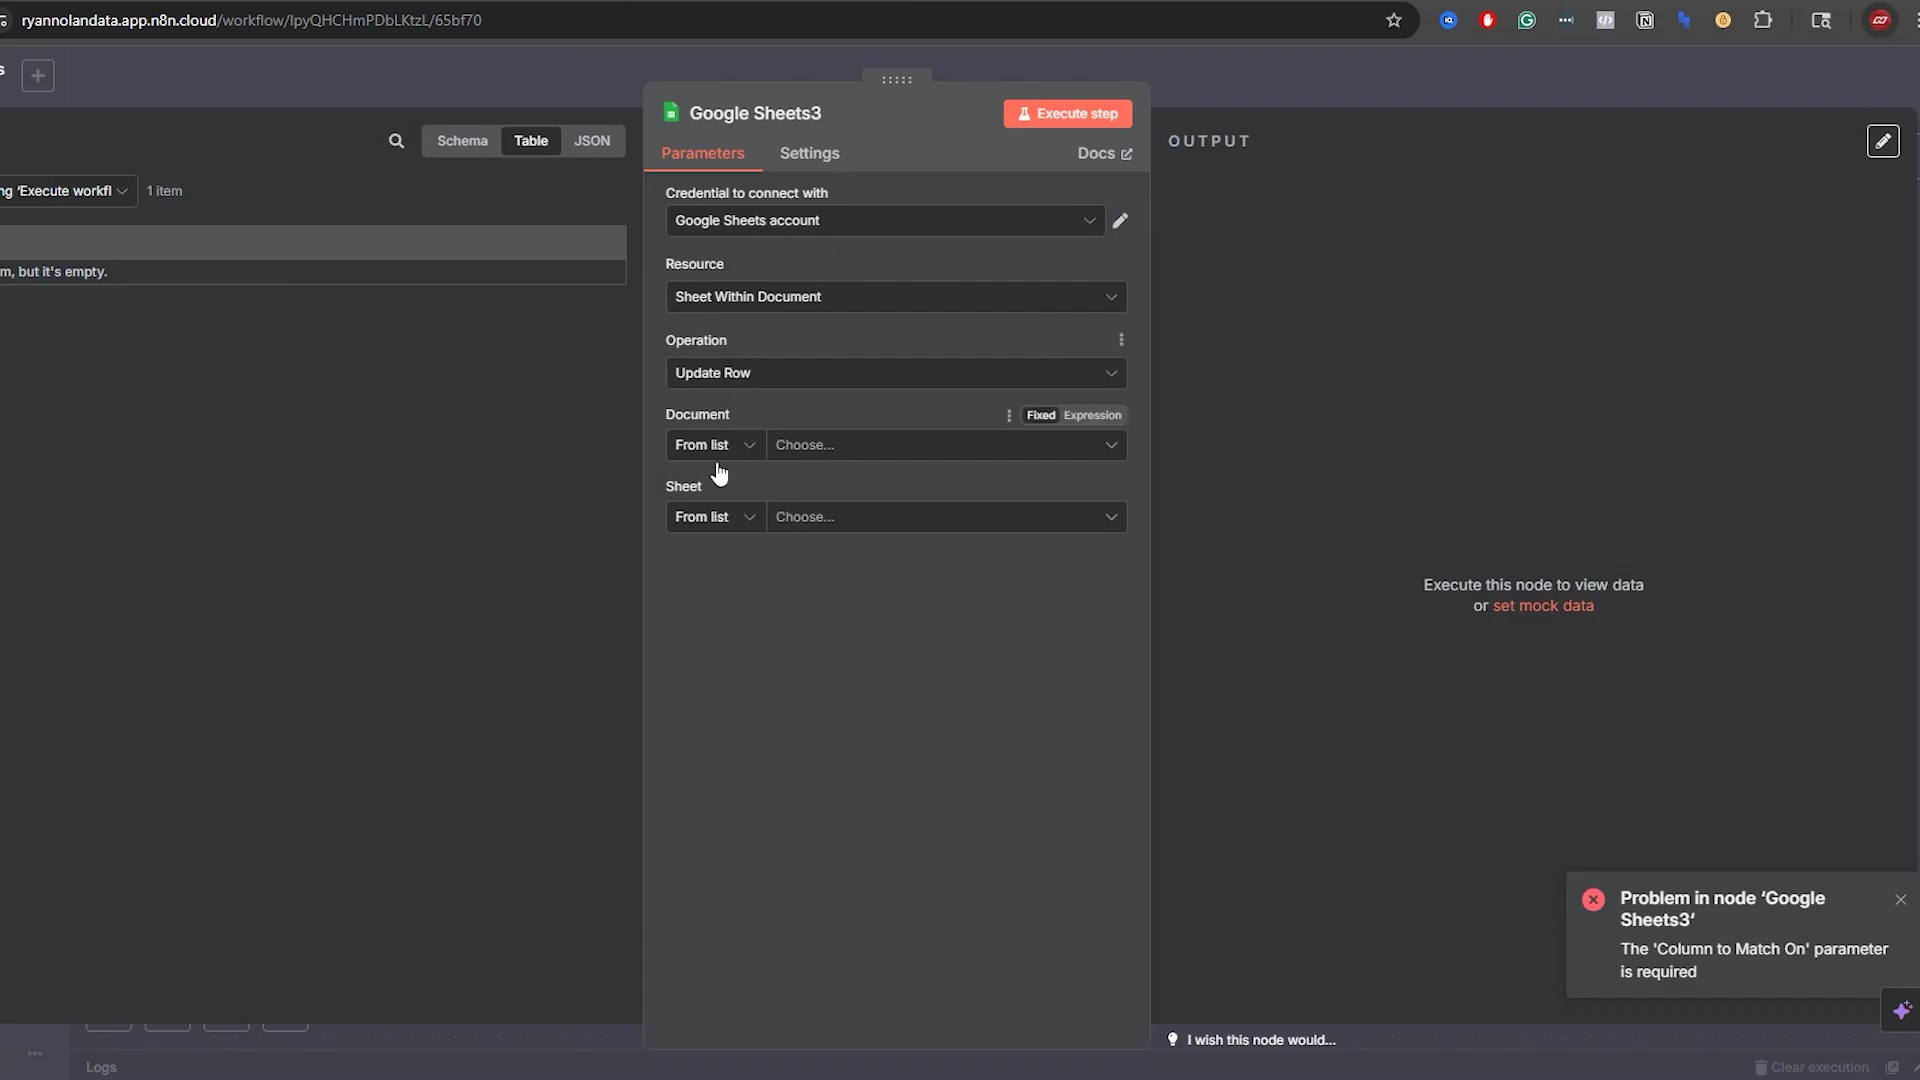
- Matching Column: Crucially, you must define a ‘Column to Match On’. This column’s value will be used to identify the specific row you want to update. Ideally, this should be a unique identifier (like a ‘Card ID’ or ‘Order Number’). This is super important! If you don’t have a unique identifier, n8n might update the wrong row, or multiple rows, and that’s a headache you don’t want.
- Matching Value: Provide the ‘Value to Match’ in the specified column. n8n will search for the first row where the ‘Column to Match On’ contains this value. So, if your matching column is ‘Card’ and your matching value is ‘1952 Topps Mickey Mantle’, n8n will find that specific row.
- New Values: In the ‘Values to Send’ section, provide the updated data for the relevant columns. Only the columns you specify here will be modified; others will remain unchanged. You only update what you need to, leaving everything else untouched.
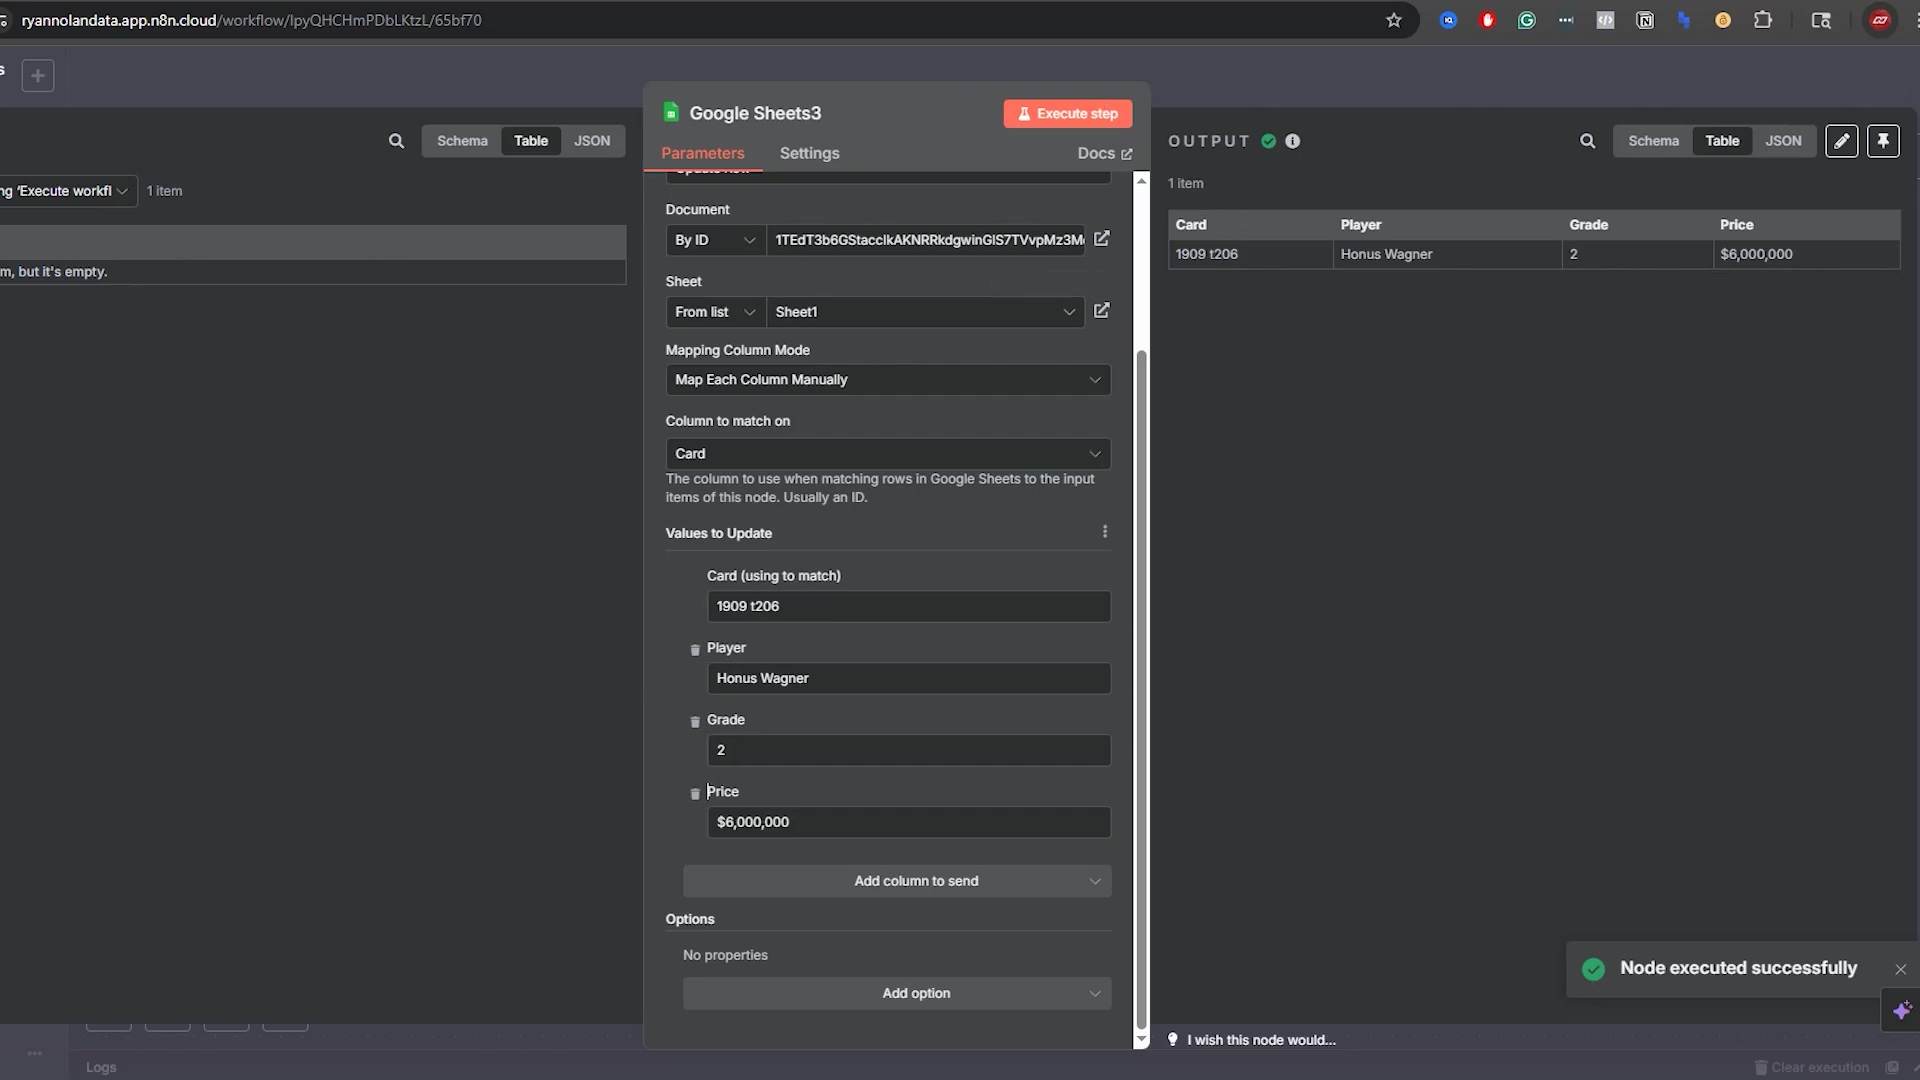
For example, if the price of a ‘1909 T206 Honus Wagner’ card changes, you can use ‘Update Row’. You’d set ‘Column to Match On’ to ‘Card’, ‘Value to Match’ to ‘1909 T206 Honus Wagner’, and then update the ‘Price’ field with the new value. This ensures that your sheet reflects the latest information accurately. It’s vital to use a unique identifier for matching to prevent unintended updates to multiple rows. Seriously, use those unique IDs!
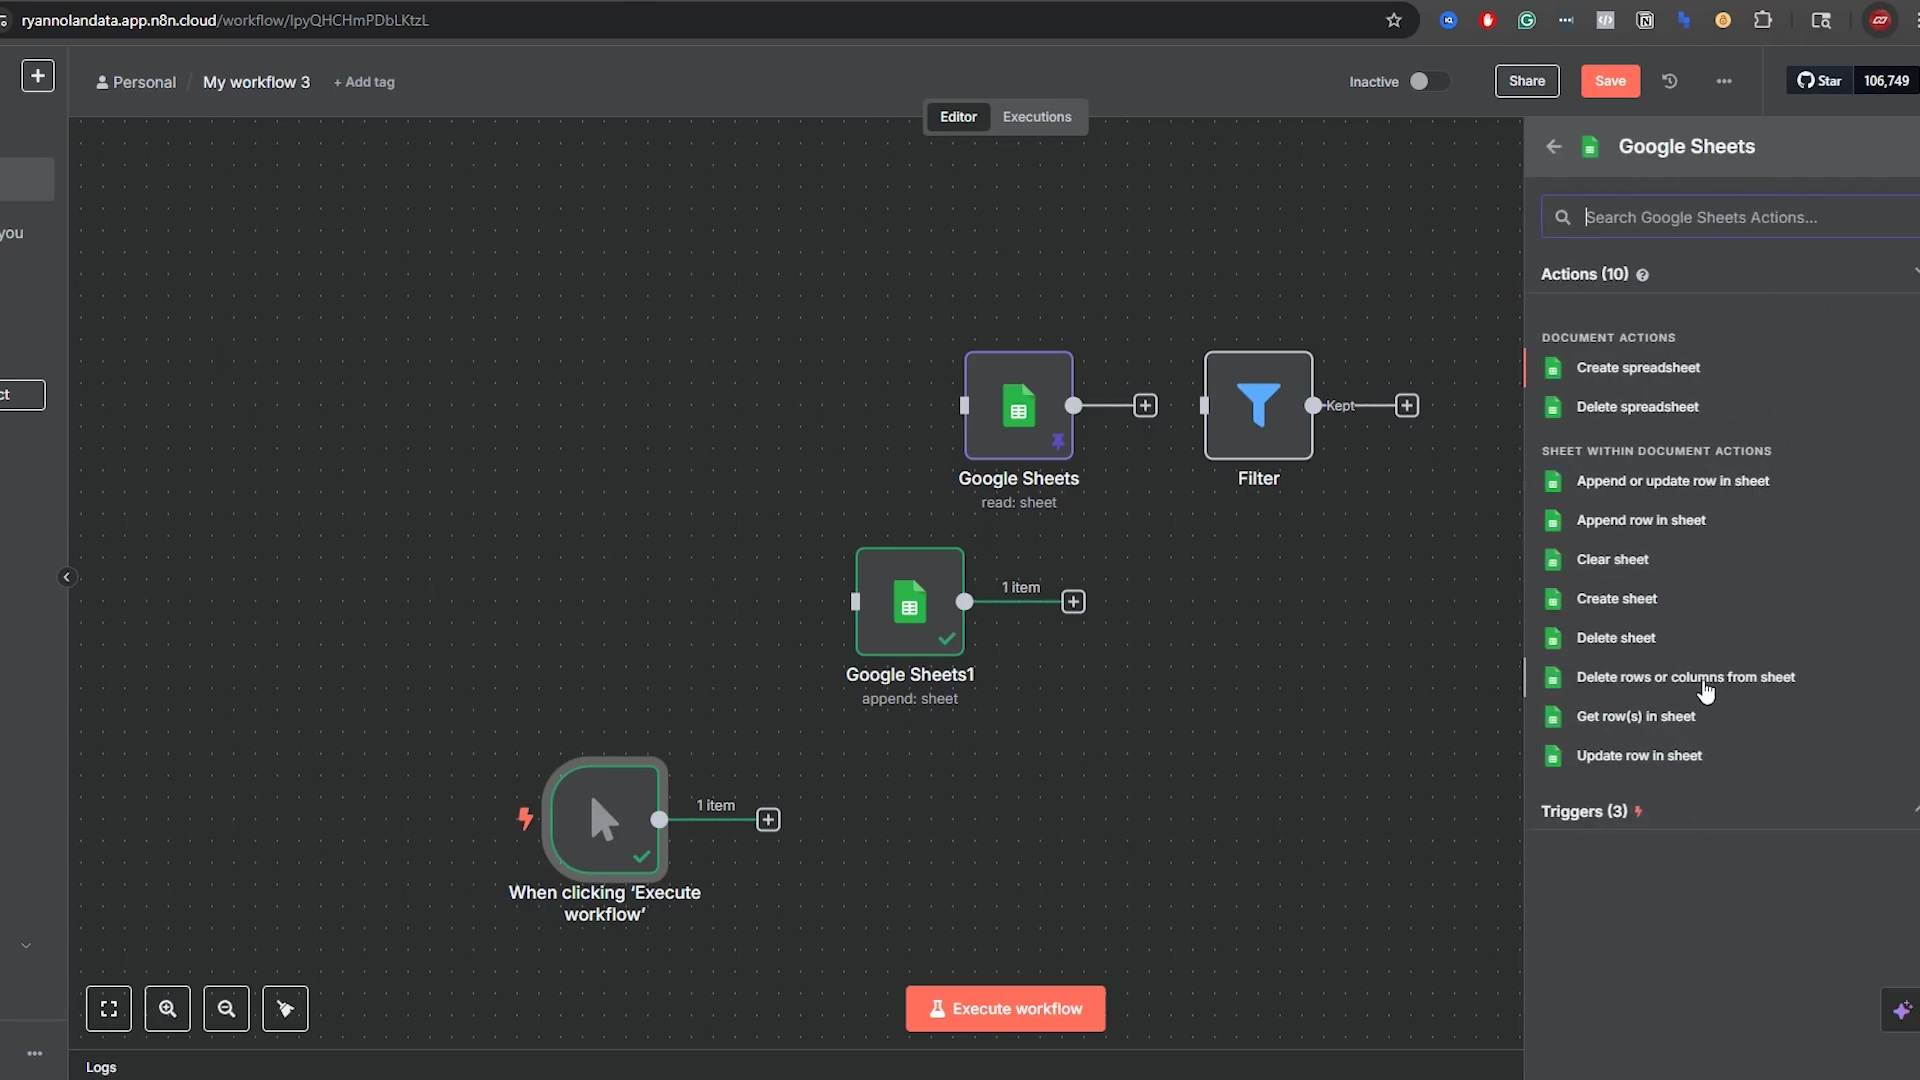
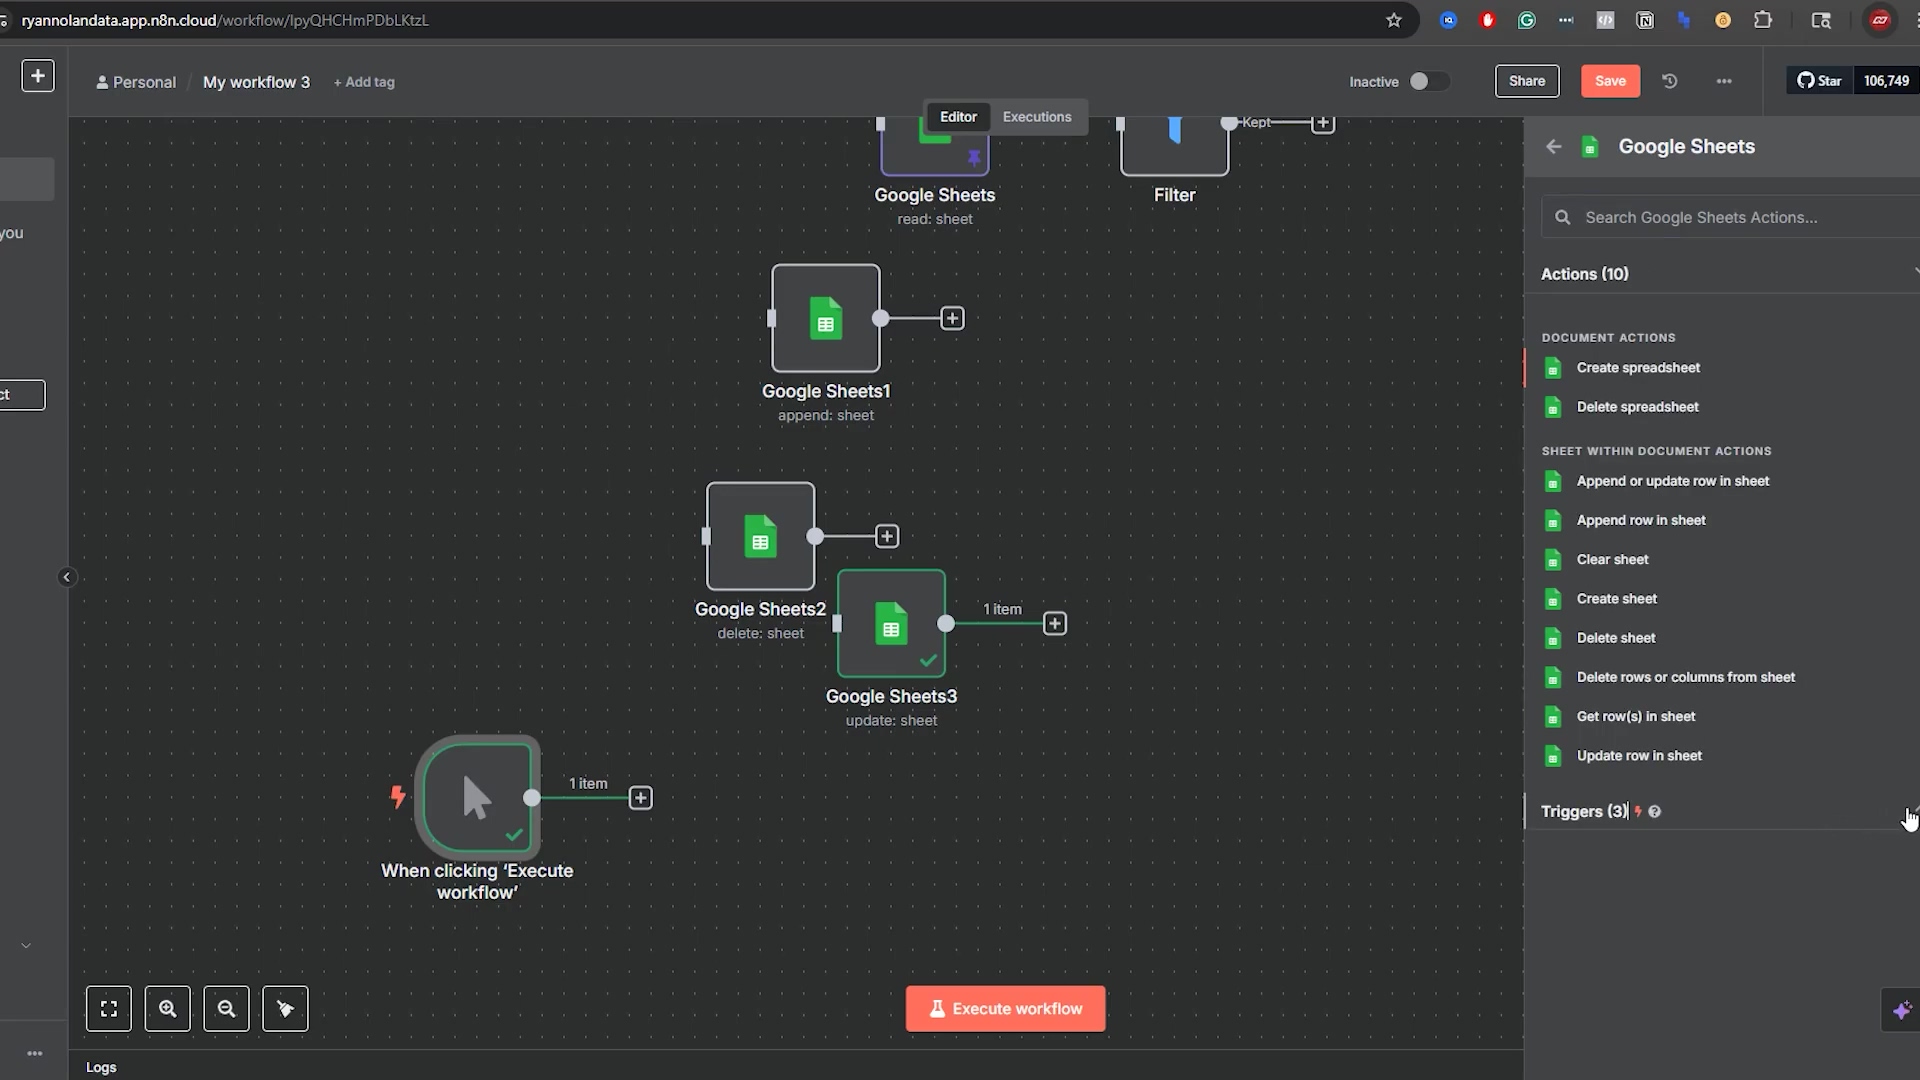
This image shows the n8n workflow editor with various Google Sheets actions listed, including ‘Append or update row in sheet’ and ‘Update row in sheet’. This visual context helps users understand the range of operations available for modifying data in Google Sheets. The highlighted ‘Update row in sheet’ option indicates its relevance to this section.
Considerations for Dynamic Data Management
When working with ‘Append Row’ and ‘Update Row’ operations, several considerations can help you build more robust and intelligent workflows, especially when dealing with dynamic data. We’re talking about making your automations smart and resilient!
- Unique Identifiers: As highlighted, using a unique identifier for ‘Update Row’ is paramount. If your sheet lacks one, consider adding an ‘ID’ column and populating it with unique values (e.g., using a ‘UUID’ function in n8n) upon initial data entry. You can generate a UUID right within n8n – it’s a globally unique identifier, perfect for this!
- Conditional Logic: Before appending or updating, you might want to add conditional logic using ‘IF’ nodes. For instance, check if a record already exists before appending a new one, or only update if a value has actually changed. This prevents duplicate entries and unnecessary updates.
- Error Handling: Implement error handling in your workflows to gracefully manage situations where a row to be updated is not found or if there are issues with data formatting. This ensures your automation doesn’t break unexpectedly. Don’t let a small hiccup derail your entire workflow!
| Operation | Purpose | Key Consideration | Example Scenario |
|---|---|---|---|
| Append Row | Add new data as a new row at the end of the sheet. | Ensure data schema matches sheet headers. | Adding new leads from a web form. |
| Update Row | Modify specific cells in an existing row. | Requires a unique identifier for matching. | Updating product inventory levels. |
By thoughtfully designing your workflows and considering these points, you can create highly efficient and reliable systems for dynamic data management in Google Sheets using n8n. This proactive approach minimizes data inconsistencies and maximizes the value of your automated processes. You’re not just automating; you’re building a fortress for your data!
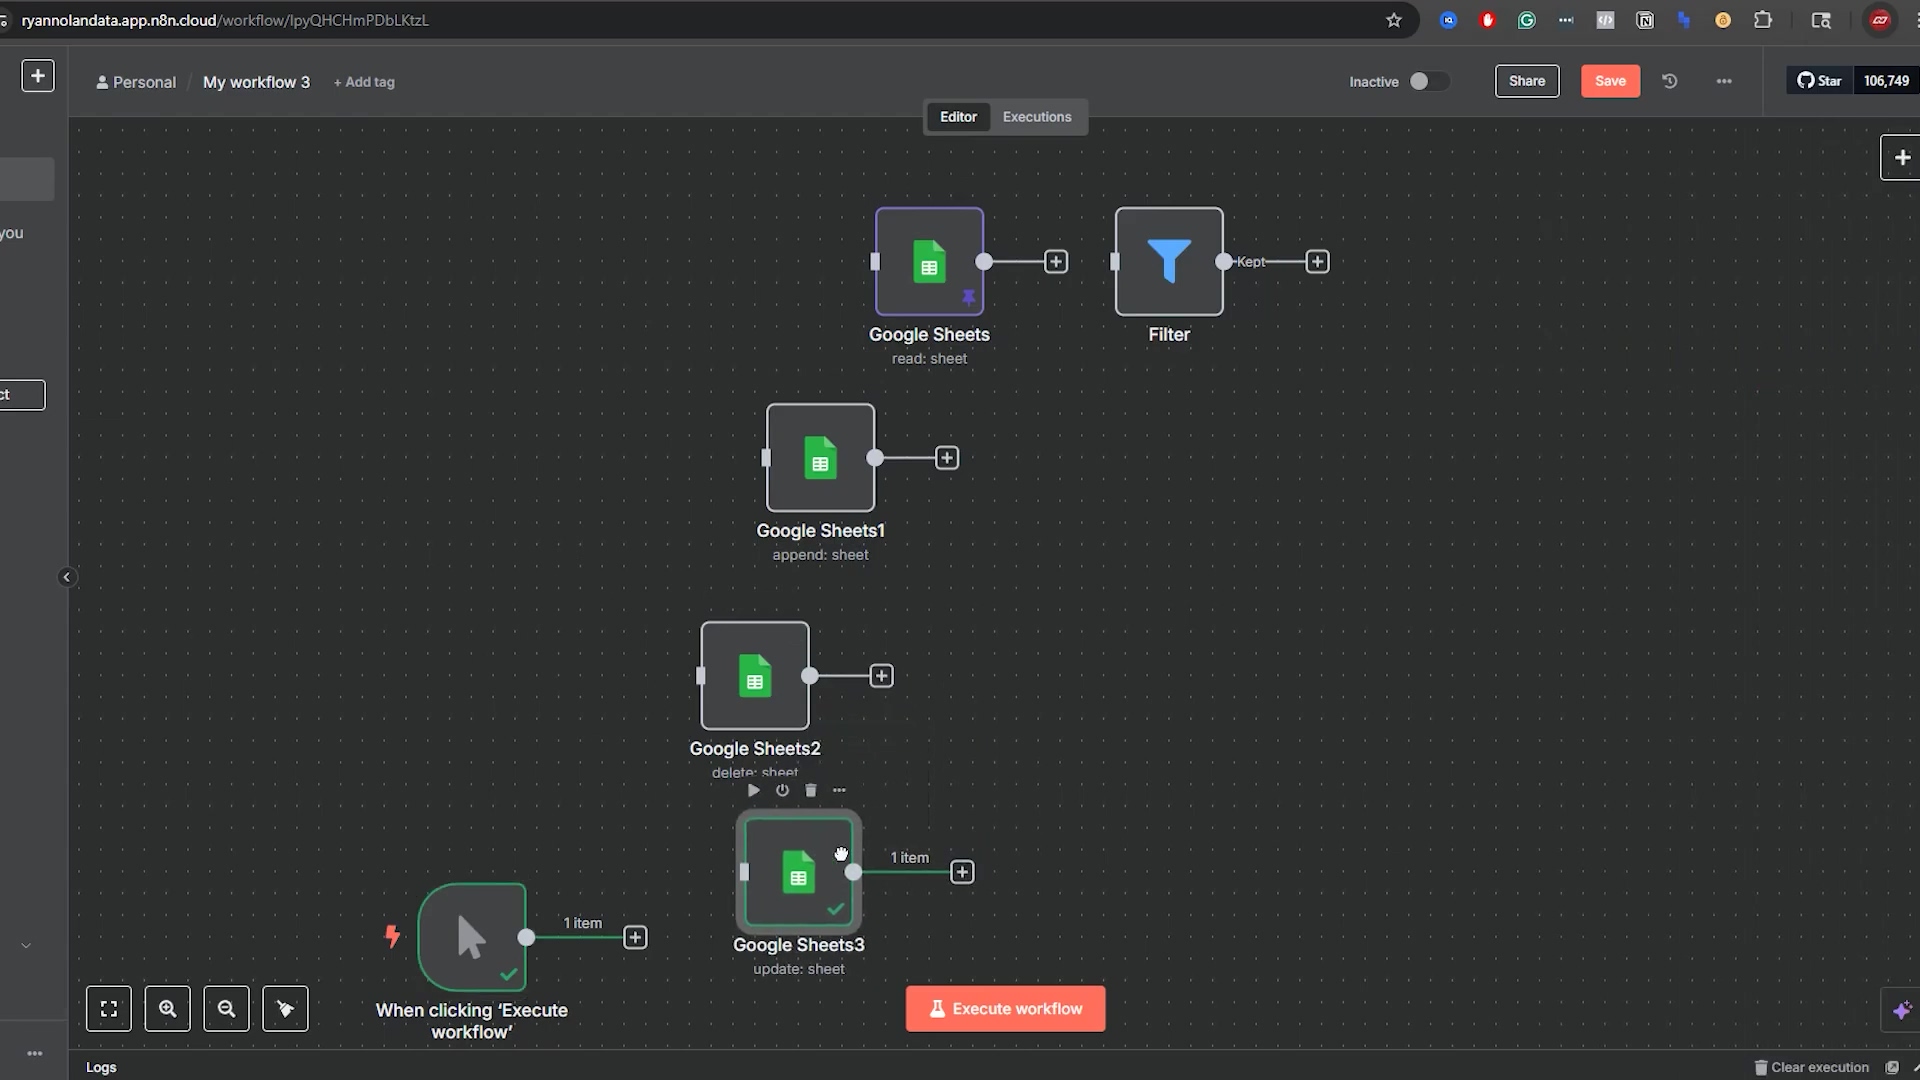
This image shows the configuration panel for a ‘Google Sheets3’ node, with an error message indicating that the ‘Column to Match On’ parameter is required for an update operation. This visually reinforces the critical need for a matching column when updating rows, a key consideration for dynamic data management. The empty output panel also suggests that the node has not yet successfully executed due to this missing parameter.
Deleting Data: Maintaining Clean & Relevant Google Sheets
Removing Rows with the ‘Delete Rows or Columns’ Operation
Maintaining a clean and relevant Google Sheet often involves removing outdated or incorrect data. n8n’s ‘Delete Rows or Columns’ operation provides a controlled way to remove specific rows from your spreadsheet, helping you keep your data organized and accurate. It’s like decluttering your digital space!
- Selecting the Operation: In the Google Sheets node, choose ‘Delete Rows or Columns’ from the ‘Operation’ dropdown. This tells n8n you want to get rid of some data.
- Document and Sheet Identification: Specify the ‘Document ID’ and ‘Sheet Name’ from which you intend to delete rows. Always confirm you’re targeting the right sheet!
- Row Specification: You must specify the ‘Start Row Number’ and the ‘Number of Rows to Delete’. Remember n8n’s row numbering convention, where the header is row 1, and the first data row is row 2. This is crucial! Deleting the wrong row can be a real pain.
For example, if you want to delete the third data row (which n8n considers row 4), you would set ‘Start Row Number’ to ‘4’ and ‘Number of Rows to Delete’ to ‘1’. It’s crucial to be extremely careful with this operation, as accidental deletions can lead to irreversible data loss. Always double-check your row numbers and consider implementing a confirmation step in your workflow for critical deletions. You wouldn’t throw out important papers without looking, would you? Treat your digital data the same way!
This image shows a Google Sheet with ‘1909 t206’ selected, which corresponds to the ‘Player’ column for ‘Honus Wagner’. This visual helps to identify a specific row that might be targeted for deletion or modification, setting the stage for understanding how ‘Delete Rows or Columns’ would operate on such data. The clear display of the sheet’s content allows for easy reference.
Practical Examples for Data Cleanup
Automating data deletion can be a powerful tool for maintaining data hygiene, especially in scenarios where data has a limited shelf life or becomes irrelevant after a certain period. Here are some practical applications:
- Archiving Old Records: Automatically delete customer records from a live sheet after they’ve been inactive for a certain period, moving them to an archive sheet first. This keeps your active data lean and mean.
- Removing Test Data: After testing a new workflow, use the ‘Delete Rows’ operation to clean up any temporary or test data that was added to your sheet. No one wants test data cluttering up their real data!
- Managing Temporary Data: For sheets used for temporary data processing, set up a scheduled workflow to periodically clear out old entries, ensuring the sheet remains performant and manageable. Keep things running smoothly!
Consider a scenario where a George Brett card entry needs to be removed from your sheet. If it’s the third data row, you would configure the ‘Delete Rows or Columns’ node to start at row 4 (since the header is row 1, and the first data row is row 2) and delete 1 row. Executing this step would then remove that specific entry. Always ensure you have a backup strategy or a way to recover data before performing automated deletions on critical sheets. Better safe than sorry, always!
This image shows the n8n ‘Google Sheets3’ node configuration for an ‘Update Row’ operation, specifically updating the price of the ‘1909 t206 Honus Wagner’ card to ‘$6,000,000’. While this is an update, it demonstrates the precision with which n8n can target specific rows using a ‘Column to Match On’ (Card) and ‘Value to Match’ (1909 t206). This precision is equally critical when performing deletion operations to ensure the correct rows are targeted.
Safeguarding Against Accidental Data Loss
Automated deletion, while efficient, carries inherent risks of unintended data loss. Implementing safeguards and best practices is essential to protect your valuable information. We’re talking about protecting your digital treasures here!
- Backup Strategy: Before running any workflow that involves deleting data, ensure you have a recent backup of your Google Sheet. Google Sheets’ version history can be a lifesaver, but an explicit backup is always recommended. Think of it as having an undo button for your entire sheet.
- Confirmation Steps: For critical deletion workflows, consider adding a manual confirmation step (e.g., sending an email for approval) or a delay node to review the data to be deleted before the ‘Delete Rows’ operation executes. A human check can prevent a lot of grief!
- Filter Before Delete: Always use a ‘Filter’ node before a ‘Delete Rows’ operation to precisely identify the rows to be deleted. Never rely on hardcoded row numbers unless absolutely necessary and verified. This is your best defense against deleting the wrong stuff!
| Best Practice | Description | Benefit |
|---|---|---|
| Use Filters | Precisely identify rows for deletion using conditional logic. | Prevents accidental deletion of incorrect rows. |
| Implement Backups | Regularly back up your Google Sheets or leverage version history. | Enables data recovery in case of errors. |
| Add Confirmations | Introduce manual review or approval steps for critical deletions. | Provides a human check before irreversible actions. |
| Test Thoroughly | Always test deletion workflows on a copy of your sheet first. | Validates workflow logic without risk to live data. |
By adhering to these safeguards, you can leverage the power of automated data deletion in n8n while minimizing the risks associated with it. This balance of efficiency and caution is key to successful and responsible workflow automation. You’re becoming a responsible automation engineer!
Beyond the Basics: Expanding Your n8n & Google Sheets Workflows
Leveraging Google Sheets Triggers for Real-time Automation
While we’ve focused on manual triggers for basic operations, n8n offers powerful Google Sheets triggers that can initiate workflows in real-time based on changes within your spreadsheets. This capability transforms your static sheets into dynamic data sources for automation. It’s like giving your spreadsheet a superpower – it can now tell n8n when something happens!
- ‘When a Row is Added or Updated’: This trigger fires whenever a new row is added or an existing row is modified in your specified Google Sheet. This is ideal for reacting instantly to new data entries or changes. Imagine getting an alert the second a new order comes in!
- ‘When a Column is Added or Updated’: Less common but equally useful, this trigger activates when changes occur at the column level, which might be relevant for schema-driven workflows. This is for those really specific use cases.
- Configuration: Setting up a trigger involves selecting the Google Sheets trigger node, authenticating your Google account, and specifying the document and sheet to monitor. n8n will then listen for changes and automatically start your workflow. It’s always listening, always ready to act!
Imagine a scenario where a customer fills out a form that populates a Google Sheet. With a ‘When a Row is Added’ trigger, you can immediately initiate a workflow to send a welcome email, create a task in your CRM, or update a sales dashboard. This real-time responsiveness significantly enhances operational efficiency and customer engagement, moving beyond batch processing to instant action. This is where automation truly shines – instant reactions, instant results!
Exploring More Complex Data Transformations
n8n’s strength lies not just in connecting applications but also in its ability to transform data between them. When integrating with Google Sheets, you’ll often encounter scenarios where data needs to be reshaped, cleaned, or enriched before it’s used elsewhere. Think of n8n as a data chef, preparing your ingredients just right for the next dish.
- ‘Set’ Node: Use the ‘Set’ node to add new fields, modify existing ones, or remove unwanted data from your items. This is perfect for standardizing data formats or adding calculated values. It’s like a Swiss Army knife for your data fields.
- ‘Code’ Node: For highly custom transformations that cannot be achieved with standard nodes, the ‘Code’ node allows you to write JavaScript to manipulate data programmatically. This provides ultimate flexibility. If you know a little code, this node is your playground!
- ‘Split In Batches’ / ‘Merge’ Nodes: When dealing with large datasets or needing to process items individually before re-combining them, these nodes help manage the flow and structure of your data efficiently. It’s like breaking a big task into smaller, manageable chunks, then putting them back together.
For example, if your Google Sheet contains separate ‘First Name’ and ‘Last Name’ columns, but another application requires a ‘Full Name’ field, you can use a ‘Set’ node to combine these two fields into a new ‘Full Name’ field. Similarly, you might use a ‘Code’ node to parse complex strings or perform custom calculations on numerical data before writing it back to a sheet or sending it to another service. These transformation capabilities are what make n8n truly powerful for data orchestration. You’re becoming a data sculptor!
Combining Operations for Sophisticated Workflows
The true power of n8n and Google Sheets integration emerges when you combine multiple operations and nodes to create sophisticated, multi-step workflows. This allows for the automation of complex business processes that would otherwise require significant manual effort or custom development. This is where you go from building LEGO bricks to building a whole LEGO city!
- Conditional Logic Branches: Use ‘IF’ nodes to create different execution paths based on data conditions. For instance, if a new entry in Google Sheets meets certain criteria, send an email; otherwise, update a different sheet. It’s like a choose-your-own-adventure for your data.
- Looping and Iteration: For processing multiple rows or items from a Google Sheet individually, ‘Loop’ nodes (like ‘Split In Batches’ followed by a ‘Merge’ node) allow you to apply operations to each item sequentially. This is super handy for processing lists of things one by one.
- Integration with Other Services: Connect Google Sheets data with CRMs (e.g., Salesforce, HubSpot), communication platforms (e.g., Slack, Email), project management tools (e.g., Trello, Asana), or external APIs to build comprehensive automation solutions. The sky’s the limit when you connect everything!
Consider a workflow that monitors new entries in a Google Sheet for ‘High Priority’ tasks. When a new high-priority task is added, n8n could: 1) Read the new row, 2) Filter for ‘High Priority’, 3) Create a new task in Asana, 4) Send a notification to a Slack channel, and 5) Update a ‘Status’ column in the Google Sheet. This end-to-end automation demonstrates how Google Sheets can serve as a central data hub, driving actions across your entire digital ecosystem, all orchestrated by n8n. You’re basically building your own digital nervous system!
| Workflow Component | Purpose | Example Use Case |
|---|---|---|
| Google Sheets Trigger | Initiates workflow on sheet changes. | Automatically process new form submissions. |
| Filter Node | Selectively route data based on conditions. | Only process sales leads above a certain value. |
| Set Node | Transform or enrich data fields. | Format dates, combine names, add default values. |
| External App Nodes | Interact with other services (CRM, Email, etc.). | Send email, create CRM entry, post to Slack. |
| Google Sheets Update | Write back status or results to the sheet. | Mark a task as ‘Processed’ or ‘Completed’. |
This modular approach, combining triggers, data manipulation, external integrations, and Google Sheets operations, empowers you to build highly customized and efficient automation solutions. The journey from basic ‘Get Row’ to these sophisticated workflows is a testament to the power and flexibility of n8n. You’ve come a long way, my friend!
Conclusion
Mastering Google Sheets Automation: A Recap
Wow, we’ve embarked on a comprehensive journey, transforming how you interact with Google Sheets through the power of n8n. From the initial connection and basic data retrieval to advanced filtering with ‘AND’ and ‘OR’ conditions, and finally to dynamic data management through ‘Append’, ‘Update’, and ‘Delete’ operations, you now possess the foundational knowledge to automate a significant portion of your data workflows. The ability to precisely control data flow, ensure data integrity, and react to real-time changes in your spreadsheets positions you to achieve unprecedented levels of efficiency and accuracy. This mastery not only saves valuable time but also liberates resources for more strategic initiatives. You’re basically a Google Sheets automation ninja now!
The Future of Your Automated Workflows
This guide is merely the beginning. The true potential of n8n and Google Sheets integration lies in its extensibility. Imagine leveraging Google Sheets triggers to initiate complex workflows that span across dozens of applications, transforming raw data into actionable insights, automated reports, or personalized customer communications. As you grow more comfortable, explore integrating AI services for data enrichment, utilizing advanced data visualization tools, or even building custom dashboards powered by your automated Google Sheets. The low-code nature of n8n means that these sophisticated automations are within reach, empowering you to continuously innovate and optimize your digital operations. The future is automated, and you’re at the forefront!
Your Next Steps to Enhanced Productivity
Ready to elevate your automation game? Start by revisiting your most repetitive Google Sheets tasks. Can you identify a process that consumes more than 30 minutes of your day? Begin by building a simple n8n workflow to automate just one step of that process. Experiment with the ‘Filter’ node to refine your data, and then try appending or updating a test sheet. Join the n8n community forums to share your creations and learn from others. The journey to becoming an automation expert is iterative; each small automation you build contributes to a larger, more efficient ecosystem. Embrace the power of n8n and Google Sheets, and unlock a new era of productivity for yourself and your organization. Your data, once a source of manual drudgery, is now a dynamic engine for innovation. Go forth and automate, my friend!
Frequently Asked Questions (FAQ)
Q: What is the main benefit of using n8n with Google Sheets?
A: The main benefit is automating repetitive data tasks, which saves significant time, reduces human error, and boosts productivity. Instead of manually copying, pasting, or updating data, n8n can handle these tasks automatically, freeing you up for more strategic work.
Q: Do I need to be a programmer to use n8n with Google Sheets?
A: Absolutely not! n8n is a low-code platform, meaning it’s designed for users with varying technical backgrounds. Its visual drag-and-drop interface allows you to build complex workflows without writing a single line of code. While custom code nodes are available for advanced users, they are not required for most integrations.
Q: What’s the difference between ‘AND’ and ‘OR’ logic in n8n’s Filter node?
A: ‘AND’ logic requires all specified conditions to be true for an item to pass through the filter. For example, filtering for items that are both ‘red’ AND ‘large’. ‘OR’ logic, on the other hand, allows an item to pass if at least one of the specified conditions is true. For example, filtering for items that are ‘red’ OR ‘blue’. Understanding this difference is crucial for precise data selection.
Q: How can I prevent accidental data loss when using ‘Delete Rows’ in n8n?
A: To safeguard against accidental data loss, always implement a backup strategy (like Google Sheets’ version history or explicit backups), use a ‘Filter’ node to precisely identify the rows to be deleted, and consider adding a manual confirmation step for critical deletions. It’s also highly recommended to test deletion workflows on a copy of your sheet first.
Q: Can n8n trigger workflows automatically when my Google Sheet changes?
A: Yes! n8n offers powerful Google Sheets trigger nodes, such as ‘When a Row is Added or Updated’. These triggers can initiate a workflow in real-time whenever a new row is added or an existing row is modified in your specified Google Sheet, enabling dynamic and responsive automations.