Watch the Video Tutorial
💡 Pro Tip: After watching the video, continue reading below for detailed step-by-step instructions, code examples, and additional tips that will help you implement this successfully.
TL;DR
Alright, fellow automation enthusiasts! If you’re anything like me, you’ve probably stared at a Google Sheet with a gazillion tabs and thought, “There has to be a better way to get all this data into n8n without pulling my hair out!” Well, you’re in luck. This guide is your secret weapon, your cheat code, for conquering that multi-tab monster. Here’s the super-quick rundown of what we’re about to achieve:
- Consolidate Google Sheets Data: We’re going to learn how to magically pull data from all those sheets within a single Google Sheets document into one neat, unified n8n workflow. No more individual requests for every single tab – we’re talking efficiency, baby!
- Dynamic Sheet ID Extraction: This is the cool part. We’ll use n8n’s
HTTP RequestandCodenodes to dynamically figure out which sheets exist and grab their data. This means your workflow won’t break if someone adds or removes a sheet. How cool is that? - Streamlined Data Processing: We’ll take all that extracted data and whip it into a single, beautiful JSON object. This makes it super easy for you to process it further with n8n’s
Codenodes or even feed it to your AI agents for some next-level analysis, like SEO wizardry. - Avoid Rate Limits: Ever hit a wall with Google’s API limits? Not anymore! Our single-pull approach drastically cuts down on API calls, keeping you well within those pesky limits and ensuring your data extraction runs smoothly, every single time.
- Enhanced Workflow Efficiency: Get ready to simplify your workflows and boost data integrity. By centralizing your Google Sheets data extraction, you’re making your n8n automations smarter, faster, and way more reliable.
Introduction
Hey there, Boyce here! As a self-taught automation consultant, I’ve been in the trenches, wrestling with data, just like you. And let me tell you, when it comes to data automation, efficiency isn’t just a buzzword; it’s the difference between a smooth-running operation and a chaotic mess. Did you know that a staggering 70% of businesses are still stuck in the dark ages, grappling with manual data entry and consolidation? That’s a huge time sink and a breeding ground for errors! For us n8n users, automation enthusiasts, and data analysts, the quest to extract information from multiple Google Sheets into a single, cohesive workflow can feel like trying to herd cats.
Imagine this: you’ve got critical SEO data, client records, or project metrics scattered across dozens of tabs within one Google Sheet document. Manually pulling this data, sheet by sheet, isn’t just a colossal waste of your precious time; it’s an open invitation for inconsistencies and, my personal nemesis, API rate limit issues. Trust me, I’ve been there, staring at a “429 Too Many Requests” error, wondering where I went wrong.
This guide, born from my own battles and triumphs in the automation trenches, is here to demystify the process. We’re going to master Google Sheets data extraction in n8n, turning that multi-tab nightmare into a dream. I’ll walk you through a comprehensive, step-by-step methodology to efficiently pull all your desired data into one unified workflow. This isn’t just about extraction; it’s about supercharging your data processing capabilities and unlocking new possibilities for advanced analysis and even integrating with those cool AI agents we all hear so much about. Let’s get this done!
Table of Contents
Open Table of Contents
- Introduction: The Challenge of Multi-Sheet Data Extraction in n8n
- Why Consolidate? The Benefits of Single-Pull Data Processing
- Setting Up Your n8n Workflow: Initial Google Drive Trigger
- Dynamic Sheet ID Extraction: The Core of Multi-Sheet Processing
- Iterating and Retrieving Data: The Google Sheets Node in Action
- Collating and Processing: Unifying Your Extracted Data
- Advanced Applications: Integrating with AI and Code Nodes
- Troubleshooting and Best Practices for n8n Google Sheets Workflows
- Conclusion: Streamline Your Data Workflow with n8n
Introduction: The Challenge of Multi-Sheet Data Extraction in n8n
The Modern Data Dilemma
For many businesses, Google Sheets is like the central command center for tons of crucial information, from financial records to marketing analytics. But here’s the kicker: it’s super common to have a single Google Sheet document that’s actually a collection of multiple sheets (you know, those tabs at the bottom), each holding distinct but related datasets. Think of an SEO pro, for example, who might keep keyword research, content ideas, and competitor analysis all in separate tabs within one master sheet. The real headache starts when you try to consolidate all this fragmented data for a unified analysis or to feed into your awesome automation workflows.
- Fragmented Data: It’s like having puzzle pieces scattered all over the floor – information spread across numerous tabs within a single document.
- Manual Consolidation: This is the dreaded copy-pasting dance, which is not only tedious but also super prone to human error. Nobody wants that!
- Automation Hurdles: The standard n8n Google Sheets nodes often make you specify each sheet individually. This quickly leads to complex, unwieldy workflows when you’re dealing with a bunch of tabs. It’s like trying to build a LEGO castle with a separate instruction manual for every single brick!
Why Traditional Methods Fall Short
Let’s say you’re looking at a Google Sheet document with, oh, four distinct sheets: ‘From GCP’, ‘Sorted’, ‘Finalized’, and ‘Reference Videos’. Your first instinct, and a perfectly natural one, might be to just use four separate ‘Google Sheets’ nodes in n8n. Each node would be set up to pull data from one specific sheet. And sure, for a tiny, unchanging number of sheets, this works. But what happens when you add a fifth sheet? Or a tenth? Or when the names change? Suddenly, your workflow becomes a tangled mess, hard to manage, and inefficient. Plus, this method means making a separate API call for each sheet, which is a fast track to hitting those dreaded API rate limits. Been there, done that, got the t-shirt (and the headache!).
- Increased Complexity: More nodes mean a workflow that looks like a spaghetti monster, making it harder to understand and debug.
- Maintenance Overhead: Every time a sheet name changes, or a new one is added/deleted, you’re manually updating your workflow. Who has time for that?
- API Rate Limit Risks: Making a bunch of individual API calls is like constantly knocking on Google’s door. Do it too much, too fast, and they’ll temporarily stop answering. This can quickly exhaust your daily limits and bring your automation to a screeching halt.
This guide is going to introduce you to a much better, more robust method to sidestep all these limitations. We’re going to extract all your necessary data in one single, streamlined process. Our mission? To transform that fragmented data landscape into a unified, actionable dataset right inside n8n, ready for whatever advanced processing and analysis you throw at it.
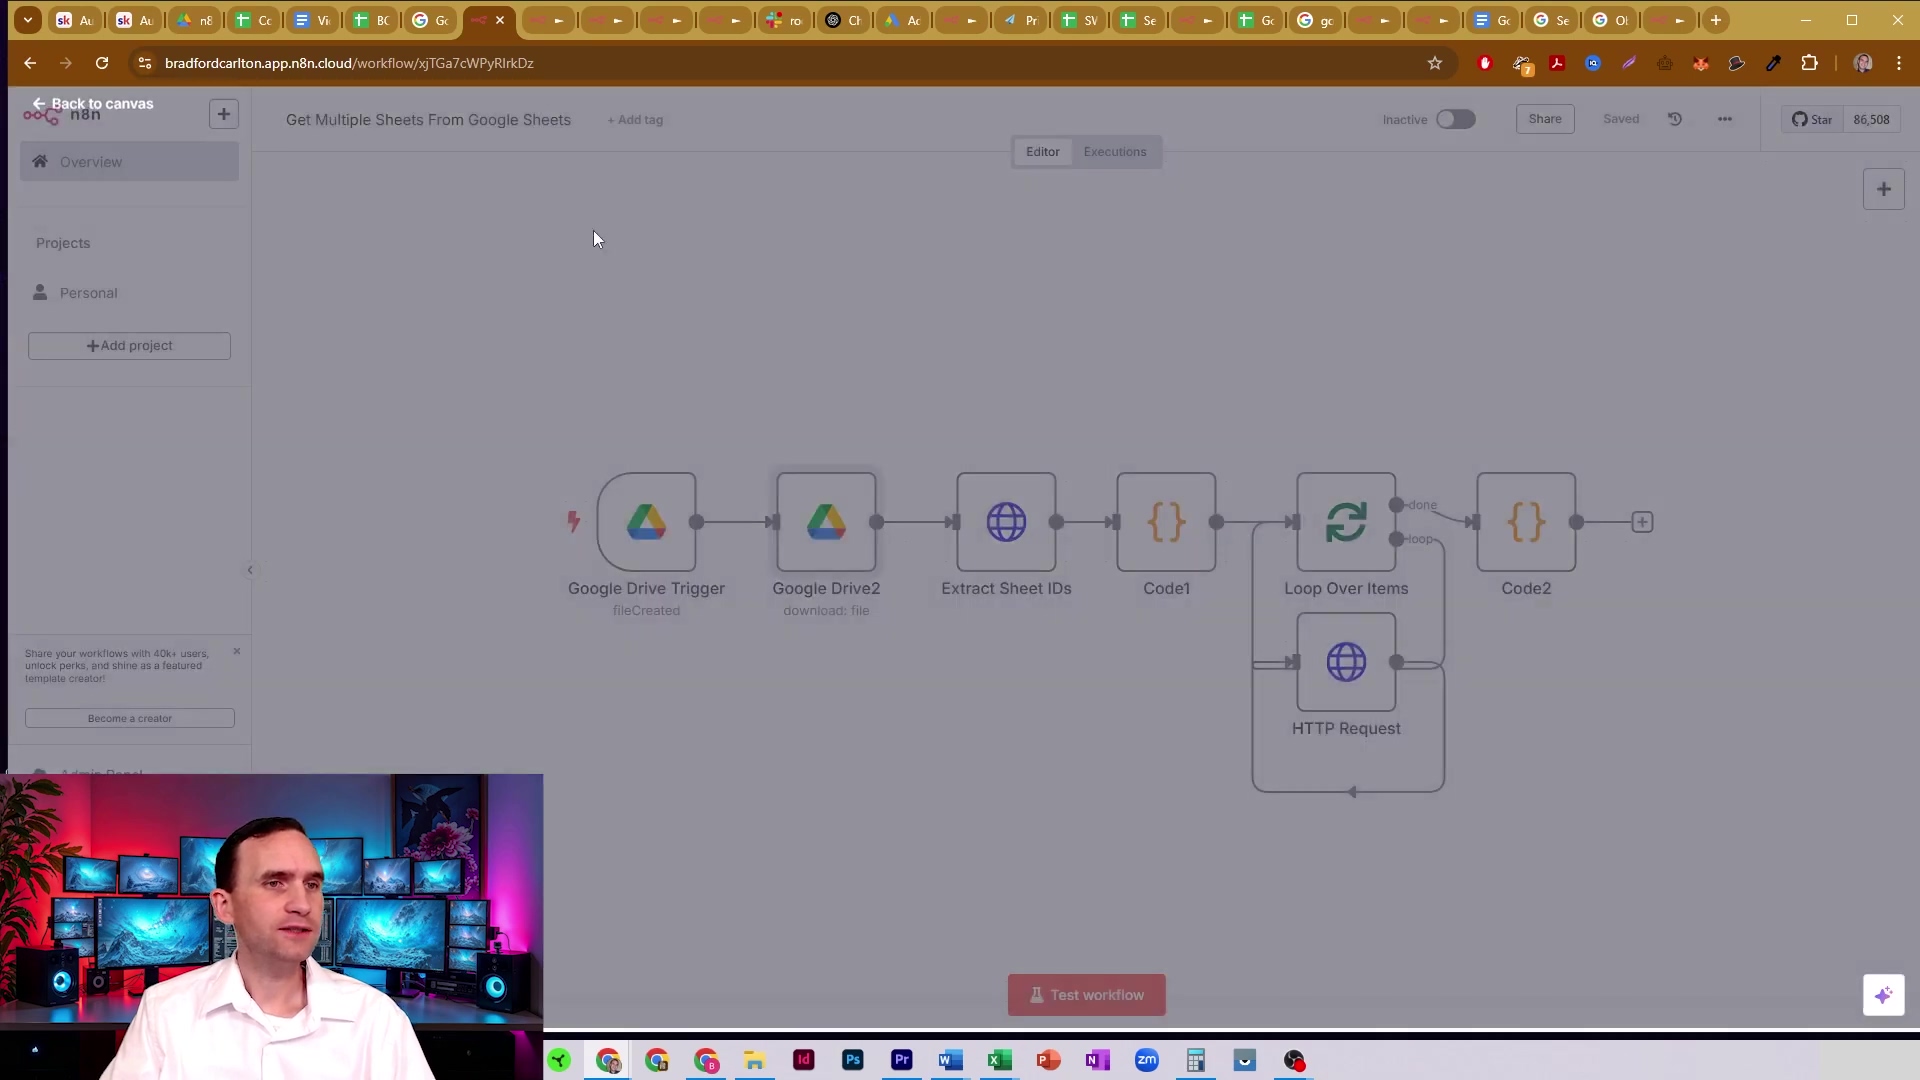
To get a sneak peek at the magic we’re about to create, take a look at this example of an n8n workflow. This visual overview gives you a glimpse into how various nodes connect, from kicking off the process to extracting and looping through those elusive sheet IDs. It’s like seeing the blueprint before we start building our data-gathering spaceship!
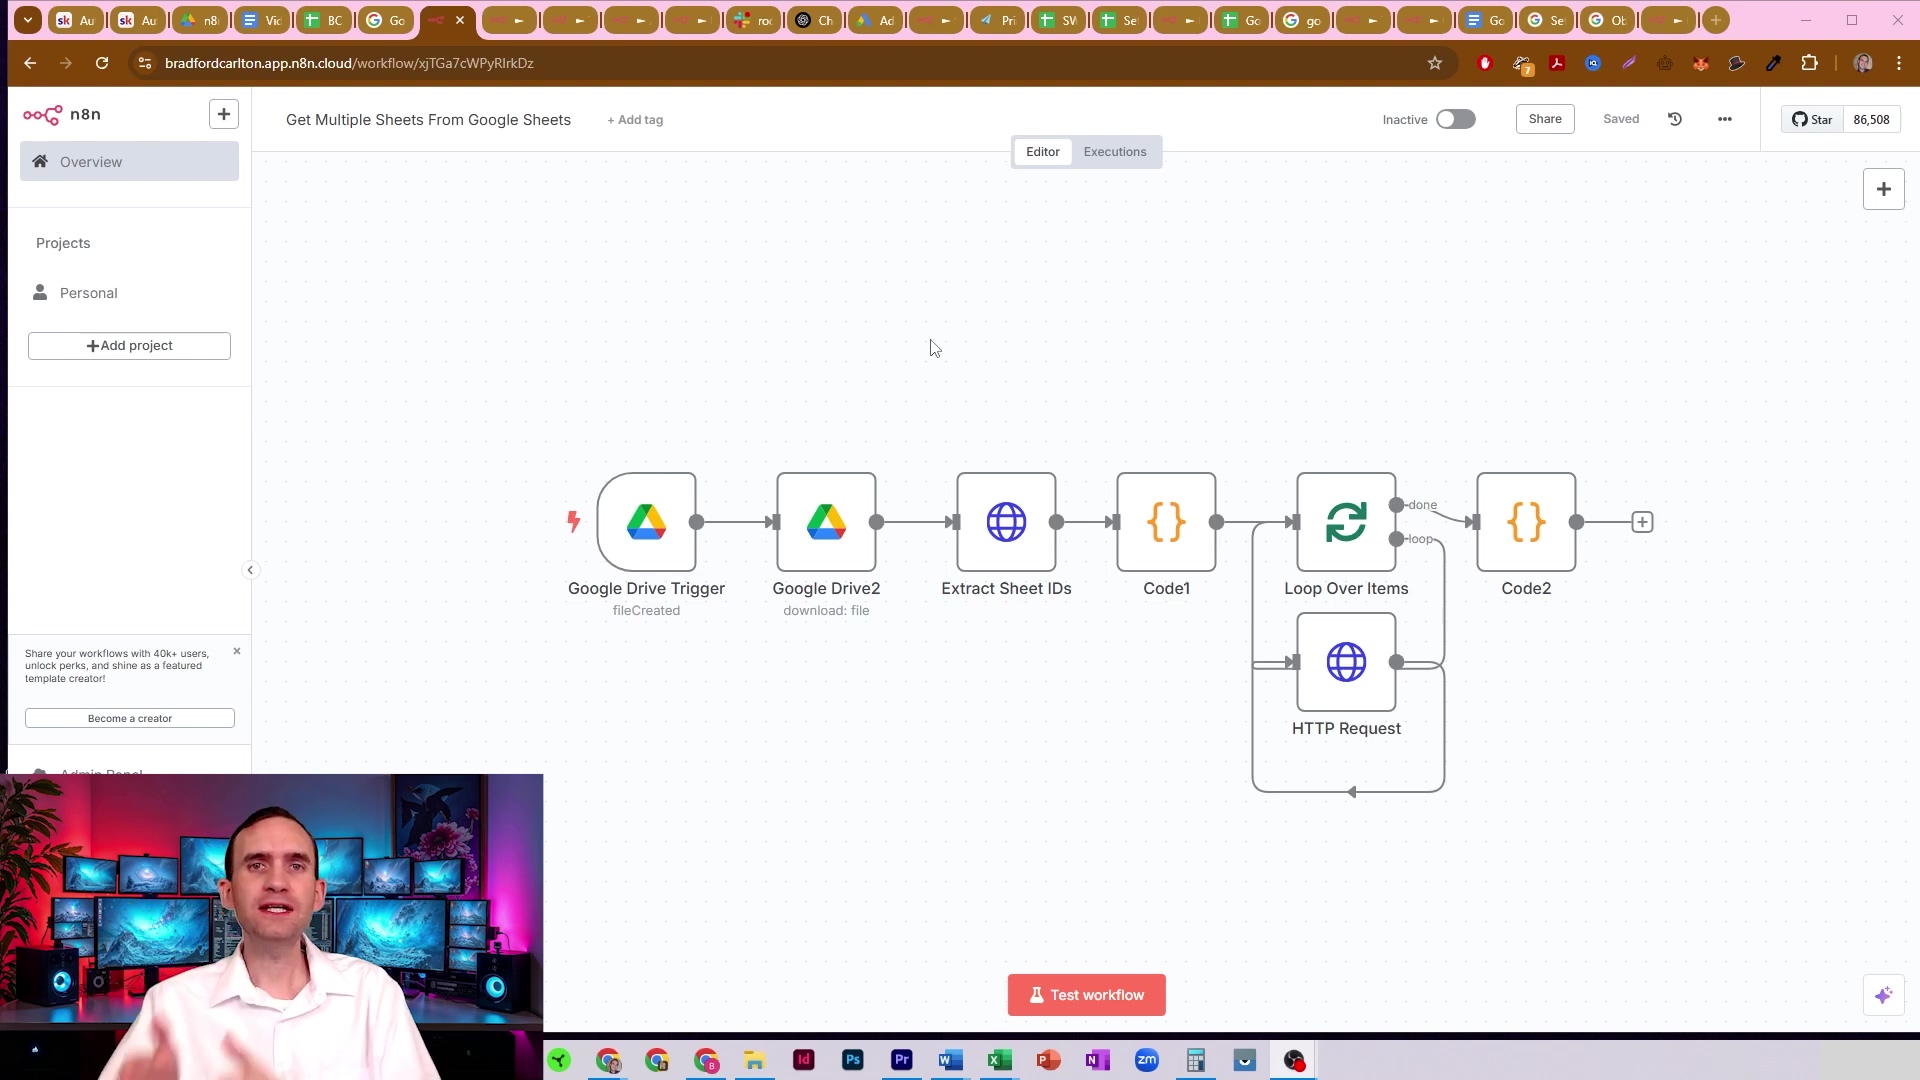
This initial workflow diagram provides a glimpse into the solution we’ll be building, highlighting the key nodes involved in efficiently pulling data from multiple sheets. It’s our roadmap to data glory!
Why Consolidate? The Benefits of Single-Pull Data Processing
The Power of Unified Data
Consolidating data from multiple Google Sheets into a single pull within n8n isn’t just a neat trick; it’s a game-changer! It offers massive advantages over those old, fragmented extraction methods. This unified approach takes what used to be a complex, multi-step headache and turns it into a streamlined, super-efficient operation. It fundamentally changes how you interact with and leverage your data. By bringing all your relevant information into one coherent structure, you’re not just organizing; you’re unlocking a whole new level of analytical power and workflow automation. It’s like upgrading from a manual typewriter to a supercomputer!
- Efficiency: Fewer operations, fewer API calls. It’s faster, smoother, and less prone to hiccups.
- Simplicity: Your workflow design becomes cleaner, and maintenance is a breeze. No more spaghetti code!
- Data Integrity: When all related data is processed together, you minimize discrepancies and ensure everything is in sync.
- Advanced Processing: Your data is now perfectly prepped for complex transformations and, my favorite part, seamless AI integration. Hello, future!
Tangible Advantages of a Single Pull
The benefits of a single-pull data processing strategy go way beyond just making things convenient. They directly impact how reliable, scalable, and performant your n8n workflows become. Think about it: if you’re pulling from, say, 30 different sheets, a single-pull method drastically cuts down on the number of individual ‘Get Google Sheets’ requests. Those individual requests can really slow things down, especially with larger datasets or if you’re running your workflow often. This not only saves you operational time but also lightens the load on your n8n instance and, crucially, on Google’s APIs. It’s a win-win!
| Feature | Multiple Pulls (Traditional) | Single Pull (Recommended) |
|---|---|---|
| API Calls | High (N calls for N sheets) | Low (1-2 primary calls) |
| Workflow Complexity | High (N nodes for N sheets) | Low (Few core nodes) |
| Rate Limit Risk | High | Low |
| Data Consistency | Moderate (manual reconciliation) | High (automatic collation) |
| Maintenance | High (updates for each sheet change) | Low (dynamic adaptation) |
| Processing Speed | Slower (sequential/parallel calls) | Faster (optimized data flow) |
This table isn’t just pretty; it clearly shows why a single-pull strategy is the way to go. It doesn’t just simplify your n8n workflow; it makes it way more robust and scalable. By embracing this approach, you’re not just extracting data; you’re building a solid foundation for more sophisticated data analysis and automation. You’re paving the way for seamless integration with advanced tools like AI agents and custom code nodes. It’s like upgrading your data pipeline from a garden hose to a superhighway!
To really get a feel for the kind of data we’re wrangling, here’s an example of a Google Sheets document. Notice those columns like “videoMentioned,” “timeStamps,” “context,” and “reminder”? These are typical data points that often get spread across multiple sheets. Our goal is to bring them all together, neatly and efficiently.
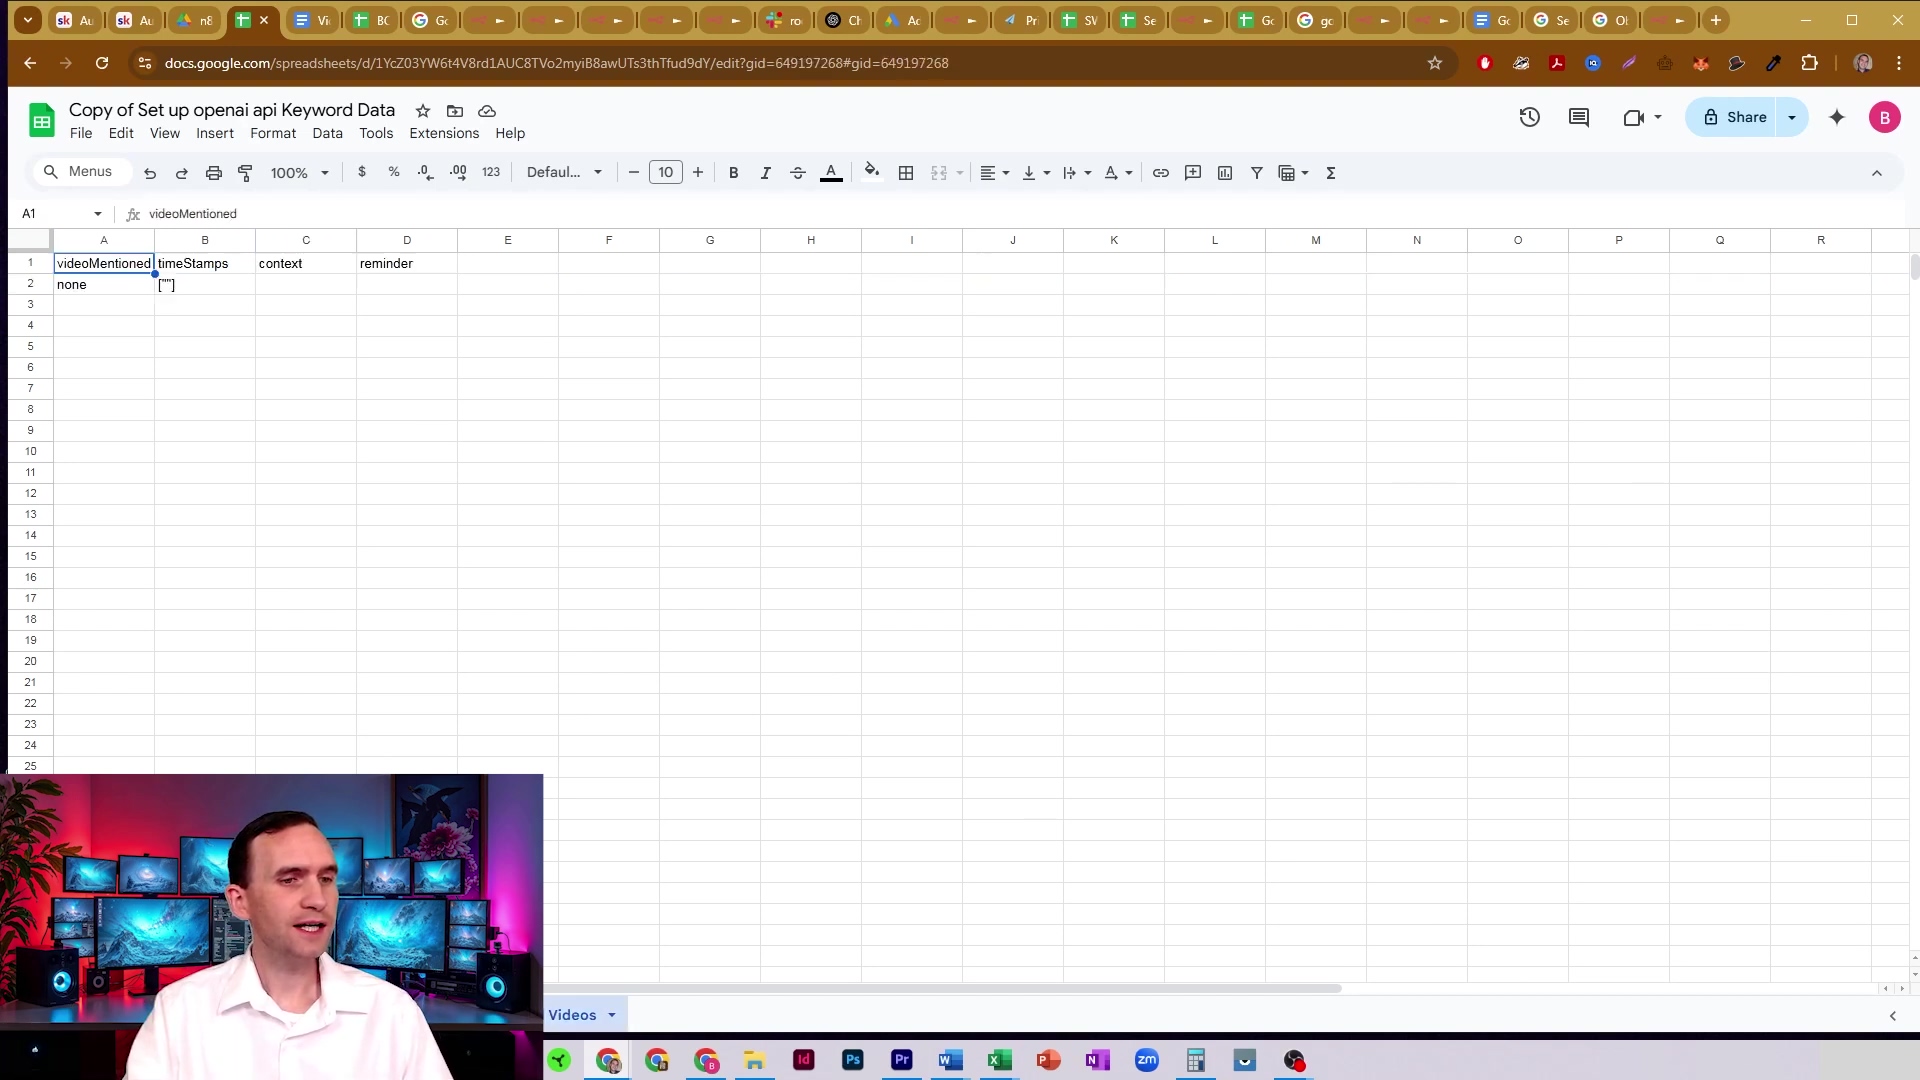
This visual helps to conceptualize the type of fragmented data we aim to unify, emphasizing the need for an efficient single-pull method. It’s the scattered pieces of our data puzzle, waiting to be assembled!
Setting Up Your n8n Workflow: Initial Google Drive Trigger
Initiating the Workflow with Google Drive
Alright, let’s kick things off! The very first, super important step in our multi-sheet data extraction adventure is to correctly identify and get access to our target Google Sheets document. Since Google Sheets documents live happily within Google Drive, using the ‘Google Drive Trigger’ node in n8n is our best bet. It’s robust, straightforward, and acts as the perfect starting point. Think of it as the launchpad for our data-gathering rocket, allowing your n8n workflow to talk to your Google Drive files and pinpoint the exact spreadsheet we want to process.
- Node Selection: First things first, drag and drop a ‘Google Drive Trigger’ node onto your n8n canvas. You can find it by searching for “Google Drive” in the node panel.
- Authentication: This is crucial! Make sure your Google Drive account is properly connected and authenticated with n8n. If you haven’t done this before, n8n will guide you through connecting your Google account. You’ll need to grant it the necessary permissions to access your files.
- File Identification: We need to tell this node which Google Sheets document we’re interested in. We’ll typically do this by providing its unique ID.
Configuring the Google Drive Trigger for Document Access
To get our ‘Google Drive Trigger’ node all set up, you’ll need the unique ID of your Google Sheets document. “Where do I find that, Boyce?” you ask? Easy peasy! Just open your Google Sheet in your web browser. Look at the URL in your address bar. It’ll look something like https://docs.google.com/spreadsheets/d/YOUR_SPREADSHEET_ID/edit. See that YOUR_SPREADSHEET_ID part? That’s your golden ticket! Copy that ID and paste it into the node’s configuration.
Once you’ve got the ID in there, set the node’s operation to ‘Download’. Now, here’s a super handy trick: make sure you enable ‘Google File Conversion’ in the options. Why? Because this tells Google Drive to automatically convert your Google Sheet into a CSV format during the download. CSV is like the universal language of data – it’s easily parsable and simplifies all the subsequent data processing steps within n8n. This little checkbox saves you a ton of headaches later!
- Add Google Drive Trigger: Find and drag the ‘Google Drive Trigger’ node onto your canvas. Connect it to your
Startnode or wherever you want your workflow to begin. - Connect Credentials: In the node’s settings panel, click on “Credentials.” If you’ve already connected your Google Drive, select it. If not, click “Create New” and follow the prompts to link your Google account. Make sure to grant access to Google Drive files.
- Specify Document ID: In the ‘File ID’ field, paste the unique ID you copied from your Google Sheet’s URL.
- Set Operation: Under the ‘Operation’ dropdown, choose ‘Download’.
- Enable Conversion: Look for the ‘Google File Conversion’ option (it might be under “Options” or “Advanced Settings”) and toggle it ON. This is critical for getting our data in a usable CSV format.
This initial setup ensures that your n8n workflow can reliably fetch the Google Sheets document. While you could technically use an HTTP Request node to download the file, the ‘Google Drive Trigger’ with ‘Google File Conversion’ is a lifesaver because it handles that CSV conversion automatically. This saves you extra steps and avoids potential parsing complexities. This foundational step is absolutely critical for smoothly transitioning to our next big move: dynamic sheet ID extraction. We’re building a solid foundation here!
To show you exactly where your target Google Sheet document lives, take a peek at this Google Drive interface. See the file “Copy of Set up openai api Keyword Data”? It’s selected within the “n8n Tests” folder, clearly showing its location and basic properties like who owns it, when it was last modified, and its size. This is where our journey begins!
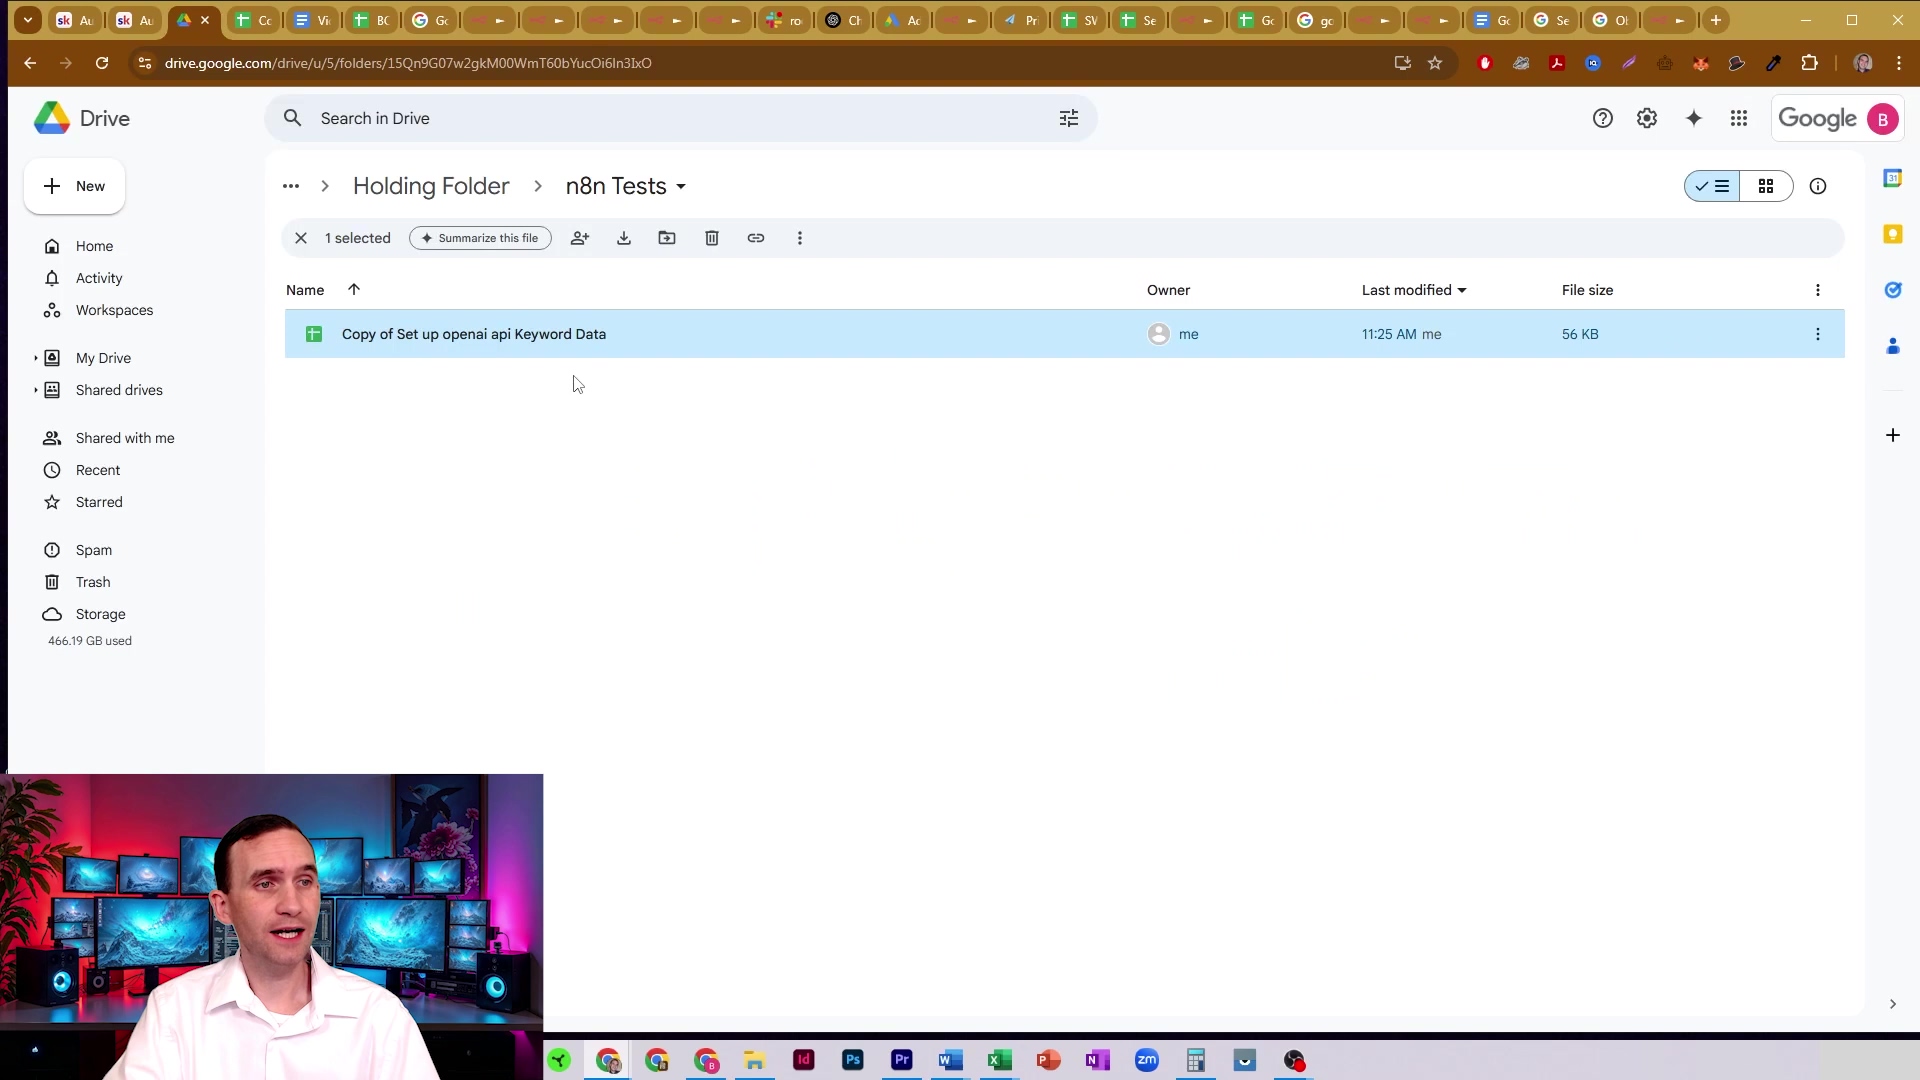
This image confirms the file’s presence and accessibility within Google Drive, which is the starting point for our n8n workflow. It’s like confirming our spaceship is on the launchpad!
Dynamic Sheet ID Extraction: The Core of Multi-Sheet Processing
Unlocking All Sheets: The Google Sheets API Call
Okay, we’ve got our Google Sheets document accessible thanks to the Google Drive trigger. Now for the really clever part: dynamically extracting the IDs of all the individual sheets (those tabs!) within that document. This is where the mighty Google Sheets API steps in to save the day. Instead of us manually listing each sheet like some kind of data entry robot, we’re going to make a direct API call to grab all the juicy metadata about the spreadsheet, including details for every single sheet it contains. This dynamic approach is super important because it means your workflow will stay robust and happy, even if someone adds, removes, or renames sheets down the line. No more broken workflows because of a simple tab change!
- API Endpoint: We’ll be using a specific part of the Google Sheets API to fetch all that spreadsheet metadata. Think of it as asking Google, “Hey, tell me everything about this spreadsheet!”
- Dynamic ID: We’ll use the document ID we got from our ‘Google Drive Trigger’ node. This keeps everything connected and dynamic.
- Comprehensive Data: The API response won’t just give us IDs; it’ll be a treasure trove of all the sheet properties, including their unique IDs and names.
Implementing the HTTP Request to Get Sheet Metadata
To pull off this magic trick, we’re going to use an ‘HTTP Request’ node in n8n. This node is essentially our messenger, making a GET request to the Google Sheets API endpoint specifically designed for grabbing spreadsheet metadata. The endpoint typically looks something like sheets.googleapis.com/v4/spreadsheets/{spreadsheetId}. See that {spreadsheetId} part? That’s where the dynamic magic happens! We’ll pull that ID directly from the output of our ‘Google Drive Trigger’ node. Make sure you configure the ‘HTTP Request’ node with your Google Sheets API credentials. If you haven’t set these up yet, you’ll need to create them in the Google Cloud Console and then add them to n8n’s credentials.
The API response will be a big JSON object, packed with information. Crucially, it will contain an array of ‘sheets’, and inside each ‘sheet’ object, you’ll find its ‘sheetId’ and ‘title’ (which is the sheet’s name). Perfect!
- Add HTTP Request Node: Drag and drop an ‘HTTP Request’ node onto your canvas, and connect it after your ‘Google Drive Trigger’ node.
- Configure URL: In the ‘URL’ field of the ‘HTTP Request’ node, paste this:
https://sheets.googleapis.com/v4/spreadsheets/{{$node["Google Drive Trigger"].json["id"]}}. This tells n8n to dynamically insert the spreadsheet ID from the previous node’s output. Super cool, right? - Authentication: Under the ‘Authentication’ section, select your Google Sheets API credentials. If you don’t have them, you’ll need to create them first (usually OAuth2 credentials with access to Google Sheets API).
- Method: Make sure the ‘Method’ dropdown is set to ‘GET’. We’re just getting information here.
- Execute Node: Run the node! You should see a successful response containing all that lovely spreadsheet metadata.
// This is just an example of what the raw output from the HTTP Request node might look like
// and how you'd conceptually extract sheet IDs from it. We'll use a Code node for this next!

const sheetsData = $json.sheets;
const sheetIds = [];

for (const sheet of sheetsData) {
  sheetIds.push({
    sheetId: sheet.properties.sheetId,
    sheetName: sheet.properties.title
  });
}

return sheetIds;
This section of the n8n workflow demonstrates the initial setup for dynamically extracting sheet IDs. The ‘Google Drive Trigger’ feeds into an ‘Extract Sheet IDs’ node (which will be our HTTP Request node followed by a Code node), which is crucial for fetching metadata. It’s the brain of our operation!
This workflow snippet visually confirms the connection between the Google Drive trigger and the sheet ID extraction process. It’s our first big step towards dynamic data pulling!
Processing the API Response with a Code Node
Now, that raw output from the ‘HTTP Request’ node? It’s going to be a big, beautiful (but messy) JSON object. To get just the bits we need – the sheet IDs and names – we’re going to use a ‘Code’ node. Think of this ‘Code’ node as our data surgeon, carefully dissecting the JSON response. It will iterate through the sheets array within that JSON and extract the sheetId and title (which is the sheet name) for each and every sheet. The output of this ‘Code’ node will be a clean, organized array of objects, where each object contains the sheetId and sheetName for one of your Google Sheets. This structured output is absolutely essential for our very next step: looping through each sheet to pull its actual data. We’re making order out of chaos!
- Input Data: The ‘Code’ node will take the JSON output directly from our ‘HTTP Request’ node.
- Logic: Inside the ‘Code’ node, we’ll write a little JavaScript to loop through the
sheetsarray that’s buried within that JSON. - Output: What we want is a neat array of objects, with each object having
sheetIdandsheetNameproperties. This makes it super easy to work with downstream.
This dynamic extraction process is the absolute cornerstone of building a flexible and scalable n8n workflow for Google Sheets. It completely eliminates the need for you to manually configure each sheet, and it ensures that your automation gracefully adapts to any changes in your spreadsheet’s structure. That’s what I call a truly robust data extraction process!
Here, we see the detailed configuration of what we’ll call the ‘Extract Sheet IDs’ node (which is actually our HTTP Request node). The input panel shows file information like ‘File Name: copy of set up openai api Keyword Data’ and ‘Mime Type: text/csv’ (remember that conversion we enabled?). The main panel configures an HTTP GET request to the Google Sheets API using the dynamic spreadsheet ID from the ‘Google Drive Trigger’ node. This setup is crucial for fetching the metadata that contains all those precious sheet IDs.
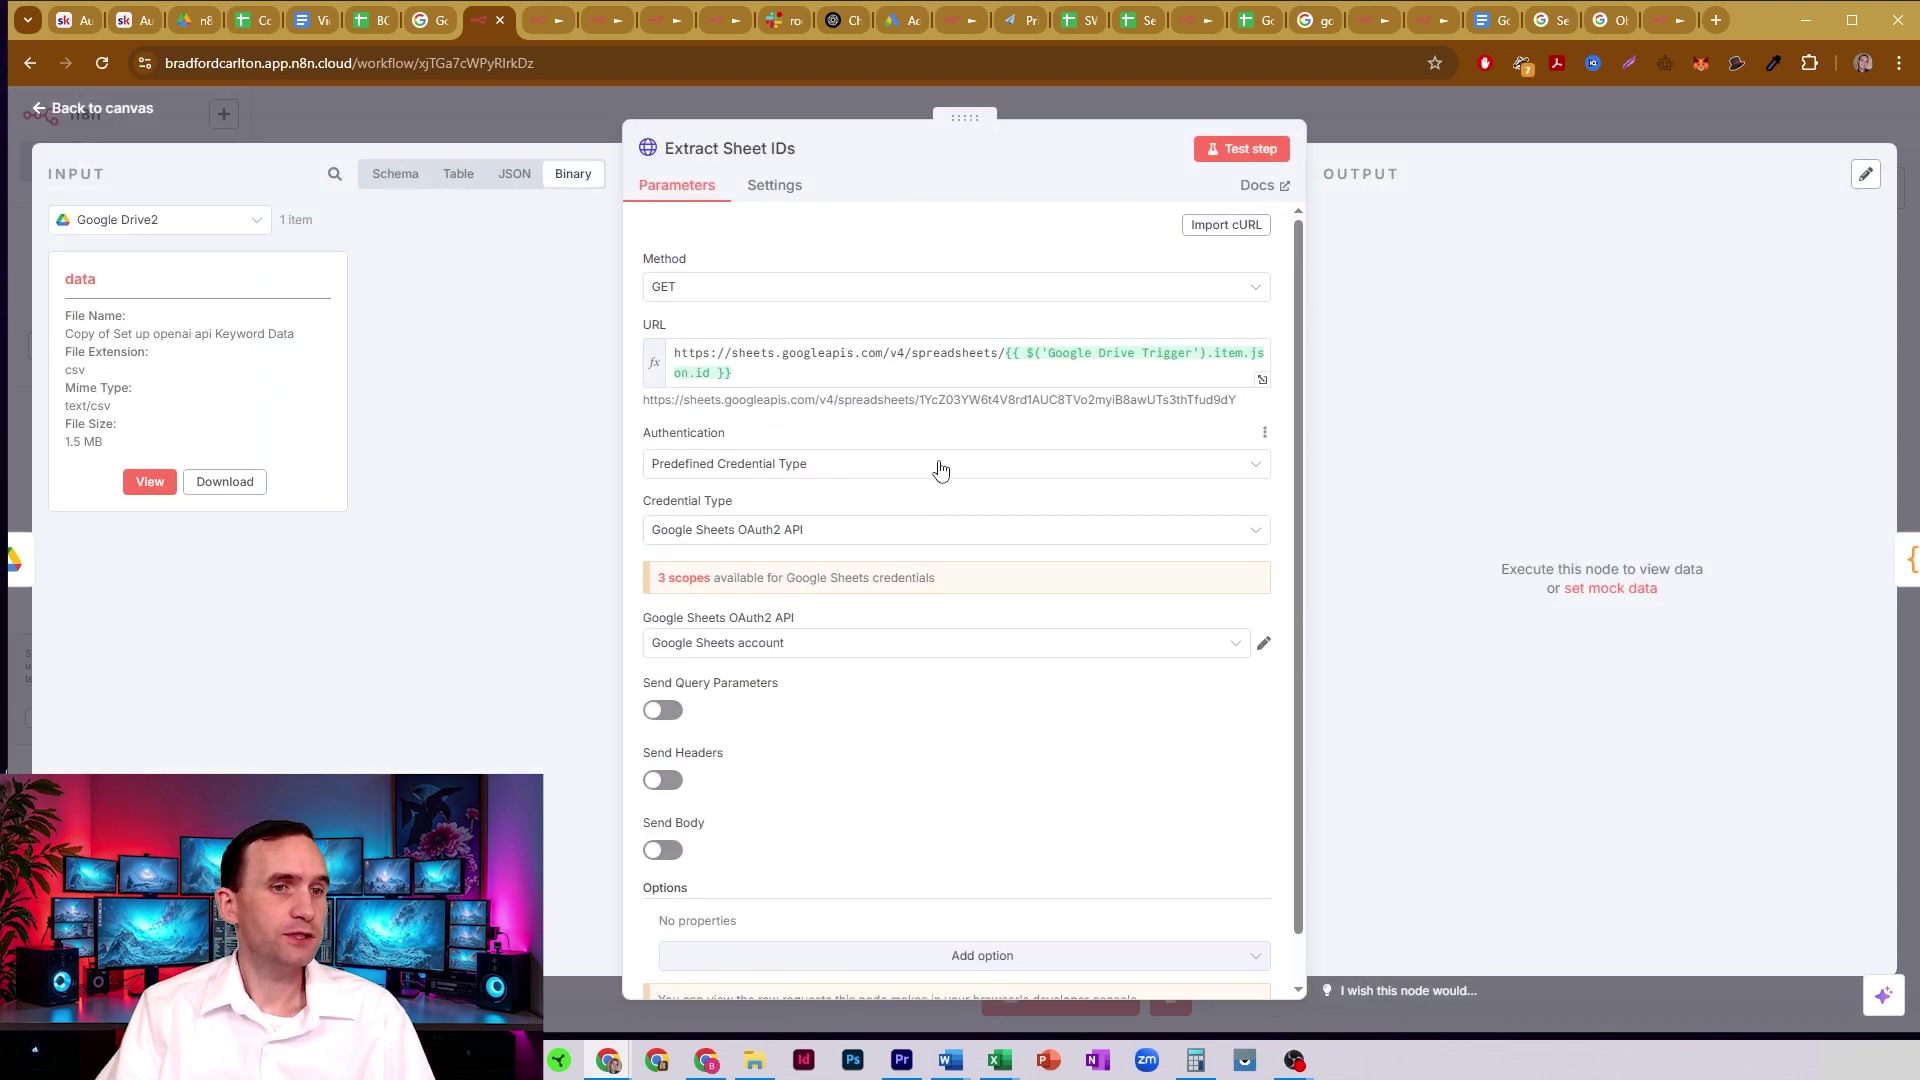
This detailed view confirms the HTTP request setup, ensuring that the workflow correctly targets the Google Sheets API to retrieve the necessary sheet metadata. We’re on track!
Iterating and Retrieving Data: The Google Sheets Node in Action
Looping Through Sheets for Data Retrieval
Alright, we’ve successfully extracted all those sheet IDs and names dynamically. High five! Now, the logical next step is to go through each identified sheet, one by one, and grab its data. This is where a ‘Loop’ node, combined with another ‘HTTP Request’ node (this time configured for data retrieval), becomes absolutely indispensable. The ‘Loop’ node is like our workflow’s personal assistant; it will take the organized list of sheet IDs and names from our previous ‘Code’ node and process each item sequentially. This ensures that data from every single tab is fetched, without you having to lift a finger. It’s a systematic approach that guarantees comprehensive data collection, no manual intervention required!
- Loop Node: This node is the workhorse. It processes each
sheetId/sheetNamepair individually, making sure no tab is left behind. - HTTP Request Node (Data): Inside the loop, this node makes a specific API call to get the actual data for the current sheet being processed.
- Dynamic Parameters: The magic here is that it uses the
sheetIdandsheetNamethat are passed along from each iteration of the loop. This keeps everything flexible and automated.
Configuring the HTTP Request for Sheet Data
Inside our ‘Loop’ node, you’ll place another ‘HTTP Request’ node. This one will be configured to make a GET request to a specific Google Sheets API endpoint designed for retrieving cell values. The endpoint will look something like sheets.googleapis.com/v4/spreadsheets/{spreadsheetId}/values/{sheetName}. Pay close attention to those curly braces!
Crucially, the {spreadsheetId} will still be pulled from the initial ‘Google Drive Trigger’ output (it’s the same spreadsheet, after all!). But the {sheetName}? That’s where the loop shines! It will be dynamically injected from the current iteration of the ‘Loop’ node (you’ll use an expression like {{$json.sheetName}}). This setup allows our workflow to fetch data from each sheet by its name, which I’ve found to be a super reliable method. And, of course, make sure your Google Sheets API credentials are selected for authentication here too.
- Add Loop Node: Drag a ‘Loop’ node (often called ‘Loop Over Items’ or similar, depending on your n8n version) after the ‘Code’ node that extracts sheet IDs. Connect the output of the ‘Code’ node to the input of the ‘Loop’ node.
- Add HTTP Request Node: Inside the ‘Loop’ node (you’ll see a small plus icon or a way to add nodes within it), add another ‘HTTP Request’ node.
- Configure URL: In this new ‘HTTP Request’ node, set the ‘URL’ field to:
https://sheets.googleapis.com/v4/spreadsheets/{{$node["Google Drive Trigger"].json["id"]}}/values/{{$json.sheetName}}. This tells n8n to use the spreadsheet ID from the Google Drive node and the current sheet name from the loop’s iteration. - Authentication: Select your Google Sheets API credentials again.
- Method: Choose ‘GET’.
This image shows the ‘HTTP Request’ node configured to fetch data for each sheet. Notice how the URL dynamically incorporates the spreadsheet ID and the current sheet name. This is the magic that ensures data is pulled for every tab we identified in the previous steps. It’s like having a personalized data retriever for each sheet!
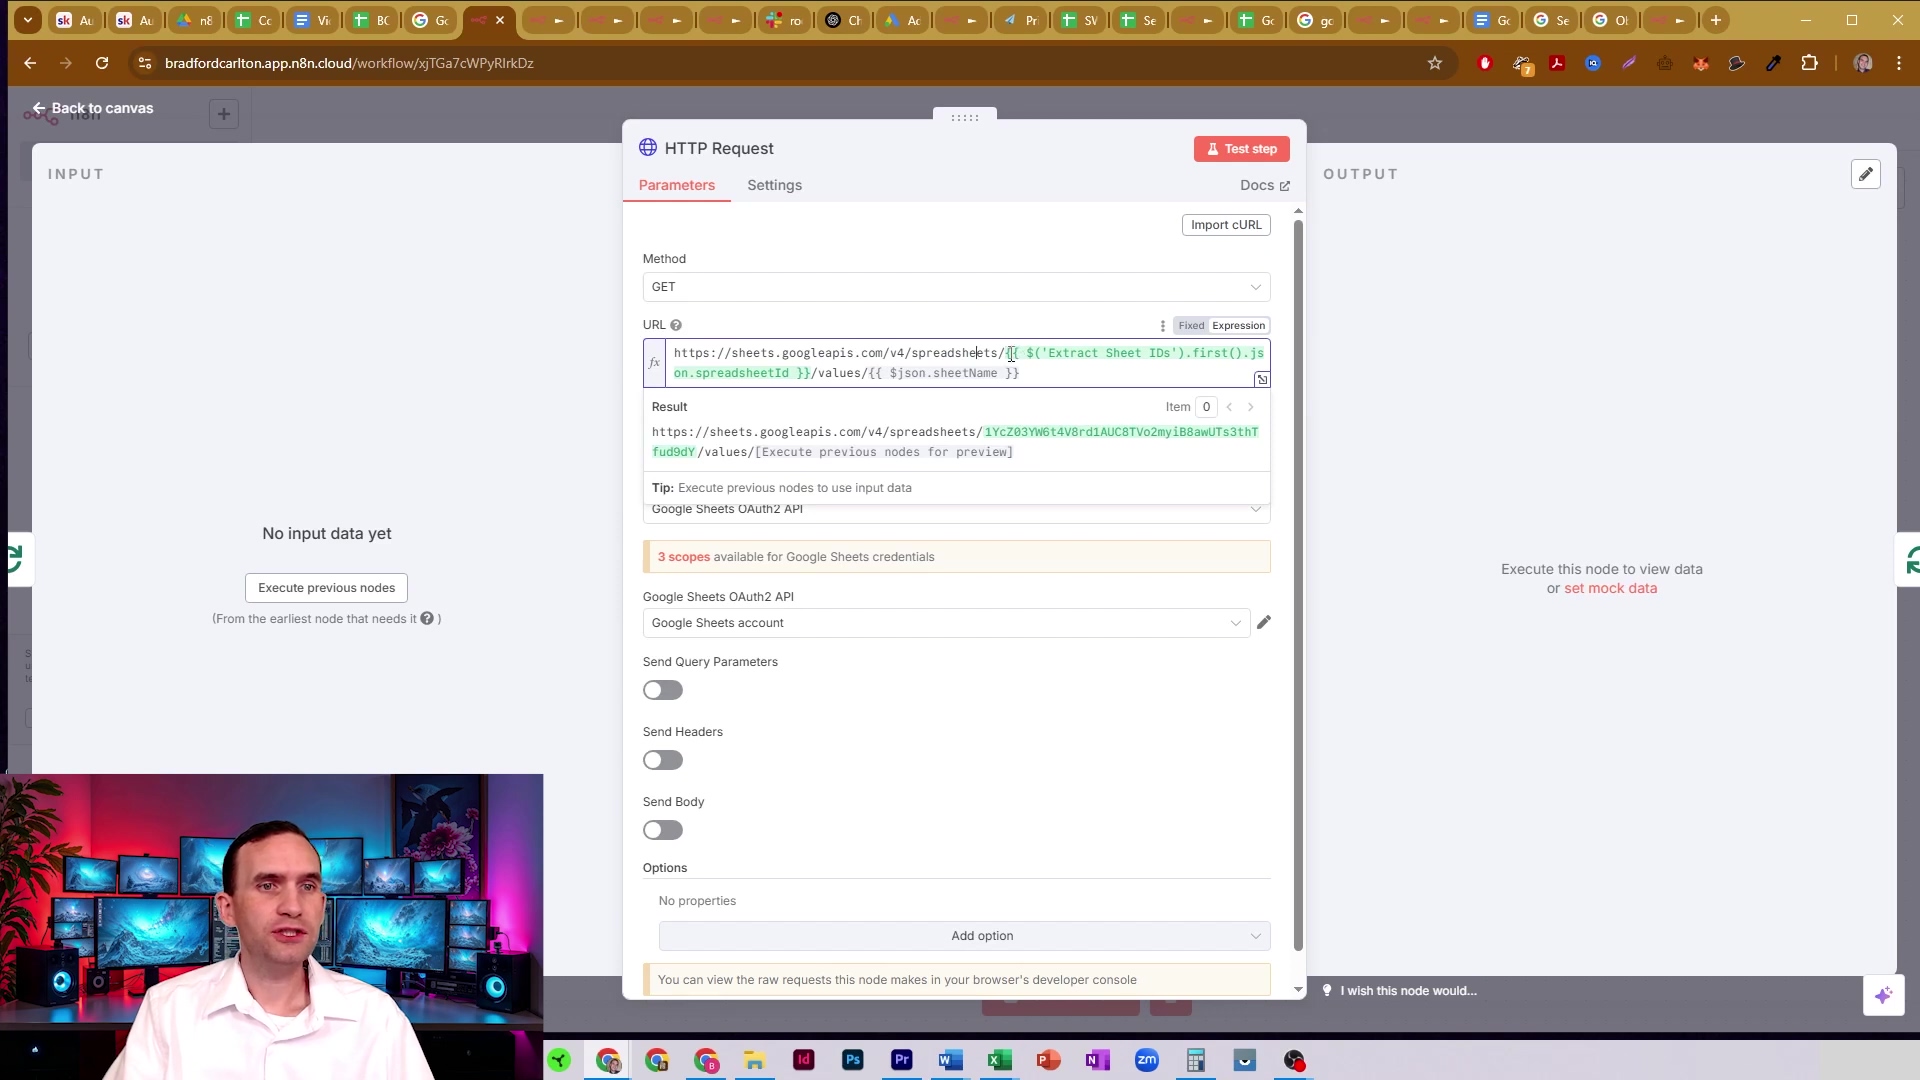
This visual confirms the dynamic URL construction and the successful execution of the HTTP request to retrieve sheet data. We’re pulling data like pros!
Handling Data Output and Potential Challenges
Once this ‘HTTP Request’ node runs, it’s going to return the data for each sheet as an array of arrays. Think of it like this: each inner array is a row, and the values within that array are the cells in that row. A common thing you’ll notice is that the very first row, which usually contains your column headers (like “Name,” “Email,” “Date”), won’t be explicitly labeled as headers in the raw API response. Instead, it just appears as the first array of values. This is a critical point to remember for our next step, the data collation, where we’ll need to re-associate these headers with their respective data columns. Don’t worry, I’ll show you how!
Now, a word to the wise: if you’re dealing with a lot of sheets, or really large ones, you might want to consider adding a ‘Wait’ node within the loop. Why? To prevent hitting those pesky API rate limits! Google is great, but they don’t like being hammered with requests too quickly. A little pause, say 3-5 seconds, between each sheet pull can significantly improve your workflow’s stability and prevent those frustrating “Too Many Requests” errors. It’s like giving Google a little breathing room.
- Raw Data Format: The data comes back as an array of arrays, with your column headers sitting pretty as the very first row.
- Missing Labels: Those column headers aren’t automatically assigned as keys. We’ll fix that soon!
- Rate Limit Mitigation: For workflows with many sheets, definitely throw in a ‘Wait’ node (e.g., 3-5 seconds) inside your loop. It’s a simple trick that makes a huge difference in pacing those API calls.
This iterative process, while it might seem a bit intricate at first glance, is incredibly efficient and scalable. It empowers your n8n workflow to intelligently navigate and extract data from every single sheet within your Google document. This lays the essential groundwork for creating a unified and structured dataset that’s perfectly ready for advanced processing. We’re building a data-gathering machine!
Following the data retrieval, a ‘Code2’ node (which we’ll configure next) is used to process the raw output. This node is responsible for taking the values from the HTTP Request and structuring them, often by associating column headers with their respective data. The input panel shows various fields like ‘sheetId’, ‘sheetName’, and example data such as ‘keyword’, ‘sourceSeed’, ‘volume’, and ‘competition’. This is where we turn raw numbers into meaningful information!
This image highlights the crucial role of the ‘Code2’ node in transforming raw data into a more usable format, ready for collation. It’s where our data starts to make sense!
Collating and Processing: Unifying Your Extracted Data
The Imperative of Data Unification
Alright, we’ve successfully iterated through each Google Sheet and retrieved its raw data. You’re probably looking at a bunch of separate data outputs now, each corresponding to a different sheet. The big challenge, and our next mission, is to consolidate all these disparate pieces of information into one single, coherent JSON object. This isn’t just about tidiness; this unification is absolutely paramount for any subsequent processing, analysis, or integration with other tools. Without a unified structure, working with the data becomes a nightmare, forcing you to create complex branching logic to handle each sheet’s data individually. My goal, and yours, is to transform these separate outputs into one easily manageable, beautiful JSON object. Think of it as assembling all the individual components of a super-robot into one formidable machine!
- Fragmented Outputs: Right now, each sheet’s data is an independent output, like separate data streams.
- Unified Structure: Our objective is to create a single JSON object that contains all the data, neatly organized.
- Simplified Downstream: A unified dataset makes all your future processing and analysis tasks so much simpler. It’s like having one master control panel instead of dozens of tiny ones.
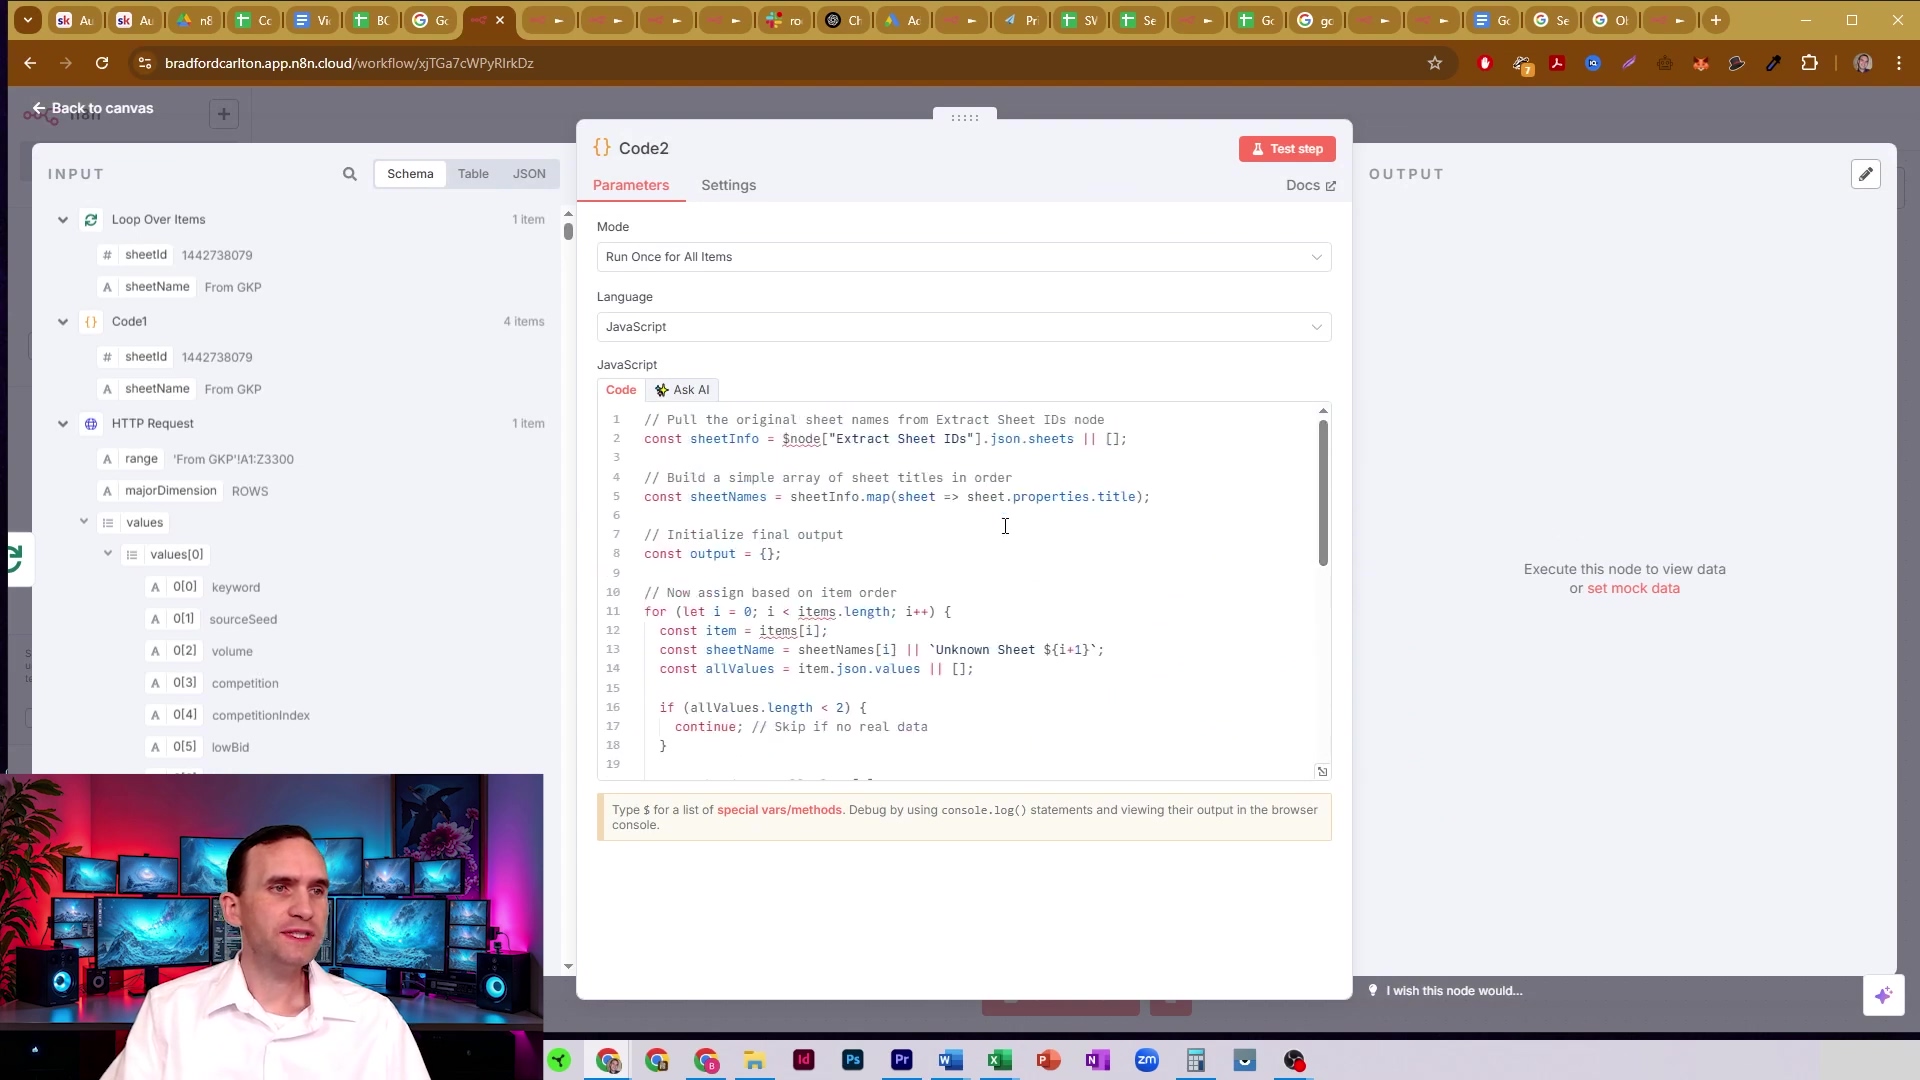
Advanced Code Node for Intelligent Data Collation
To achieve this critical collation, we’re going to deploy a sophisticated ‘Code’ node. This node is our intelligent aggregator, taking all the fragmented outputs from the ‘Loop’ (each containing data from a single sheet) and transforming them into a single, comprehensive JSON object. The core functionality of this ‘Code’ node involves two key processes:
- Sheet-wise Grouping: It creates a top-level JSON object where each key is the name of a sheet (e.g., “fromgcp”, “sorted”). The value associated with each key will be the structured data from that specific sheet. This gives us a clear, organized hierarchy.
- Header-Value Mapping: For each sheet’s data, it intelligently identifies the first row as the column headers. Then, it iterates through all the subsequent data rows, mapping each cell’s value to its corresponding header. This effectively converts each row into a JSON object where the keys are your column headers (like
keyword,volume) and the values are the cell contents. This adds semantic meaning to your data, making it much easier to work with!
Here’s the JavaScript code you’ll put into your ‘Code’ node. Make sure to connect this ‘Code’ node after your ‘Loop’ node (the one that contains the HTTP Request for sheet data). The input to this Code node will be the collection of outputs from each iteration of the loop.
// This code node takes the output from the loop, which contains data from each sheet.
// It then processes each sheet's data to associate column headers with their values.
// The final output is a single JSON object where keys are sheet names and values are arrays of structured data.

const aggregatedData = {};

// Iterate over each item (which represents data from one sheet) from the previous node (the loop)
for (const item of $input.json) {
  const sheetName = item.sheetName; // Assuming sheetName is passed from the previous code node
  const sheetValues = item.values; // Assuming 'values' contains the raw data from the HTTP Request

  if (!sheetValues || sheetValues.length === 0) {
    // If a sheet has no data, we'll just add an empty array for it and move on.
    aggregatedData[sheetName] = [];
    continue;
  }

  const headers = sheetValues[0]; // The first row is assumed to be the headers
  const dataRows = sheetValues.slice(1); // All subsequent rows are data

  const structuredData = dataRows.map(row => {
    const rowObject = {};
    headers.forEach((header, index) => {
      // Clean header name: remove non-alphanumeric characters and convert to camelCase or similar
      // This makes the header names safe and easy to use as JSON keys.
      const cleanHeader = header.replace(/[^a-zA-Z0-9]/g, '').toLowerCase();
      rowObject[cleanHeader] = row[index];
    });
    return rowObject;
  });

  aggregatedData[sheetName] = structuredData;
}

// Return the single aggregated JSON object. This will be the output of our Code node.
return [{ json: aggregatedData }];
This image illustrates the ‘Code1’ node’s configuration, which is vital for processing the initial API response to extract sheet properties. The code snippet shown maps over json.sheets from the ‘Extract Sheet IDs’ node, returning objects with sheetId and sheetName, preparing the data for the looping process. This is where we get our list of sheets ready for action!
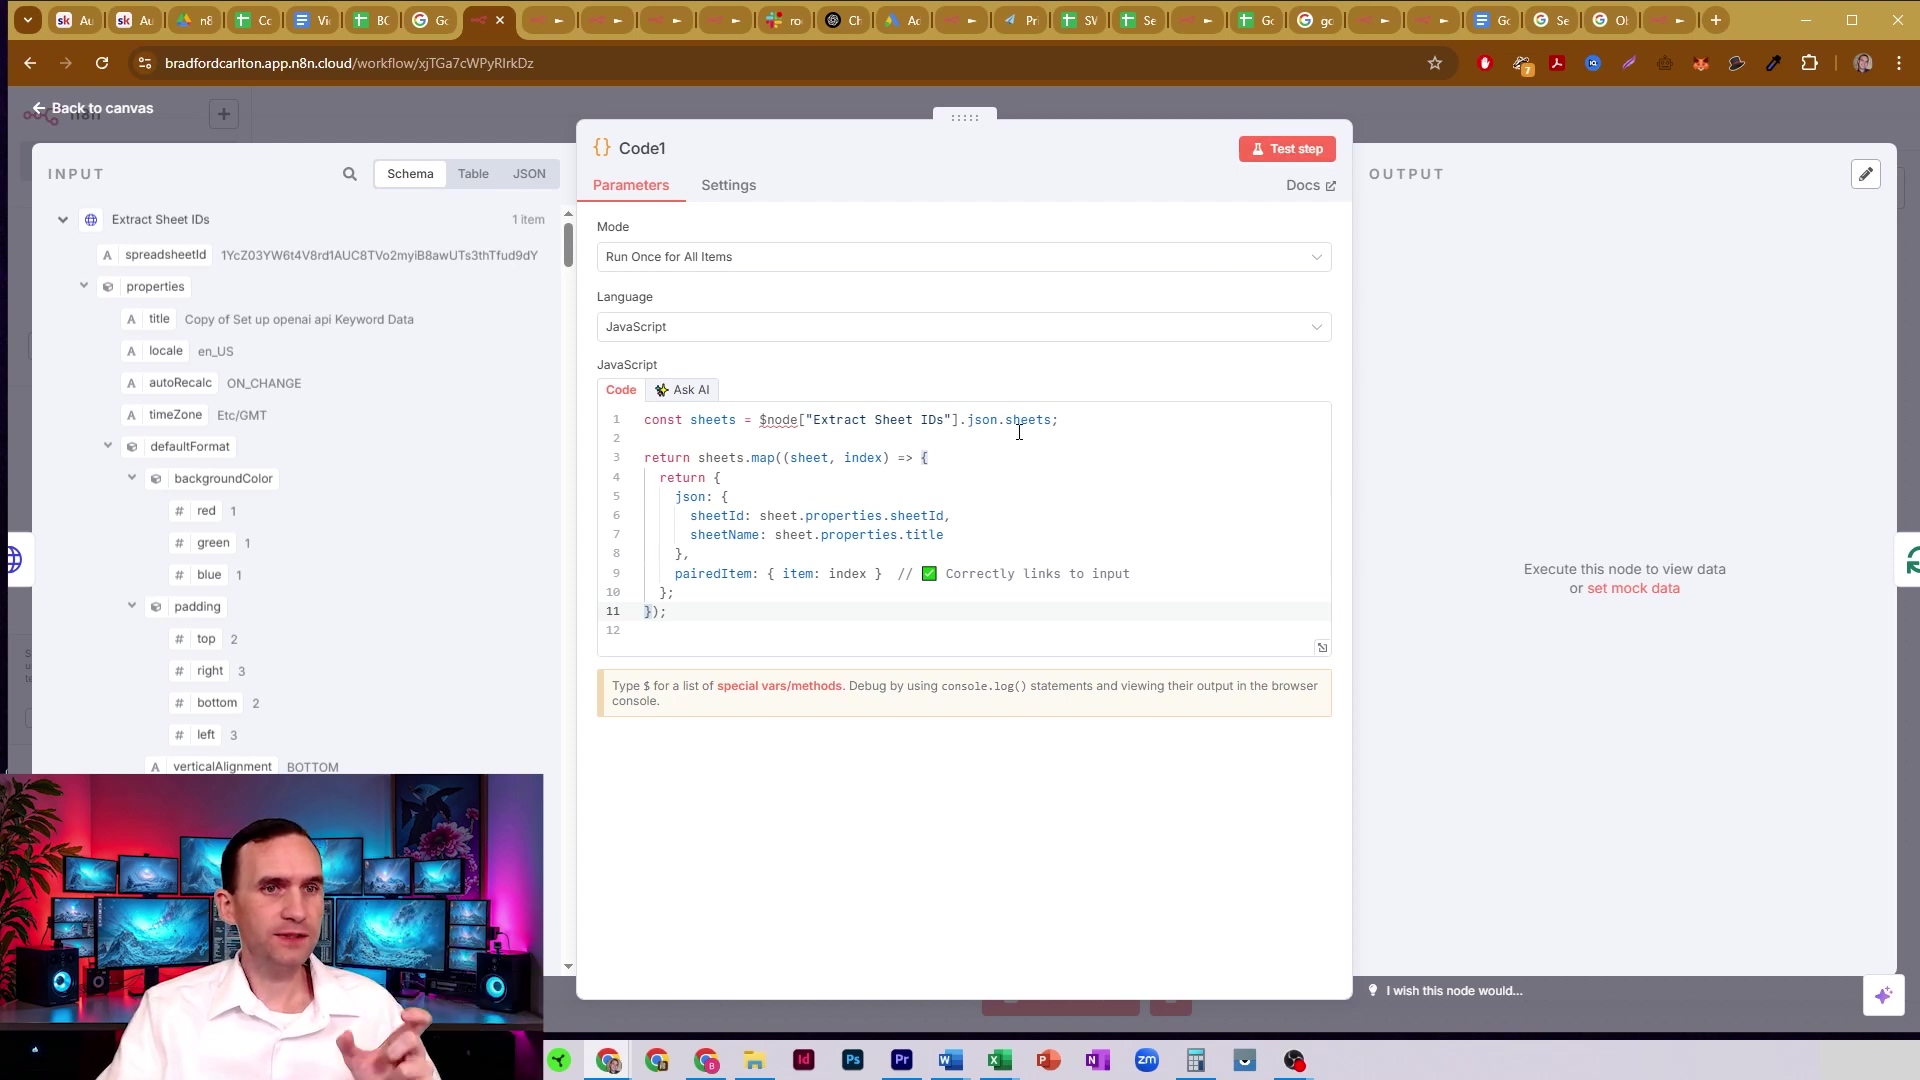
This ‘Code1’ node is fundamental for structuring the sheet metadata before individual sheet data is retrieved. It’s like creating an index for our data library!
Verifying the Collated Output
After you run this ‘Code’ node, you’ll see something beautiful: a single item containing a perfectly structured JSON object. This object is your new central data hub! It will have keys that correspond to your sheet names (e.g., fromgcp, sorted, finalized, referencevideos). And here’s the best part: each of these keys will hold an array of JSON objects. Each inner object represents a row from your original sheet, with keys being those dynamically assigned column headers (like keyword, volume, competition) and values being the actual row data. For example, fromgcp might contain an array where each object has keys like keyword, volume, competition, etc. This structured, unified output is now perfectly poised for any subsequent processing, whether it’s filtering, transformation, or feeding into an AI agent. You’ve done it!
- Output Structure: You’ll get a single JSON object with your sheet names acting as the main keys.
- Row Representation: Each row from your original sheets is now a neat JSON object, complete with dynamic column headers.
- Ready for Use: Your data is now clean, structured, and ready for all sorts of advanced applications. The world is your oyster!
This robust collation step is what truly transforms raw, fragmented spreadsheet data into a highly usable and intelligent dataset right within your n8n workflow. It’s the bridge that enables powerful automation and insightful analysis. You’ve just leveled up your data game!
This image provides a broader view of the n8n workflow, showing the ‘Loop Over Items’ node connected to an ‘HTTP Request’ node, which then feeds into ‘Code2’ (our collation code node). This visual confirms the smooth flow of data from individual sheet retrieval all the way to the final collation step, where all those data streams are unified. It’s a symphony of automation!
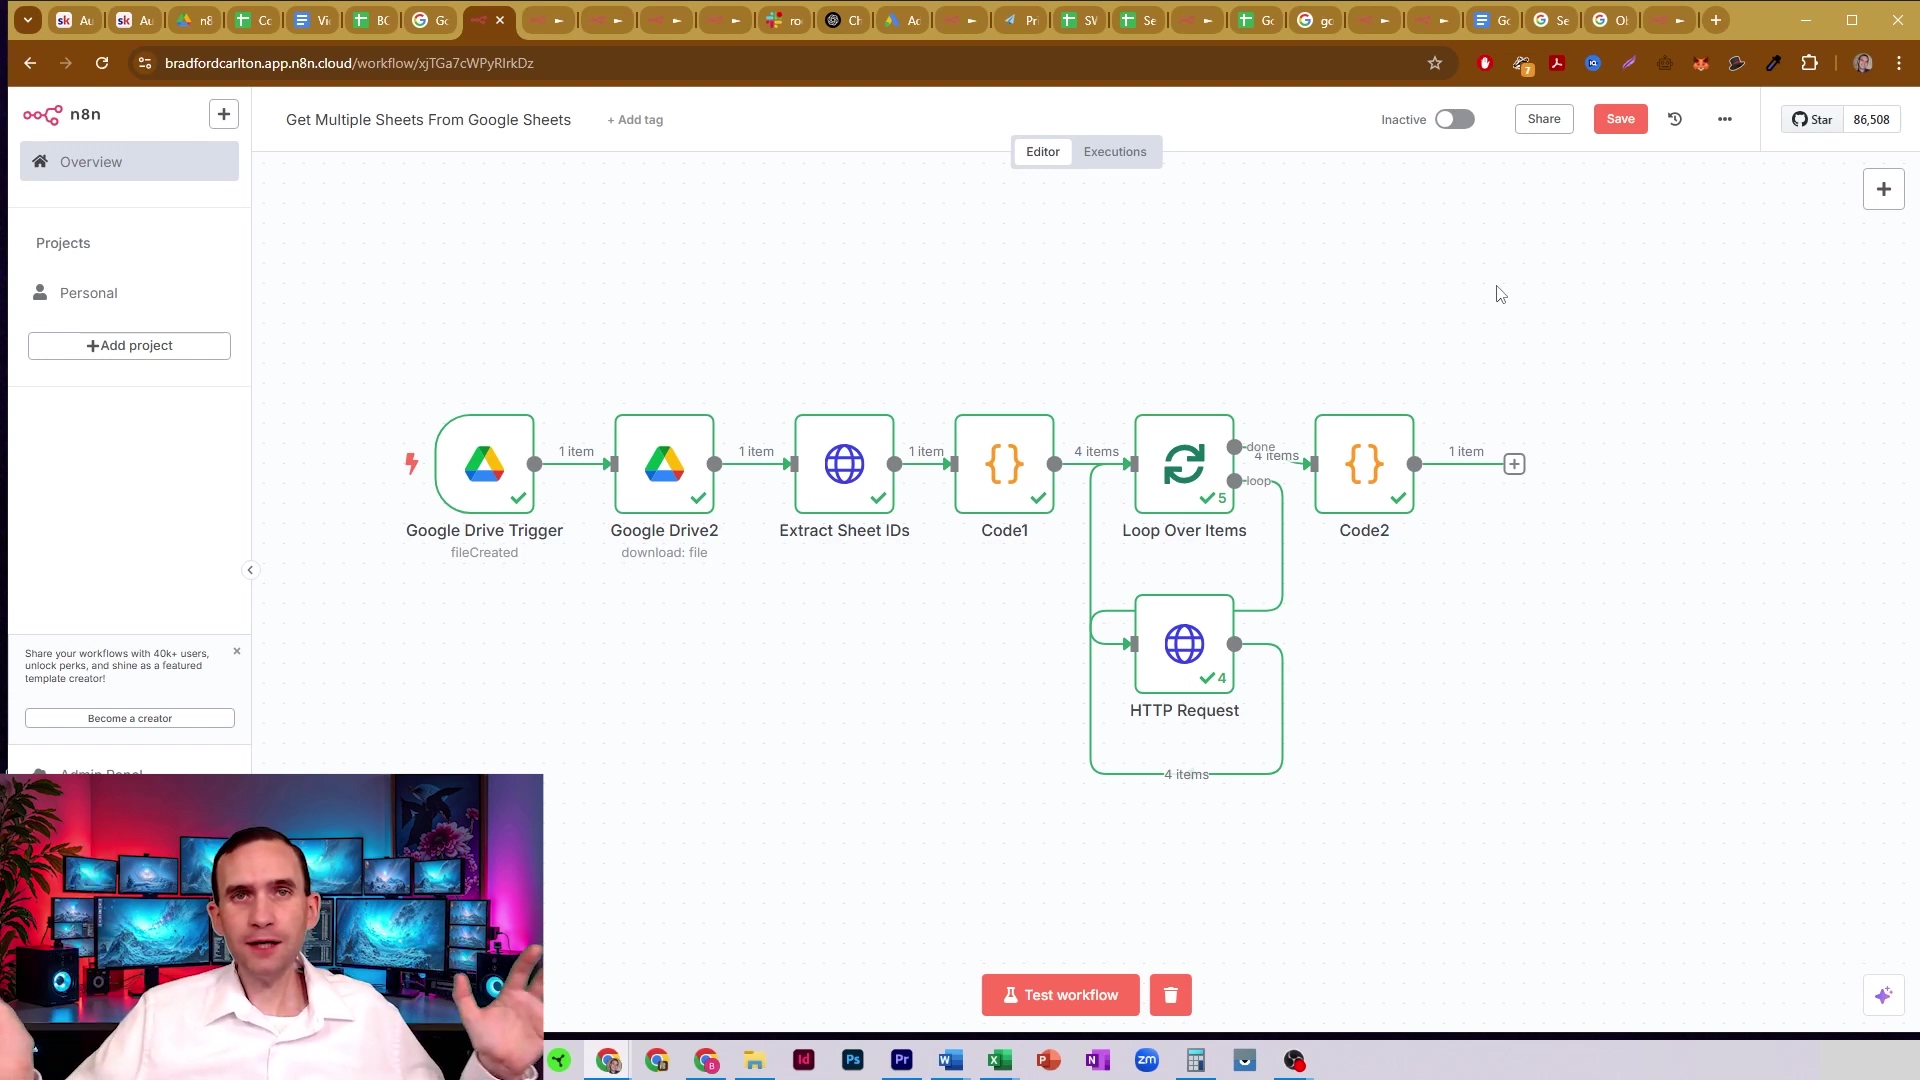
This workflow overview helps to contextualize the collation process within the larger n8n automation. It’s the grand finale of our data assembly line!
Advanced Applications: Integrating with AI and Code Nodes
Unleashing the Power of Consolidated Data
Congratulations! With your Google Sheets data now consolidated into a single, structured JSON object within n8n, you’ve officially moved beyond mere data extraction. This unified dataset isn’t just raw information anymore; it’s a powerful resource, a digital goldmine, ready for advanced processing, insightful analysis, and intelligent decision-making. The ability to access all related data in one coherent structure significantly simplifies its integration with n8n’s ‘Code’ nodes for custom logic or with cutting-edge AI agents for sophisticated, data-driven tasks. This is where your automation truly becomes intelligent and impactful. You’re not just automating tasks; you’re building a digital brain!
- Unified Data Source: You now have a single, comprehensive source for all your related information. No more hunting around!
- Custom Logic: ‘Code’ nodes give you the superpower to perform highly specific data manipulation and transformation, exactly how you need it.
- AI Integration: Your structured data is now the perfect input for AI-driven analysis and generation. Get ready for some mind-blowing insights!
Tailored Data Manipulation with Code Nodes
n8n’s ‘Code’ node offers unparalleled flexibility for transforming and manipulating your collated data. With all your sheet data neatly organized under a single JSON object, you can write custom JavaScript code to perform operations that go far beyond standard node functionalities. For instance, you might want to filter specific rows based on complex criteria spanning multiple sheets, aggregate metrics from different tabs, or even dynamically generate new data points based on existing information. The ‘Code’ node can easily access the entire aggregatedOutput object, allowing you to pinpoint and process information from any sheet with precision. For example, you could extract only the ‘titles’ and ‘proposed descriptions’ from the ‘finalized’ sheet to prepare content for a video upload, or cross-reference keywords from ‘fromgcp’ with ‘sorted’ data to identify high-potential content topics. The possibilities are endless, limited only by your imagination!
// Example: Extracting specific data for video content generation or SEO analysis
// This code assumes the aggregated data is the first item's JSON output from the previous collation node.
const allData = $input.json[0].json;

const videoContentSuggestions = [];

// Let's process the 'finalized' sheet to get video titles and descriptions
if (allData.finalized && allData.finalized.length > 0) {
  for (const row of allData.finalized) {
    videoContentSuggestions.push({
      type: 'Video Suggestion',
      title: row.title || 'N/A', // Use 'N/A' if title is missing
      description: row.description || 'N/A', // Use 'N/A' if description is missing
      tags: row.tags ? row.tags.split(',') : [] // Assuming tags are comma-separated, split them into an array
    });
  }
}

// Now, let's process the 'fromgcp' sheet to find high-volume keywords
if (allData.fromgcp && allData.fromgcp.length > 0) {
  const highVolumeKeywords = allData.fromgcp
    .filter(row => parseInt(row.volume) > 10000) // Example: filter for keywords with search volume > 10,000
    .map(row => ({ keyword: row.keyword, volume: row.volume })); // Create new objects with just keyword and volume

  videoContentSuggestions.push({ type: 'High Volume Keywords', keywords: highVolumeKeywords });
}

// Return the processed data. This can then be used by other nodes, including AI agents.
return [{ json: { processedData: videoContentSuggestions } }];
Empowering Workflows with AI Agents
This structured and unified data is like rocket fuel for n8n’s AI agent nodes or for integrating with external AI services. Imagine feeding your comprehensive SEO keyword data, proposed titles, competitor analysis, and even past video performance metrics directly into an AI agent. This agent, with access to all this relevant context, could then perform some truly incredible feats:
- Generate Optimized Content Ideas: Based on high-volume keywords, low competition, and identified content gaps, the AI can brainstorm winning content strategies.
- Refine SEO Meta Descriptions: Using data from the ‘finalized’ sheet, the AI can craft compelling, click-worthy descriptions that boost your search rankings.
- Perform Predictive Analysis: By analyzing historical data across various sheets, the AI can forecast market trends, helping you stay ahead of the curve.
- Automate Report Generation: The AI can summarize key insights from all your consolidated data, creating comprehensive reports without you lifting a finger.
This integration elevates your n8n workflows from simple automation to intelligent, data-driven decision-making. The AI agent can process the entire aggregatedOutput object, understanding the relationships between different sheets and providing comprehensive insights or generating contextually relevant outputs. This not only saves immense manual effort but also significantly enhances the quality, strategic value, and scalability of your automated processes, allowing you to focus on higher-level tasks. You’re not just automating; you’re augmenting your intelligence!
- AI-driven Content Strategy: Develop entire content plans based on consolidated market data and AI insights.
- Automated SEO Audits: Use AI to identify optimization opportunities across all your content assets, from blog posts to video descriptions.
- Smart Data Summarization: Get concise, intelligent summaries of complex datasets pulled from multiple sources, making data analysis a breeze.
By unifying your data, you’re not just making it accessible; you’re making it intelligent, paving the way for advanced automation strategies that can profoundly impact your business operations and analytical capabilities. Welcome to the future of automation!
After the data has been processed and collated, the ‘Code2’ node’s output shows the structured data, including ‘ProposedTitle’, ‘ProposedDescription’, and ‘ProposedTags’ from the ‘Finalized’ section, along with ‘Referenced Videos’ and ‘TimeStamps’. This demonstrates the rich, organized data ready for advanced applications like AI integration. It’s the final, polished product of our data assembly line!
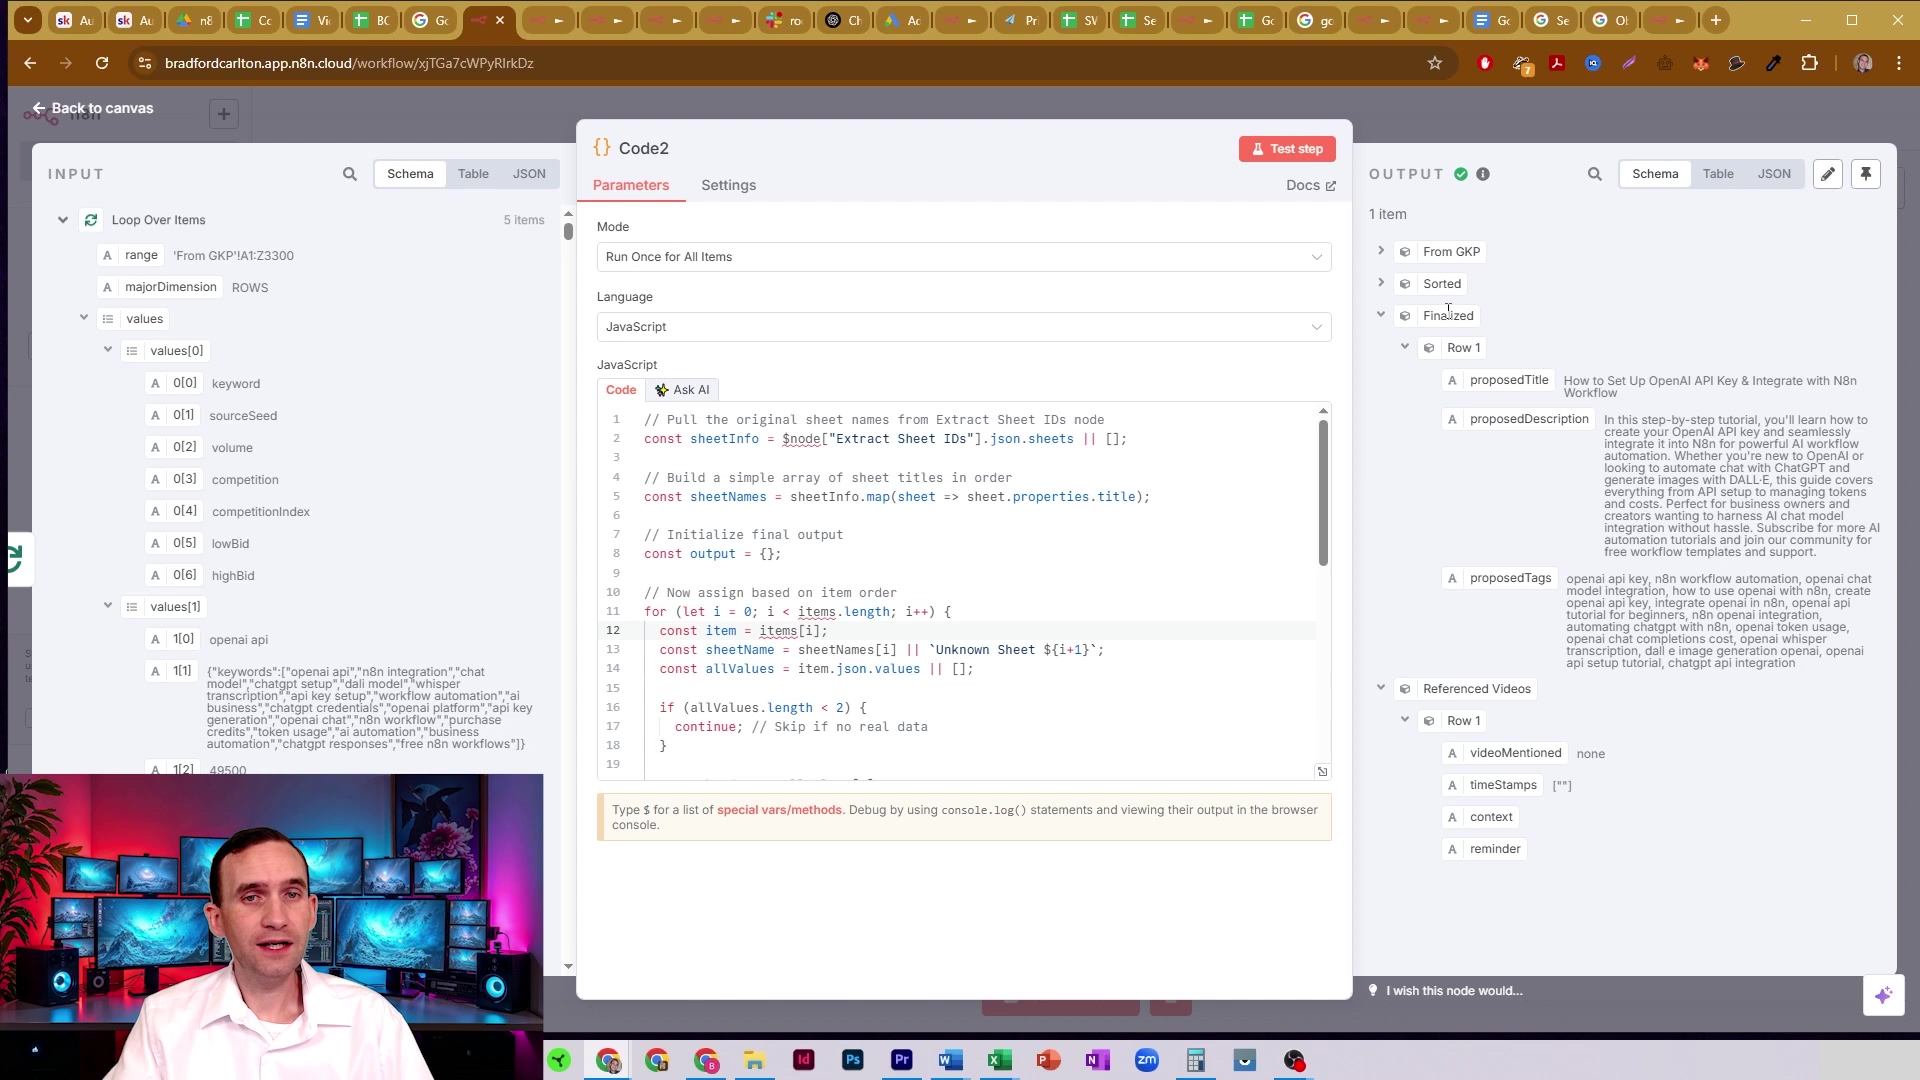
This output confirms that the data is now in a highly usable format, perfect for feeding into AI agents for further analysis or content generation. Your data is ready to talk to the robots!
Troubleshooting and Best Practices for n8n Google Sheets Workflows
Common Pitfalls and How to Avoid Them
Building robust n8n workflows for Google Sheets data extraction, especially when you’re pulling from multiple sheets, can sometimes feel like navigating a minefield. Trust me, I’ve stepped on a few! Understanding the common issues and knowing how to implement best practices can save you a ton of time, frustration, and maybe even a few gray hairs. One frequent problem, as we’ve discussed, is hitting Google API rate limits, especially if you’re dealing with a large number of sheets or running your workflow super frequently. Another common headache is ensuring data consistency and correct parsing, which can get tricky if your sheet structures aren’t perfectly uniform.
- API Rate Limits: This is like Google telling you to slow down! Too many requests too quickly can lead to temporary blocks, halting your workflow.
- Data Parsing Errors: Inconsistent data types (e.g., a number where text is expected) or missing headers can throw a wrench in your data processing.
- Authentication Failures: Expired tokens, incorrect permissions, or misconfigured API scopes can prevent n8n from talking to Google Sheets at all.
Best Practices for Robust Workflows
To ensure your n8n Google Sheets workflows are not just powerful but also reliable, efficient, and resilient, keep these best practices in your back pocket. They’re like your automation toolkit!
- Implement Rate Limiting: For workflows that process many sheets, this is a lifesaver. Insert a ‘Wait’ node (I usually go for 3-5 seconds) within your loop. This spaces out your API calls, significantly reducing the chance of hitting Google’s rate limits. It’s a small pause for a big gain in stability.
- Error Handling: Don’t just let your workflow crash! Utilize n8n’s ‘Error Trigger’ and ‘Try/Catch’ nodes. These are super handy for gracefully handling API errors or unexpected data formats. This prevents workflow failures and allows you to log issues, send notifications, or even retry operations. It’s like having a safety net!
- Dynamic Credentials: Always store your API keys and other sensitive information securely using n8n’s built-in credentials system. And here’s a pro tip: ensure your credentials have the minimum necessary permissions (this is called the principle of least privilege). Don’t give your workflow access to everything if it only needs access to a few things.
- Input Validation: Before you dive deep into processing, use ‘Code’ nodes to validate the structure and content of your extracted data. Check for expected headers, make sure data types are correct, and confirm that essential values aren’t empty. This catches problems early and prevents downstream errors.
- Modular Design: Think of your workflow like a LEGO set. Break down complex workflows into smaller, more manageable sub-workflows or distinct sections. This makes everything easier to read, maintain, and troubleshoot. If something breaks, you know exactly where to look!
- Version Control: Treat your n8n workflows like code. Export them regularly and store them in a version control system (like Git or even just a well-organized folder with dates). This way, you can track changes, revert to previous versions if something goes wrong, and collaborate more effectively.
- Logging and Monitoring: Implement logging within your workflow. You can use a ‘Log’ node, send notifications (via email, Slack, etc.), or even write to a database. Track execution status, what data was processed, and any errors encountered. This gives you visibility and helps you understand what’s happening behind the scenes.
By adhering to these best practices, you’ll build n8n workflows that are not only powerful in extracting and consolidating data but also resilient, maintainable, and reliable over time. They’ll keep humming along smoothly, even as your data sources evolve and API constraints change. You’ll be a true automation wizard!
When dealing with numerous sheets, it’s often beneficial to introduce a ‘Wait’ node to prevent hitting API rate limits. This image shows an n8n workflow with a ‘Wait’ node strategically placed after the ‘HTTP Request’ node within the loop, demonstrating how to pace API calls for improved stability. It’s a simple yet powerful technique!

This visual emphasizes the importance of rate limiting as a best practice for robust Google Sheets workflows. It’s all about being a good API citizen!
Conclusion: Streamline Your Data Workflow with n8n
Wow, what a journey! We’ve just navigated through a comprehensive guide, and hopefully, you now feel like a master of multi-sheet Google Sheets data extraction in n8n. We’ve transformed what could have been a fragmented, complex, and frustrating task into a streamlined, efficient, and intelligent automation. By leveraging dynamic sheet ID extraction, iterative data retrieval, and advanced code-based collation, you now possess the skills to pull all necessary data from a single Google Sheets document into a unified, structured format. This approach isn’t just about making your workflows run better; it significantly enhances efficiency, drastically reduces the risk of hitting those annoying API rate limits, and, most excitingly, perfectly prepares your data for sophisticated processing with n8n’s code nodes and powerful AI agents. You’ve basically built a data superhighway!
Looking ahead, the techniques you’ve learned here are more than just a one-off solution; they form a foundational skill for any data-driven automation. Imagine applying these principles to automate comprehensive client reporting, dynamically generate content for your next big campaign, or even perform real-time market analysis. All of this, powered by intelligently extracted and processed data! The ability to seamlessly integrate diverse datasets from Google Sheets opens up a whole new universe of possibilities for more insightful analytics and proactive decision-making within your business operations. It’s like having a crystal ball for your data!
I really encourage you to roll up your sleeves and implement these strategies in your own n8n workflows. Don’t be afraid to experiment with the ‘Code’ nodes – they’re your playground for custom logic! Explore the integration with AI agents, and customize the data processing to fit your unique needs. A great starting point? Identify a Google Sheet with multiple tabs that currently requires manual data consolidation. Apply the steps outlined in this guide, and experience firsthand the transformative power of a unified data extraction process. Share your successes (and even your challenges!) in the n8n community – we’re all learning and growing together. Keep exploring how intelligent automation can elevate your data management to new heights. The future is automated, and you’re at the forefront!