Watch the Video Tutorial
💡 Pro Tip: After watching the video, continue reading below for detailed step-by-step instructions, code examples, and additional tips that will help you implement this successfully.
What if you could teach n8n not just how to send an email, but how to think before it sends one? Most guides show you the basics, but today, we’re building something truly intelligent: a complete AI assistant that can read, understand, and draft personalized replies for you.
This guide is all about building an AI-powered email automation agent using n8n and Gmail. We’re going to turn that email mountain into a molehill, streamlining how you capture leads and generate responses. By the end of this, your AI agent will be intelligently processing emails, pulling out key info, storing it neatly, and even drafting personalized replies. How cool is that?
Table of Contents
Open Table of Contents
- TL;DR
- Email Overload? Automate Responses with AI and n8n
- Setting Up Your Workspace: Connecting n8n with Gmail and Google Cloud
- Designing the Core Logic: Triggering Workflows on New Emails
- Intelligent Email Analysis: Using the AI Agent Node in n8n
- Streamlining Lead Management: Integrating with Airtable for Data Storage
- Crafting AI-Powered Responses: Automating Email Generation
- Review and Send: Saving Drafts or Instant Dispatch
- Advanced Optimization and Best Practices for Your AI Agent
- Enhancing Your Workflow: Next Steps and Further Automation Ideas
- Final Summary
- Frequently Asked Questions (FAQ)
- Q: Why do I need to disable ‘Simplify Output’ in the Gmail trigger node?
- Q: What if my AI Agent doesn’t always return the JSON in the exact format I defined?
- Q: Is it safe to automatically send emails without human review?
- Q: How can I handle different types of incoming emails, not just sponsorships?
TL;DR
Alright, for those of you who like to get straight to the point, here’s the quick rundown, like a cheat sheet for your automation journey:
- Connect Gmail \u0026 Google Cloud: First up, we’re heading to cloud.google.com (think of it as mission control for your Google services). We’ll create a new project (let’s call it “n8n email automation”), flip the switch on the Gmail API, set up an OAuth consent screen (make sure it’s “external” and you “publish” the app – super important!), and finally, grab those OAuth client ID and secret keys. These are like the secret handshake n8n needs to talk to your Gmail.
- Configure Gmail Trigger: Inside n8n, we’ll add a Gmail ‘On Message Received’ trigger. This is our watchful sentinel, set to check for new emails “every minute.” And here’s a pro tip: disable ‘Simplify Output’ so our AI gets all the juicy details from the email, not just a snippet.
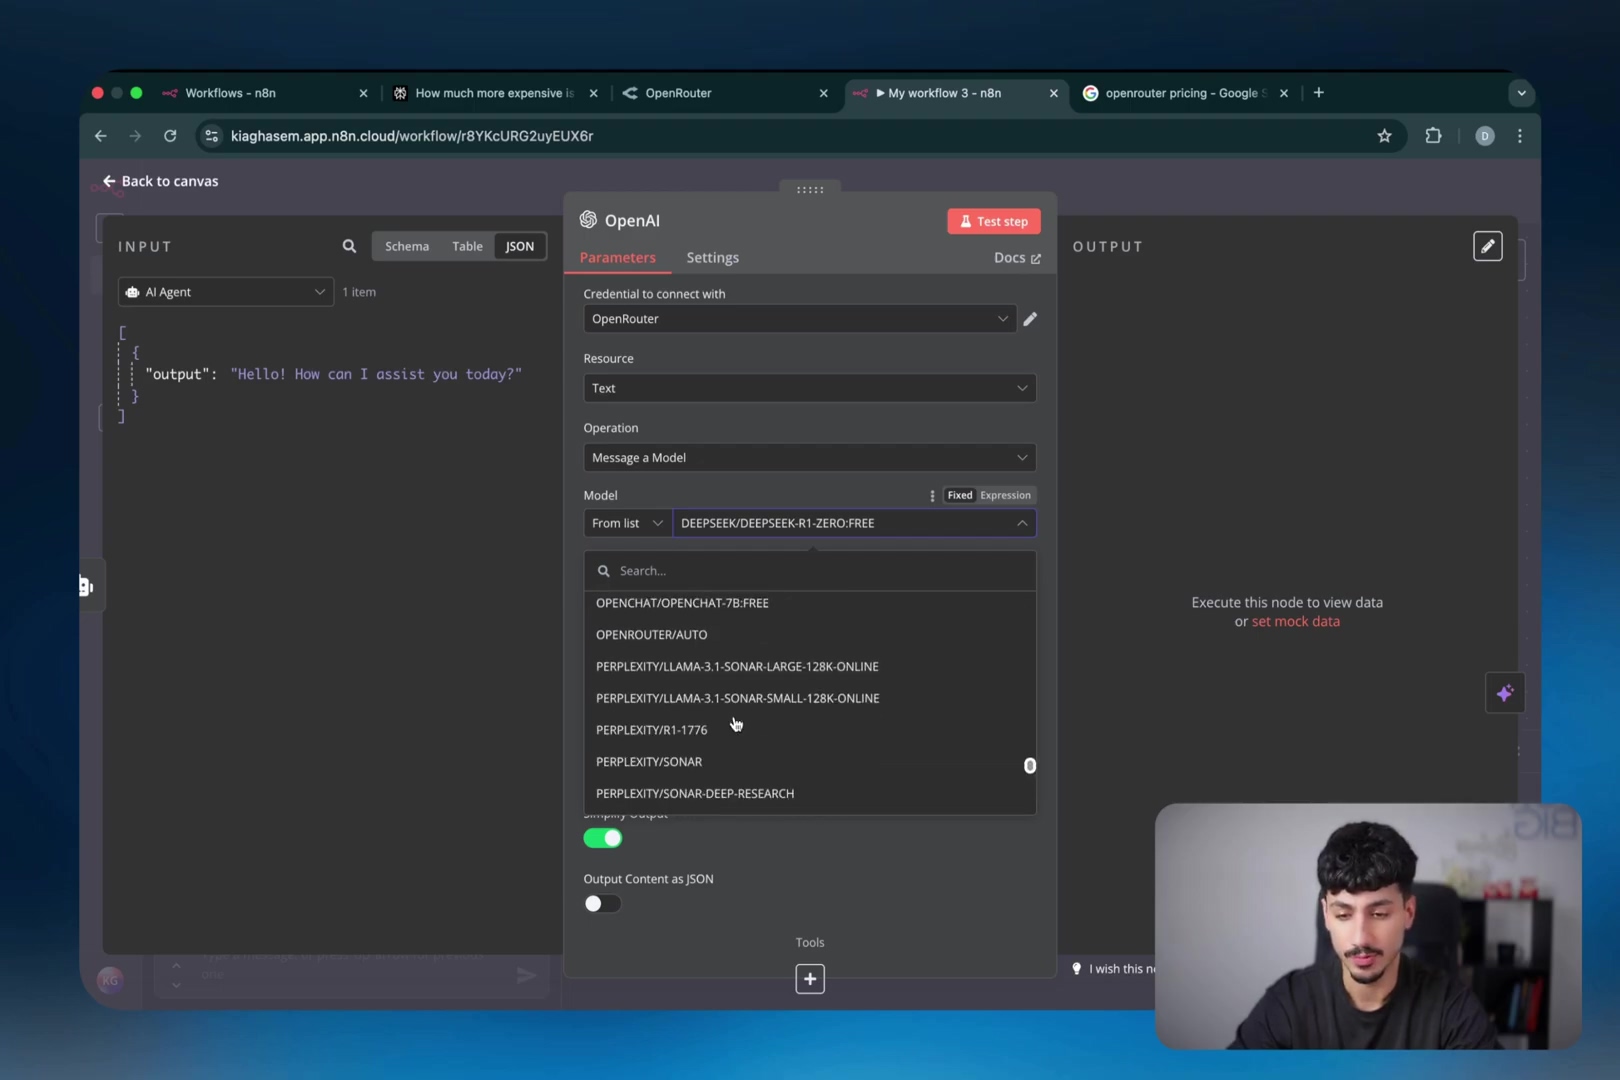
- Implement AI Agent: Next, the brains of the operation! We’ll add an AI Agent node, hooking it up to an OpenAI Chat Model (like the super-efficient GPT-4o Mini). We’ll give it a system prompt in plain text, telling it exactly what its job is:
Your role is to determine if an email is related to a sponsorship deal.... Then, we’ll use a structured output parser to make sure it spits out cleanisSponsorship(true/false) andreasoning(text) data. This is how we’ll decide where the email goes next! - Automate Data Storage: If our AI says “Yep, this is a sponsorship!”, we’ll add an Airtable ‘Create a Record’ node. We’ll set up an Airtable base with fields for ‘email address’, ‘company’, and ‘reasoning’. To connect n8n, you’ll need an Airtable personal access token with
data records:read,data records:write, andschema bases:readscopes. This is how n8n gets permission to write to your database. - Draft AI Responses: Finally, we’ll bring in another OpenAI node to generate email replies. We’ll give it a system prompt that includes all your channel details, rates, and terms and conditions. Then, a Gmail ‘Create Draft’ node will take that AI-generated content, reference the original email’s thread ID, and save it as a draft. Make sure the email type is HTML for beautiful formatting!
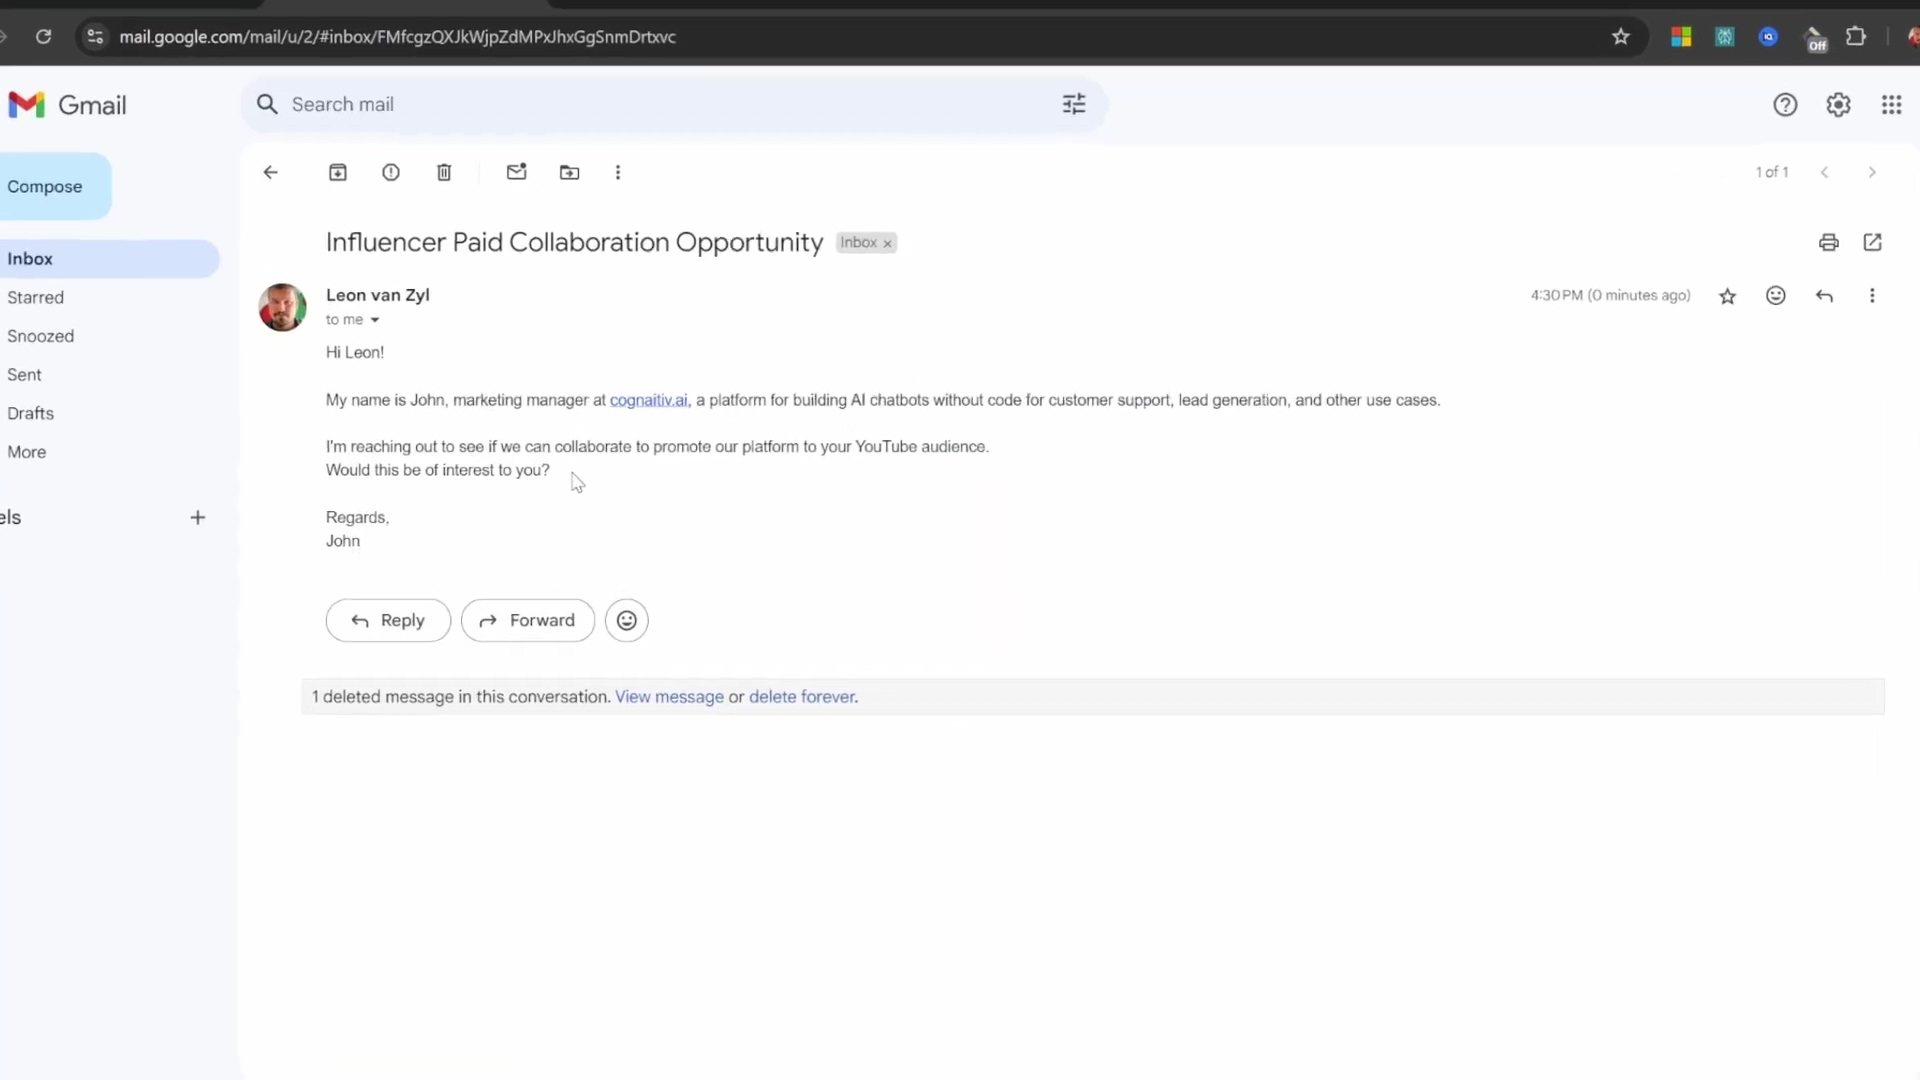
Managing a high volume of emails, especially for critical communications like sponsorship opportunities, can feel like trying to herd cats in a hurricane. It’s overwhelming, right? This guide is your secret weapon to build an AI-powered email automation agent using n8n and Gmail. We’re going to streamline lead capture and response generation, turning that chaos into calm. By leveraging AI, this agent can intelligently process incoming emails, extract relevant information, store it in a database, and even draft personalized replies. It’s like having a super-efficient personal assistant who never sleeps!
Email Overload? Automate Responses with AI and n8n
Email overload is a common challenge for content creators, marketers, and small business owners alike. Trust me, I’ve been there, sifting through hundreds of emails, trying to spot the golden opportunities. It’s like finding a needle in a haystack, and it eats up valuable time that you could be spending on your actual work. This tutorial is going to give you a practical solution to automate these processes, specifically targeting those sweet sponsorship inquiries, by deploying an AI-driven agent built with n8n and integrated with Gmail. It’s time to reclaim your inbox!
Regular email responses can be time-consuming, as shown by typical manual email management processes.
This agent is engineered to be your digital superhero, ready to:
- Identify Sponsorship Opportunities: It’s like having a radar for sponsorships, automatically figuring out if an incoming email is the real deal.
- Extract Key Information: It’ll pull out all the essential details about potential leads, like names and company affiliations, so you don’t have to squint at tiny text.
- Centralize Data: All that extracted contact information gets neatly tucked away in a structured database like Airtable, making it super easy to access and follow up. No more scattered notes!
- Generate Draft Responses: It’ll even whip up tailored email responses based on your guidelines and context, saving them as drafts for you to quickly review before hitting send. Think of it as your personal email ghostwriter!
The n8n workflow provides a comprehensive solution for email automation, integrating various tools to efficiently manage incoming correspondence.
By following these steps, you’ll significantly reduce the time you spend on email management. That means timely responses and efficient lead nurturing, all without breaking a sweat. This approach transforms a manual, time-consuming task into a streamlined, automated workflow, allowing you to focus on creating awesome content rather than wrestling with your inbox. Isn’t that the dream?
Setting Up Your Workspace: Connecting n8n with Gmail and Google Cloud
Alright, let’s get down to business! Connecting n8n to your Gmail account is like giving it the keys to your email kingdom. But before it can drive, we need to set up some secure access via the Google Cloud Console. This process ensures that n8n can talk to Gmail securely and with all the right permissions. Don’t worry, I’ll walk you through every step.
Step 1: Create a Google Cloud Project
Goal: We need a dedicated space in Google Cloud for our n8n integration. Think of it as building a new garage for our automation car.
- Path: First, open your browser and head over to cloud.google.com. Log in with your regular Google account. Once you’re in, look for the project dropdown menu right at the top of the console. It usually shows your current project name. Click on it, and then select ‘New Project’.
- Action: Time to name our project! Something clear like ‘n8n Email Automation’ works perfectly. After you’ve typed it in, click ‘Create’. Give it a moment to spin up. Once it’s created, double-check that your shiny new project is selected in that dropdown menu. This ensures all our subsequent actions happen within this specific project.
Initiate the process by creating a new Google Cloud project.
Step 2: Enable the Gmail API
Goal: Now that we have our project, we need to tell Google Cloud that our project wants to use Gmail’s superpowers. This is like giving our garage a special tool for fixing email engines.
- Path: From the Google Cloud console navigation menu (usually on the left side), find and click on ‘APIs & Services’, then select ‘Library’. This is where all the cool Google APIs live.
- Action: In the API Library search bar, type
Gmail. You’ll see ‘Gmail API’ pop up in the results. Click on it, and then hit that big ‘Enable’ button. This activates the Gmail API specifically for your project, giving it the green light to interact with Gmail.
Activating the Gmail API for your Google Cloud project is a crucial step.
Step 3: Configure the OAuth Consent Screen
Goal: This step is about telling Google how our application (n8n) will ask users (you!) for permission to access their Gmail data. It’s like setting up the privacy policy for our automation tool.
- Path: Back in the Google Cloud Console, navigate to ‘APIs & Services’ > ‘OAuth consent screen’. This is where we define the user experience for granting access.
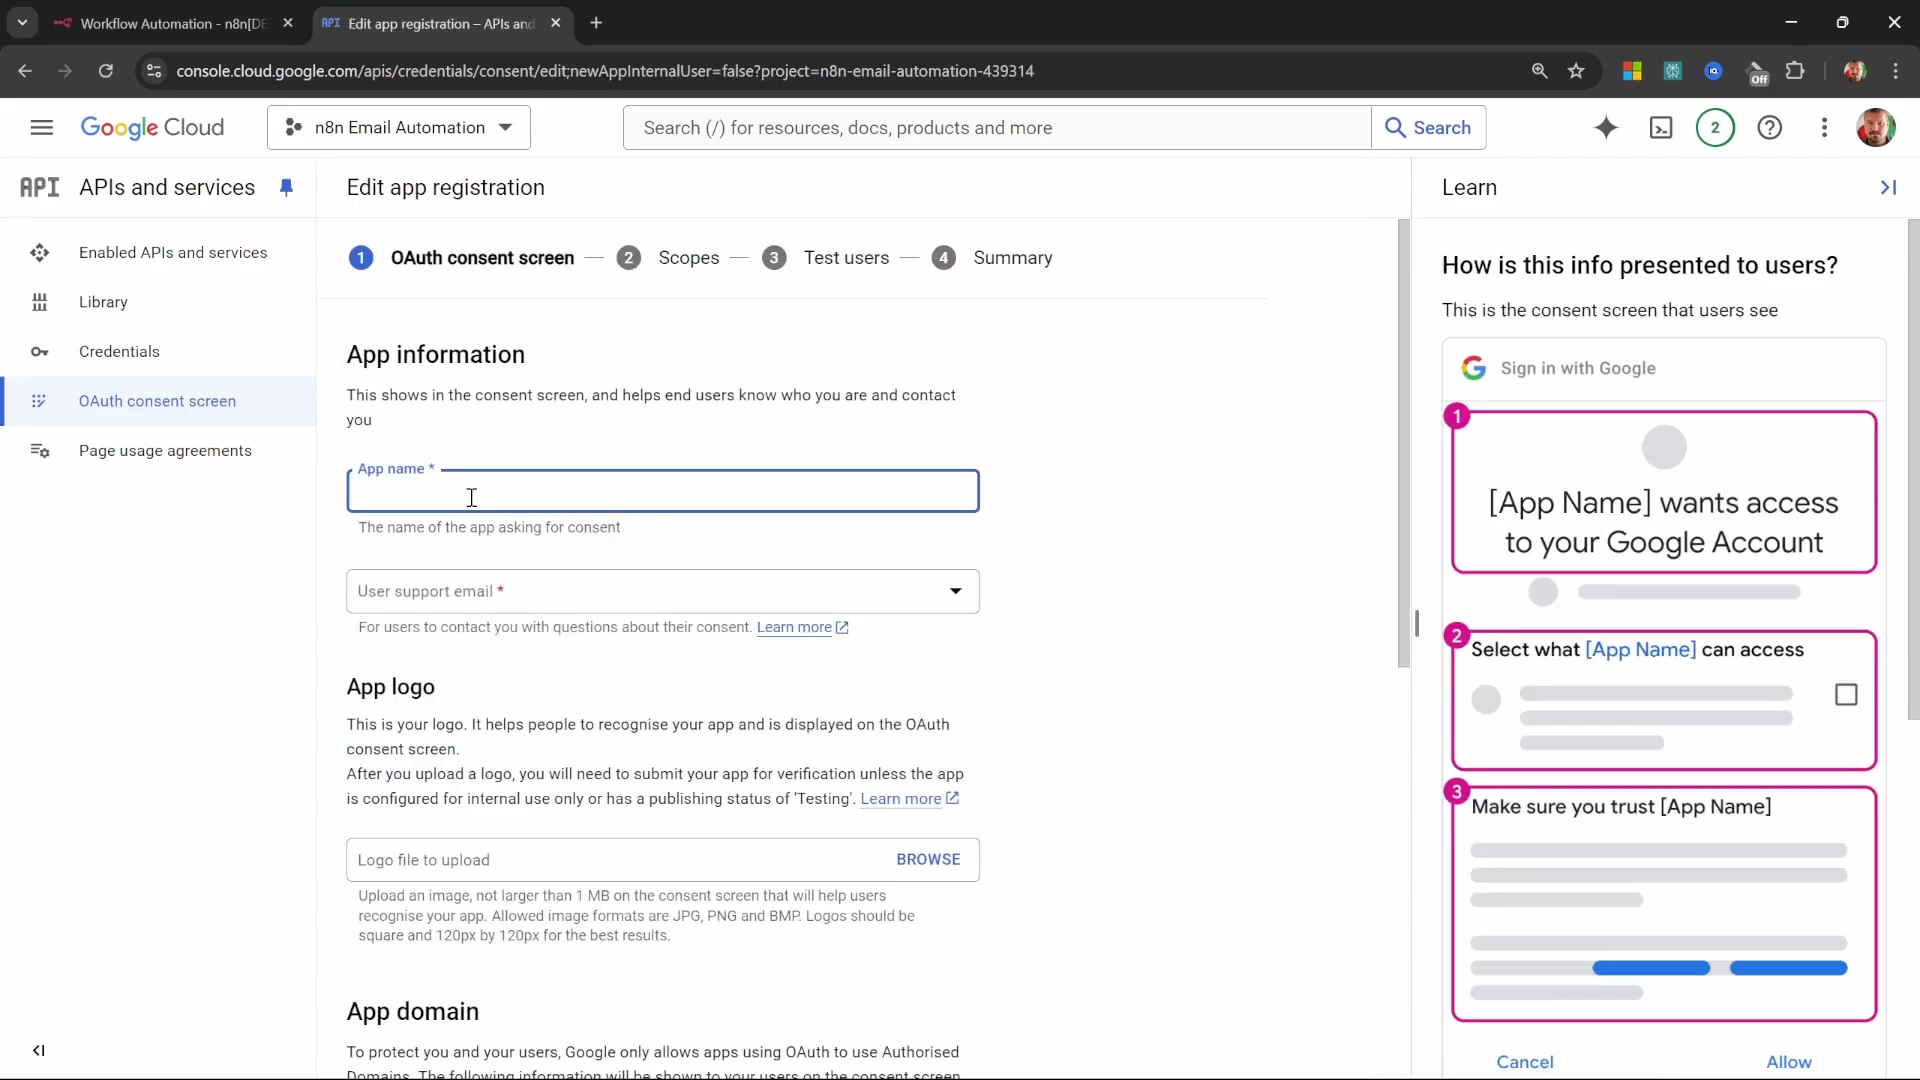
- Action: For the ‘User type’, select ‘External’. Why external? Because we’re not building an internal Google app; n8n is an external service. Then click ‘Create’. You’ll need to provide an ‘App name’ (again, ‘n8n email automation’ is a good choice) and select your ‘User support email’ (just pick your own email for now). Scroll down to ‘Developer contact information’ and enter an email address there too. Click ‘Save and Continue’. You can skip the ‘Scopes’ section for now by clicking ‘Save and Continue’ again. Similarly, skip ‘Test users’ by clicking ‘Save and Continue’. Finally, on the summary page, scroll all the way to the bottom and click ‘Back to Dashboard’.
Define app information and user support email in the ‘OAuth consent screen’ configuration.
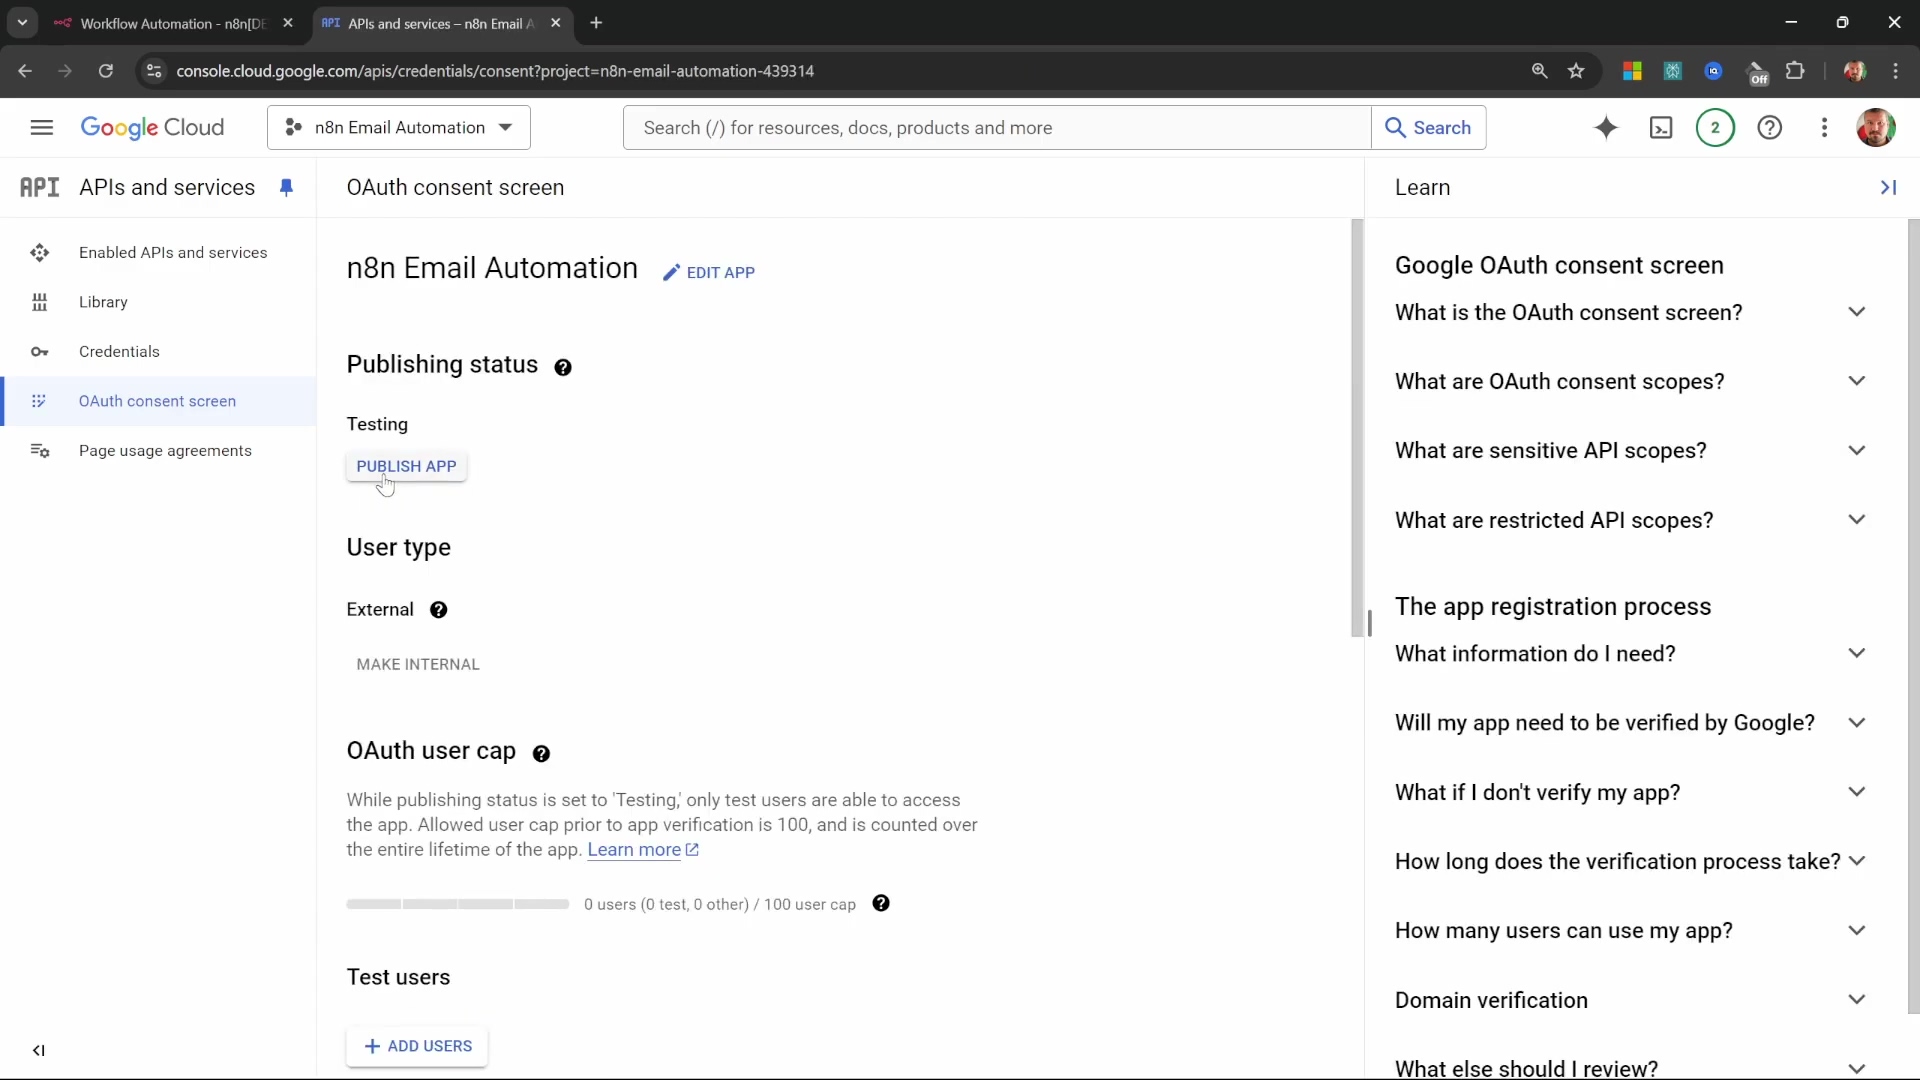
- Crucial Step: You’re not done with this screen yet! Once you’re back on the dashboard for the OAuth consent screen, you’ll see a button that says ‘Publish App’. Click it, and then ‘Confirm’. This makes your app externally available after Google’s verification process. Without this, n8n won’t be able to connect properly. It’s like putting your app out into the world!
Publishing the app ensures it is externally available for verification.
Step 4: Create OAuth Client ID Credentials
Goal: This is where we generate the actual ‘Client ID’ and ‘Client Secret’. These are the unique keys n8n will use to securely identify itself to Google and get permission to access your Gmail. Think of them as the username and password for our automation app.
- Path: Navigate to ‘APIs & Services’ > ‘Credentials’ in the Google Cloud Console. This is where all your project’s access keys are managed.
- Action: Click ‘Create Credentials’, then select ‘OAuth client ID’ from the dropdown.
Choose ‘Web application’ as the application type for creating OAuth client ID credentials.

For ‘Application type’, select ‘Web application’. Give it a ‘Name’ (e.g., ‘n8n email automation’).
- Redirect URI Configuration: This is a super important part! In n8n, when you’re setting up new Gmail credentials, you’ll see an ‘OAuth Redirect URL’ provided. Copy this URL from n8n first! Then, paste this exact URL into the ‘Authorized redirect URIs’ field in Google Cloud. This tells Google where to send the user back to after they’ve granted permission. If this doesn’t match, the connection won’t work. Once pasted, click ‘Create’.
- Retrieve Credentials: A pop-up window will appear, proudly displaying your ‘Client ID’ and ‘Client Secret’. Copy both of these values immediately! Paste them into the respective fields in your n8n Gmail credential setup. Seriously, copy them now, because once you close that pop-up, they’re harder to find again.
Step 5: Authorize Gmail in n8n
Goal: We’re almost there! This final step is about completing the connection by authenticating your Gmail account directly within n8n, using those shiny new credentials we just got.
- Action: In n8n, after you’ve entered the Client ID and Client Secret you copied, click ‘Sign in with Google’.
n8n’s Gmail credentials setup with OAuth2 fields and ‘Sign in with Google’ option.
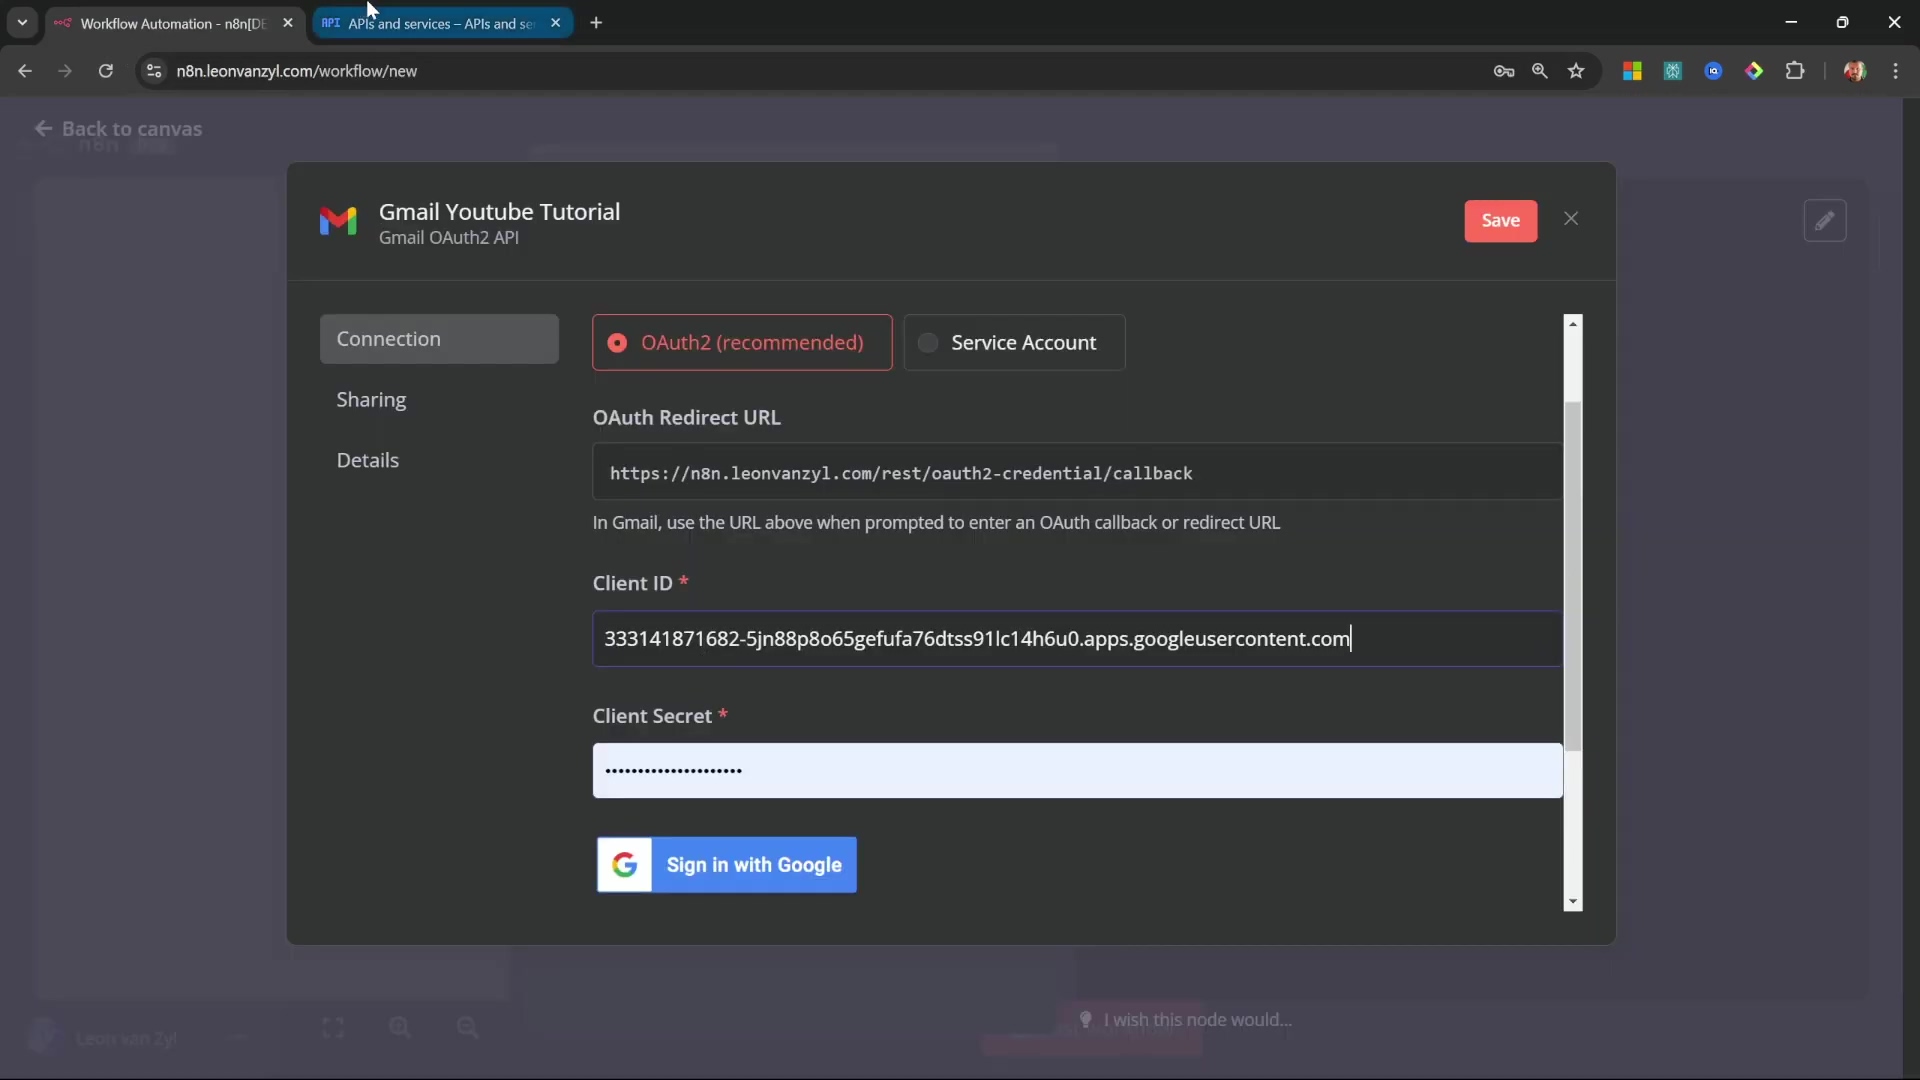
This will open a new browser window or tab. Select the Google account you want n8n to access. You might see a warning that says “Google hasn’t verified this app.” Don’t panic! This is normal for apps you’ve just created. Click ‘Advanced’ (or ‘Details’), then click ‘Go to…’ (it might say something like ‘Go to n8n email automation (unsafe)’). This is just Google being cautious. Finally, grant all the requested permissions by selecting them and clicking ‘Continue’. If everything goes smoothly, you’ll see a successful connection message, confirming your Gmail account is now securely linked to n8n. You’ve nailed it!
This comprehensive setup ensures that n8n has the authorized access needed to manage your email workflows securely and efficiently. It might seem like a few steps, but it’s all about keeping your data safe and sound.
Designing the Core Logic: Triggering Workflows on New Emails
Alright, with our Gmail connected, it’s time to build the heart of our automation: the trigger! Every great email automation workflow starts with a trigger that says, “Hey, new email! Let’s get to work!” This section will guide you through configuring the Gmail trigger node in n8n to effectively detect and process every single incoming message. It’s like setting up a tripwire for your inbox.
Step 1: Add the Gmail ‘On Message Received’ Trigger Node
Goal: We need to tell n8n to constantly keep an eye on your Gmail inbox for any new messages. This is our workflow’s starting gun.
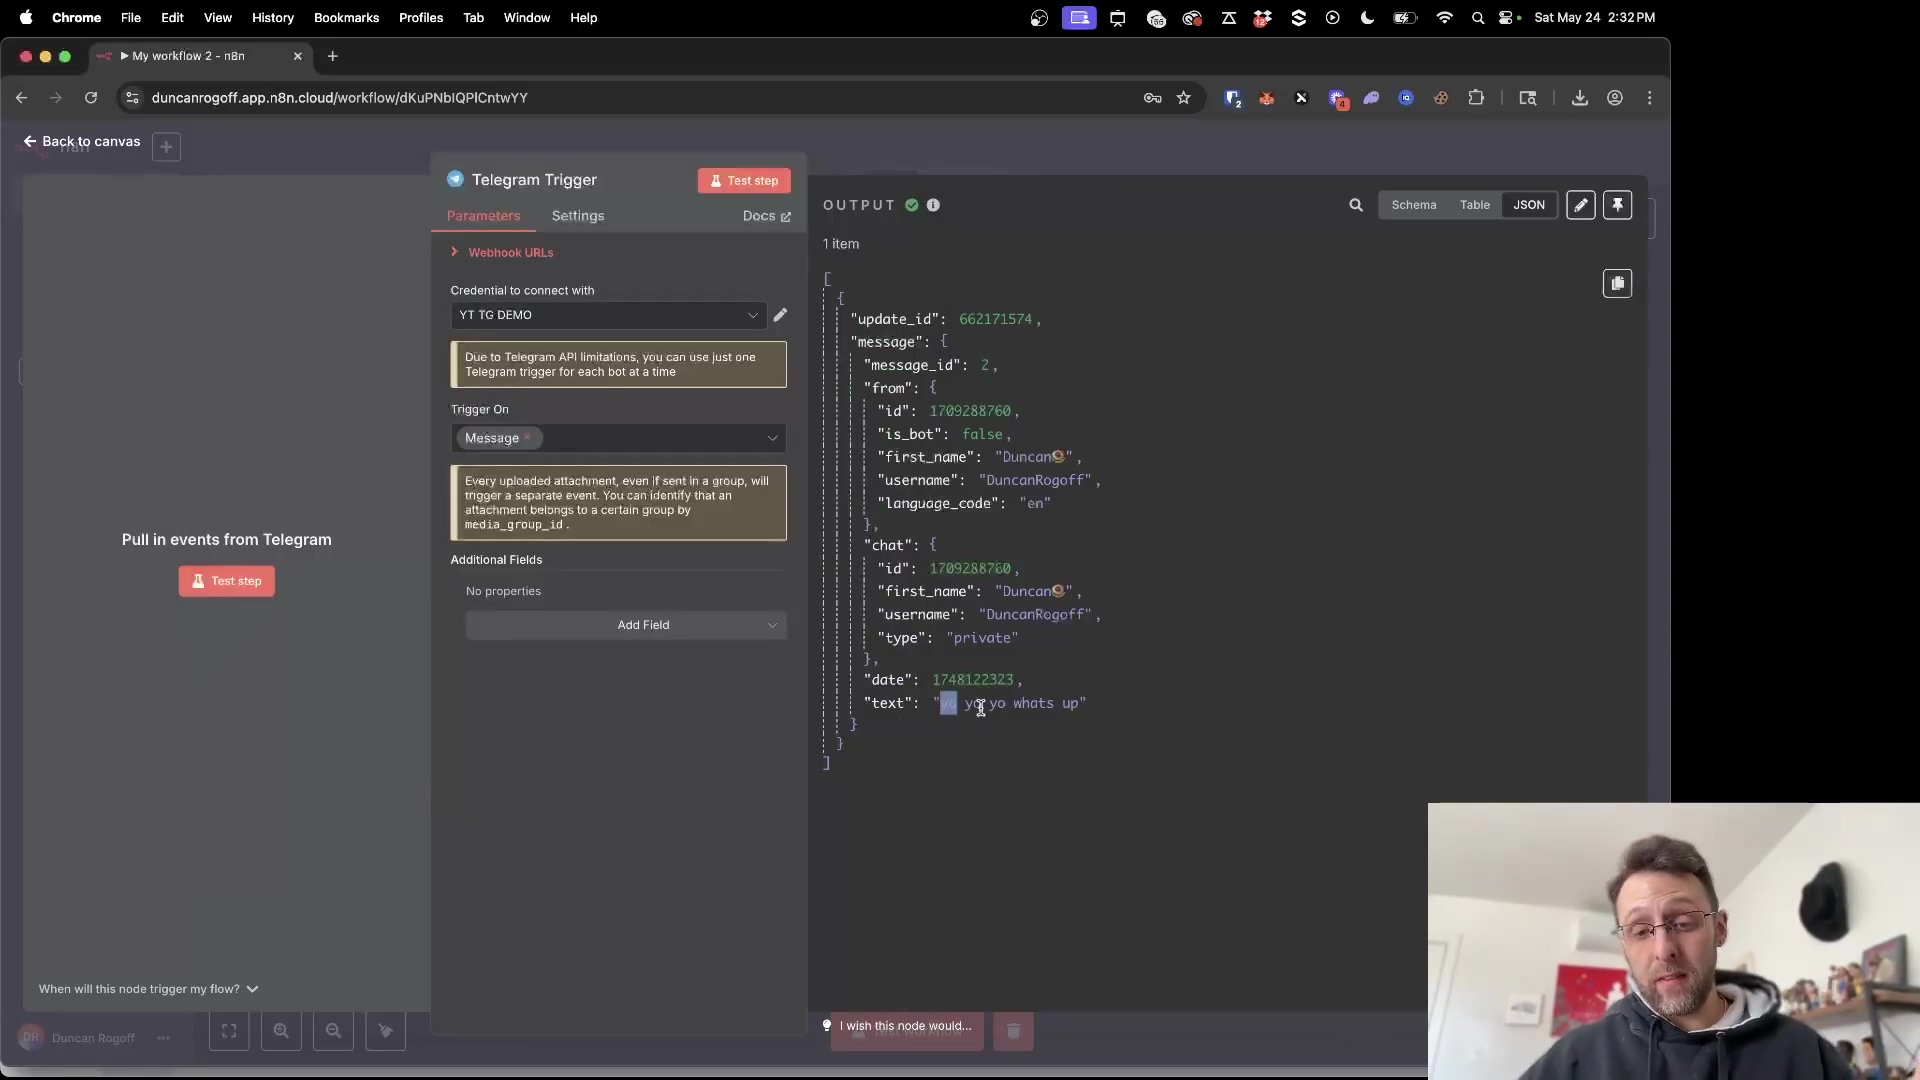
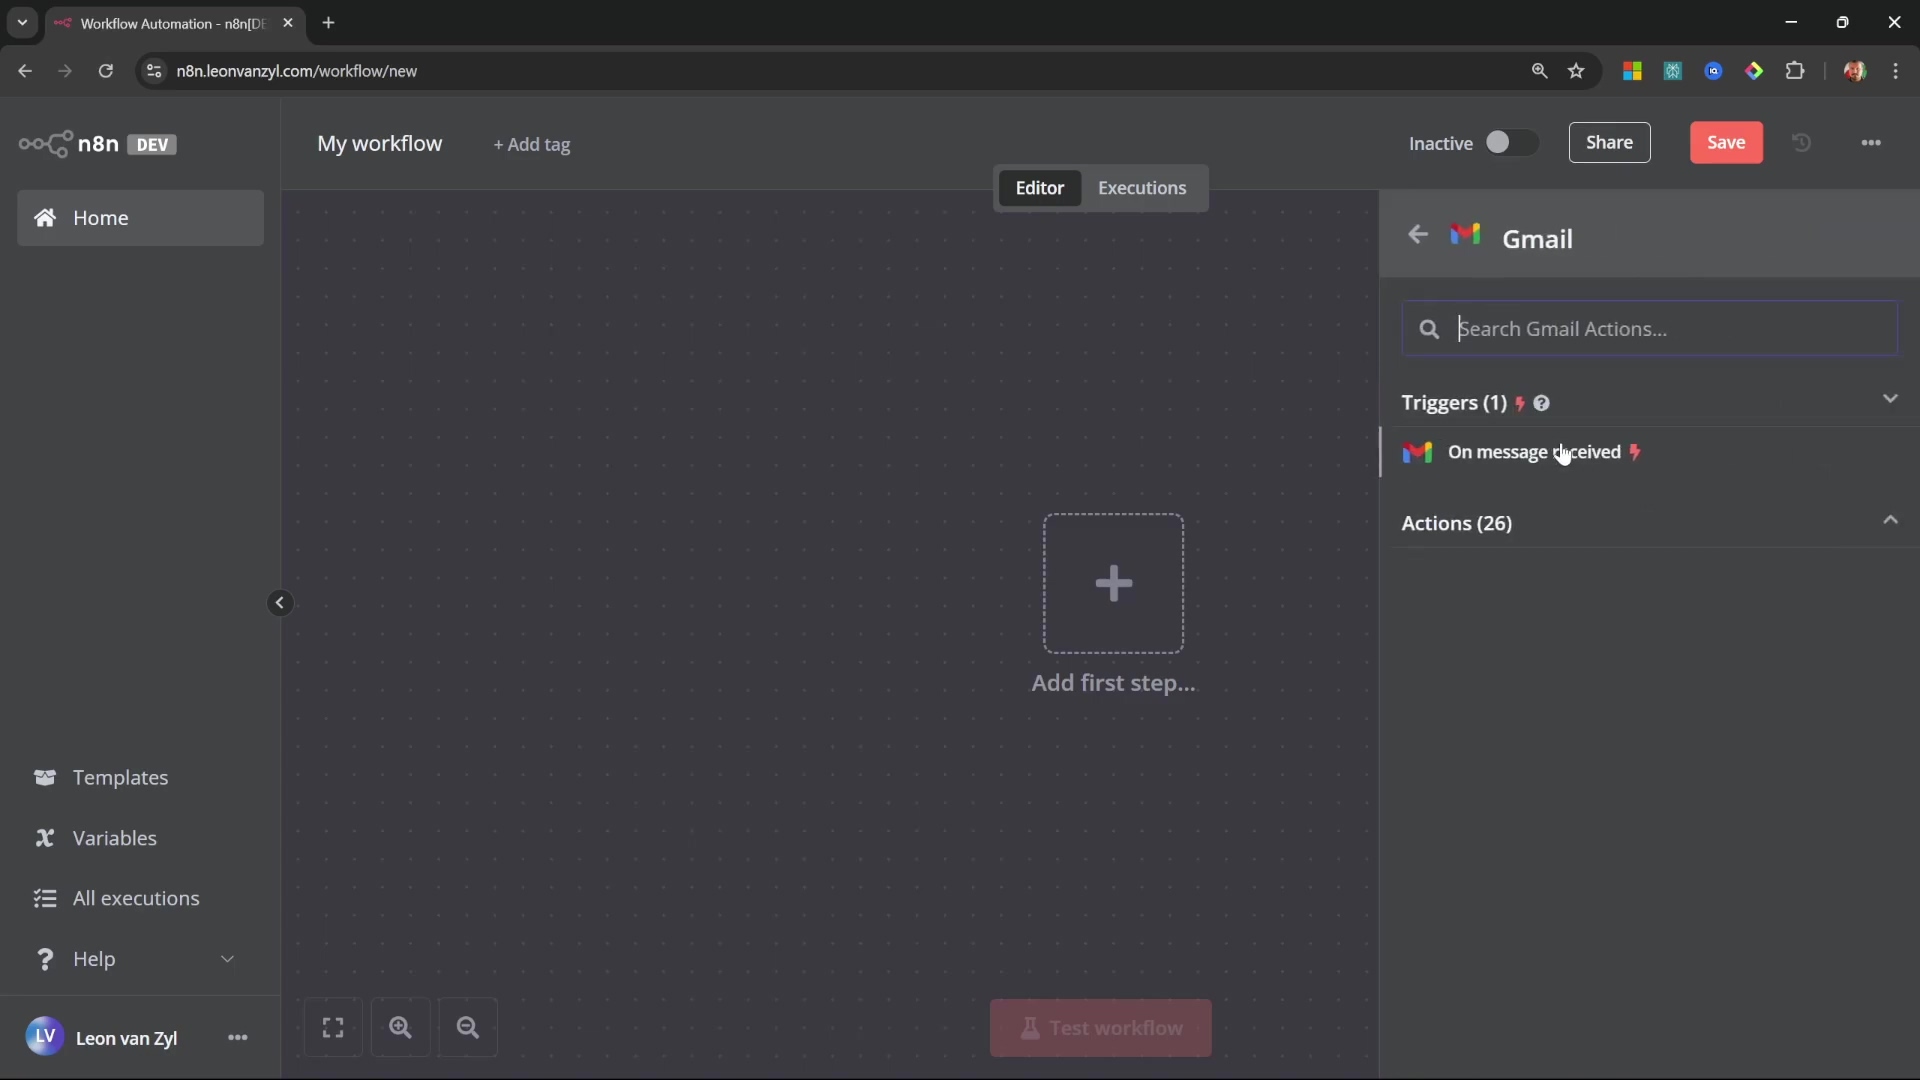
- Path: In your n8n workflow canvas (that big empty space where you drag and drop nodes), search for the ‘Gmail’ node. You can usually find the search bar at the top or by right-clicking on the canvas. From the options that appear, select the ‘On Message Received’ trigger. This is the one that listens for new emails.
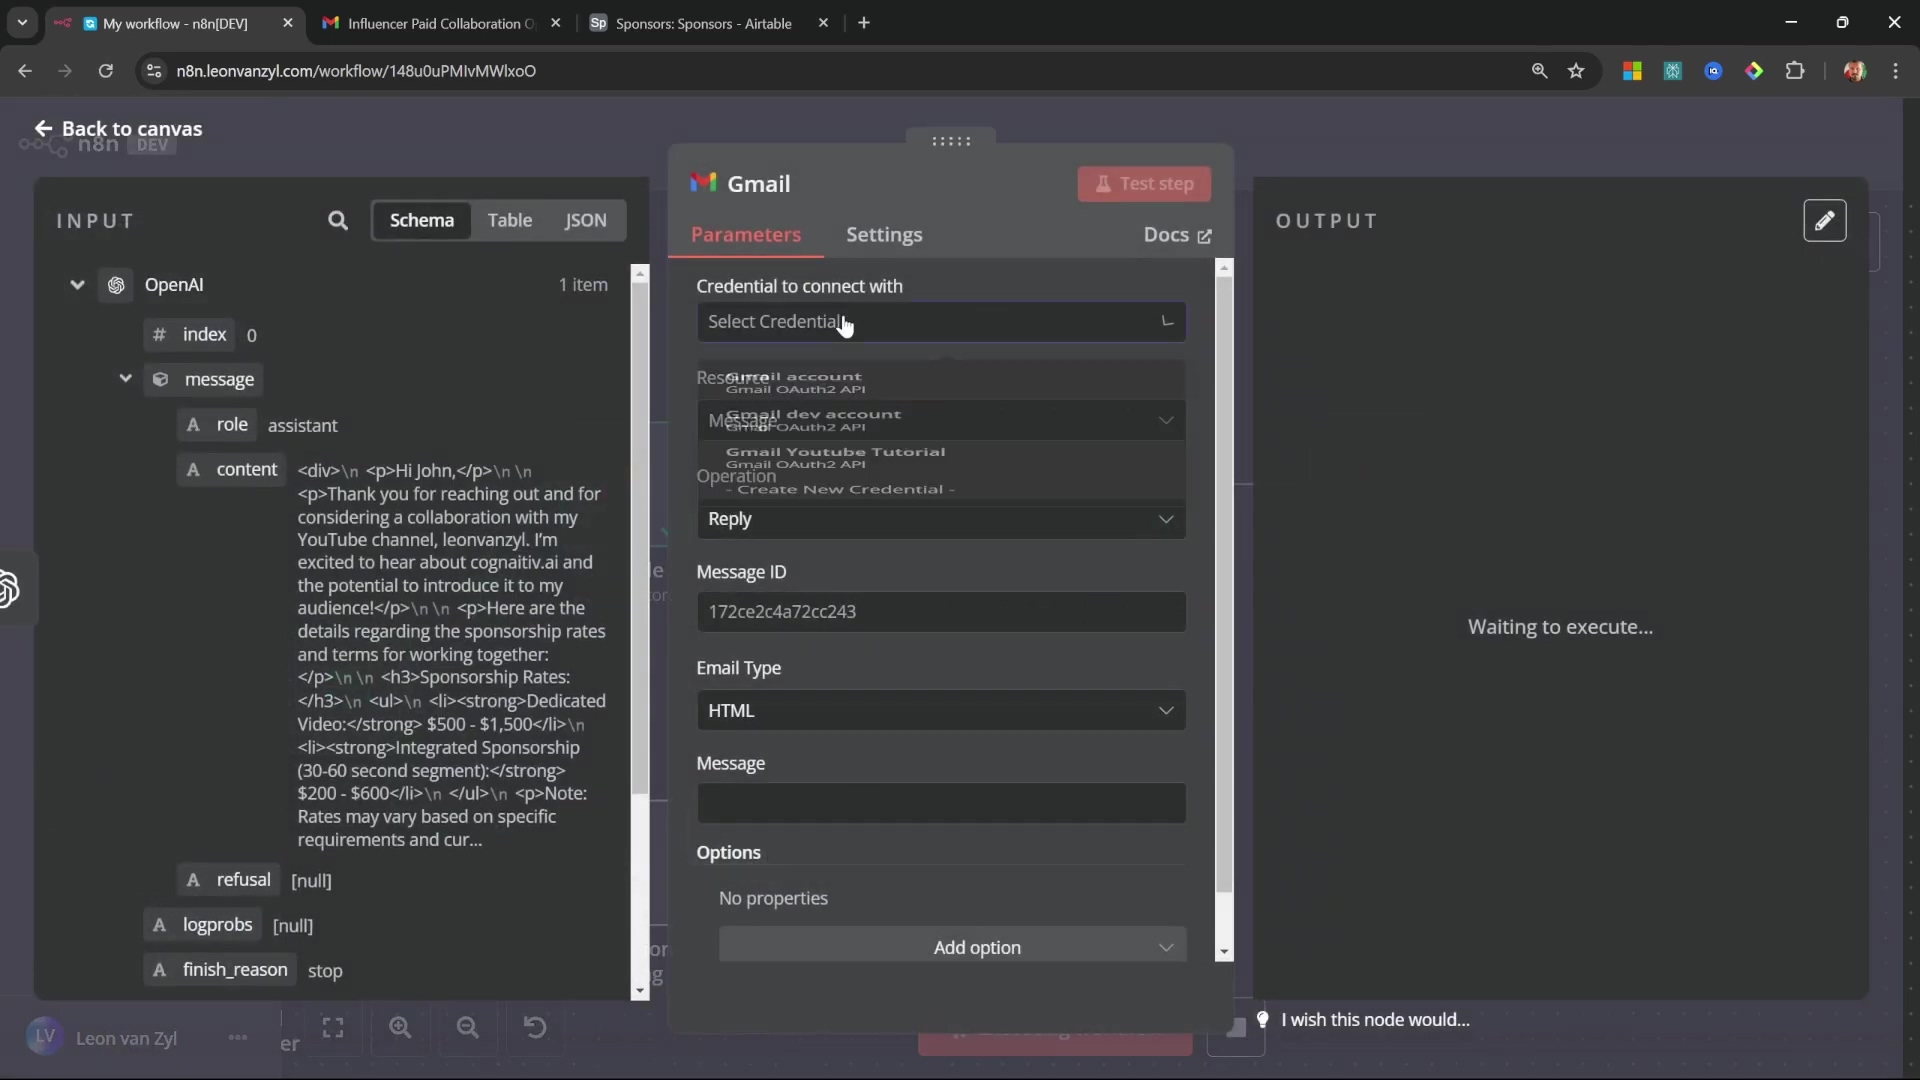
- Action: Once the node is on your canvas, you’ll need to connect it to the Gmail credentials we just painstakingly set up in the previous section. Click on the node, go to its settings, and select your saved Gmail credential. This tells the trigger which Gmail account to watch.
Add a ‘Gmail’ node and select the ‘On message received’ trigger.
Step 2: Configure Poll Times and Event Types
Goal: How often should n8n check for new emails? And what kind of email event should kick off our workflow? We’re defining the rules of engagement here.
- Poll Times: In the node settings, find the ‘Poll Time’ option. Set it to ‘every minute’. This is super important because it means n8n will check your inbox frequently, ensuring our automation reacts quickly to new mail. You don’t want a sponsorship email sitting there for hours, right?
- Event Type: Make sure ‘New Message Received’ is selected as the event that triggers the workflow. This ensures that any new email landing in your inbox will prompt our automation to spring into action.
Step 3: Disable Simplify Output for Full Email Content
Goal: This is a critical step! We need to make sure our trigger captures every single detail of the incoming emails, not just a summary. Our AI needs all the context it can get!
- Action: Within the Gmail ‘On Message Received’ node settings, you’ll see a toggle labeled ‘Simplify Output’. You absolutely must disable this toggle! If ‘Simplify Output’ remains enabled, n8n will only give us a stripped-down version of the email, maybe just the subject and sender. Our AI agent needs the full metadata and body content, including both HTML and plain text versions, to do its job properly. Without the full content, the AI won’t be able to analyze the email effectively, and our automation will fall flat.
The Gmail Trigger node configured with ‘Poll Time’ and ‘Simplify Output’ settings.
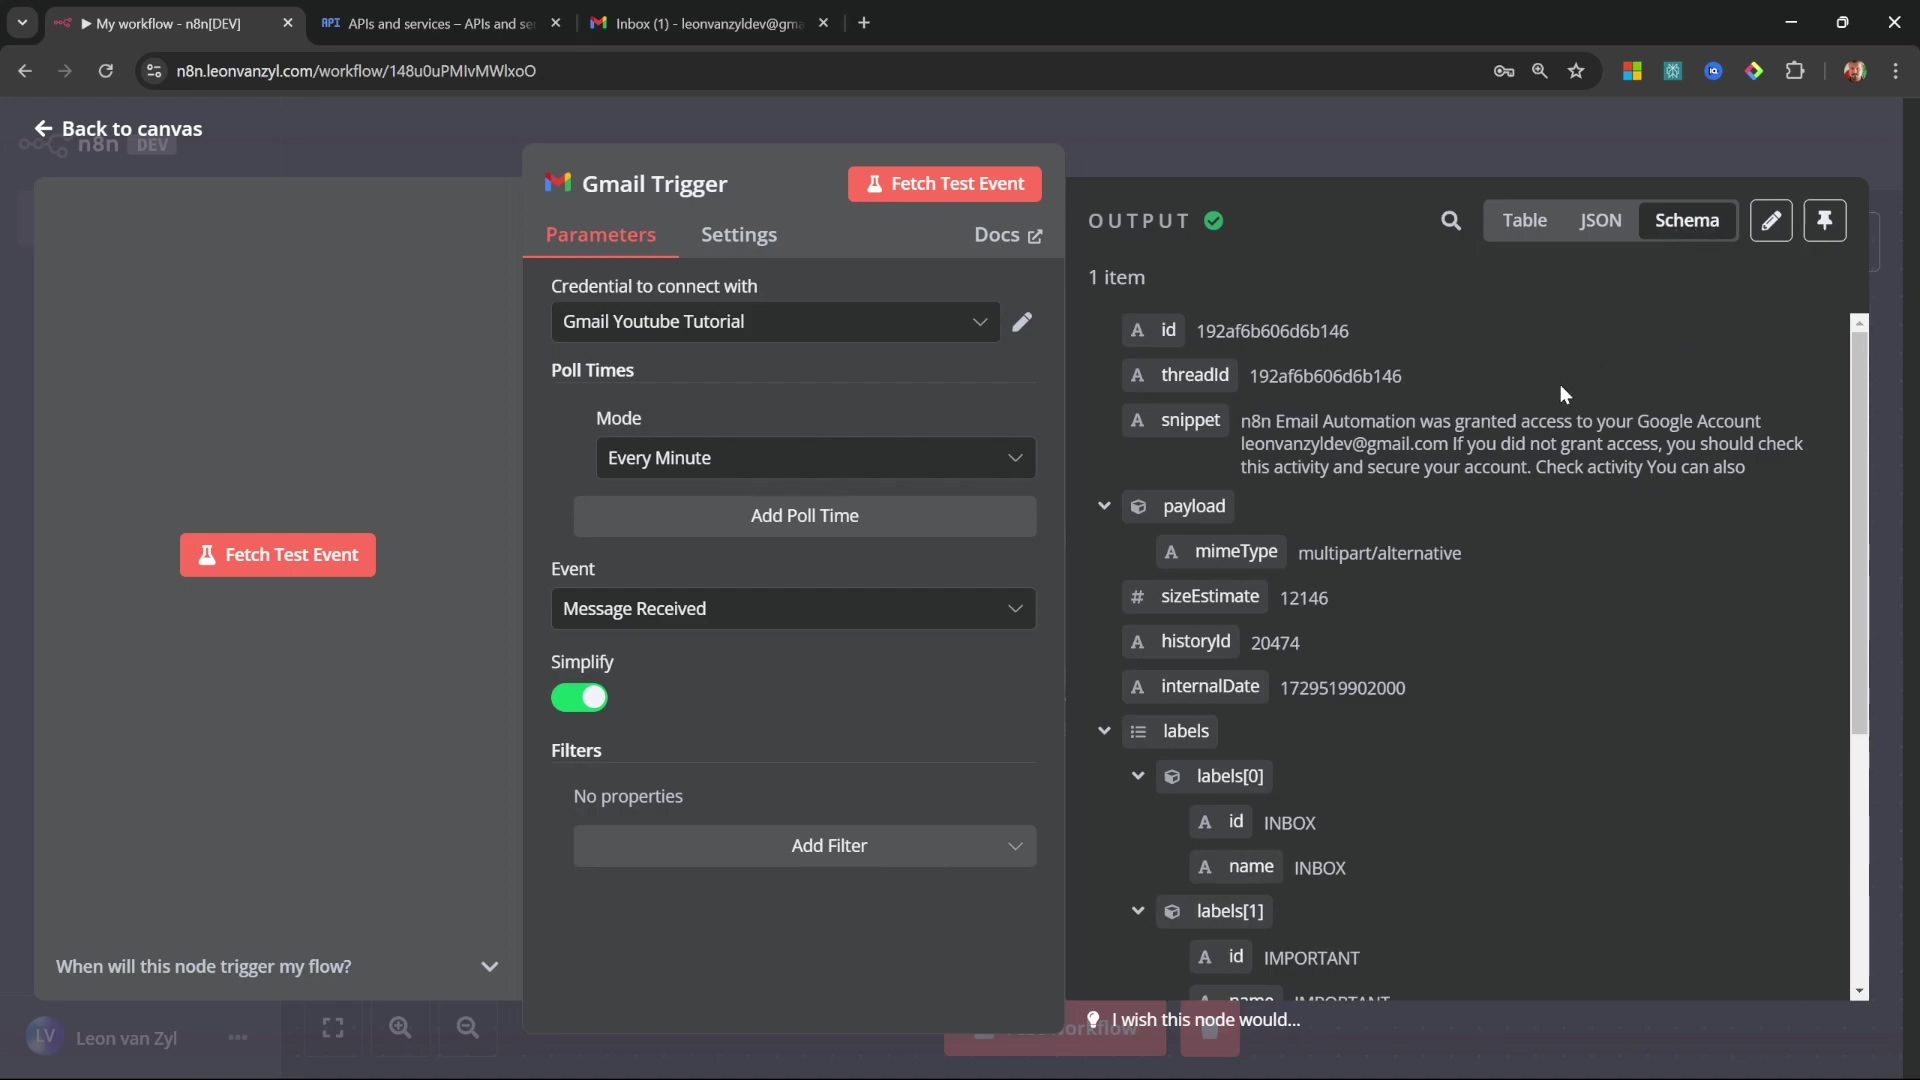
- Verification: After configuring the node, it’s always a good idea to test it. Click ‘Fetch Test Event’ (or ‘Execute Node’ if you’re running the whole workflow). Then, check the output on the right-hand side of your n8n canvas. You should see comprehensive email data, including the full text and HTML body, usually under properties like
textandhtml. If you only see a few fields, go back and double-check that ‘Simplify Output’ is indeed disabled.
Step 4: Create an Email Context Variable with a ‘Set’ Node
Goal: Our AI agent is smart, but it likes its information neatly packaged. This step is about taking all the relevant bits of the email (sender, subject, body) and combining them into one single, standardized variable. Think of it as preparing a delicious meal for our AI!
-
Path: Add a ‘Set’ node immediately after your Gmail trigger node. You can drag it from the node panel or right-click on the canvas and search for ‘Set’.
-
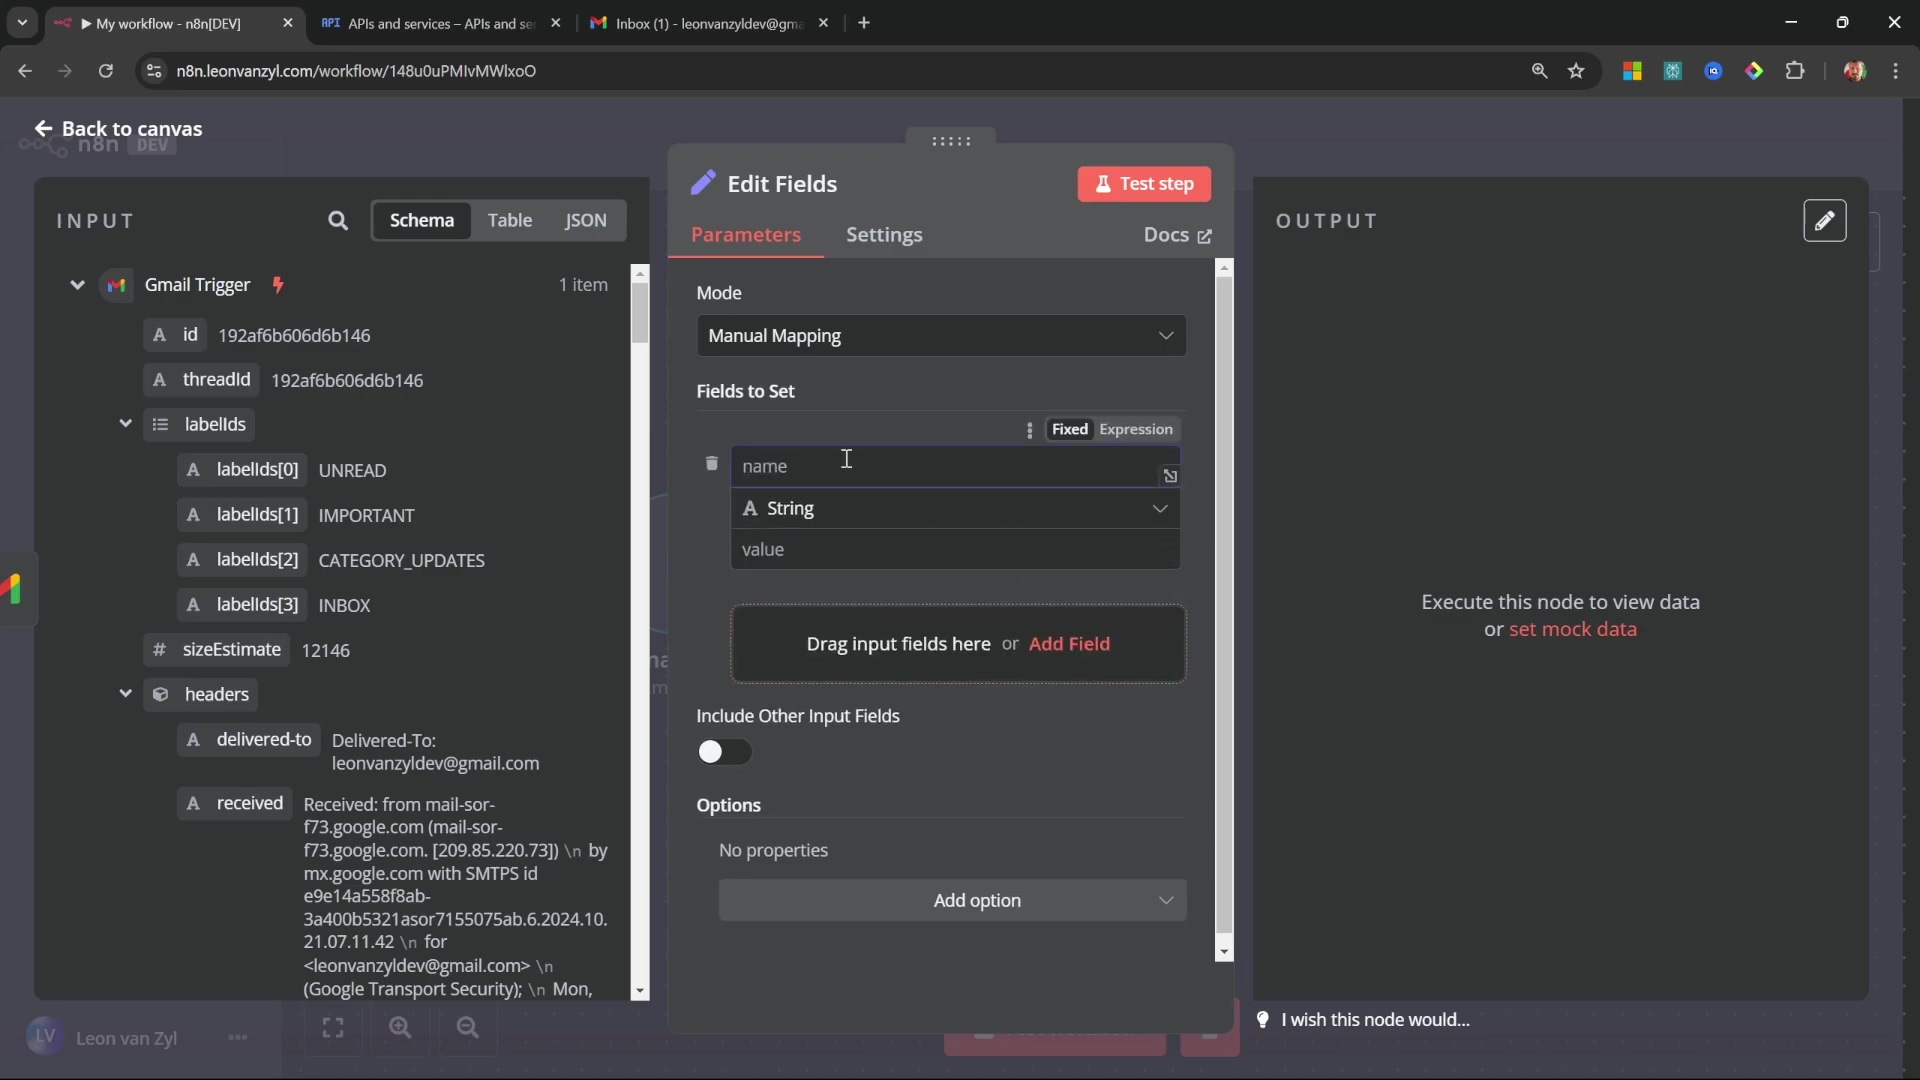
Action: Within the ‘Set’ node’s settings, click ‘Add Value’ to create a new field. Name this field
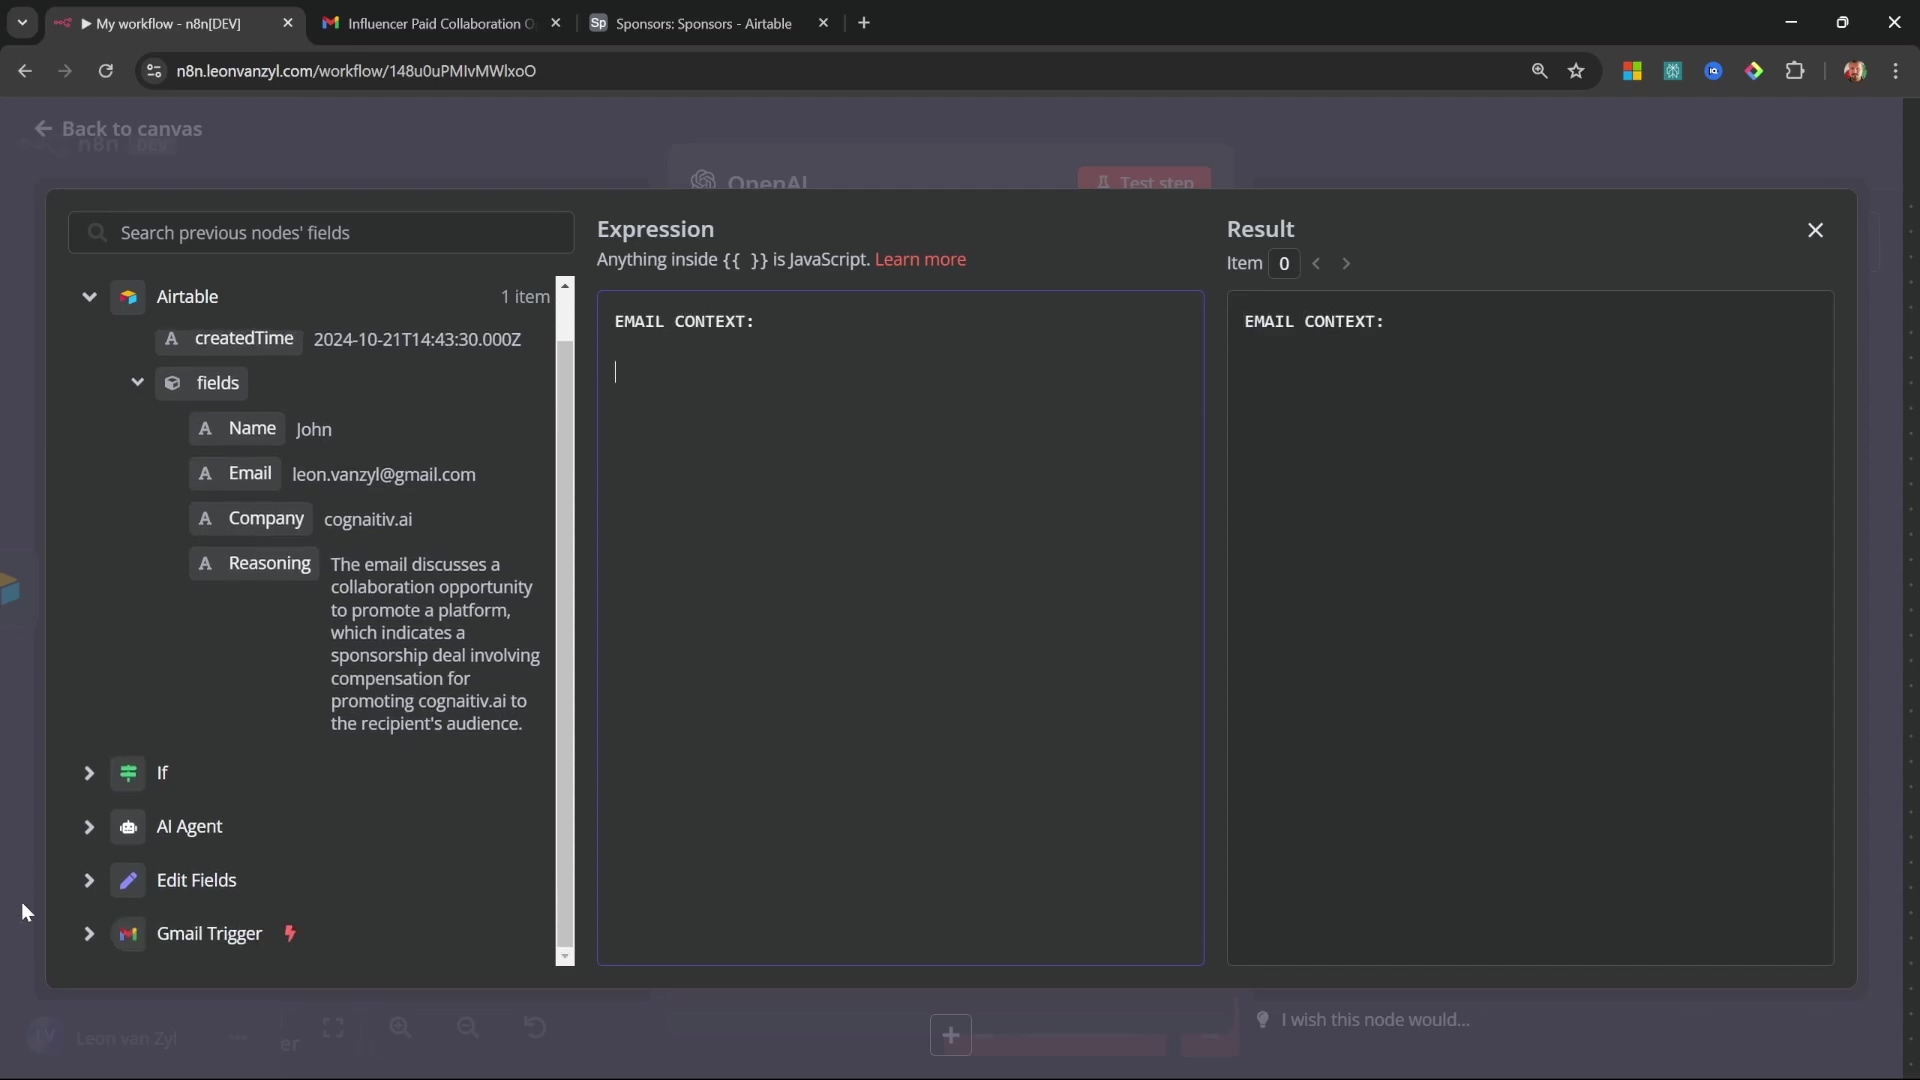
emailContext. Set its type tostring. Now, for the magic: we’re going to use an expression to combine the sender’s email address, the subject line, and the plain text body of the email into one long string. Click the ‘Expression’ button (it looks like a little wrench or{{ }}) and paste in something similar to this:"Sender: " + $json.from[0].emailAddress + "\nSubject: " + $json.subject + "\nBody: " + $json.textWhy this expression?
"Sender: ": This is just a label to make it clear what follows.$json.from[0].emailAddress: This grabs the email address of the sender from the Gmail trigger’s output. The[0]is becausefromis an array, and we want the first (and usually only) sender."\nSubject: ": Another label, and\ncreates a new line, making the output readable.$json.subject: This pulls the email’s subject line."\nBody: ": You guessed it, another label and a new line.$json.text: This is the plain text body of the email. We usetexthere because it’s usually cleaner for AI analysis thanhtml.
Configure the ‘Set’ node to define emailContext with specific input fields.
- Verification: Execute just the ‘Set’ node (or the whole workflow up to this point). Check the output on the right-hand side. You should now see a single
emailContextvariable containing all that concatenated information, neatly formatted. This structured context is exactly what our AI needs to make informed decisions about the email’s content. You’ve just made your AI’s job a whole lot easier!
Intelligent Email Analysis: Using the AI Agent Node in n8n
Now for the really exciting part: bringing in the AI! The AI Agent node is the brain of our operation, responsible for processing and categorizing incoming emails. This is where we teach our AI to tell the difference between a genuine sponsorship inquiry and, say, a newsletter. We’ll also get it to extract all the vital details we need. Get ready to unleash some serious intelligence!
Step 1: Add and Configure the AI Agent Node
Goal: We’re introducing our AI assistant into the workflow to analyze the email content. This is like hiring a super-smart detective for your inbox.
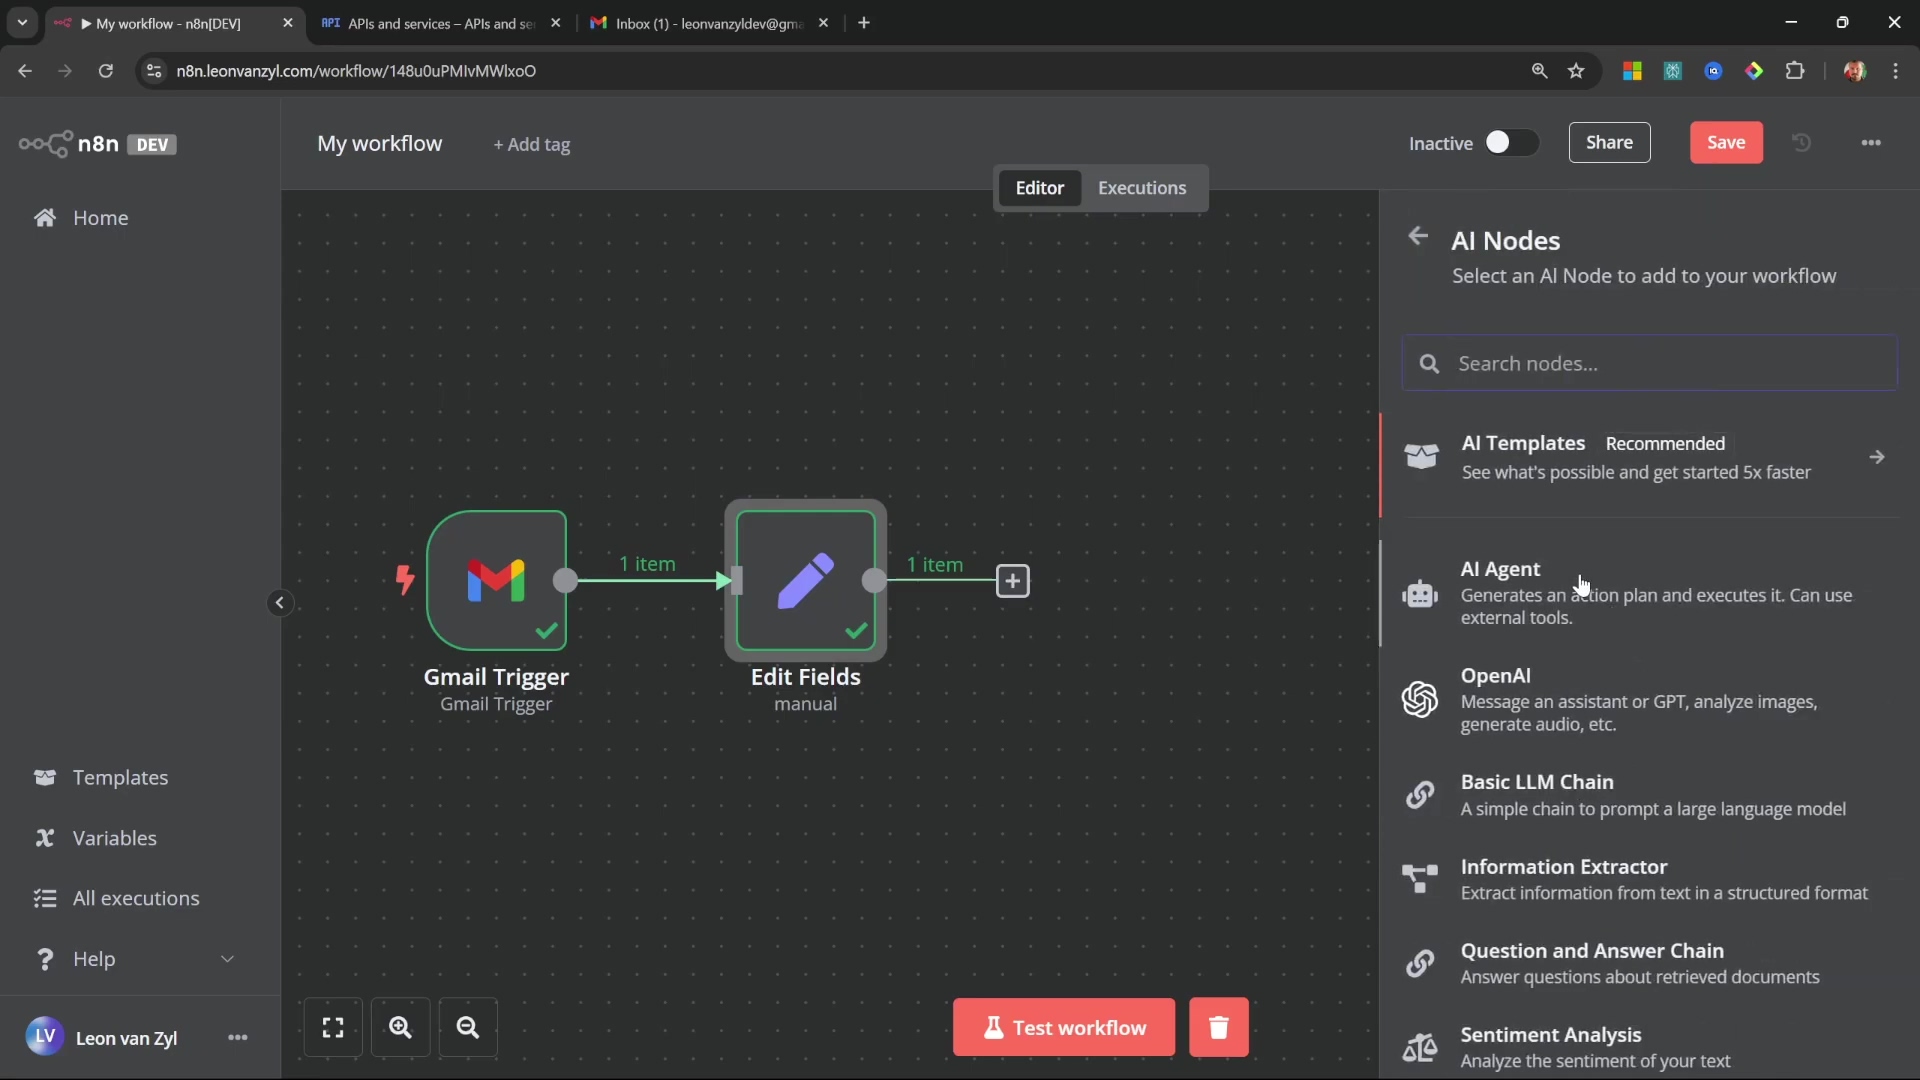
- Path: After our ‘Set’ node (the one that created
emailContext), add an ‘AI Agent’ node. You can find it in the node panel. If n8n automatically connects any default nodes to it (like ‘Chat Message Received’), go ahead and delete those – we don’t need them for this specific workflow. - Action: Click on the ‘AI Agent’ node to open its settings. We need to tell it which AI model to use. Configure it with an ‘OpenAI Chat Model’. You’ll need to select your OpenAI credentials (if you haven’t set them up yet, you’ll need an OpenAI API key). For efficiency and cost-effectiveness, I highly recommend choosing a model like ‘GPT-4o Mini’. It’s powerful enough for this task without breaking the bank.
Add an ‘AI Agent’ node to the workflow for email content analysis.
Step 2: Define the Agent’s System Prompt
Goal: This is where we give our AI its marching orders. We’ll tell it exactly what its role is and what kind of output we expect. Think of it as writing the job description for our AI detective.
-
Action: In the ‘AI Agent’ node settings, find the ‘Prompt’ section. Set the ‘Prompt’ type to ‘Define Below’. Now, in the text field that appears, we’re going to craft a detailed system prompt. This prompt is crucial because it guides the AI to analyze our
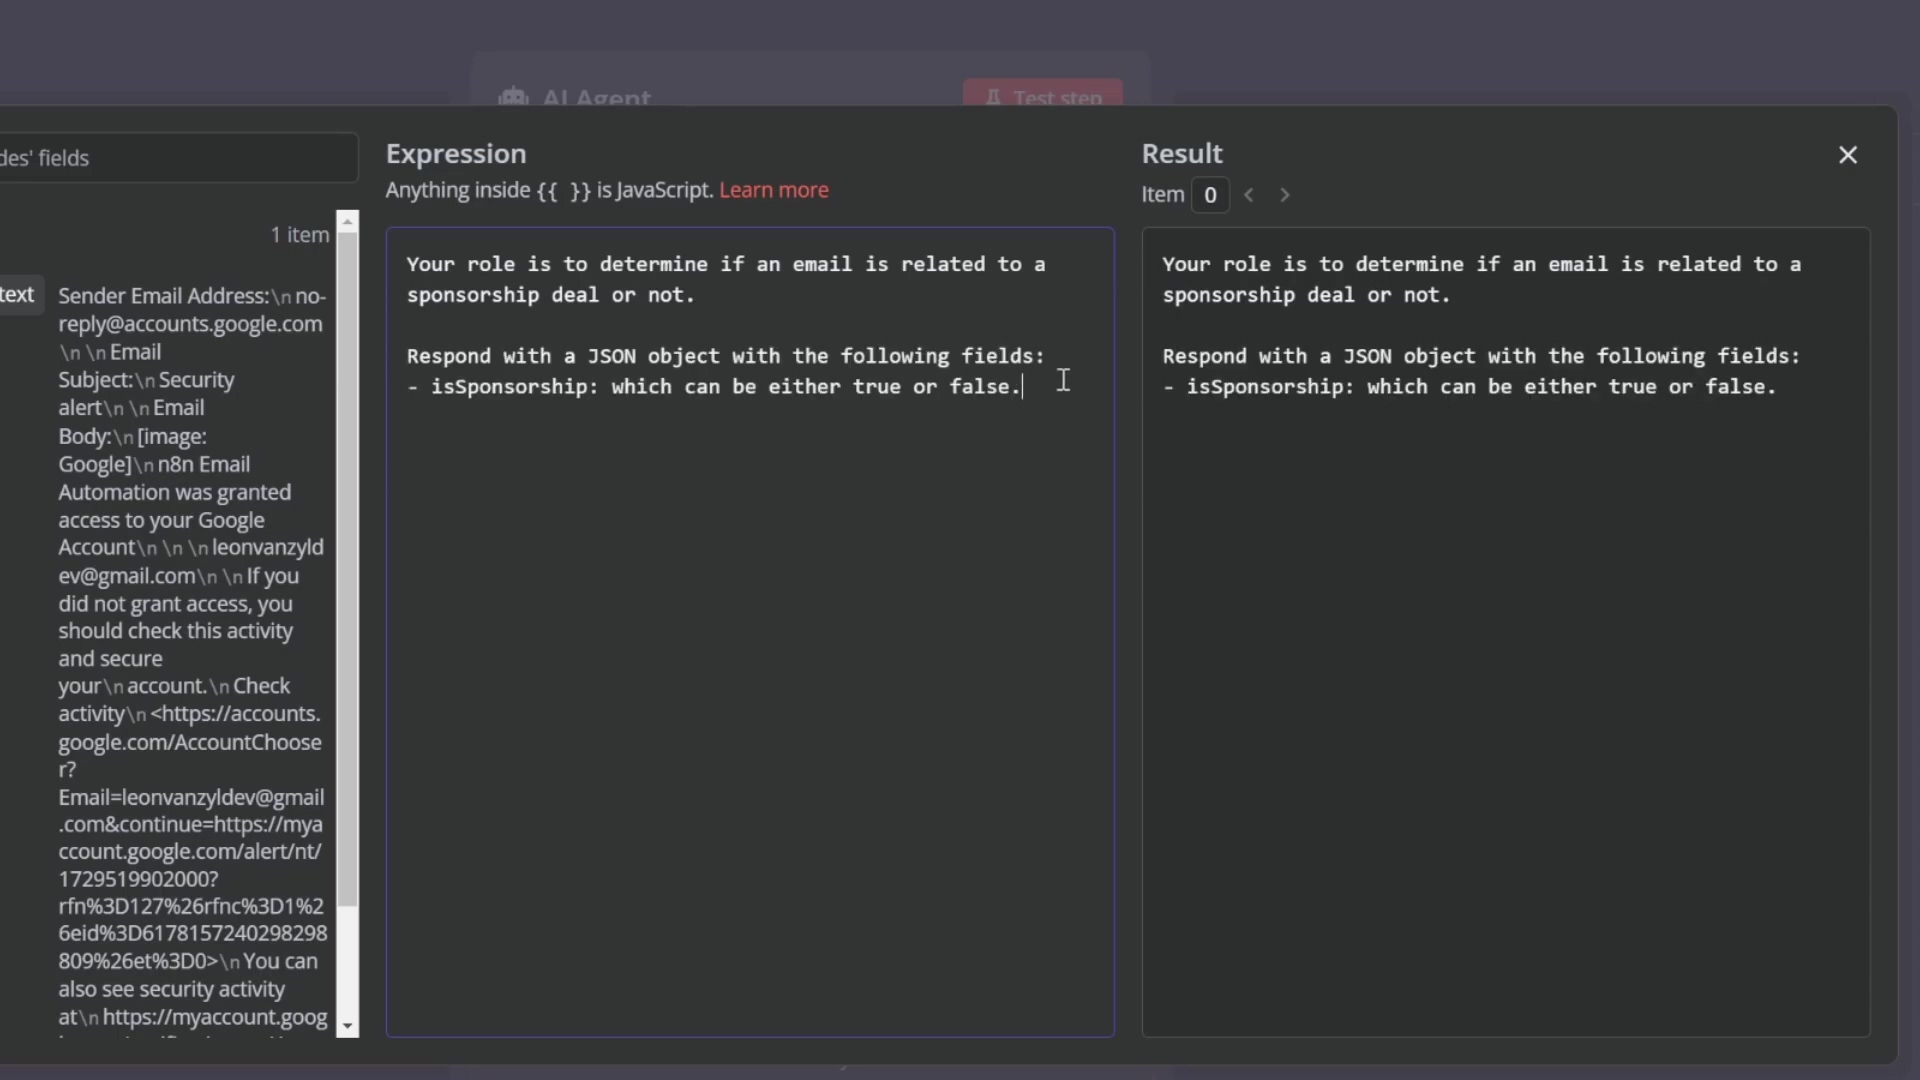
emailContextand respond with structured JSON. We’ll integrate theemailContextvariable we created earlier. Here’s an example prompt structure you can use:Your role is to determine if an email is related to a sponsorship deal or not. Respond with a JSON object with the following fields: - `isSponsorship` (boolean): true or false - `reasoning` (string): brief explanation for the decision - `leadName` (string): name of the person from the email body (leave blank if not a sponsored email) - `leadCompany` (string): company wanting to sponsor (leave blank if not a sponsored email) Think carefully about your answer. The email context is: {{$json.emailContext}}Let’s break down this prompt:
Your role is to determine...: Clearly states the AI’s primary objective.Respond with a JSON object...: This is vital! We’re telling the AI exactly how we want its answer formatted. This makes it super easy for n8n to parse the output later.-isSponsorship(boolean): true or false: We want a clear yes/no answer for sponsorship.-reasoning(string): brief explanation...: The AI should tell us why it made its decision. Super handy for debugging or understanding its logic.-leadName(string): name of the person...: If it is a sponsorship, we want the lead’s name.-leadCompany(string): company wanting to sponsor...: And the company name too!Think carefully about your answer.: A little nudge to encourage thoroughness.The email context is: {{$json.emailContext}}: This is where we inject the actual email content from our ‘Set’ node. The{{$json.emailContext}}is an n8n expression that pulls the value of ouremailContextvariable.
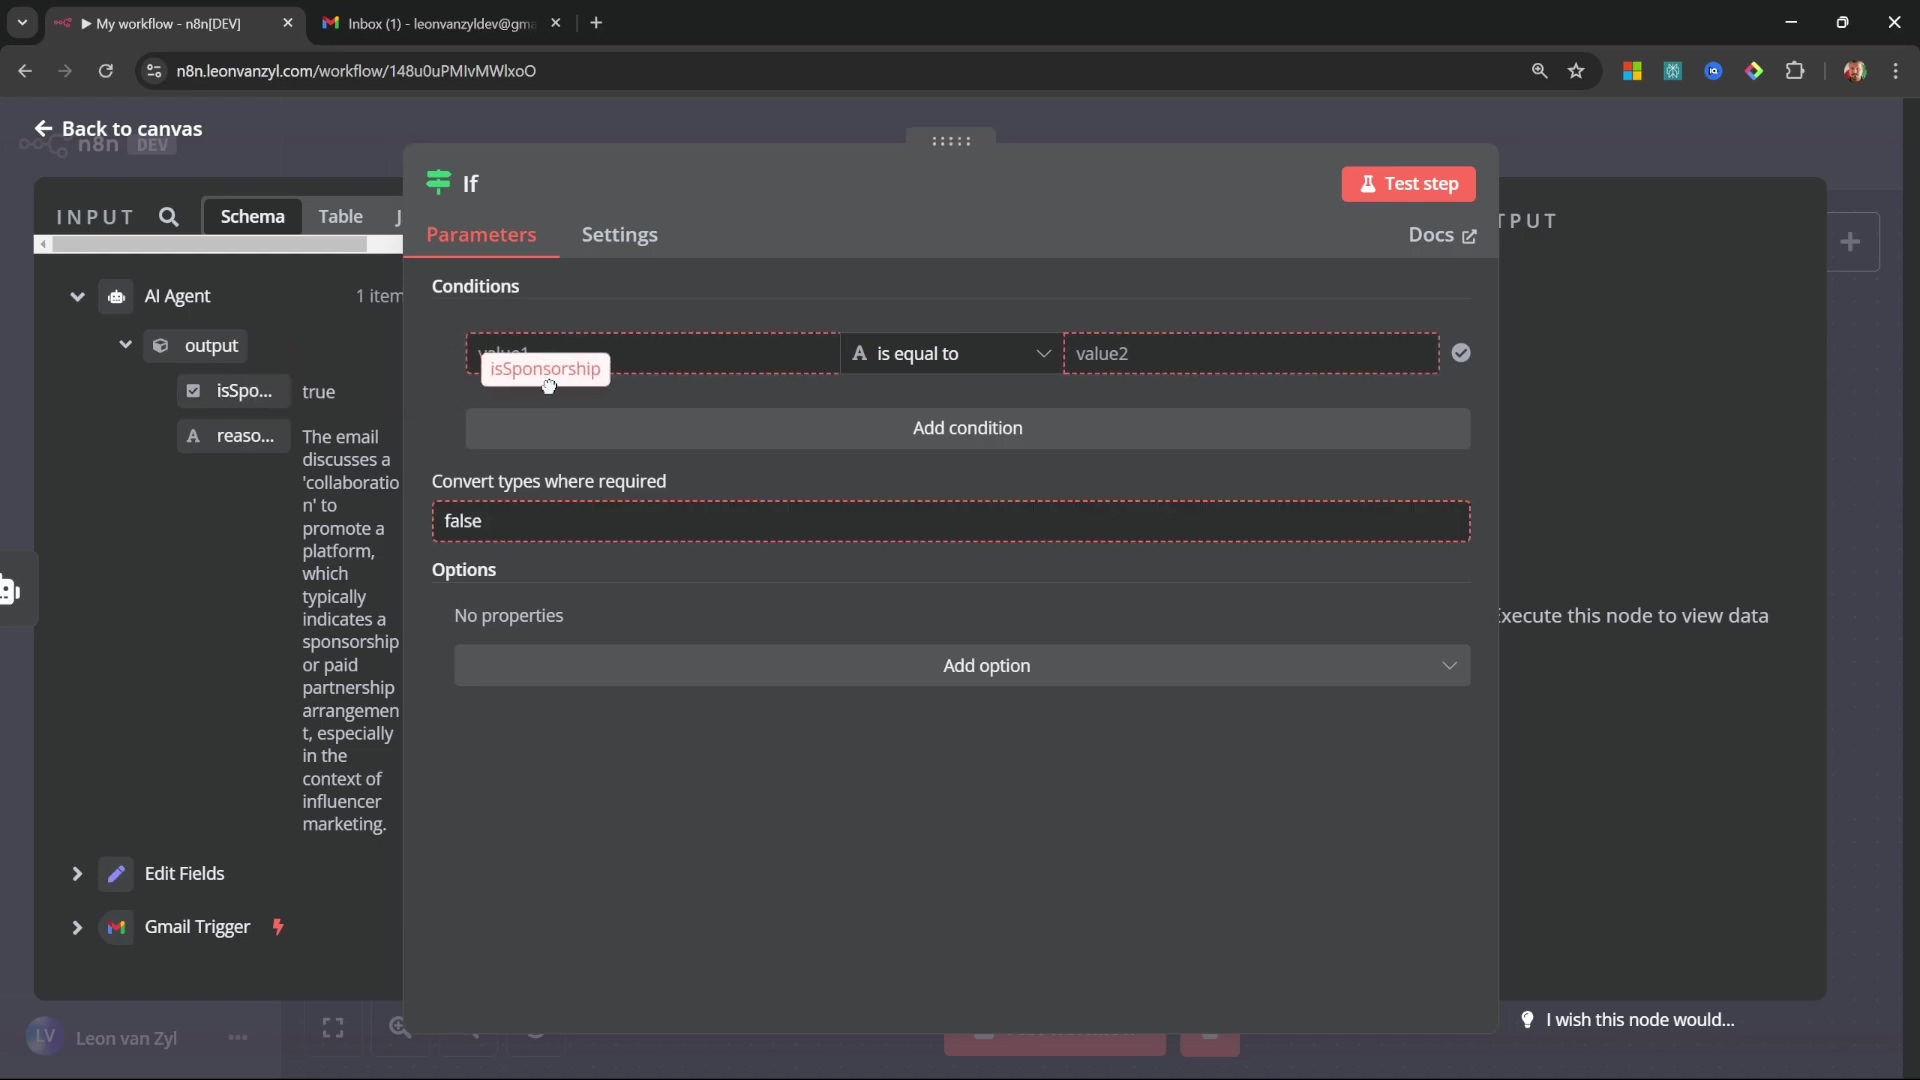
The AI agent’s prompt defines its role in determining sponsorship emails, and output format for key fields like isSponsorship.
Step 3: Implement an Output Parser for Structured Responses
Goal: Even with a good prompt, AI can sometimes be a bit creative. This step ensures that the AI agent always returns data in the exact JSON format we defined, making it reliable for our workflow.
-
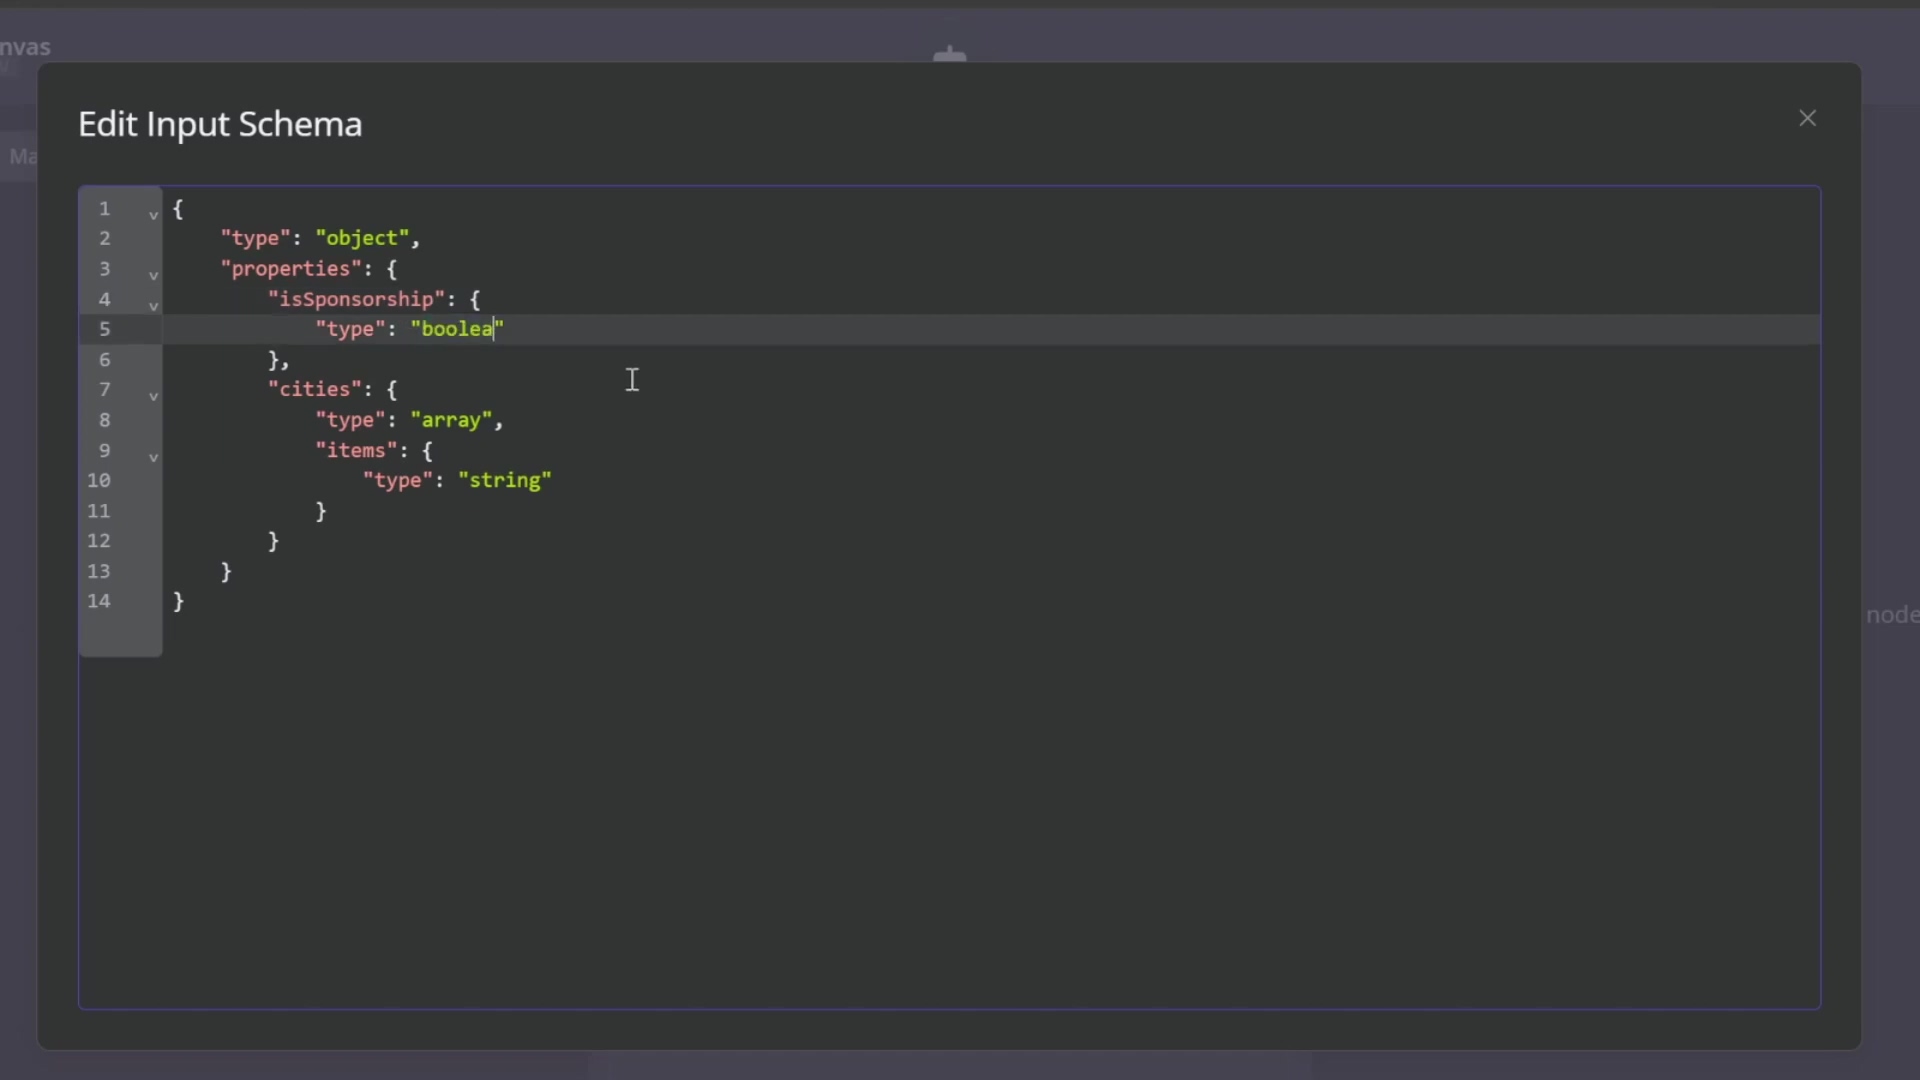
Action: In the ‘AI Agent’ node, enable ‘Require Specific Output Format’. This tells n8n to enforce a strict structure. Then, add a ‘Structured Output Parser’ node. Change the ‘Schema Type’ to ‘Define Below’. Now, we’ll define the expected JSON schema. This is like a blueprint for the AI’s output:
{
"type": "object",
"properties": {
"isSponsorship": {
"type": "boolean"
},
"reasoning": {
"type": "string"
},
"leadName": {
"type": "string"
},
"leadCompany": {
"type": "string"
}
},
"required": ["isSponsorship", "reasoning"]
}
What’s happening here?
"type": "object": We expect a JSON object."properties": { ... }: These are the fields we expect inside that object."isSponsorship": { "type": "boolean" }: We’re explicitly telling n8n thatisSponsorshipmust be a boolean (true or false)."reasoning": { "type": "string" }: Andreasoningmust be a string."required": ["isSponsorship", "reasoning"]: This tells the parser that these two fields must always be present in the AI’s output. If they’re not, it’ll throw an error, which is good because it means our AI didn’t follow instructions!
This ensures consistent data extraction for
isSponsorship,reasoning,leadName, andleadCompany. No more guessing games!
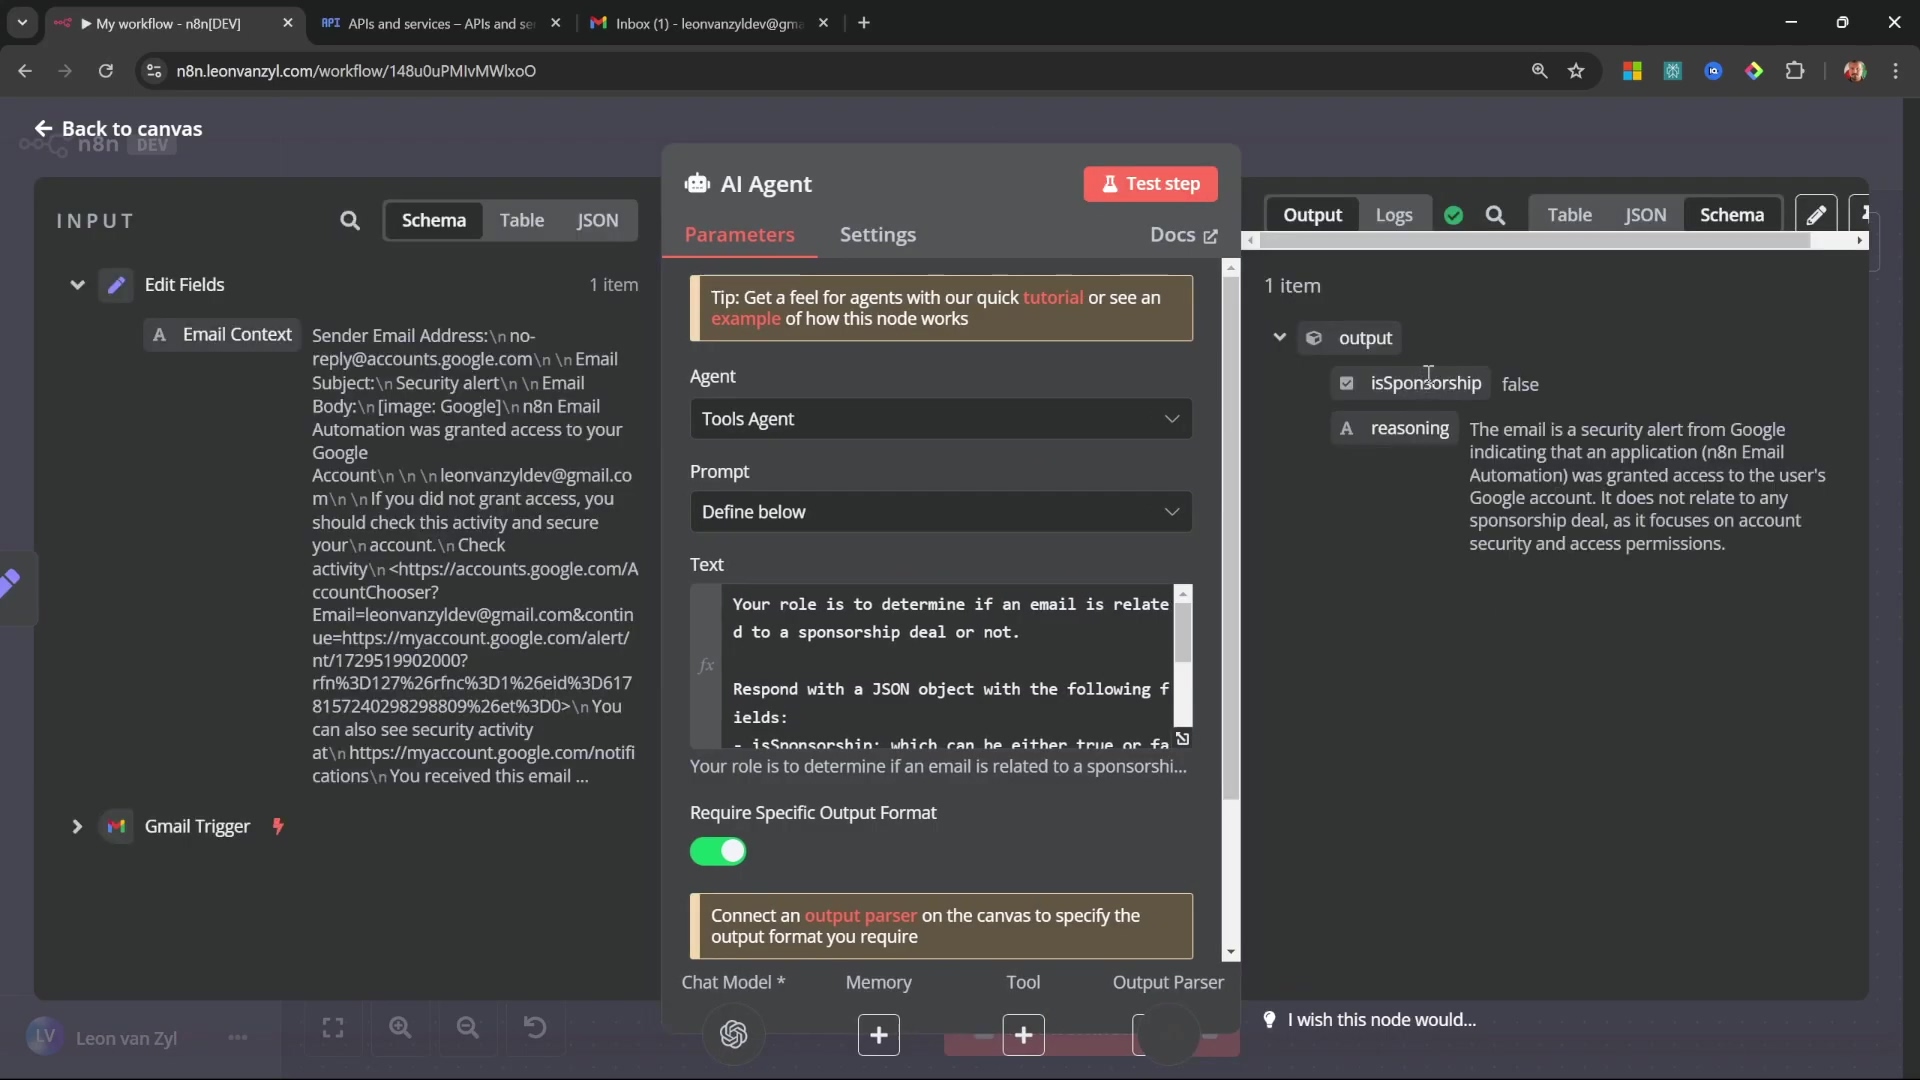
Step 4: Test the AI Agent’s Functionality
Goal: Time to see if our AI detective is doing its job! We need to verify that it accurately identifies sponsorship emails and extracts the correct data.
- Action: Click ‘Test Step’ (or ‘Execute Node’) on the AI Agent node. This will run the AI with the test data from your previous nodes. Review the output on the right-hand side. For example, if you fed it a generic email (like a Google security alert),
isSponsorshipshould befalse, and thereasoningshould explain why.
The AI Agent node’s output shows isSponsorship: false for a non-sponsorship email.
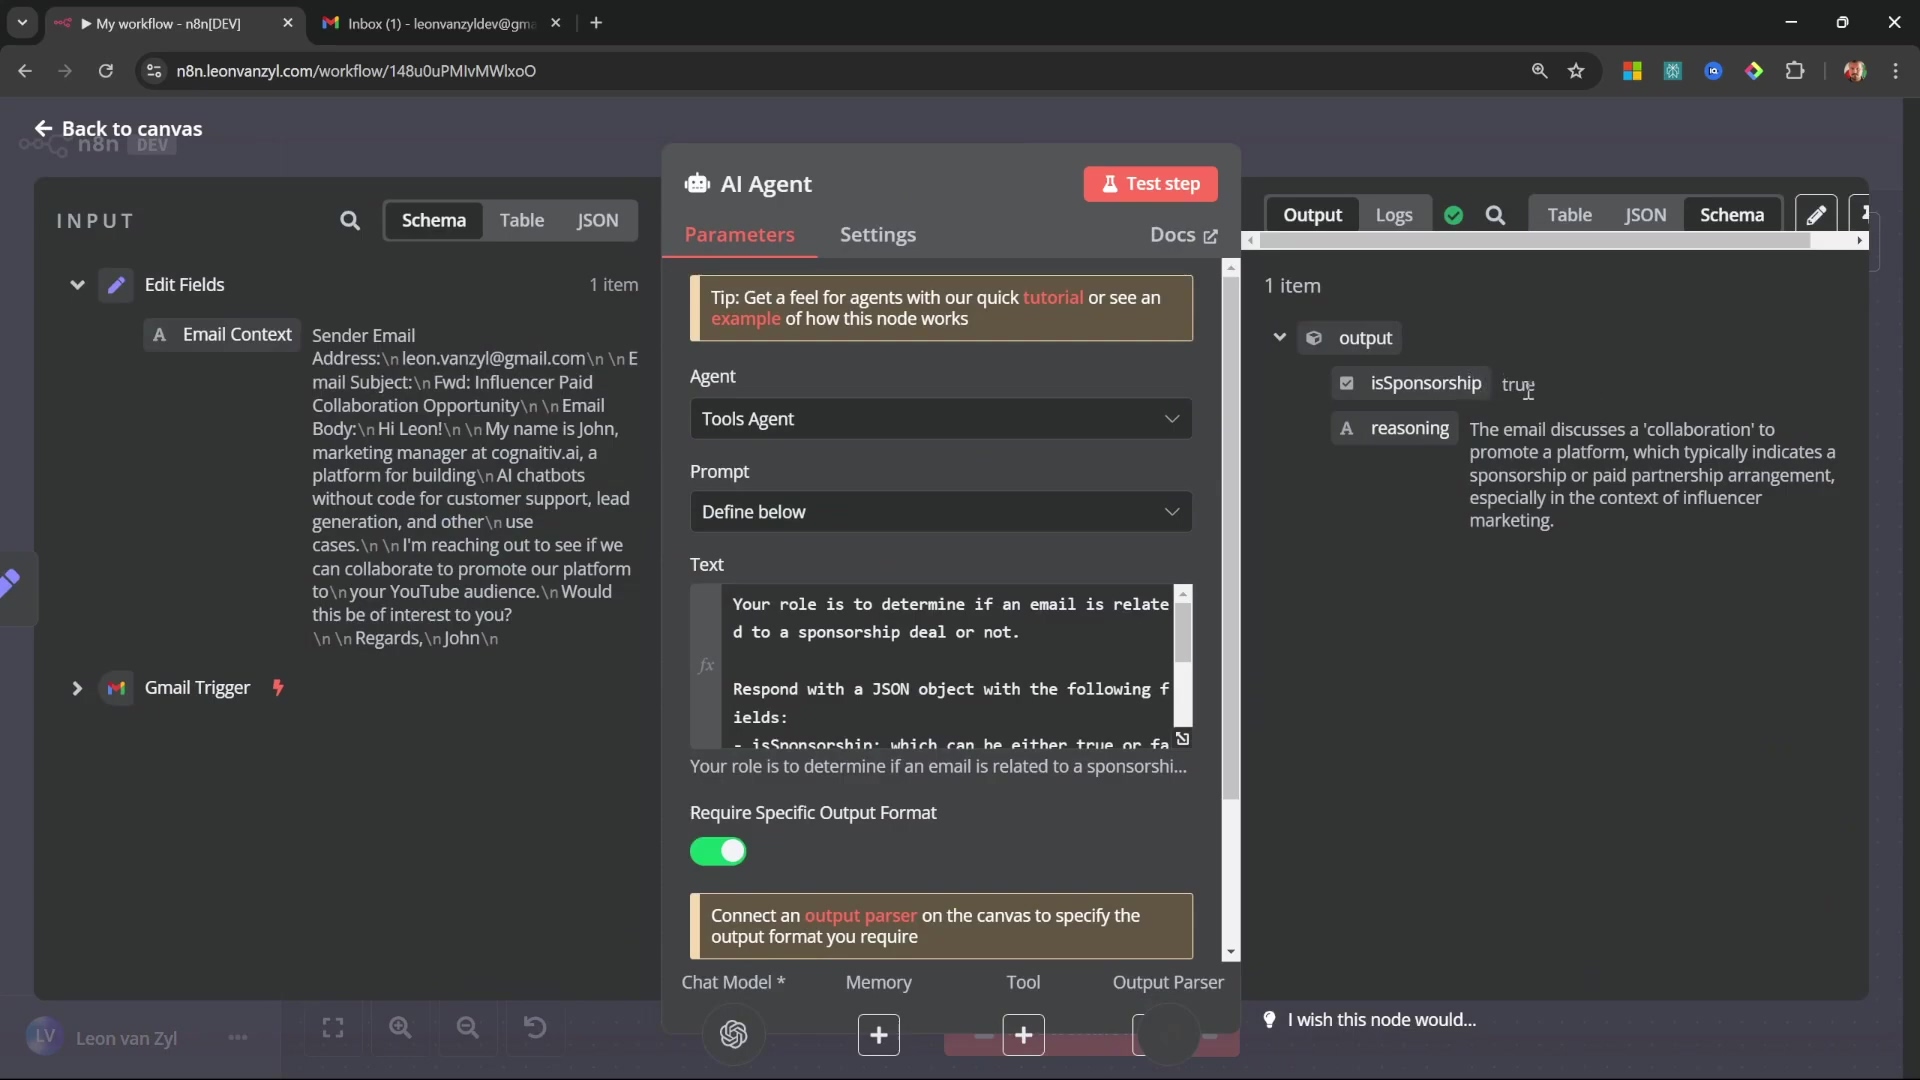
Now, for the real test: send a test sponsorship email to your Gmail account (something like “Hey, we’d love to sponsor your channel!”). Then, re-run the AI Agent. This time, you should see isSponsorship as true, and leadName and leadCompany should be correctly extracted. If they are, you’ve successfully trained your AI!
The AI Agent node correctly identifies a sponsorship email and extracts lead information.
This setup allows the AI to effectively triage emails, directing sponsorship opportunities down a specific automation path while gracefully ignoring irrelevant communications. You’ve just built an intelligent email gatekeeper!
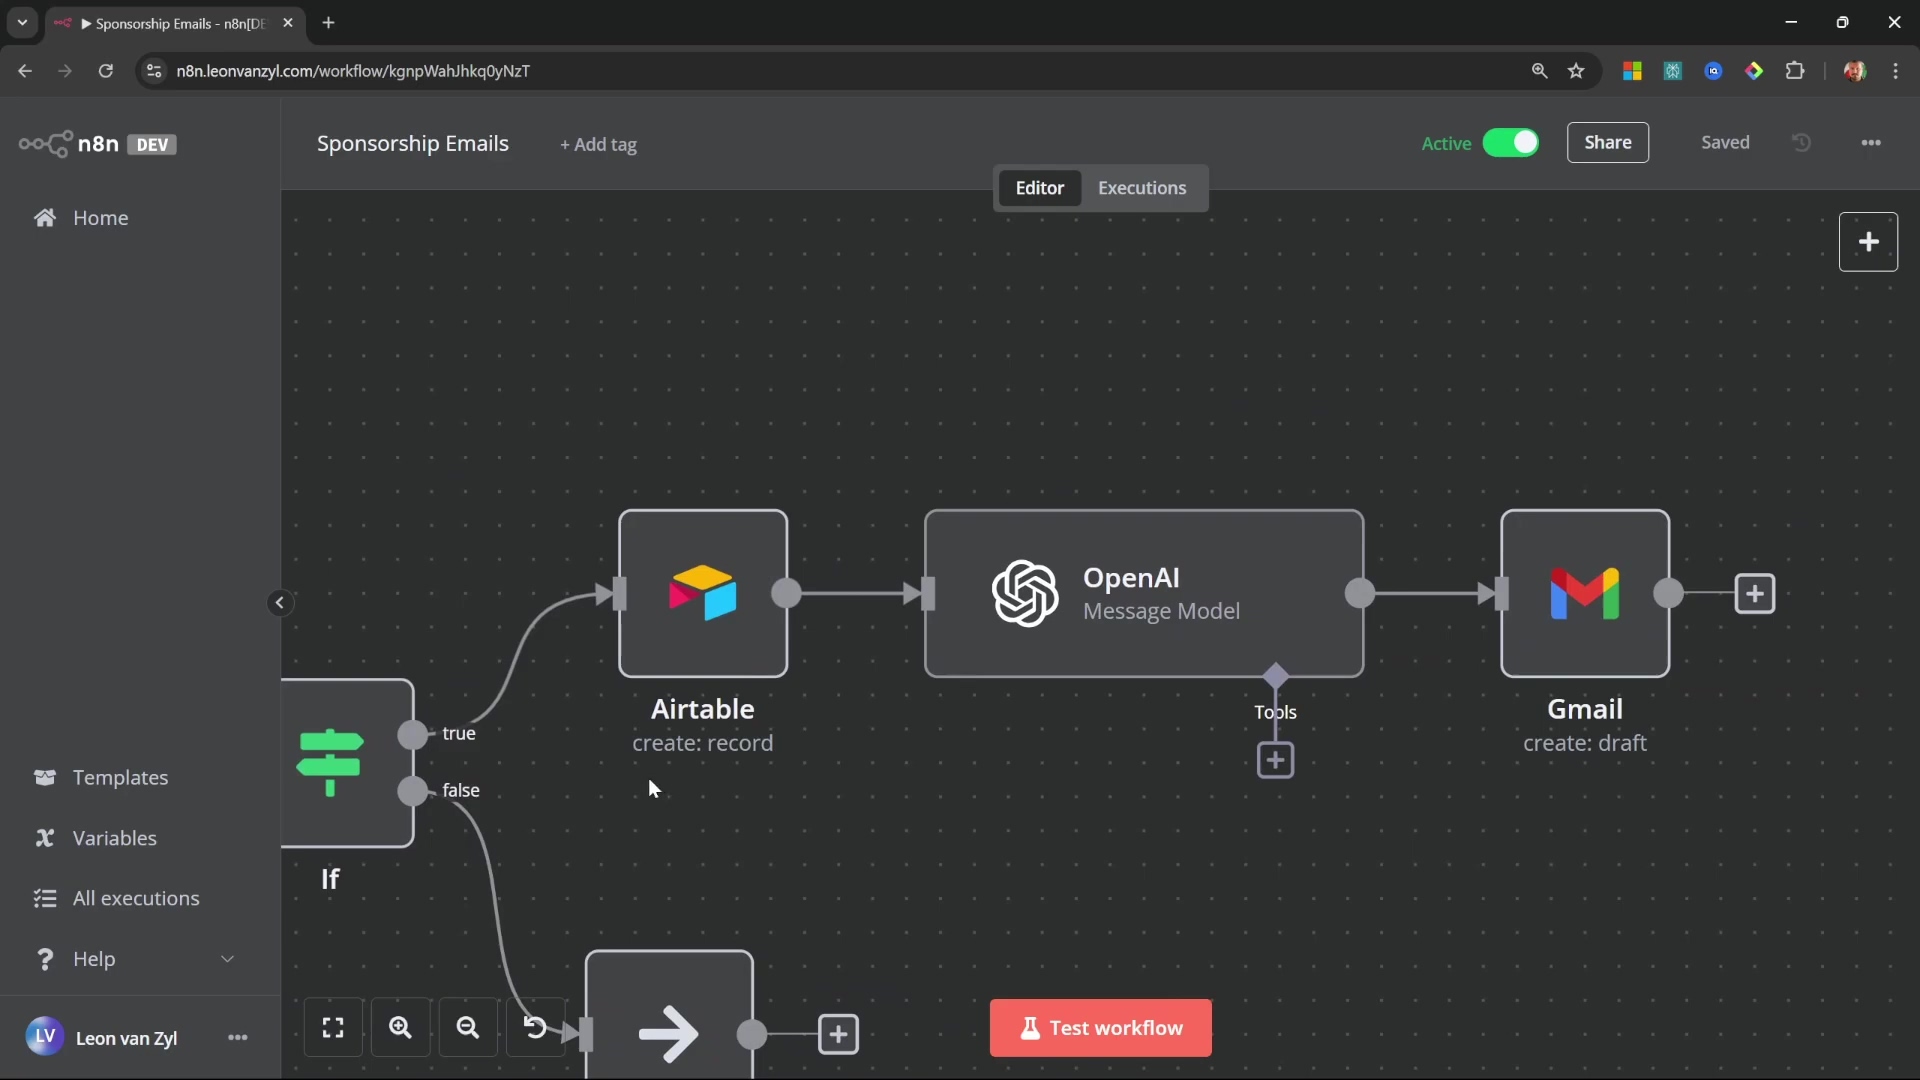
Streamlining Lead Management: Integrating with Airtable for Data Storage
Okay, our AI is smart enough to spot a sponsorship email. Now what? We need a place to store all that valuable lead information! Automating the capture of lead information into a structured database is absolutely crucial for effective follow-up and management. Airtable is a fantastic, flexible solution for this, like a super-powered spreadsheet that can act as our mini-CRM. This section will walk you through integrating n8n with Airtable to store all that extracted sponsorship lead data.
Step 1: Set Up Conditional Routing with an ‘If’ Node
Goal: We need to tell our workflow, “If it’s a sponsorship, go this way. If not, go that way.” This is where the ‘If’ node comes in, directing the workflow based on our AI’s decision.
- Path: After the AI Agent node, add an ‘If’ node. This node is like a traffic cop for your workflow.
- Action: In the ‘If’ node settings, we’re going to add a condition. We want to check the
isSponsorshipproperty that our AI Agent just outputted. Set the value totrueand the type toboolean. This means: “If the AI saidisSponsorshipis true…” Configure the ‘If’ node with two branches: a ‘True’ path for those golden sponsorship emails and a ‘False’ path for everything else.
The ‘If’ node conditionally routes the workflow based on the isSponsorship boolean output.
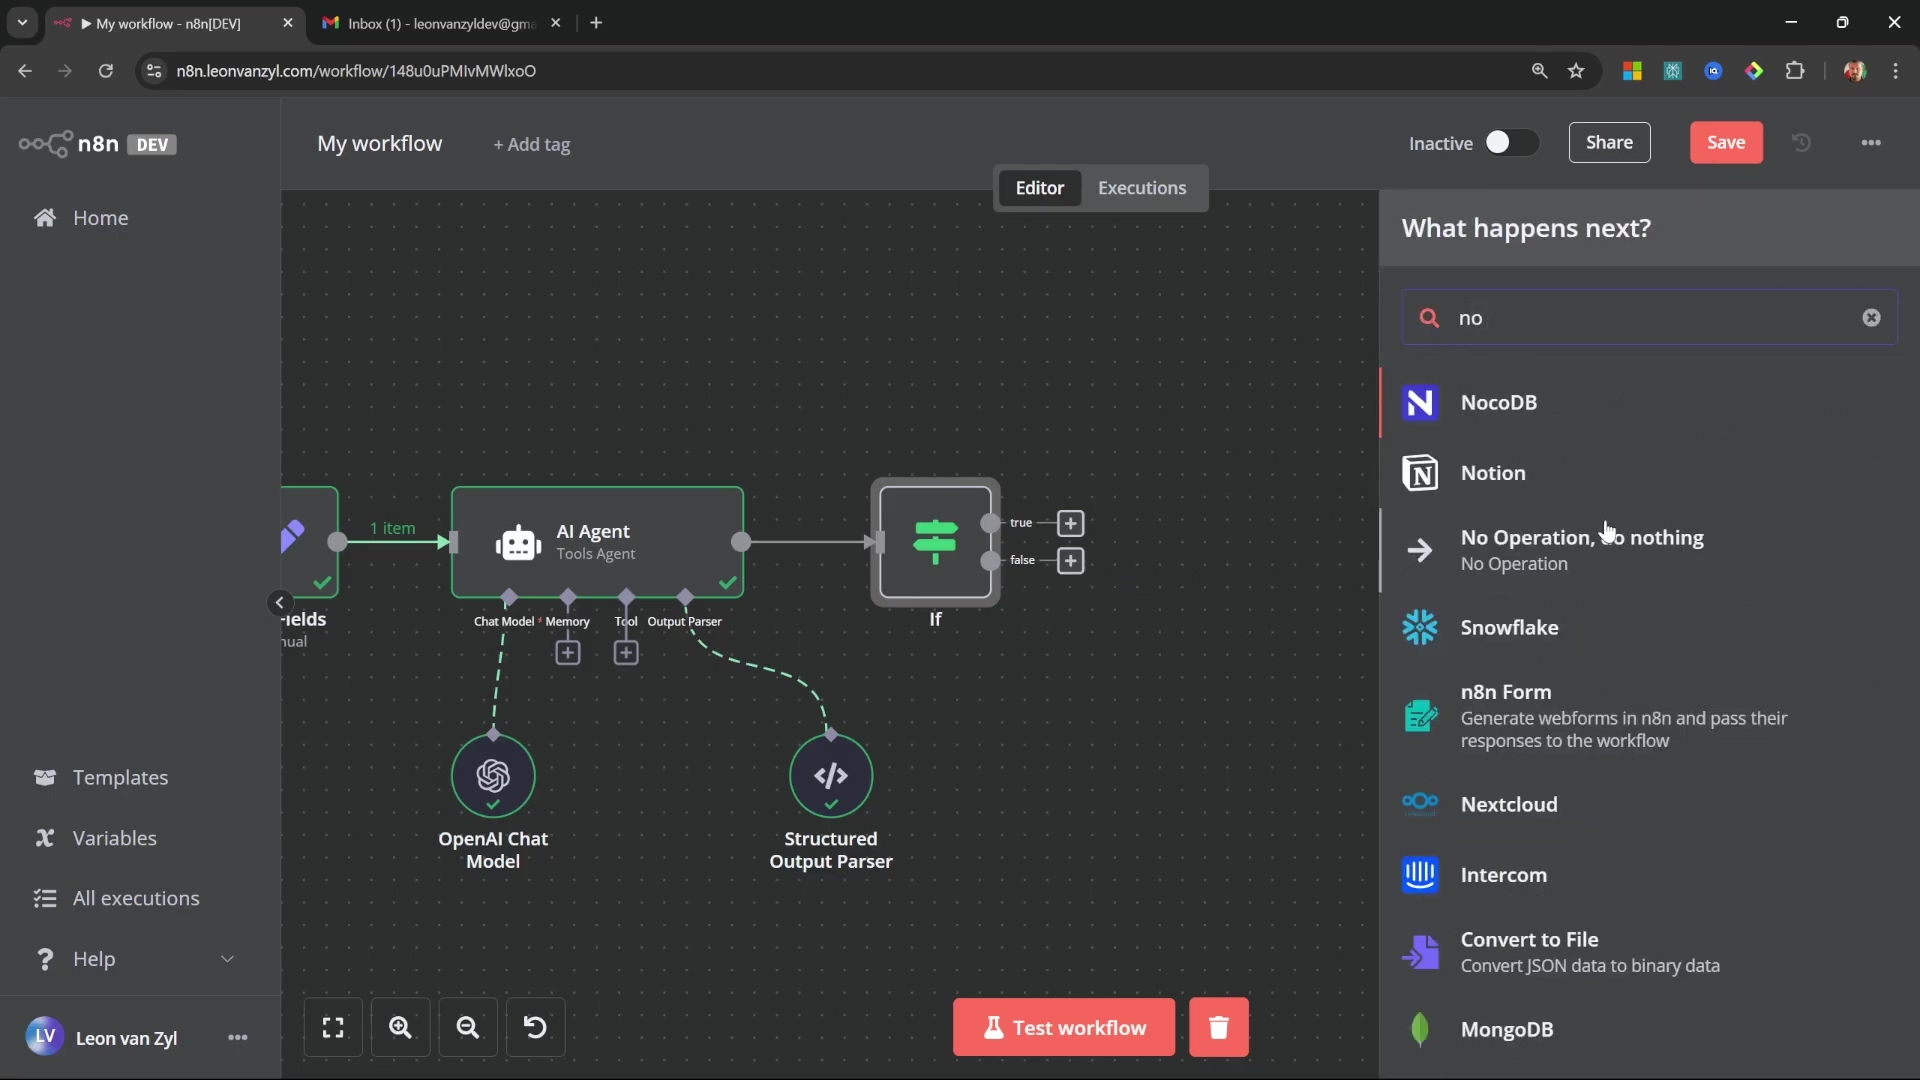
For the ‘False’ path, we don’t need to do anything further with those emails. So, connect a ‘No Operation’ node to it. This node simply terminates that specific branch of the workflow gracefully, like a polite “Thanks, but no thanks!” sign.
Selecting a ‘No Operation’ node to terminate workflow paths where no further action is needed.
Step 2: Create an Airtable Base and Table
Goal: Before n8n can send data to Airtable, we need to prepare Airtable to receive it. This is like setting up the perfect filing cabinet for our leads.
-
Path: Open your browser and navigate to airtable.com. Log into your account. If you don’t have one, it’s free to start!
-
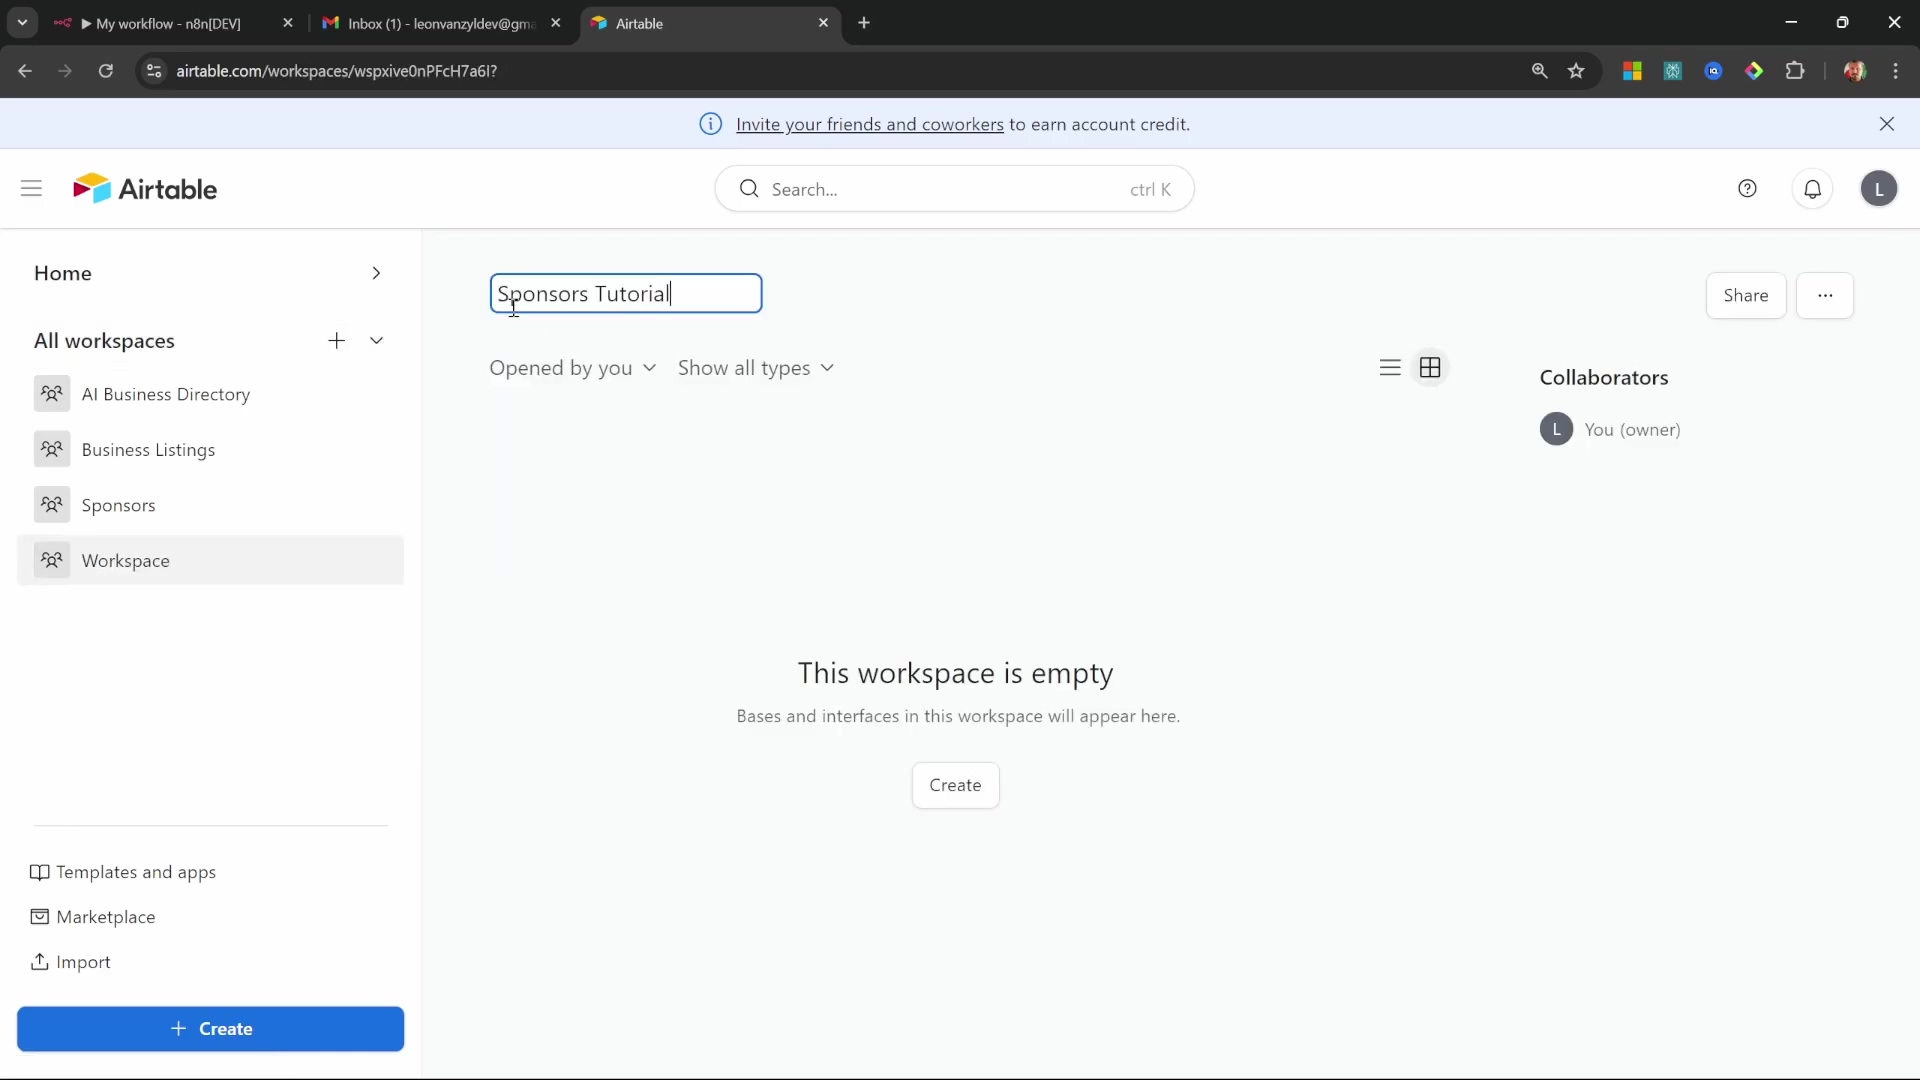
Action: Once logged in, create a new workspace (e.g., ‘Sponsors Tutorial’). Then, within that workspace, create a new base from scratch. Let’s name this base ‘Sponsors’. Now, rename the default table within this base to ‘Sponsors’ as well (keeping things consistent!). Finally, we need to define the columns (or fields) that will hold our lead data. Create the following columns:
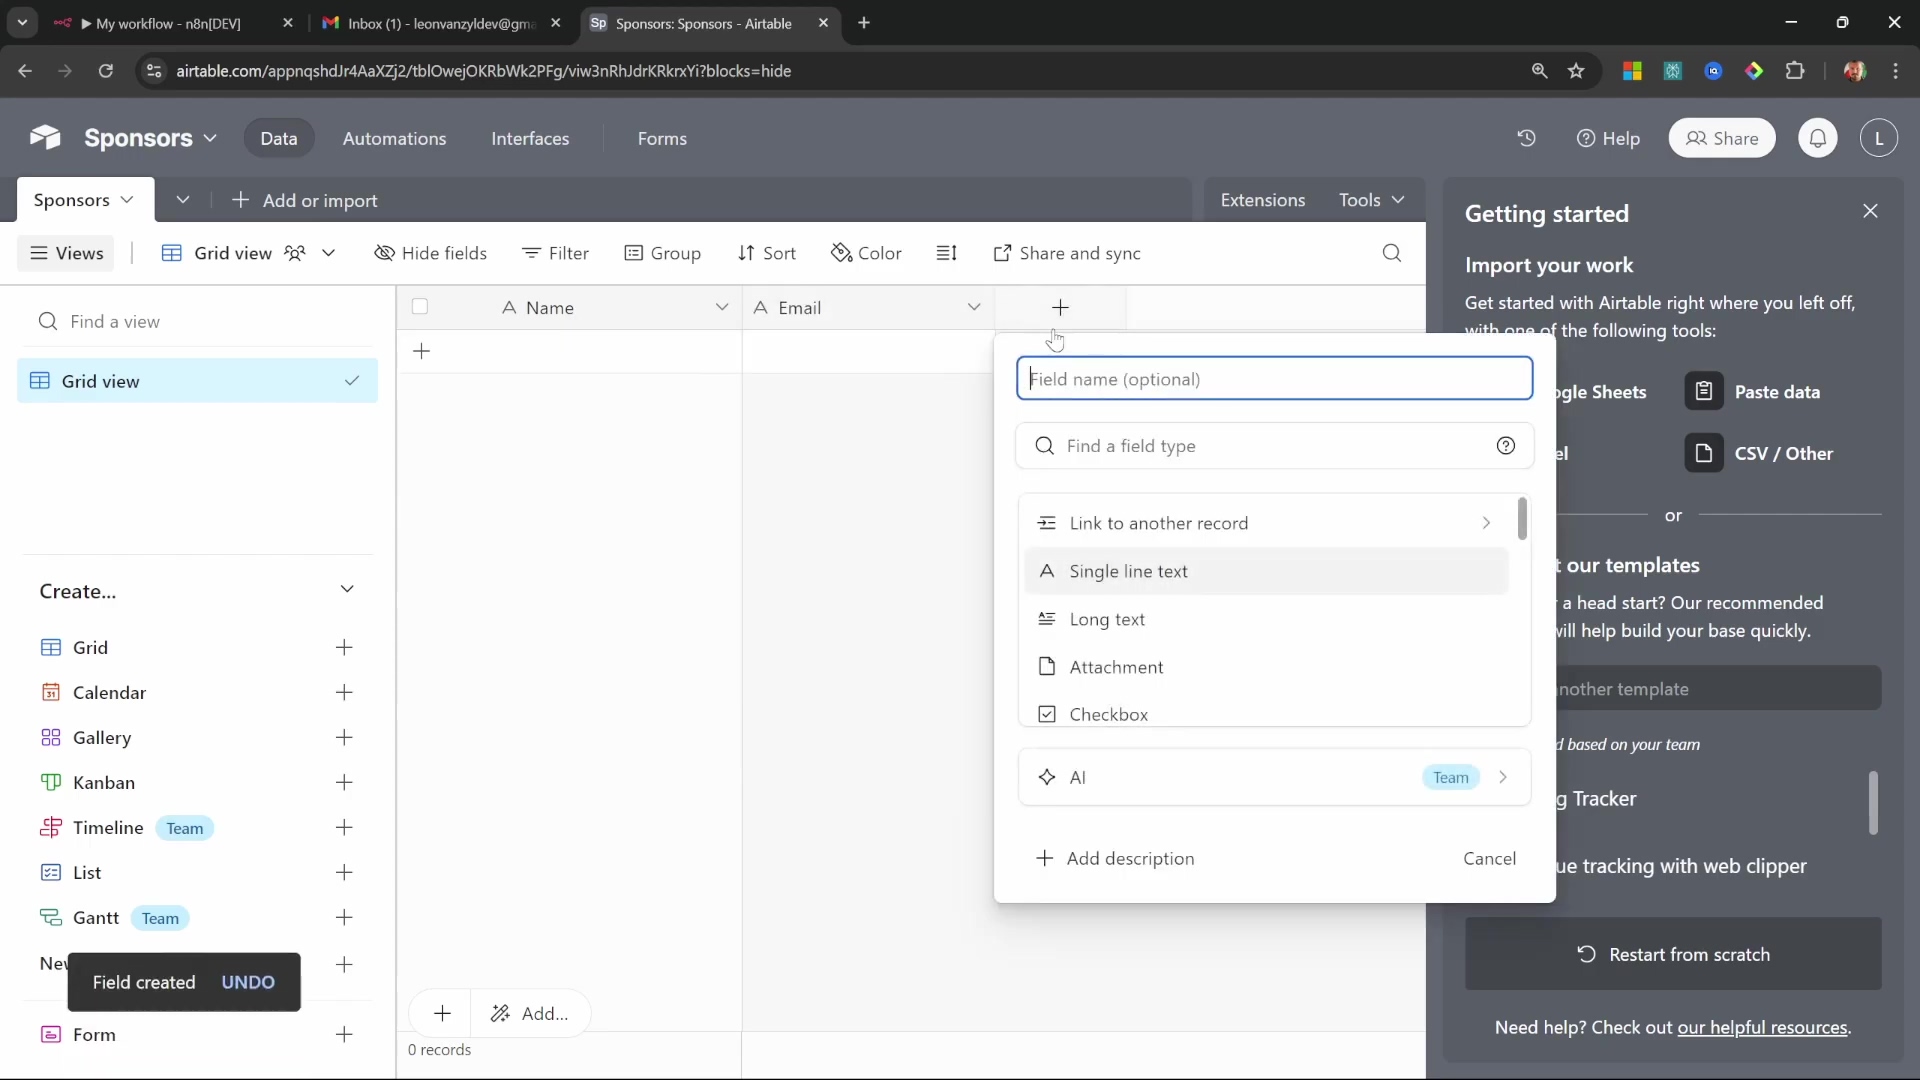
Name(choose ‘Single line text’ as the field type)Email(choose ‘Single line text’ as the field type)Company(choose ‘Single line text’ as the field type)Reasoning(choose ‘Long text’ as the field type)
Go ahead and delete any unnecessary default columns that Airtable might have created (like ‘Notes’ or ‘Attachments’) to keep things clean.
Initialize an Airtable workspace and create a new base named ‘Sponsors Tutorial’.
Defining new fields in Airtable for ‘Name’ and ‘Email’ as single line text.
Step 3: Connect n8n to Airtable
Goal: Now we need to establish a secure, authenticated connection between n8n and our brand-new Airtable base. This is like giving n8n the special key to our filing cabinet.
-
Path: Back in n8n, on the ‘True’ path coming out of our ‘If’ node, add an ‘Airtable’ node. In its settings, set the ‘Operation’ to ‘Create a Record’. Under ‘Credentials’, click ‘Create New Credential’.
-
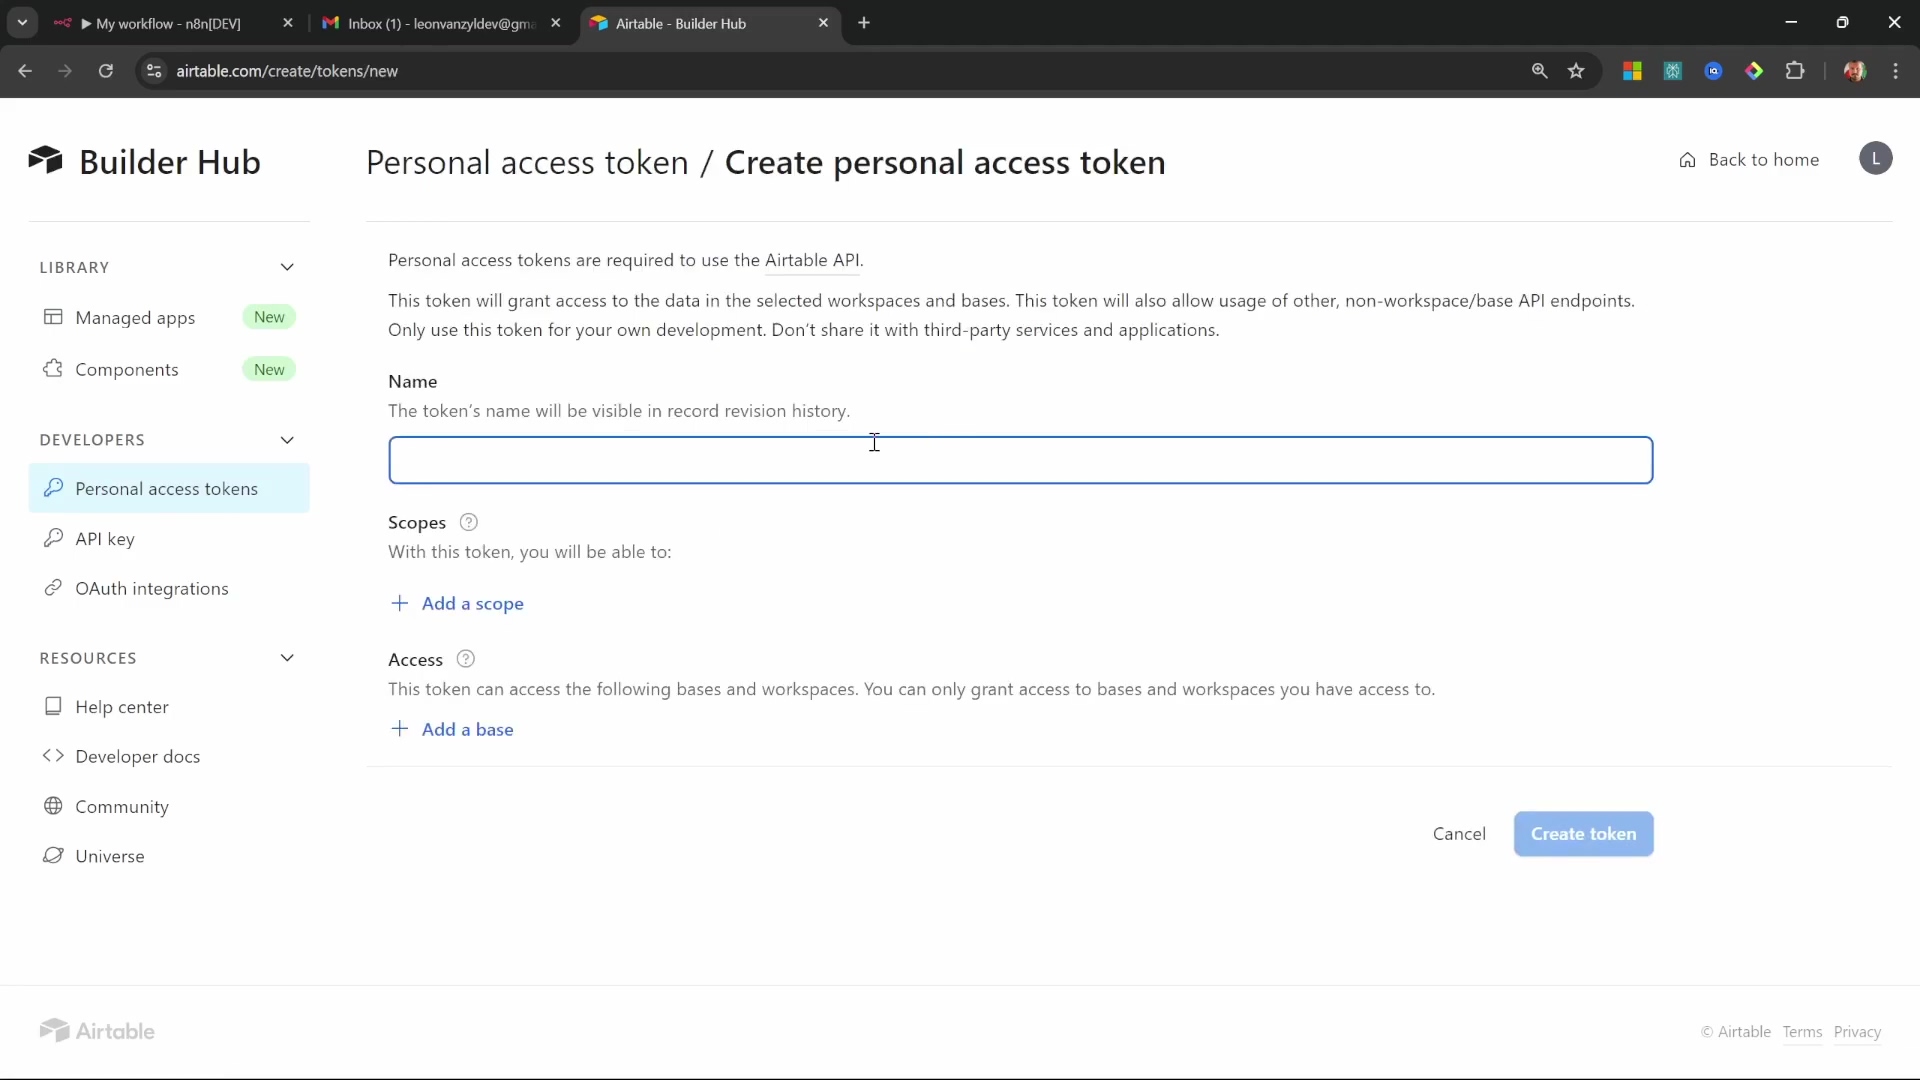
Action: This is where we get a Personal Access Token from Airtable. Go back to Airtable, click on your profile picture (usually top right), and go to ‘Account settings’. Look for ‘Developer hub’ and then ‘Personal access tokens’. Click ‘Create a new token’. Give it a descriptive name (e.g., ‘Sponsors API Token’). This is super important: you need to add specific scopes (permissions) to this token. Add the following:
data.records:readdata.records:writeschema.bases:read
Then, select your ‘Sponsors’ base for access. Click ‘Create token’, and Airtable will generate a long string of characters. Copy this token immediately! It’s only shown once. Paste this token into the n8n Airtable credential field and save it. Now, verify the connection status within n8n. If it says “Connected,” you’re golden!
Create a personal access token for Airtable API access within the Builder Hub, specifying necessary scopes.
Step 4: Map Data to Airtable Fields
Goal: Our last step for Airtable is to tell n8n exactly which piece of information from our email should go into which column in our Airtable base. It’s like labeling each file in our cabinet.
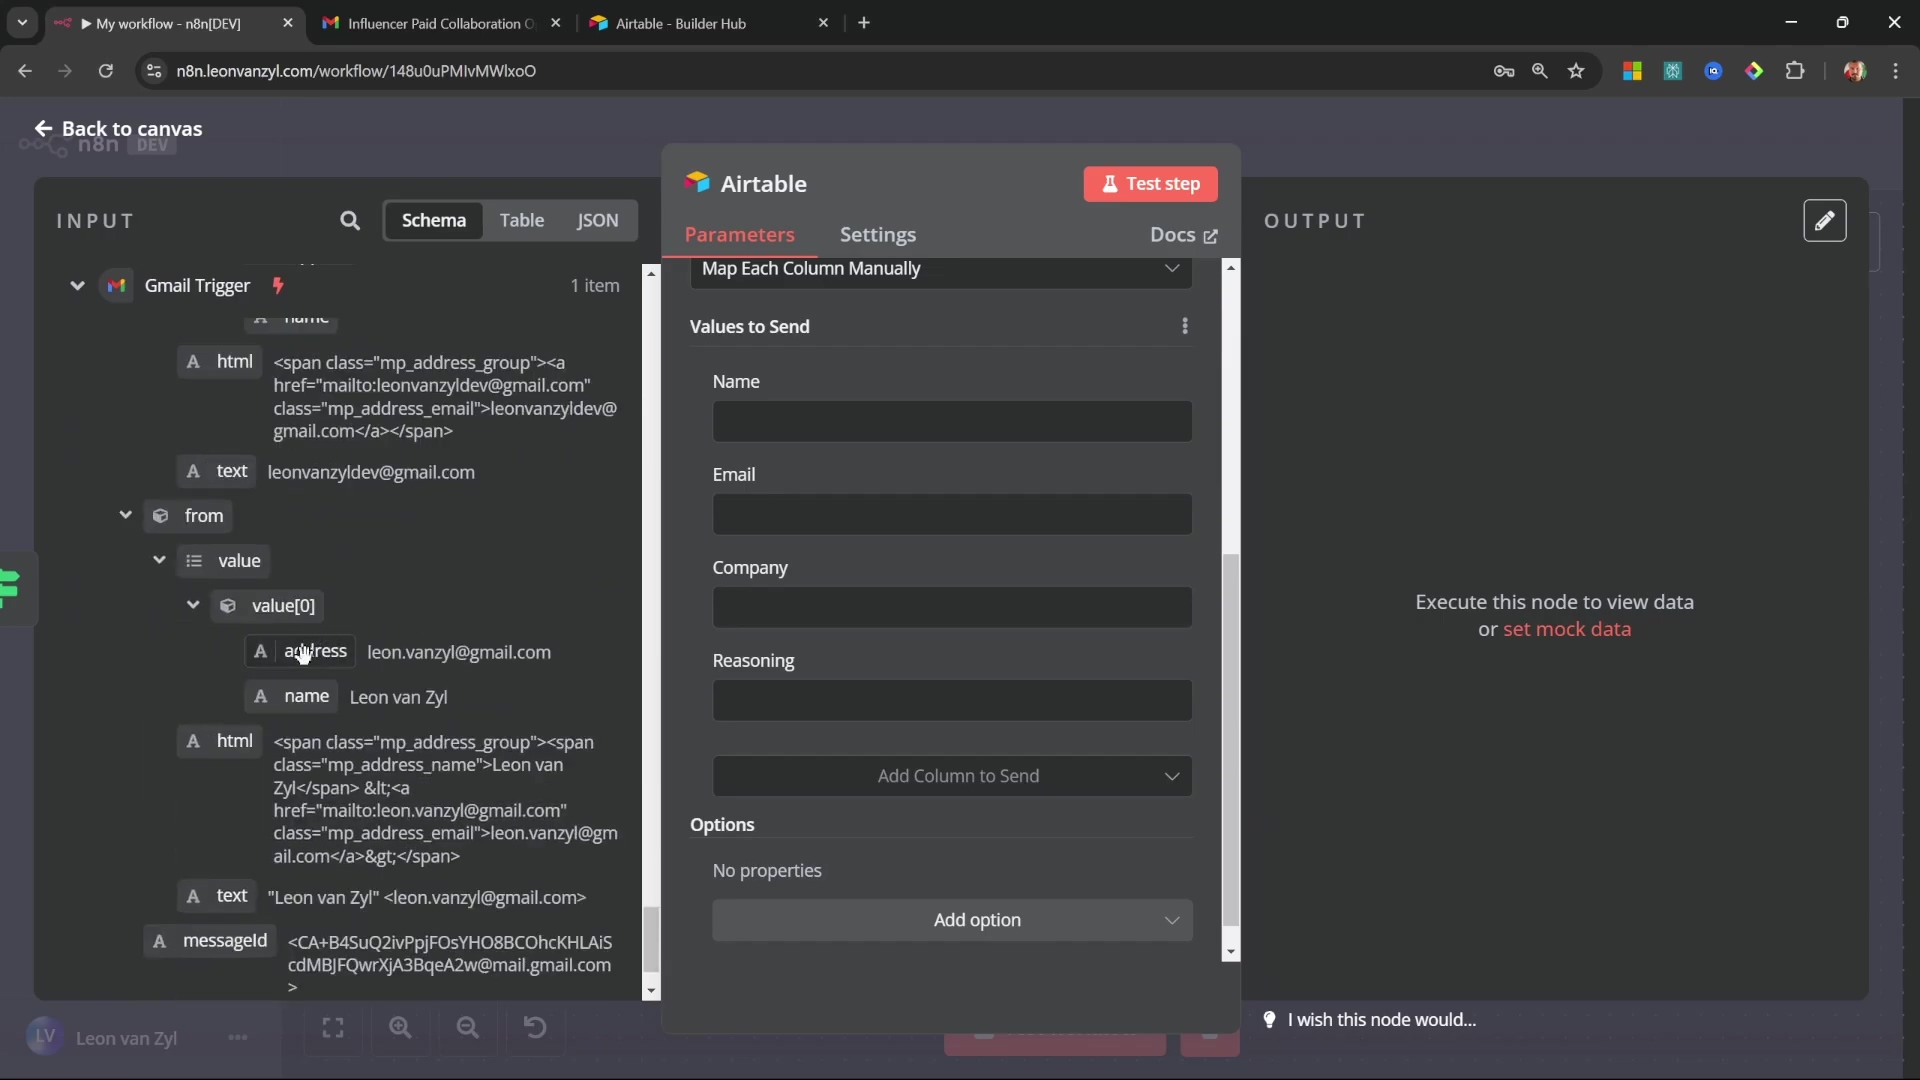
- Action: In the n8n Airtable node configuration, first select your ‘Sponsors’ base and then your ‘Sponsors’ table. Now, you’ll see fields corresponding to your Airtable columns. We need to map the input fields from the AI Agent’s output (and the original Gmail trigger) to these columns. Use expressions to link them:
Nameshould map toleadName(from the AI Agent’s output)Emailshould map tofrom[0].emailAddress(from the Gmail Trigger’s output)Companyshould map toleadCompany(from the AI Agent’s output)Reasoningshould map toreasoning(from the AI Agent’s output)
Map input fields like Name, Email, Company, and Reasoning to Airtable columns.
The AI Agent accurately extracts and formats sender email address, subject, and body for emailContext.
- Verification: Execute the Airtable node (or the whole workflow up to this point). Then, hop over to your Airtable base. You should see a new record created with all the lead details correctly populated in their respective columns. If it’s all there, you’ve successfully automated your lead capture! No more manual copy-pasting, ever!
This integration ensures all relevant sponsorship lead data is automatically and consistently stored, eliminating manual data entry and facilitating organized follow-up. You’re now a data management pro!
Crafting AI-Powered Responses: Automating Email Generation
Okay, we’ve identified the sponsorship, and we’ve stored the lead data. What’s next? Responding, of course! But not just any response – we want dynamic, personalized email replies that sound professional and include all our important details. This section is all about leveraging an AI model to draft those replies, incorporating your specific channel details, rates, and terms. This is where we save a ton of manual effort!
Step 1: Add and Configure the OpenAI Node
Goal: We need to bring in another AI model, specifically designed for generating text, to help us write our email responses. Think of it as hiring a super-fast copywriter.
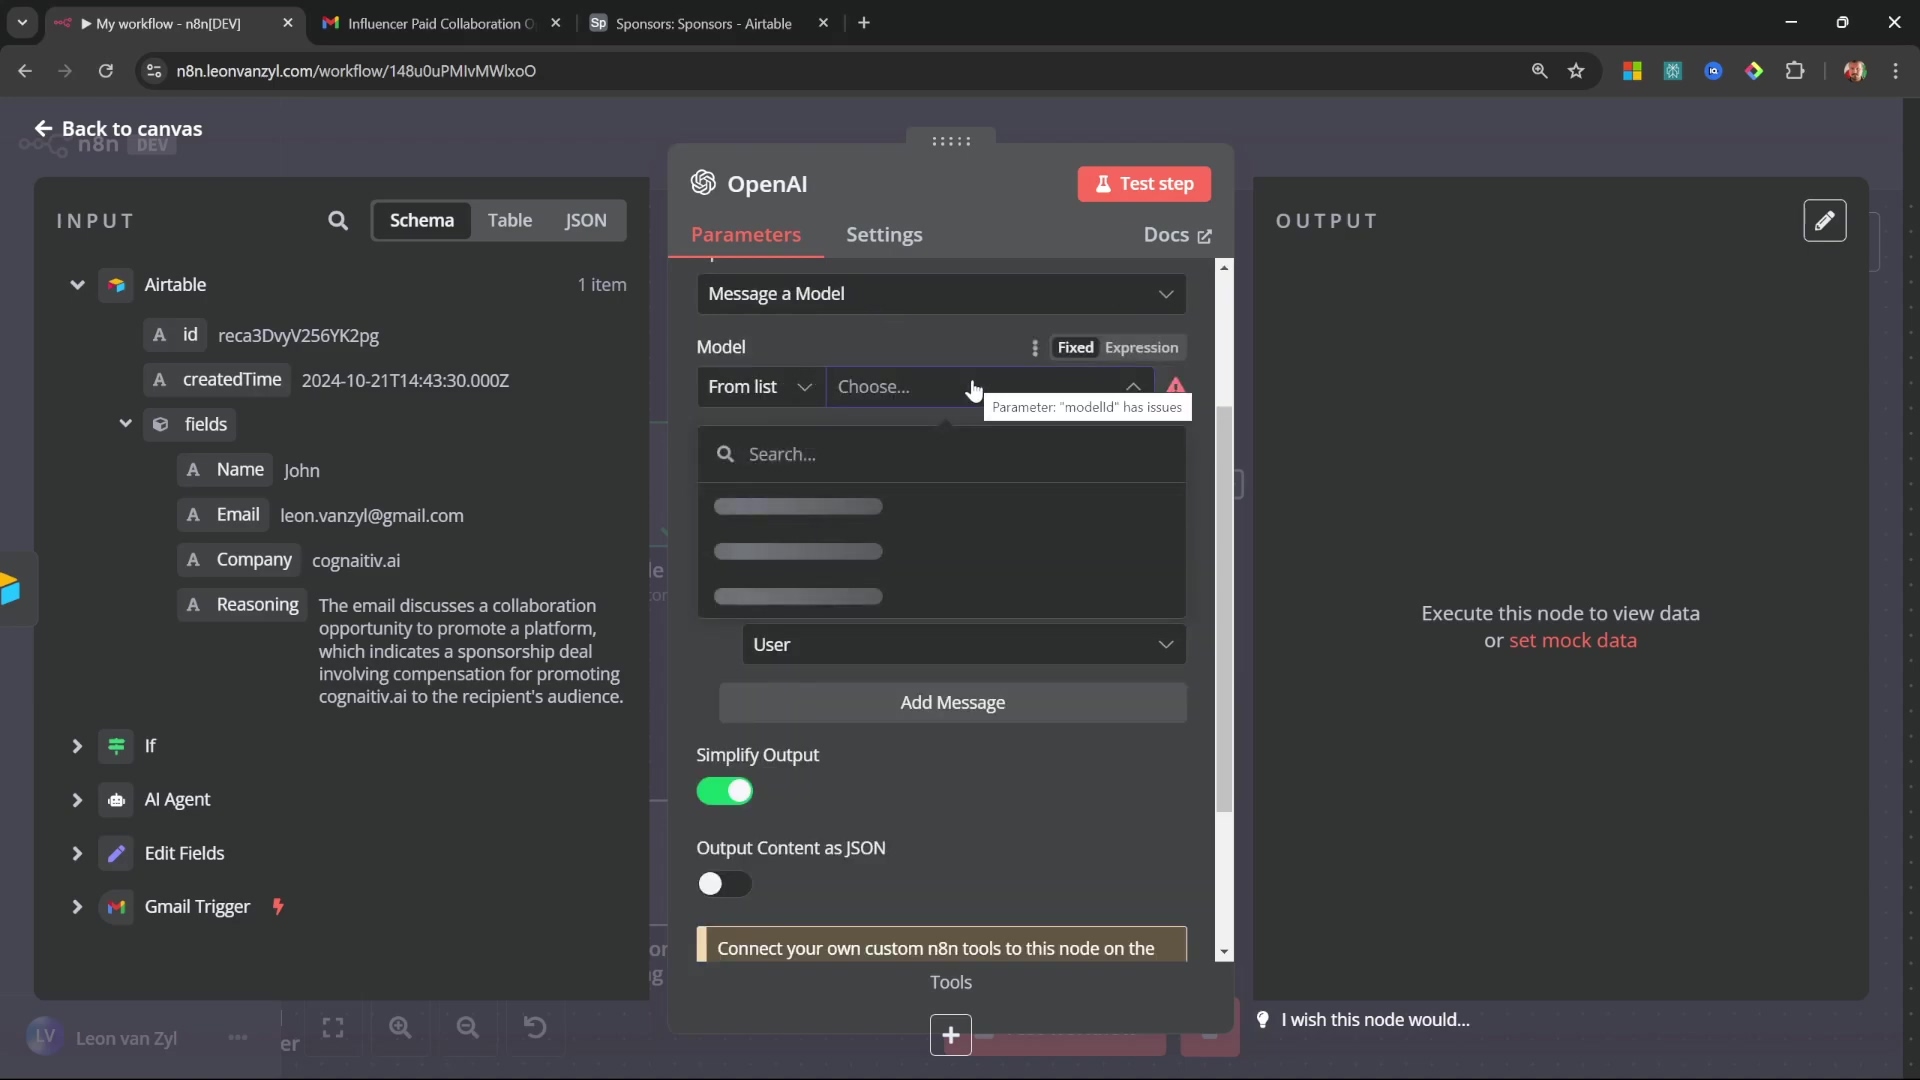
- Path: On the ‘True’ path, right after your Airtable node, add an ‘OpenAI’ node. This is different from the ‘AI Agent’ node we used earlier; this one is focused purely on generating text.
- Action: In the OpenAI node’s settings, set the operation to ‘Message a Model’. Select your OpenAI credentials again (the same ones you used for the AI Agent). For a good balance of cost and performance,
GPT-4o Miniis still an excellent choice here. It’s quick and capable of crafting professional emails.
Configure the ‘OpenAI’ node to message a model for email generation.
Step 2: Define the System Prompt for Email Generation
Goal: This is where we give our AI copywriter its detailed brief. We need to provide comprehensive instructions and context so it can draft a suitable, professional response that includes all our business specifics.
- Action: Add a first message within the OpenAI node with the role ‘System’. Switch the text field to an expression (that little
{{ }}icon). Now, craft a detailed prompt. This prompt is like your personal style guide and information packet for the AI. It needs to include:- Your role: Start by clearly stating what you want the AI to do, e.g.,
Your role is to respond to sponsorship opportunities by drafting a response email. - Instructions: Give it clear guidelines on the tone and format. For example:
Carefully look at the below email and write a friendly and professional response. Only return the body of the email in HTML format. Do not write a head, only the body. The email must include the following information: - Channel Details: Provide specific details about your platform. Be as concrete as possible! E.g., ‘YouTube channel called Leon Fansel, 100K subscribers, focus on tech tutorials’.
- Sponsorship Rates: Lay out your pricing structure clearly. E.g., ‘Dedicated video: $X, Integrated mention: $Y’. (Remember to replace X and Y with your actual rates!)
- Terms \u0026 Conditions: Any important caveats or requirements. E.g., ‘Content approval required, deliverables based on agreed scope’.
- Your role: Start by clearly stating what you want the AI to do, e.g.,
The system prompt for the AI agent includes channel overview and sponsorship rates.
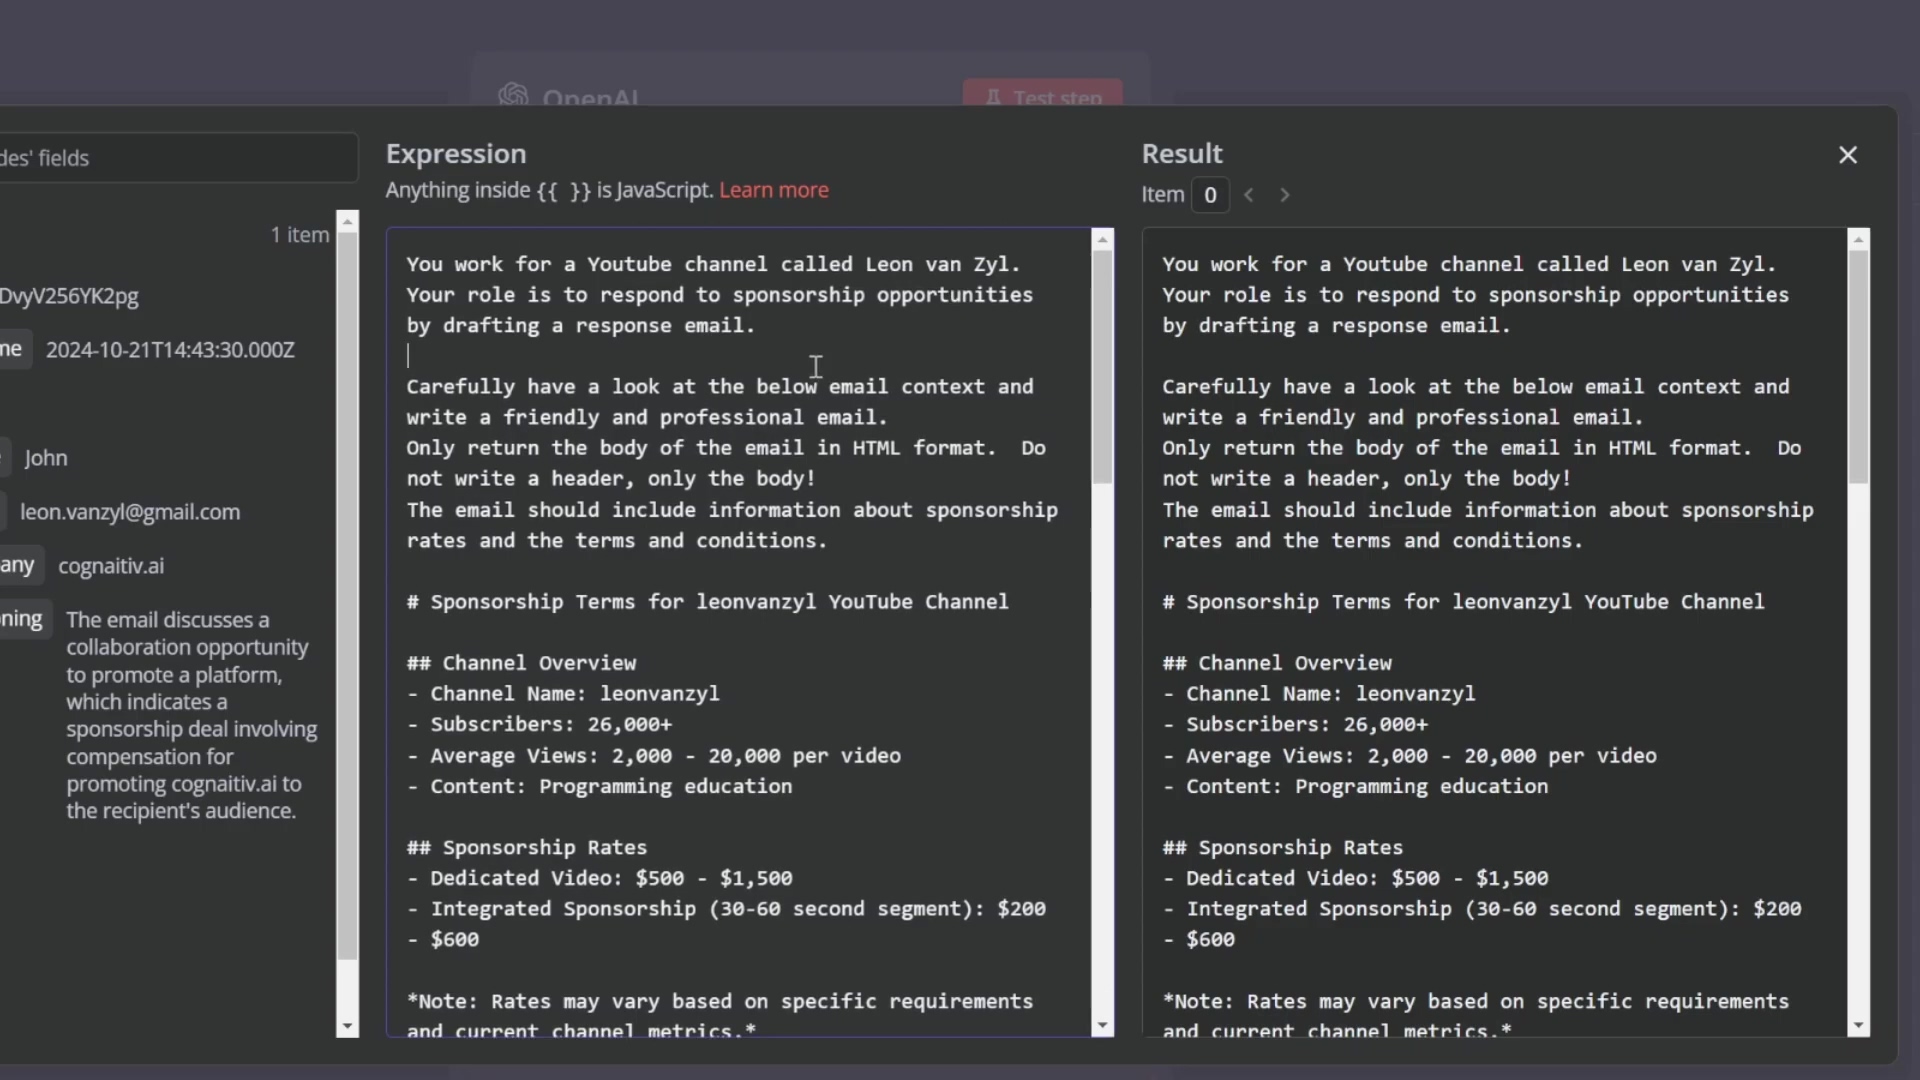
- Refinement: Add specific instructions to prevent formatting headaches. For example,
Do not include funny HTML characters.This helps ensure the output is clean and ready for Gmail. This detailed prompt acts as the training data, guiding the AI’s response content to be exactly what you need.
Step 3: Pass Email Context to the AI
Goal: Our AI copywriter needs to know which email it’s responding to! This step provides the AI with the specific incoming email’s details, allowing it to formulate a truly personalized response.
- Action: Add a second message within the OpenAI node with the role ‘User’. In the text field, we’ll simply reference our
emailContextvariable from the earlier ‘Set’ node. This is done using an expression:{{$json.emailContext}}. This feeds the AI the original incoming message, giving it all the context it needs to tailor its reply perfectly.
Provide email context to the AI for personalized email responses.
- Verification: Execute the OpenAI node. Check the output on the right-hand side. You should see an HTML-formatted email body containing the AI-generated response. It should be personalized with information from the incoming email and include all your specified rates and terms. If it looks good, you’ve got a fantastic AI copywriter on your hands!
This process automates the initial draft of complex email responses, ensuring consistency and incorporating all necessary business details without manual intervention. You’re now generating professional emails with the power of AI!
Review and Send: Saving Drafts or Instant Dispatch
We’re at the finish line! The final stage of our email automation workflow gives you crucial flexibility: you can either save the AI-generated response as a draft for your human review (always a good idea for important communications!) or, if you’re feeling brave and confident, send it immediately. This control ensures quality while maximizing efficiency. Let’s look at both options.
Option 1: Saving the AI-Generated Response as a Draft
Goal: Create an email draft in Gmail, neatly linked to the original message, so you can quickly review and send it yourself. This is my preferred method for critical emails.
- Path: After the OpenAI node, add a ‘Gmail’ node. This is the same node we used for the trigger, but now we’re using it to send or draft emails.
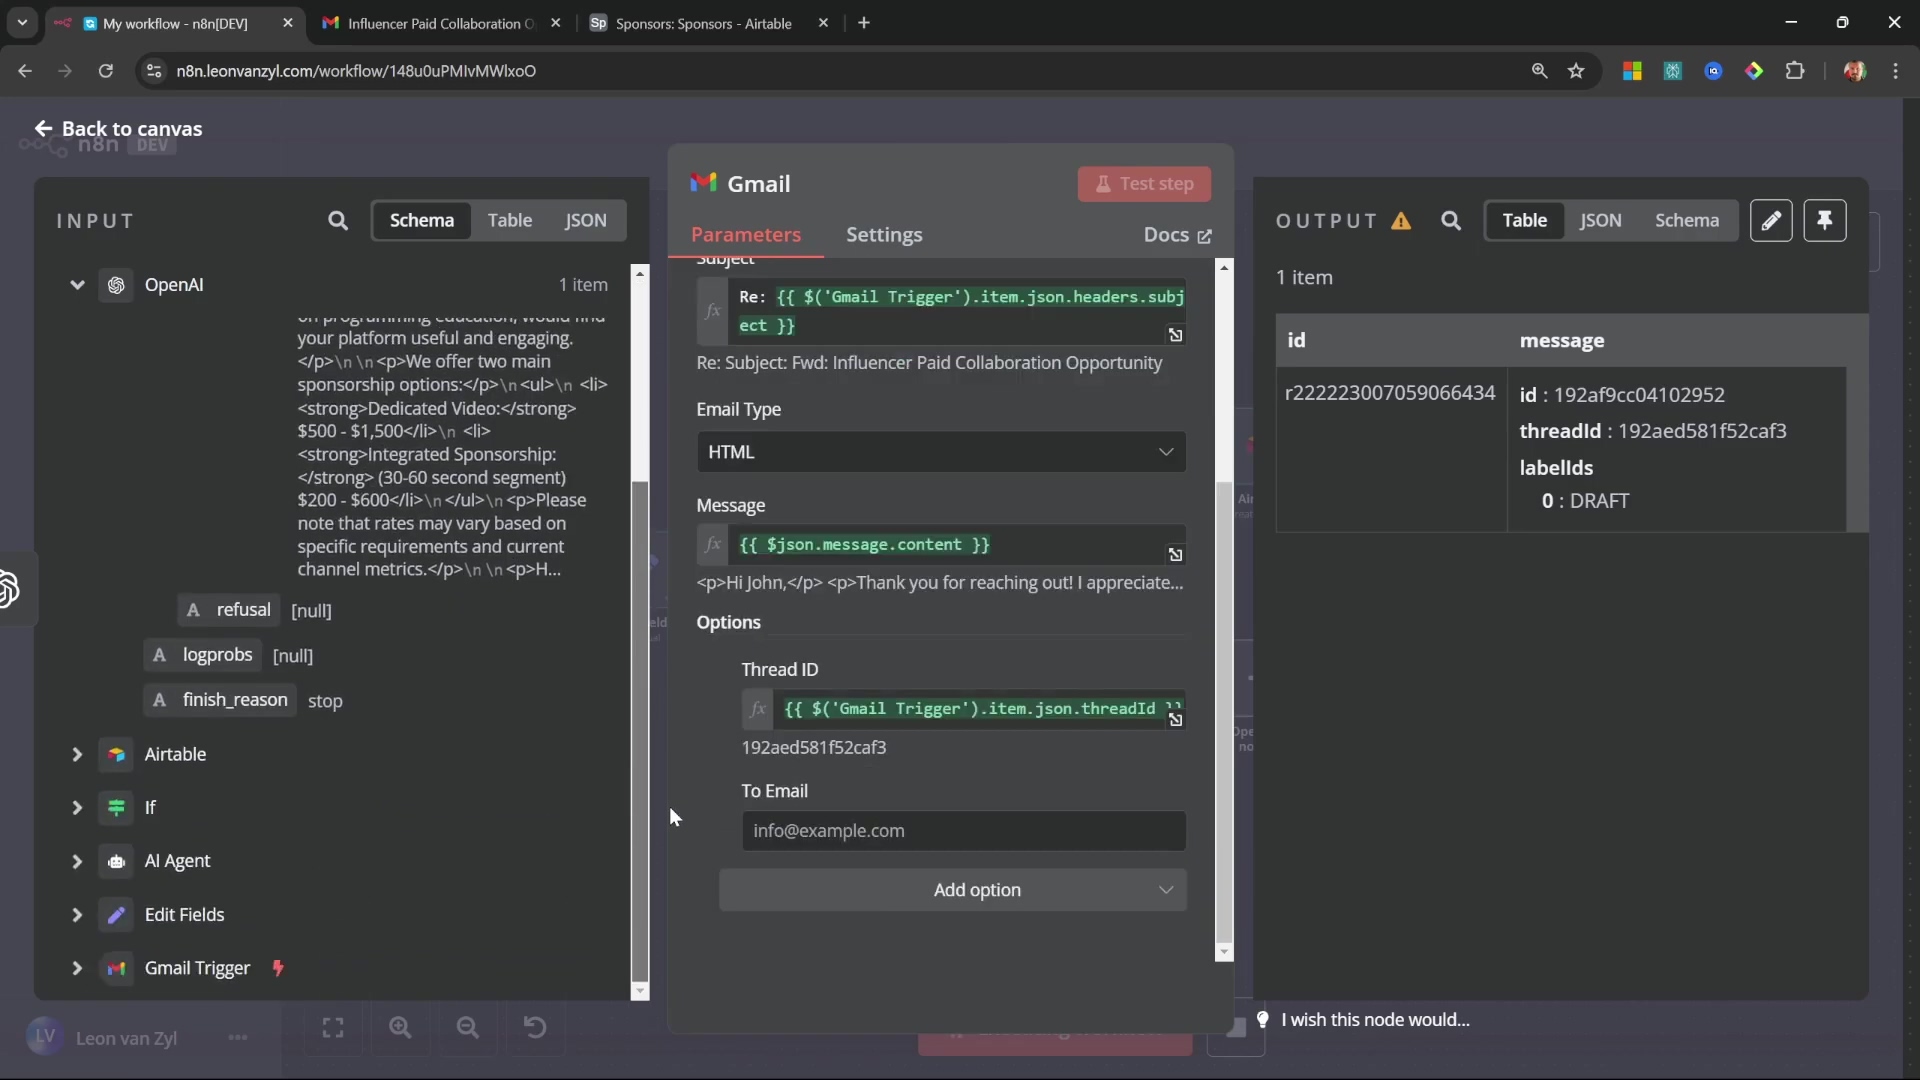
- Action: In the Gmail node’s settings, set the ‘Resource’ to ‘Draft’ and the ‘Operation’ to ‘Create’. This tells n8n we want to make a new draft.
- Configuration: Now, let’s fill in the details:
- Subject: We want our draft to clearly indicate it’s a reply. Reference the original email’s subject from the Gmail trigger’s output (e.g.,
{{$json.subject}}) and prepend a marker likeRE:orReply:. So, your expression might look like:="RE: " + $json.subject. - Message: This is where our AI’s hard work goes! Use the HTML content generated by the OpenAI node. You’ll likely reference it with an expression like
{{$json.message.content}}(the exact path might vary slightly depending on your OpenAI node’s output structure, so check the output panel). - Email Type: This is crucial! Set the ‘Email Type’ to ‘HTML’. Why? Because our AI generated HTML content. If you leave it as ‘Plain Text’, you’ll see all the raw HTML tags (like
<p>,<b>) visible in your draft, which looks terrible. Setting it to HTML ensures proper rendering. - Thread ID: Under ‘Options’ (you might need to click ‘Add Option’), add a ‘Thread ID’. Link this to the
threadIdfrom the original Gmail trigger’s output (e.g.,{{$json.threadId}}). This is super handy because it ensures your draft is grouped with the original conversation in Gmail, keeping your inbox tidy.
- Subject: We want our draft to clearly indicate it’s a reply. Reference the original email’s subject from the Gmail trigger’s output (e.g.,
Configure the Gmail node to create a draft, specifying operation, content, and type.
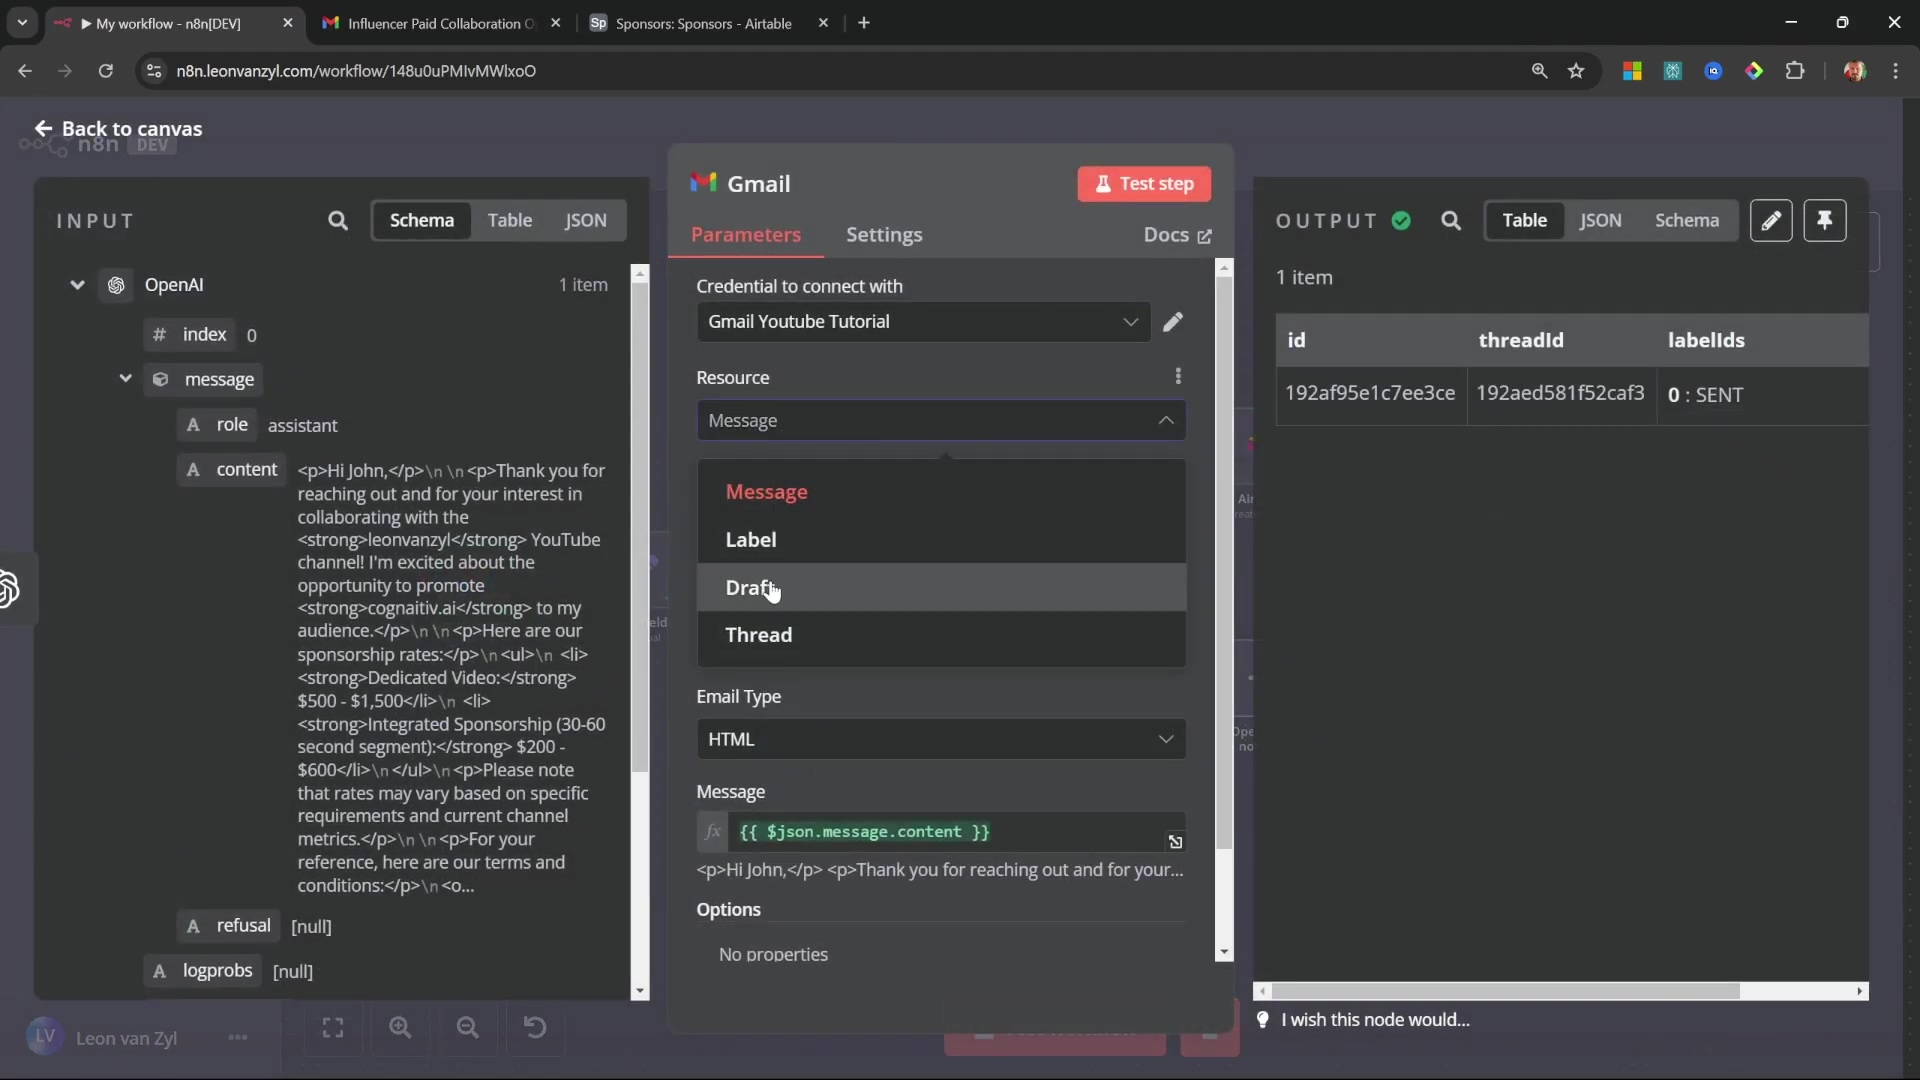
The Gmail node subject includes a preview of the subject line from the original trigger.

- To Email: Also under ‘Options’, add a ‘To Email’ field. Populate it with the sender’s email address from the original Gmail trigger:
{{$json.from[0].emailAddress}}. This pre-fills the recipient for you, making it a one-click send once you review the draft.
Set ‘Email Type’ to HTML for proper rendering of AI-generated content in the draft.
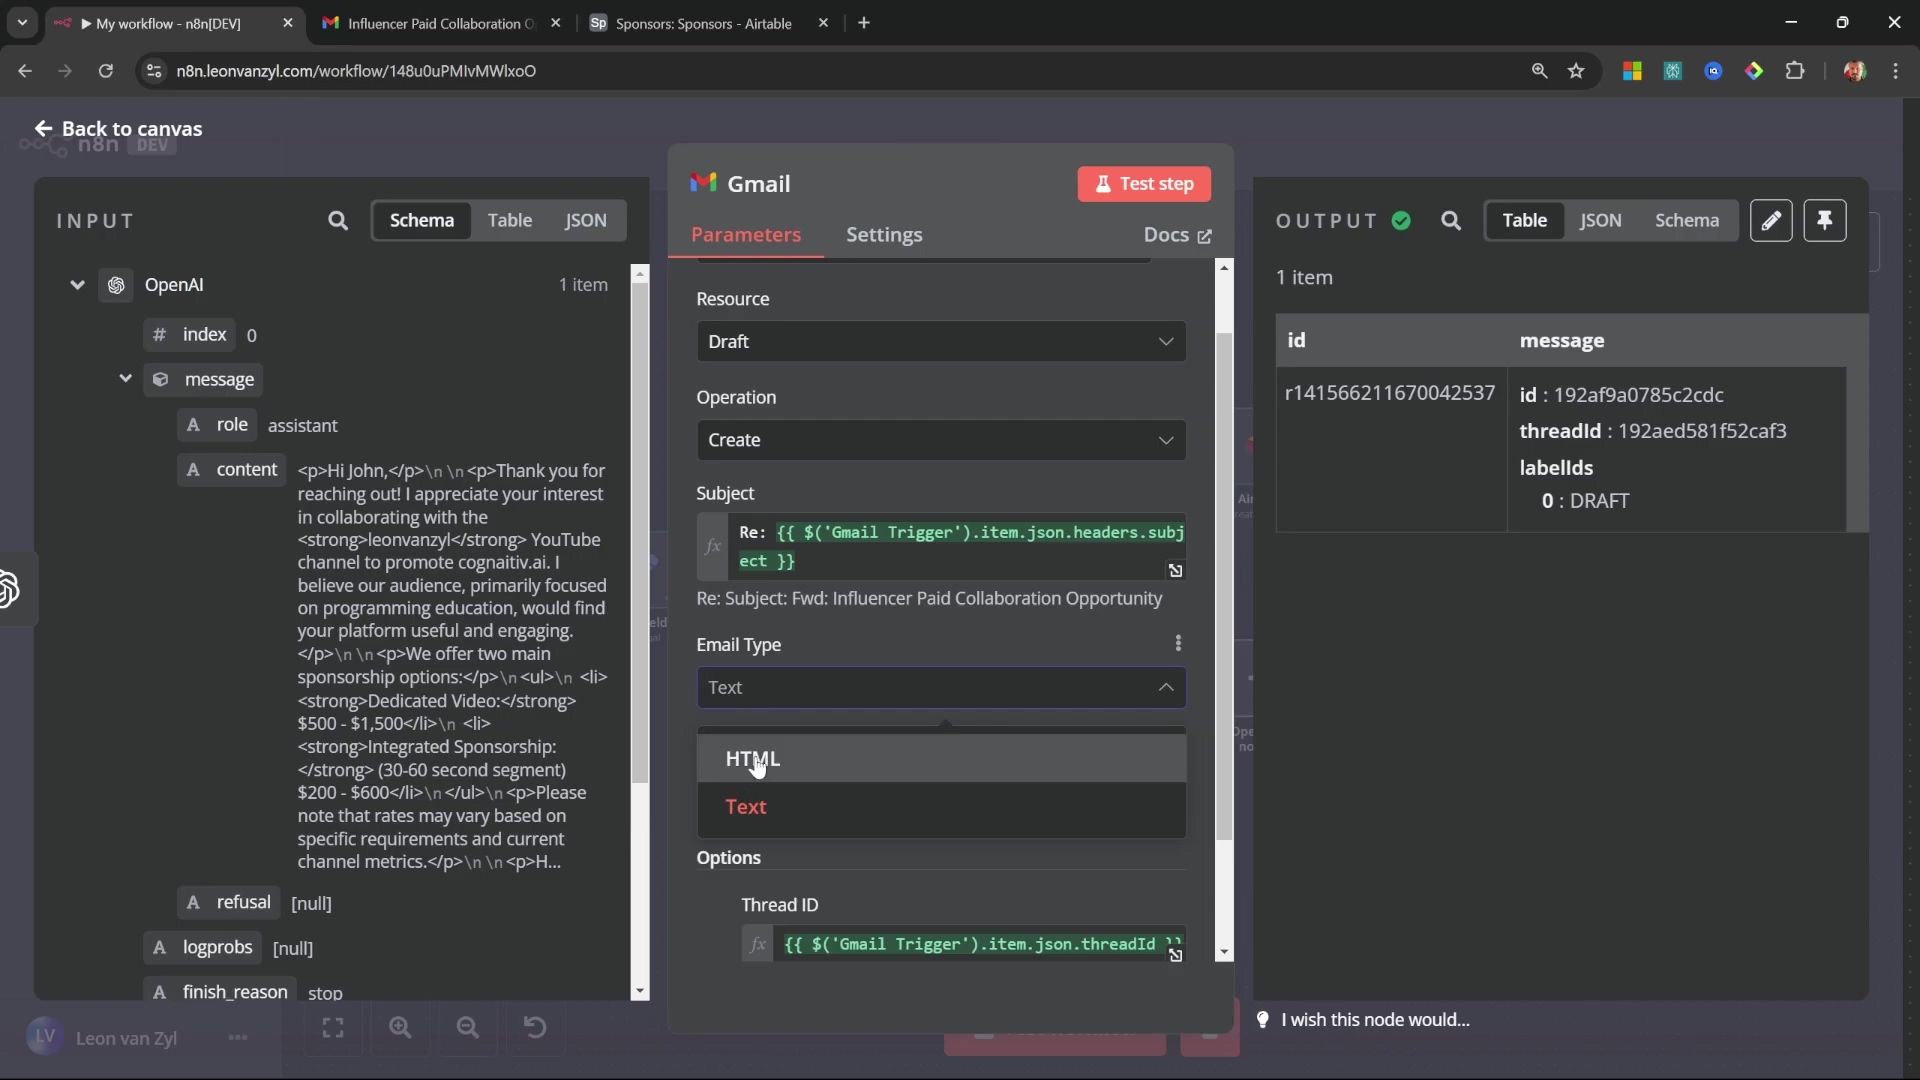
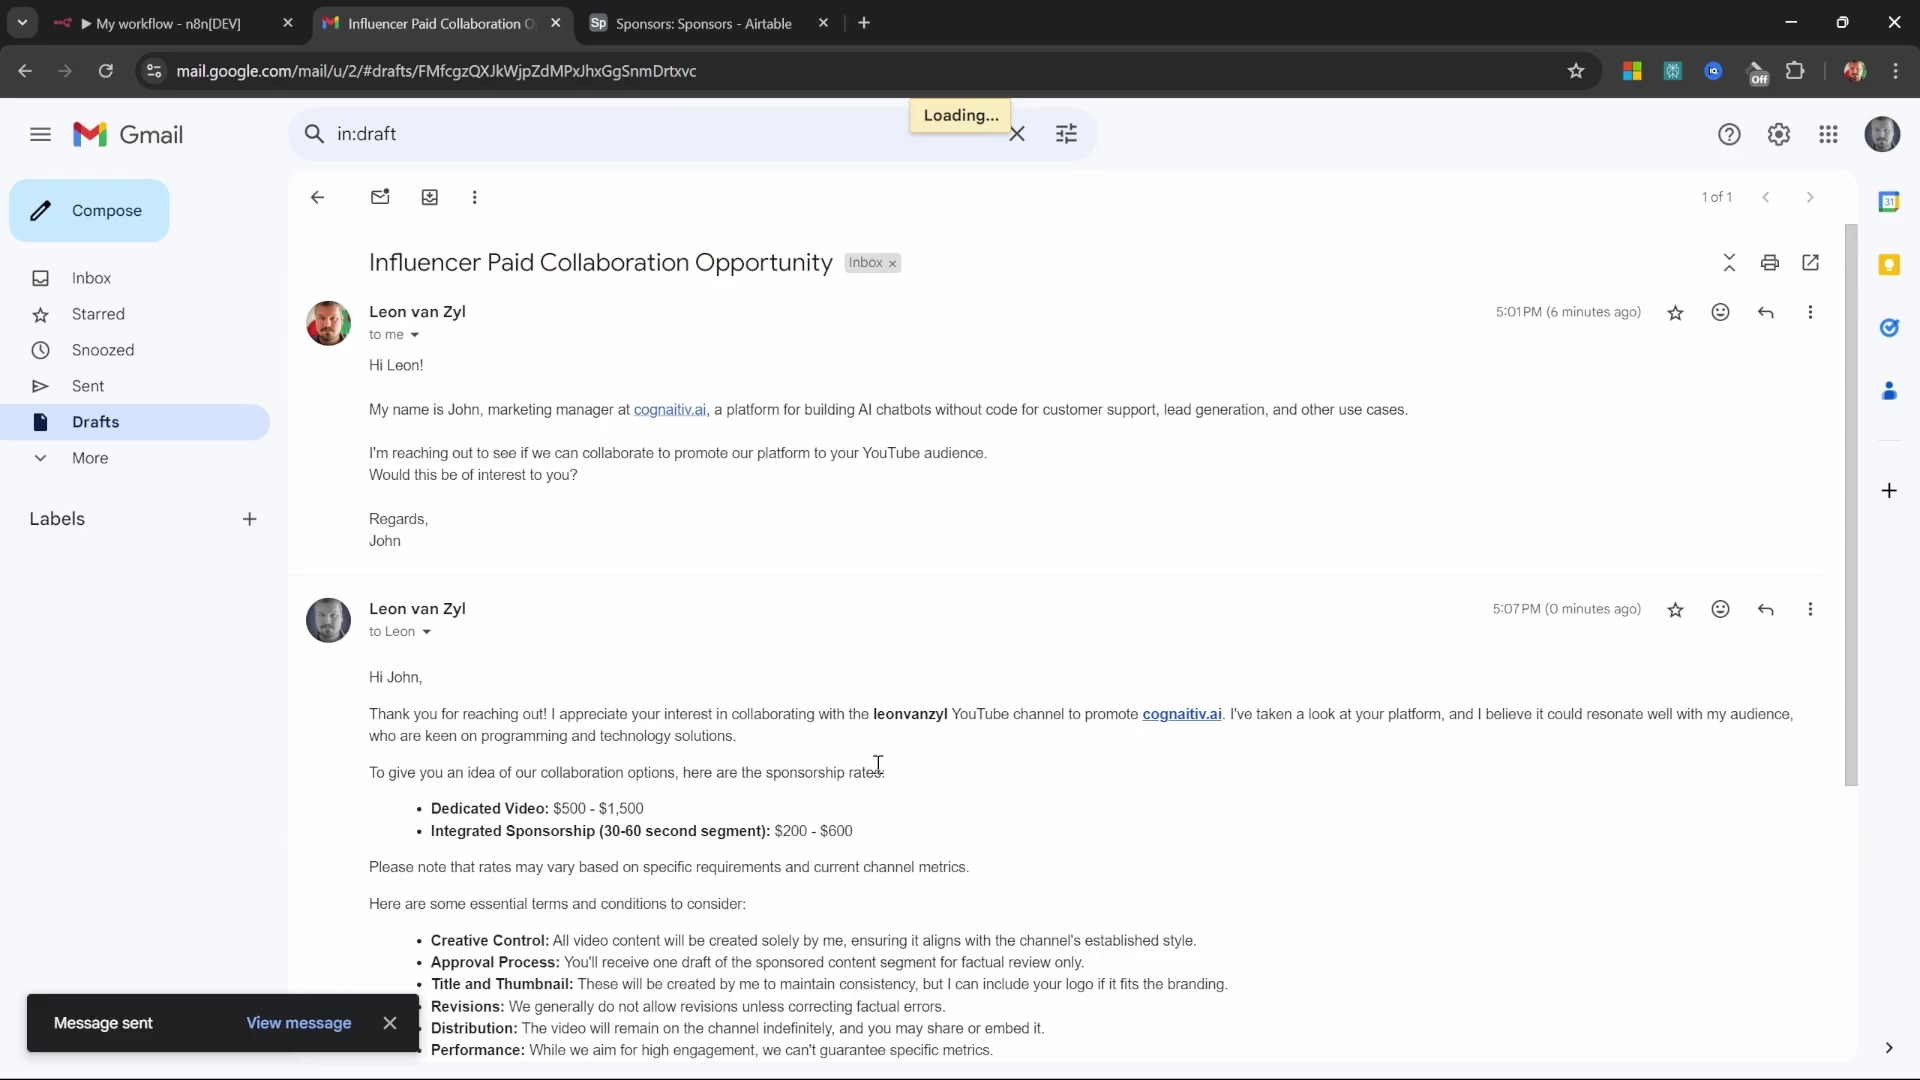
- Verification: Run the workflow. Then, quickly check your Gmail drafts folder. You should see a new draft, linked to the original email, with the AI-generated content beautifully formatted and addressed to the original sender. Give yourself a pat on the back!
Option 2: Instantly Dispatching the AI-Generated Response
Goal: For less sensitive or high-volume communications, you might want to automatically send the AI-generated email response without any human intervention. Use this option with caution!
- Path: Instead of setting the ‘Resource’ to ‘Draft’, use the ‘Message’ resource in the Gmail node.
- Action: Set the ‘Operation’ to ‘Reply to a Message’.
- Configuration: Similar to drafting, but with a few key differences:
- Message ID: Connect this to the
messageIdfrom the original Gmail trigger (e.g.,{{$json.messageId}}). This tells Gmail which specific message you’re replying to. - Message Content: Link this to the HTML output from the OpenAI node, just like before.
- Email Type: Again, ensure this is set to ‘HTML’ if your AI generates HTML content.
- Message ID: Connect this to the
Configure the Gmail node to send a reply, specifying message ID, content, and type.
- Verification: Execute the workflow. Check your Gmail ‘Sent’ folder. The AI-generated reply should be visible there, sent directly to the original sender. Instant communication, powered by AI!
Gmail node showing advanced options for ‘Thread ID’ and ‘To Email’.
This two-pronged approach provides incredible flexibility. You can review critical communications to ensure perfection, while still enabling full automation for less sensitive interactions. It’s all about finding the right balance for your workflow!
Advanced Optimization and Best Practices for Your AI Agent
Alright, you’ve built an amazing AI-powered email agent! But like any good piece of tech, there’s always room for improvement. To maximize its effectiveness and reliability, continuous optimization and adherence to best practices are essential. This ensures accuracy, helps handle those tricky edge cases, and keeps everything secure. Let’s level up your automation game!
Refine AI Prompts for Precision
Goal: We want our AI to be not just good, but great. This means constantly improving its understanding and the quality of its responses.
- Iterative Testing: Don’t just set it and forget it! Regularly test your AI Agent with a diverse set of real-world emails. Throw everything at it – both sponsorship inquiries and non-sponsorship emails. Pay attention to where it struggles or makes mistakes.
- Specificity: The more specific you are in your system prompts, the better the AI will perform. Go beyond general instructions. For example, instead of just
be professional, tryadopt a formal, concise tone, addressing the sender as 'Dear [LeadName]' and avoiding colloquialisms.You can even specify negative keywords to avoid or preferred phrasing. - Output Format Reinforcement: If you notice the AI occasionally deviates from your perfect JSON schema (it happens!), add a firm reminder to your system prompt. Something like
Strictly adhere to the JSON format. Do not include any conversational text outside the JSON object.can work wonders. It’s like reminding a child to stay within the lines!
The AI agent’s detailed prompt for drafting professional sponsorship responses, including specific channel information and rates.

Enhance Data Extraction and Storage
Goal: We want to make sure we’re collecting all the right information, and that it’s super accurate.
- Expand Data Fields: Take a look at the sponsorship emails you receive. Are there common pieces of information you’re missing? Things like ‘proposed budget’, ‘campaign duration’, or ‘target audience’? If so, update your AI Agent prompt to extract this new information, and then add corresponding columns in your Airtable base. Your database will become even more valuable!
- Data Validation: AI is powerful, but not infallible. Consider adding additional n8n nodes to validate extracted data before it gets stored in Airtable. For instance, you could use a ‘Code’ node to check if an extracted email address is in a valid format, or if a budget value is actually a number. This prevents garbage data from polluting your database.
- Duplicate Prevention: Nobody likes duplicate records! In your Airtable integration, think about adding a ‘Check if Record Exists’ step before the ‘Create a Record’ step. You can check if an email address or company name already exists. If it does, you might update the existing record instead of creating a new one, or simply skip it.
Error Handling and Notifications
Goal: Things can go wrong (it’s tech, after all!). We need to be prepared and know immediately if something breaks.
- Failure Notifications: Add an ‘Error Trigger’ node in n8n. This node is your workflow’s alarm system. Configure it to send an internal email or a Slack message to you or your team if any part of the workflow fails. This could be due to an API key expiring, the AI giving a weird response, or a database insertion failing. Knowing immediately means you can fix it fast!
- Fallback Mechanisms: For critical steps, always have a Plan B. For example, if the AI agent completely fails to generate a response, instead of just halting the workflow, you could route that specific email to a human review queue. This ensures no important communication falls through the cracks.
Security and Privacy Considerations
Goal: Protecting sensitive information and complying with regulations is paramount. We’re dealing with emails, so security is a big deal.
- API Key Management: Never hardcode your API keys (OpenAI, Airtable, etc.) directly into your nodes. Always store them securely in n8n’s credentials manager. And make it a habit to regularly rotate these keys, just like changing your passwords.
- Data Minimization: Only extract and store the information you absolutely need. Avoid capturing overly sensitive personal data unless it’s strictly required and you have a clear justification (and consent!). Less data means less risk.
- Consent Management: If you’re processing emails from individuals in regions with strict data protection laws (like GDPR in Europe), you might need to implement steps to obtain explicit consent for data storage and processing. This is a legal requirement, so don’t skip it!
By proactively implementing these advanced optimizations and best practices, your AI-powered email automation agent will become more robust, intelligent, and reliable, further enhancing your workflow efficiency. You’re not just automating; you’re building a fortress of efficiency!
Enhancing Your Workflow: Next Steps and Further Automation Ideas
Wow, you’ve done it! Building an AI-powered email automation agent with n8n is a huge accomplishment. You’ve transformed how you manage communications, from intelligently categorizing sponsorship opportunities to extracting lead data, storing it centrally, and even drafting personalized responses. This foundational setup gives you a significant competitive advantage by saving you precious time and ensuring consistent, professional engagement. You’re basically a digital superhero now!
An example of a drafted email in Gmail showcasing the AI-generated response.
To really take this system to the next level, consider these exciting next steps:
- Integrate a CRM: While Airtable is great, for a full sales pipeline, you might want to connect your agent to a full-fledged CRM (Customer Relationship Management) system like Salesforce or HubSpot. This allows you to track the entire journey of your sponsorship leads, from initial contact to closed deal.
- Automate Follow-ups: Don’t let those leads go cold! Extend your AI’s capabilities to generate and schedule follow-up emails. You could set it up so that if a draft isn’t sent within a certain timeframe, or if you don’t hear back from a lead after a week, the AI automatically drafts a gentle nudge.
- Personalized Nurturing Sequences: Get even more sophisticated! Develop more complex AI prompts to create multi-stage nurturing email sequences. These could be tailored based on a lead’s profile, their previous interactions, or even their industry. Imagine an AI that sends a series of perfectly timed, relevant emails to warm up a lead!
Final Summary
This guide walked you through constructing an n8n workflow that leverages the power of AI to automate Gmail-based sponsorship email management. We covered everything from intelligent categorization to personalized draft responses. You’ve learned how to connect Google Cloud and Gmail, configure triggers, use AI agents for smart analysis, store data in Airtable, and even generate email replies. Moving forward, remember that n8n is incredibly versatile. For example, to integrate a comprehensive CRM like Salesforce, you’d simply add a ‘Salesforce’ node to your n8n workflow and configure it to ‘Create a Record’ for new sponsorship leads. The possibilities are endless, and you’re now equipped to build them!
Frequently Asked Questions (FAQ)
Q: Why do I need to disable ‘Simplify Output’ in the Gmail trigger node?
A: Disabling ‘Simplify Output’ is crucial because it ensures the Gmail trigger node provides the full email content, including both plain text and HTML body, along with all metadata. If it’s enabled, n8n might only output a simplified snippet, which isn’t enough for the AI agent to perform a thorough analysis and extract all necessary details like lead names or company information. Think of it as giving your AI detective all the clues, not just a summary!
Q: What if my AI Agent doesn’t always return the JSON in the exact format I defined?
A: This can happen! AI models, while smart, can sometimes be a bit creative. To enforce strict adherence to your defined JSON schema, make sure you’ve enabled ‘Require Specific Output Format’ in the AI Agent node and correctly configured the ‘Structured Output Parser’ with your schema. Additionally, you can add a very explicit instruction to your system prompt, such as Strictly adhere to the JSON format. Do not include any conversational text outside the JSON object. This usually helps guide the AI to produce the desired output.
Q: Is it safe to automatically send emails without human review?
A: While technically possible, automatically sending emails without human review (Option 2) should be used with caution, especially for critical communications like sponsorship deals. It’s generally recommended for less sensitive, high-volume, or highly standardized responses where the risk of error is low. For important interactions, saving the AI-generated response as a draft (Option 1) for a quick human review is a best practice. This allows you to catch any AI hallucinations or misinterpretations before they go out, ensuring quality and professionalism.
Q: How can I handle different types of incoming emails, not just sponsorships?
A: You can extend this workflow by adding more ‘If’ nodes or even a ‘Switch’ node after the AI Agent. Your AI Agent’s prompt could be expanded to identify multiple categories (e.g., isSponsorship, isSupportRequest, isPartnershipInquiry). Based on the AI’s output for these categories, you can then route emails to different branches of your workflow, each with its own specific automation (e.g., sending support requests to a helpdesk, or partnership inquiries to a different team). The key is to make your AI’s output structured and actionable for conditional routing.