Watch the Video Tutorial
💡 Pro Tip: After watching the video, continue reading below for detailed step-by-step instructions, code examples, and additional tips that will help you implement this successfully.
Tired of manually creating invoices? This guide shows you exactly how to create Stripe invoices with n8n, transforming your billing from a tedious chore into a seamless, automated workflow. Boyce here, and if you’re looking to connect your project management tool (like ClickUp) directly to Stripe, you’ve found the definitive tutorial. We’re going to build a powerful system that automatically generates and sends a professional Stripe invoice the moment you update a task status. Forget copy-pasting and costly mistakes; let’s build an invoicing machine that works for you!
Table of Contents
Open Table of Contents
- TL;DR
- Why Automate Your Invoicing System?
- Essential Tools for Automated Invoicing
- Setting Up Your CRM for Automated Invoicing
- Connecting ClickUp to n8n: The Trigger Setup
- Implementing Conditional Logic for Invoice Generation
- Retrieving Task Details from ClickUp for Invoice Data
- Creating a Stripe Customer via n8n
- Generating Stripe Invoices with Detailed Line Items
- Handling Dates and Unix Epoch Conversion in Invoicing
- Sending Invoice by Email and Internal Notifications
- Advanced Automation: Recurring Invoices and Beyond
- Troubleshooting Common n8n and Stripe Integration Issues
- Key Takeaways: Mastering Automated Invoicing
- Future-Possibilities of Your Financial Automations
- Ready to Transform Your Invoicing?
- Final Summary
- Frequently Asked Questions (FAQ)
- Q: What is Unix epoch time and why does Stripe use it?
- Q: Can I use n8n to automatically send the invoice email to the client after it’s created in Stripe?
- Q: What happens if the ‘Project Cost’ in ClickUp is not a number?
- Q: How do I switch from Stripe’s test mode to live mode?
- Q: Can n8n handle different currencies for invoices?
TL;DR
- Objective: Automate Stripe invoicing from ClickUp using n8n to reduce manual effort and errors.
- Step 1: Configure CRM: Set up your CRM (e.g., ClickUp) with ‘Project Cost’, ‘Status’, and ‘Client Email’ fields .
- Step 2: Connect ClickUp to n8n: Use the ‘ClickUp Trigger’ node in n8n. Select ‘On Task Status Updated’ and link to your ClickUp task list ID .
- Step 3: Integrate Stripe API: Use n8n’s HTTP Request node to interact with the Stripe API for customer and invoice creation . Ensure Stripe test mode is active for safe testing .
- Verification: Check your Stripe dashboard under ‘Invoices’ for newly created invoices and status changes (e.g., ‘Open’ after sending) .
- Risk: Incorrect API keys or data mapping can lead to failed invoices; always test in Stripe’s test mode first .
This guide outlines a method to automate Stripe invoicing, integrating n8n with ClickUp to streamline financial operations. This setup aims to significantly reduce manual invoicing time, enhance accuracy, and seamlessly connect your CRM with payment processing. By following these instructions, businesses can minimize costly errors and free up valuable resources previously spent on repetitive administrative tasks.
Automated invoicing allows for efficient management of financial operations, as seen in dashboard views of pending invoices.
Why Automate Your Invoicing System?
Manual invoicing processes often consume considerable time and are prone to human error, leading to financial discrepancies and delayed payments. Automating this system through an integration platform like n8n, combined with a robust payment gateway like Stripe, offers significant strategic advantages. These include substantial time savings, reduced operational costs, enhanced accuracy in billing, and improved cash flow management. An automated system ensures invoices are sent promptly and correctly, fostering better client relationships and financial stability.
Automated invoicing eliminates the need for manual data entry, reducing the probability of errors in amounts, dates, and client details. This precision directly translates to fewer disputes and faster payment cycles. Furthermore, by automating routine tasks, staff can focus on more strategic activities, increasing overall productivity and efficiency within the finance department. The system’s ability to integrate with existing CRMs ensures that sales and project data seamlessly transition into billing without manual intervention, providing an end-to-end management solution.
Essential Tools for Automated Invoicing
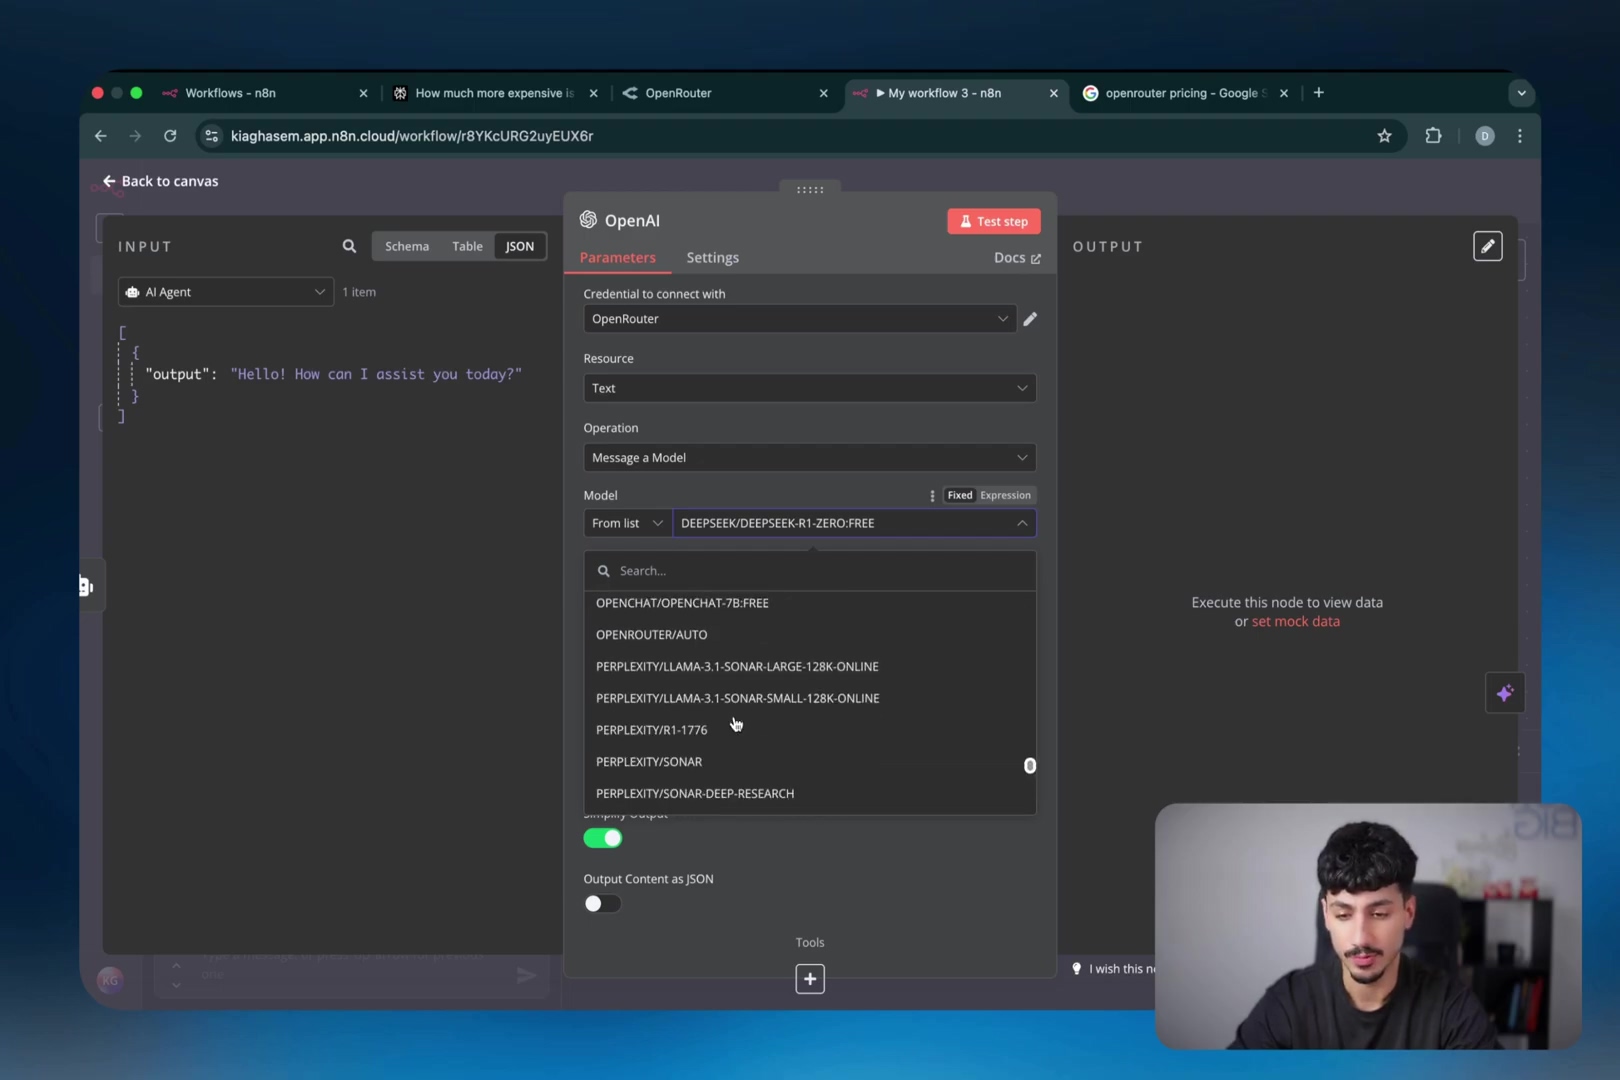
An effective automated invoicing system relies on the seamless integration of several key platforms. At its core, n8n acts as the workflow orchestrator, connecting various applications and automating the flow of information. Stripe serves as the payment gateway, handling all aspects of payment processing, from customer creation to invoice generation and collection. For client management and triggering automation events, a Customer Relationship Management (CRM) system such as ClickUp, Monday, or HubSpot is essential .
- n8n: An open-source workflow automation platform that allows users to connect applications, manipulate data, and automate complex tasks without extensive coding knowledge. It facilitates the creation of custom workflows that respond to specific triggers, making it ideal for automating invoicing processes based on CRM events. You can learn more about n8n here: n8n.io
- Stripe: A comprehensive platform for online payments, offering robust API capabilities for managing customers, creating invoices, handling subscriptions, and processing transactions. Its flexibility makes it a powerful backend for automated billing solutions. Explore Stripe’s offerings at: stripe.com
- ClickUp (or similar CRM): Used for managing client projects and tracking their status. It stores critical information like project costs, client email addresses, and project status, which serve as triggers and data sources for the n8n automation. Discover ClickUp’s features at: clickup.com
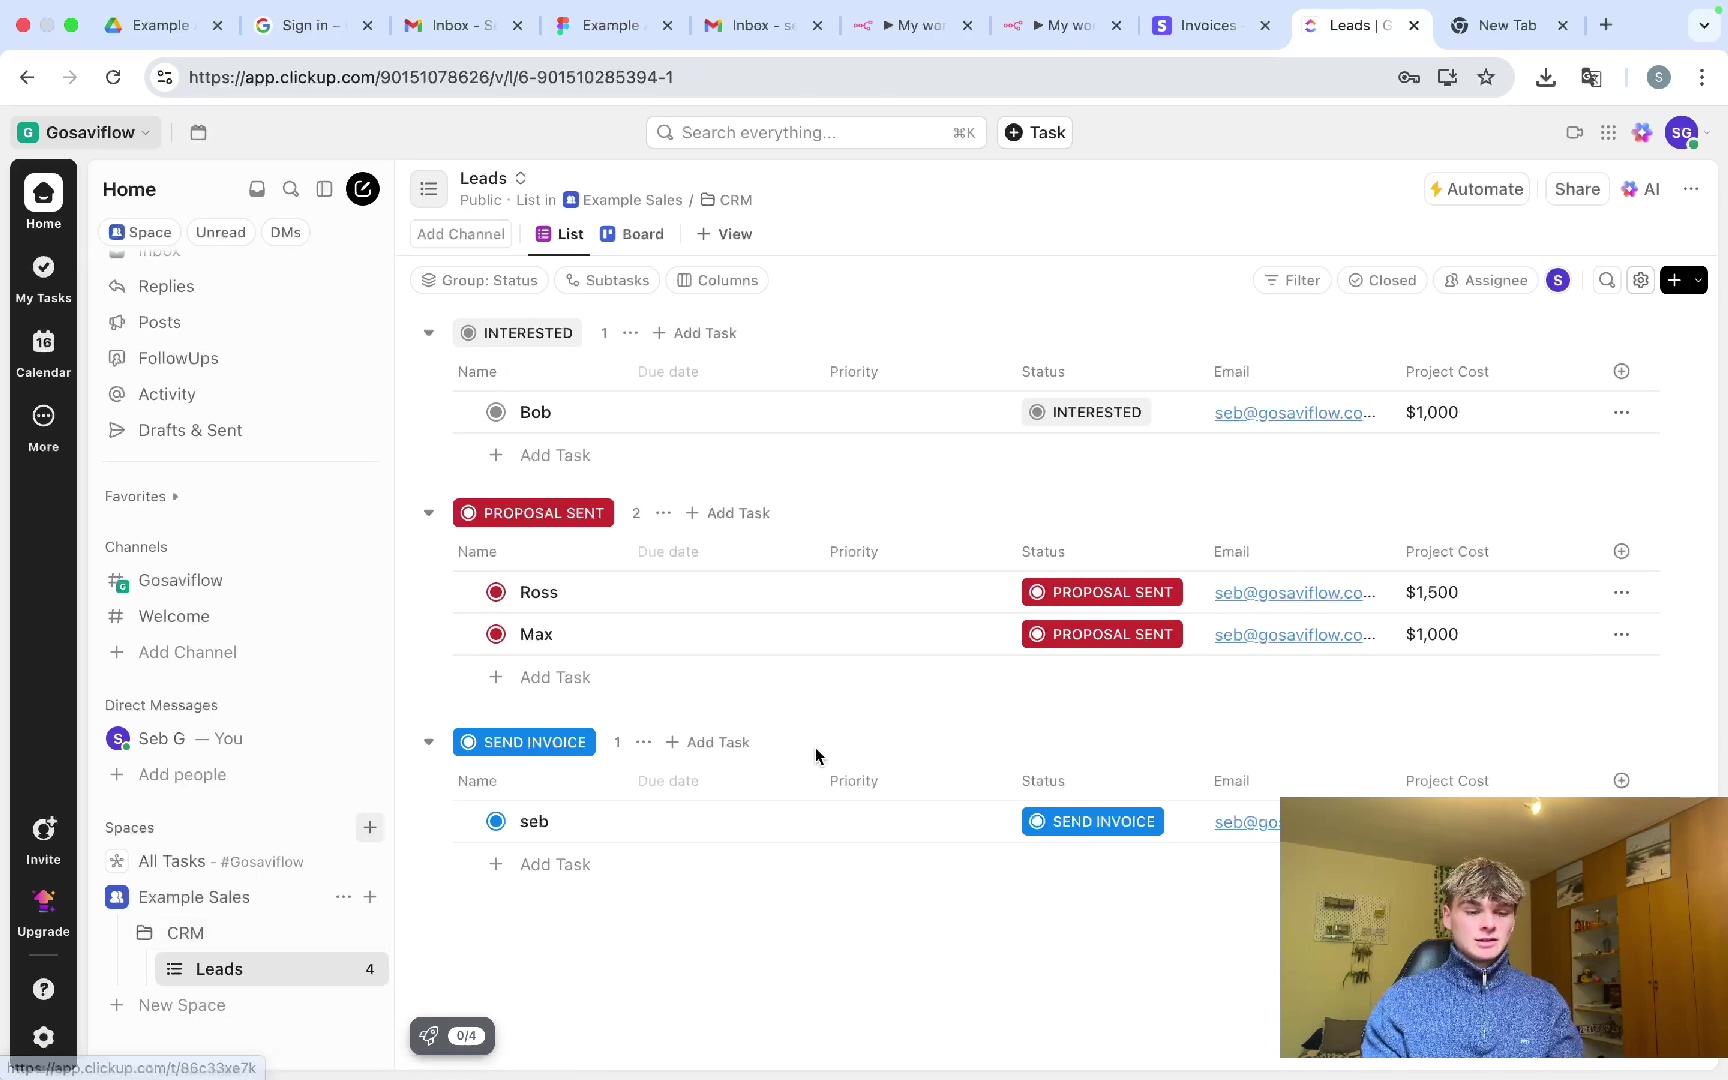
Initiating the invoicing process often depends on a status change within ClickUp’s task management interface, where a ‘Send Invoice’ status can trigger the automation.
The task details within ClickUp, such as ‘Project Cost’ and ‘Status’, are critical inputs for the automation workflow.
Setting Up Your CRM for Automated Invoicing
To prepare your CRM (e.g., ClickUp) for automated invoicing, it is crucial to configure specific fields that will store the necessary data for invoice generation. Think of these fields like setting up specific columns in a spreadsheet – they centralize critical client and project information, ensuring that n8n can accurately retrieve and utilize it to create Stripe invoices.
- Define Key Data Fields: Within your ClickUp task or project template, create custom fields for essential data points. These typically include:
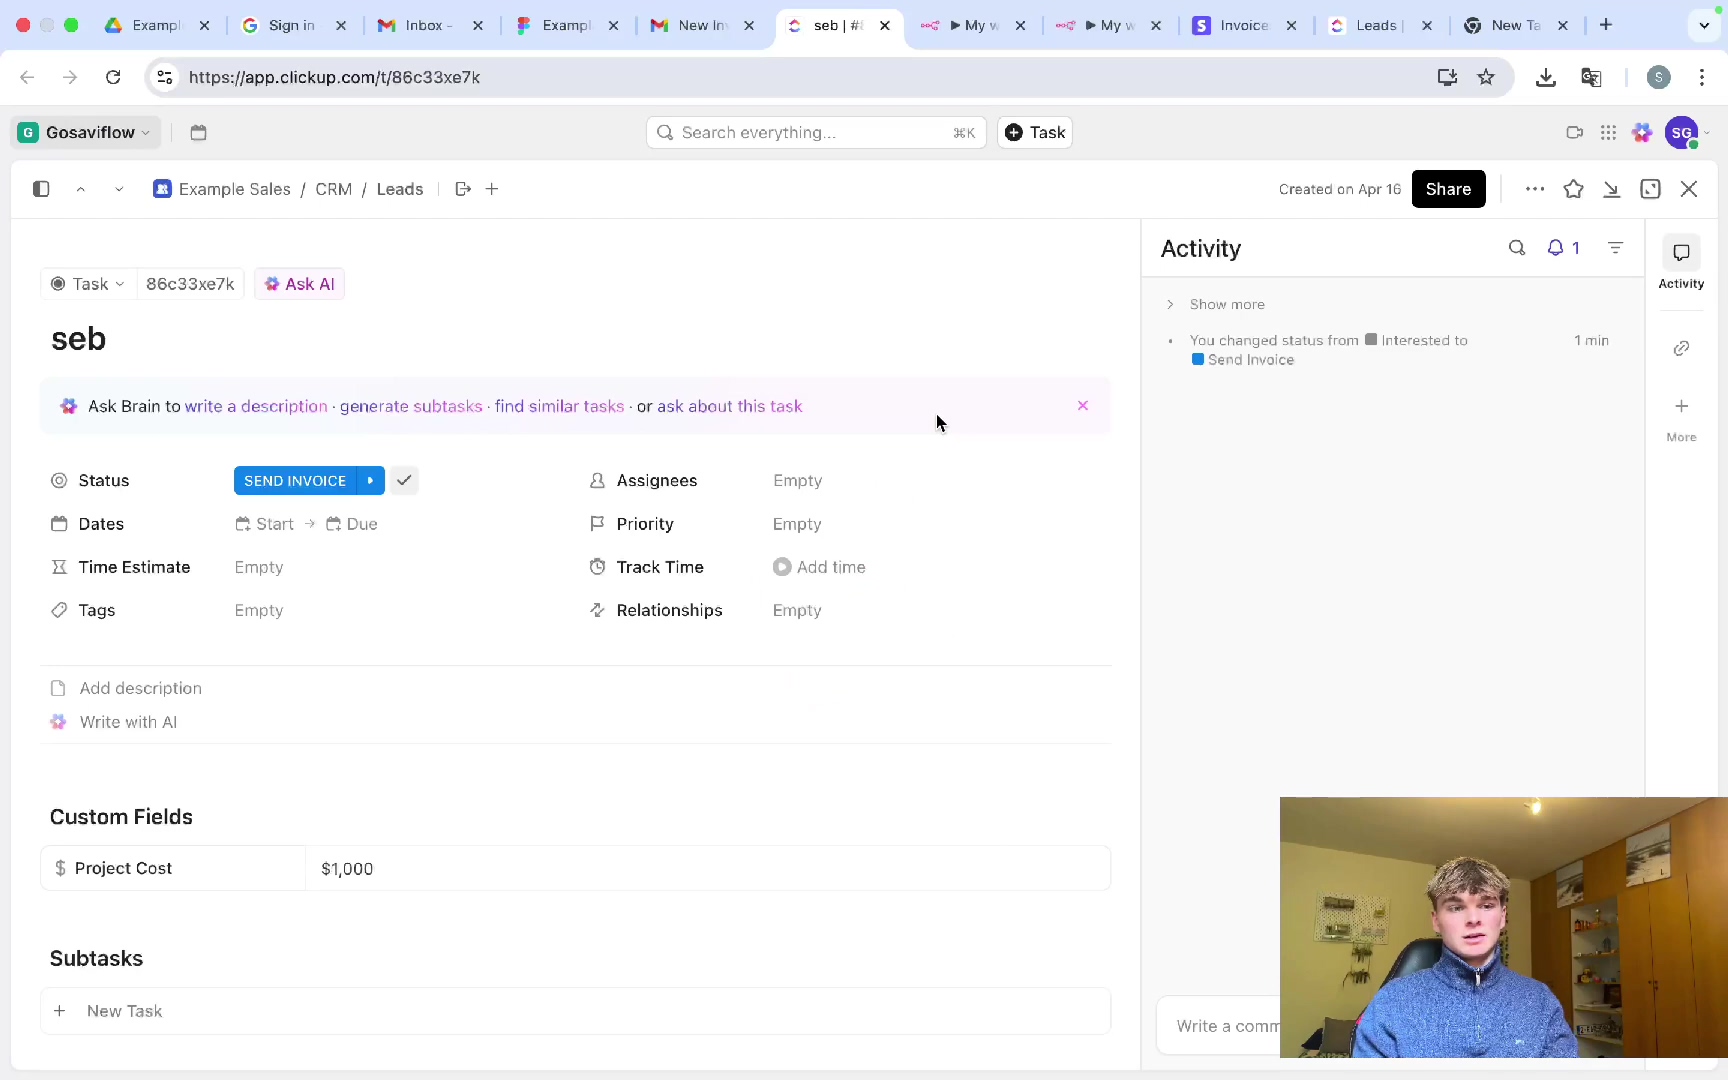
- ‘Project Cost’ (e.g., a number field to specify the amount to be invoiced). This is where you’ll input the exact dollar amount.
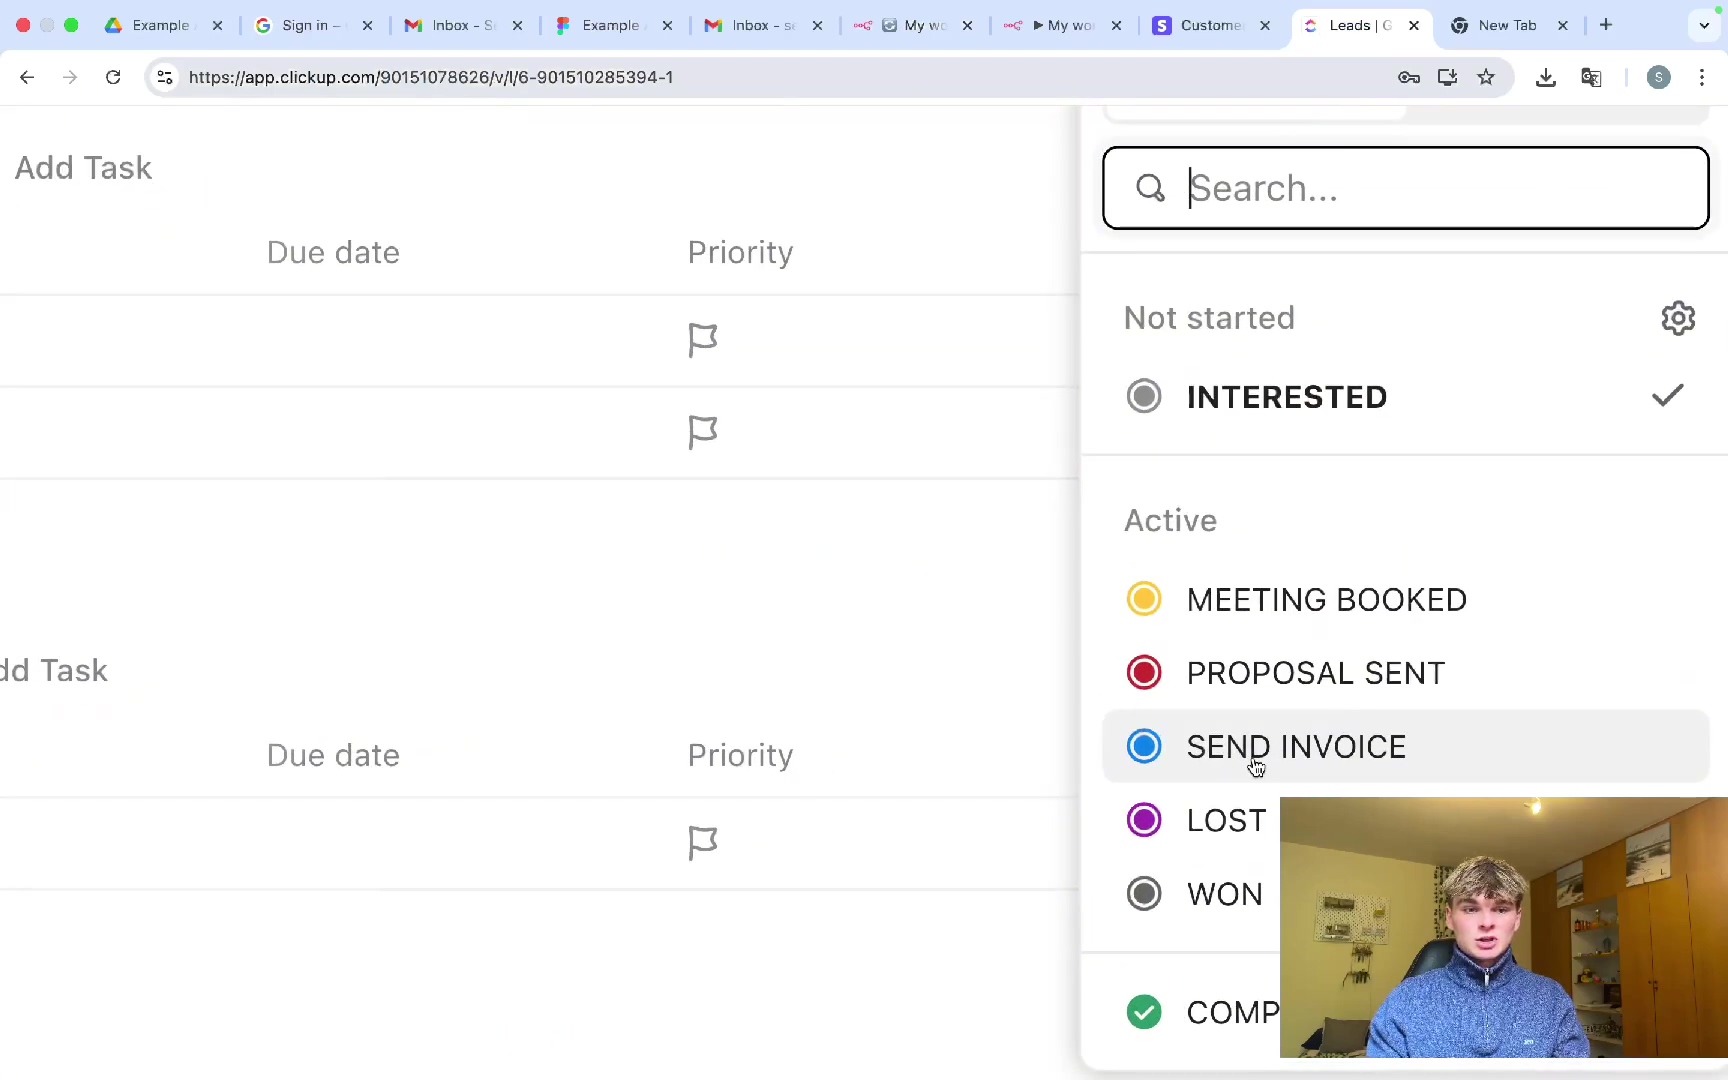
- ‘Status’ (e.g., a dropdown or text field with options like ‘Interested’, ‘Meeting Booked’, ‘Send Invoice’, ‘Invoiced’). This field will serve as the primary trigger for the automation. When this status is set, n8n knows it’s time to act!
- ‘Client Email’ (e.g., an email field to capture the recipient’s address for the invoice). Make sure this is the correct email where the invoice should be sent.
- Populate Client Data: Ensure that each client’s task or project entry in ClickUp contains accurate and complete data for these newly created fields. For instance, input the exact project cost and the client’s email address into their respective fields. Garbage in, garbage out, as they say!
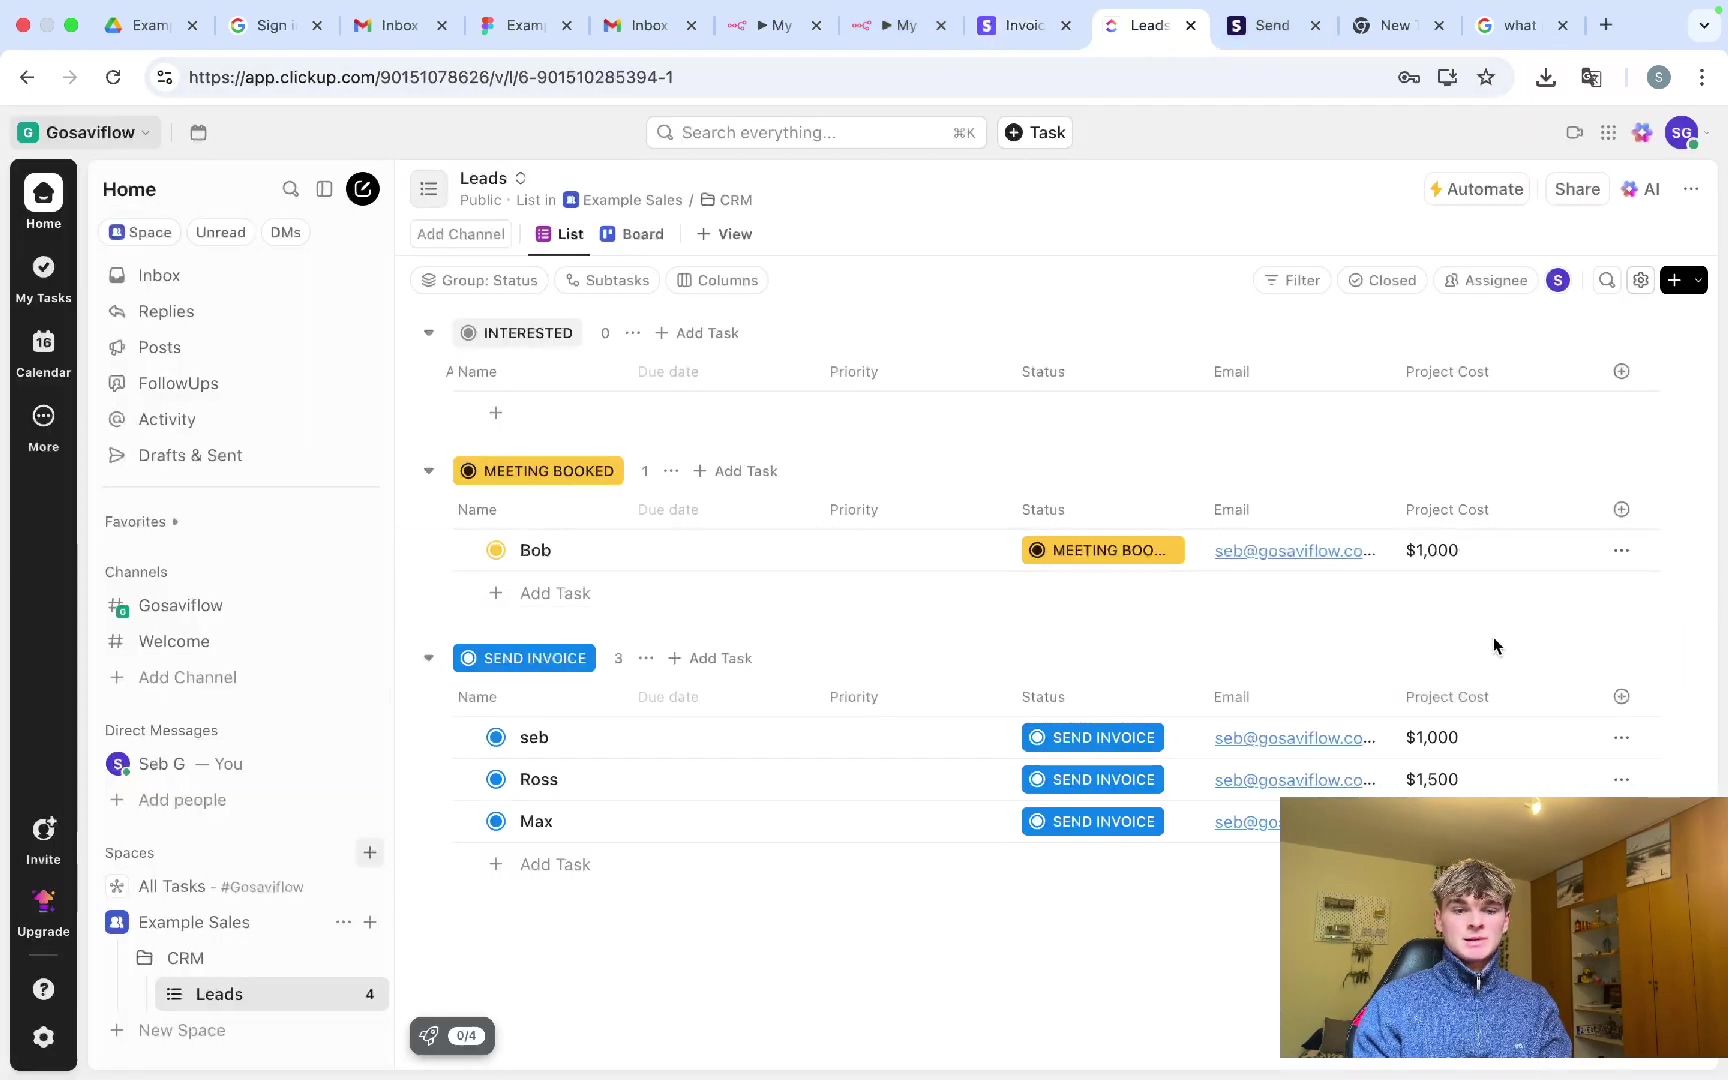
Properly configured CRM fields provide the foundation for a seamless automation flow, ensuring that all necessary information is readily available when n8n needs to generate an invoice. This step is fundamental to preventing errors and maintaining data consistency. The ClickUp Leads list demonstrates how these custom fields for status, email, and project cost are organized for various clients.
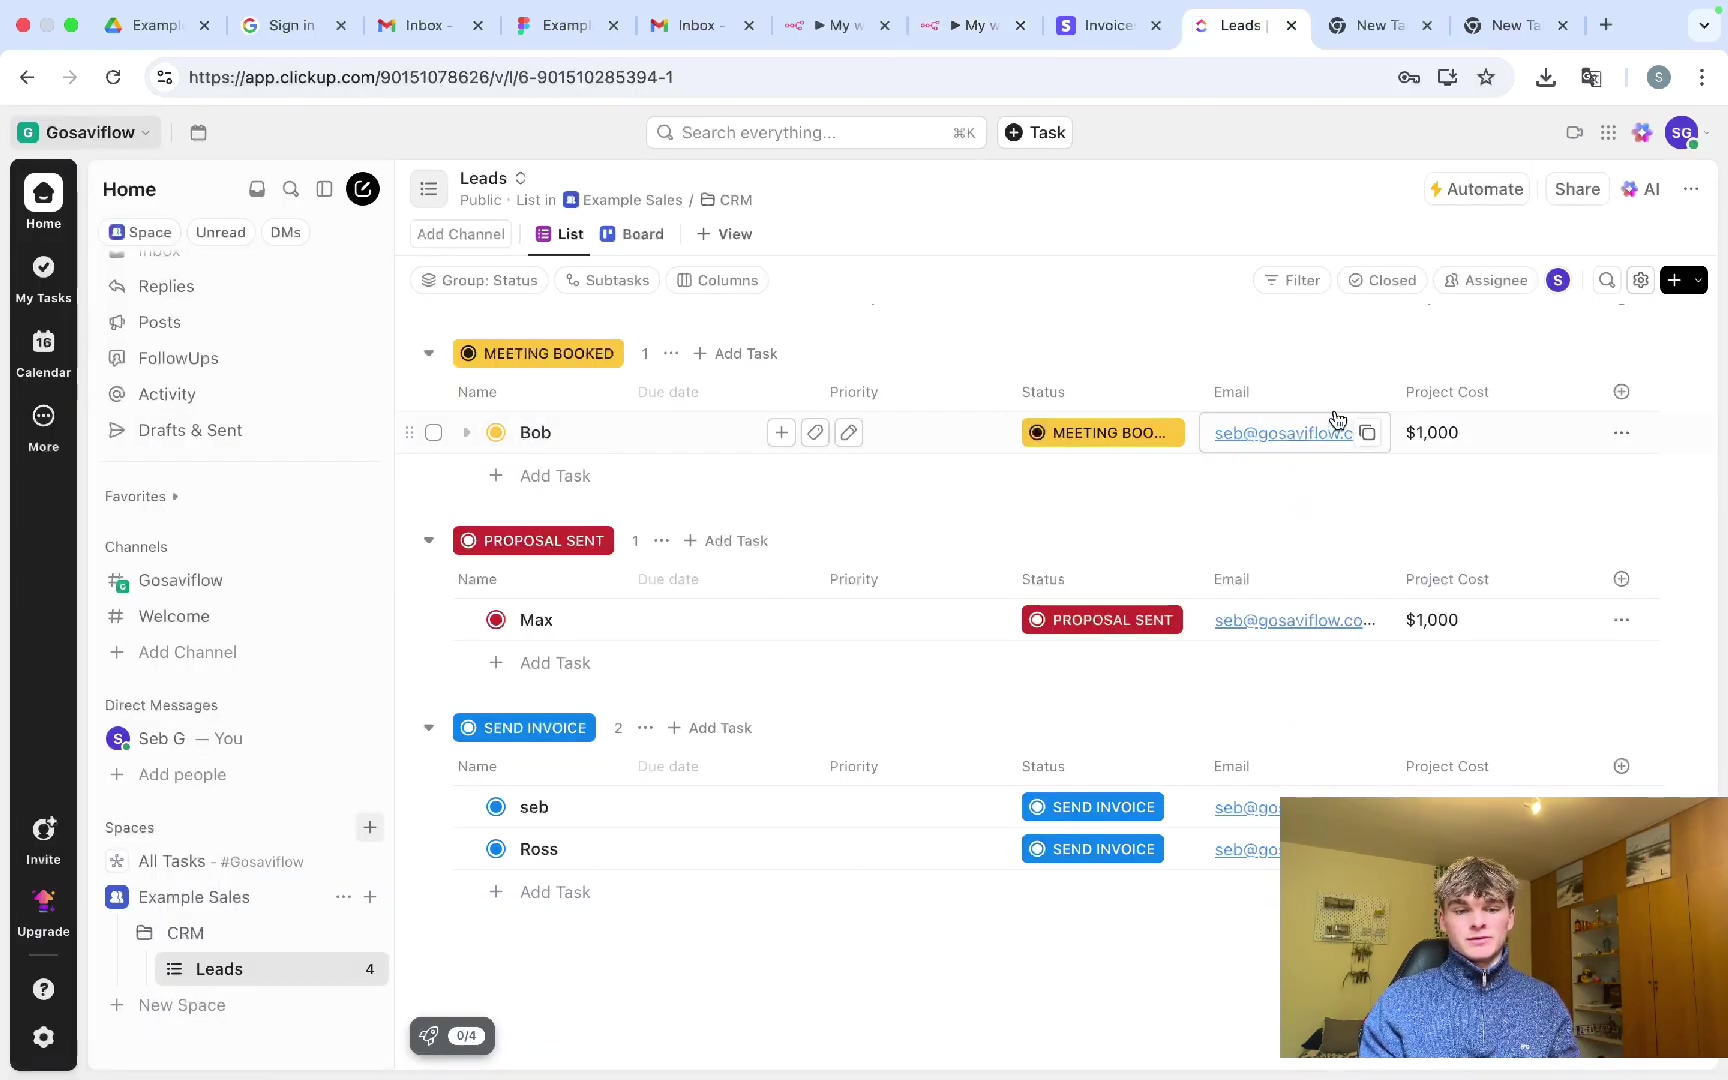
Monitoring ClickUp task lists, such as ‘Leads’, for changes in status or other custom fields is essential for triggering the automated invoicing process.
Connecting ClickUp to n8n: The Trigger Setup
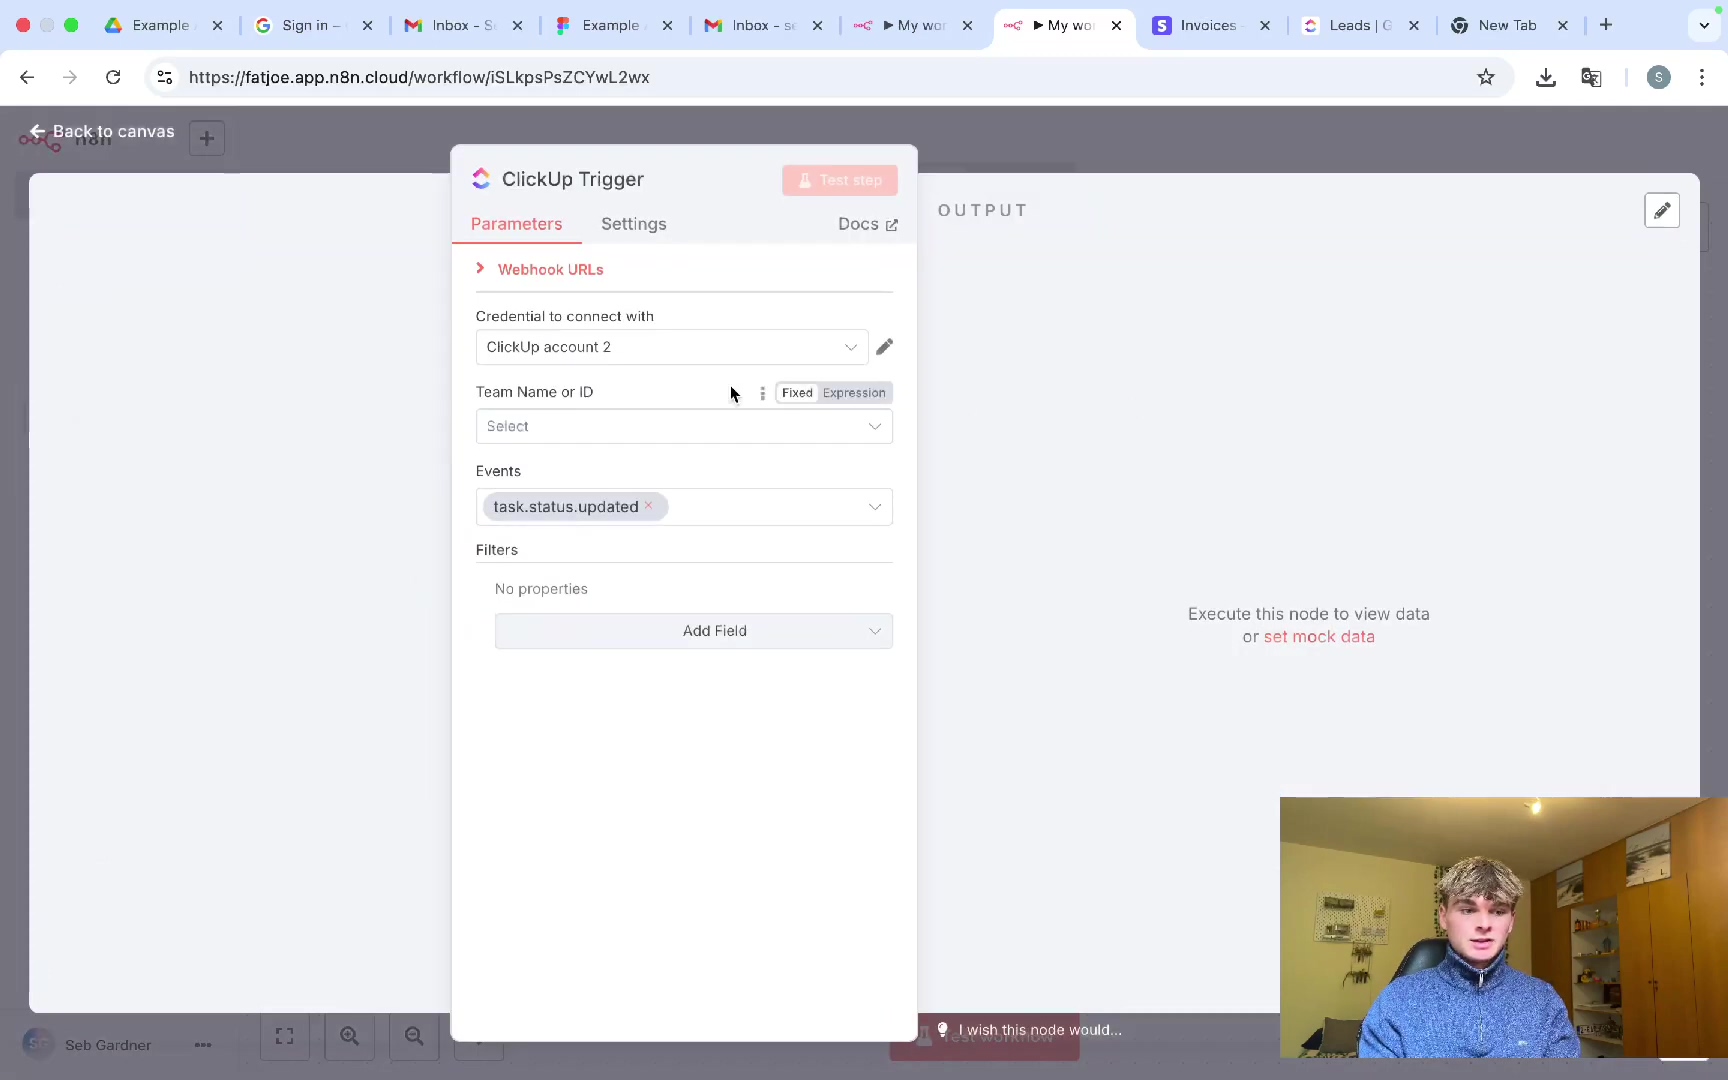
The first step in automating your invoicing workflow is to establish a connection between ClickUp and n8n, allowing n8n to monitor specific events in your CRM. This involves configuring a ‘ClickUp Trigger’ node in n8n to listen for status updates in your designated ClickUp task list. It’s like setting up a listener that waits for a specific signal!
- Add ClickUp Trigger Node: In your n8n workflow editor, search for and add a ‘ClickUp Trigger’ node. From the available event types, select ‘On Task Status Updated’. This tells n8n to pay attention whenever a task’s status changes.
- Connect ClickUp Account: If you haven’t already connected your ClickUp account to n8n, you’ll need to do that now. Click ‘Connect Account’ and follow the prompts. This usually involves authorizing n8n to access your ClickUp workspace, and it only takes a few seconds.
- Specify Space Name: To make sure n8n isn’t monitoring every task in your entire ClickUp account, choose the appropriate ClickUp space name from the dropdown menu. This helps narrow down the scope.
- Retrieve List ID: To ensure the trigger only watches for changes in a specific task list (like your ‘Leads’ list), you need its unique List ID. Here’s how to find it: Navigate to your desired list in ClickUp. Click the three dots next to the list name, select ‘Copy link’, and paste the URL into a new browser tab. The string of characters at the end of the URL, usually after
/list/, is your List ID. It’s a unique identifier for that specific list. - Input List ID: Paste the copied List ID into the ‘List ID’ field within the n8n ‘ClickUp Trigger’ node. This is how n8n knows exactly which list to watch.
- Test the Trigger: To verify the connection, save your workflow and then run it. Go back to ClickUp and change the status of a task within the list you’re monitoring (e.g., from ‘Interested’ to ‘Meeting Booked’). If everything is set up correctly, n8n should capture this event and display the updated task data. This confirms that the trigger is correctly integrated and listening!
This setup ensures that n8n actively monitors your ClickUp tasks, ready to initiate the invoicing process when a defined status change occurs. The ClickUp Trigger node configuration in n8n defines how status updates are monitored.
Implementing Conditional Logic for Invoice Generation
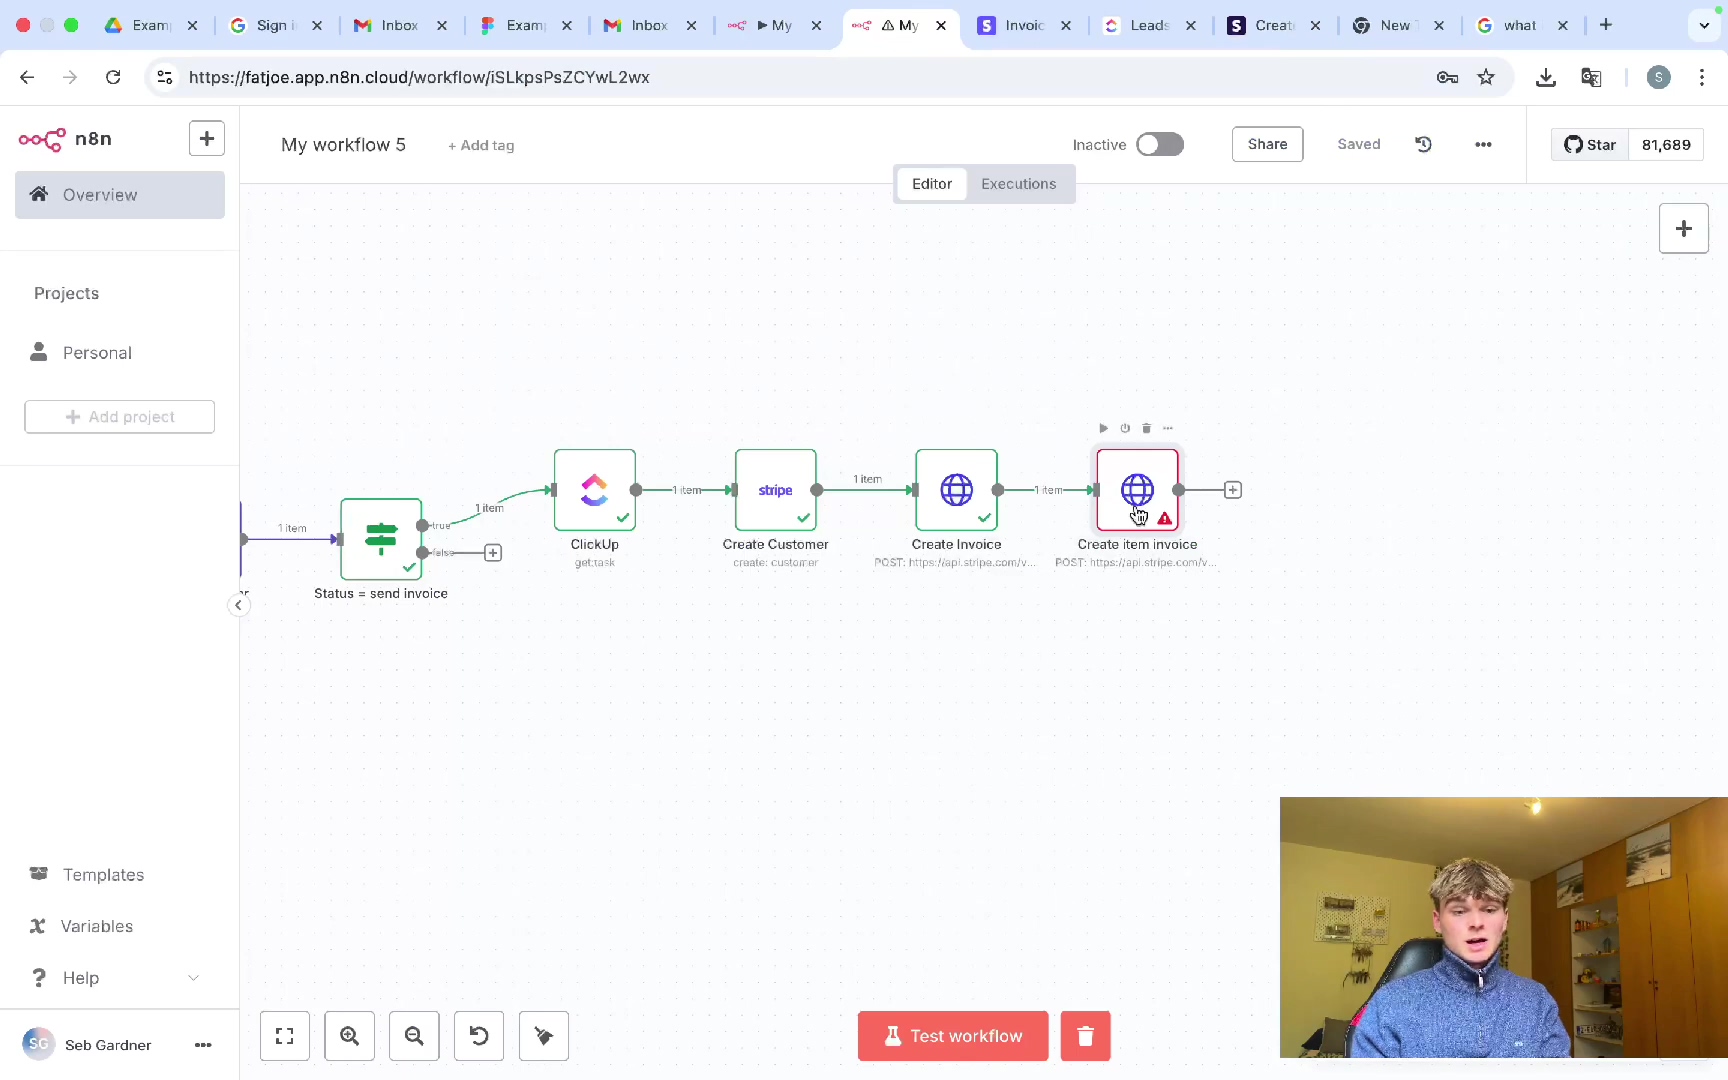
Implementing conditional logic within your n8n workflow is crucial to prevent premature or erroneous invoice generation. Think of this as a gatekeeper! An ‘If’ node ensures that an invoice is created only when a specific, predefined condition is met, typically a change in task status to ‘Send Invoice’. This prevents accidental invoices from being created when a task is just moving between other statuses.
- Add an ‘If’ Node: After your ‘ClickUp Trigger’ node (and potentially after a node that retrieves task details), add an ‘If’ node. This node will evaluate a condition before allowing the workflow to proceed down a specific path.
- Define the Condition: Configure the ‘If’ node to check if the ‘after’ status of the ClickUp task is exactly ‘Send Invoice’. You’ll do this by referencing the output of the ‘ClickUp Trigger’ node. The condition might look something like this in n8n:
{{ $json.current.status.status.after.status | lower }}. It’s super important to convert the status to lowercase using| lowerto avoid case sensitivity issues (likesend invoicevsSend Invoice). - Set Paths: The ‘If’ node will have two outputs: ‘True’ and ‘False’. Only connect your subsequent invoice generation nodes (like the Stripe nodes) to the ‘True’ path. If the status is not ‘Send Invoice’, the workflow will follow the ‘False’ path, and no invoice will be created. This keeps things tidy!
- Rename Node: For clarity, rename the ‘If’ node to something descriptive like ‘Status equals Send Invoice’. This makes your workflow easier to understand later.
This conditional gate guarantees that invoices are only generated when explicitly intended, adding a layer of control and accuracy to your automation. The n8n ‘If’ node configuration shows how conditions are defined, evaluating task status updates.

The overall n8n workflow demonstrates the sequential execution of nodes, including the ‘Status = send invoice’ trigger, ClickUp interaction, and Stripe customer/invoice creation.
Retrieving Task Details from ClickUp for Invoice Data
Once the conditional logic confirms that an invoice should be sent (meaning the ‘If’ node’s condition was true), the next step involves retrieving all the relevant task and client information from ClickUp. This data, such as project cost, client name, and email, is essential for populating the Stripe invoice accurately. It’s like gathering all the ingredients before you start cooking!
- Add ‘ClickUp Get a Task’ Node: Along the ‘True’ path of your ‘If’ node, add a ‘ClickUp Get a Task’ node. This node is specifically designed to fetch detailed information about a particular task.
- Provide Task ID: To retrieve the correct task details, you need to provide the ‘Task ID’. This can be dynamically pulled from the output of your initial ‘ClickUp Trigger’ node. You do this by dragging and dropping the task ID from the trigger’s output into the ‘Task ID’ field of the ‘Get a Task’ node. This tells the node exactly which task to fetch.
- Pin Data for Testing: For development and testing purposes, you can ‘pin’ the data from this node. This means n8n will use the last received data from this node even if the trigger doesn’t fire again. It’s super handy for repetitive testing without constantly changing task statuses in ClickUp.
- Verify Retrieved Data: Execute the ‘Get a Task’ node (or run the workflow with pinned data) and inspect its output. Verify that it successfully retrieves all the expected information, including the client’s name, email, and the project cost, which you configured in your CRM setup. Make sure the data looks correct!
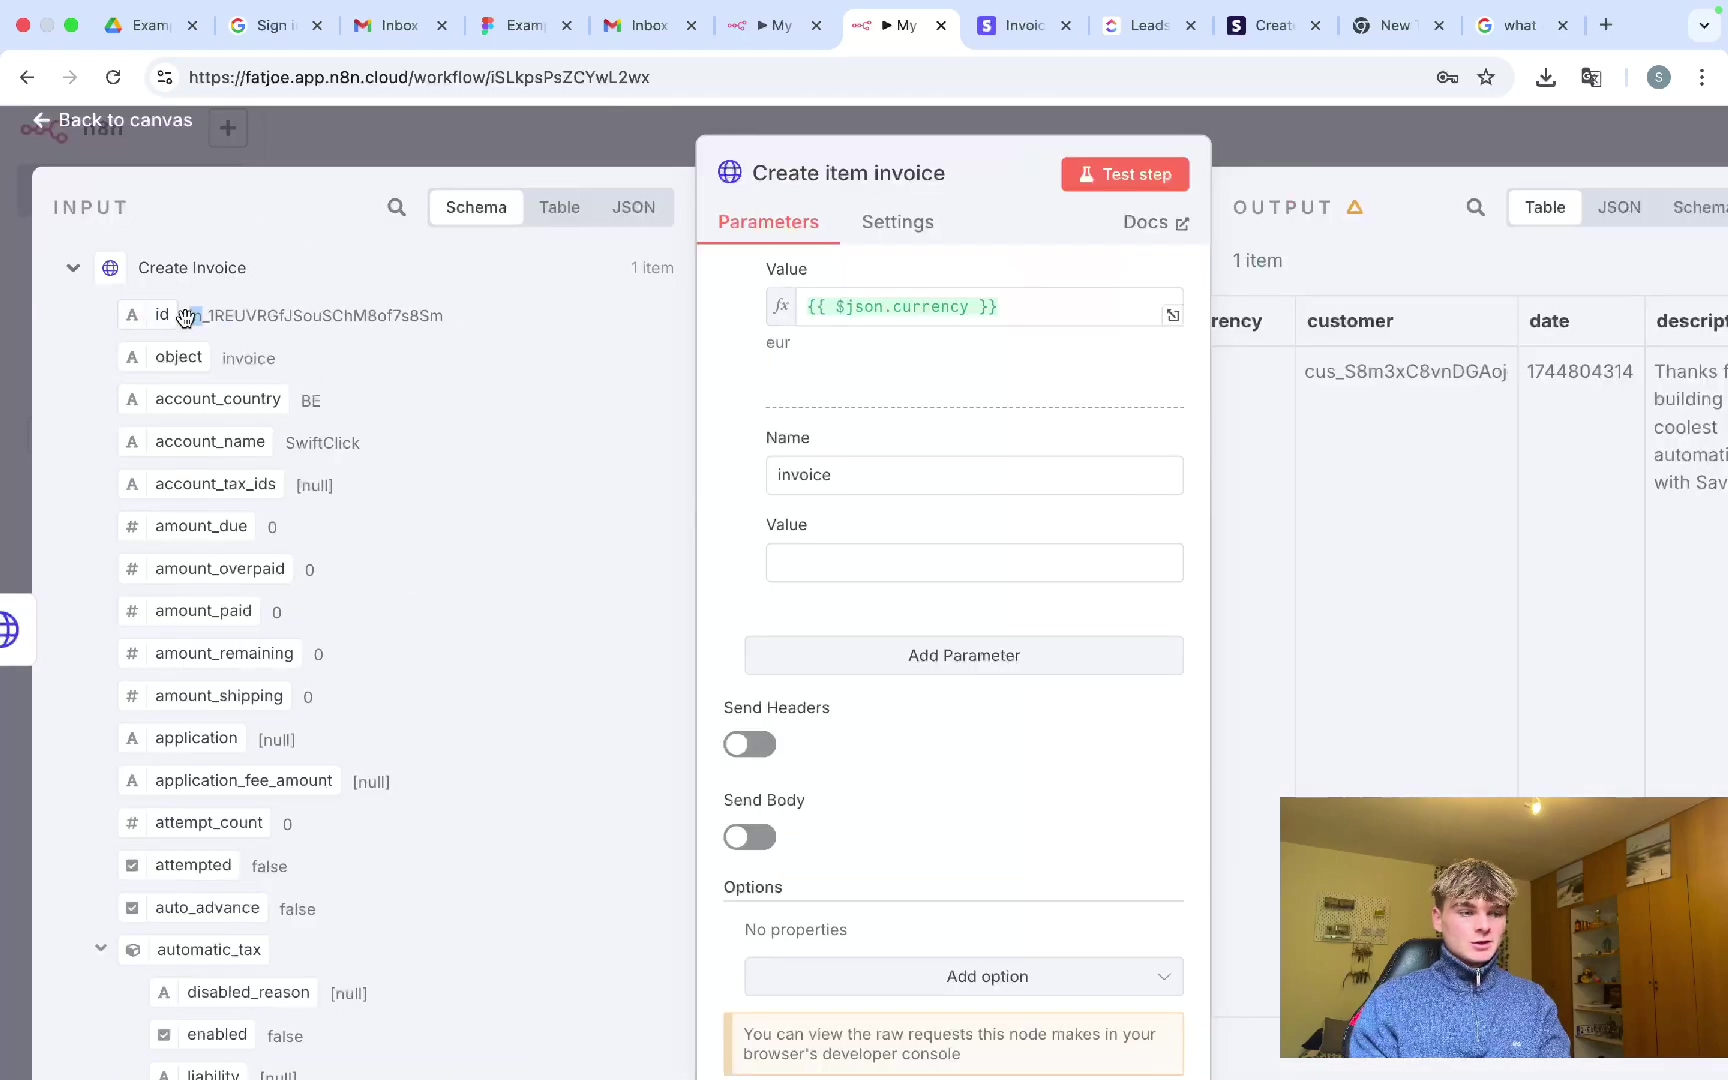
This ‘Get a Task’ node acts as a bridge, extracting all necessary data from ClickUp and making it available for subsequent nodes in the n8n workflow to use in building the Stripe invoice. The n8n interface for the ‘Create item invoice’ node displays input data sourced from previous steps, including task details.
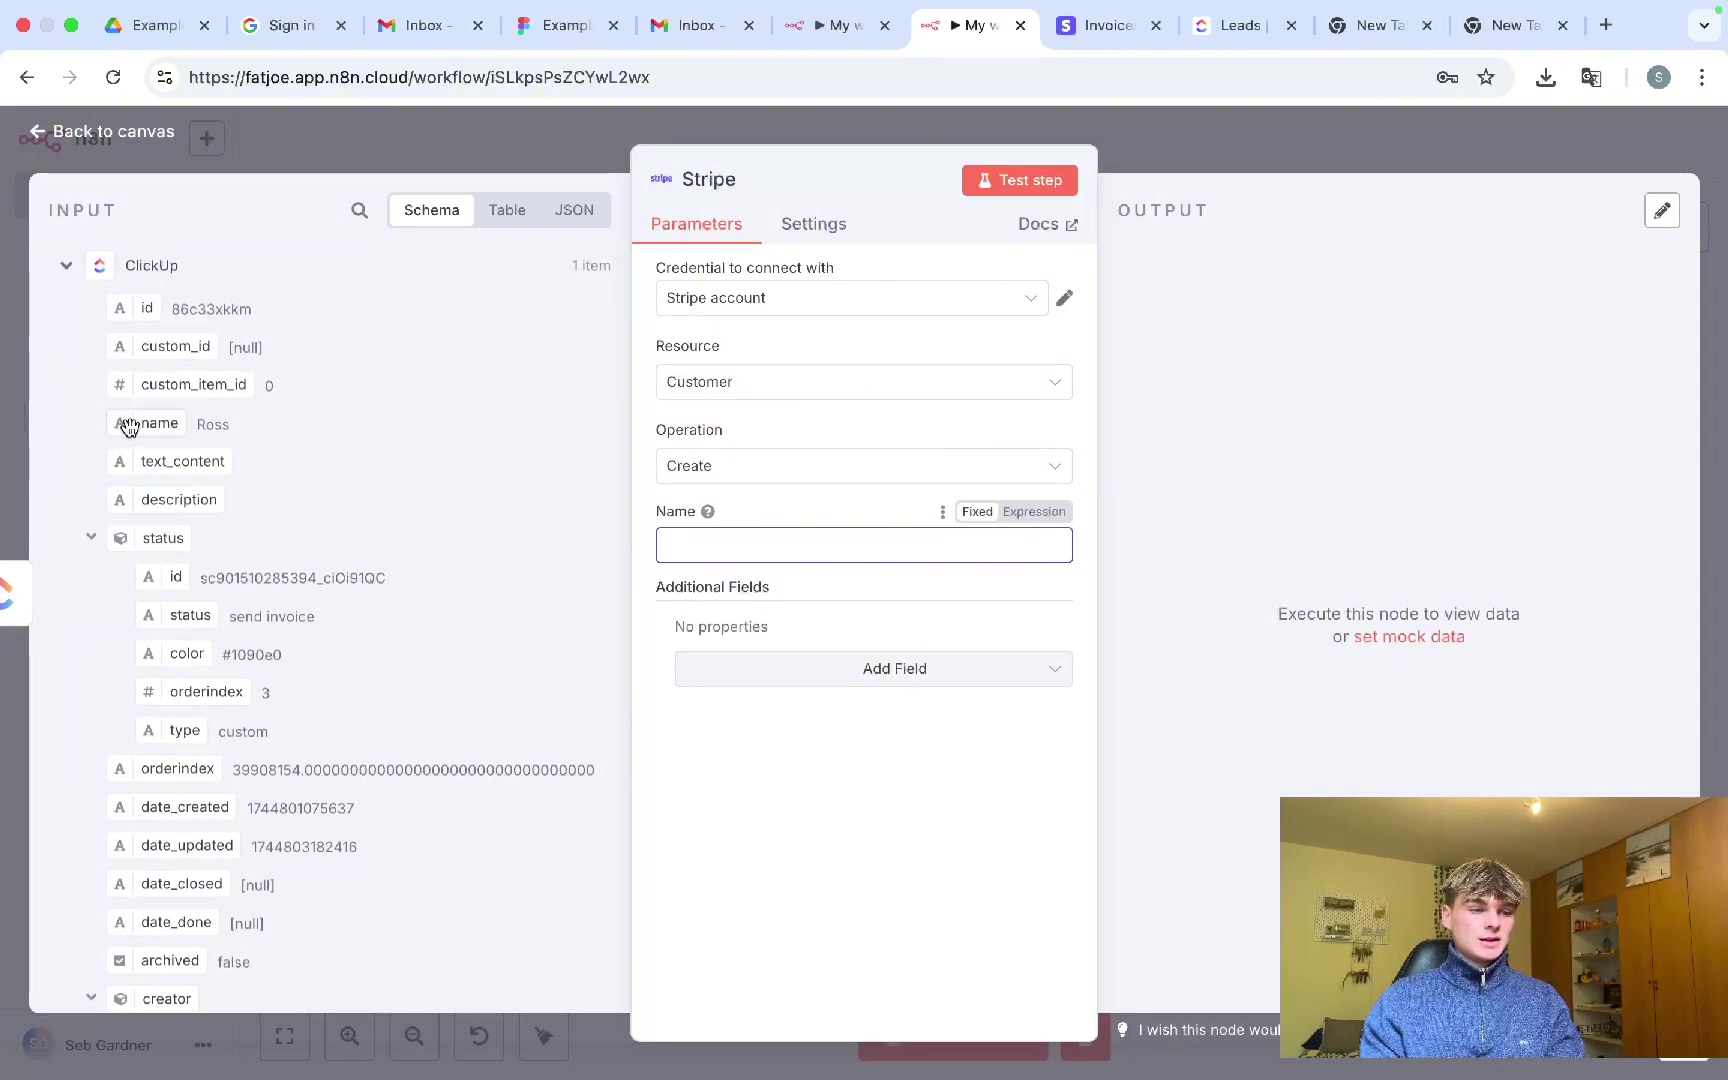
Creating a Stripe Customer via n8n
Before you can generate an invoice in Stripe, Stripe requires an associated customer record. This step involves using an n8n Stripe node to create a new customer in Stripe, dynamically populating their name and email from the data you just retrieved from ClickUp. It’s like adding the client to your Stripe address book.
- Add Stripe Node: After the ‘ClickUp Get a Task’ node, add a ‘Stripe’ node to your n8n workflow. You might need to search for it in the node selector.
- Connect Stripe Account: Authenticate your Stripe account. If prompted, select ‘Connect Account’. You’ll need to provide your Stripe secret key. You can find this in your Stripe Dashboard under ‘Developers’ > ‘API keys’. Crucially, ensure you are using a test mode secret key for initial setup and testing. This prevents you from accidentally creating real charges or invoices in your live Stripe account.
- Configure Operation: Set the ‘Operation’ for this Stripe node to ‘Create’. This action is specifically for creating a new customer record.
- Map Customer Details: This is where the magic happens! Dynamically map the customer’s name and email address from the output of the ‘ClickUp Get a Task’ node:
- For the ‘Name’ field, drag and drop the client’s name from the ClickUp task data output.
- For the ‘Email’ field, drag and drop the client’s email address from the ClickUp task data output.
- Optional Fields: Stripe allows for additional customer details like phone number, shipping address, or a description. If you have this information in ClickUp, you can map those fields here too!
After executing this node, a new customer record will be created in your Stripe account (in test mode), providing the necessary ‘Customer ID’ that you’ll need for the next step: invoice generation. The n8n Stripe node’s configuration demonstrates how customer name and email are mapped for creation.
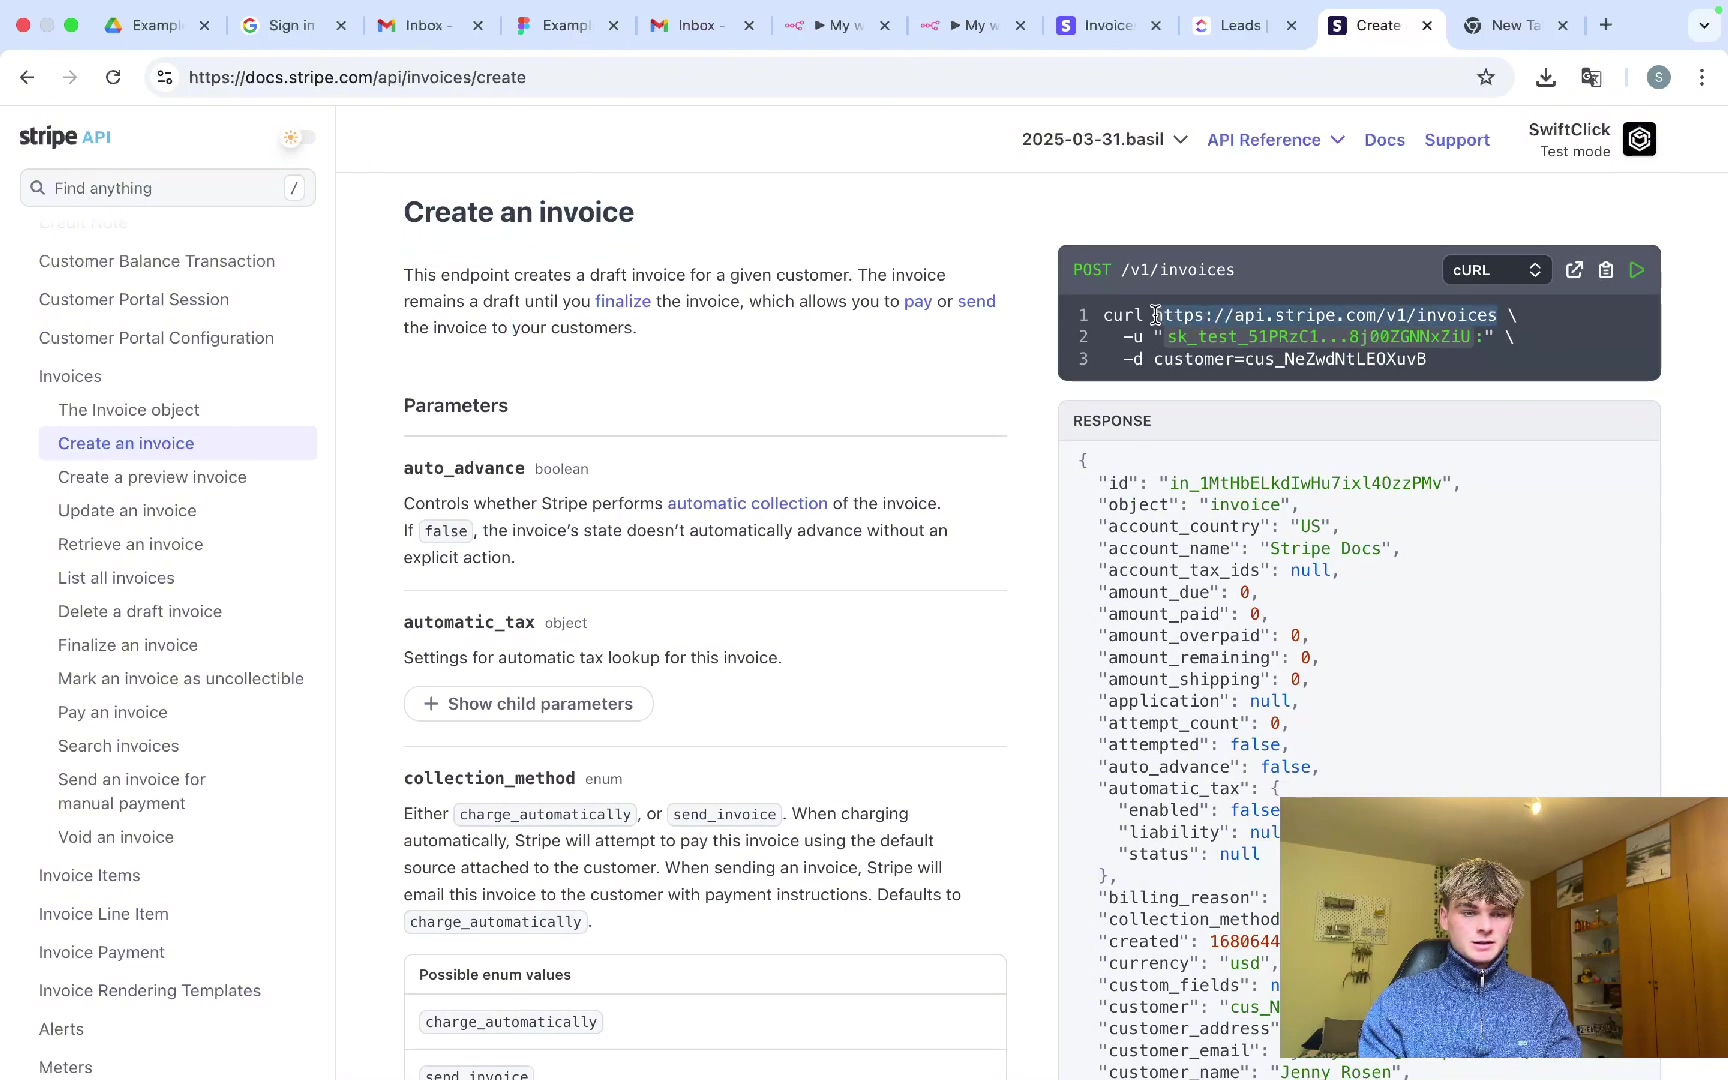
Generating Stripe Invoices with Detailed Line Items
Creating a detailed Stripe invoice involves multiple steps because n8n doesn’t have a single, all-encompassing node for invoice creation and itemization. Instead, we’ll use HTTP requests to interact directly with the Stripe API. This gives us precise control over all the invoice details, including dynamic line items and due dates. It’s like building the invoice piece by piece.
-
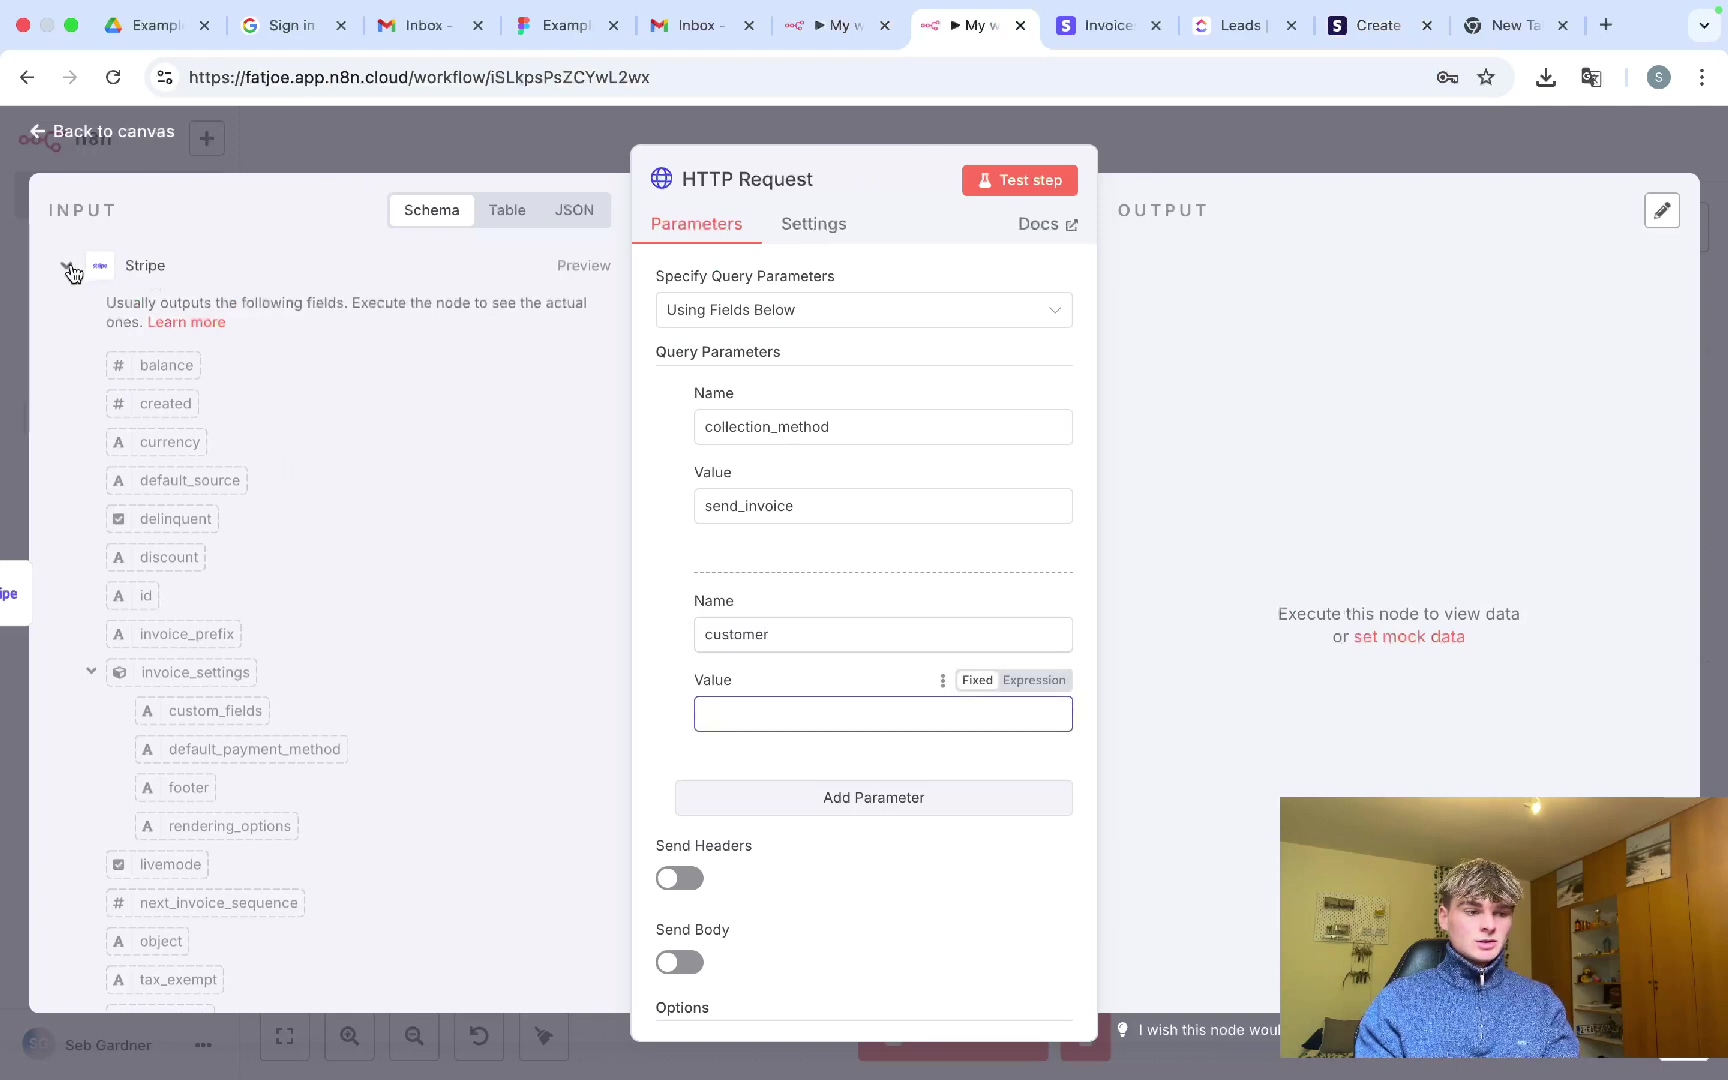
Create the Invoice (HTTP Request): a. Add HTTP Request Node: Add an ‘HTTP Request’ node to your workflow. Set its method to
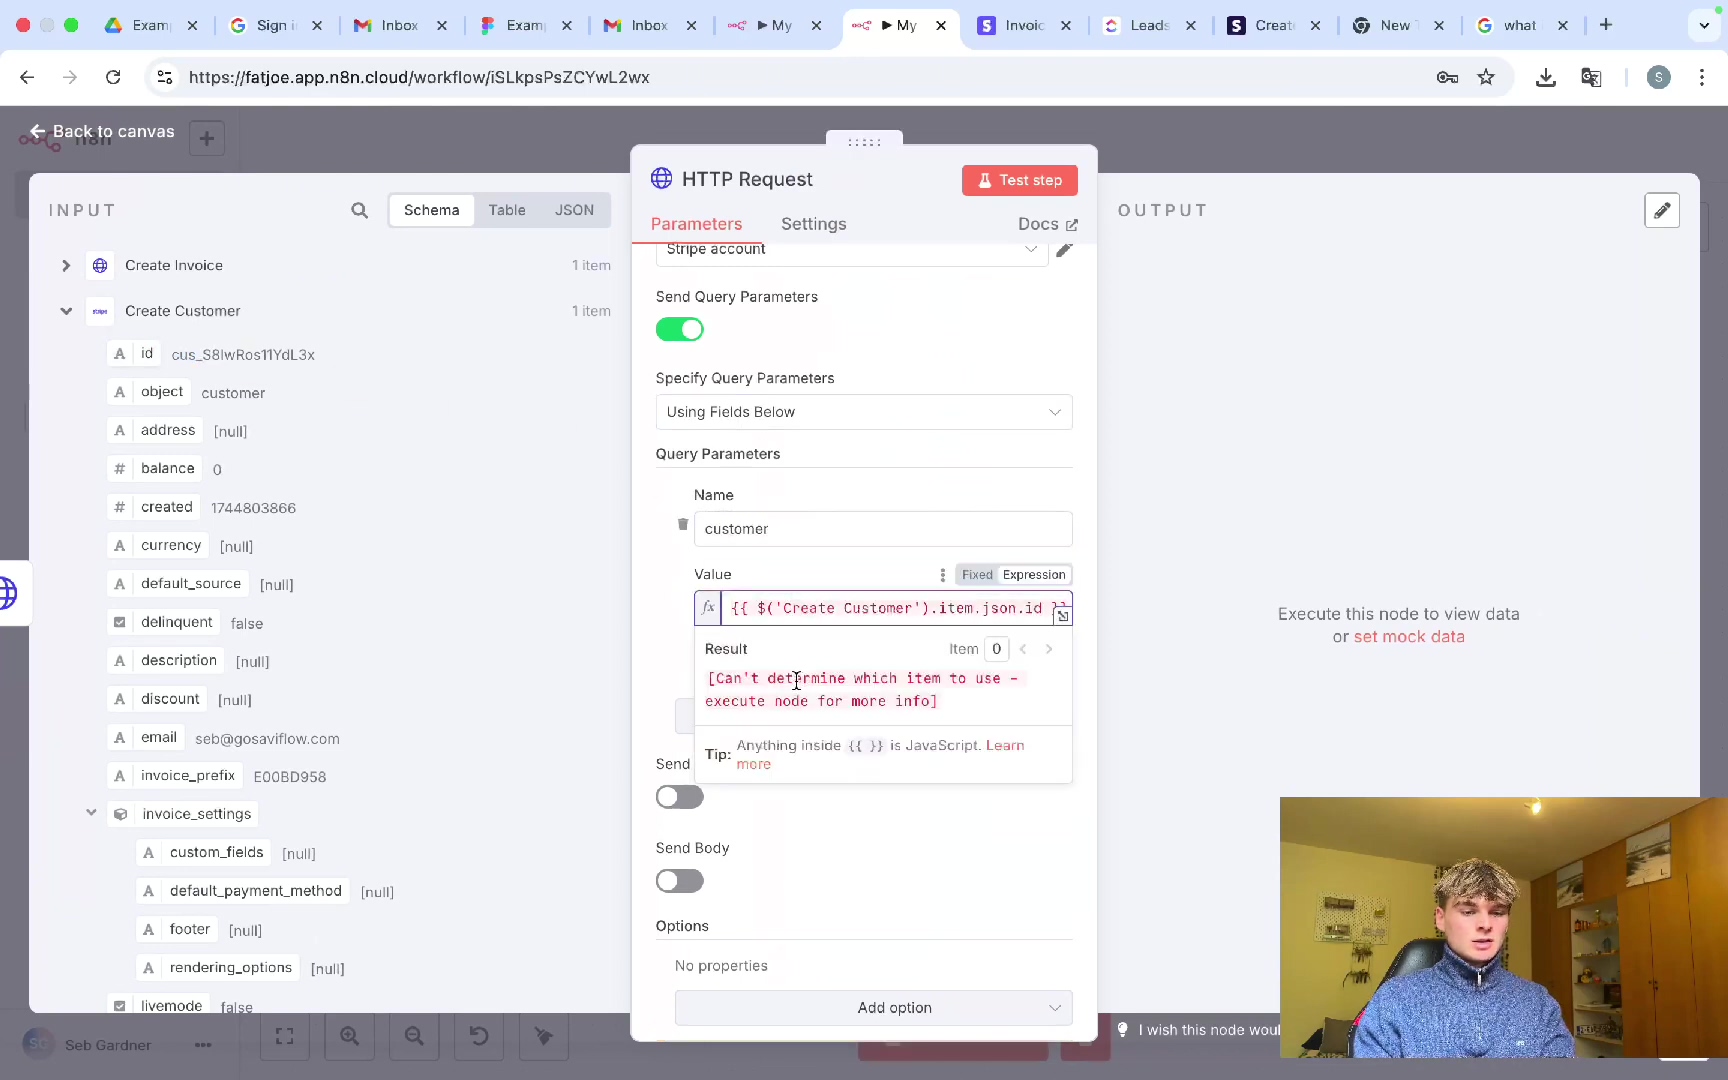
POSTbecause we are creating something new. b. Stripe API Endpoint: The specific URL we need to send this request to is the Stripe API endpoint for creating invoices:https://api.stripe.com/v1/invoices. c. Authentication: Select ‘Predefined Credential Type’ and choose your configured Stripe authentication. This uses the secret key you added earlier. d. Query Parameters: This is where we provide the details for the invoice. Add the following parameters: * collection_method: Set this tosend_invoice. This means the invoice will be created as a draft and you’ll need to send it manually later (or via another step). If you wanted Stripe to automatically charge the customer’s card on file, you’d usecharge_automaticallyinstead. * customer: This is crucial! Dynamically map the customer ID from the preceding ‘Stripe Create Customer’ node. This links the invoice to the customer we just created. * description: You can optionally add a general description for the invoice, like ‘Thanks for working with Savvy Flow’. * due_date: Stripe requires due dates in Unix epoch time. Don’t worry, n8n makes this easy! Use the n8n expression:{{ $('Today').toSeconds() + (7 * 24 * 60 * 60) }}. This expression calculates the current Unix epoch timestamp (seconds since Jan 1, 1970) and adds seven days worth of seconds to it, setting the due date for seven days from now. * footer: You can add a custom footer message that will appear at the bottom of the invoice. -
Create Invoice Items (HTTP Request): a. Add another HTTP Request Node: This node will add specific line items to the invoice we just created. Set its method to
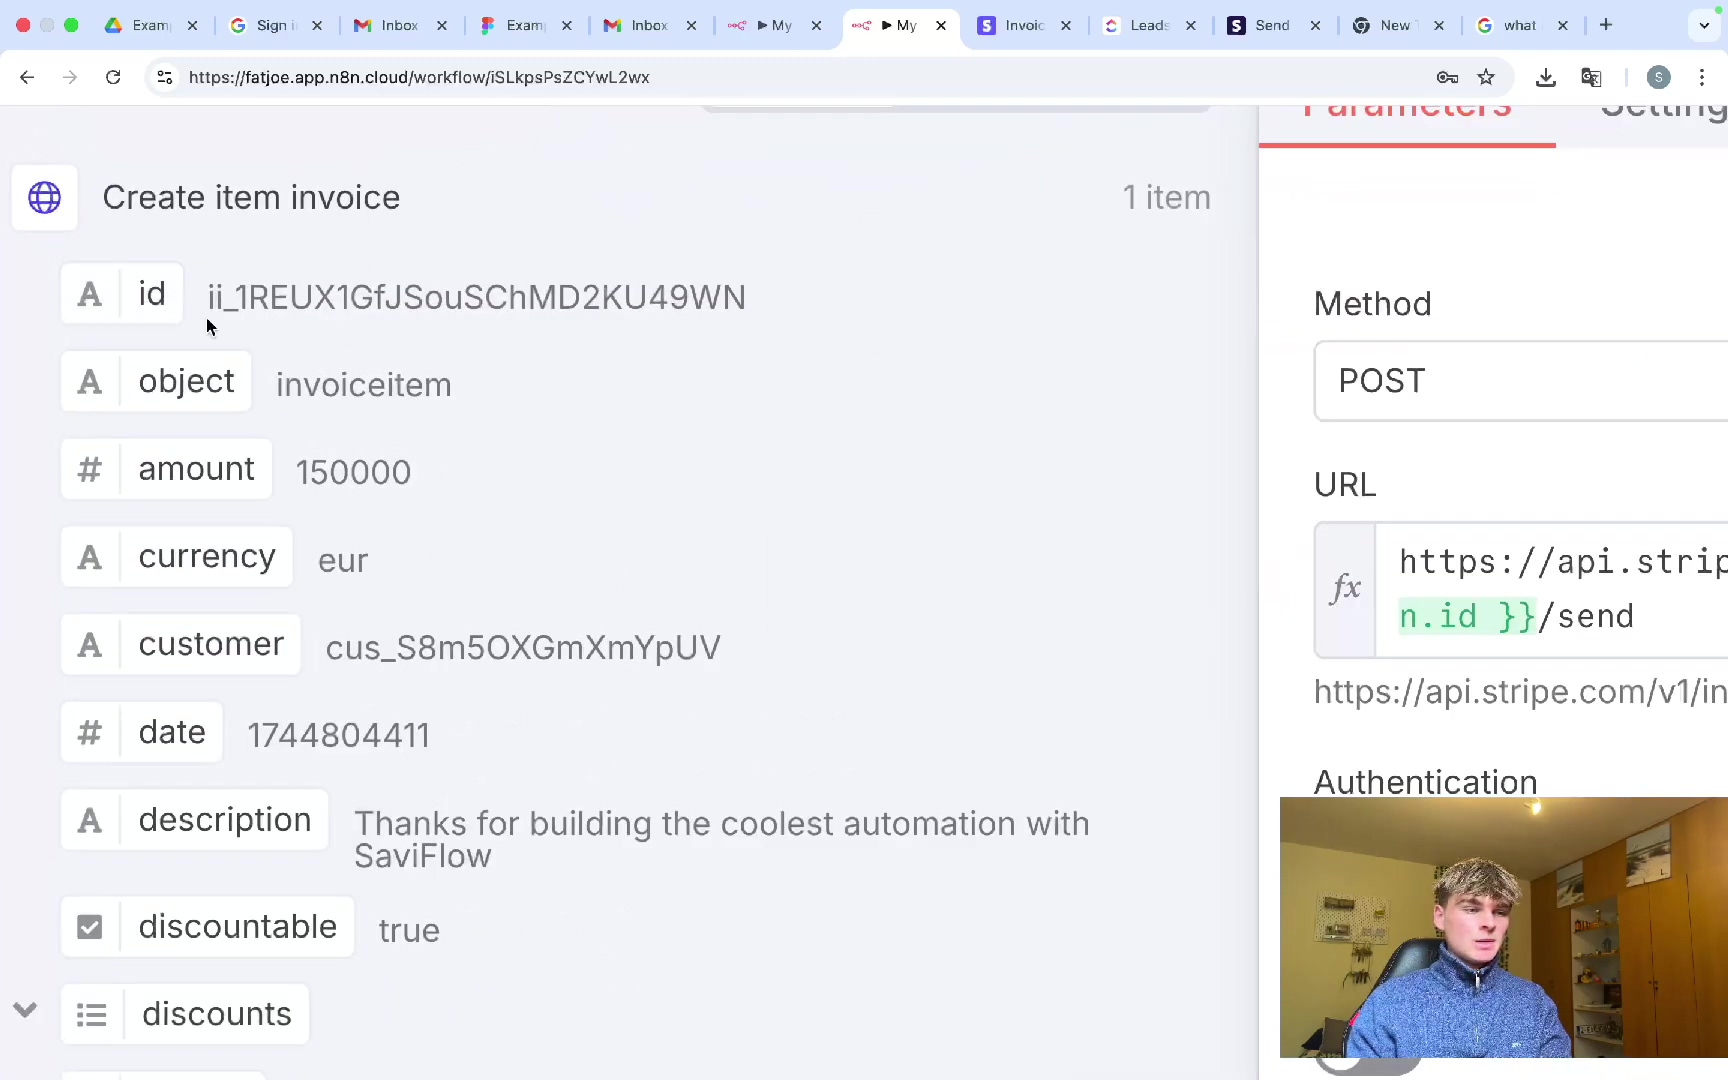
POSTagain. b. Stripe API Endpoint: The endpoint for creating invoice items is:https://api.stripe.com/v1/invoiceitems. c. Authentication: Configure this node with your Stripe authentication, just like the previous one. d. Query Parameters: Here’s where we define the actual service or product being billed: * customer: Map the customer ID from the ‘Stripe Create Customer’ node again. This is needed for invoice items too. * amount: Dynamically pull the ‘Project Cost’ from your ‘ClickUp Get Task’ node. Super important: Stripe processes amounts in cents, not dollars. So, you need to multiply your project cost by 100. The expression would look something like:{{ $('ClickUp Get a Task').item.json.data.project_cost.value * 100 }}. Make sure the expression correctly references the value field from your ClickUp data. * currency: Map the currency from a previous Stripe node’s output to ensure consistency. If you don’t map it, Stripe might use a default, which could cause issues. * description: Provide a specific description for this line item, like ‘Thanks for building the coolest automation with Savvy Flow’. * invoice: This is critical! Map the ‘Invoice ID’ from the output of your ‘Create Invoice’ HTTP Request node. This explicitly links this invoice item to the correct invoice we created in the previous step.
Executing these steps will create a draft invoice in Stripe with the specified customer, due date, description, and detailed line items. Always verify the output in your Stripe dashboard to confirm accuracy. Stripe’s API documentation for creating an invoice provides the necessary endpoint and parameter details.
The n8n HTTP Request node configuration showcases how query parameters like ‘collection_method’ and ‘customer’ are set for invoice creation.
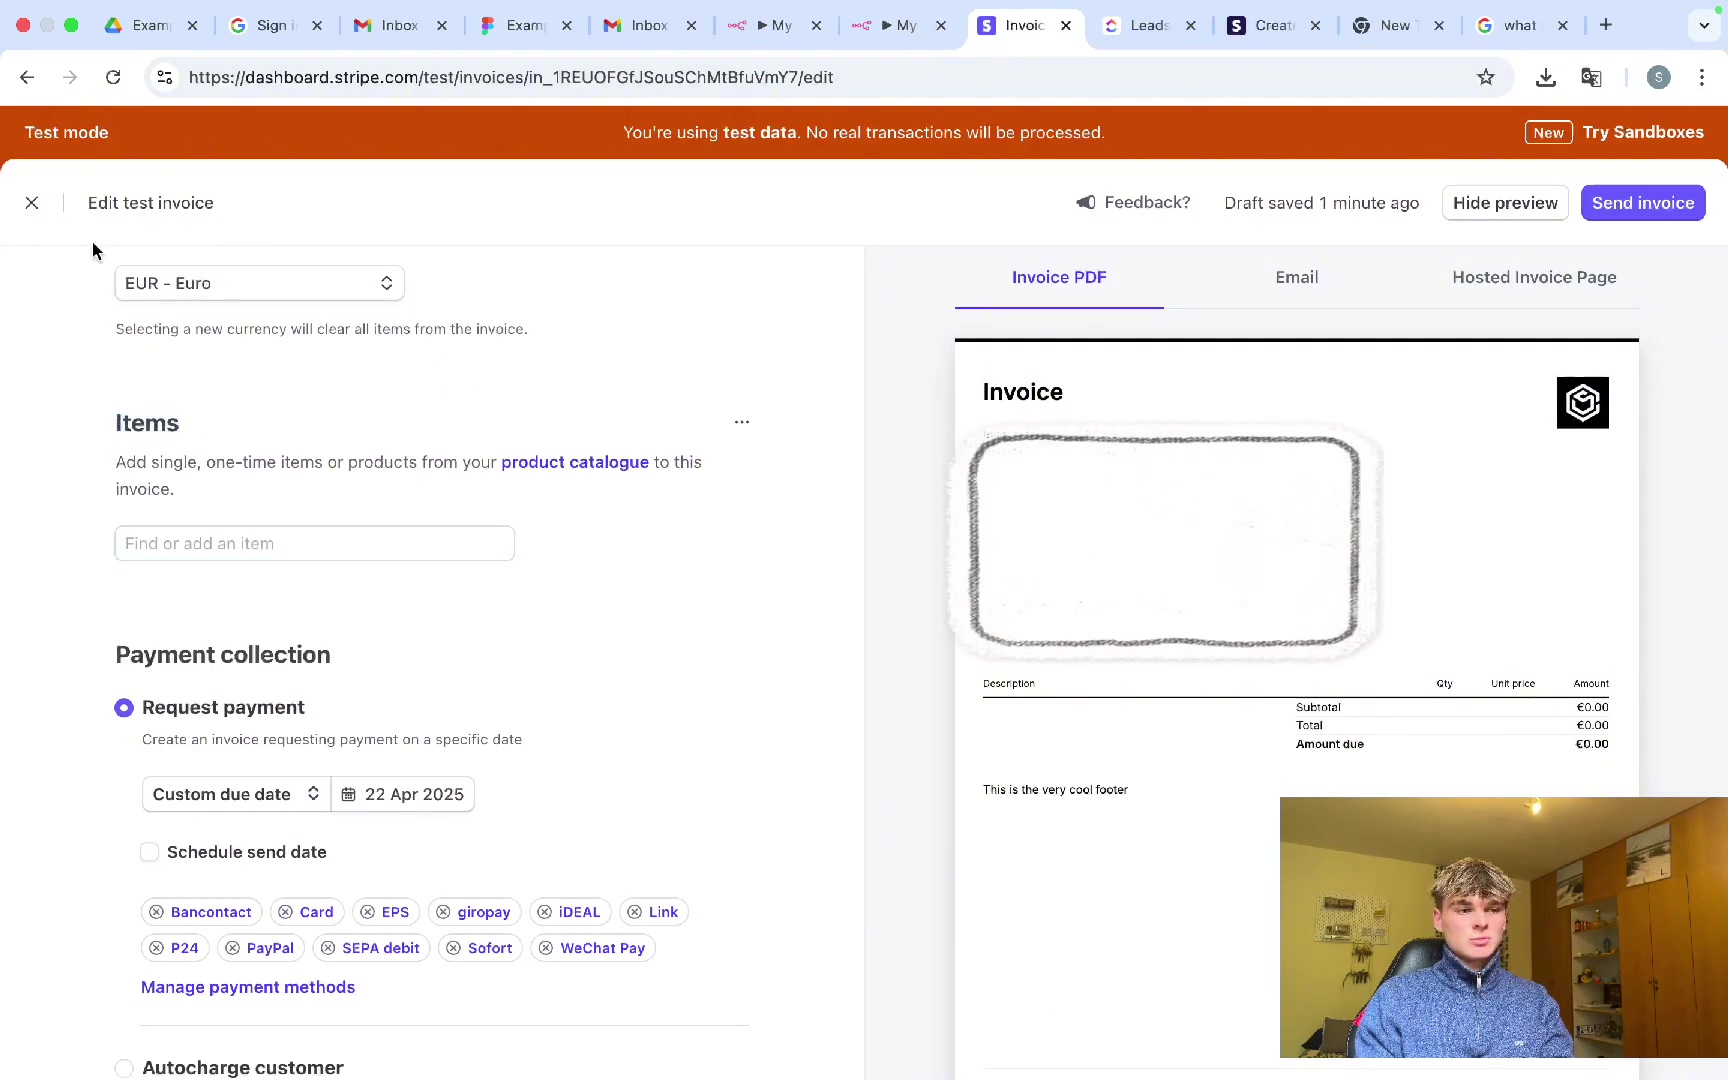
An example of a draft invoice in Stripe illustrates how line items, totals, and a custom footer are presented.
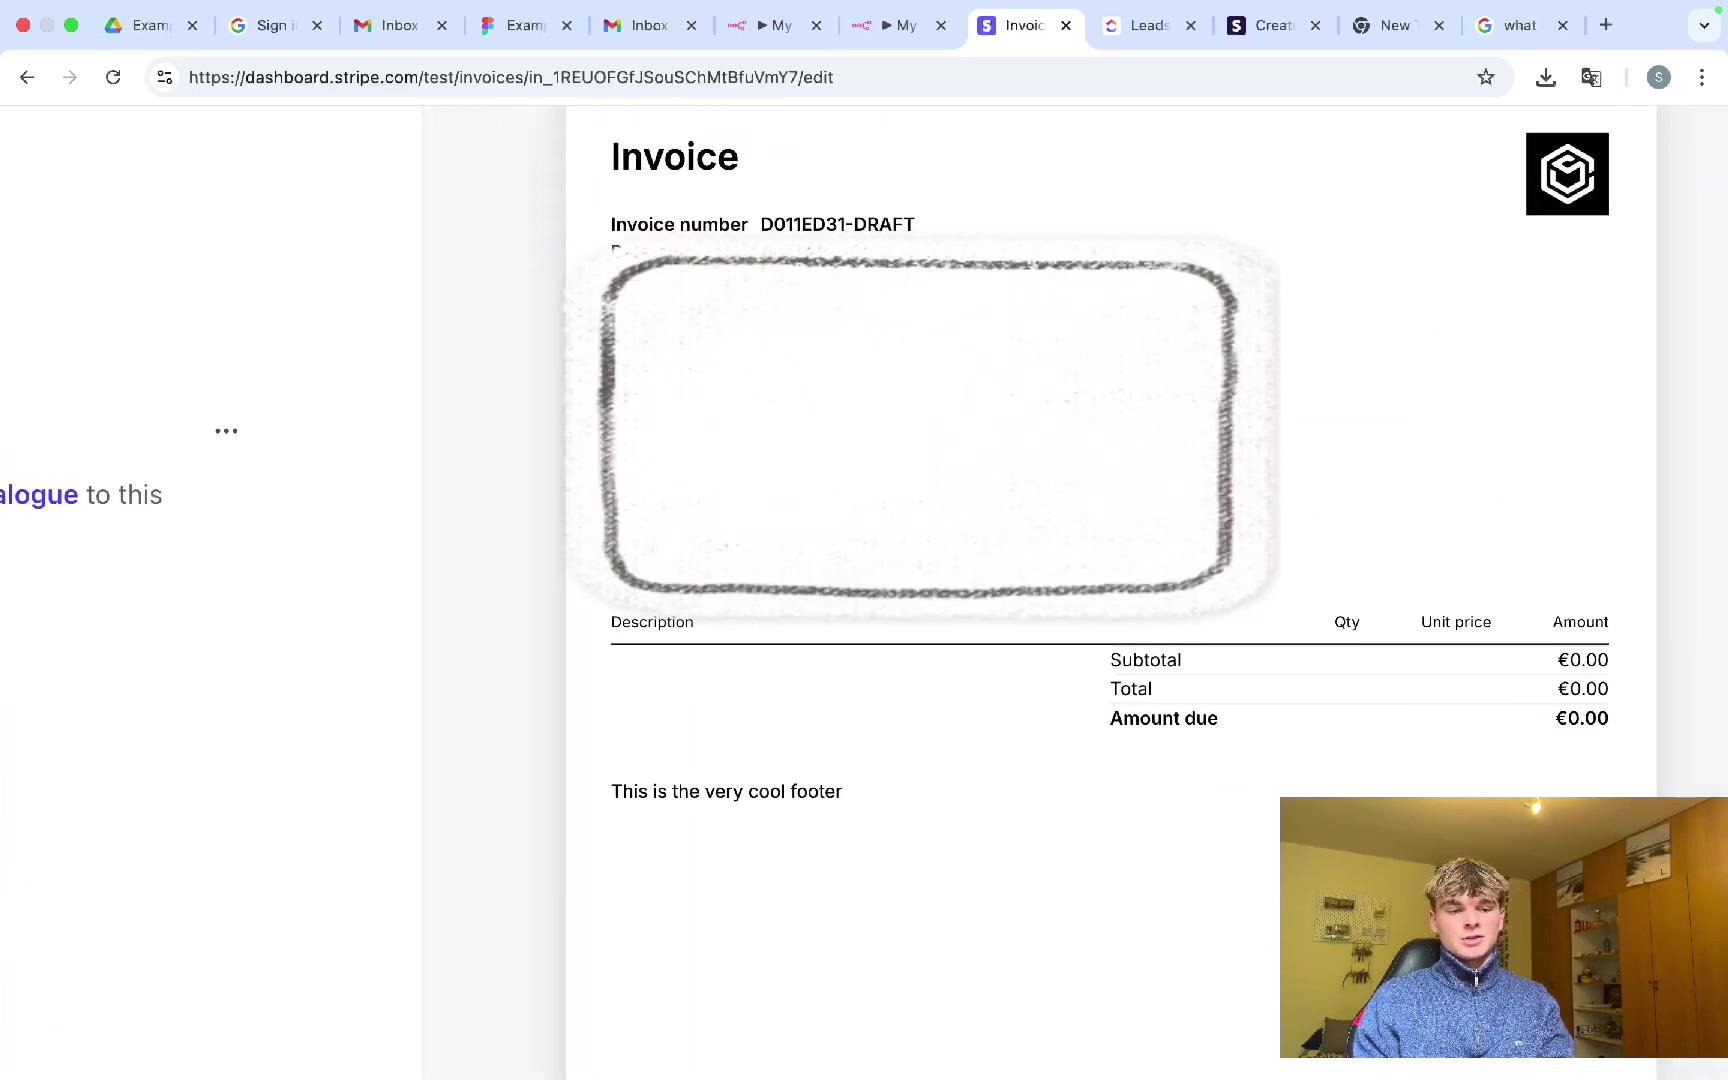
Stripe’s invoice editing interface displays options for setting currency, due dates, and adding line items within test mode.
The n8n interface for the ‘Create item invoice’ node demonstrates the JSON data structure for invoiceitem properties, including amount and description.
Handling Dates and Unix Epoch Conversion in Invoicing
Stripe’s API often requires dates, especially for invoice due dates, to be specified as a Unix epoch timestamp. This format represents the number of seconds that have elapsed since January 1, 1970 (UTC), also known as the Unix Epoch. It sounds complicated, but it’s just a way for computers to count time consistently. Understanding and correctly converting dates to this format within n8n is essential for accurate invoice scheduling.
- Unix Epoch Explained: Unlike human-readable dates (e.g., April 22, 2025), Unix epoch is a single numerical value. For example, to set an invoice due date seven days from today, you first determine today’s Unix timestamp and then add the equivalent of seven days in seconds. It’s like counting seconds from a specific starting point.
- Converting in n8n: The n8n expression
{{ $('Today').toSeconds() }}directly calculates the current Unix epoch timestamp. To add seven days, you append+ (7 * 24 * 60 * 60)to this expression. This translates to adding 604,800 seconds (which is 7 days * 24 hours/day * 60 minutes/hour * 60 seconds/minute). So, the full expression looks like this:
{{ $('Today').toSeconds() + (7 * 24 * 60 * 60) }}This conversion ensures compatibility with the Stripe API’s requirements for date fields, allowing you to dynamically set future due dates for your invoices. While seemingly complex, n8n’s expression builder simplifies this calculation, making it straightforward to implement. Understanding the concept of Unix epoch is crucial for date handling in APIs.
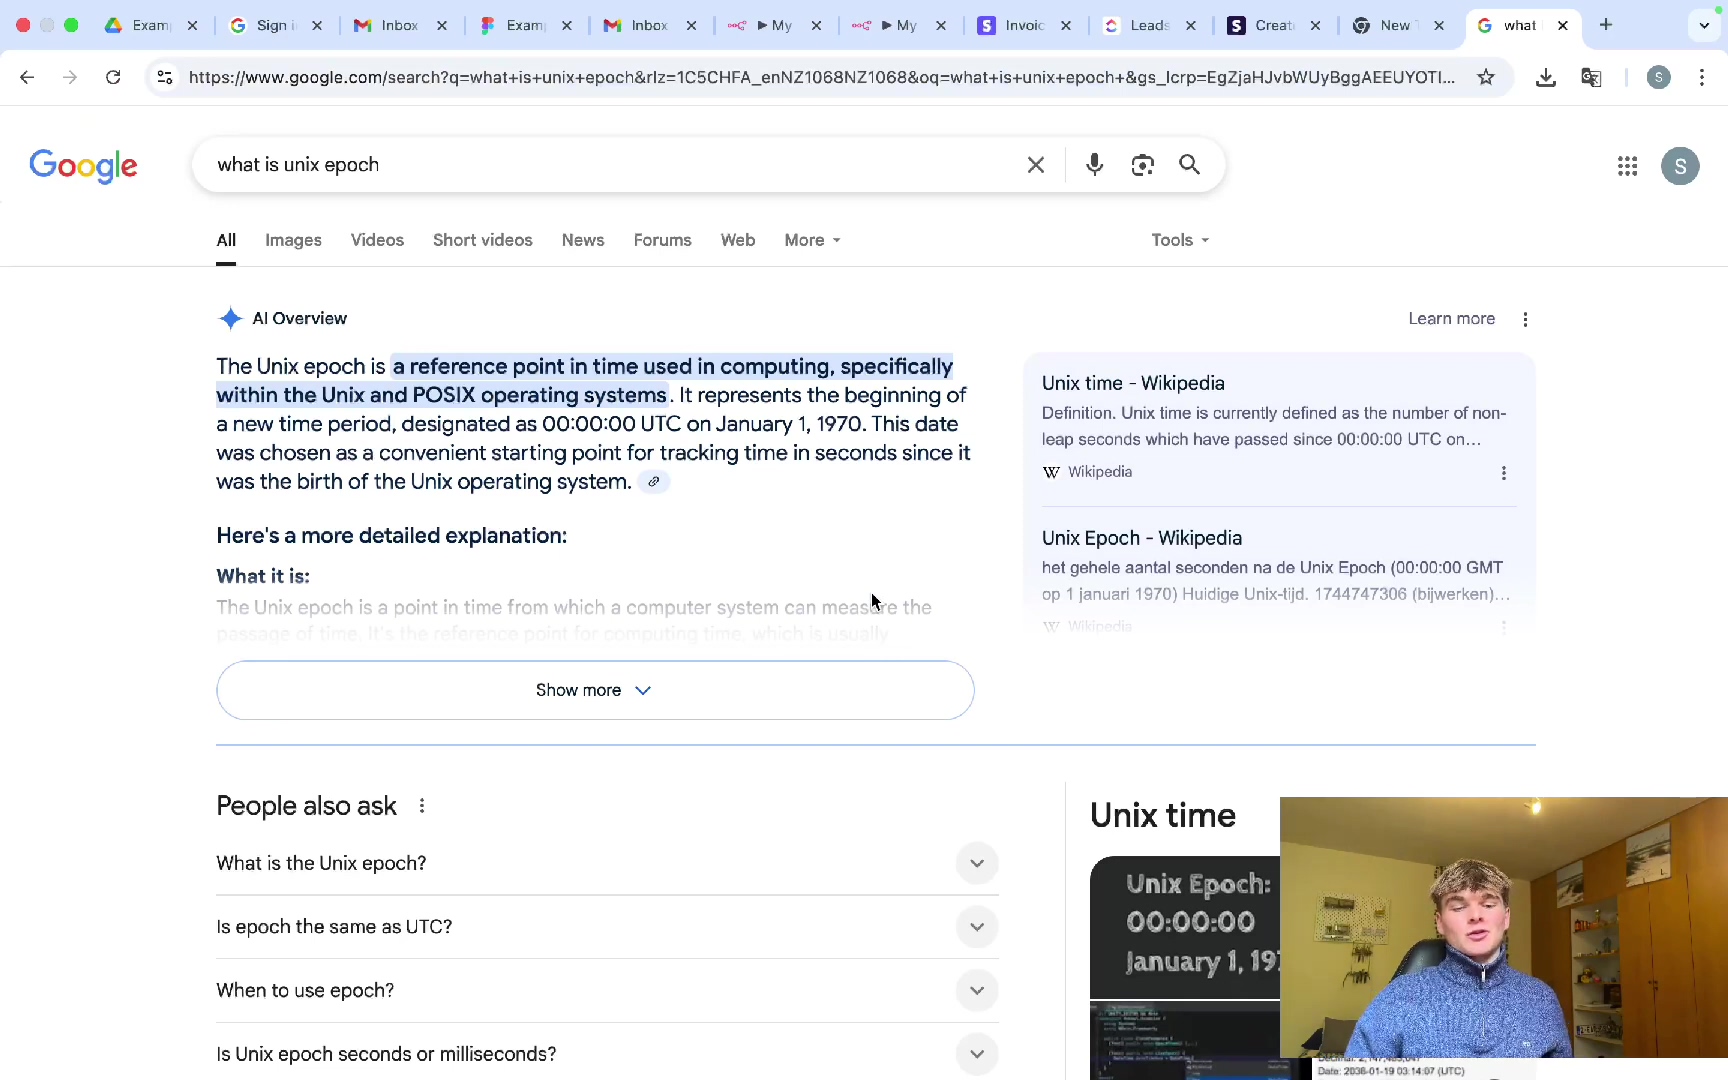
Further clarification on Unix timestamps aids in correct date conversions for Stripe’s API.
Sending Invoice by Email and Internal Notifications
After an invoice is successfully created and itemized in Stripe, the next crucial steps are to send it to the client and notify your internal team. This ensures that the client receives their invoice promptly and that relevant internal stakeholders are aware of its dispatch. It’s about closing the loop!
-
Send the Invoice (HTTP Request): a. Add another HTTP Request Node: This node will trigger the sending of the invoice. Set its method to
POST. b. Stripe API Endpoint: The endpoint for sending an invoice ishttps://api.stripe.com/v1/invoices/{INVOICE_ID}/send. Notice the{INVOICE_ID}placeholder. c. Dynamic Invoice ID: You need to replace{INVOICE_ID}with the actual ID from the output of your ‘Create Invoice’ HTTP Request node. Make sure you select the ‘Invoice ID’ (which usually starts withii_) and not an ‘Invoice Item ID’. n8n’s data selector makes this easy. d. Authentication: Configure this node with your Stripe authentication. e. Verification: After running this node, check your Stripe dashboard. The invoice status should change from ‘draft’ to ‘open’, indicating it has been sent. Note: In test mode, actual emails are not sent, but the status change confirms the action. -
Internal Notification (Gmail Node): a. Add a ‘Gmail’ Node: To notify your team, add a ‘Gmail’ node and configure it to ‘Send an Email’. b. Recipient: Set the recipient to your internal team’s email address. You could even dynamically pull this if you have it stored in ClickUp. c. Subject: Create a clear subject line, for example: ‘New Invoice Sent: {{ $(‘ClickUp Get a Task’).item.json.data.name }}’. Using dynamic data here makes it easy to see which client the invoice was for at a glance. d. Body: Craft a message confirming the invoice send. Include dynamic details like the client’s name and a direct link back to the ClickUp task for quick reference. You can construct the ClickUp task link using the base URL of your ClickUp instance and the dynamic task ID from the initial ‘ClickUp Trigger’ or ‘Get a Task’ node. For example:
https://app.clickup.com/t/{{ $('ClickUp Get a Task').item.json.data.id }}. e. Disable n8n Attribution: In the Gmail node’s options, uncheck ‘Append n8n Attribution’. This removes the default n8n signature from the email, making it look more professional.
This two-pronged approach ensures that your clients receive their invoices and your team is kept in the loop, maintaining transparency across your financial operations. The n8n ‘HTTP Request’ node’s JSON input for ‘Create Invoice’ details critical properties, including ID, customer, and invoice settings, crucial for connecting invoice items.
The configured n8n HTTP Request node’s JSON input for ‘Create Invoice’ details critical properties, including ID, customer, and invoice settings, crucial for connecting invoice items.
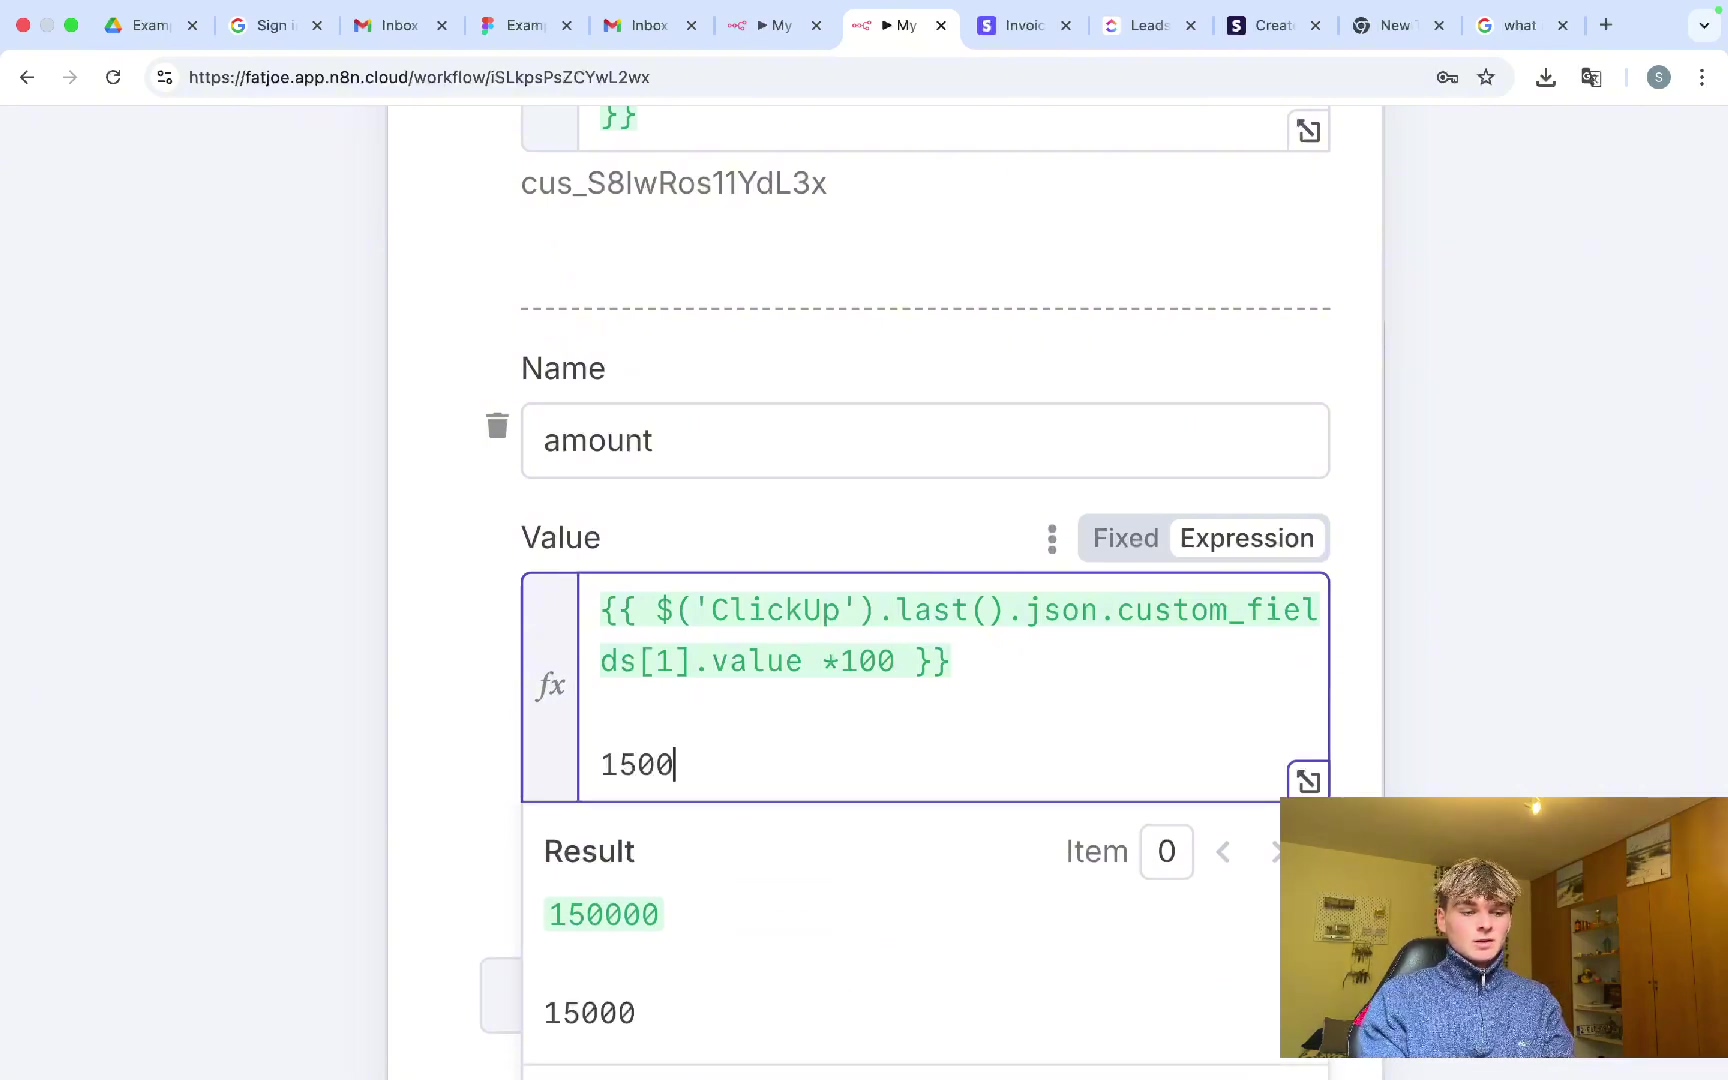
The configured ‘amount’ value in n8n, dynamically pulled and multiplied by 100 for cents, is shown with its result (e.g., 150000).
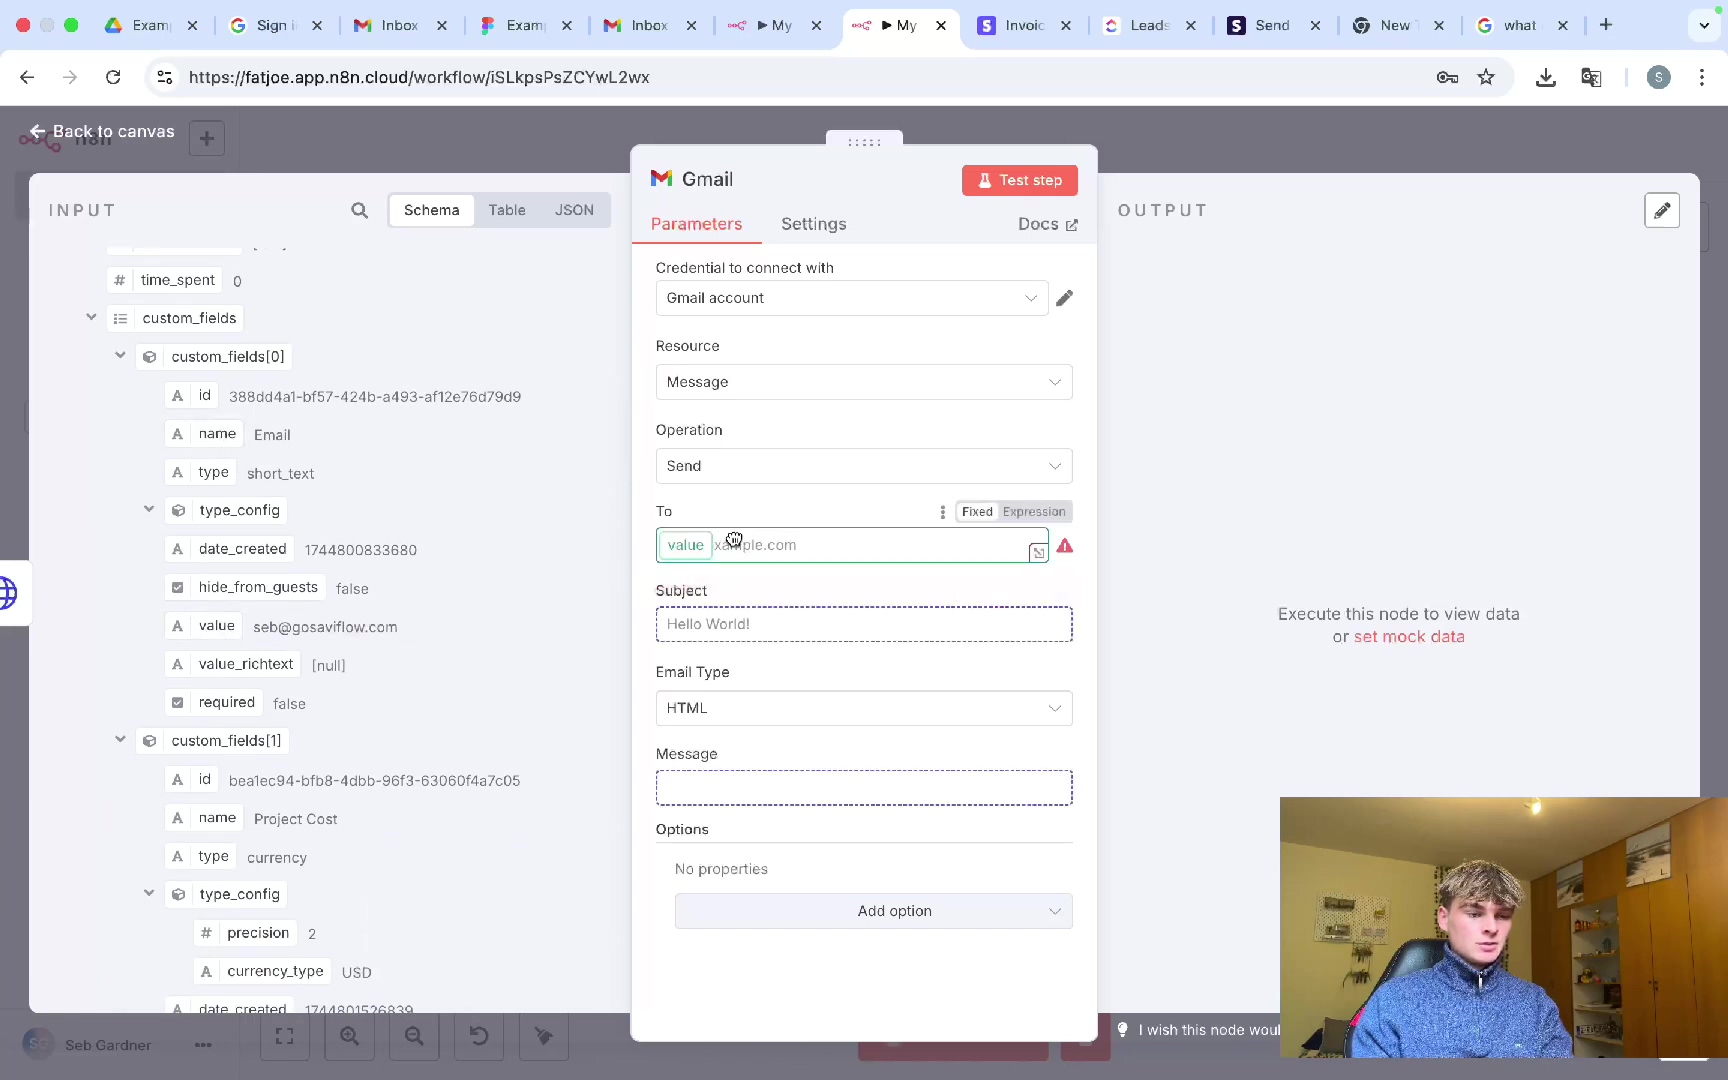
Configuring the n8n Gmail node involves defining the recipient, subject, and message content for internal notifications.

The n8n workflow for sending email notifications, including dynamic fields in the message content, ensures internal teams are aware of sent invoices.
Advanced Automation: Recurring Invoices and Beyond
While the core automation covers one-time invoicing, n8n and Stripe offer capabilities for more advanced scenarios, such as recurring invoices, integration with other accounting software, and automated payment reminders. Expanding your automation can further enhance efficiency and financial management. Think of this as leveling up your automation game!
Setting Up Recurring Invoices
- Stripe Subscriptions: Stripe natively supports subscriptions, allowing you to define recurring billing cycles. You can extend your n8n workflow to create Stripe subscriptions based on specific triggers (e.g., a ‘Subscription’ status in ClickUp), rather than single invoices. This is perfect for retainer clients or SaaS products.
- n8n Scheduling: For more custom recurring billing, n8n’s ‘Schedule Trigger’ node can initiate workflows at set intervals (e.g., monthly). This trigger would then fetch a list of recurring clients from your CRM and generate invoices for them via the Stripe API.
Integrating with Accounting Software
- Xero/QuickBooks Integration: n8n offers nodes for popular accounting software like Xero and QuickBooks. After a Stripe invoice is sent, the workflow can automatically create a corresponding entry in your accounting system, ensuring all financial records are up-to-date without manual double-entry. This saves a ton of bookkeeping time!
Automating Payment Reminders
- Scheduled Reminders: Implement a separate n8n workflow that periodically checks Stripe for overdue invoices. If an invoice is past its due date, the workflow can trigger an email reminder to the client (via a Gmail or similar node) and an internal notification to your team (e.g., Slack). This helps improve cash flow by gently nudging clients.
These advanced automations build upon the foundational invoice system, providing a comprehensive solution for managing various aspects of your billing and financial operations. Each expansion offers further opportunities to reduce manual effort and improve financial health.
A broader view of the ClickUp Leads list shows various task statuses, indicating opportunities for advanced automation.
An individual speaking to the camera further emphasizes the potential for enhancing these workflows.

Troubleshooting Common n8n and Stripe Integration Issues
Integrating n8n with Stripe can occasionally present challenges. It’s totally normal! Understanding common issues and their solutions is key to a smooth setup and reliable workflow operation. Here’s a guide to frequent problems:
API Key Errors
- Issue: Workflow fails with authentication errors or unauthorized access messages.
- Solution: Double-check that your Stripe secret API key is correctly entered in n8n. Ensure you are using the correct key type (e.g., a test mode key for testing purposes, which starts with
sk_test_, and a live key for production, which starts withsk_live_). Verify that the key has the necessary permissions based on the Stripe API version being used. Sometimes, a simple copy-paste error is the culprit!
Webhook Failures
- Issue: n8n’s ClickUp trigger (webhook) doesn’t fire when a task status changes.
- Solution: Confirm that the ‘List ID’ in your ClickUp Trigger node precisely matches the ClickUp list you are monitoring. Check ClickUp’s webhook settings (if applicable) to ensure the webhook is active and correctly pointing to your n8n instance’s webhook URL. You can also run the n8n webhook test to confirm it’s listening properly.
Data Mapping Problems
- Issue: Invoice fields (e.g., amount, customer name) are empty or incorrect in Stripe.
- Solution: Carefully re-examine the data expressions in your n8n nodes. Ensure that you are pulling the correct fields from previous nodes’ outputs. Use n8n’s ‘Test Workflow’ feature to inspect the data output at each step. Common mistakes include referencing the wrong item in an array (e.g., using
iteminstead oflastfor dynamically created data) or incorrect dollar/cent conversion for amounts. Always check that the data path is correct!
Unix Epoch Date Conversion Errors
- Issue: Stripe rejects invoices due to invalid date formats.
- Solution: Verify that your
due_dateparameter for Stripe invoices is correctly formatted as a Unix epoch timestamp. The expression{{ $('Today').toSeconds() + (7 * 24 * 60 * 60) }}provides the value in seconds from January 1, 1970. Ensure no additional characters or incorrect calculations interfere with this numerical format. It needs to be a clean number!
Currency Mismatch
- Issue: Stripe gives an error about currency mismatch during invoice or invoice item creation.
- Solution: Ensure that the currency defined in your invoice item (e.g., ‘USD’, ‘EUR’) matches the currency settings or the customer’s default currency in Stripe. Dynamically mapping the currency from a preceding Stripe node can help maintain consistency. Avoid explicitly setting a currency that conflicts with existing customer or Stripe account defaults, or ensure the customer’s currency is explicitly set during creation.
Key Takeaways: Mastering Automated Invoicing
Mastering automated invoicing with n8n and Stripe significantly transforms financial operations. This system reduces manual effort by triggering invoice generation based on real-time CRM updates, ensuring accuracy and timeliness. The process involves meticulous setup of CRM fields, precise data mapping in n8n, proper API key management, and understanding Stripe’s specific data requirements like Unix epoch timestamps for dates and cent-based amounts. It’s like building a well-oiled machine for your finances!
This automation not only minimizes errors but also frees up valuable human resources, allowing teams to focus on more strategic initiatives. The ability to integrate, customize, and expand the workflow for advanced scenarios like recurring invoices positions businesses for scalable and efficient growth.
Future-Possibilities of Your Financial Automations
Maintaining and scaling an automated financial system requires forward-thinking strategies to ensure its long-term effectiveness. As your business evolves and software platforms update, your n8n workflows need to remain robust and adaptable. Think of it as keeping your spaceship in top condition!
- Regular Audits: Periodically review your n8n workflows and Stripe configurations. Check for deprecated API versions, outdated data mappings, or inefficient nodes. A quarterly audit can help identify and resolve potential issues before they impact operations.
- Version Control: For complex n8n workflows, consider exporting your workflows and storing them in a version control system (e.g., Git). This allows for tracking changes, easy rollback to previous versions, and collaborative development with your team.
- Stay Updated: Keep n8n and its integrated connectors updated to their latest versions. Newer versions often include performance improvements, bug fixes, and support for new API features. Similarly, monitor updates from ClickUp and Stripe to anticipate any changes that might affect your integration.
- Modular Design: Design your n8n workflows with modularity in mind. Break down complex automations into smaller, reusable sub-workflows. This approach simplifies maintenance, makes troubleshooting easier, and allows for quicker adaptation to new business requirements or system changes.
- Explore New Integrations: Continuously explore n8n’s extensive library of integrations. As your business grows, you might find new tools that can further enhance your financial automation, such as advanced analytics platforms, additional CRMs, or specialized accounting software. Periodically reassess if new integrations could offer further efficiency gains or improved data insights.
By proactively managing and evolving your automated invoicing system, you ensure it remains a dynamic asset that supports your business’s growth and efficiency for years to come.
Ready to Transform Your Invoicing?
Automating your invoicing process with n8n and Stripe provides a powerful solution to enhance operational efficiency and minimize errors. By following the outlined steps, you’ve established a system that watches for ClickUp status changes, dynamically creates Stripe customers and invoices, and sends out notifications, all hands-free. This foundation not only streamlines current operations but also opens doors for further automation across your business. Begin by building your first workflow in n8n, then explore advanced integrations for marketing, sales, and internal communications to truly maximize your efficiency.
Final Summary
This guide provided a step-by-step approach to automating Stripe invoicing using n8n and ClickUp, detailing how to set up triggers, map data, and handle API calls to create and send invoices seamlessly. By implementing this system, businesses can significantly reduce manual effort and improve billing accuracy. To take the next step, evaluate your current manual processes and identify other areas within your financial operations that could benefit from similar automation, then configure new triggers or HTTP requests in n8n to integrate those elements.
Frequently Asked Questions (FAQ)
Q: What is Unix epoch time and why does Stripe use it?
A: Unix epoch time is a system for describing a point in time as the number of seconds that have elapsed since January 1, 1970 (UTC). Stripe uses it because it’s a standardized, unambiguous way for computer systems to represent dates and times, making it easier for their API to process date-related information like invoice due dates consistently across different systems and time zones.
Q: Can I use n8n to automatically send the invoice email to the client after it’s created in Stripe?
A: Yes, absolutely! After you’ve created the invoice and invoice items using HTTP Request nodes, you can add another HTTP Request node to call the Stripe API endpoint for sending the invoice (/v1/invoices/{INVOICE_ID}/send). You would then use the Invoice ID obtained from the creation step. You could also set up a separate n8n workflow triggered by Stripe webhooks (if available for invoice status changes) or schedule a check for new invoices to send emails via a service like Gmail or SendGrid.
Q: What happens if the ‘Project Cost’ in ClickUp is not a number?
A: If the ‘Project Cost’ field in ClickUp contains text or is not formatted as a number, the n8n workflow will likely fail when it tries to multiply it by 100 for the Stripe API. You should ensure that this field is consistently populated with numerical data. You might need to add an extra ‘If’ node or a ‘Set’ node in n8n to validate the data type or handle potential errors gracefully, perhaps by sending an internal notification that the data is incorrect.
Q: How do I switch from Stripe’s test mode to live mode?
A: To switch to live mode, you’ll need to replace your Stripe API keys in n8n. Specifically, you’ll need to use your live secret key (which starts with sk_live_) instead of your test secret key (which starts with sk_test_). Make sure you also update any other Stripe-related configurations if necessary. It’s a good practice to test your workflow thoroughly in test mode before switching to live mode to avoid any unexpected issues with real transactions.
Q: Can n8n handle different currencies for invoices?
A: Yes, n8n can handle different currencies. When creating the invoice item using the Stripe API via an HTTP Request node, you need to specify the currency parameter (e.g., USD, EUR). It’s best to dynamically map this currency value from your ClickUp data if you store it there, or have a default currency set in your n8n workflow. Ensure the currency code you use matches Stripe’s supported currency codes.