Watch the Video Tutorial
💡 Pro Tip: After watching the video, continue reading below for detailed step-by-step instructions, code examples, and additional tips that will help you implement this successfully.
Table of Contents
Open Table of Contents
- Introduction: The Power of Webhooks in Automation
- Understanding Webhook Types: Test vs. Production
- Passing Parameters to Your Workflow
- Customizing Webhook Responses
- Triggering Other Workflows with Webhooks
- Required Resources and Cost-Benefit Analysis
- ⚠️ Critical Best Practices for Webhook Implementation
- Key Takeaways for Effective Webhook Usage
- Conclusion
- Frequently Asked Questions (FAQ)
- Q: What’s the main difference between a Test and Production Webhook URL?
- Q: Why would I want to pass parameters to my workflow via a webhook?
- Q: My webhook isn’t triggering! What should I check first?
- Q: Can I send data in the body of a POST request to an n8n webhook, not just in the URL parameters?
- Q: Is it safe to expose my webhook URLs publicly?
- Q: How can I debug my webhook if it’s not behaving as expected?
Introduction: The Power of Webhooks in Automation
Hey there, fellow automation enthusiast! Boyce here, your friendly neighborhood self-taught automation consultant. Ever feel like your workflows are stuck in a time loop, waiting for something to happen? Well, webhooks are like that super-fast, real-time communication device from a sci-fi movie – they make your workflows react instantly to stuff happening outside n8n. Think of them as the ultimate doorbell for your automation.
In n8n, webhooks are your workflow’s front door, the entry point for all sorts of cool external events. This guide is going to be your trusty roadmap, walking you through everything from the absolute basics of setting up a webhook to some really advanced tricks like passing dynamic data and even making your workflows talk to each other. By the time we’re done, you’ll be a webhook wizard, ready to build some seriously smart automation!
This isn’t just some theoretical stuff, by the way. I’ve been in the trenches, wrestling with countless integration challenges and trying every webhook configuration under the sun. This guide distills all that trial and error into a super-streamlined, fool-proof approach. We’re talking about building efficient, reliable n8n workflows that just work.
Understanding Webhook Types: Test vs. Production
Alright, first things first. n8n, being the smart platform it is, gives us two flavors of webhooks. It’s like having a sandbox for building your LEGO castle and then the actual, finished castle for display. Each has its own job in your workflow’s journey from idea to live action.
- Test Webhooks: These are your sandbox. When you’re building a new workflow or tweaking an existing one, you’ll use a test webhook. Why? Because it’s designed to listen for just one incoming request. This single request is super important because it tells n8n, “Hey, this is what the data coming in looks like!” n8n then uses this sample data to help you configure all the other nodes in your workflow. It’s like showing n8n a blueprint before you start building.
- Production Webhooks: Once your workflow is built, tested, and ready for prime time, you switch to a production webhook. This is the real deal. When your workflow is active and using a production webhook, any incoming request to its unique URL will instantly trigger your workflow to run. This is how your automation goes live and starts doing its magic in the real world.
Setting Up Your Webhook
Ready to get our hands dirty? Let’s set up our first webhook node. This is where we tell n8n how our webhook should behave. We’ll define its path (that’s the specific address it lives at), the HTTP method (how it expects to receive data), and how it should respond.
- Drag and Drop the Webhook Node: First, open your n8n canvas. On the left sidebar, search for “Webhook” and drag the “Webhook” node onto your workflow canvas. It’s usually the first node in any workflow that needs to react to external events.
- Configure the Webhook Node: Click on the Webhook node to open its settings panel. You’ll see options like:
- HTTP Method: This defines how the data will be sent to your webhook. The most common ones are
GET(for retrieving data, often used with URL parameters) andPOST(for sending data, usually in the body of the request). For most initial setups,GETis fine for testing, butPOSTis more common for real-world data submissions. - Path: This is the unique part of your webhook URL. Think of it as the specific room number in a big building. You can name it anything you like, but keep it simple and descriptive (e.g.,
my-first-webhook,new-lead). - Authentication: For now, we’ll leave this as
None. We’ll talk about security later, but for initial testing,Noneis perfectly fine. - Response Mode: We’ll keep this as
On "Webhook Response" Nodefor now, which means the webhook will wait for a specific node to send a response back. Don’t worry, we’ll dive deeper into this later!
- HTTP Method: This defines how the data will be sent to your webhook. The most common ones are
-
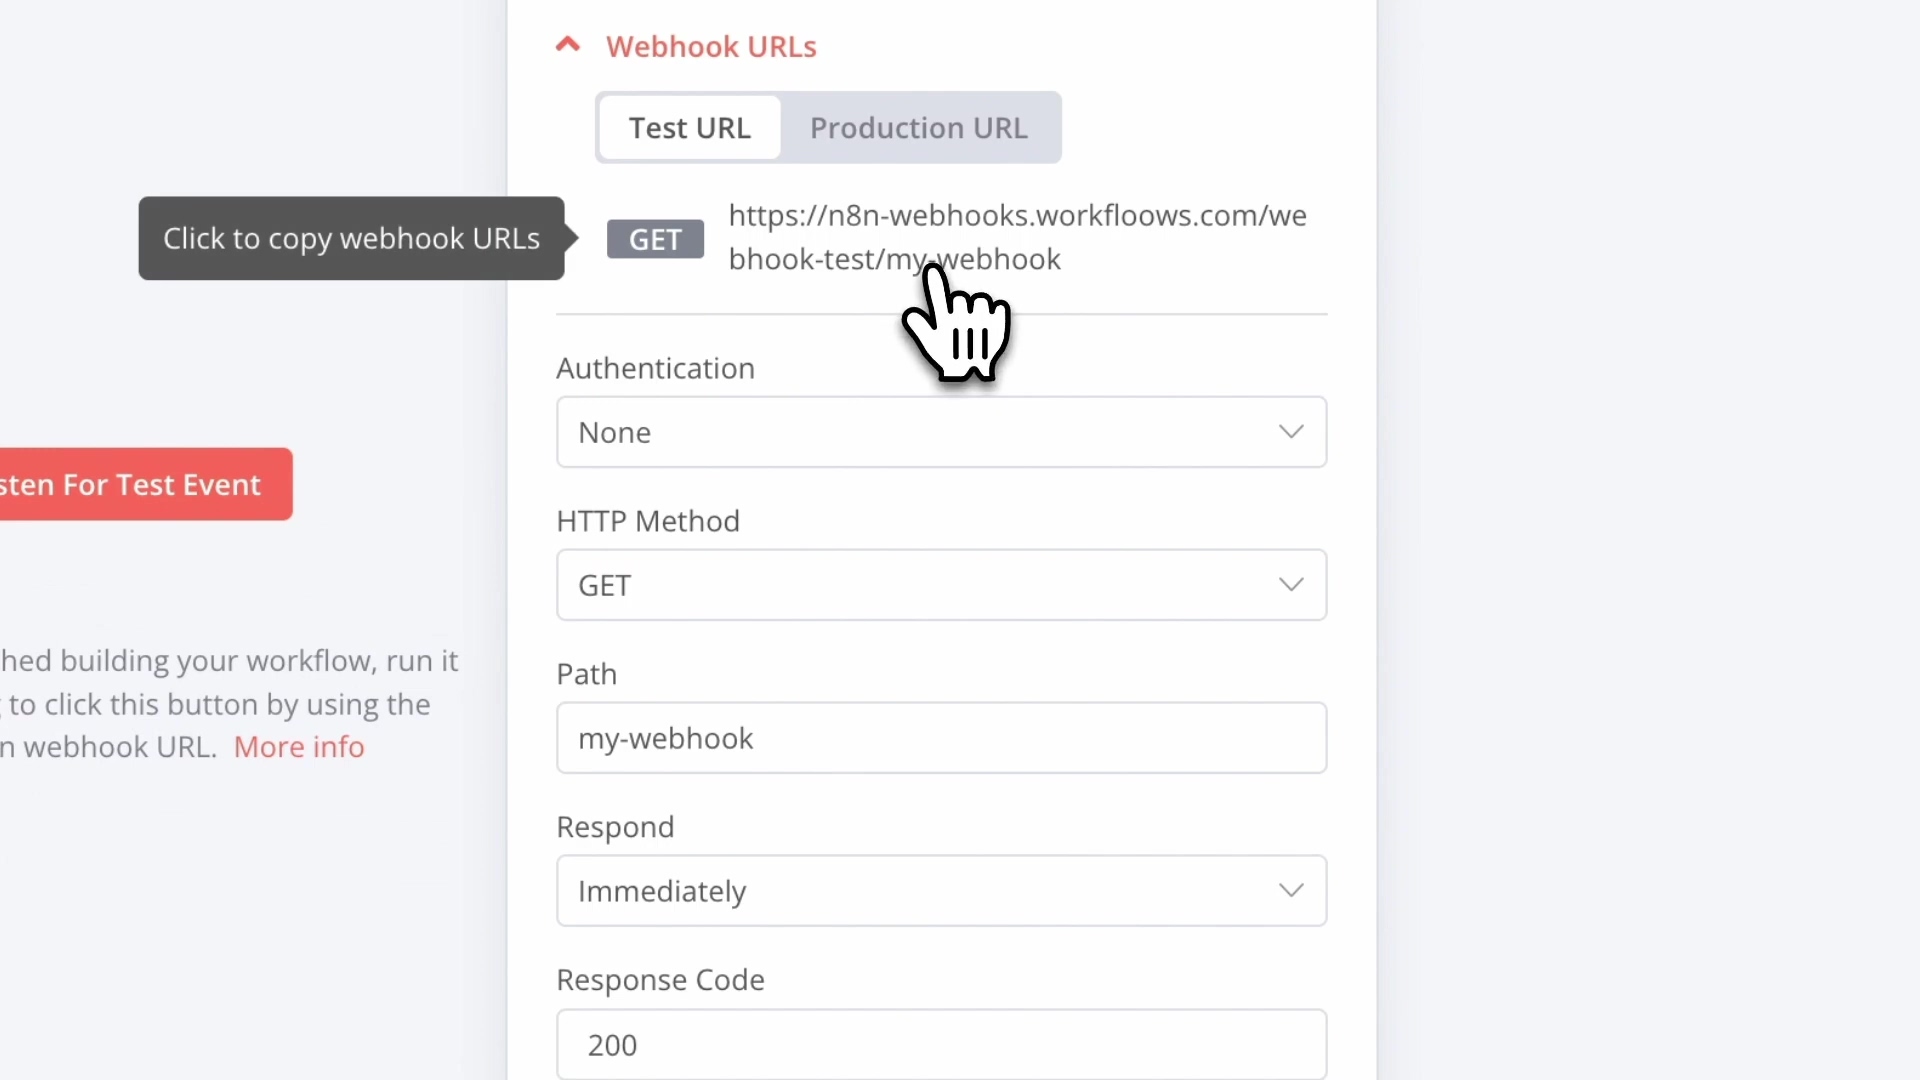
Copy the Webhook URL: After you’ve configured the node, you’ll see a “Webhook URL” section. There will be two URLs: one for “Test” and one for “Production”. For now, click the “Copy Test URL” button. This is the URL we’ll use to send our first test request.
Expected Feedback: You should see a little pop-up saying “Test URL copied to clipboard!” or similar. If you don’t, try clicking the copy button again.
-
Send Your First Test Request: Now, here’s the magic moment! Open a new tab in your web browser (like Chrome, Firefox, or Safari) and paste the copied Test URL into the address bar. Press Enter.
Expected Feedback: In your browser, you might see a blank page or a simple “OK” message. But the real magic happens back in n8n! If you look at your Webhook node, you should see a little green dot or a “Last run” timestamp update, indicating that it successfully received a request. Below the node, you’ll also see the incoming data in the “Input” section. This confirms your webhook is listening and ready to receive data. Nailed it!
Passing Parameters to Your Workflow
Okay, so we’ve got our webhook listening. That’s cool, but what if we want to send specific information along with that trigger? This is where parameters come in. Think of them like sending a package with a note attached – the note contains extra details your workflow can use.
Webhooks become truly powerful when you can pass dynamic data into your workflow. This data can be included directly in the URL itself, using something called “query strings.” It’s super handy!
Adding Query Parameters
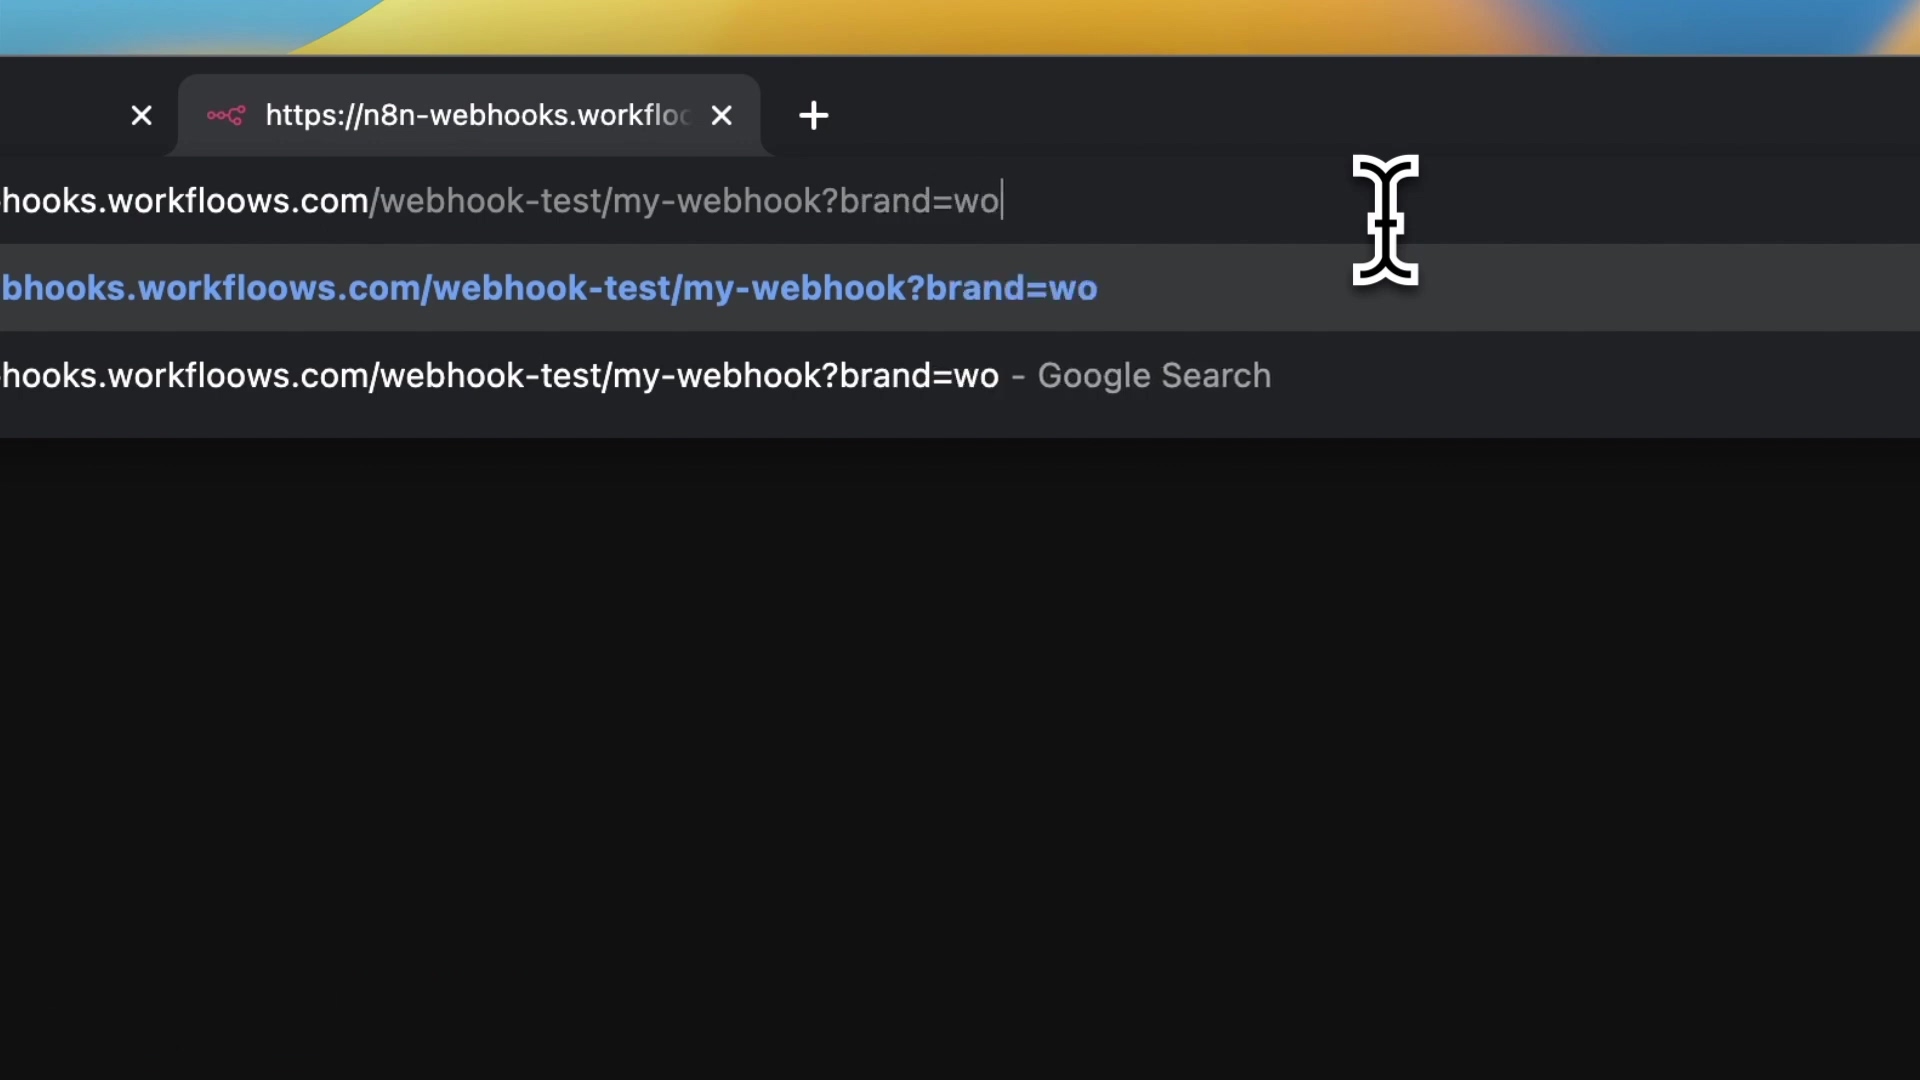
To pass parameters, we simply add them to our webhook URL. It’s like adding ingredients to a recipe. You start with a question mark ? after your main URL, and then you add key-value pairs separated by ampersands &. Each pair is parameterName=value.
Let’s say we want to tell our workflow what brand is sending the request and what action they want to perform. Your URL might look something like this:
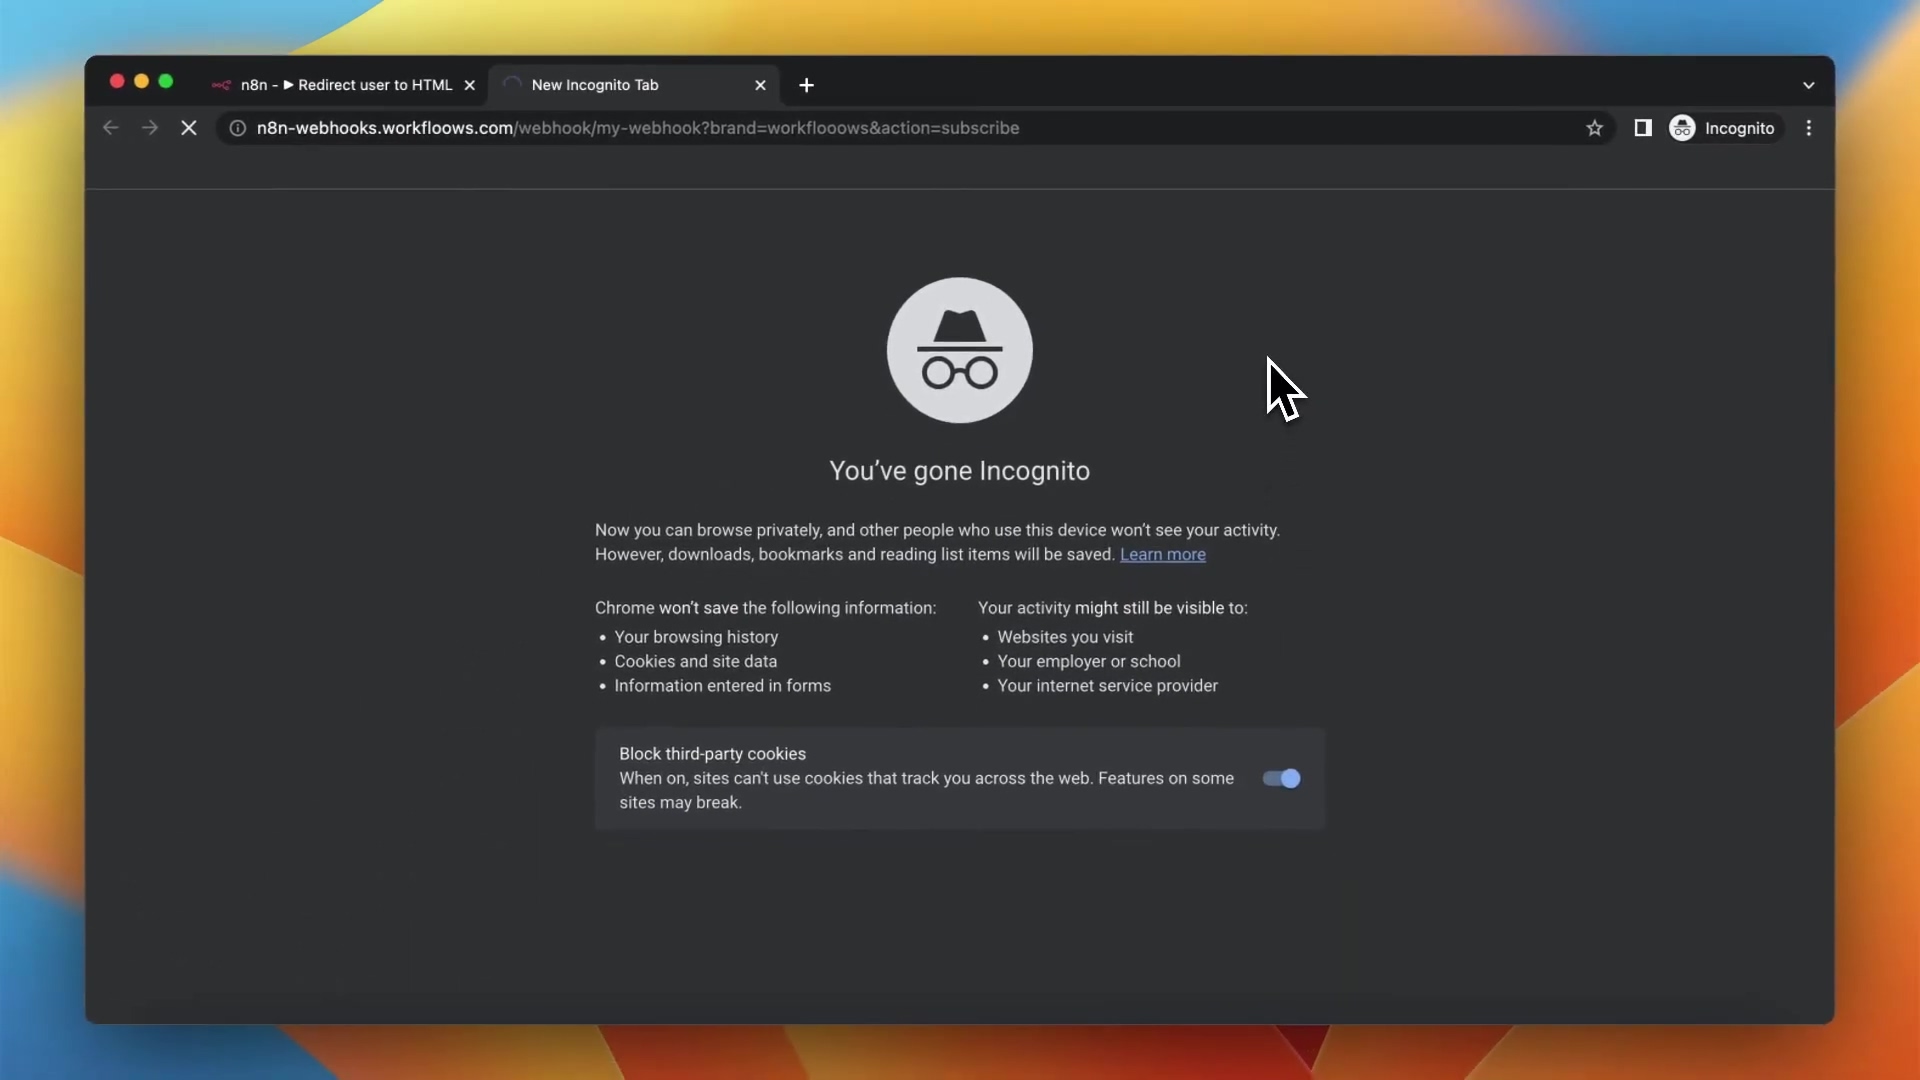
https://n8n-webhooks.workfloows.com/webhook-test/my-webhook?brand=workfloows&action=subscribeLet’s try it!
-
Modify Your Test URL: Go back to your n8n workflow. Copy your Webhook node’s Test URL again. Now, paste it into your browser’s address bar, but before you press Enter, add
?brand=mycompany&action=signupto the end of it. So it should look something like:YOUR_N8N_TEST_WEBHOOK_URL?brand=mycompany&action=signup -
Send the Request: Press Enter in your browser.
Expected Feedback: Back in n8n, click on your Webhook node. In the “Input” section below the node, you should now see a
queryobject, and inside it, you’ll findbrand: "mycompany"andaction: "signup". See? We just passed data directly into our workflow! How cool is that?
Once these parameters are passed, n8n’s webhook node automatically captures them. They become available for you to use in any subsequent nodes within your workflow. This is where the real fun begins! You can then build conditional logic (e.g., using an ‘IF’ node) to perform different actions based on the values of these parameters. For example, if action is subscribe, you might add the user to a mailing list; if it’s unsubscribe, you remove them. The possibilities are endless!
Customizing Webhook Responses
So far, we’ve focused on getting data into n8n. But what if we want n8n to send something back? Maybe redirect a user to a thank-you page, return some specific data, or just confirm that everything worked. This is where customizing webhook responses comes in. It’s like your workflow saying, “Got it! Here’s what’s next.”
Redirecting Users with ‘Respond to Webhook’ Node
One super common scenario is redirecting a user after they submit a form or click a link that triggers your webhook. For this, we need to tell our webhook node to wait for a specific node to send the response, and then we use the ‘Respond to Webhook’ node.
-
Change Webhook Node’s Response Mode: Click on your Webhook node. In its settings, find the ‘Response Mode’ option. Change it from
On "Webhook Response" NodetoUsing 'Respond to Webhook' node.Why this change? By default, the webhook node sends a generic ‘OK’ response immediately. But if we want to control the response (like a redirect), we need to tell it to wait for another node to do the heavy lifting.
-
Add an ‘IF’ Node (Optional but Recommended): Let’s make this dynamic! Drag an ‘IF’ node onto your canvas and connect it after your Webhook node. In the ‘IF’ node, set a condition. For example, you could check if
{{ $json.query.action }}(that’s how you access theactionparameter we sent earlier)is equal tosubscribe.Expected Feedback: The ‘IF’ node will have two branches: ‘True’ and ‘False’.
-
Add a ‘Respond to Webhook’ Node: Drag a ‘Respond to Webhook’ node onto your canvas. Connect it to the ‘True’ branch of your ‘IF’ node (or directly after the Webhook node if you skipped the ‘IF’ node for simplicity).
-
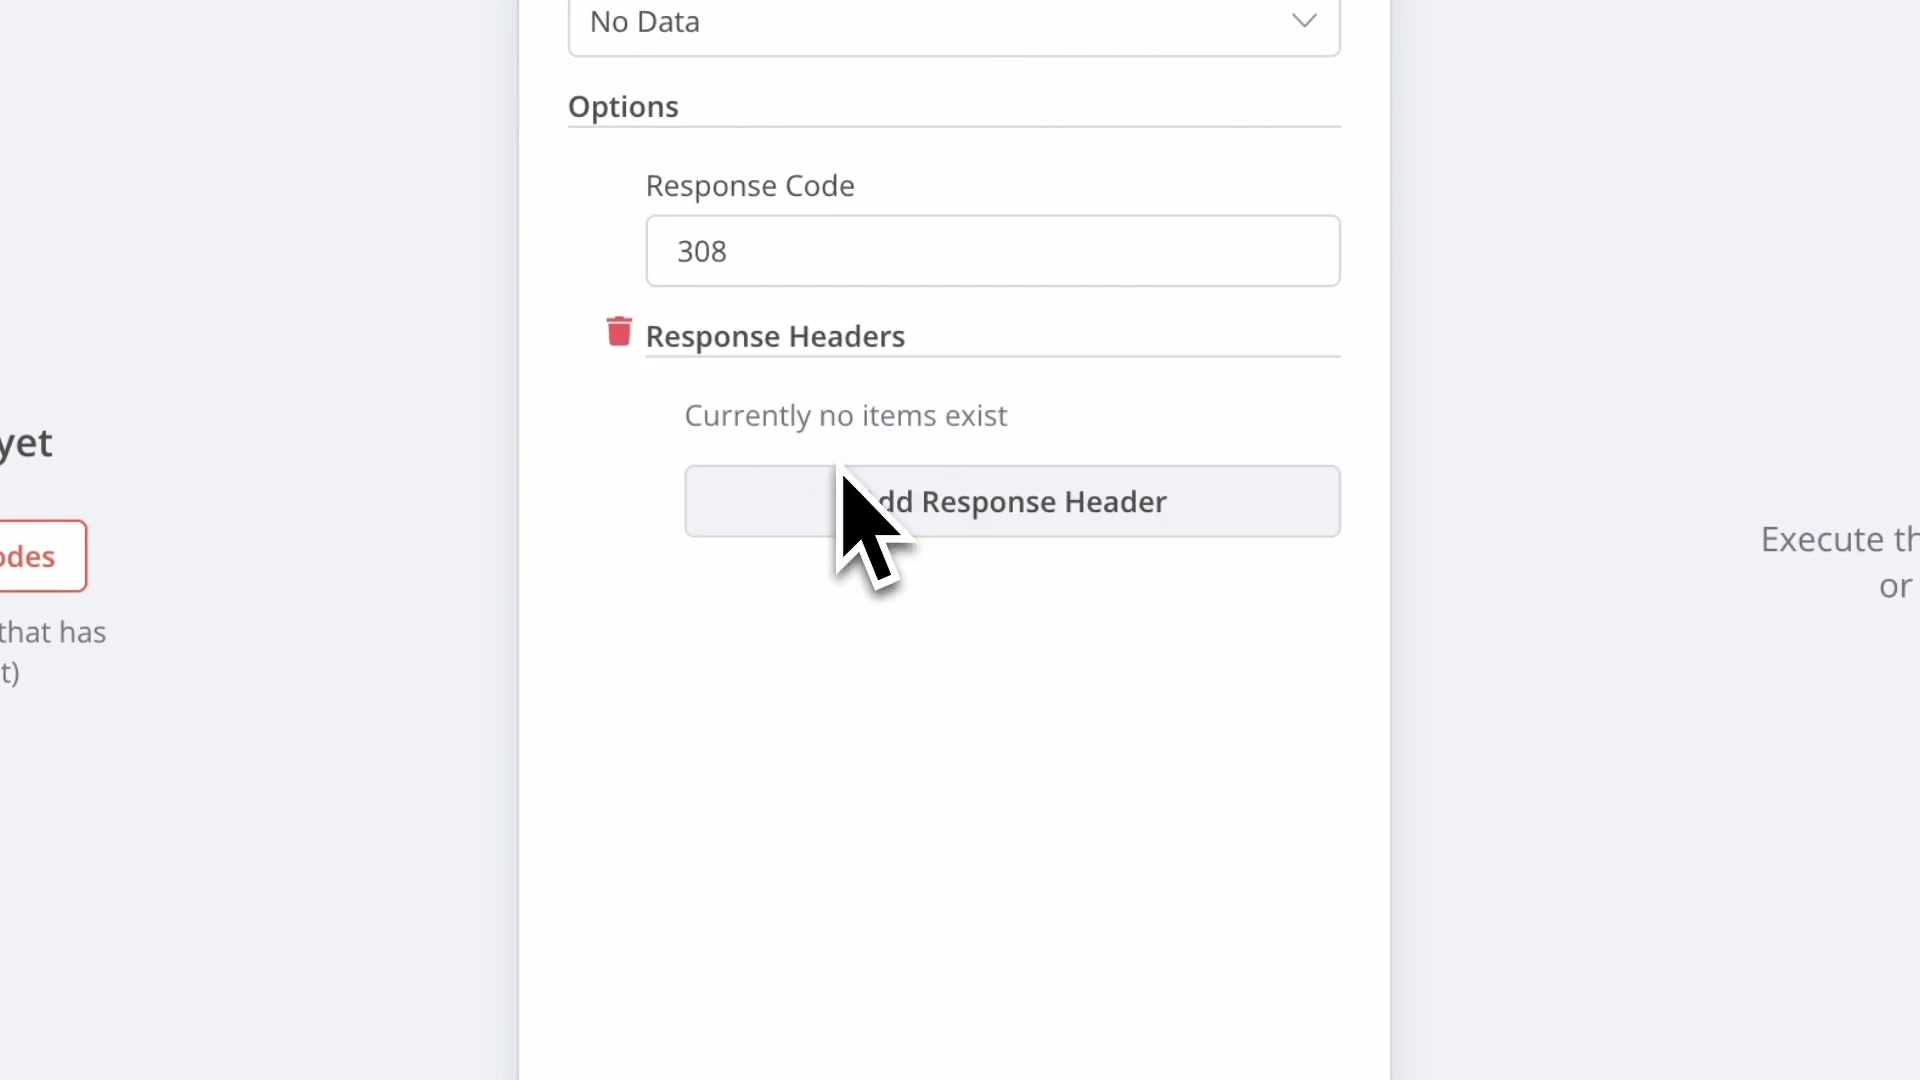
Configure ‘Respond to Webhook’ for Redirection: Click on the ‘Respond to Webhook’ node. Here’s how we set up the redirect:
- Respond With: Set this to
No Data. We’re not sending content, just a command to redirect. - Response Code: This is crucial for redirects. Use
308(Permanent Redirect) or302(Found).302is generally safer for temporary redirects, while308tells the browser to always go to the new URL from now on. - Response Headers: This is where the magic happens! Click “Add Header”.
- For ‘Name’, type
Location(case-sensitive!). - For ‘Value’, enter the URL you want to redirect to. For example,
https://n8n.io.
- For ‘Name’, type
- Respond With: Set this to
-
Test the Redirect: Now, copy your Test Webhook URL again. If you used the ‘IF’ node, make sure to add the parameter that makes the ‘IF’ node’s condition true (e.g.,
?action=subscribe). Paste it into your browser and hit Enter.Expected Feedback: Instead of seeing a blank page, your browser should automatically redirect you to
https://n8n.io(or whatever URL you put in the ‘Location’ header)! How cool is that? Your workflow just told the browser where to go next.
This setup ensures that when the workflow is triggered with the specified parameters (e.g., action=subscribe), the user’s browser will be automatically redirected to the designated URL. Super useful for form submissions or custom landing pages!
Returning Dynamic HTML Pages
What if you want to show a custom message or a dynamically generated page instead of just redirecting? Maybe a personalized “Welcome, [User Name]!” page. n8n can do that too! This is where we return a full HTML page as the webhook’s response.
This is useful for displaying dynamic notifications or personalized content based on the incoming webhook parameters. By integrating HTML nodes (or just using a ‘Set’ node with HTML content) and dynamically populating them with data from your webhook, you can generate rich, interactive responses.
For example, a workflow could generate a ‘subscribed’ or ‘unsubscribed’ notification page, dynamically inserting the ‘brand’ parameter from the webhook URL.
-
Change Webhook Node’s Response Mode: Make sure your Webhook node’s ‘Response Mode’ is set to
Using 'Respond to Webhook' node. -
Add a ‘Set’ Node: After your Webhook node (or after an ‘IF’ node if you’re using conditional logic), add a ‘Set’ node. This node is super versatile for creating custom data.
-
Configure the ‘Set’ Node with HTML: In the ‘Set’ node, add a new field. Let’s call it
htmlResponse. For its value, you’ll enter your HTML content. You can even use expressions to pull in dynamic data from your webhook!<h1>Hello from n8n!</h1> <p>You triggered the webhook for brand: {{ $json.query.brand }}</p> <p>Action performed: {{ $json.query.action }}</p> <p>Thanks for visiting!</p>Pro Tip: You can make this HTML as complex as you want, including CSS and JavaScript, though for simple messages, basic HTML is fine.
-
Add a ‘Respond to Webhook’ Node: Connect a ‘Respond to Webhook’ node after your ‘Set’ node.
-
Configure ‘Respond to Webhook’ for HTML: Click on the ‘Respond to Webhook’ node. Here’s the setup:
- Respond With: Set this to
Last Node(orJSONif you want to return raw JSON data). - Response Code: Use
200(OK) for a successful response. - Response Headers: This is important! We need to tell the browser that we’re sending HTML.
- Click “Add Header”.
- For ‘Name’, type
Content-Type. - For ‘Value’, type
text/html.
- Respond With: Set this to
-
Test the HTML Response: Copy your Test Webhook URL again, add some parameters like
?brand=myawesomebrand&action=viewpage, and paste it into your browser. Hit Enter.Expected Feedback: Your browser should now display a custom HTML page with the dynamic values you passed in the URL! How cool is that? You’re basically building mini-web apps with n8n.
Triggering Other Workflows with Webhooks
Webhooks aren’t just for external triggers; they’re also fantastic for making your own n8n workflows talk to each other. Think of it like a relay race: one workflow finishes its part and then passes the baton (via a webhook) to another workflow to continue the process. This is super useful for breaking down complex automations into smaller, more manageable, and reusable pieces. It’s like building with LEGOs – you can snap different workflow modules together!
Chaining Workflows with HTTP Request Node
To trigger one workflow from another, we use the ‘HTTP Request’ node in the initiating workflow. This node acts like a little messenger, sending a request to the webhook URL of your target workflow.
Here’s how we set up this workflow chain:
-
Create the Target Workflow: First, let’s build the workflow that will be triggered. Create a new workflow (you can name it something like “Action Workflow”). Add a Webhook node as its first step. Configure it with a simple path (e.g.,
action-trigger).Important: Make sure this “Action Workflow” is active. You’ll see a toggle switch in the top right corner of the workflow editor. If it’s not active, its production webhook URL won’t work!
Expected Feedback: Once active, the Webhook node in your “Action Workflow” will show its Production URL. Copy this URL – we’ll need it in the next step.
-
Create the Initiating Workflow: Now, create another new workflow (let’s call this one “Trigger Workflow”). This workflow will be the one that starts the chain. You can begin with any trigger node you like – maybe a ‘Schedule’ node to run it periodically, or another Webhook node if it’s triggered externally.
-
Add an ‘HTTP Request’ Node: After your trigger node in the “Trigger Workflow”, drag an ‘HTTP Request’ node onto the canvas and connect it.
-
Configure HTTP Request to Call the Target Webhook: Click on the ‘HTTP Request’ node. In its settings:
- URL: Paste the Production Webhook URL of your “Action Workflow” that you copied in step 1. This is crucial – you need the production URL for one workflow to trigger another live workflow.
- HTTP Method: Usually,
GETis fine for simple triggers, but if you need to send data from the “Trigger Workflow” to the “Action Workflow”, you might usePOSTand include data in the ‘Body’ section.

-
Activate the Initiating Workflow: Activate your “Trigger Workflow” as well.
Expected Feedback: Now, when your “Trigger Workflow” runs (e.g., if it’s scheduled to run every 15 seconds), you’ll see the ‘HTTP Request’ node execute. If you then go to your “Action Workflow”, you should see its Webhook node also trigger, indicating it received the request from the “Trigger Workflow”! You’ve successfully chained them together!
By activating the initiating workflow, it will periodically (e.g., every 15 seconds using a ‘Schedule’ node) send an HTTP request to the target workflow’s webhook, effectively triggering it in a loop. This is incredibly powerful for building complex, interconnected systems within n8n.
Required Resources and Cost-Benefit Analysis
Alright, let’s talk shop. What do you actually need to get all this webhook goodness working? The main thing is an n8n instance. You can run n8n yourself (which is what I usually do, because I love having full control!) or use their cloud service. Both are great options, depending on your comfort level and needs.
Resource Checklist
Here’s a quick rundown of what you’ll need. Good news: most of it is free or things you probably already have!
| Resource/Tool | Description | Estimated Cost (Monthly) | Notes |
|---|---|---|---|
| n8n Instance | This is your automation engine! You can self-host it on your own server (like a VPS or even a Raspberry Pi) using Docker (super easy way to run software in isolated containers) or use n8n Cloud for a managed service. | $0 - $50+ | Self-hosting has a free tier, just pay for your server. Cloud has different plans. |
| Web Browser | For testing your webhooks by pasting URLs and seeing the responses. | Free | Chrome, Firefox, Safari, Edge – whatever you prefer. |
| Internet Access | Gotta have that connection to send and receive webhook calls! | Varies | Standard utility, you probably have this already. |
| Text Editor | If you’re getting fancy and returning dynamic HTML pages, a good text editor makes life easier. | Free | VS Code, Sublime Text, Notepad++ are all excellent choices. |
| Basic HTTP Client | (Optional but super handy!) For more advanced testing, debugging, or sending POST requests with a body, these tools are your best friends. | Free | Postman, Insomnia, or even the command-line tool curl are great. |
DIY vs. Commercial Solutions: Cost-Benefit Analysis
So, why n8n over something like Zapier or Make (formerly Integromat)? It’s a classic build-vs-buy dilemma. Here’s my take:
| Feature/Aspect | DIY n8n Webhooks | Commercial Automation Platform (e.g., Zapier, Make) | Notes |
|---|---|---|---|
| Initial Setup | Can be a bit more complex, especially if you’re self-hosting and new to Docker. Requires a bit more technical know-how. | Generally lower complexity, they hold your hand through the setup. | DIY gives you ultimate control, but yeah, it’s a bit more effort upfront. Think of it as assembling IKEA furniture vs. buying it pre-built. |
| Operating Cost | Potentially free (if self-hosted on existing infrastructure) to very low (just server costs). | Subscription-based, and costs often scale up with the number of tasks or operations you run. | For high-volume or super custom needs, n8n can be way more cost-effective in the long run. |
| Customization | Highly customizable, open-source, you can literally build anything! | Limited to the platform’s pre-built features and integrations. | n8n’s flexibility is its superpower. If you have a unique workflow that doesn’t fit a pre-made connector, n8n is your go-to. |
| Scalability | Depends entirely on your hosting infrastructure. You manage it. | Managed by the provider, generally robust and scales automatically. | Self-hosted n8n can scale, but you’re responsible for managing the server resources. |
| Maintenance | Your responsibility! Updates, security patches, troubleshooting – it’s on you. | Managed by the provider. They handle the boring stuff. | This is the trade-off for control. But honestly, the n8n community is super helpful if you get stuck. |
| Learning Curve | Moderate to High. You need to understand nodes, expressions, and workflow logic. | Low to Moderate. They’re designed to be user-friendly. | n8n is a powerful tool, and with great power comes a slightly steeper learning curve. But trust me, it’s worth it! |
| Data Privacy | Full control over your data. It stays on your servers. | Depends on the provider’s policies and infrastructure. | For sensitive data or strict compliance requirements, self-hosting n8n gives you maximum peace of mind. |
⚠️ Critical Best Practices for Webhook Implementation
Alright, listen up! This section is super important. Building automations is fun, but building secure and reliable automations is even better. These are the lessons I’ve learned the hard way, so you don’t have to!
- Security First: I know we used
Nonefor authentication in our examples, but for production webhooks, that’s a big no-no! Always, always, always consider adding authentication. Think of it like putting a lock on your front door. You can use API keys, basic authentication (username/password), or even OAuth for more complex scenarios. This prevents unauthorized folks from triggering your workflows. - Error Handling: What happens if the external service your workflow talks to is down? Or if a crucial piece of data (a parameter) is missing from the incoming webhook? Your workflow shouldn’t just crash! Implement robust error handling. Use ‘Error’ nodes, ‘IF’ nodes, or ‘Try/Catch’ blocks to gracefully manage unexpected scenarios. It’s like having a backup plan for your backup plan.
- Idempotency: This is a fancy word, but it’s super important. It means designing your webhook-triggered workflows so that if a webhook call is received multiple times (which can happen due to network glitches or retries), it won’t cause unintended duplicate actions. For example, if a webhook adds a user to a database, you don’t want them added twice if the webhook fires twice. Check if the user already exists before adding them again. It’s about making your workflow smart enough to handle redundancy.
- Asynchronous Processing: If your workflow does something really long-running (like processing a huge file or making a bunch of API calls), you might run into webhook timeouts. The calling application might give up waiting for a response. For these cases, consider triggering an asynchronous workflow or queuing the task. The ‘Respond to Webhook’ node can send an immediate “OK” response to the caller, while the rest of your long-running workflow continues processing in the background. It’s like telling someone, “Got your message, I’m working on it!” and then actually doing the work later.
Key Takeaways for Effective Webhook Usage
Alright, we’ve covered a lot of ground! Let’s quickly recap the most important nuggets of wisdom you should carry with you:
- Differentiate Webhook Types: Remember the sandbox vs. live castle analogy? Know when to use ‘Test’ webhooks for development and ‘Production’ webhooks for your live automations. This makes your development process smooth and efficient.
- Leverage Parameters: Don’t just trigger workflows; send dynamic data along for the ride! Using URL parameters makes your workflows super adaptable and responsive to different situations.
- Master Custom Responses: Your workflow can talk back! Use the ‘Respond to Webhook’ node to control what the caller receives, whether it’s a simple “OK,” a redirect to another page, or even a dynamically generated HTML page. This is where your workflow gets interactive.
- Chain Workflows: Think modular! Use webhooks and ‘HTTP Request’ nodes to build interconnected n8n workflows. This helps you break down complex automations into smaller, reusable, and easier-to-manage pieces. It’s like building with LEGO bricks!
- Prioritize Security & Error Handling: This isn’t optional, folks. Always build with security measures (authentication!) and robust error handling in mind. This ensures your automations are reliable, safe, and don’t break down when things go sideways.
Conclusion
Phew! We made it. Webhooks, my friends, are truly the backbone of real-time automation. They provide such a flexible and powerful way to integrate n8n with virtually any external service or application out there. By mastering the concepts we’ve covered – understanding test and production webhooks, effectively passing parameters, crafting custom responses, and chaining workflows – you’re not just building automations; you’re unlocking a whole new level of automation sophistication.
The ability to dynamically respond to events and orchestrate complex processes makes webhooks an indispensable tool in your n8n toolkit. Embrace these techniques, and you’ll transform your automation capabilities, building systems that are not only efficient but also intelligent and responsive. It’s like upgrading your automation from a basic calculator to a supercomputer!
Now, armed with this knowledge, go forth and build your next powerful webhook-driven automation in n8n! I can’t wait to see what you create.
Frequently Asked Questions (FAQ)
Q: What’s the main difference between a Test and Production Webhook URL?
A: The Test Webhook URL is primarily for development. It listens for a single incoming request to capture its data structure, helping you build your workflow. The Production Webhook URL is for live workflows; once active, any request to it will trigger your workflow’s execution. Think of Test as a sandbox and Production as the live environment.
Q: Why would I want to pass parameters to my workflow via a webhook?
A: Passing parameters allows you to send dynamic data into your workflow, making it much more flexible and responsive. For example, you can send a user ID, an action type, or specific product details, and your workflow can then use this information to perform different actions or customize responses based on the data received. It’s like giving your workflow specific instructions for each incoming event.
Q: My webhook isn’t triggering! What should I check first?
A: Ah, the classic! First, make sure your workflow is active (especially if you’re using a Production URL). Second, double-check that the webhook URL you’re using is exactly correct – even a tiny typo can break it. Third, ensure the HTTP method (GET, POST, etc.) you’re using to send the request matches what you configured in the n8n Webhook node. Finally, if you’re using a Test URL, remember it only listens once, so you might need to reactivate it in n8n if you’ve already sent a request.
Q: Can I send data in the body of a POST request to an n8n webhook, not just in the URL parameters?
A: Absolutely! While URL parameters (query strings) are great for simple data, for more complex or sensitive data, you’ll typically send it in the body of a POST request, often as JSON. In n8n, the Webhook node will automatically parse this body data, and you can access it using expressions like {{ $json.body.yourFieldName }}. This is common for forms or API integrations.
Q: Is it safe to expose my webhook URLs publicly?
A: For production webhooks, simply exposing the URL without any authentication is generally not safe. Anyone with the URL could trigger your workflow, potentially leading to unintended actions or resource consumption. Always implement authentication (like API keys, basic auth, or OAuth) for production webhooks to ensure only authorized applications or users can trigger them. Security is key!
Q: How can I debug my webhook if it’s not behaving as expected?
A: n8n provides excellent debugging tools. After triggering your webhook, check the “Input” and “Output” data of your Webhook node and subsequent nodes in the workflow. This shows you exactly what data came in and how it transformed at each step. You can also use the “Execute Workflow” button in test mode to step through the workflow manually with sample data. For external testing, tools like Postman or Insomnia (or curl) give you more control over the request.