Watch the Video Tutorial
💡 Pro Tip: After watching the video, continue reading below for detailed step-by-step instructions, code examples, and additional tips that will help you implement this successfully.
Hey there, fellow automation enthusiast! Boyce here, your friendly neighborhood self-taught automation consultant. Today, we’re diving into something super important for anyone using n8n to supercharge their workflows: securely connecting to Google services. Think of it like building a super-powered robot that needs to talk to the Google mothership – you want that communication to be rock-solid, right?
In today’s interconnected digital landscape, the ability to seamlessly integrate various services is paramount for efficiency and innovation. For users of n8n, a powerful workflow automation tool, connecting with Google services like Google Sheets, Calendar, and Drive is a frequent requirement. However, achieving this integration securely and reliably hinges on a robust authentication mechanism. This is where Google OAuth 2.0 steps in, providing a secure, industry-standard protocol that allows n8n to access Google services on your behalf without ever needing your Google password. This comprehensive guide will demystify the process of setting up Google OAuth authentication for n8n, transforming a potentially complex task into a clear, step-by-step journey. We will cover everything from initial Google Cloud project setup to configuring the OAuth consent screen and finally connecting n8n, ensuring your workflows are not only powerful but also impeccably secure. As a seasoned expert in workflow automation and secure integrations, I’ve guided countless professionals through these exact steps, ensuring their systems operate with maximum efficiency and security.
Table of Contents
Open Table of Contents
- Introduction: Why Google OAuth for n8n?
- Setting Up Your Google Cloud Project: The Foundation
- Enabling Necessary APIs: Unlocking Google Services
- Configuring the OAuth Consent Screen: User Trust and Permissions
- Creating OAuth Client ID: Your n8n’s Identity
- Connecting Google OAuth to n8n: Bridging the Gap
- Testing Your Google Sheets Connection in n8n
- Beyond Google Sheets: Expanding Your n8n Integrations
- Frequently Asked Questions (FAQ)
- Q: Why am I getting an ‘Application Blocked’ or ‘This app isn’t verified’ error during authentication?
- Q: My n8n credential setup shows ‘Invalid redirect URI’ or a similar error.
- Q: I’m unable to see certain Google services (e.g., Google Drive) in n8n, even after successful OAuth setup.
- Q: My n8n Google OAuth connection keeps expiring or requiring re-authentication.
- Q: I’m getting ‘Access Denied’ or ‘Insufficient Permissions’ errors when running a Google node.
- Conclusion: Secure and Seamless Google Integrations with n8n
Introduction: Why Google OAuth for n8n?
Alright, let’s kick things off with the “why.” Why bother with Google OAuth 2.0 when you just want to get your n8n workflow talking to Google Sheets? Well, integrating Google services with n8n workflows offers unparalleled opportunities for automation, from updating spreadsheets automatically to managing calendar events and processing emails. But here’s the kicker: accessing these sensitive services requires a secure and authorized method. And that’s exactly what Google OAuth 2.0 provides! It’s like a VIP pass that lets n8n into the Google party, but only to the areas you approve, and without ever handing over your actual party invitation (your password).
Instead of directly sharing your Google account credentials (which, let’s be honest, is a big no-no in the security world) with n8n, OAuth allows you to grant n8n specific permissions to access certain Google services. This method significantly enhances security by minimizing credential exposure and allowing granular control over what n8n can do. For instance, you can tell n8n, “Hey, you can read from this Google Sheet, but don’t you dare write anything!” or “Okay, you can both read and write to this one.” You’re not giving it the keys to your entire Google kingdom, just a specific room. This principle of least privilege is a cornerstone of modern cybersecurity, making OAuth an indispensable component for any n8n user looking to build reliable and secure integrations with Google’s ecosystem. Without proper OAuth configuration, your n8n workflows would either be unable to connect to Google services or would rely on less secure, deprecated authentication methods, exposing your data to unnecessary risks. This guide ensures you establish a secure and future-proof connection. So, let’s get this secure connection built!
Setting Up Your Google Cloud Project: The Foundation
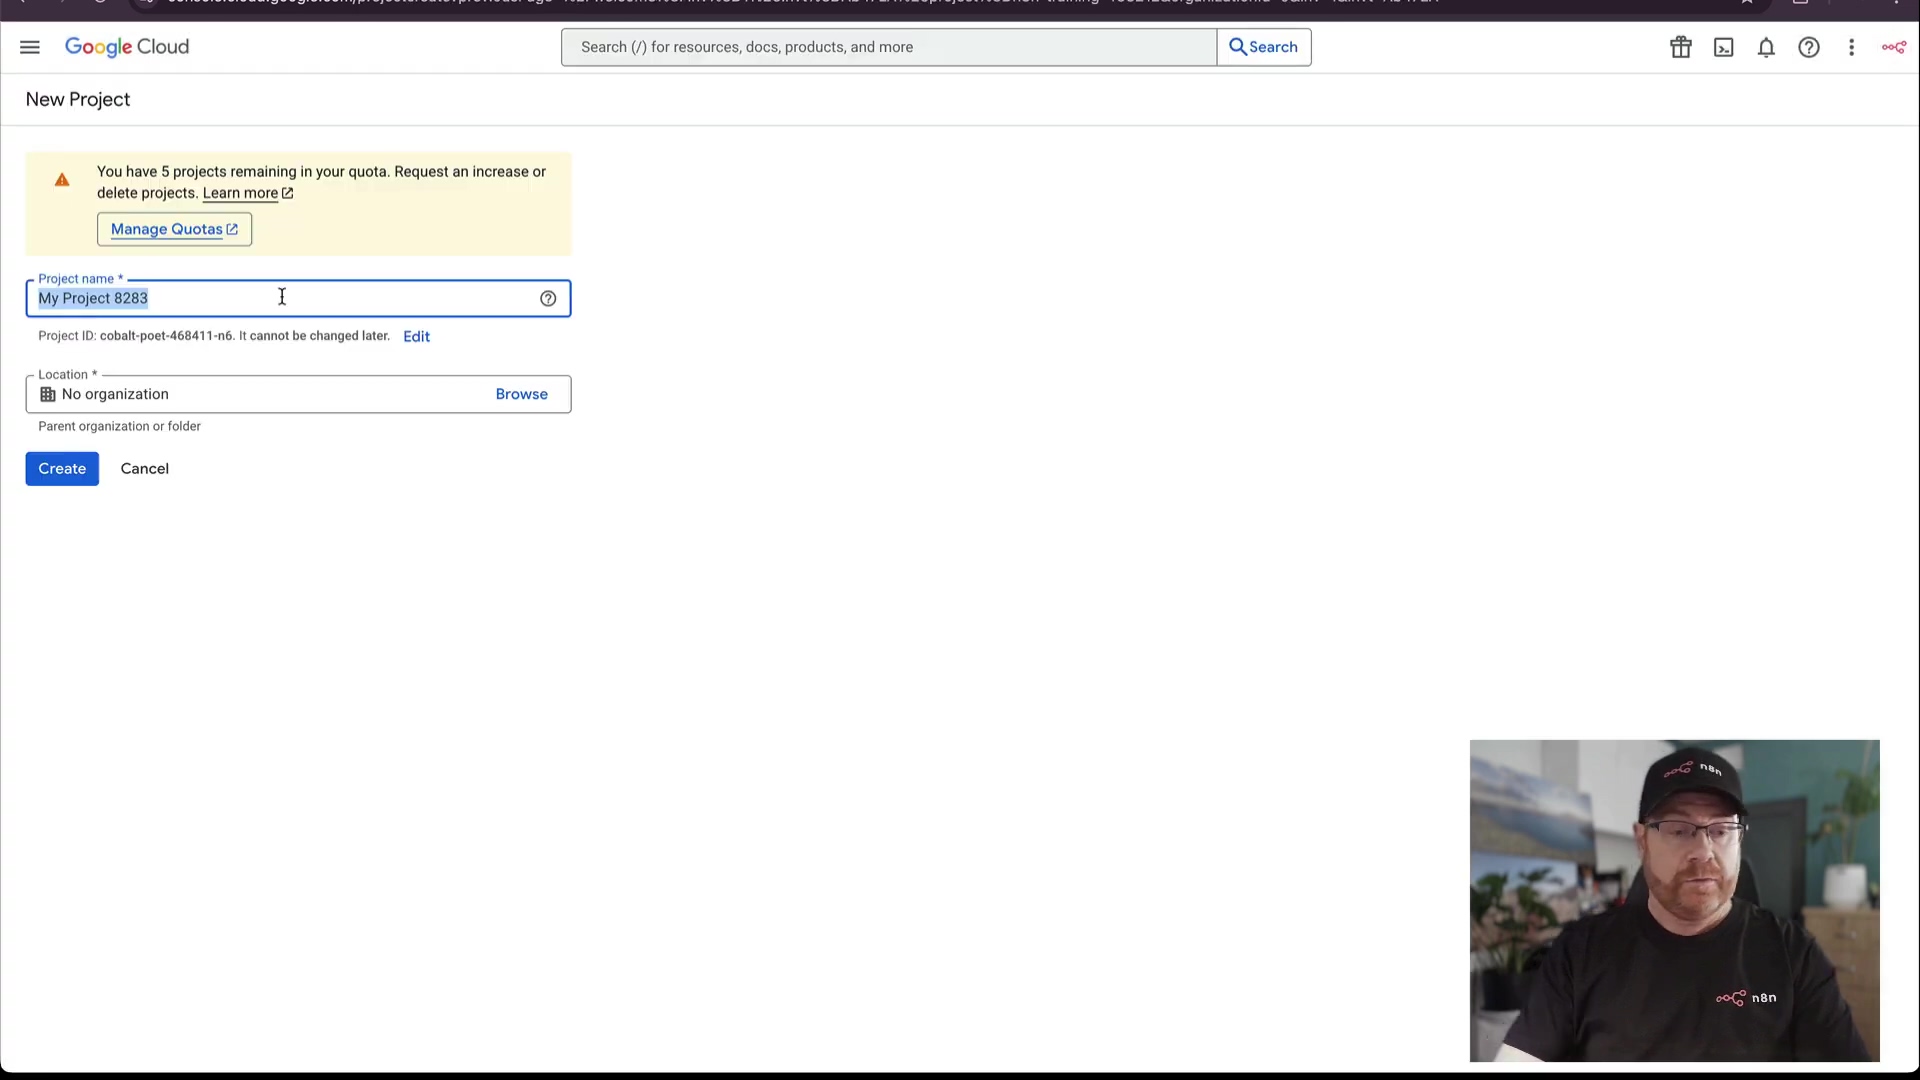
Alright, space cadets, our journey to secure Google service integration with n8n begins in the Google Cloud Console. Think of this as the mission control center for all your Google Cloud adventures. This console serves as the central hub for managing all your Google Cloud resources, including the essential components for OAuth. The first critical step is to create a new project. A Google Cloud project acts like a dedicated folder or a container for your resources, allowing you to organize and manage them effectively. It’s crucial to assign a descriptive name to your project, something like ‘n8n Google Integrations’ or ‘My N8N Workflows,’ so you can easily identify its purpose later. Trust me, future you will thank you for this organizational step! It’s not just cosmetic; it helps in managing billing, permissions, and service quotas associated with your integrations.
If you already have a Google Cloud account, just navigate directly to the console. If not, you’ll need to sign up, which often includes a free trial – super handy for getting started without commitment! Once you’re inside the console, look for the project selector at the top left of the screen. It usually shows the name of your current project or “Select a project.” Click on it! From there, you can either select an existing project or, for this setup, choose to create a new one. I always recommend creating a new, dedicated project for n8n. Why? Because it keeps things clean and isolated. This dedicated project will house all the necessary configurations for n8n’s access to Google services, ensuring a clean and manageable setup. Without a properly configured Google Cloud project, you cannot proceed with enabling APIs or creating OAuth credentials, as all these elements are scoped to a specific project. So, let’s get that project created!
Enabling Necessary APIs: Unlocking Google Services
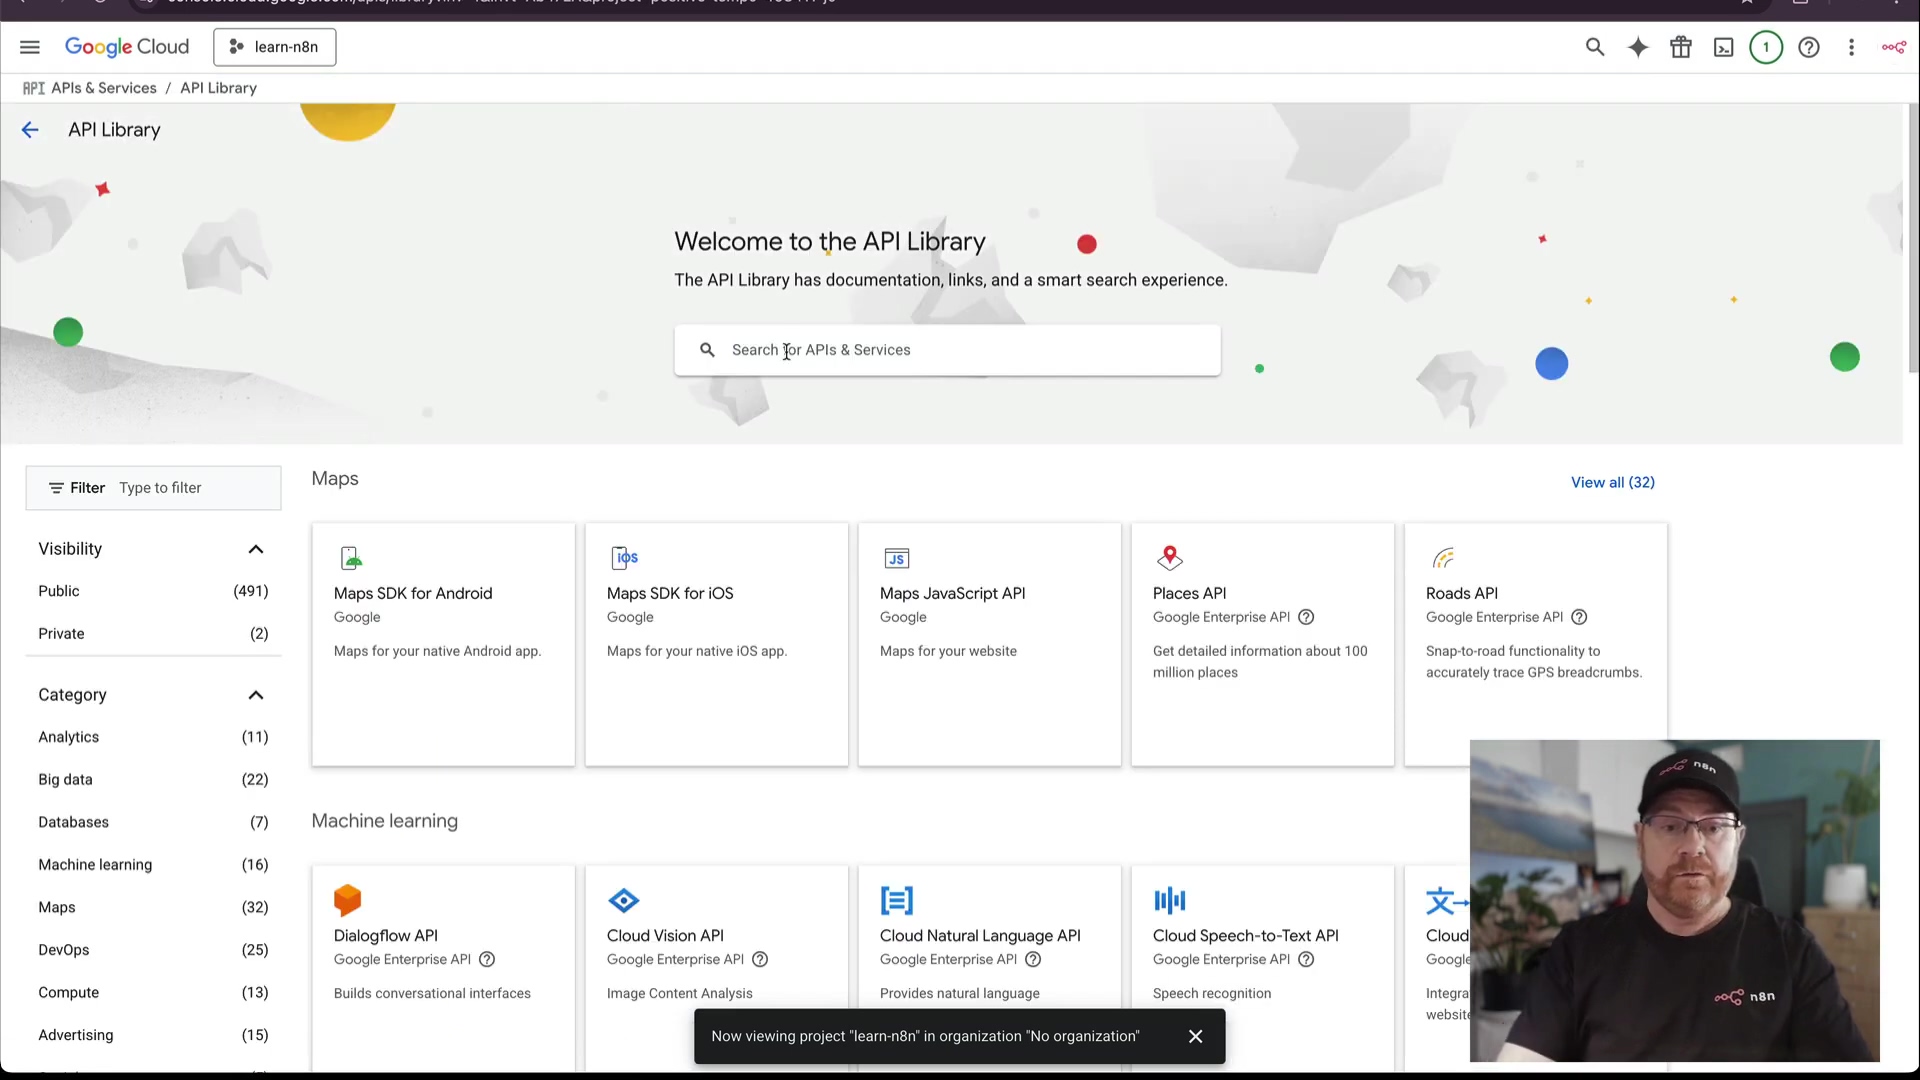
Okay, project created? Awesome! Now, let’s give our n8n robot the specific tools it needs to interact with Google. Once your Google Cloud project is established, the next crucial step is to enable the specific Google APIs that your n8n workflows intend to interact with. Google’s ecosystem is vast, like a giant toolbox, and each service, such as Google Sheets, Google Calendar, or Google Drive, operates through its own dedicated API (Application Programming Interface). Think of an API as a specific instruction manual for how to talk to a particular Google service.
Enabling these APIs within your project grants your project the necessary permissions to communicate with these services. For instance, if your n8n workflow aims to read from and write to Google Sheets, you must explicitly enable the ‘Google Sheets API.’ Similarly, for calendar management, the ‘Google Calendar API’ is required, and for file operations, the ‘Google Drive API’ is essential. The ‘Google Drive API’ is particularly important as many other Google services, including Sheets, often rely on Drive for file storage and management. So, if you’re using Sheets, you’ll likely need Drive too!
To enable an API, navigate to the ‘APIs & Services’ section in your Google Cloud Console. You’ll usually find this in the left-hand navigation menu. Then, select ‘Enabled APIs & Services.’ From there, you can search for and enable each required API. It’s a best practice to enable only the APIs you genuinely need. This goes back to our “principle of least privilege” – only give your robot the tools it absolutely needs, no more, no less. This minimizes potential security risks. Enabling APIs is a prerequisite for any application, including n8n, to interact programmatically with Google services, forming the backbone of your integration capabilities. So, go ahead and enable those APIs your n8n workflows will be using!
Configuring the OAuth Consent Screen: User Trust and Permissions
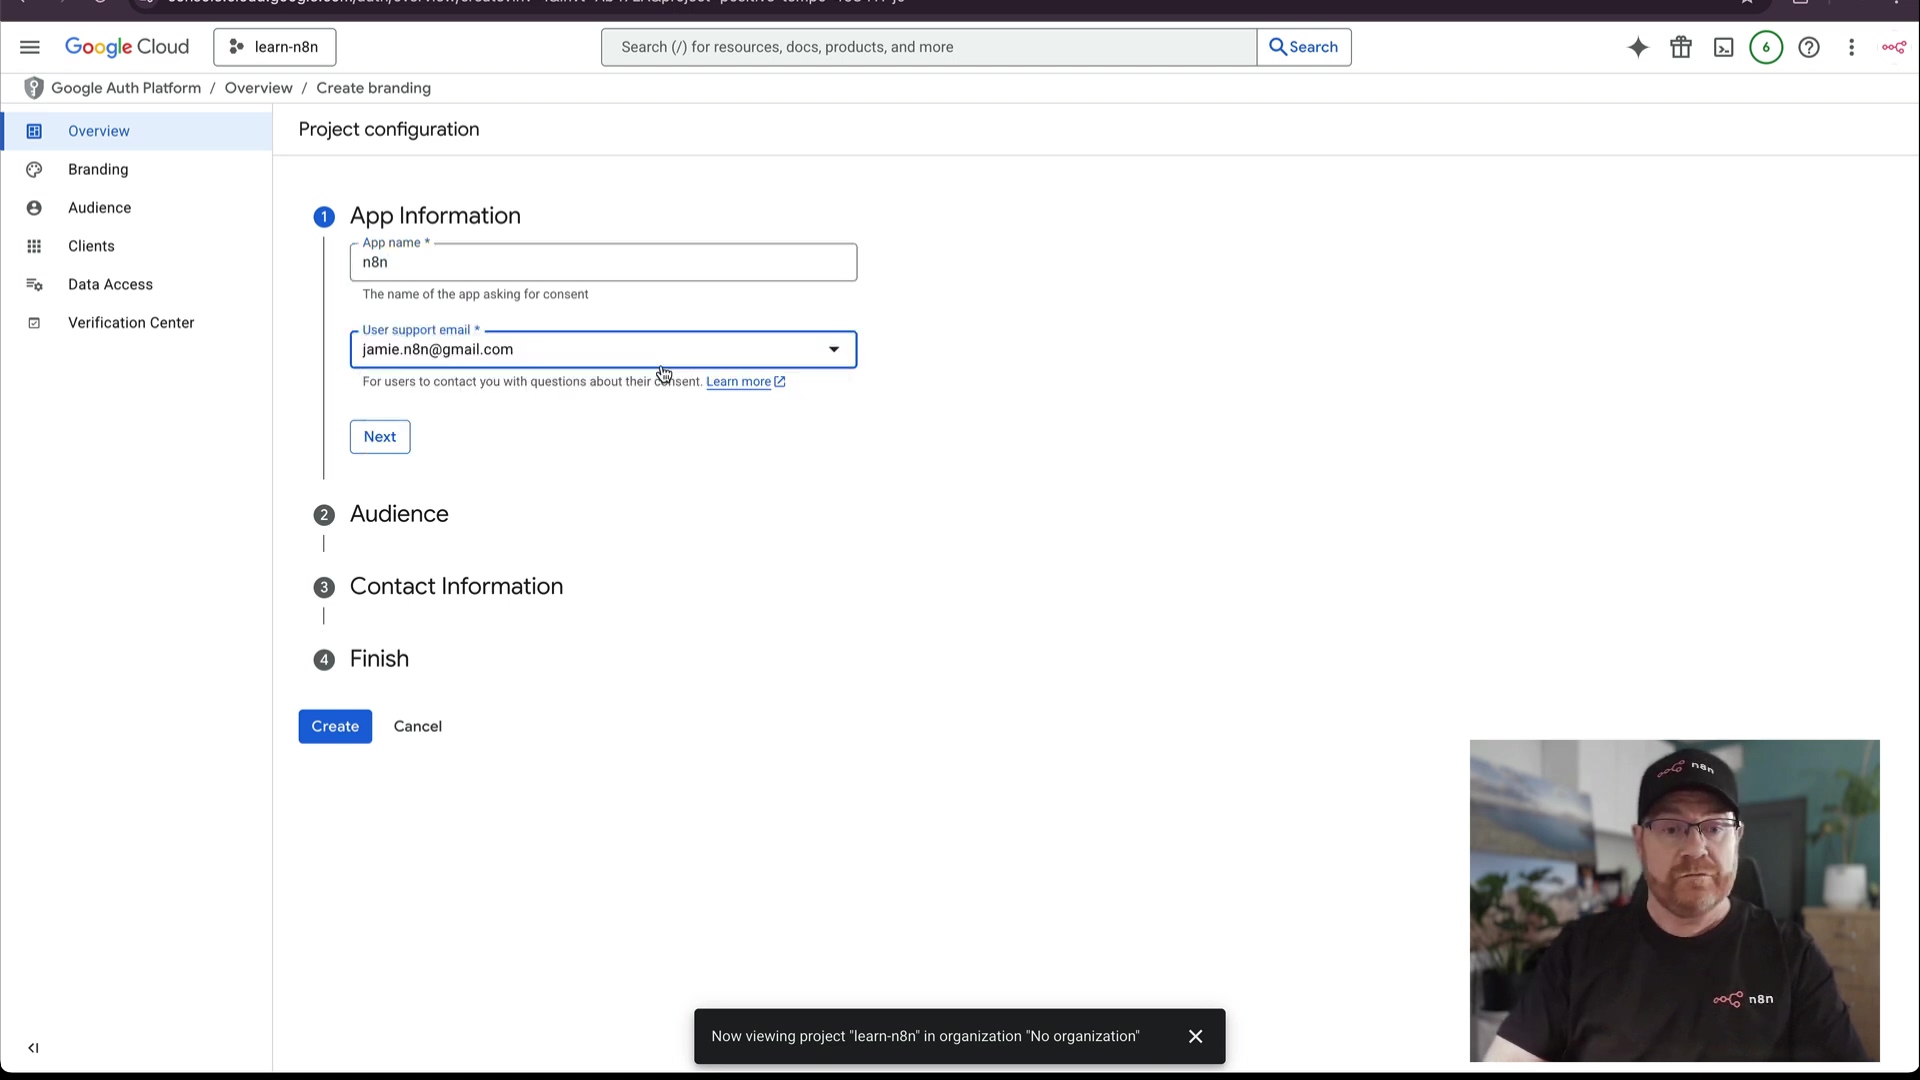
Alright, this next part is super important for building trust with anyone who uses your n8n workflows (even if that’s just you!). The OAuth Consent Screen is a critical component of the Google OAuth setup, serving as the user-facing interface that informs users about the permissions an application (in this case, n8n) is requesting to access their Google account data. Think of it as the “permission slip” that Google shows to the user.
Properly configuring this screen is paramount for transparency and user trust. When a user attempts to connect n8n to their Google account, they will be presented with this consent screen, detailing what data n8n wishes to access. Key elements to configure include the ‘App name,’ which should clearly identify your n8n instance or the purpose of the integration (e.g., ‘n8n Workflow Integrations’ or ‘My Awesome Automation’). You also need to specify a ‘User support email’ (your email is fine if it’s just for you!) and, optionally, an ‘App logo’ and ‘Application homepage link’ to enhance professionalism and trust. These optional fields are great if you’re building something for others to use.
Crucially, you must define the ‘Scopes’ – these are the specific permissions n8n will request. For example, to access Google Sheets, you might request https://www.googleapis.com/auth/spreadsheets. It’s vital to request only the scopes necessary for your workflows to function, again adhering to the principle of least privilege. Don’t ask for access to someone’s entire Google Drive if you only need to update a single sheet!
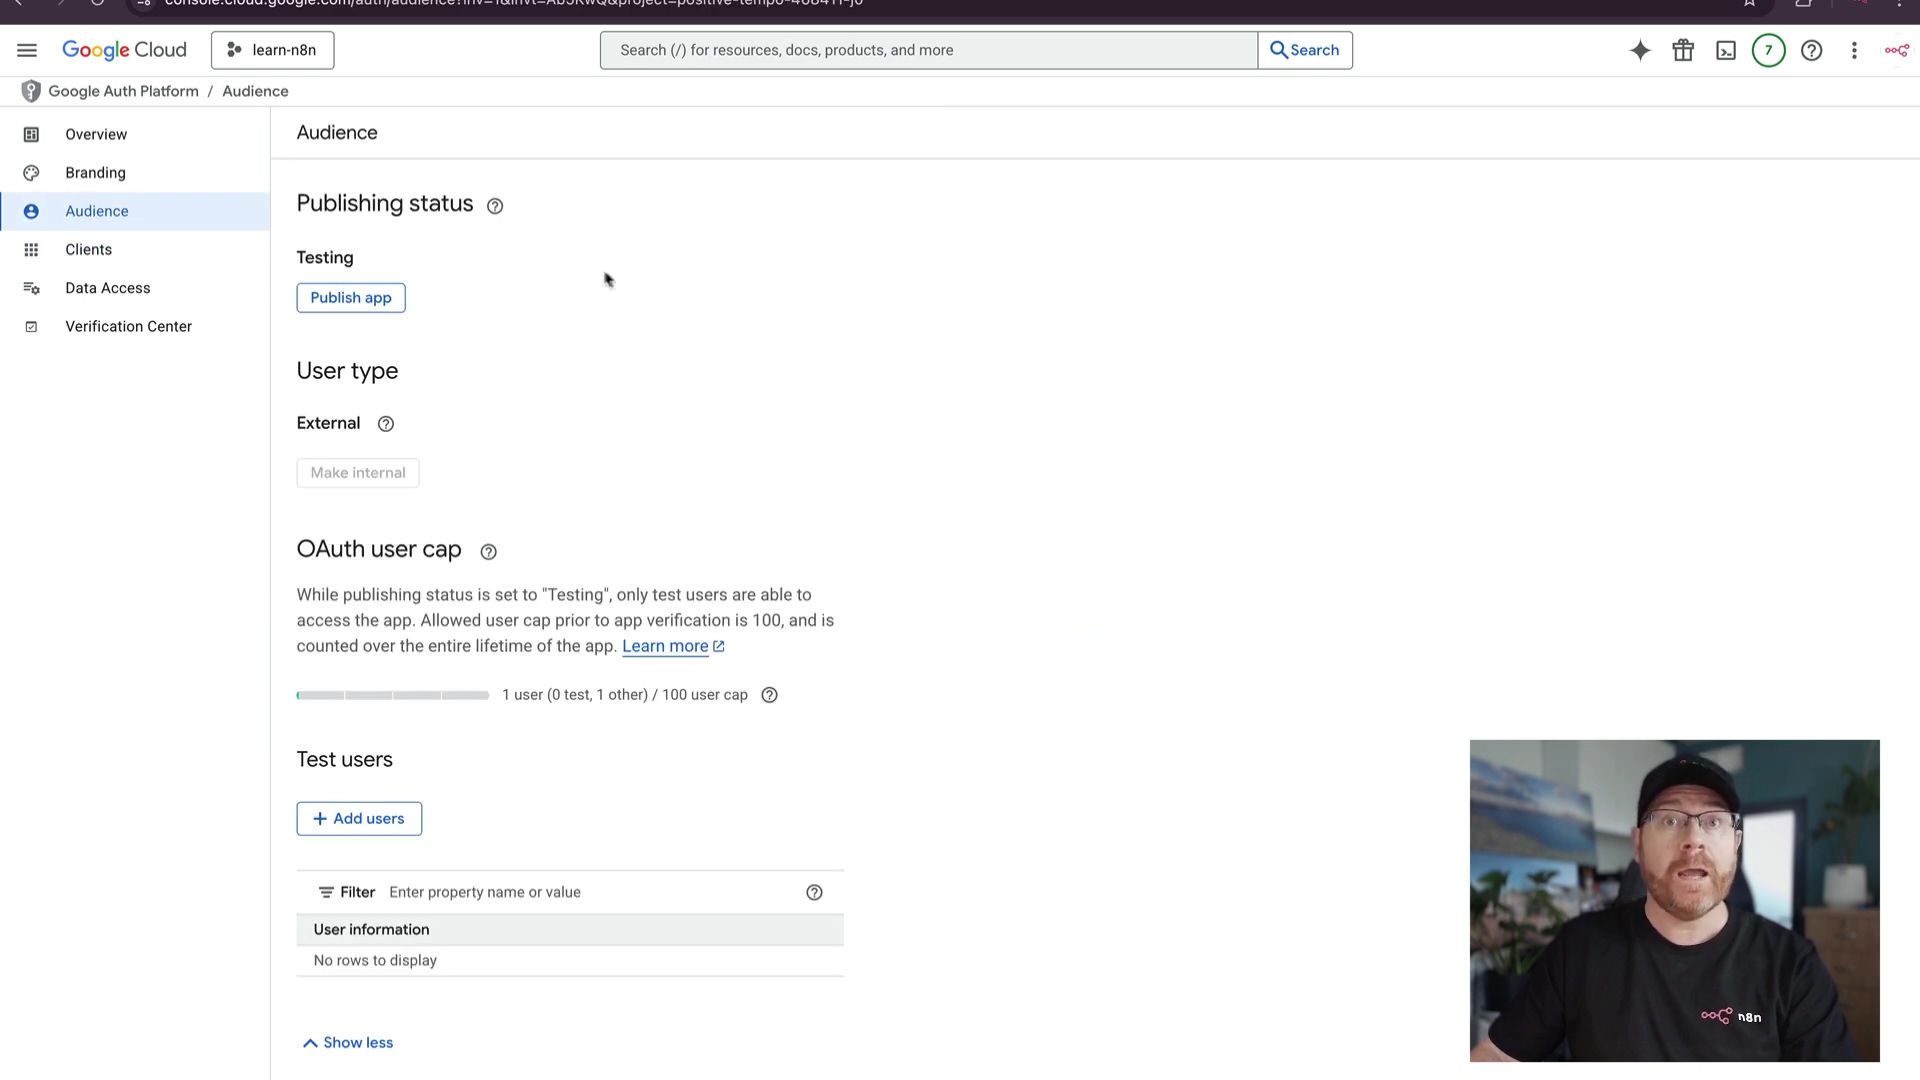
The ‘User type’ setting is also important: ‘Internal’ is for Google Workspace users within your organization, while ‘External’ is for general Google account users (like personal Gmail accounts). For most n8n users connecting to personal or external accounts, ‘External’ will be the correct choice. A well-configured consent screen not only facilitates a smooth authentication process but also builds user confidence in your n8n integrations. So, take your time here and make sure it looks good and asks for just what you need!
Creating OAuth Client ID: Your n8n’s Identity
Okay, we’re making great progress! After setting up your Google Cloud project, enabling the necessary APIs, and configuring the OAuth consent screen, the next pivotal step is to create the OAuth Client ID and Client Secret. These two credentials act as the unique identifier for your n8n instance when it attempts to authenticate with Google services. Think of the Client ID as n8n’s public name – how Google recognizes it – and the Client Secret as its private password, which it uses to prove its identity to Google. Keep that Client Secret safe, like a secret handshake!
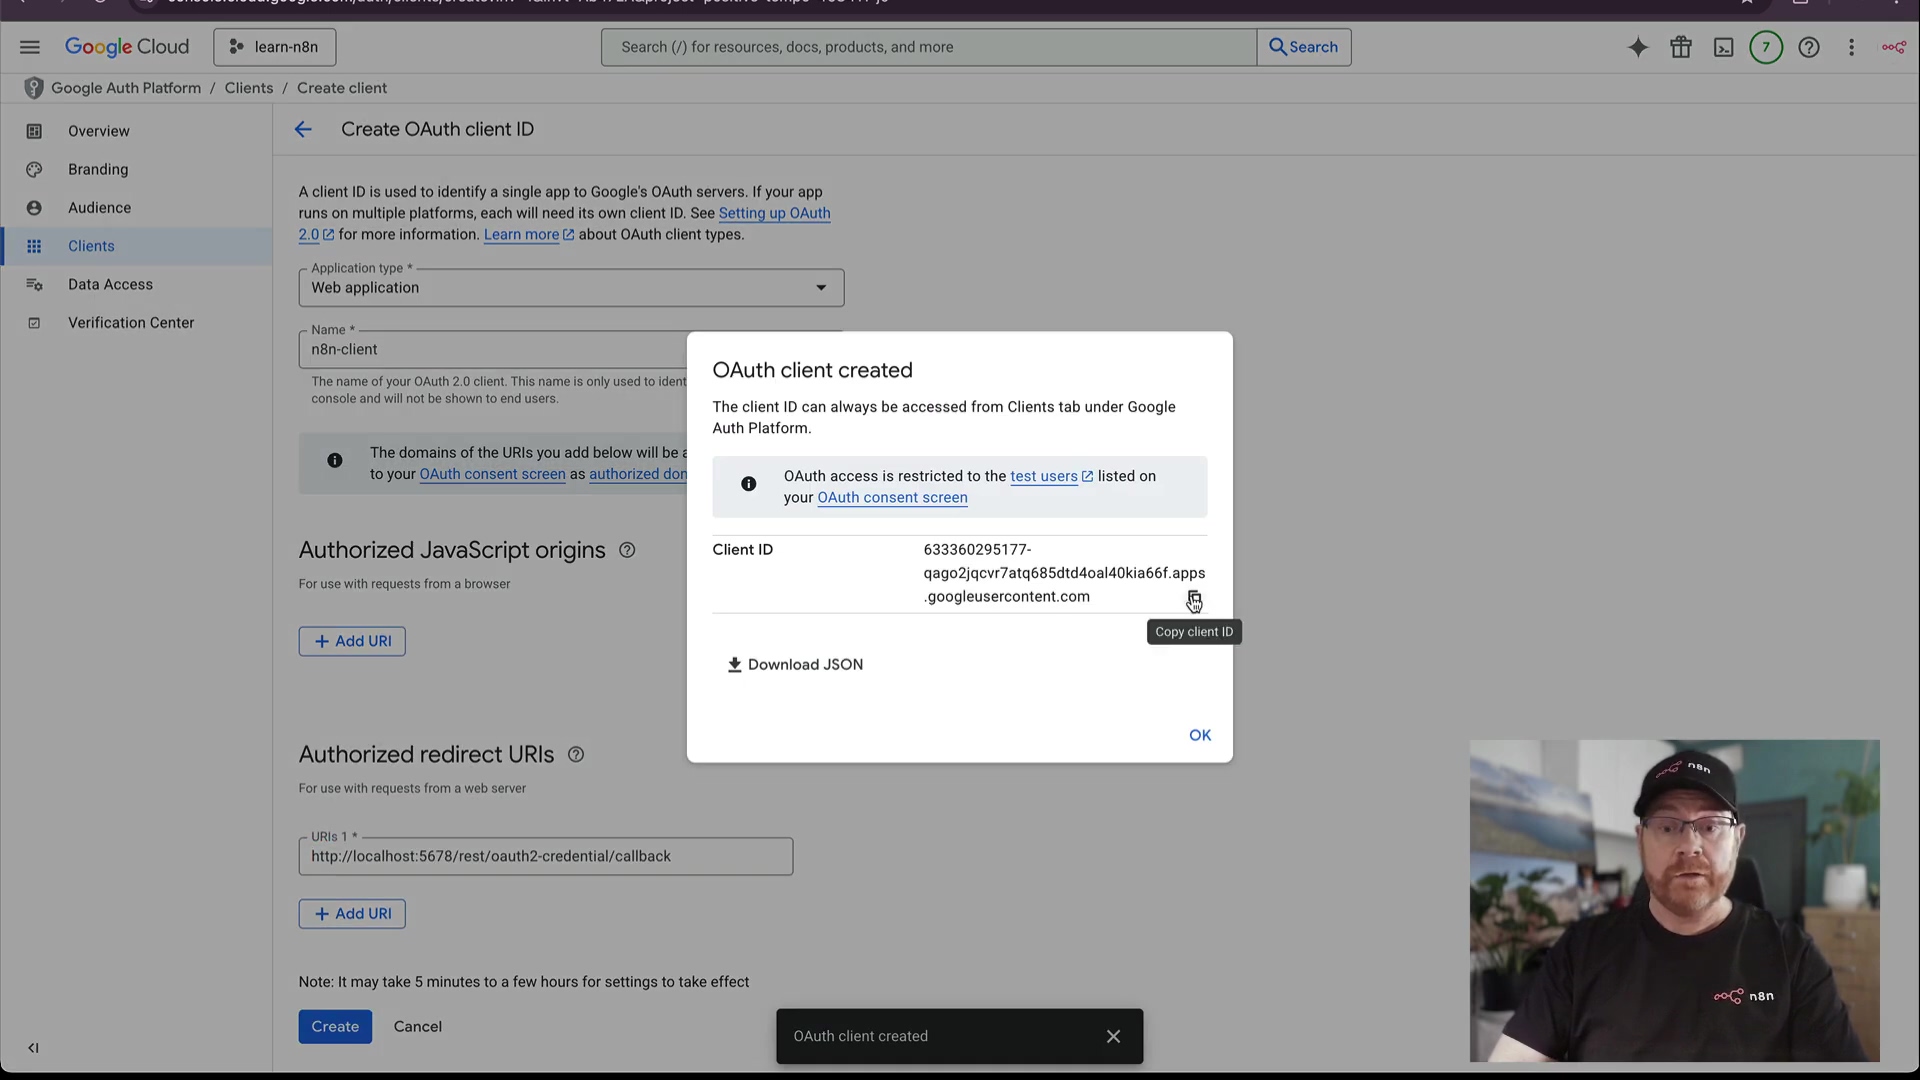
To generate these, navigate back to the ‘Credentials’ section within ‘APIs & Services’ in your Google Cloud Console. You’ll see a ‘Create Credentials’ button; click that, and then select ‘OAuth client ID.’ For n8n, the ‘Application type’ should always be ‘Web application,’ because n8n operates as a web-based application. Provide a descriptive ‘Name’ for your OAuth client, something like ‘n8n Client’ or ‘My N8N OAuth,’ so you know what it’s for.
Now, here’s the most critical configuration: the ‘Authorized redirect URIs.’ This URI is the specific URL where Google will send the authentication response after a user grants permission. n8n provides a unique redirect URI for its Google OAuth credentials, which you can easily copy directly from the n8n credentials setup page (we’ll get to that in the next step, but keep an eye out for it!). It typically follows a pattern like https://your-n8n-instance.com/rest/oauth2-credential/callback. It is imperative that this URI is precisely correct; any mismatch will lead to authentication failures. Even a single typo will break it, so double-check, triple-check! Once created, Google will present you with your Client ID and Client Secret. Copy these immediately and securely, as the Client Secret is often only shown once. These credentials are the keys that unlock the secure connection between n8n and your Google services. You’re almost there!
Connecting Google OAuth to n8n: Bridging the Gap
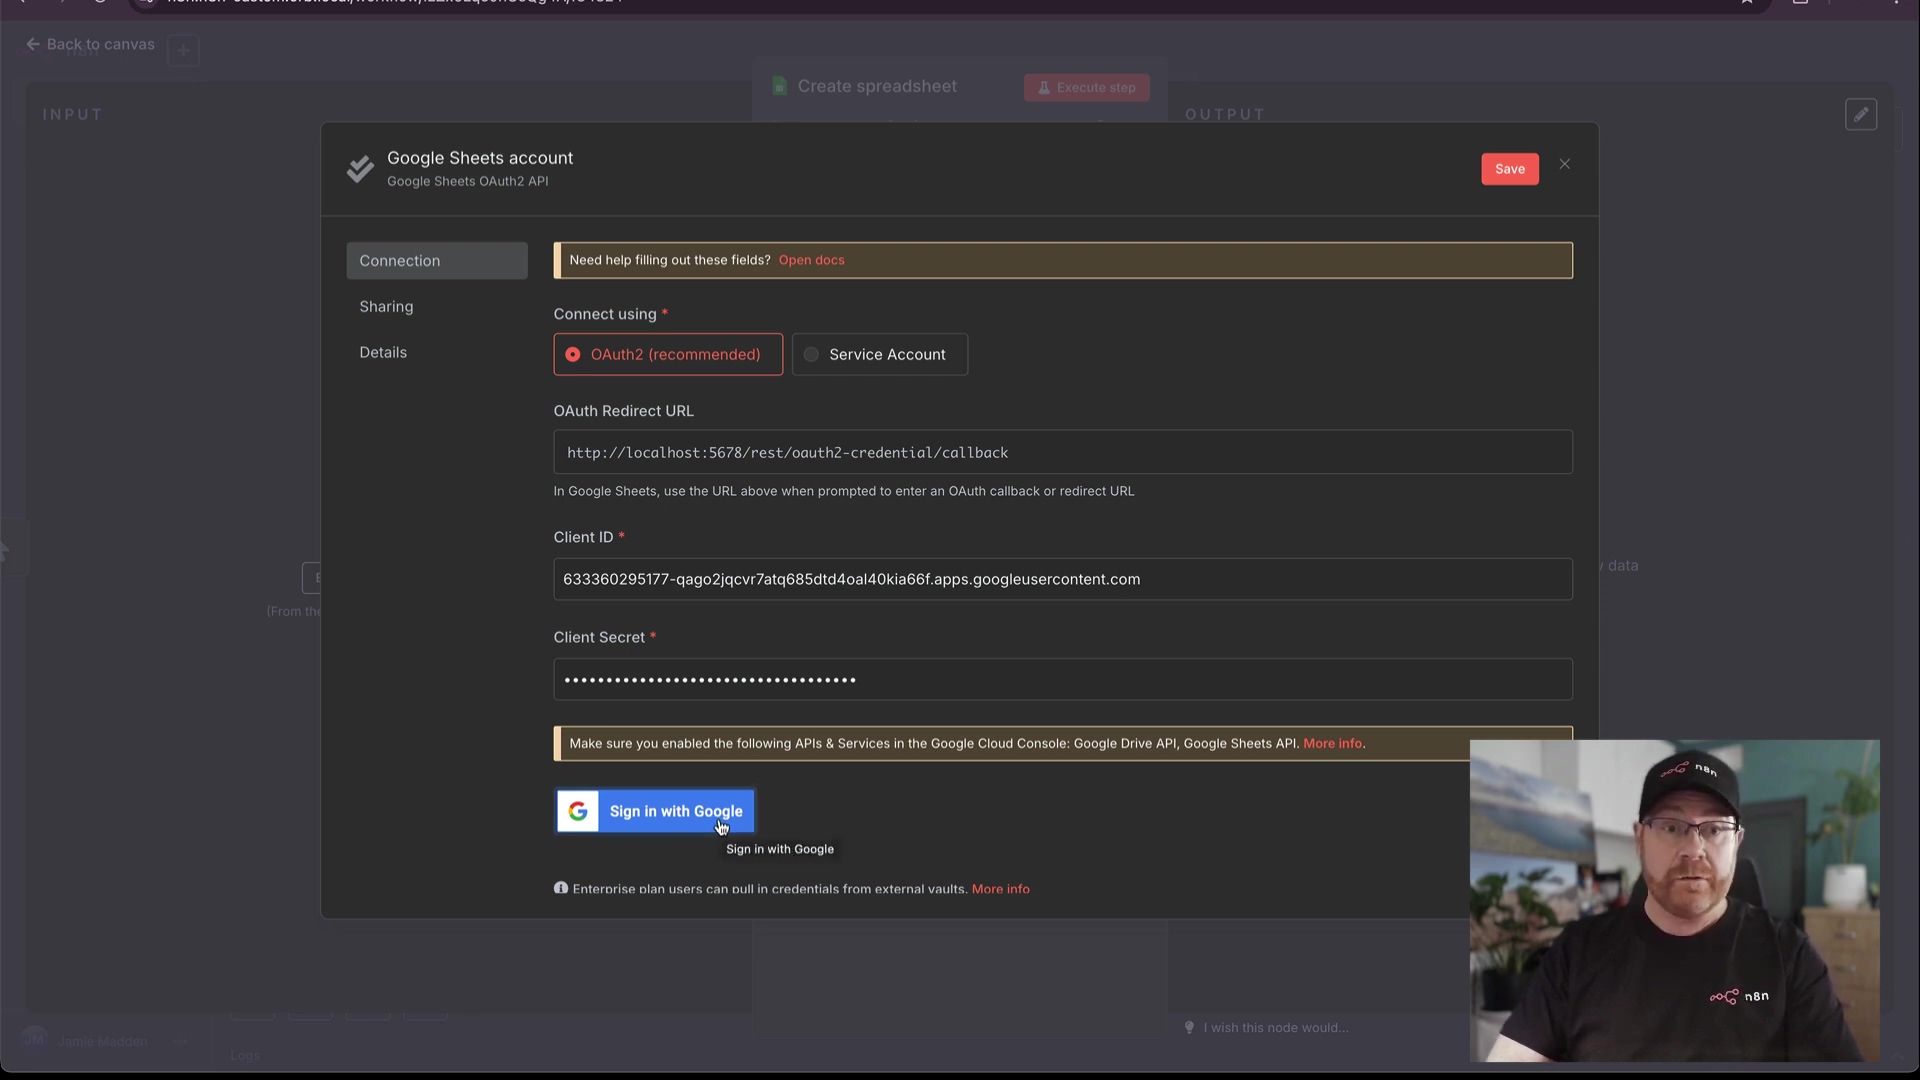
Alright, you’ve got your shiny new Google OAuth Client ID and Client Secret. Now for the moment of truth: connecting them to n8n! This is the final step to integrate these credentials into your n8n instance, thereby establishing the secure bridge to Google services. In your n8n interface, navigate to the ‘Credentials’ section. You’ll usually find this in the left-hand sidebar. Here, you will create a new credential for Google OAuth. When prompted, select ‘Google OAuth2 API’ as the credential type. This tells n8n exactly what kind of connection you’re trying to make.
You will then be presented with fields to input the ‘Client ID’ and ‘Client Secret’ that you obtained from the Google Cloud Console. Carefully paste the respective values into these fields. I can’t stress this enough: ensure there are no leading or trailing spaces or any transcription errors. Copy-paste is your friend here! Once these are entered, n8n will typically provide a button or link to ‘Sign in with Google.’ Clicking this will redirect you to Google’s authentication flow, where you will select the Google account you wish to connect and grant the permissions defined in your OAuth consent screen. If your application is still in ‘Testing’ mode in Google Cloud, you might encounter a warning about the app not being verified; however, you can usually proceed by clicking ‘Continue’ or ‘Advanced’ and then ‘Go to [Your App Name] (unsafe).’ For production environments, it’s advisable to publish your app to avoid repeated re-authentication requests every seven days.
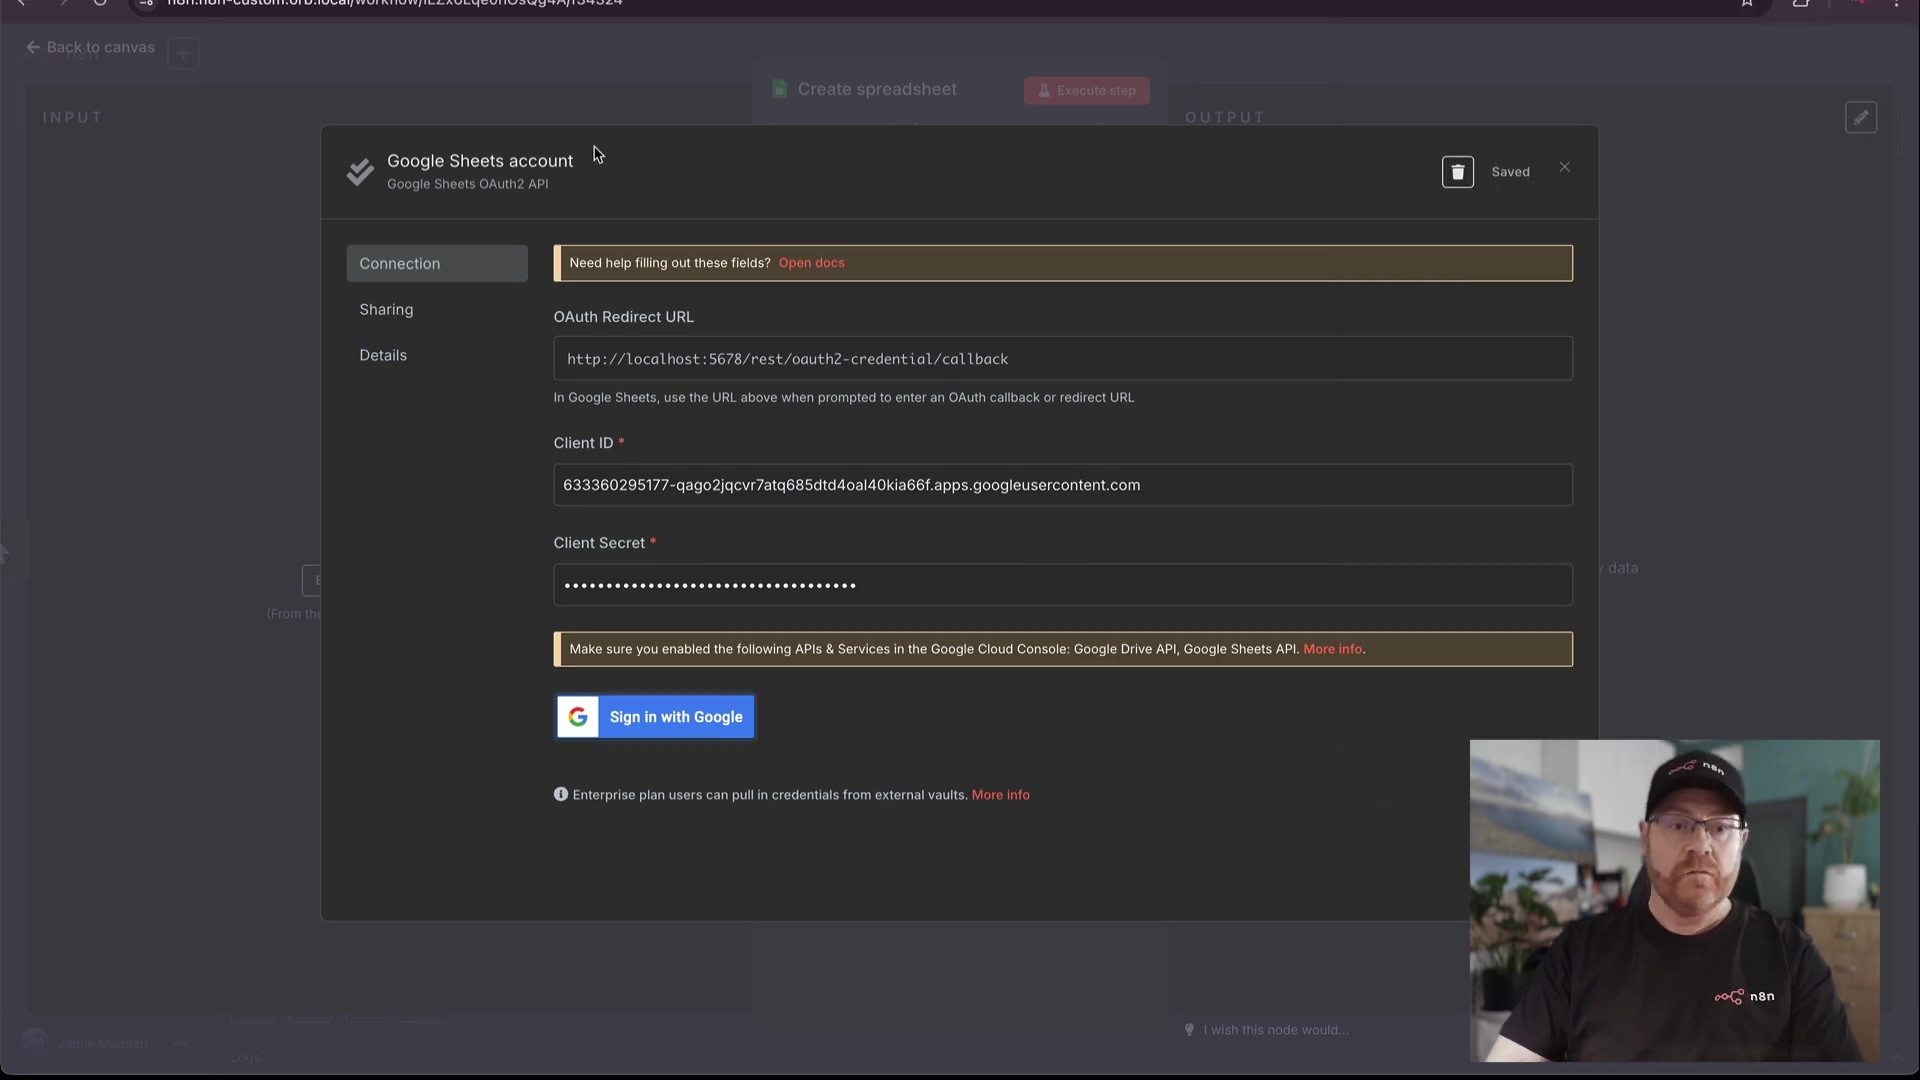
After successfully authenticating with Google, you will be redirected back to n8n, and your Google OAuth credential will be marked as connected. You’ll see a green checkmark or a similar indicator. It is highly recommended to give this credential a meaningful name within n8n, such as ‘Google Sheets OAuth’ or ‘My Main Google Account,’ especially if you plan to manage multiple Google connections. This naming convention will simplify selecting the correct credential when configuring Google nodes in your workflows. You’ve done it – your n8n is now securely linked to Google!
Testing Your Google Sheets Connection in n8n
Pat yourself on the back! You’ve successfully configured your Google OAuth credentials in n8n. But how do we know it really works? The next logical step is to verify that the connection works as expected. A simple and effective way to do this is by using a Google Sheets node within an n8n workflow. This test not only confirms the authentication but also ensures that the necessary APIs are enabled and permissions are correctly granted. It’s like a quick diagnostic check for your new connection.
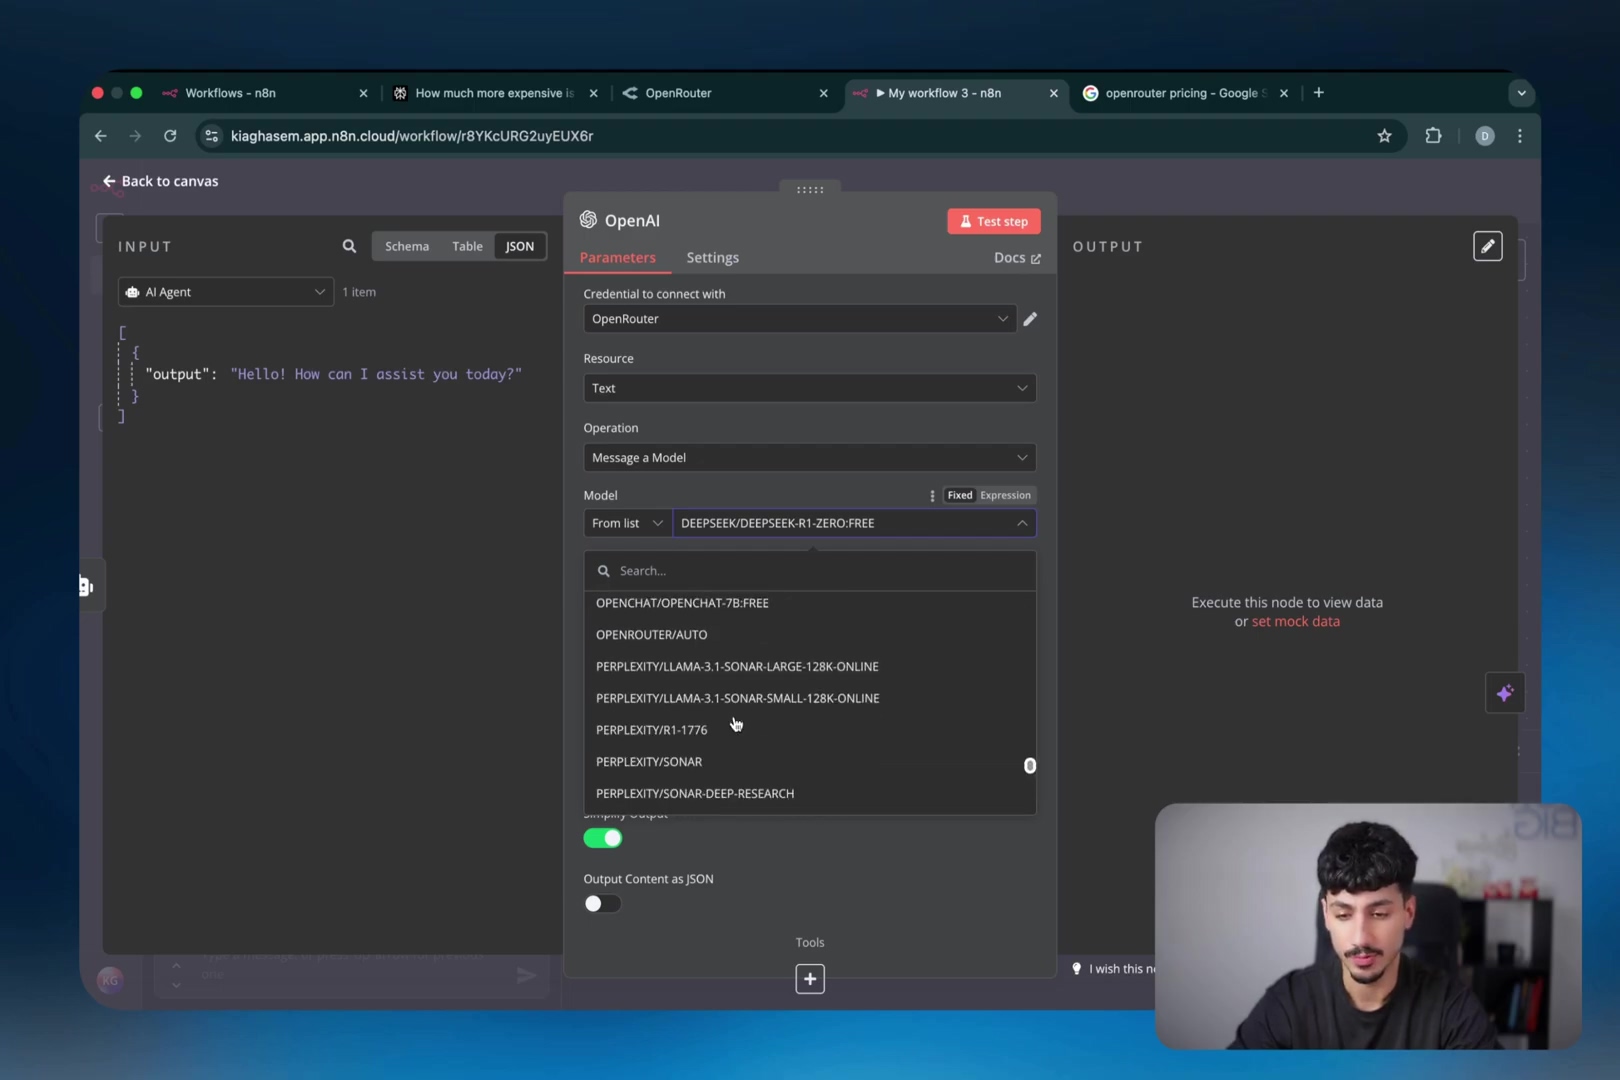
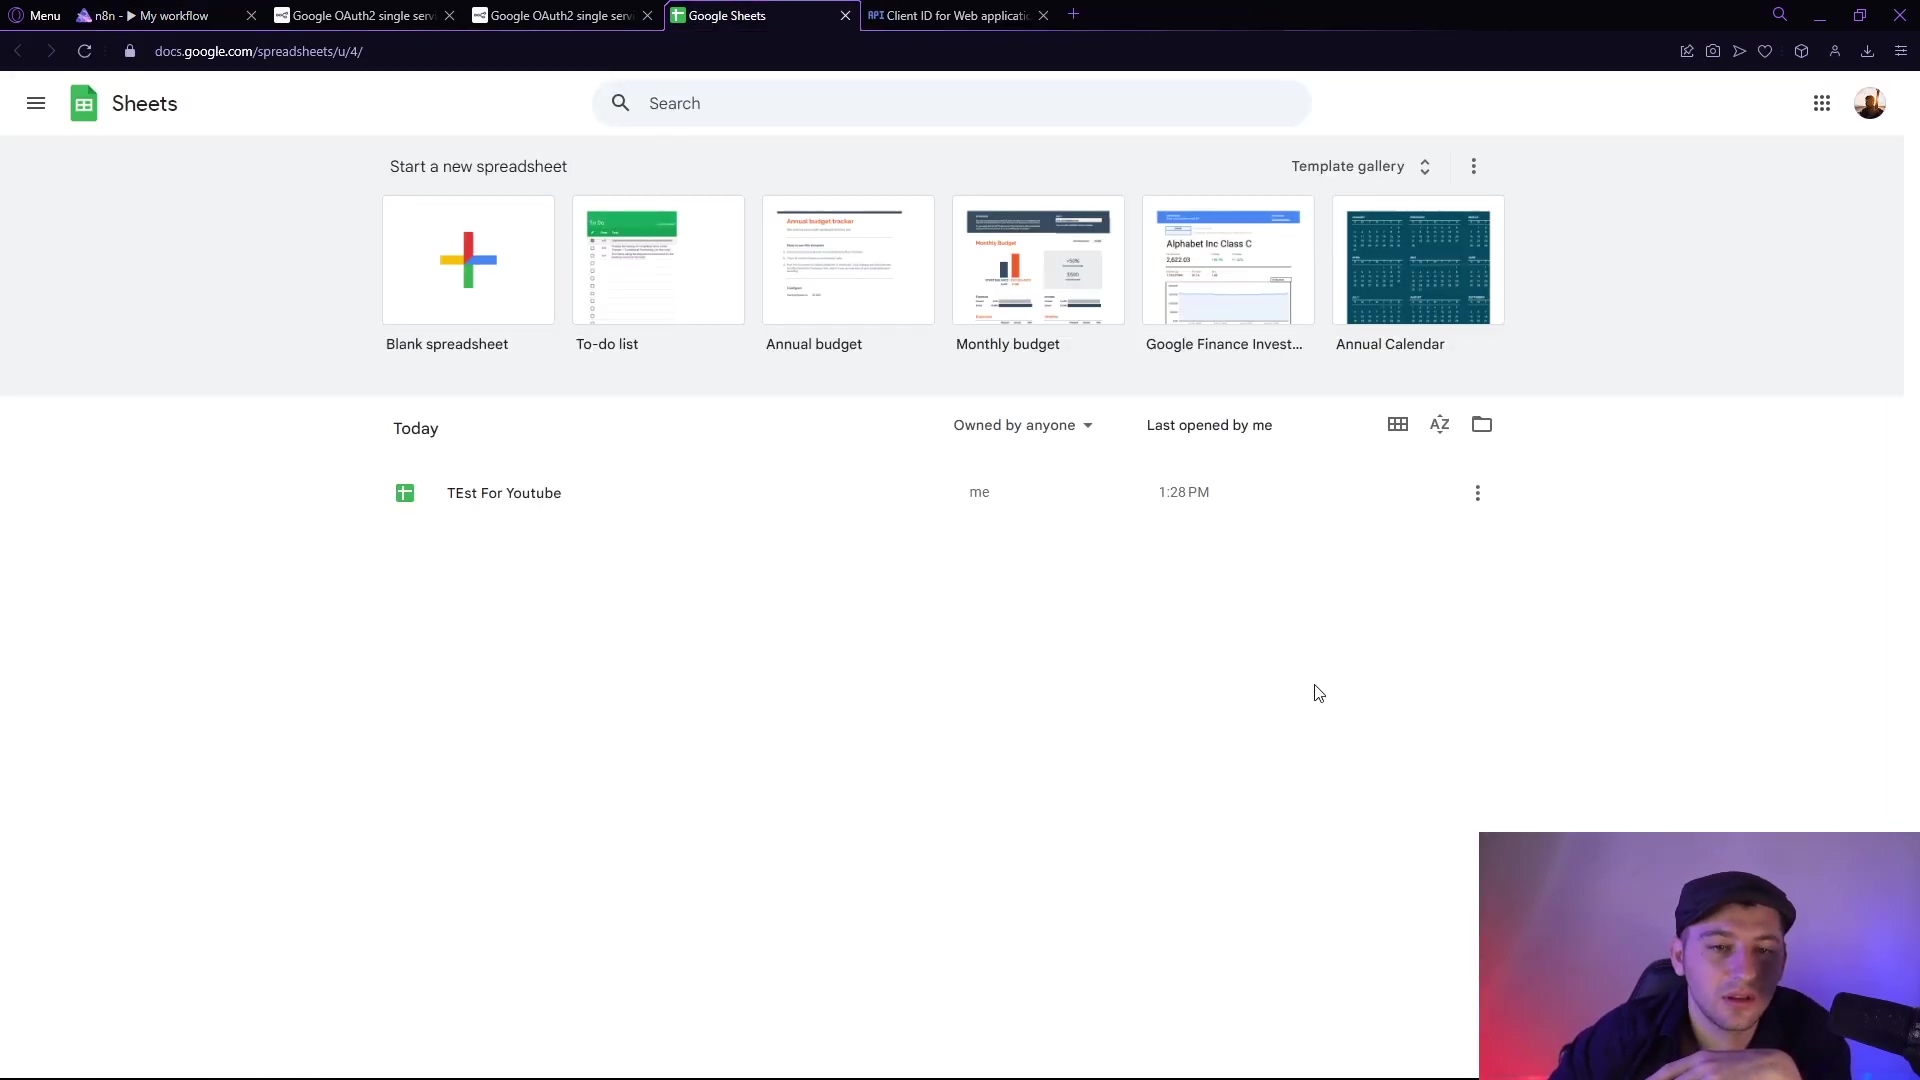
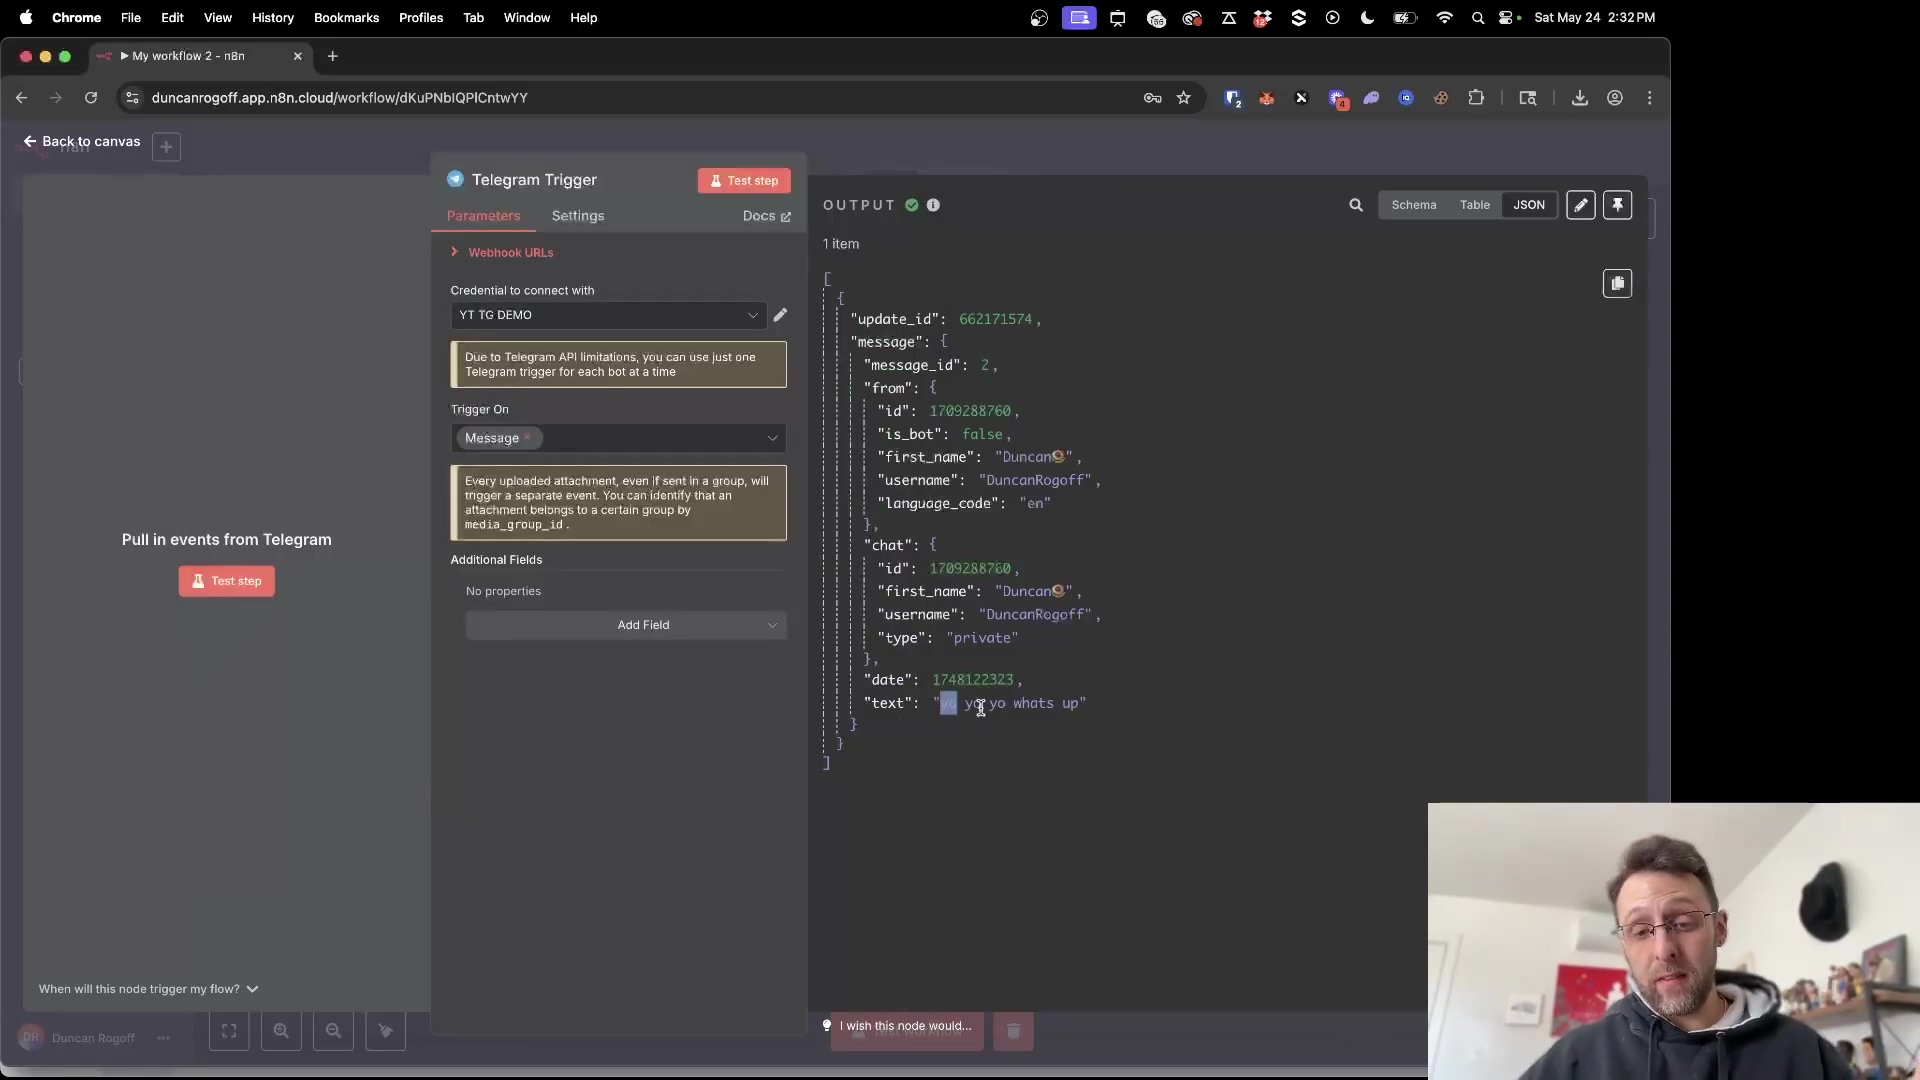
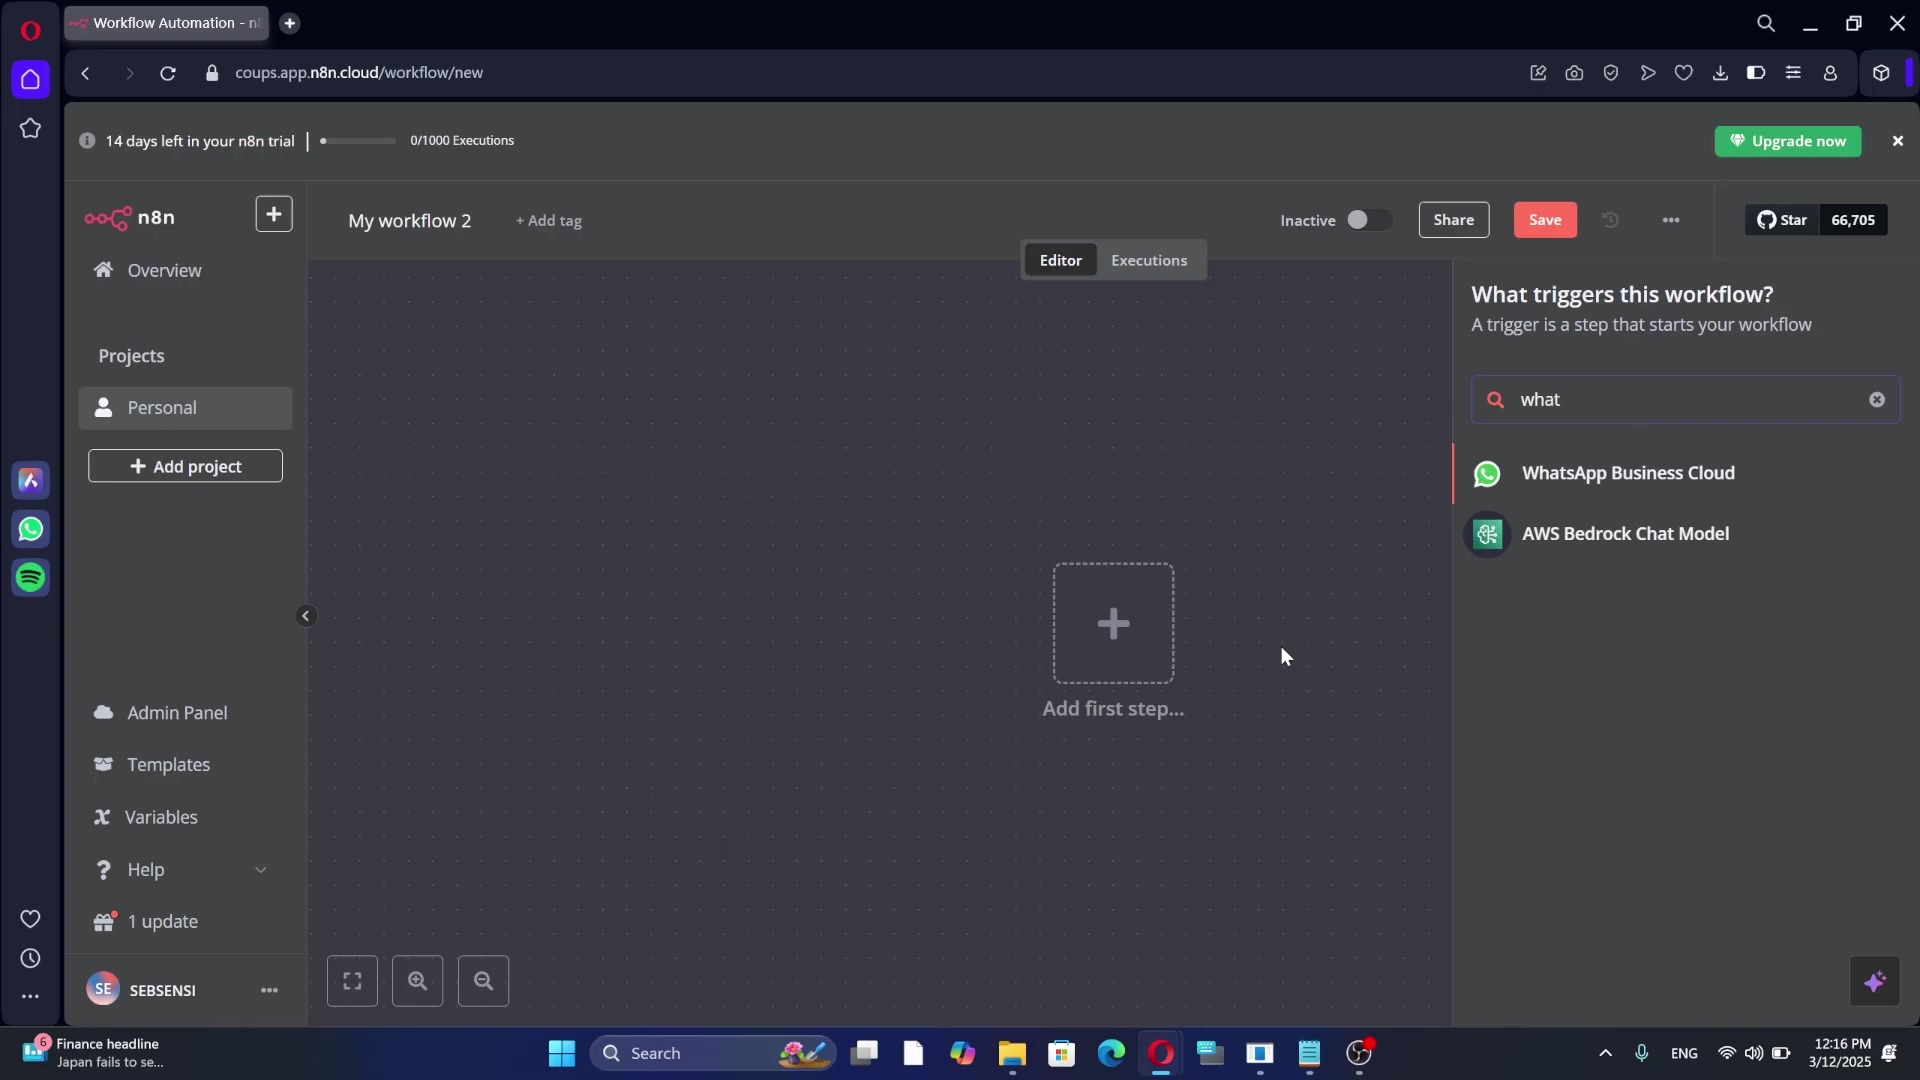
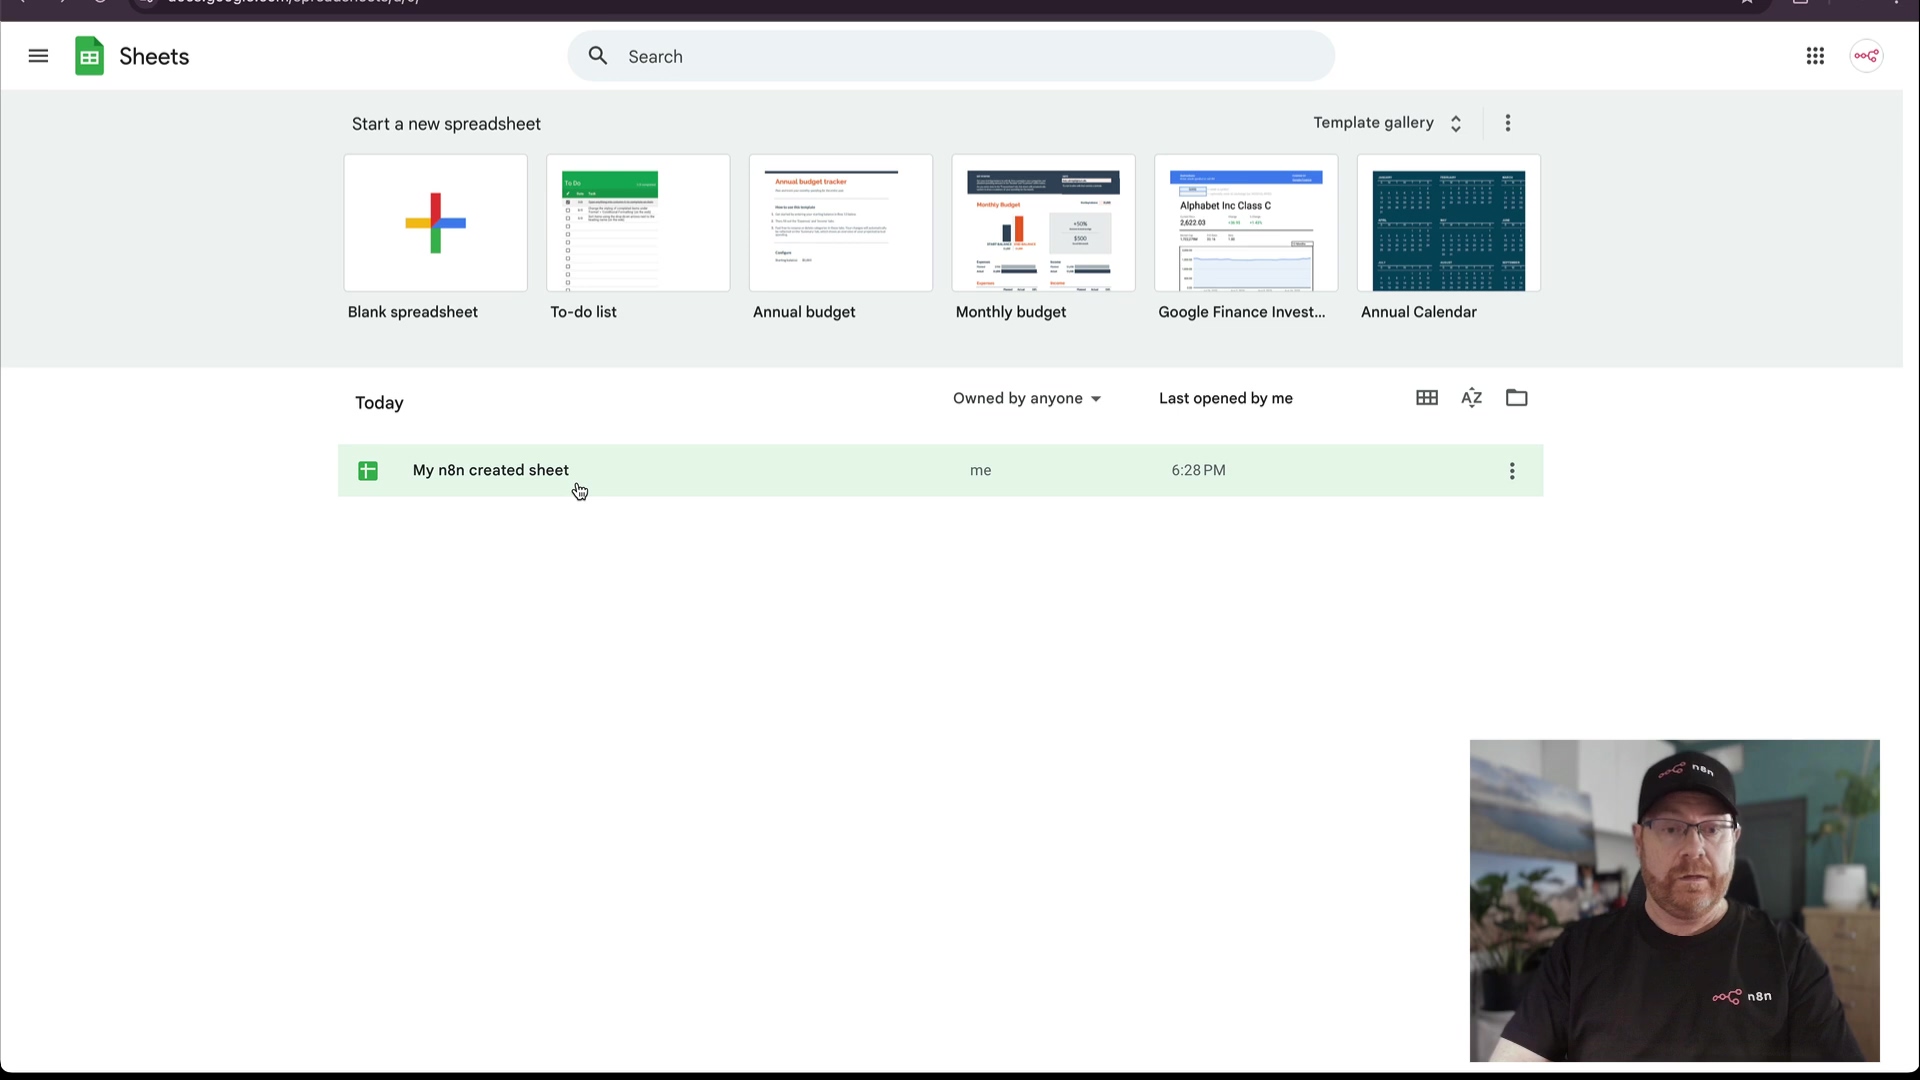
Start by adding a Google Sheets node to a new n8n workflow. You can find it by searching for “Google Sheets” in the node panel. In the node’s configuration panel, select the Google OAuth credential you just set up from the dropdown menu. For a basic test, choose an operation like ‘Get All’ or ‘Get Many’ to retrieve data from a spreadsheet, or even ‘Create Spreadsheet’ to make a new one. A common and straightforward test is to use the ‘Get All’ operation and specify a sample spreadsheet ID (you can create a simple test sheet in Google Sheets for this purpose and copy its ID from the URL). Alternatively, you can use the ‘List Spreadsheets’ operation, which will attempt to retrieve a list of all spreadsheets accessible by the connected Google account. This is a great way to see if n8n can even see your sheets.
If the connection is successful, the node will execute without errors and return the expected data (like a list of your spreadsheets or the content of your test sheet) or confirm the creation of a new spreadsheet. You’ll see green success messages in n8n. If you encounter errors, don’t panic! Double-check your OAuth consent screen settings, API enablement, and especially that redirect URI in your Google Cloud project. This verification step is crucial; it provides immediate feedback on your setup and confirms that n8n can now securely interact with your Google Sheets data, paving the way for more complex automations. You’re ready for prime time!

Beyond Google Sheets: Expanding Your n8n Integrations
Congratulations, you’ve mastered the art of connecting n8n to Google Sheets! But guess what? While Google Sheets is a popular starting point for n8n integrations, the Google OAuth setup you’ve just completed opens the door to a vast array of other Google services. This is where the real fun begins!
The beauty of this centralized OAuth credential is its reusability across various Google nodes within n8n. Whether you need to manage events in Google Calendar, send emails via Gmail, store files in Google Drive, or analyze data with Google BigQuery, the same robust authentication mechanism applies. It’s like having one master key that unlocks many different doors in the Google ecosystem.
To integrate with other services, you generally only need to ensure that the corresponding API (e.g., Google Calendar API, Gmail API, Google Drive API) is enabled in your Google Cloud project and that the necessary scopes are included in your OAuth consent screen. For instance, if you later decide to integrate Google Calendar, you would revisit your Google Cloud project, enable the Google Calendar API, and potentially add the https://www.googleapis.com/auth/calendar scope to your existing OAuth client. Remember, if you add new scopes, you might need to re-authenticate your n8n credential to apply the updated permissions. This modular approach allows for scalable and secure expansion of your n8n workflows. Furthermore, consider advanced use cases such as integrating with Google Photos for image management, Google Contacts for CRM synchronization, or Google Translate for language processing. The foundational OAuth setup provides a consistent and secure method for all these integrations, making n8n an incredibly versatile tool for automating across the entire Google ecosystem. Always remember to review and update your scopes as your integration needs evolve, ensuring your n8n instance has precisely the permissions it requires, and no more. The Google universe is now your oyster!
Frequently Asked Questions (FAQ)
Even with a detailed guide, users may encounter specific challenges during the Google OAuth setup. Here are some frequently asked questions and their expert solutions to help you troubleshoot common issues:
Q: Why am I getting an ‘Application Blocked’ or ‘This app isn’t verified’ error during authentication?
A: Ah, the classic “unverified app” warning! This typically occurs if your Google Cloud project’s OAuth consent screen is still in ‘Testing’ status. While in testing, Google may block access or show warnings, especially if the app is not verified. To resolve this, navigate to the ‘OAuth consent screen’ in your Google Cloud Console and click ‘Publish App.’ For production use, Google may require verification of your app, which involves submitting it for review. For personal use or internal tools, adding your Google account as a ‘Test User’ can bypass some restrictions without full verification. Just click “Add Users” under “Test users” in the OAuth Consent Screen settings and add your Google account email.
Q: My n8n credential setup shows ‘Invalid redirect URI’ or a similar error.
A: This is almost always due to a mismatch between the ‘Authorized redirect URIs’ configured in your Google Cloud OAuth client and the exact redirect URI provided by n8n. It’s like giving Google the wrong address to send the confirmation letter! Double-check that the URI copied from n8n (e.g., https://your-n8n-instance.com/rest/oauth2-credential/callback) is precisely pasted into the Google Cloud Console, without any typos, extra spaces, or missing slashes. Even a minor discrepancy will cause this error. Seriously, copy-paste is your best friend here!
Q: I’m unable to see certain Google services (e.g., Google Drive) in n8n, even after successful OAuth setup.
A: This usually means one of two things: either the specific Google API for that service (e.g., ‘Google Drive API’) is not enabled in your Google Cloud project under ‘APIs & Services,’ or the necessary OAuth scopes for that service (e.g., https://www.googleapis.com/auth/drive for full Drive access) are not included in your OAuth consent screen configuration. Go back to your Google Cloud Console, enable the API, and add the correct scope. If you add new scopes, you might need to re-authenticate your n8n credential to apply the updated permissions. Think of it as giving your robot a new tool and then telling it, “Hey, you can use this now!”
Q: My n8n Google OAuth connection keeps expiring or requiring re-authentication.
A: If your OAuth consent screen is in ‘Testing’ mode, test users might need to re-authenticate every 7 days. This is Google’s way of saying, “Hey, this app isn’t fully vetted yet!” Publishing your app (as mentioned in Q1) resolves this for external users. For internal Google Workspace applications, ensure the ‘User type’ is set to ‘Internal’ and that the app is properly configured within your organization’s Google Workspace settings. This ensures a more permanent connection.
Q: I’m getting ‘Access Denied’ or ‘Insufficient Permissions’ errors when running a Google node.
A: This indicates that the Google account connected via OAuth does not have the necessary permissions to perform the requested action on the specific resource (e.g., editing a Google Sheet it doesn’t own or hasn’t been shared with). First, verify the permissions of the Google account itself on the target resource – can you manually do what n8n is trying to do with that account? Also, double-check that the OAuth scopes granted during authentication are sufficient for the operation (e.g., you need write access for editing, not just read access). It’s like trying to open a locked door with the right key, but the key only opens the window!
Addressing these common issues systematically will help ensure a smooth and reliable Google OAuth integration with your n8n workflows.
Conclusion: Secure and Seamless Google Integrations with n8n
Wow, you’ve made it! Mastering Google OAuth authentication for n8n is a pivotal step towards building robust, secure, and highly efficient automation workflows. This guide has walked you through the intricate yet essential process, from setting up your Google Cloud project and enabling critical APIs to configuring the OAuth consent screen and finally integrating these credentials into n8n. By adhering to these steps, you not only unlock the full potential of Google’s vast suite of services within your n8n automations but also ensure that these integrations are governed by industry-standard security protocols, protecting your data and maintaining user trust. The principle of least privilege, careful scope management, and accurate credential configuration are the cornerstones of a successful setup. You’re basically a digital security wizard now!
Looking ahead, the skills acquired in setting up Google OAuth are transferable and foundational for integrating with numerous other services that utilize similar authentication mechanisms. As your n8n workflows grow in complexity and scope, a solid understanding of secure authentication will be an invaluable asset. This foundation empowers you to confidently expand your automation horizons, knowing that your connections are both powerful and protected. Embrace the power of secure automation, and let n8n transform your operational efficiency.
Now that you’ve successfully established a secure connection, we encourage you to experiment with various Google nodes in n8n. Start by automating a simple task, like logging new form submissions to a Google Sheet, or scheduling calendar events based on specific triggers. Share your innovative n8n Google integrations with the community, and explore the extensive n8n documentation for more advanced use cases. Your journey into seamless, secure automation has just begun! Go forth and automate, my friend!