Watch the Video Tutorial
💡 Pro Tip: After watching the video, continue reading below for detailed step-by-step instructions, code examples, and additional tips that will help you implement this successfully.
Table of Contents
Open Table of Contents
- Introduction to the No-Code Photoshop AI Agent
- Core System Architecture: n8n Workflow Breakdown
- Required Resources and Cost-Benefit Analysis
- ⚠️ Critical Best Practices for AI Agent Development
- Key Takeaways
- Conclusion
- Frequently Asked Questions (FAQ)
- Q: What is n8n and why is it used in this project?
- Q: What is NanoBanana and how does it relate to FAL AI?
- Q: Why do we need imageBB to generate public URLs for images?
- Q: Can I use other messaging apps instead of Telegram for the agent interface?
- Q: What if I want to add a new image manipulation tool to the agent?
Introduction to the No-Code Photoshop AI Agent
Alright, let’s talk about the future, shall we? In this wild, rapidly evolving AI landscape, having tools that can streamline our creative processes isn’t just nice to have, it’s absolutely essential. Think of it like having a super-powered sidekick for your design work. This guide is going to walk you through building your very own “Photoshop AI Agent” using n8n, which is, hands down, one of my favorite no-code automation platforms. We’re also going to hook it up with Google’s cutting-edge NanoBanana image generation model – yeah, the name sounds fun, and so is what it does!
This agent? It’s designed to automate those complex image manipulation tasks that usually eat up so much of your time. We’re talking combining multiple images, editing existing ones, and guess what? You’ll manage it all conveniently through a Telegram interface. How cool is that? It’s like having a tiny AI art studio right in your pocket!
Agent Capabilities Overview
So, what can this AI agent actually do? Well, it’s got a pretty robust set of functionalities, mainly split into two big buckets: image generation/editing and file handling. It’s super versatile because it can take both text and image inputs. Imagine telling your agent, “Hey, combine these two images with a sci-fi vibe,” or “Edit this photo to look like it’s from a cyberpunk city.” Pretty neat, right?
- Image Generation Tools: Our agent comes with two core image generation superpowers:
- Combine Images: This one’s a gem. It seamlessly merges two distinct images based on a prompt you give it. Think of it as a digital collage artist, but way faster.
- Edit Existing Images: Got an image you want to tweak? This tool modifies a single image according to your specific instructions. It’s like having a personal photo editor on demand.
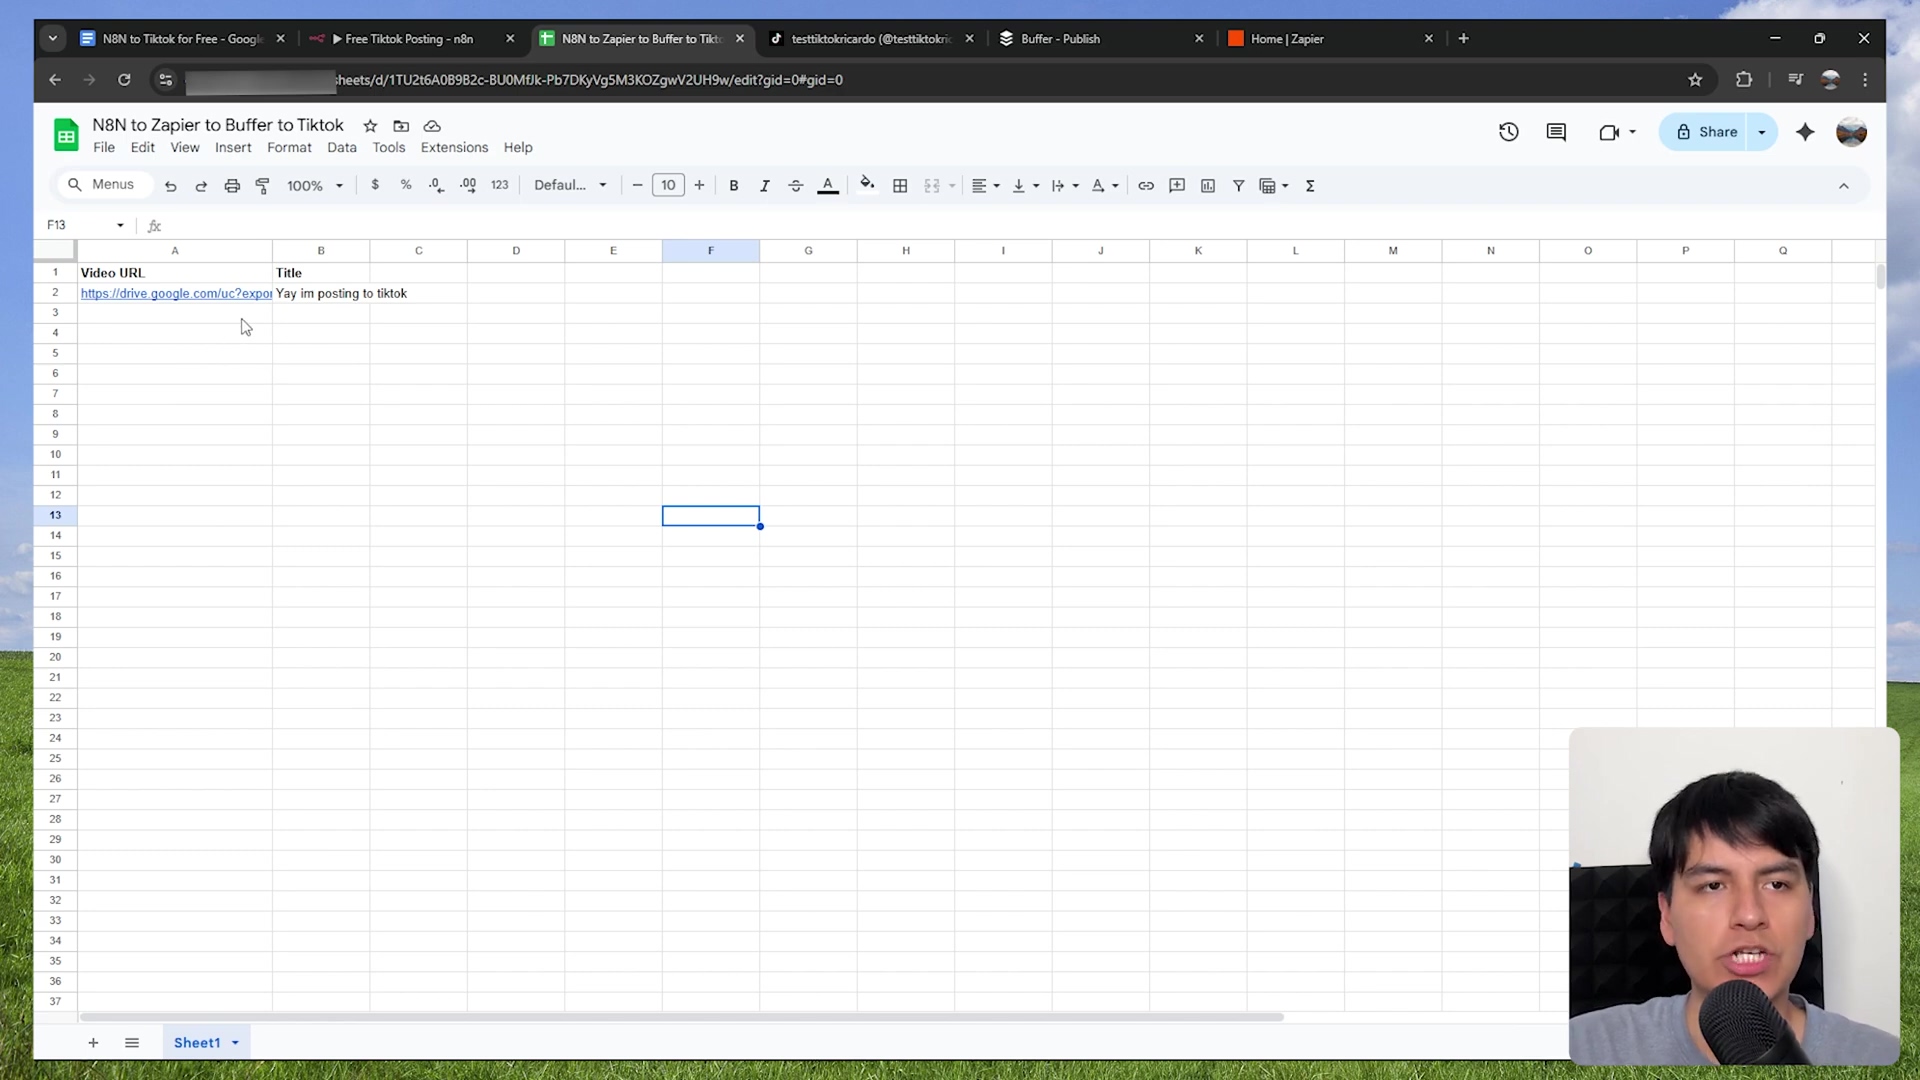
- File Handling Tools (Google Drive Integration): To keep all our digital masterpieces organized, the agent includes three handy file management functions, all integrated with Google Drive:
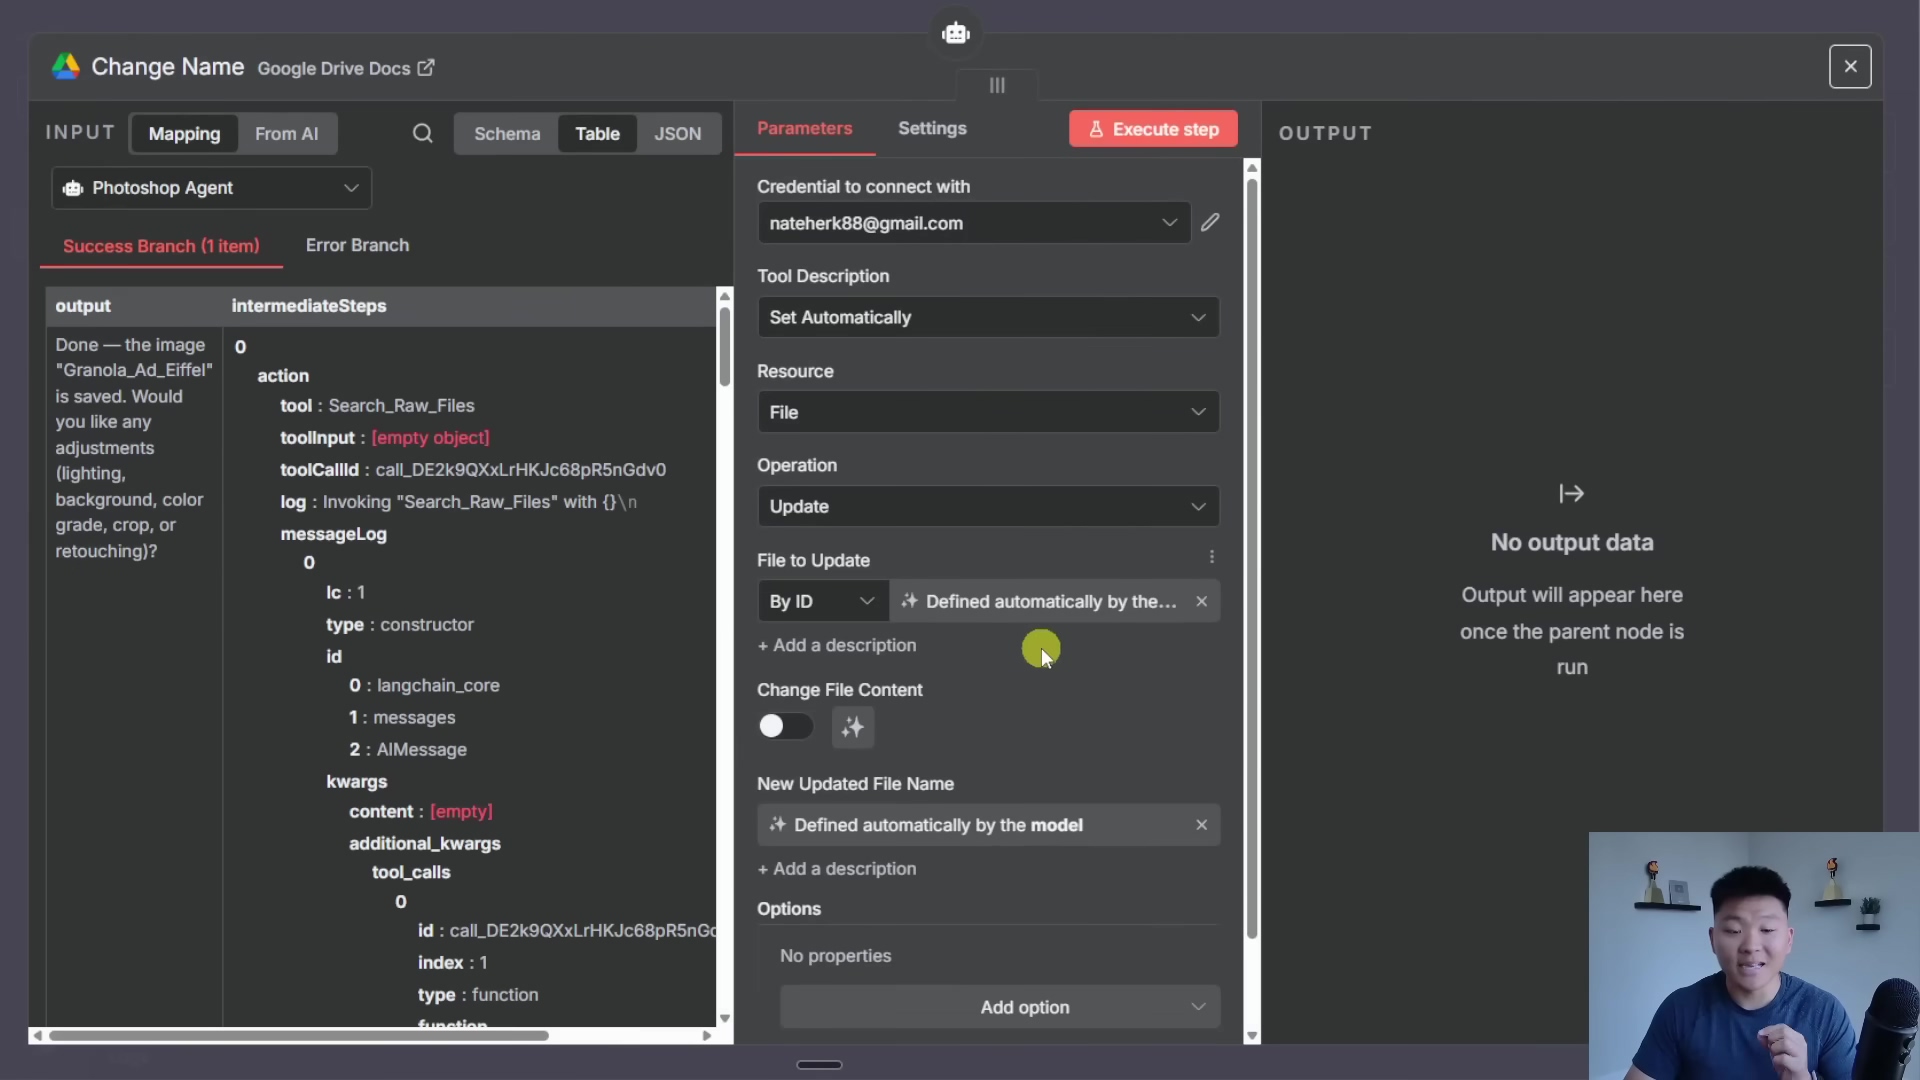
- Change File Name: Ever struggled with messy file names? This renames files stored in your Google Drive. Simple, but super handy.
- Search Raw Files: Need to find those original, unedited image files? This tool helps you locate them in a flash.
- Search AI Generated Images: This one’s for finding all the cool stuff the AI has already created for you.
And the best part? You can kick off and manage all these operations directly through a Telegram chat. It’s a user-friendly interface that hides all the complex AI wizardry behind the scenes. No more wrestling with complicated software!
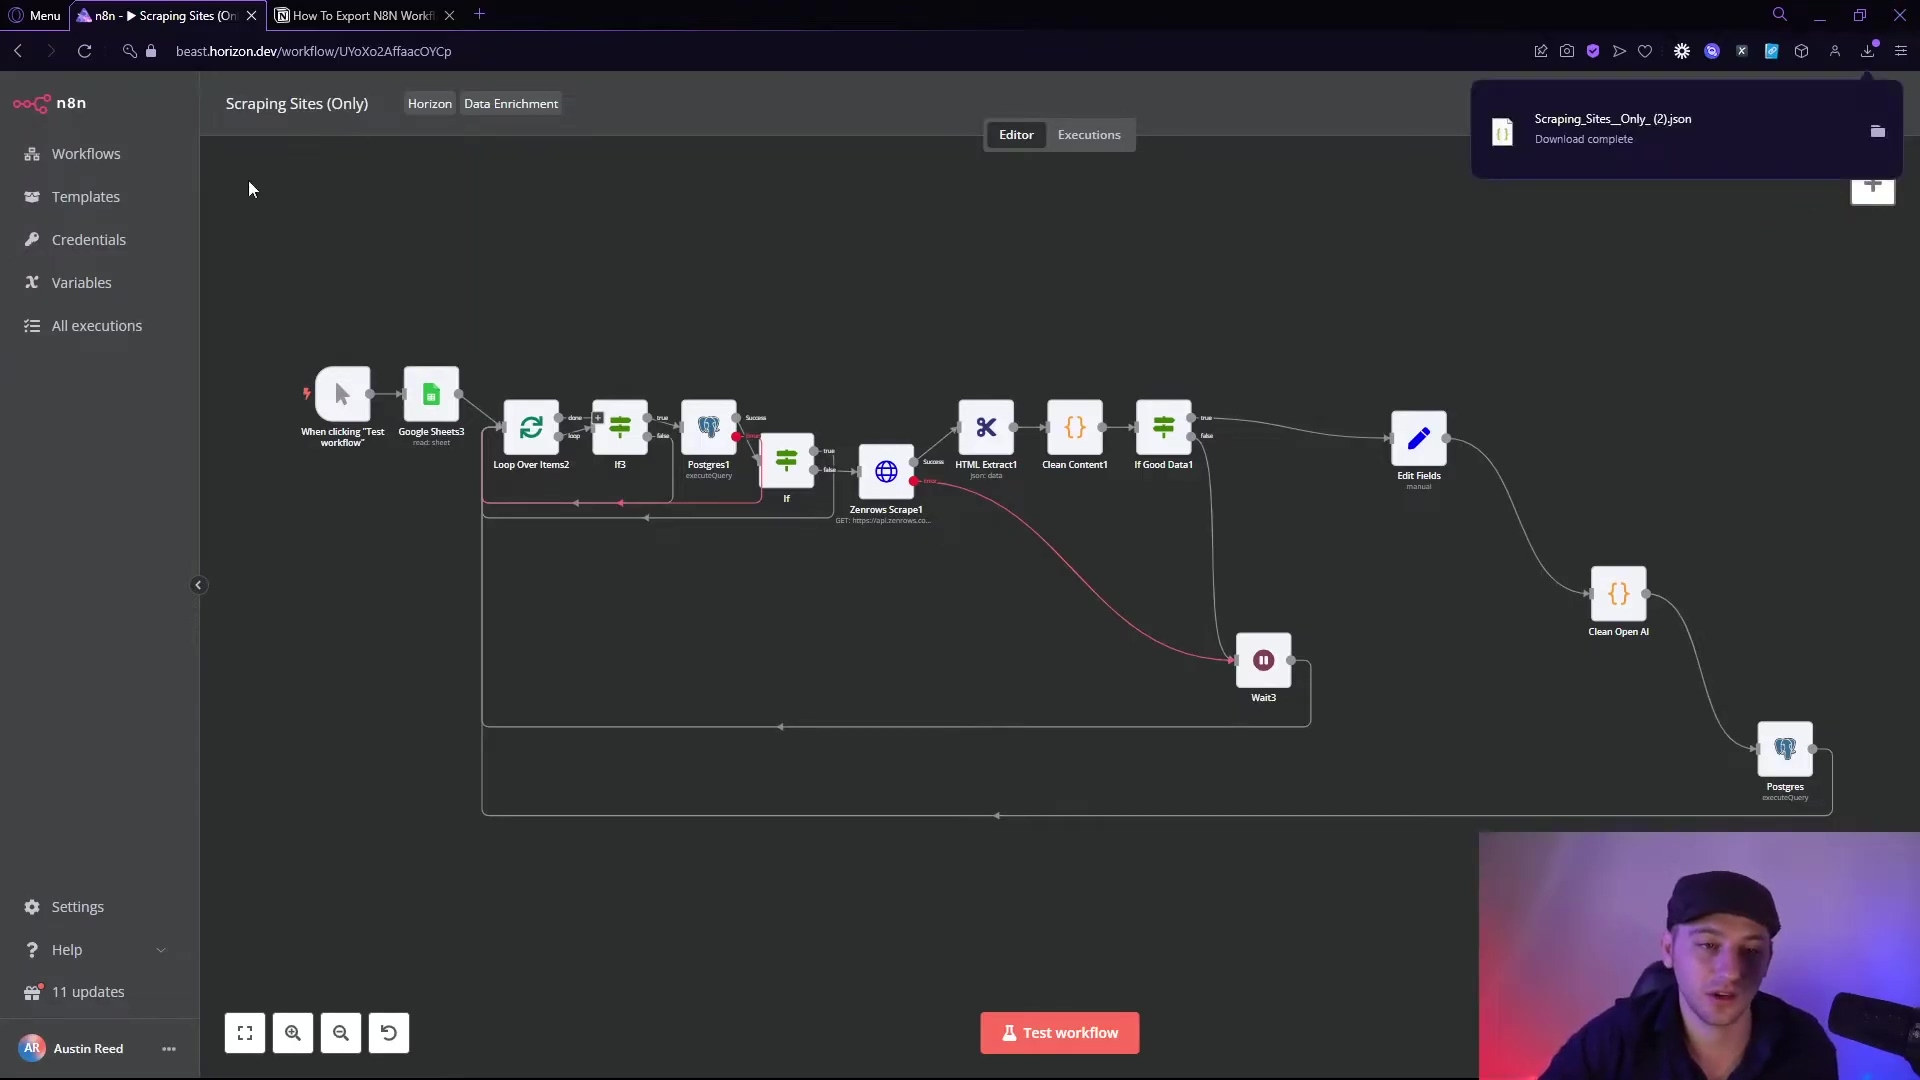
Core System Architecture: n8n Workflow Breakdown
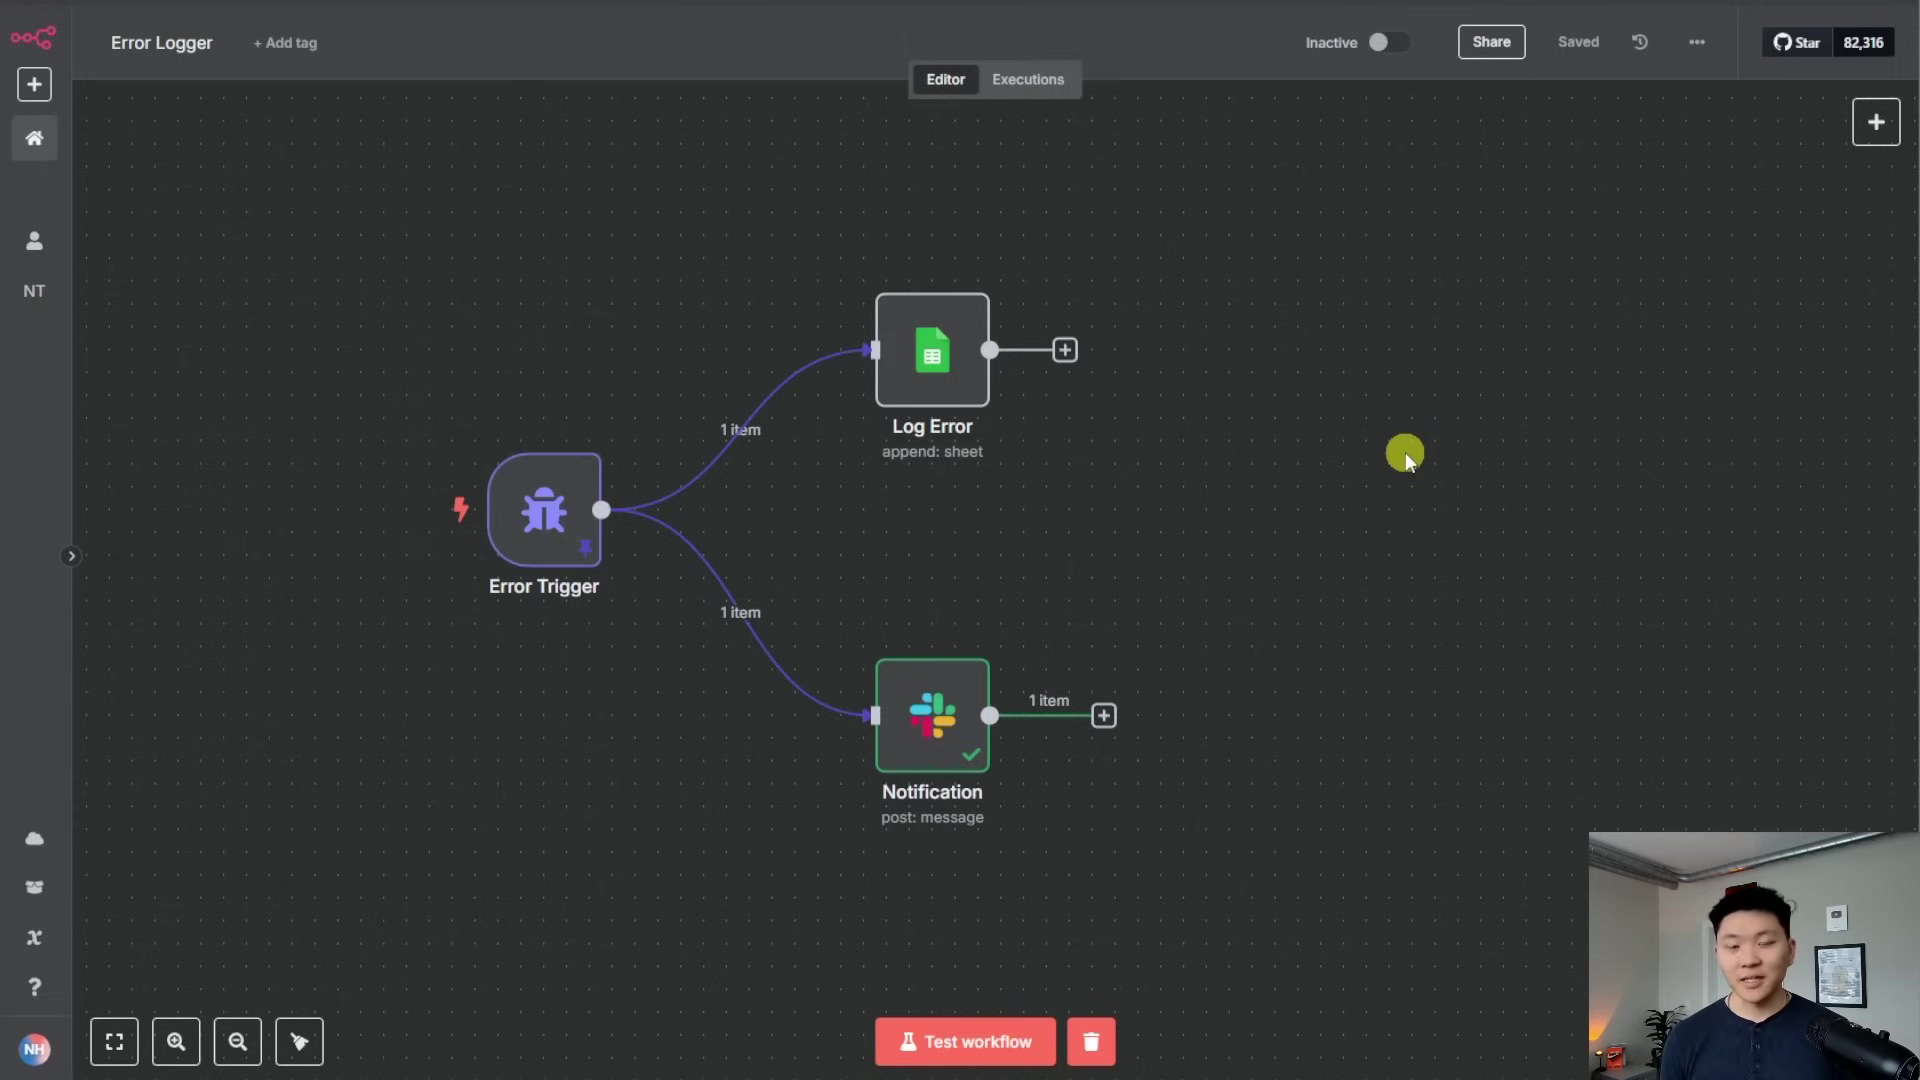
Alright, let’s peek under the hood, shall we? The real magic of this AI agent lives inside its n8n workflow. Think of an n8n workflow as the brain of our operation, orchestrating all the interactions between your inputs, the AI models, and our file management services. Understanding this architecture is key, because once you get it, you’ll be able to customize and expand its capabilities like a pro. It’s like learning the secret language of your AI sidekick!
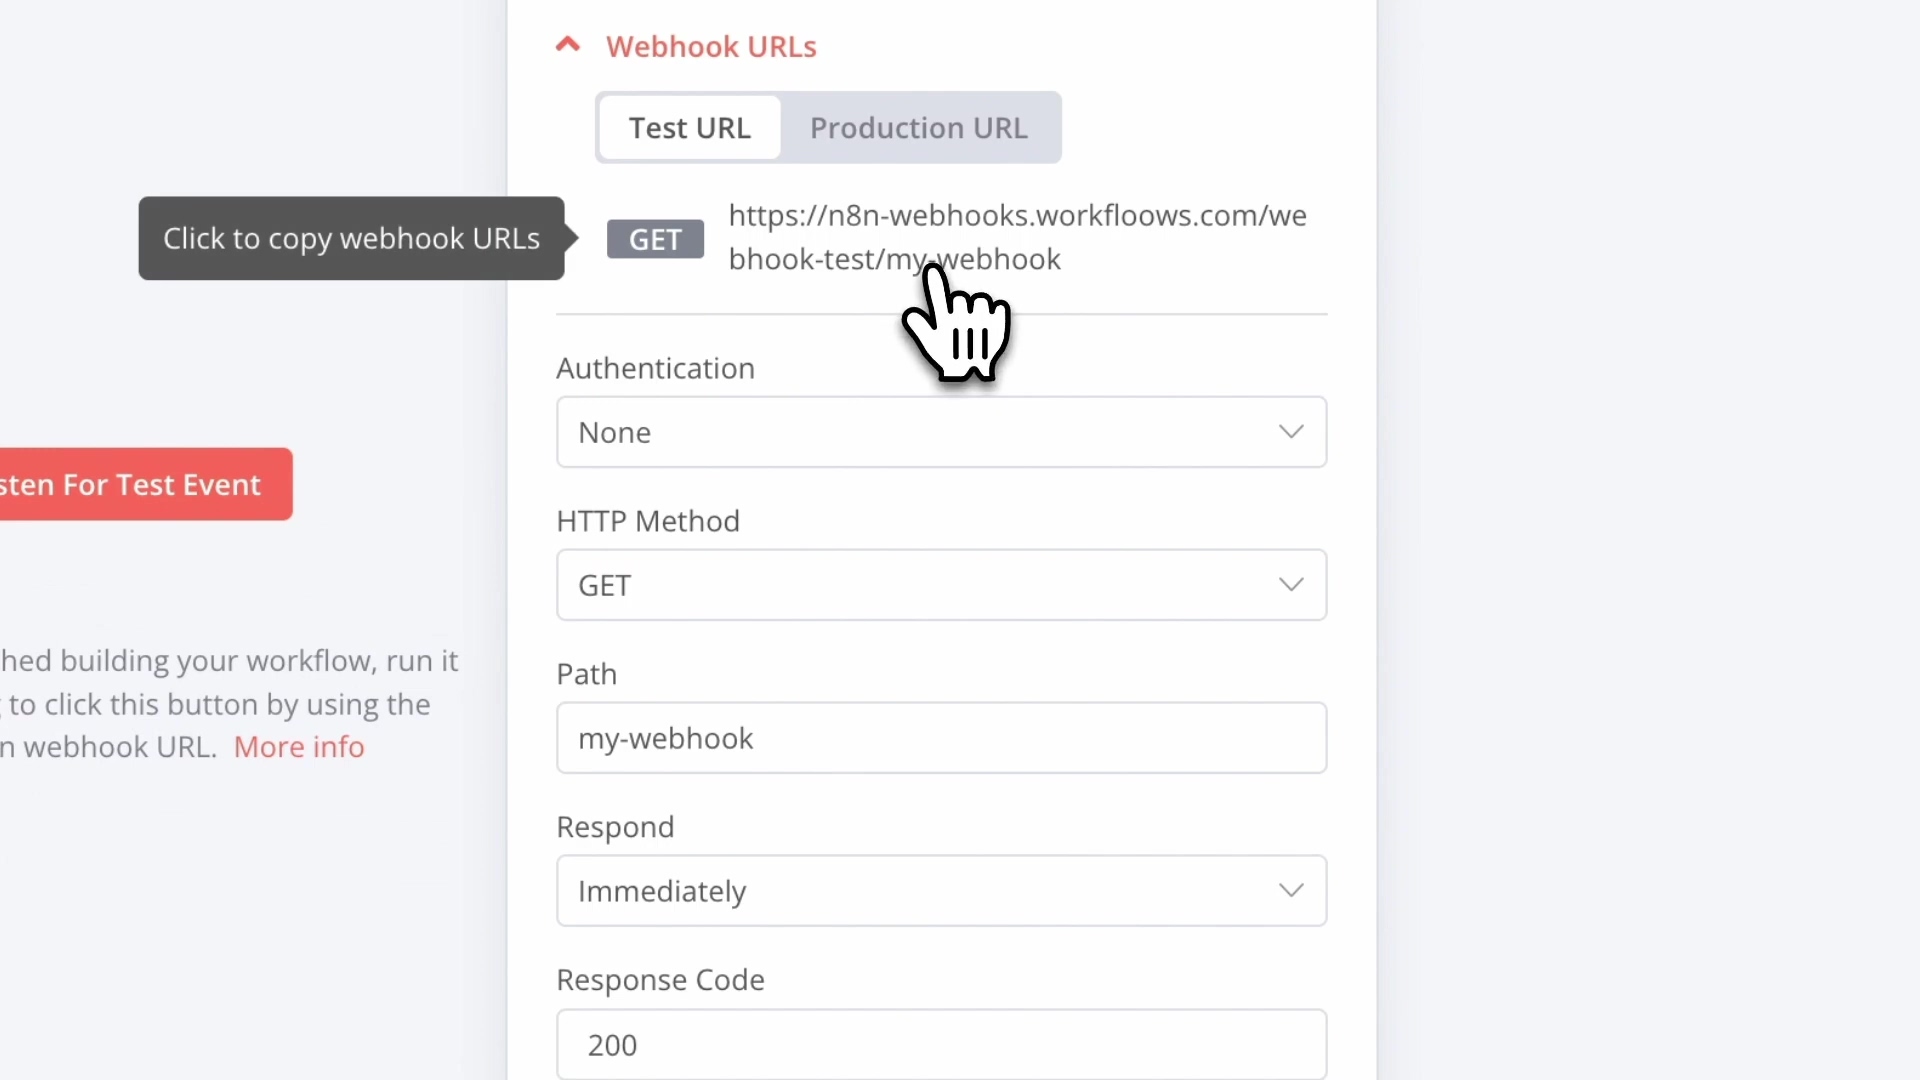
Input Handling: Text vs. Image
So, how does our agent know what you’re trying to do? The workflow kicks off with a super flexible input mechanism that can tell whether you’ve sent it text (like a command) or an image. A special ‘switch’ node (think of it as a traffic cop for data) directs the flow accordingly:
- Image Input: If you send an image, the agent first downloads it (gotta grab it from Telegram!), then uploads it to Google Drive (so we have a copy), and finally, it passes that image to the main Photoshop agent. It’s a little journey for your pixels!
- Text Input: If you just type out a command or a prompt, that text goes straight to the agent. No detours needed.
To make sure everything is processed smoothly and consistently, all inputs are standardized into a JSON message.ext field. This means the agent always knows exactly where to look for your instructions, no matter if it’s text or an image. It’s all about keeping things tidy for our AI brain!
AI Agent Configuration: The System Prompt
Now, how do we tell our agent what kind of personality it has and what tools it can use? That’s where the “system prompt” comes in. It’s a concise little instruction manual that defines its role and lists its available tools. Don’t let its simplicity fool you; this prompt, especially when paired with powerful models like GPT 5.1 and Sonnet 3.5 (which acts as a reliable fallback if GPT is busy), allows our agent to perform remarkably well. It’s like giving your AI a mission briefing!
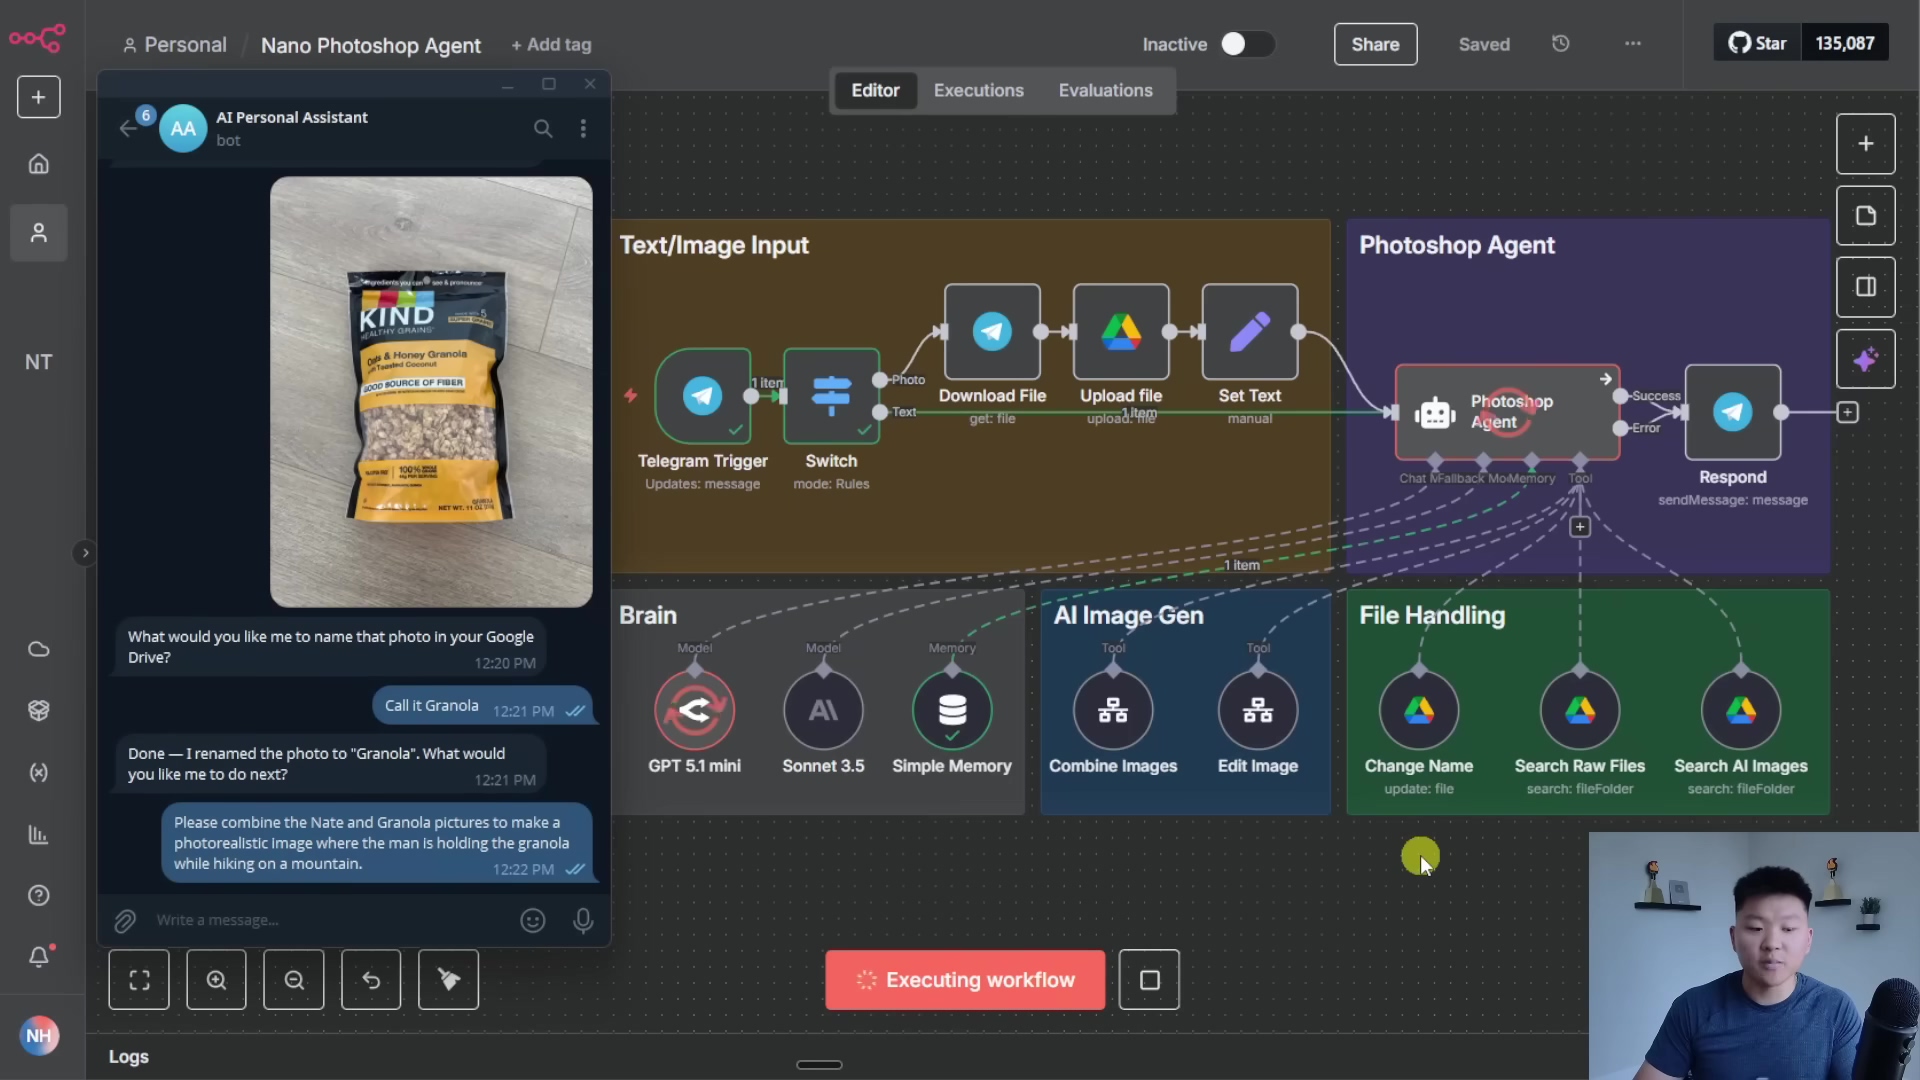
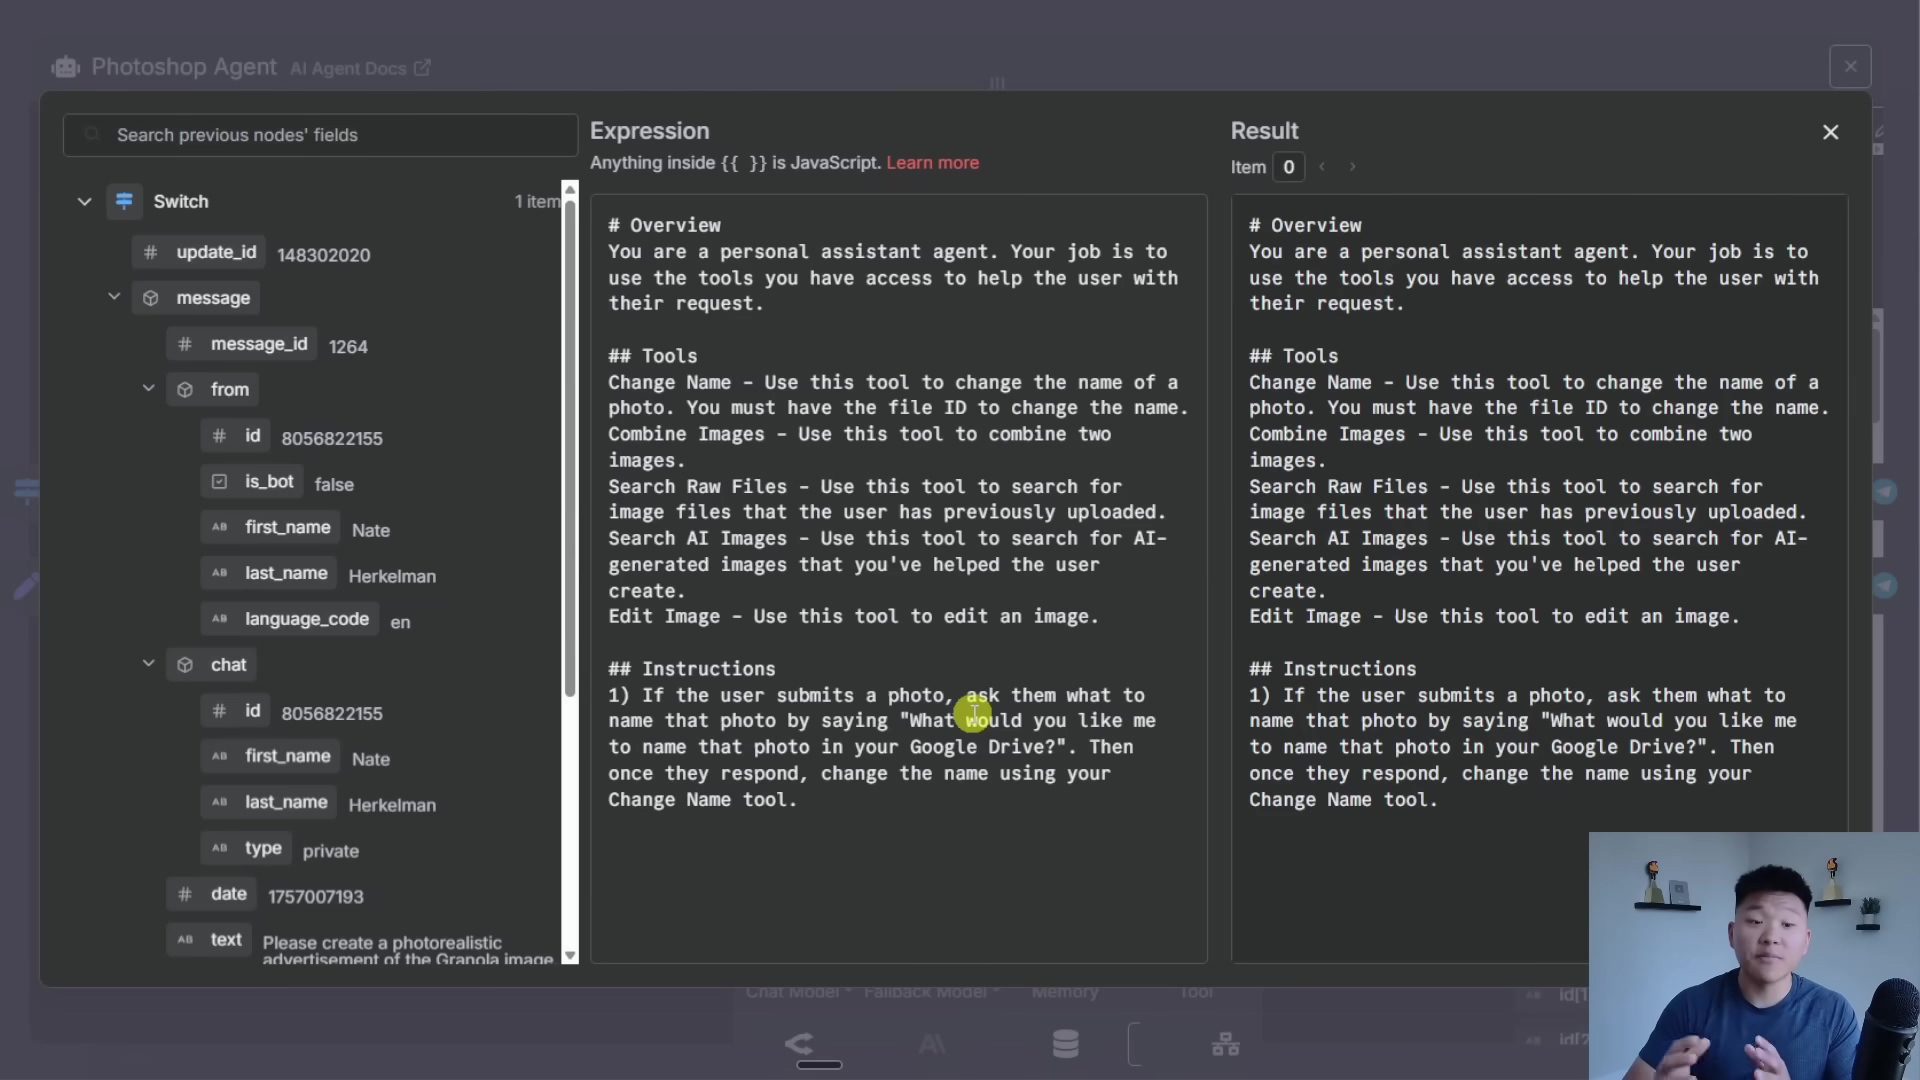
- Role Definition: “You are a personal assistant agent. Your job is to use the tools you have access to help the user with their request.” Simple, right? It clearly tells the AI what its purpose is.
- Tool Listing: We give it a minimal description of each tool. The more detailed descriptions actually live within the tools themselves. This keeps the main prompt clean and focused.
- Instructions: We also bake in some specific behavioral rules. For example, if you submit a photo, the agent is instructed to ask you for a file name and then use the ‘Change Name’ tool. This makes the interaction feel much more natural and guided.
This modular approach is super cool because it makes refinement a breeze. If new scenarios pop up or we want the agent to handle something differently, we just add a new instruction to the system prompt. It’s like giving your AI new directives without having to rewrite its entire operating system!
File Handling Tools in Detail
Okay, let’s talk about the unsung heroes of our agent: the file handling tools. They might seem straightforward, but they are absolutely essential for managing all those image assets within Google Drive. Their main job is to interact with Google Drive by updating, searching for, and retrieving file IDs. Think of them as the librarians of our digital art studio, always knowing where everything is.
- Change Name: This tool does exactly what it says: it updates a file’s name in Google Drive. It needs the file ID to do this, which the agent either remembers from a previous step or finds using one of the other search tools. It’s like giving a book a new title on the shelf.
- Search Raw Files: This one’s for digging through a designated ‘media’ folder in Google Drive to find your original, untouched files. Super useful when you need to start fresh.
- Search AI Images: This tool looks for all the cool images our AI has generated, but in a separate folder. This helps the agent (and you!) easily tell the difference between your original photos and the AI’s creations. Organization is key, even for robots!
These tools work together to ensure that our agent can efficiently locate and manage every single image it needs for processing. No lost files on our watch!
AI Image Tools: Combine and Edit
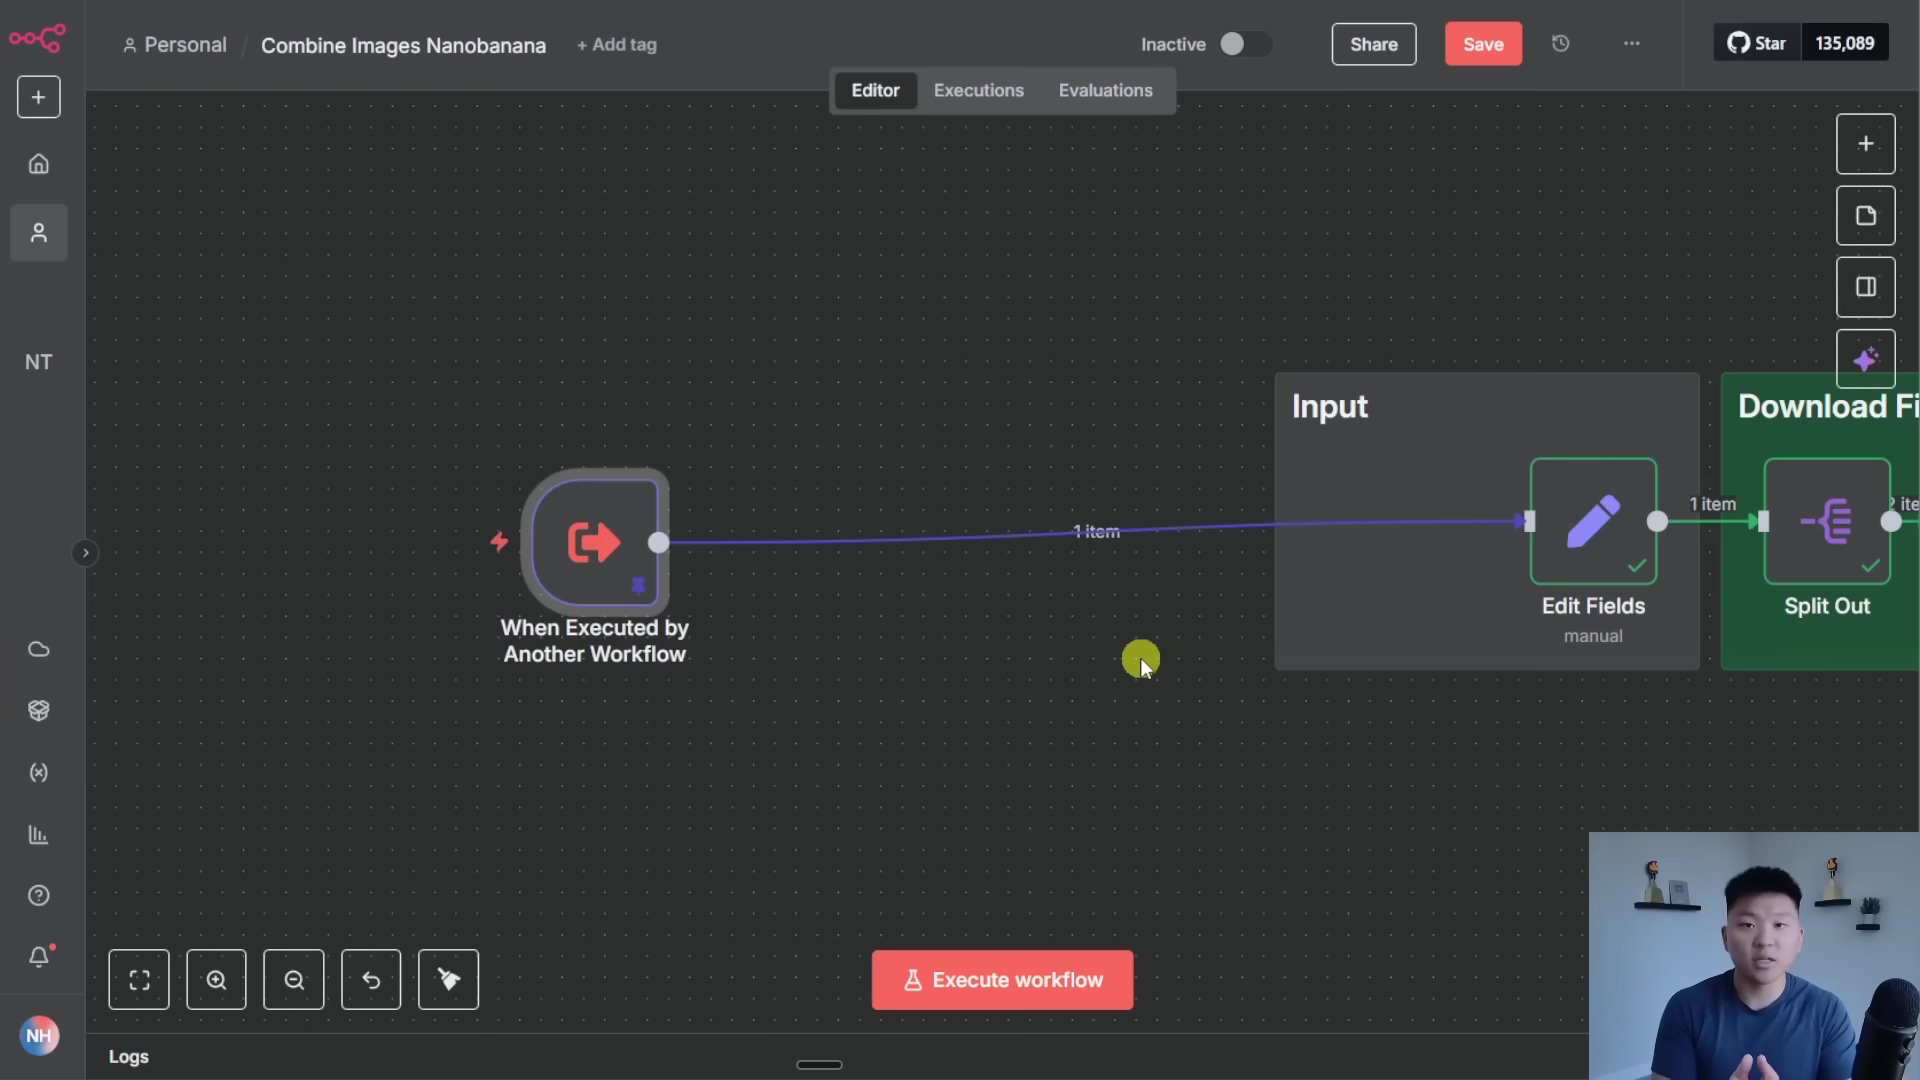
Now for the really exciting stuff! These are the custom n8n workflows that actually tap into Google’s NanoBanana model via the FAL AI service to perform all the image generation and editing. The beauty of this setup is its modular design. We’ve built these as separate, reusable workflows, meaning the main Photoshop agent (or any other agent, for that matter!) can call them as tools whenever it needs image manipulation done. It’s like having specialized workshops for different types of creative tasks.
Combine Images Workflow
This workflow is a master at taking two image IDs and a text prompt, then generating a brand-new combined image. Here’s the play-by-play:
- Input: First, it patiently waits for your instructions: an image prompt (like “make them look like they’re in space”), the IDs of the two images you want to combine, and a title for the new image. It’s like placing an order at a digital art cafe.
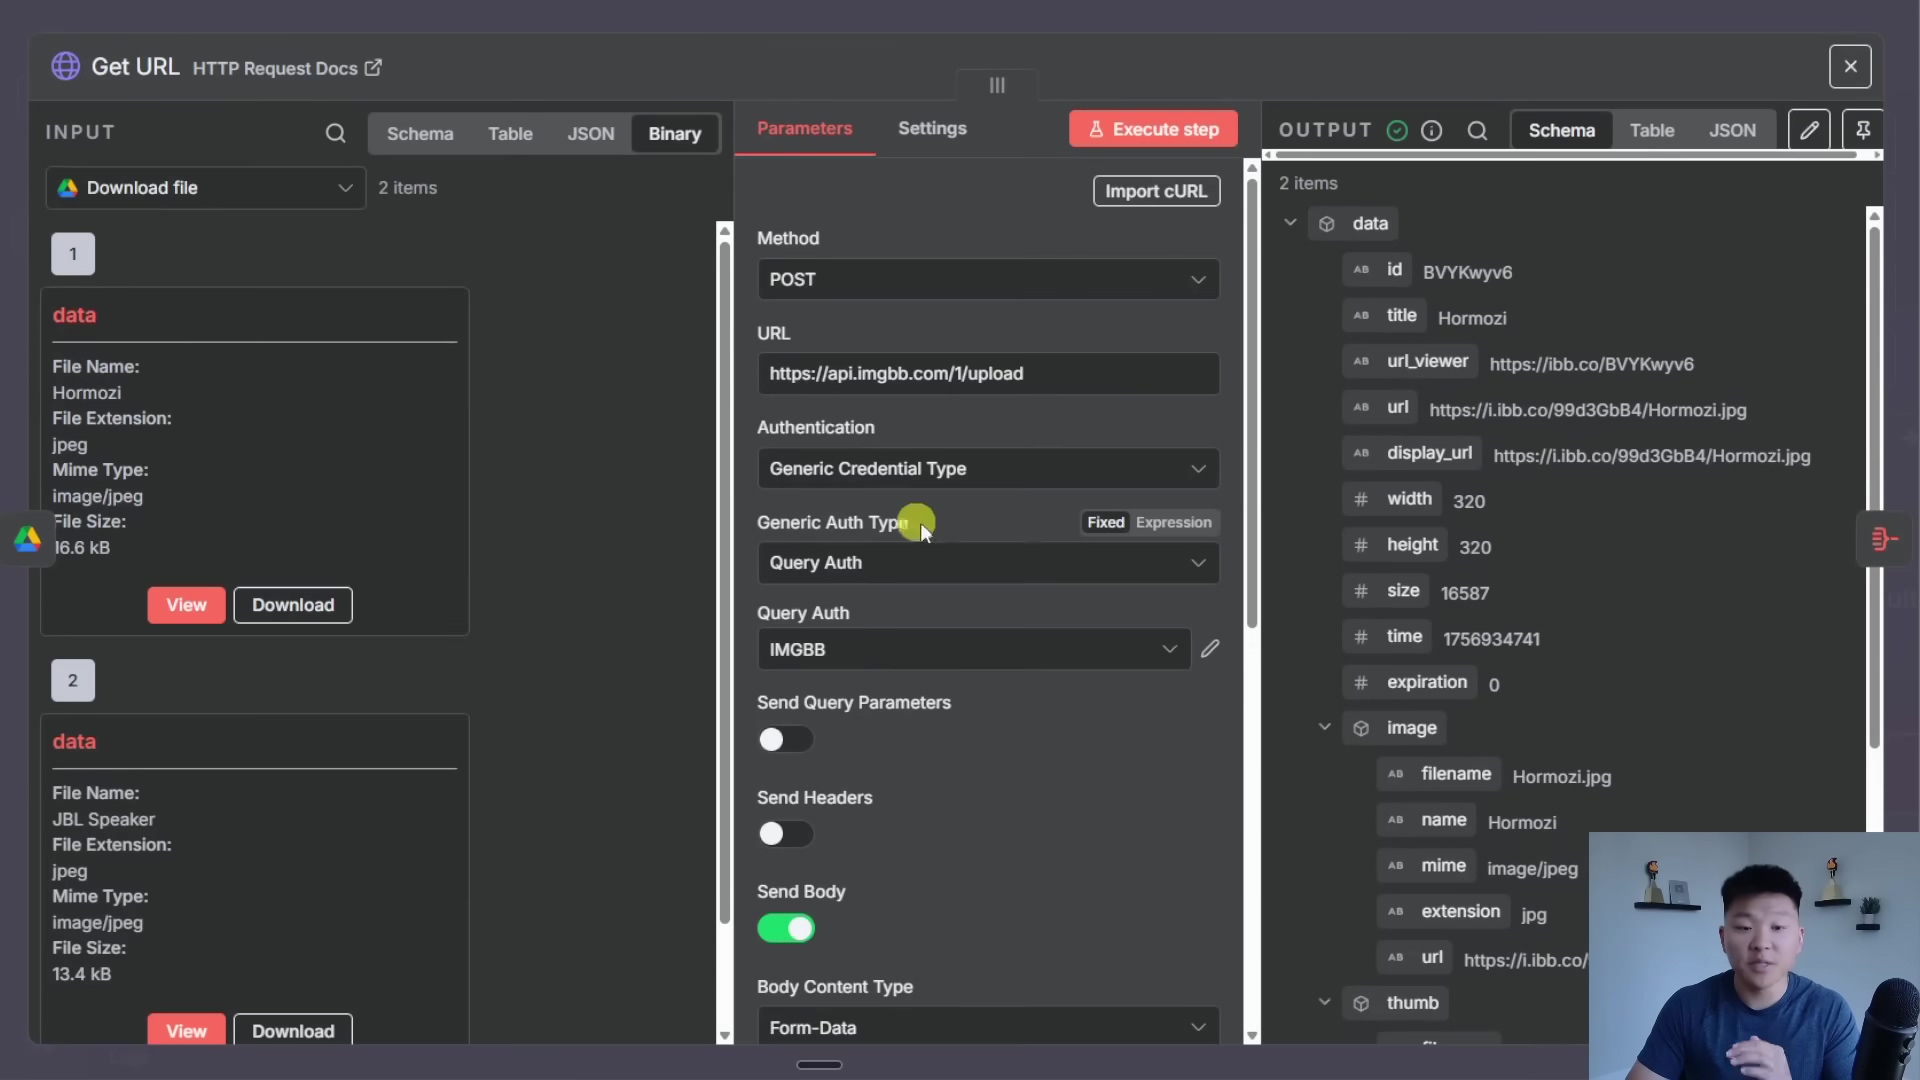
- Download and Public URL Generation: Next, it downloads those two images from Google Drive. Here’s a little secret: NanoBanana needs public URLs to work its magic. So, we use a free service like imageBB to generate these public URLs from our binary image data. Think of it as giving NanoBanana a public address to find your images on the internet.
- API Request to FAL AI: With everything ready, a single API request is sent to FAL AI. This request includes your prompt and those two public image URLs. This is where the actual image combination magic begins!
- Polling for Results: Image generation isn’t instant, even for AI. So, our workflow periodically checks FAL AI to see if the image generation task is complete. It’s like waiting for a pizza to bake, but way more high-tech.
- Image Retrieval and Upload: Once FAL AI gives the green light and the image is ready, the generated image is downloaded as binary data. Then, it’s uploaded to Google Drive (so you can access it easily!), and finally, a response is sent back to the main agent with the link to your brand-new, combined image. Ta-da! Your masterpiece is ready.
Edit Image Workflow
This workflow is the sibling to the combine images one, but its focus is on editing a single image. The process is quite similar, ensuring consistency and ease of use:
- Input: Just like before, it needs some instructions: an image title, your editing prompt (e.g., “make this dog wear a tiny hat”), and the ID of the single image you want to edit.
- Download and Public URL Generation: It downloads the image from Google Drive and, you guessed it, generates a public URL using imageBB. Gotta make it accessible for the AI!
- API Request to FAL AI: A request is sent off to FAL AI, carrying your prompt and that single image URL. This is where the AI gets to work on transforming your picture.
- Polling and Retrieval: The workflow keeps an eye on FAL AI, polling for the result. Once the edited image is ready, it downloads it.
- Upload and Response: Finally, the edited image is uploaded to Google Drive, and the main agent gets a response with all the details of your newly transformed image. It’s like sending your photo to a digital artist and getting it back perfectly retouched!
Required Resources and Cost-Benefit Analysis
Alright, let’s get down to brass tacks. Building this AI Photoshop agent isn’t just about cool tech; it requires specific tools and services. Understanding what each one does, and what it might cost you, is super important for getting this whole operation off the ground. Think of this as your shopping list and budget planner for your AI adventure.
Resource Checklist
Here’s a quick rundown of what you’ll need:
| Resource/Tool | Description | Purpose |
|---|---|---|
| n8n | No-code automation platform | This is the brain of our operation, handling all the workflow orchestration and agent logic. It’s where we connect everything! |
| Google Drive | Cloud storage service | Our digital filing cabinet for all images, raw or AI-generated. |
| Telegram | Messaging application | This is our user interface! You’ll chat with your AI agent directly here. |
| FAL AI | AI model hosting service (for NanoBanana) | This is where the heavy lifting happens. FAL AI hosts the NanoBanana model, which does the actual image generation and editing via API. |
| imageBB | Free image hosting service | A super handy little service that helps us generate those public URLs that NanoBanana needs. |
| GPT 5.1 / Sonnet 3.5 | Large Language Models | These models provide the agent’s conversational intelligence and help it decide which tool to use based on your request. Think of them as the agent’s smart decision-makers. |
Cost-Benefit Analysis: DIY vs. Commercial Solutions
Now, you might be thinking, “Why go through all this trouble when I can just buy a commercial plugin?” Great question! Let’s break down the pros and cons, so you can see why this DIY approach is a game-changer, especially for us self-taught folks.
| Feature | DIY AI Agent (n8n + NanoBanana) | Commercial AI Photoshop Plugin |
|---|---|---|
| Cost | Low (potentially free for basic usage, ~$0.04/image for FAL AI) | High (monthly/annual subscriptions, per-use fees) |
| Customization | High (fully customizable workflows, prompts, integrations) | Low (limited to plugin’s features) |
| Control | Full control over data, models, and workflow logic | Limited control, dependent on vendor |
| Learning Curve | Moderate (requires n8n and API understanding) | Low (plug-and-play) |
| Scalability | Scalable with n8n’s capabilities and cloud services | Dependent on commercial provider’s infrastructure |
| Integration | Highly flexible (integrates with various services) | Limited to pre-built integrations |
| Maintenance | Requires self-maintenance and updates | Vendor-managed updates and support |
This analysis really highlights why I’m such a fan of the DIY approach. Yes, it might have a slightly steeper initial learning curve – you’ll need to get comfortable with n8n and understand how APIs work. And sure, you’ll be responsible for your own maintenance and updates. But in return? You get unparalleled flexibility, complete control over your data and workflows, and significant long-term cost savings compared to those pricey commercial alternatives. It’s like building your own custom spaceship versus buying a pre-built one – yours will always be exactly what you need!
⚠️ Critical Best Practices for AI Agent Development
Alright, listen up! Building and deploying AI agents, especially those handling creative tasks, isn’t just about getting them to work. It’s about getting them to work well, reliably, and securely. Think of these as the golden rules for being a responsible AI builder. Trust me, following these will save you a ton of headaches down the line.
- Optimize Prompts: You know how we talked about the system prompt? While our current one is minimal and gets the job done, there’s a whole universe of prompt engineering out there. For real production-level stuff, you might even consider building another dedicated AI agent whose sole purpose is to refine prompts before they get sent to the image generation model. This can significantly improve the quality of your generated images. It’s like having a prompt whisperer for your AI!
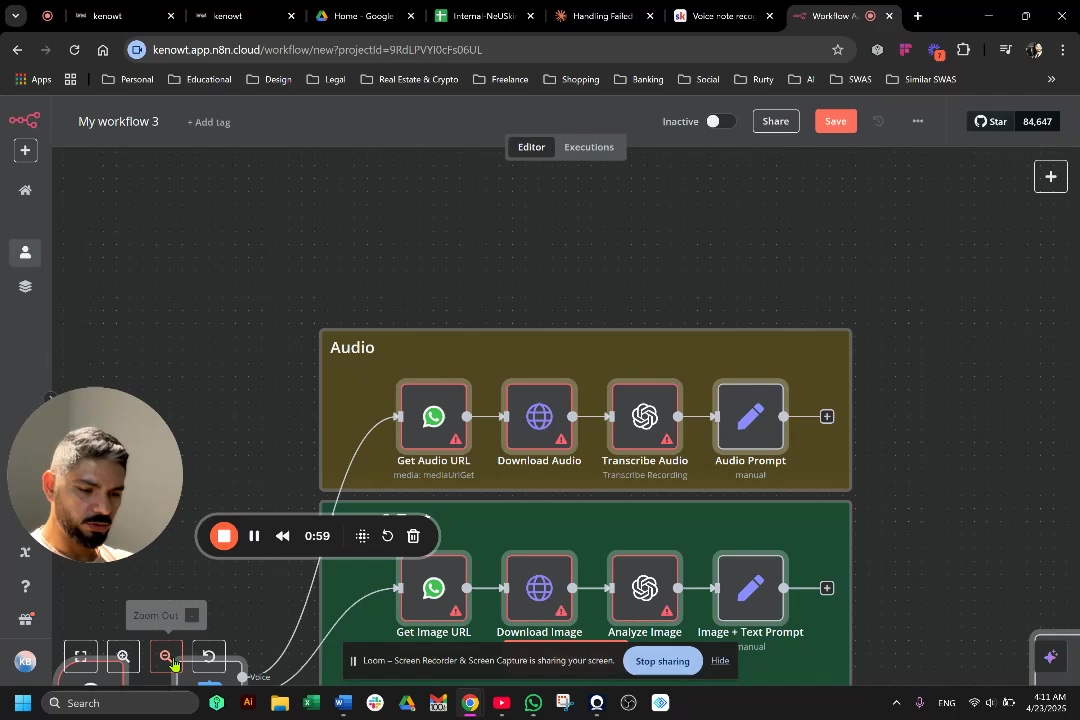
- Implement Robust Logging: If you’re building something that’s going to be used regularly, comprehensive logging is absolutely indispensable. I’m talking about integrating a system (like a simple Google Sheet or a more advanced database) to log every single activity your agent performs. This includes what inputs it processed, which tools it called, and whether it succeeded or failed. Why? Because this gives you invaluable insights for debugging when things go wrong, monitoring performance, and even tracking costs (like how many tokens you’re using). It’s your AI’s diary, and it’s super helpful for troubleshooting!
- Modular Workflow Design: Remember how we talked about building those separate workflows for combining and editing images? That’s modularity in action! Embrace this concept by creating reusable sub-workflows for specific tasks. This doesn’t just simplify the main agent’s logic (making it easier to understand and manage), but it also means you can easily plug and play these sub-workflows into other agents or projects. It’s like building with LEGOs – each piece can be used in countless different creations, enhancing reusability and making your life so much easier when you want to expand or maintain your system.
Key Takeaways
So, what’s the big picture here? If you’ve stuck with me this far, you’ve just unlocked some serious knowledge. Here are the main points I want you to walk away with:
- No-Code Power: n8n is a true game-changer. It lets us create incredibly sophisticated AI agents without writing a single line of code. This isn’t just cool; it democratizes access to advanced AI capabilities, meaning anyone can start building, not just seasoned developers.
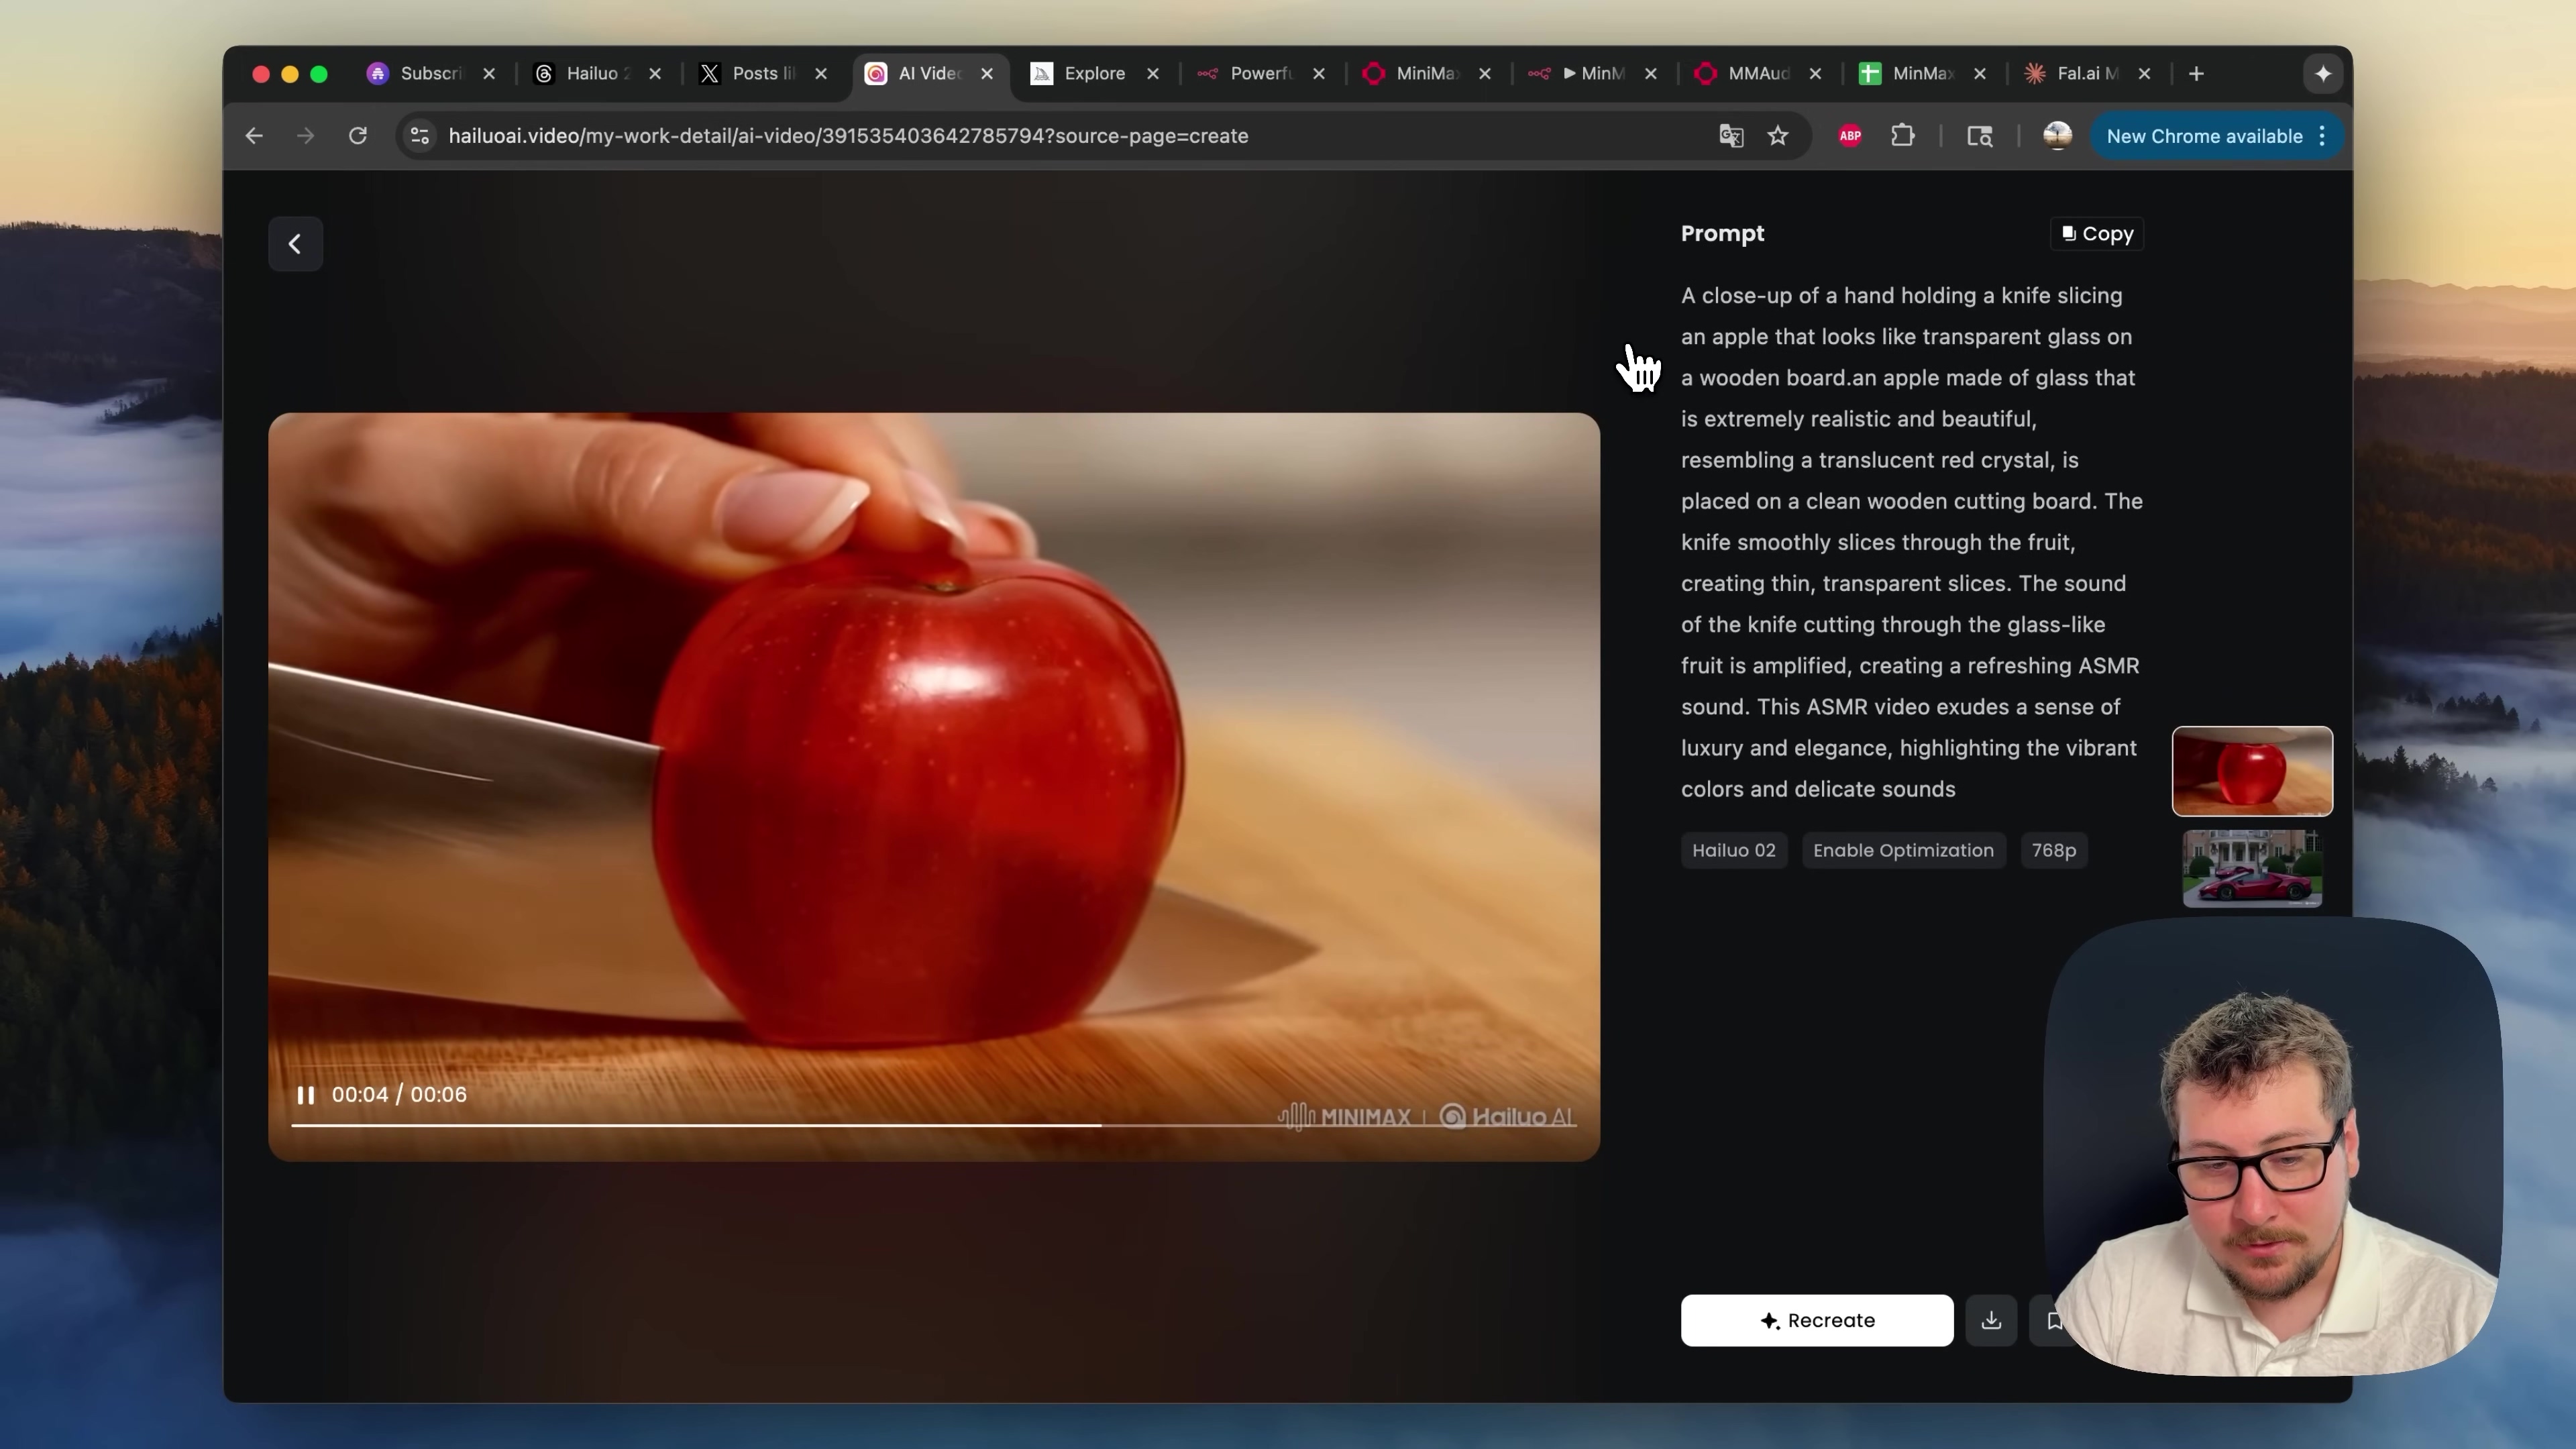
- NanoBanana’s Impact: Google’s NanoBanana model is seriously impressive. Its image generation and editing capabilities are top-notch, making it a real game-changer for things like ad creatives and user-generated content. Get ready to make some stunning visuals!
- Seamless Integration: Our agent seamlessly integrates with Telegram for user interaction and Google Drive for file management. This means you get a complete, user-friendly solution that just works.
- Modular Design for Scalability: The way we’ve designed this with modular workflows in n8n means it’s super easy to expand and integrate new tools and functionalities. Your agent isn’t static; it’s highly adaptable and can grow with your needs.
- Cost-Effective Automation: By leveraging services like FAL AI (which is roughly $0.04 per image – pretty sweet!), this DIY solution offers a highly cost-effective alternative to expensive commercial image manipulation software. You get professional results without breaking the bank!
Conclusion
Building an AI-powered Photoshop agent with n8n and NanoBanana isn’t just a cool project; it represents a significant leap forward in automating creative workflows. By following the steps we’ve outlined, you’re not just building a tool; you’re creating a highly customizable and efficient system that will transform how you approach image generation and editing. This approach doesn’t just save you time and resources; it literally opens up new possibilities for creative expression and content production. Imagine the art you’ll make, the designs you’ll create, all with your trusty AI sidekick!
For those of you looking to really level up your AI automation skills, I highly recommend exploring n8n’s more advanced functionalities and maybe even integrating additional AI models. The modular nature of this setup means your agent can continuously evolve, adapting to new AI advancements and expanding its capabilities. The sky’s the limit, my friends!
What are your thoughts on no-code AI automation for creative tasks? Have you built anything similar? Share your experiences and ideas in the comments below! I’d love to hear from you.
Frequently Asked Questions (FAQ)
Q: What is n8n and why is it used in this project?
A: n8n is a powerful open-source workflow automation platform. We use it here because it allows us to connect different services (like Telegram, Google Drive, and AI models) and orchestrate complex tasks without writing any code. It’s the central brain that makes our AI agent work!
Q: What is NanoBanana and how does it relate to FAL AI?
A: NanoBanana is an image generation model developed by Google. FAL AI is a service that hosts and provides access to various AI models, including NanoBanana, via an API. So, we use FAL AI to interact with the NanoBanana model and perform our image generation and editing tasks.
Q: Why do we need imageBB to generate public URLs for images?
A: Many AI models, including NanoBanana when accessed via FAL AI, require images to be accessible via a public URL on the internet. Google Drive links are often not directly public in the way these models need. imageBB provides a quick and free way to convert our downloaded image data into a publicly accessible URL that the AI can then process.
Q: Can I use other messaging apps instead of Telegram for the agent interface?
A: Absolutely! While this tutorial uses Telegram for its ease of integration and user-friendliness, n8n supports integrations with many other messaging platforms like Slack, Discord, or even custom webhooks. You would just need to configure the initial trigger node in your n8n workflow to listen for inputs from your preferred platform.
Q: What if I want to add a new image manipulation tool to the agent?
A: That’s the beauty of this modular design! You would typically create a new custom n8n workflow for your new tool (similar to how we built ‘Combine Images’ or ‘Edit Image’). Then, you’d update your main agent’s system prompt to include a description of this new tool and ensure the agent knows when and how to call it. It’s like adding a new superpower to your AI sidekick!