Watch the Video Tutorial
💡 Pro Tip: After watching the video, continue reading below for detailed step-by-step instructions, code examples, and additional tips that will help you implement this successfully.
Table of Contents
Open Table of Contents
- Why Automate Instagram Posting?
- Essential Steps for Setting Up Instagram Automation
- Automating Instagram Posts with n8n Workflow
- Required Resources List and Cost-Benefit Analysis
- Critical Safety & Best Practice Tips
- Key Takeaways
- Conclusion
- Frequently Asked Questions (FAQ)
- Q: My access token expired really quickly. What did I do wrong?
- Q: I’m getting an error about my Instagram account not being a professional account. What does this mean?
- Q: Can I post videos or carousels with this n8n workflow?
- Q: What if my n8n workflow fails to post? How do I troubleshoot?
- Q: Is n8n free to use for this kind of automation?
- Q: How often do I need to refresh my long-lived access token?
Why Automate Instagram Posting?
Alright, let’s get real. Why bother automating Instagram posts? Simple: it’s a massive time-saver and the secret sauce for consistent content delivery. Whether you’re a business juggling a gazillion accounts or just an individual trying to keep your feed fresh without sacrificing your sanity, programmatic posting with n8n is a game-changer. It’s like having a tiny, tireless robot working for you 24/7. But here’s the kicker: Instagram’s API is like a constantly evolving alien language, especially after those big changes in December 2024. So, a careful setup is absolutely key.
Essential Steps for Setting Up Instagram Automation
Before we unleash our automation superpowers, we need to lay some groundwork. To get Instagram posting smoothly with n8n, we’ll need to:
- Create a Meta app.
- Set up the right permissions for it.
- Grab an access token (this is like our secret key).
- Finally, plug all these goodies into our n8n workflow.
Ready? Let’s go!
Step 1: Create a Meta App
Our adventure begins in the Meta for Developers universe. This is where we’ll forge a new application that acts as the translator between n8n and Instagram’s API. Think of it as building a custom spaceship for our data.
Accessing Meta for Developers
First things first, open your browser and beam yourself over to developers.facebook.com. If you’re not already logged in, go ahead and sign in with your Facebook account. Once you’re in, look for ‘My Apps’ – it’s usually in the top navigation bar. This is your command center for all your Meta applications.
Initiating App Creation
See that ‘Create app’ button? That’s our launch button! Click it to kick off the setup process. You’ll be asked for some basic info about your new application. Don’t worry, it’s pretty straightforward.
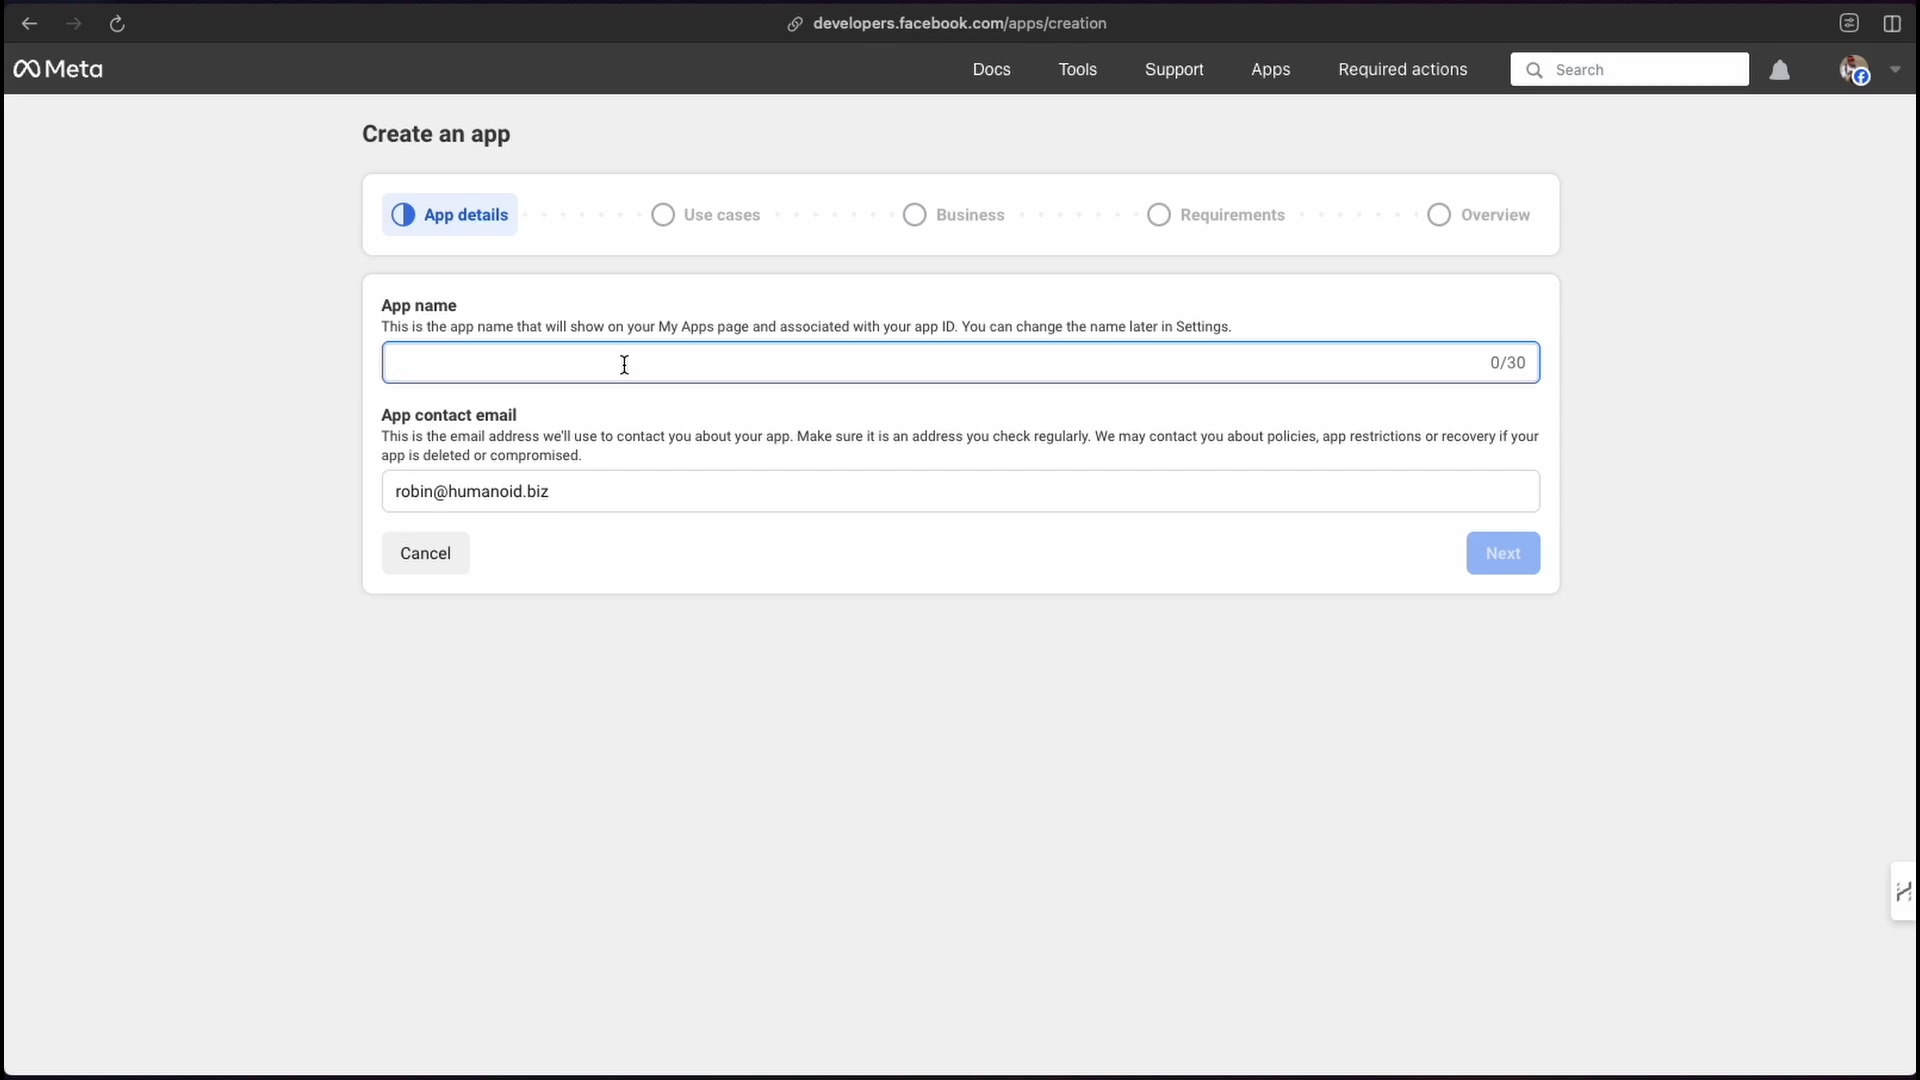
Naming Your App
Now, for the fun part: naming your creation! Pick something descriptive, but here’s a crucial rule from Meta’s side: you absolutely cannot use words like ‘Instagram’, ‘Facebook’, or ‘Meta’ in your app’s name. They’re pretty strict about their branding, you know? So, ‘n8n Tutorial’ is a perfect example of an acceptable name. Pop in a contact email, then hit ‘Next’.
Selecting App Use Case
This part can be a bit tricky because none of the pre-defined options scream “Instagram automation!” So, when it asks you to select a use case, scroll all the way down to the bottom and pick ‘Other’. After that, you’ll need to specify the app type. For our purposes, ‘Business’ is the way to go. This ensures your app has the right foundational permissions for what we’re trying to do.
Finalizing App Creation
Almost there! Click ‘Create App’. What just happened? You’ve just brought a new Meta app into existence! This app is now the crucial bridge, the wormhole if you will, between your n8n workflows and the Instagram universe. Pretty cool, right?
Step 2: Configure App Permissions
Alright, our Meta app is born, but it’s like a newborn alien – it needs to learn how to interact with its environment. We need to give it the necessary permissions to talk to Instagram.
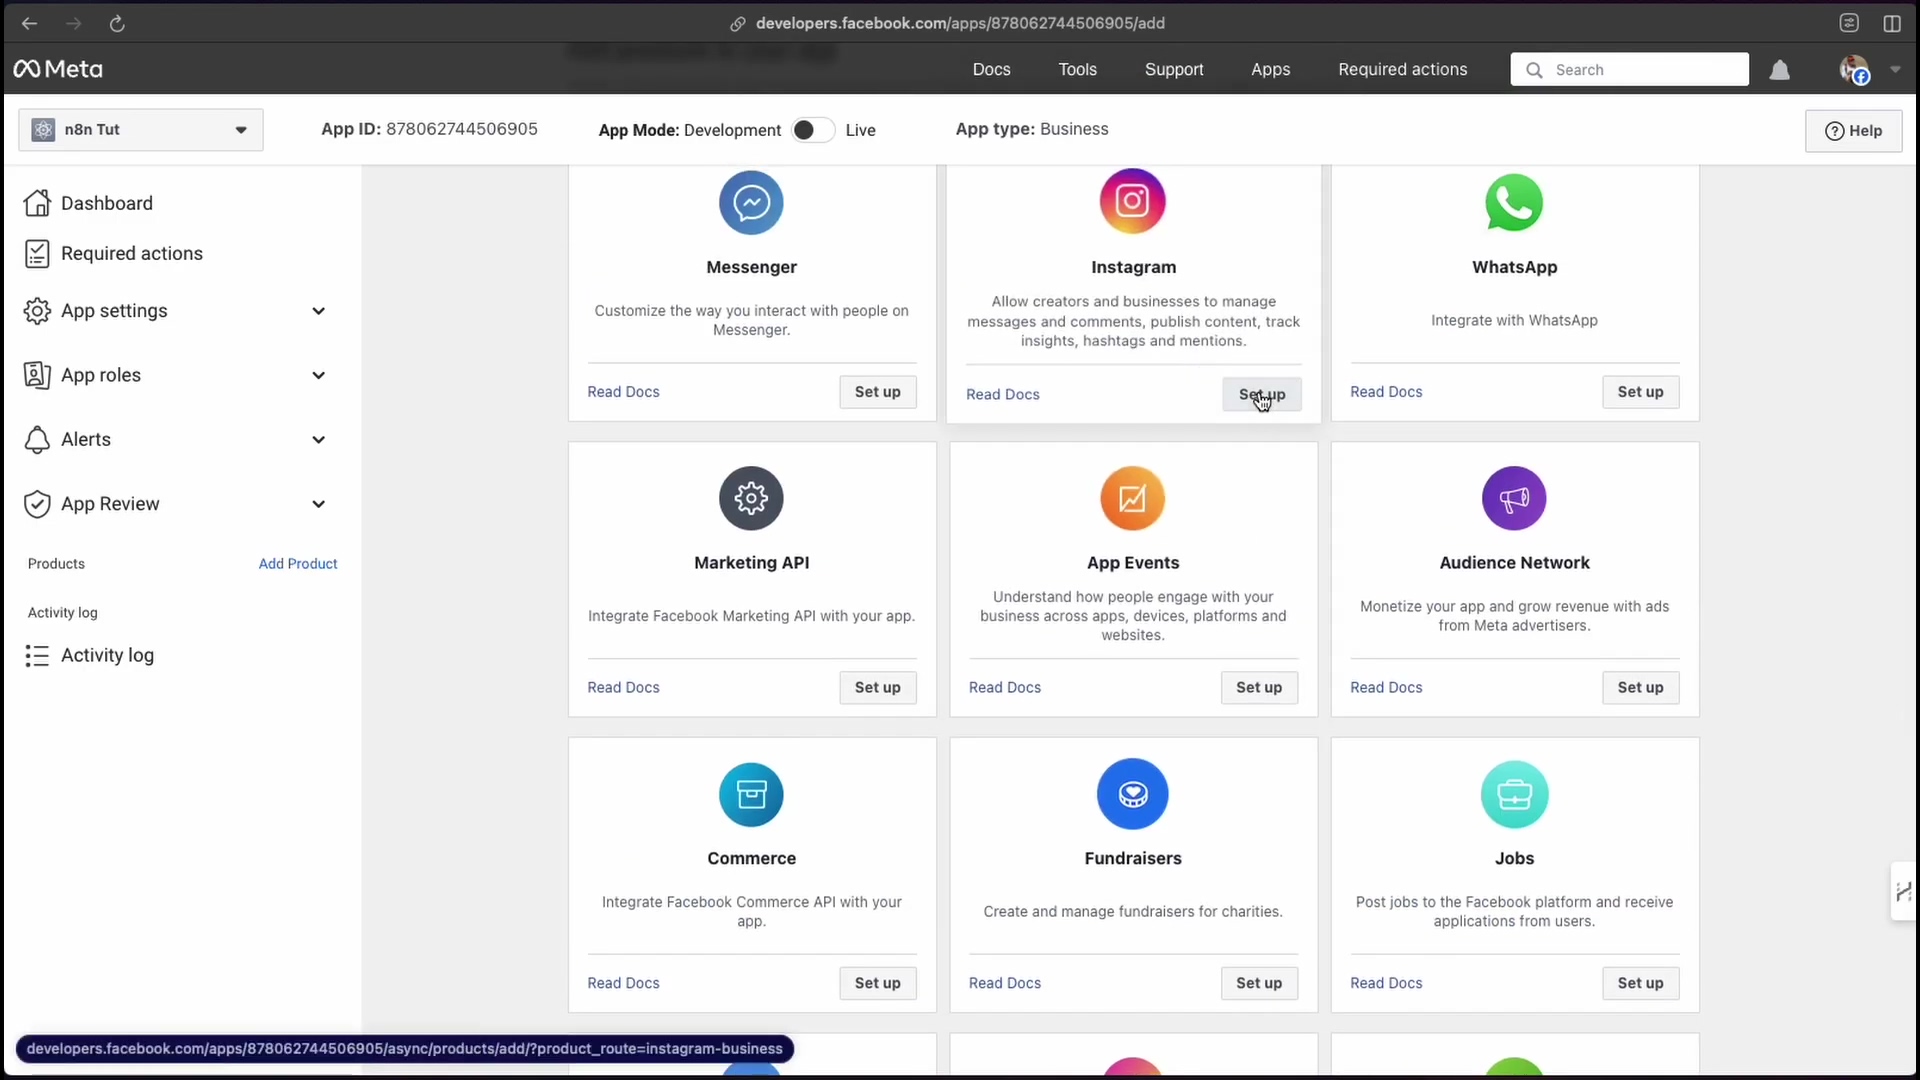
Adding the Instagram Product
From your app’s shiny new dashboard, you’ll need to find and select the ‘Instagram’ product. It might be under ‘Products’ or ‘Add Product’. Once you find it, click ‘Set up’. This is a critical step because it installs all the Instagram-specific functionalities into your app. Without this, your app won’t even know what Instagram is!
Assigning Instagram Tester Role
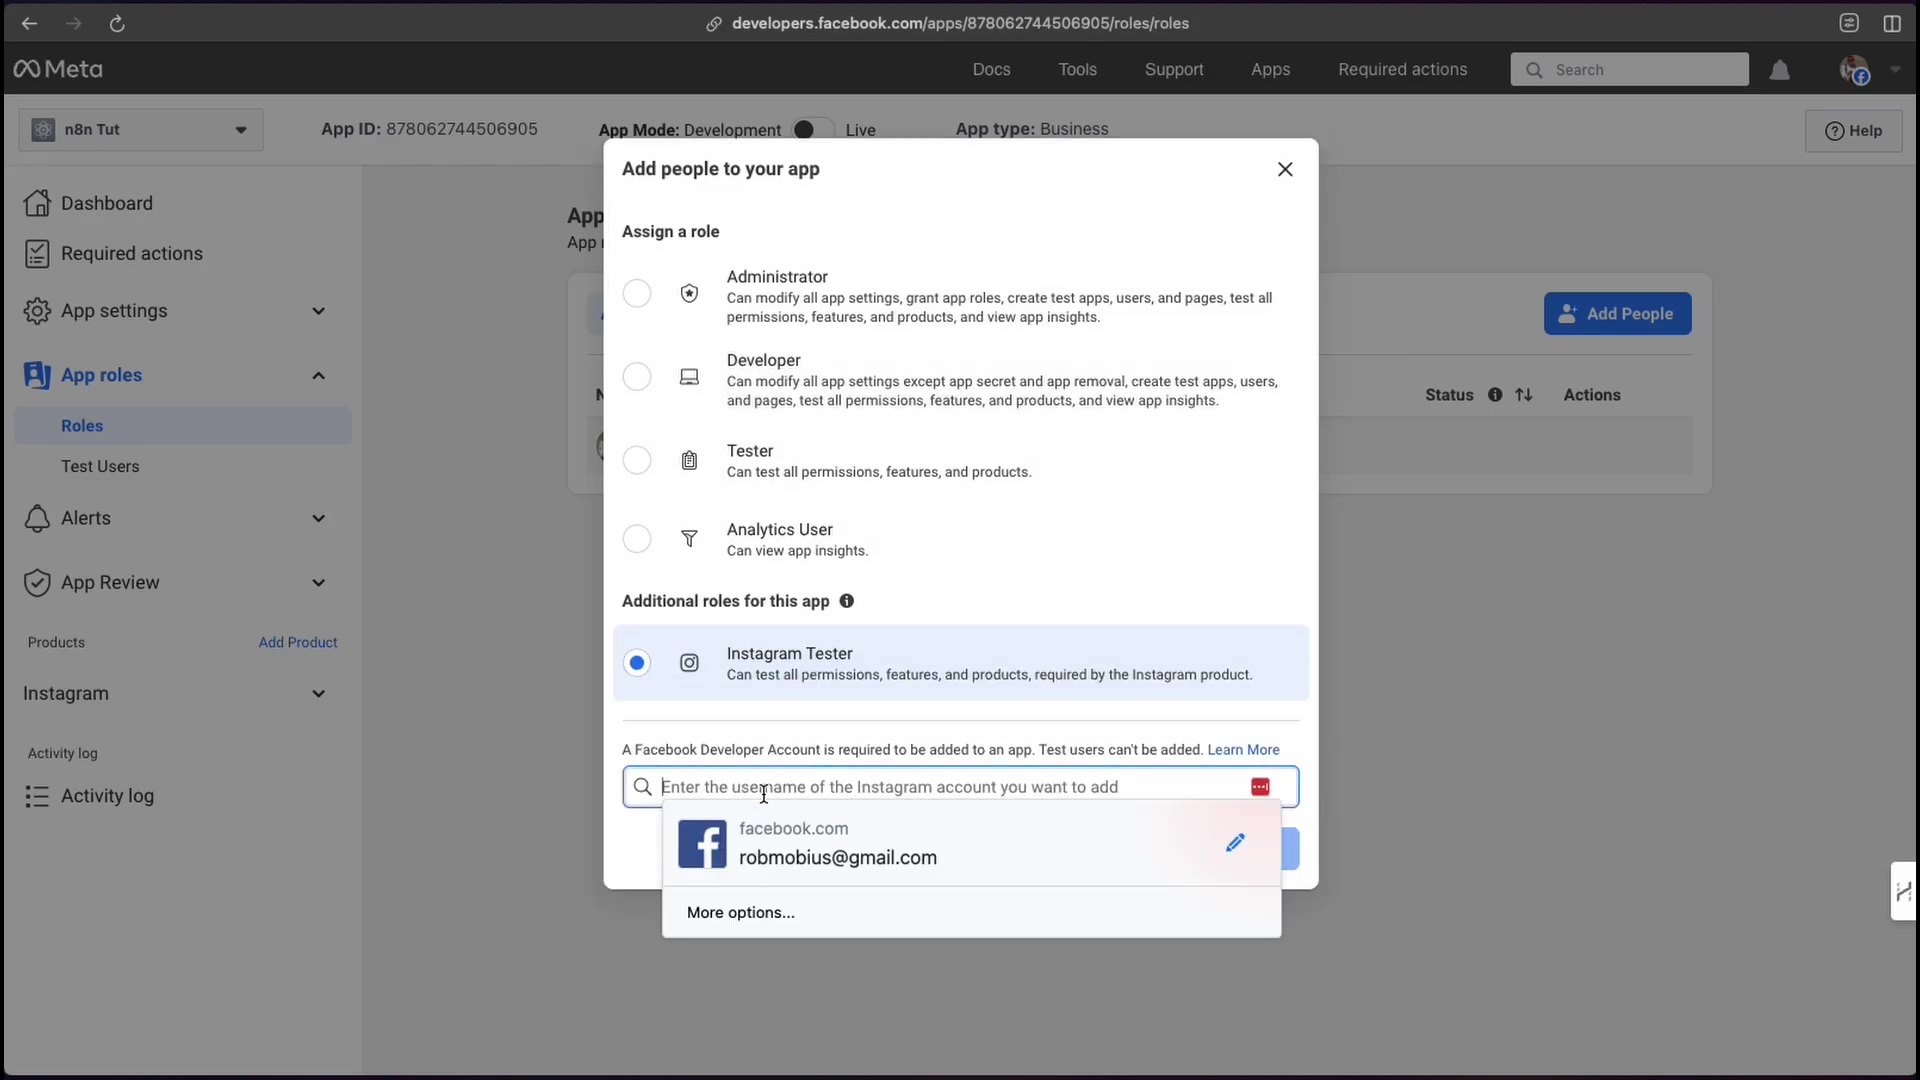
This is where we tell Meta which Instagram account our app is allowed to mess with (in a good way!). Navigate to ‘App roles’ within your Meta app settings. Then, click on ‘Roles’ and ‘Add people’. In the little pop-up window, select ‘Instagram Tester’ and then search for the exact username of the Instagram account you want to automate. Adding this role sends an invitation directly to that Instagram account. It’s like sending a special VIP pass.
Accepting the Tester Invite
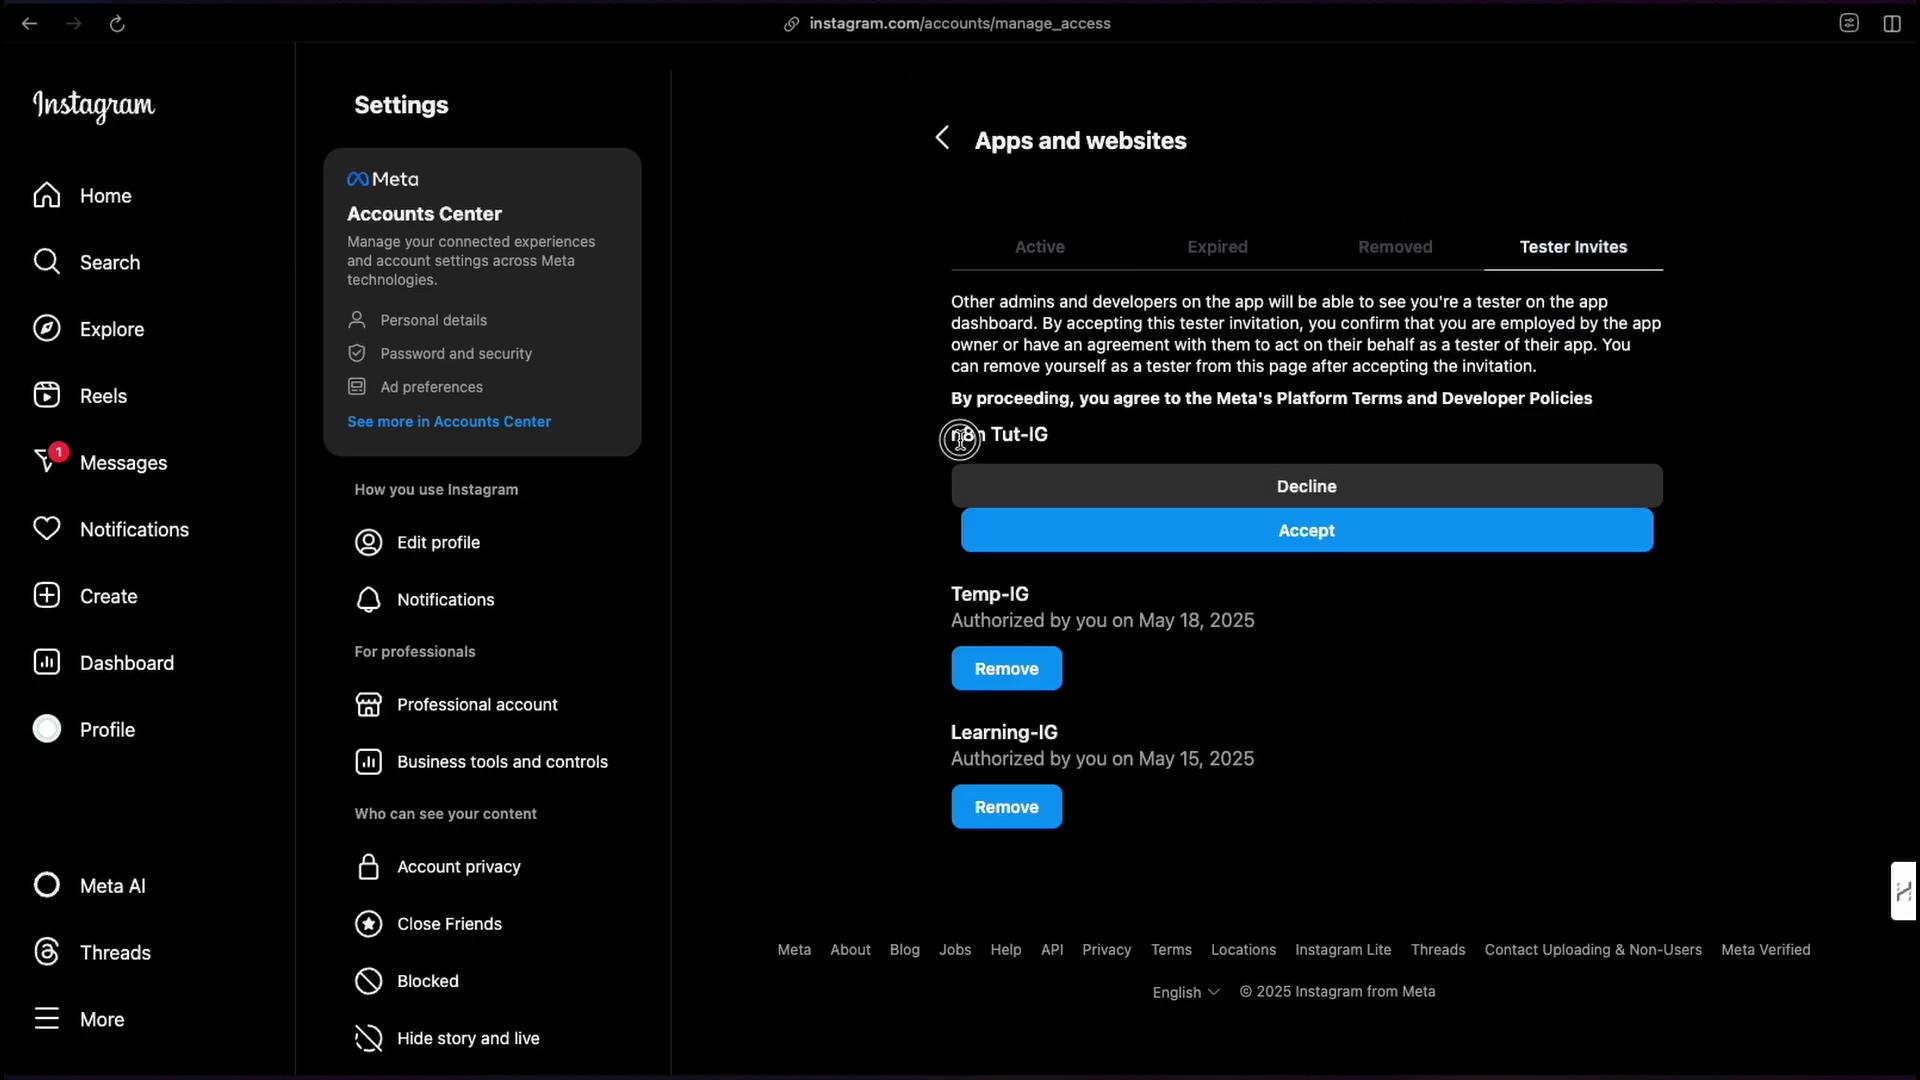
Now, switch gears! Log into the Instagram account that you just assigned as a tester. Head over to instagram.com/accounts/manage_access. Under the ‘Tester Invites’ tab, you should see the invitation from your brand-new Meta app. Go ahead and accept that invitation. This is the final handshake, granting your app the green light to interact with your Instagram account.
Important Note: This is a big one, so listen up! Your Instagram account must be a ‘Professional Account’ (either a Business or Creator account) to allow programmatic handling. If it’s currently a personal account, Instagram will usually prompt you to switch during this process. Don’t skip this; it’s non-negotiable for API access!
Step 3: Obtain an Access Token
Think of access tokens as the secret keys that authenticate your n8n workflows with Instagram. Without them, it’s like trying to open a locked door without the right key. There are a couple of ways to get these keys, and one is definitely more reliable than the other.
Method 1: Direct Generation (Often Unreliable)
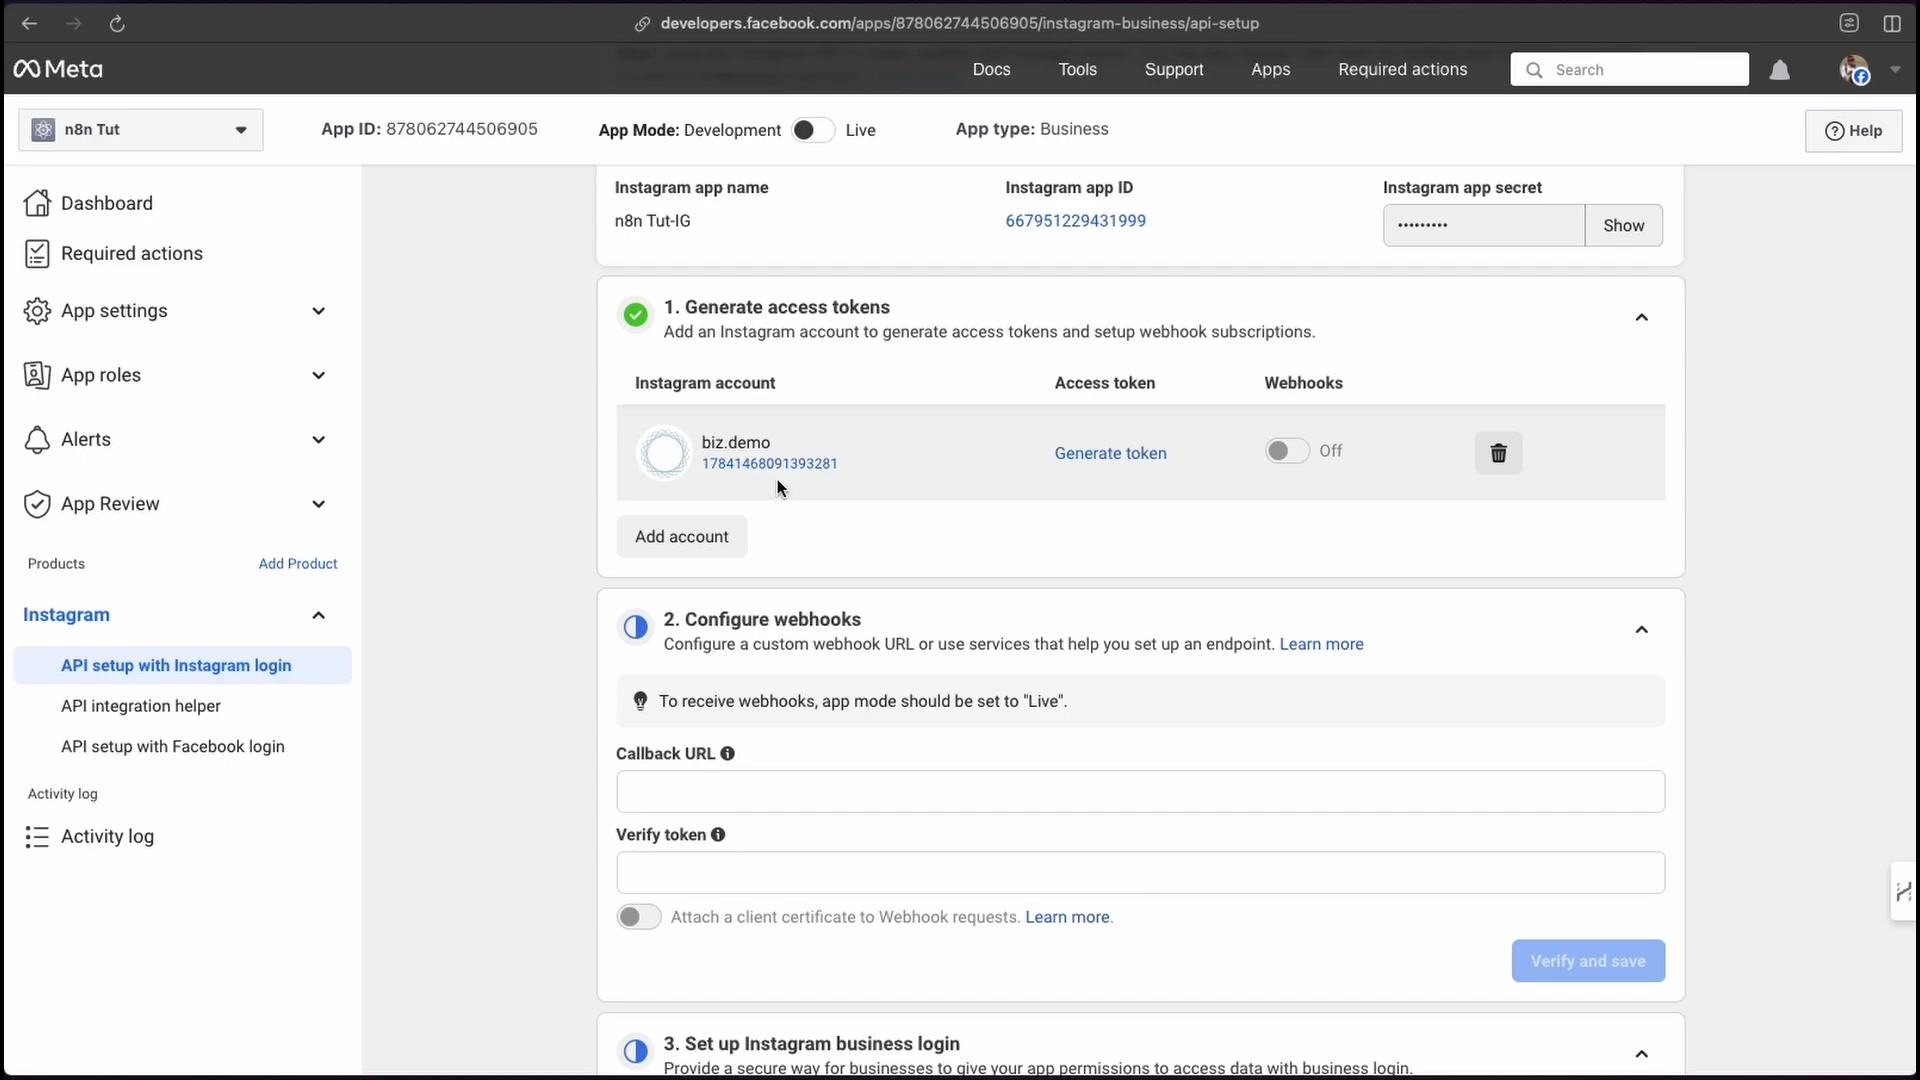
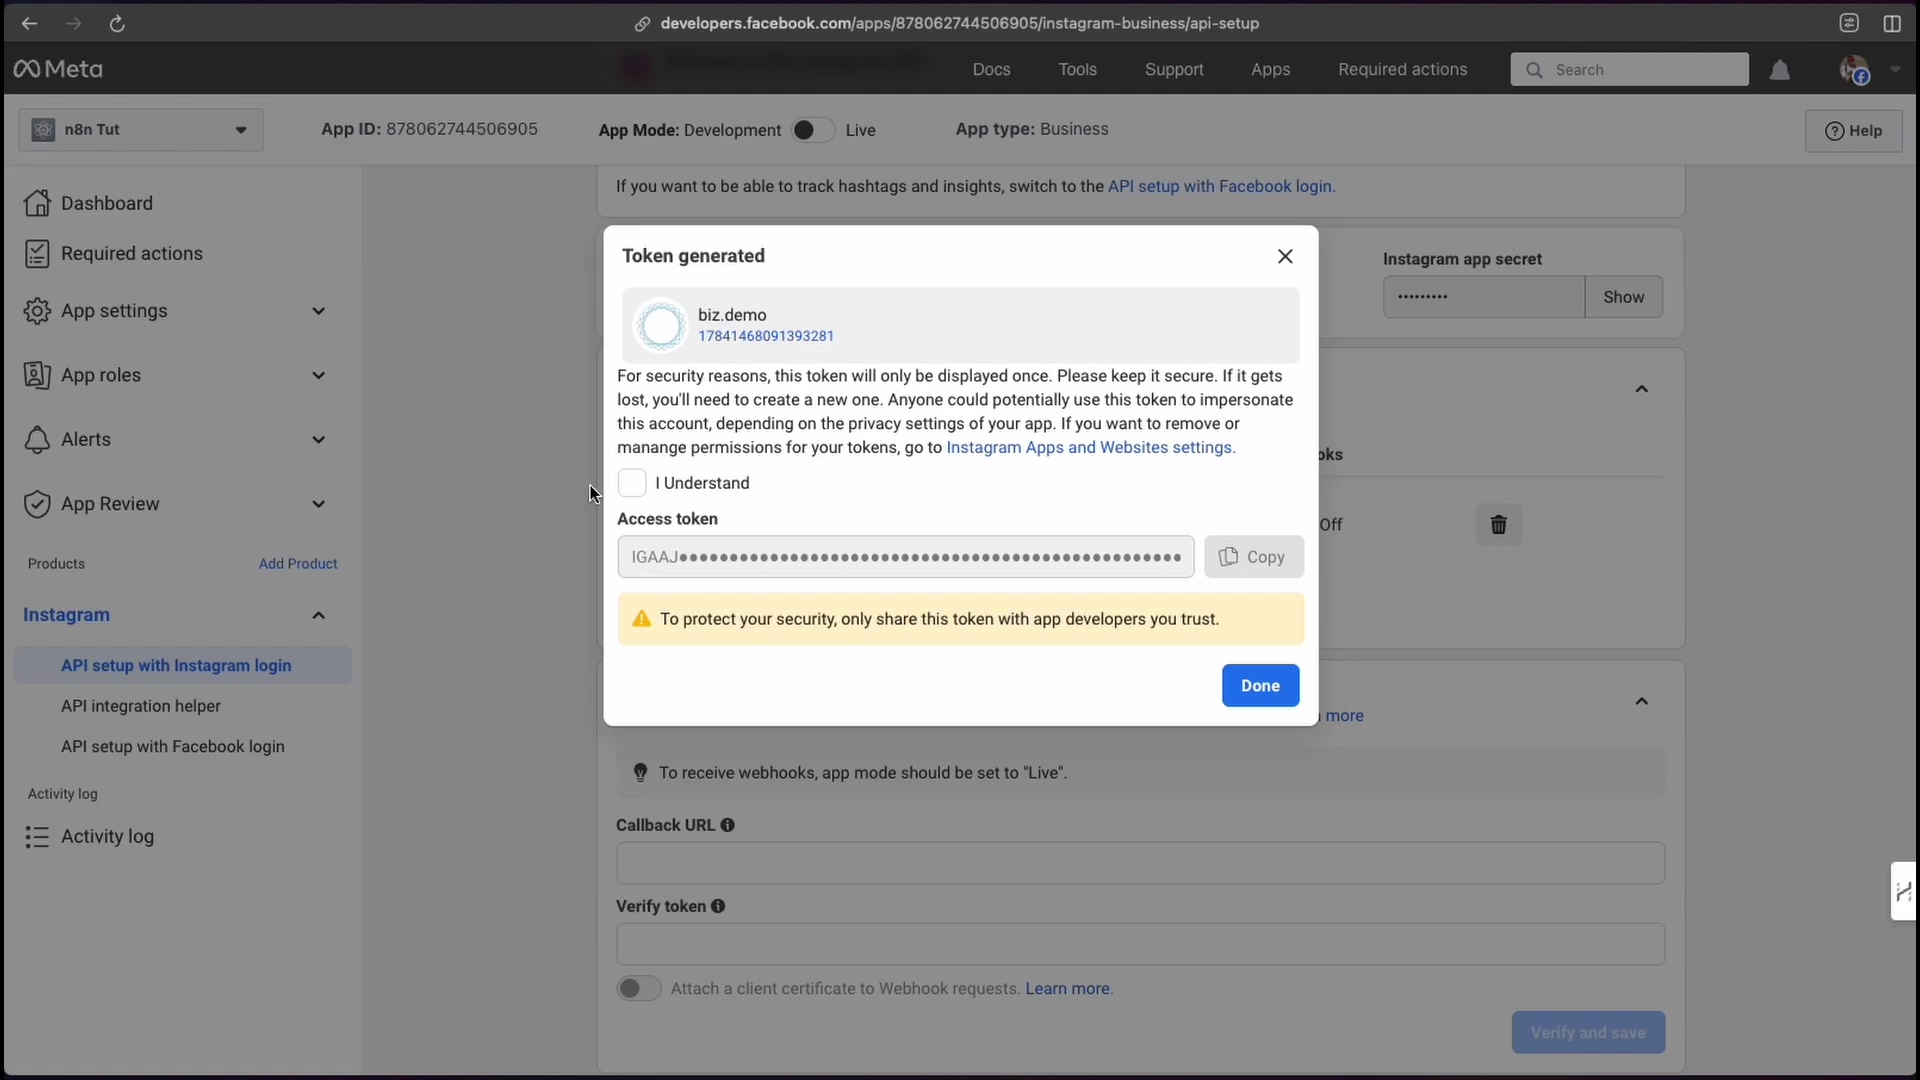
From your Meta app’s Instagram API setup dashboard, you might spot a ‘Generate access tokens’ section. If your Instagram account is connected, it should be listed there. Click ‘Generate token’. A new window will pop up, asking for a bunch of permissions. Just go ahead and allow all of them. A token will then magically appear, which you can copy.
Now, while this looks easy, in my experience, tokens generated this way often throw tantrums and don’t play nice with n8n. If you try it and things go sideways (which they often do), don’t despair! Just move on to Method 2. It’s the tried-and-true path.
Method 2: Graph API Explorer (Recommended for Reliability)
This is my go-to method for getting a rock-solid access token. It’s a bit more involved, but it’s worth the extra steps for the peace of mind.
-
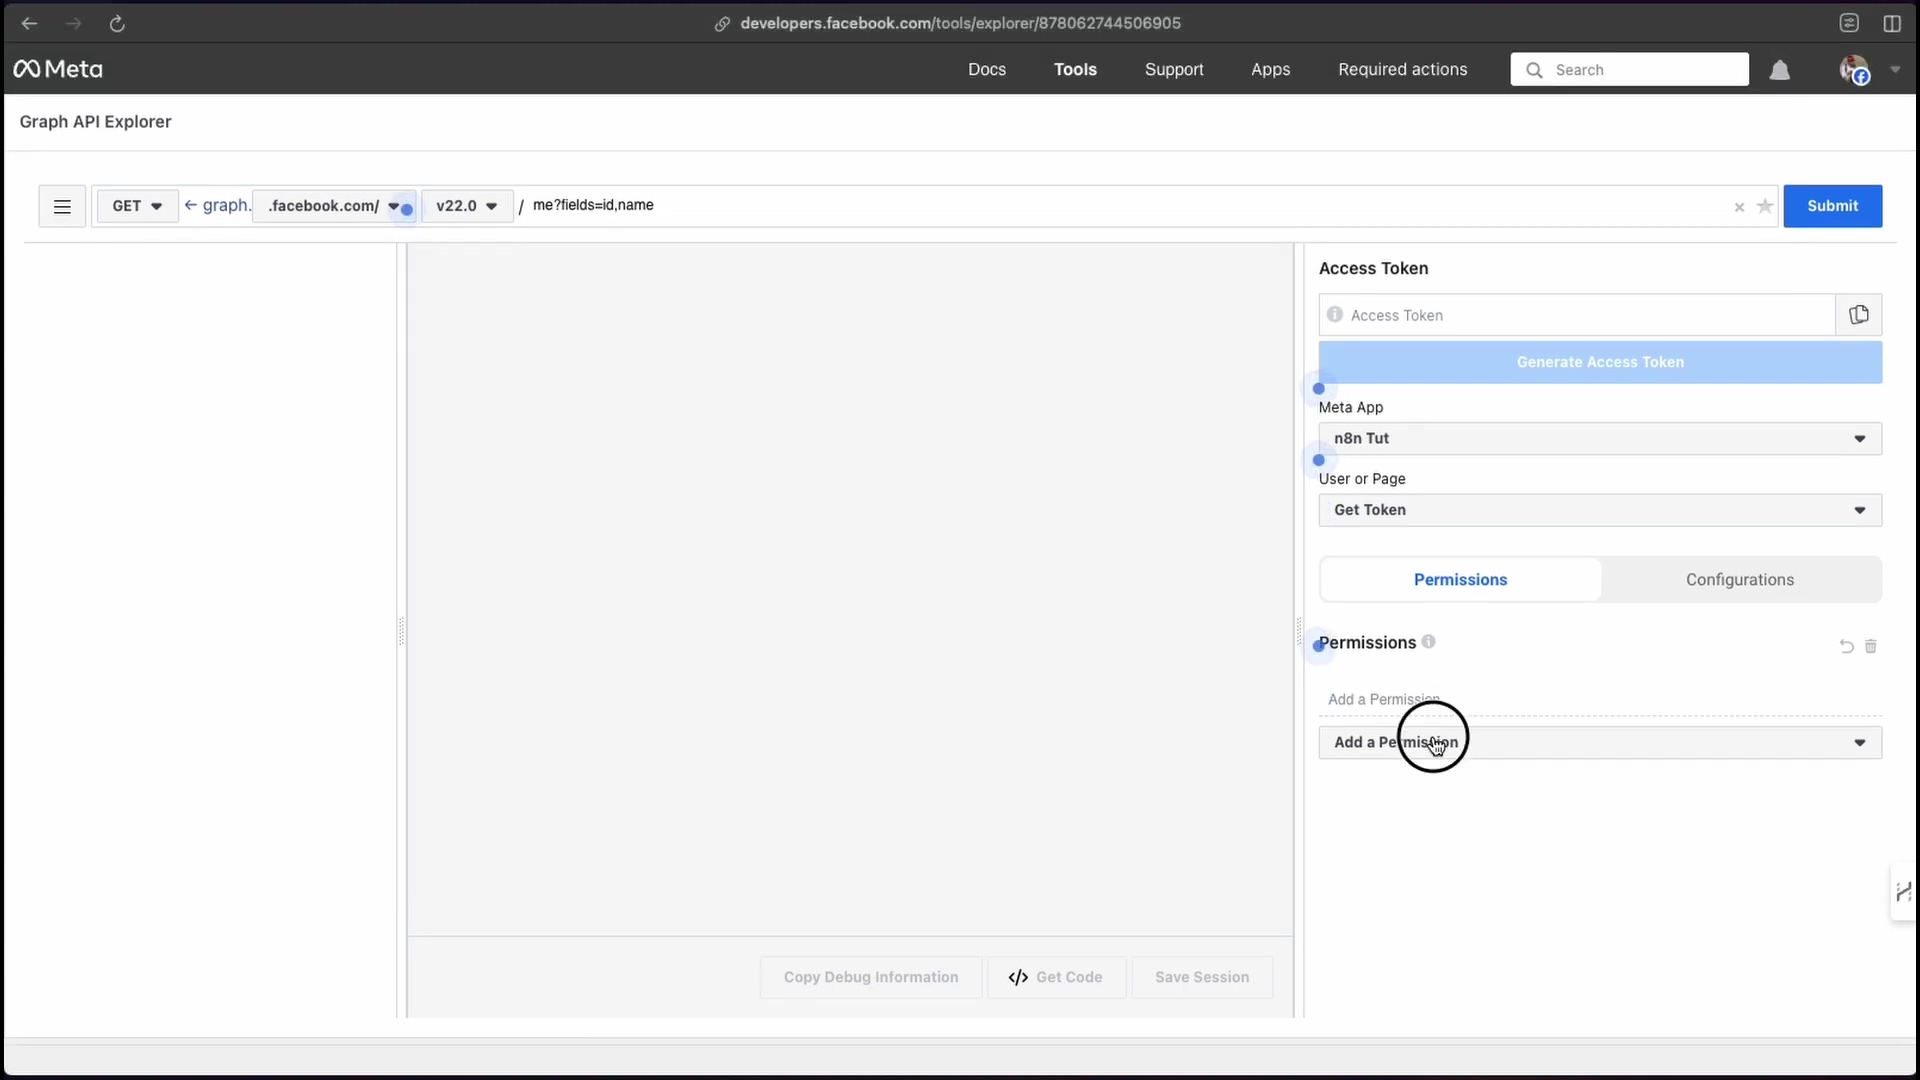
Access Graph API Explorer: Back in your Meta for Developers dashboard, look for ‘Tools’ (usually in the left sidebar or top menu) and select ‘Graph API Explorer’. This is like the control panel for interacting directly with Meta’s API.
-
Select Your App: At the top of the Graph API Explorer page, there’s a dropdown menu. Make sure your newly created Meta app (like ‘n8n Tutorial’) is selected. This tells the Explorer which app’s permissions we’re working with.
-
Add Permissions: This is crucial. Under the ‘Permissions’ tab, you need to add all the relevant Instagram permissions. While you might not use every single one right now, adding them upfront saves you a headache later if you decide to expand your automation. Better safe than sorry, right?
-
Generate Access Token: Once you’ve added the permissions, click ‘Generate Access Token’. You’ll be prompted again to grant permissions, but this time it’s through your Facebook profile. Follow the prompts, connect your Instagram account, and allow all the necessary permissions. This step links your personal Facebook/Instagram identity to the app’s token generation.
-
Copy the Token: Voila! Your shiny new access token will appear. Copy it immediately! This is your golden ticket.
Step 4: Extend Access Token Life
Here’s a little secret about those access tokens: they’re usually short-lived, like a fleeting moment of glory (think an hour or so). For automation, that’s just not going to cut it. We need a long-lived token, something that sticks around for a while, typically a couple of months. This means less maintenance for us!
-
Use Access Token Debugger: Head back to ‘Tools’ in your Meta for Developers dashboard and select ‘Access Token Debugger’. This tool is super handy for checking out your tokens.
-
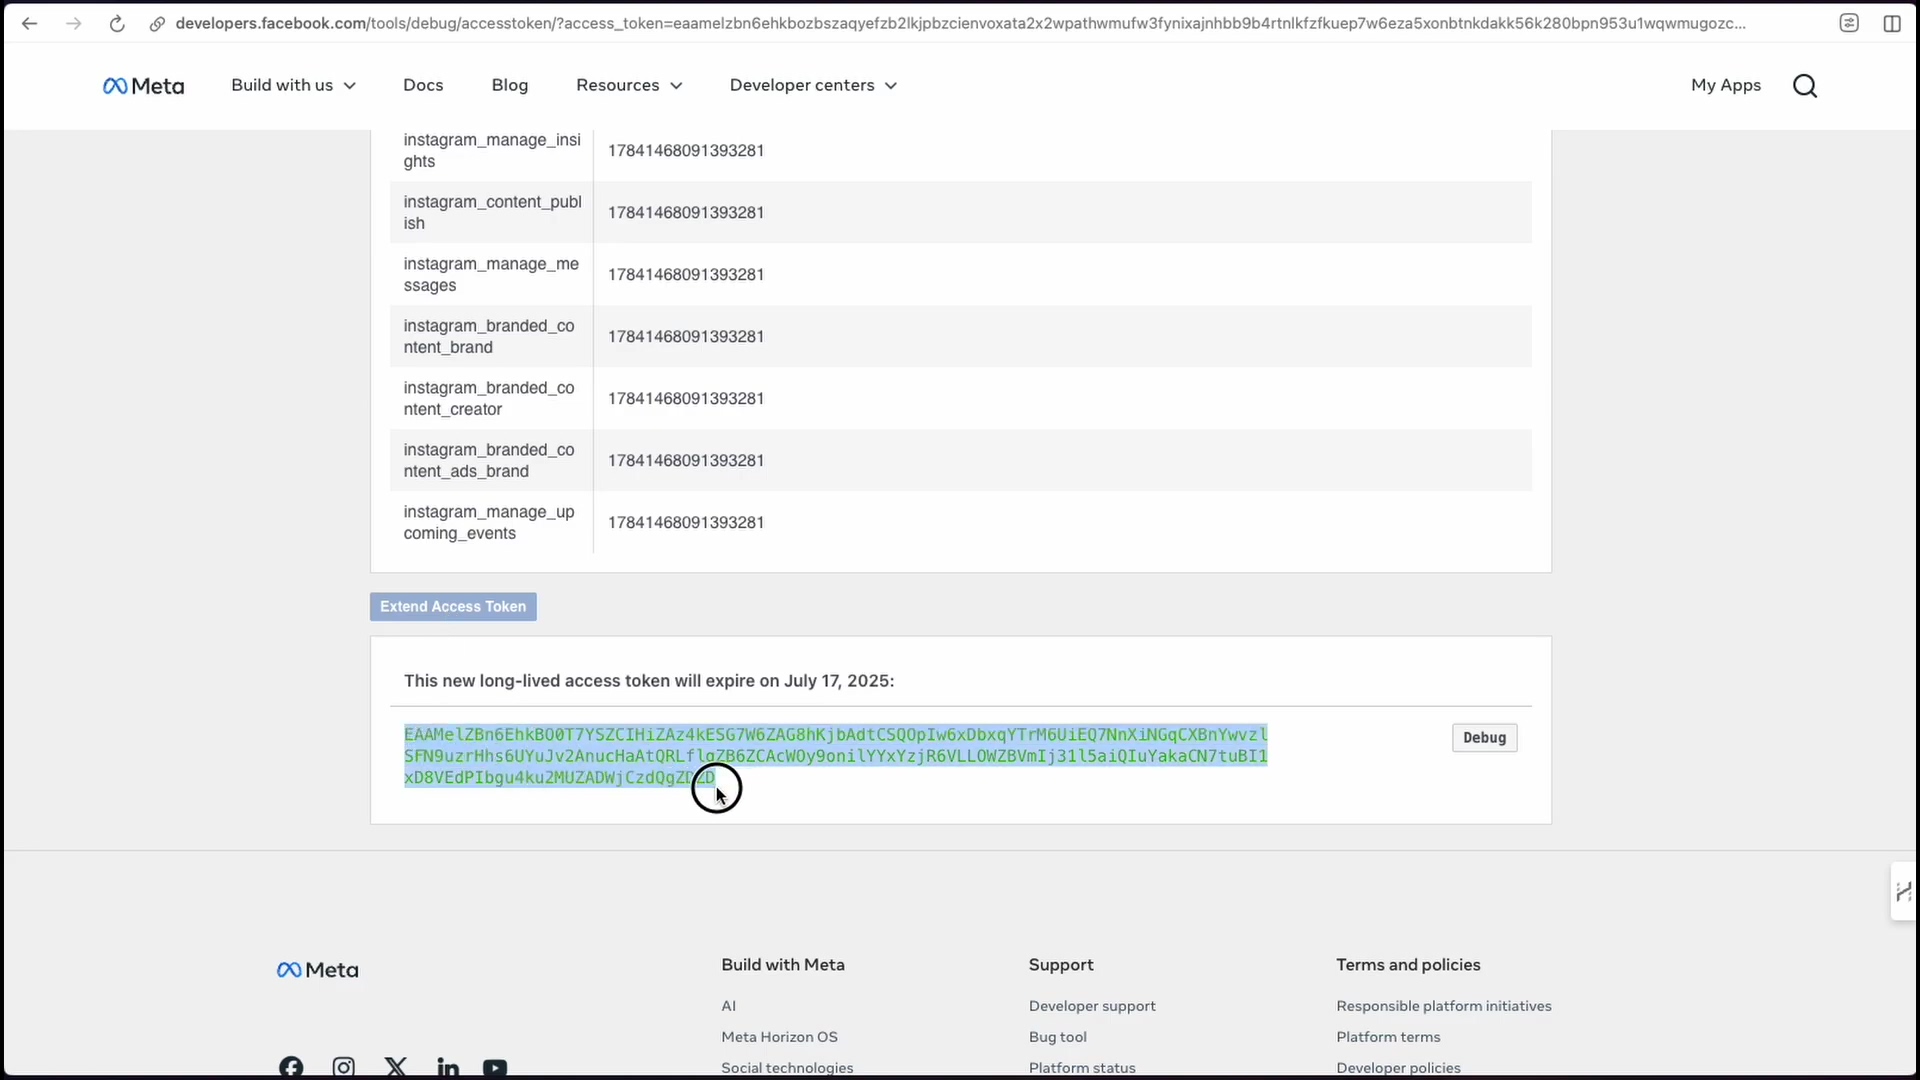
Debug Your Token: Paste the access token you just copied (the short-lived one) into the debugger field and click ‘Debug’. The debugger will show you all sorts of info about your token, including its expiration time.
-
Extend Life: Look towards the bottom of the debugger page. You’ll see a button that says ‘Extend Access Token’. Click it! This magical button transforms your short-lived token into a long-lived one. Now you’ve got a token that’s good for weeks, maybe even months, before you need to refresh it. Sweet!
Step 5: Configure n8n Credentials
We’ve got our long-lived access token – the ultimate key! Now it’s time to bring it home to n8n. This is where we tell n8n how to securely talk to Instagram.
-
Add New Credential: Open up your n8n instance. In the left-hand sidebar, you’ll see ‘Credentials’. Click on it, and then click ‘Add New Credential’. This is where n8n stores all your sensitive API keys and tokens.
-
Select Facebook Graph API: In the search bar, type ‘Facebook’. You’ll see ‘Facebook Graph API’ pop up. Select that as the credential type. Why Facebook? Because Instagram’s API is actually part of Facebook’s larger Graph API ecosystem. Paste your long-lived access token into the designated field. Make sure there are no extra spaces before or after the token!
-
Save and Test: Give your credential a descriptive name (e.g., “My Instagram Automation Token”) and then click ‘Save’. If everything is set up correctly, you should see a successful connection indication. This means n8n can now securely communicate with your Instagram account via the Meta API. You’ve nailed it!
Automating Instagram Posts with n8n Workflow
Credentials are set, keys are in hand! Now for the fun part: building the actual workflow in n8n to automate your Instagram posts. This is where your robot assistant truly comes to life!
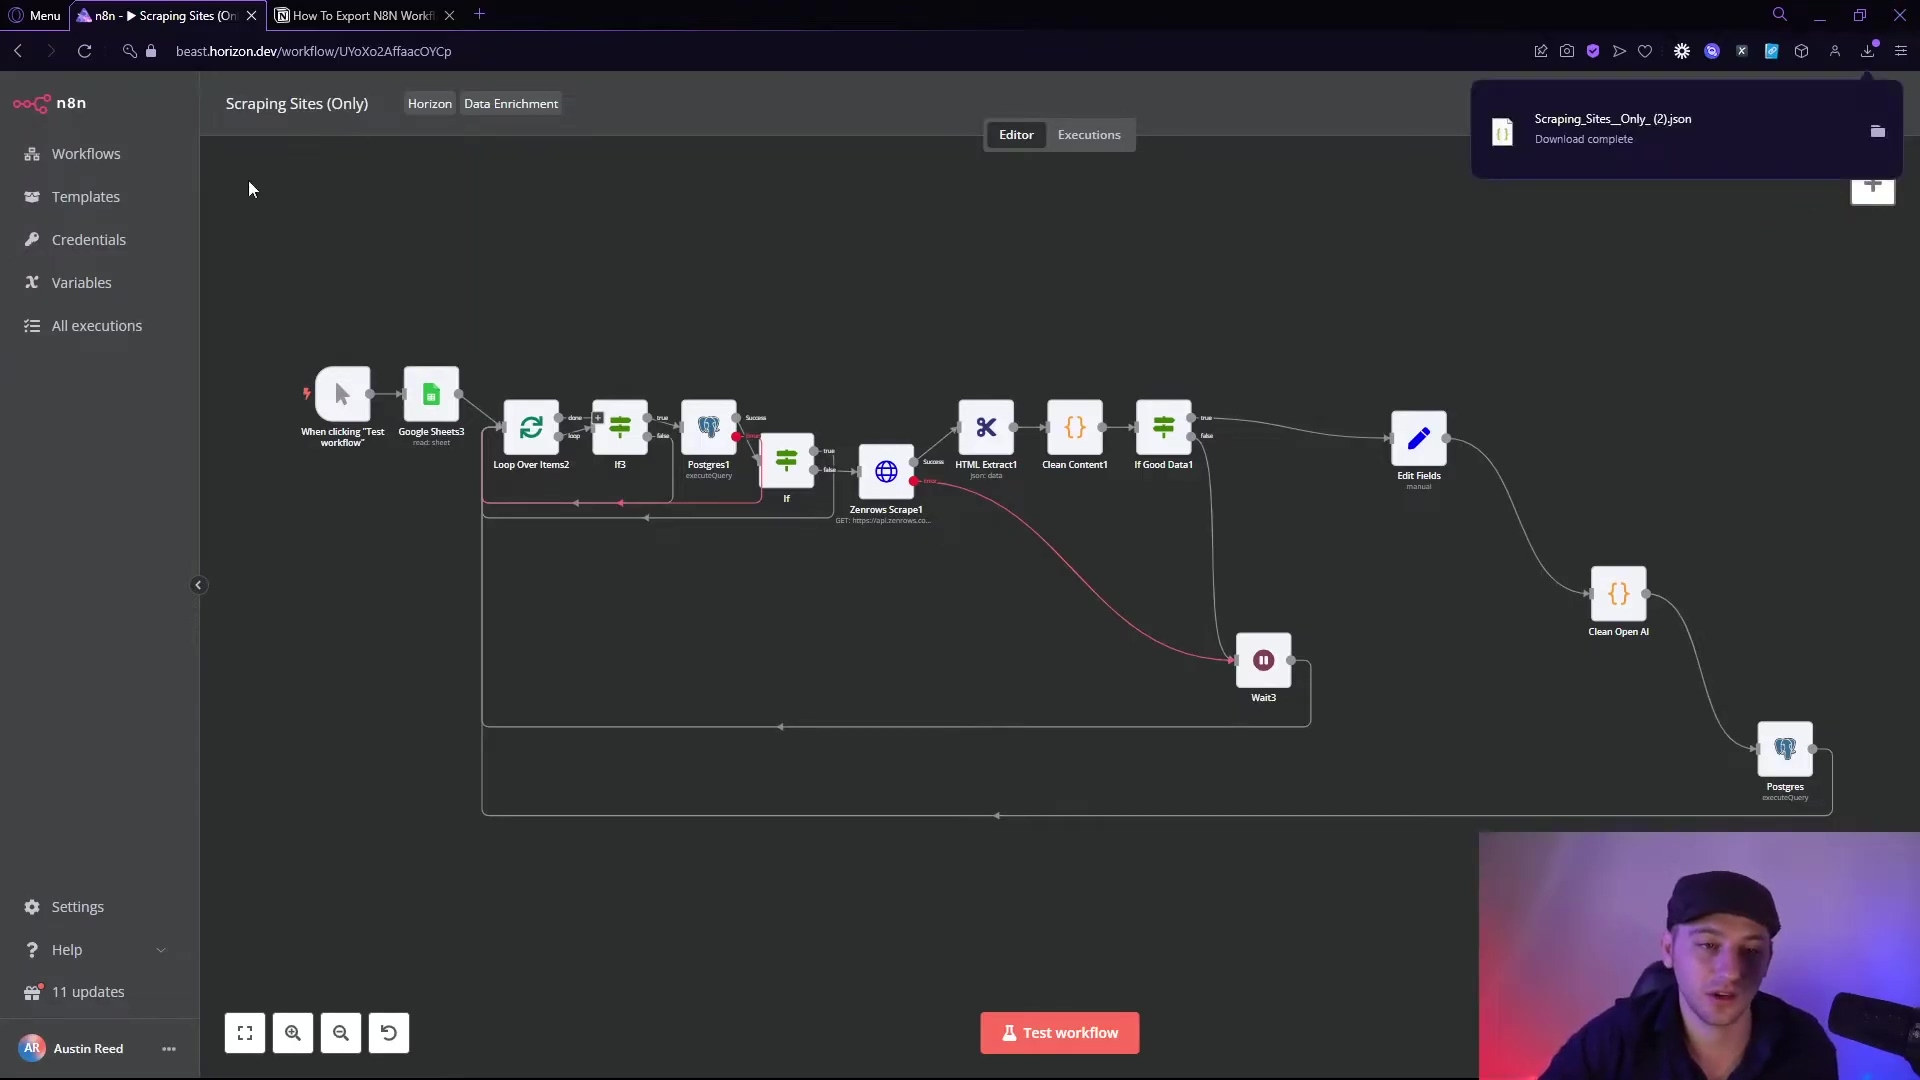
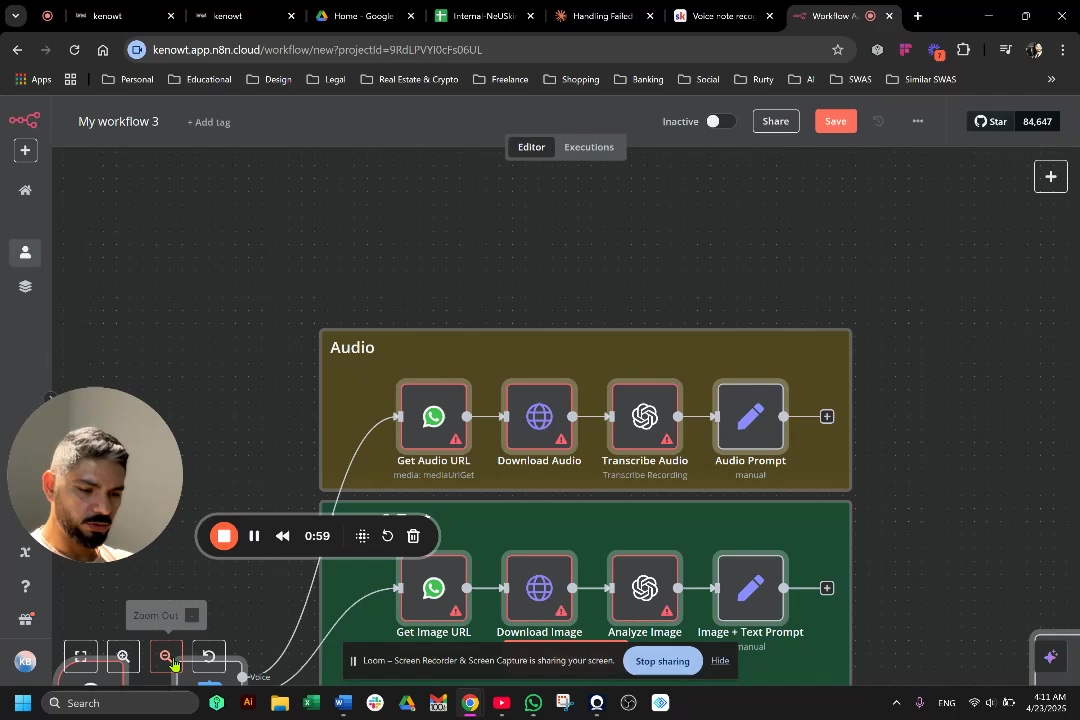
Workflow Overview
So, what does a typical n8n workflow for Instagram posting look like? It’s usually a sequence of a few key nodes, each doing a specific job:
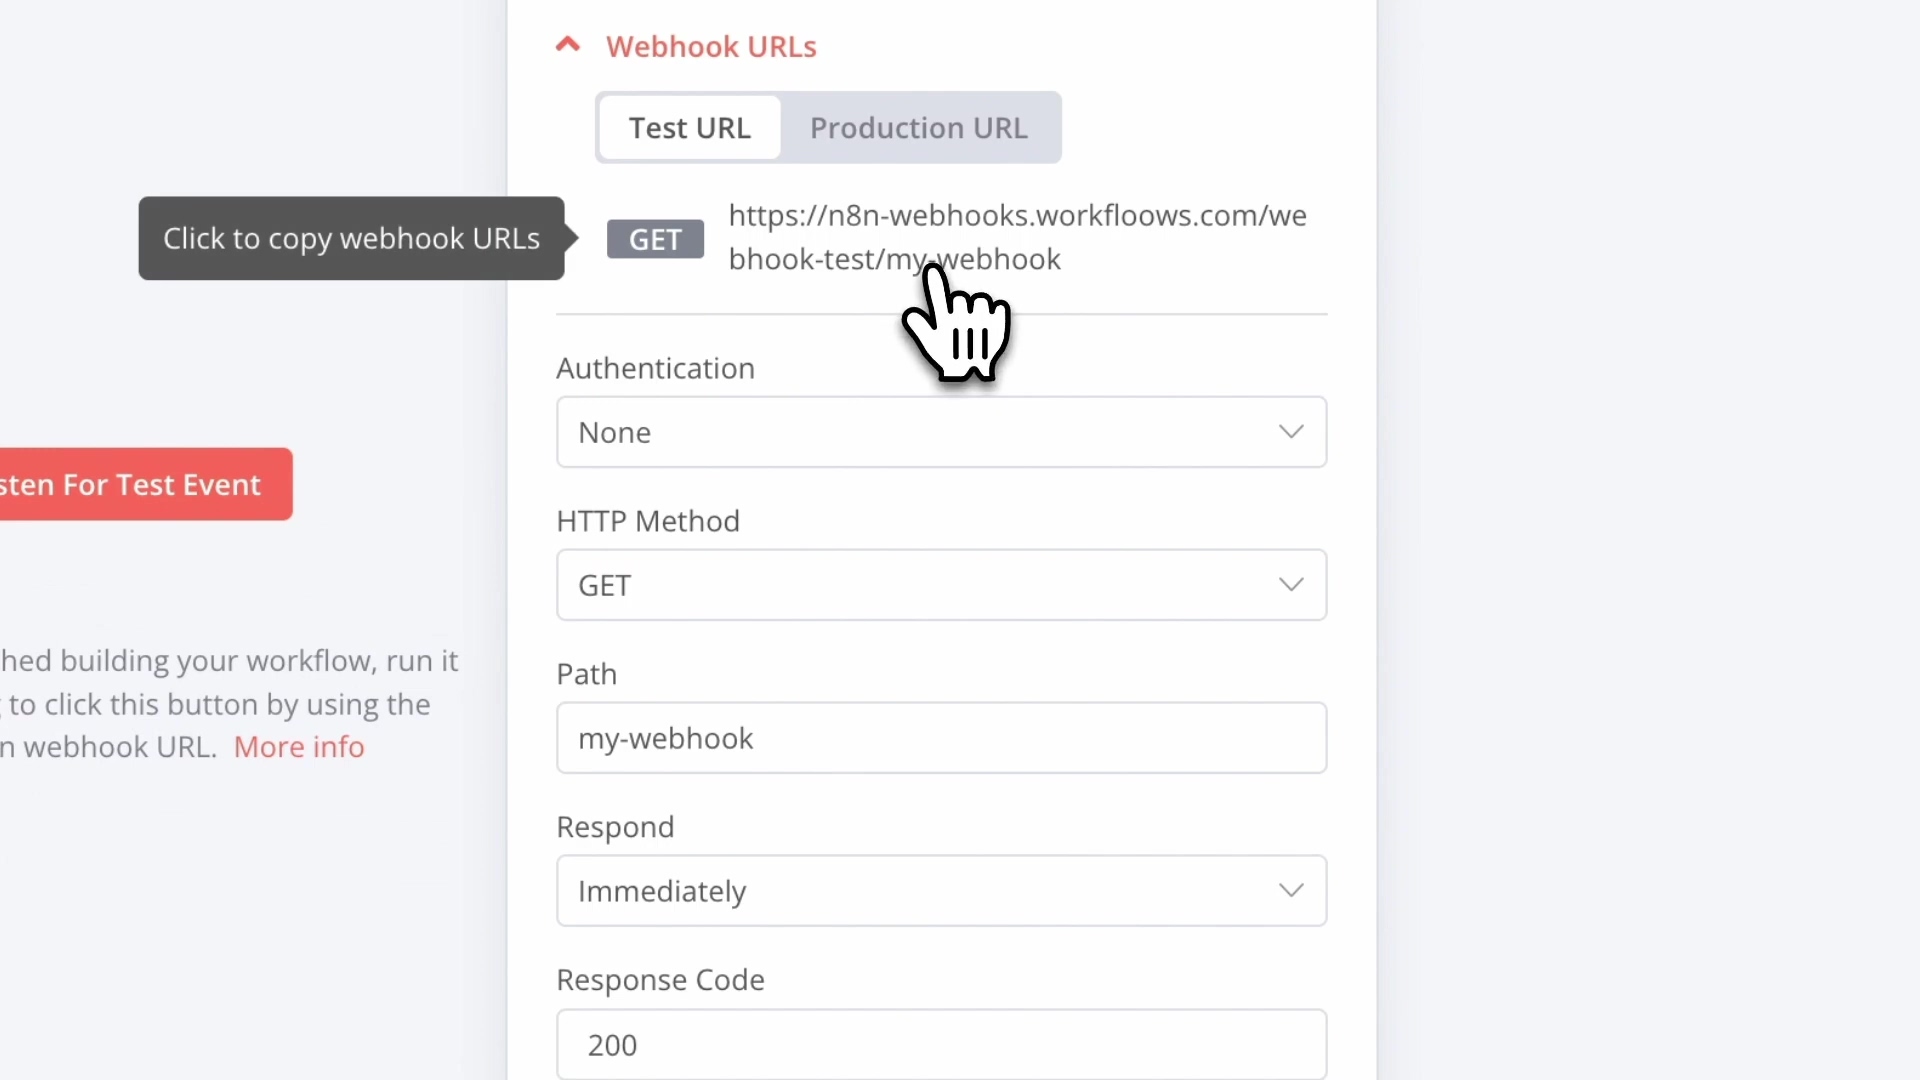
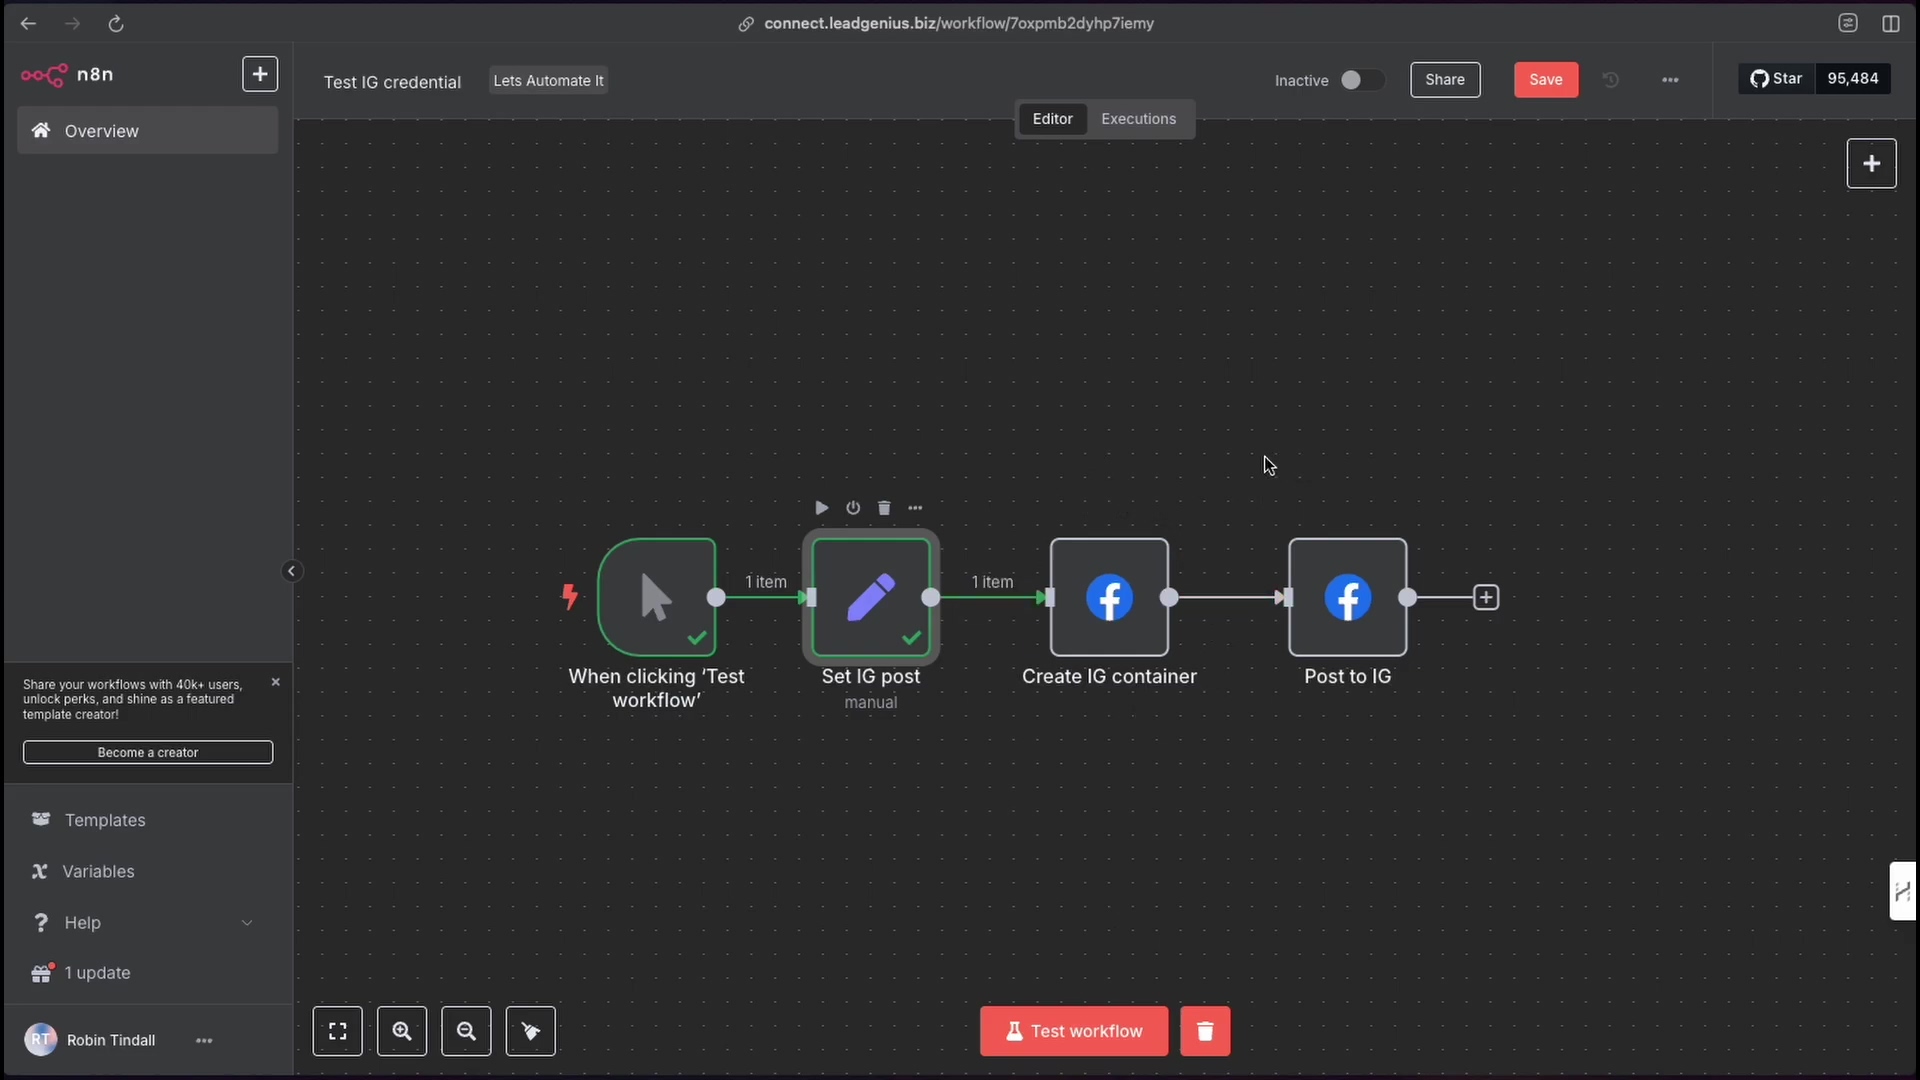
- Trigger Node: This is what kicks off our workflow. For testing, a ‘Manual Trigger’ is perfect. You click a button, and the magic happens. Later, you could swap this for a ‘Schedule Trigger’ to post at specific times, or even a ‘Webhook Trigger’ if you want to post from another app!
- Set Node: This is our content preparation station. Here, we define the image URL, the caption, and tell n8n which Instagram account ID to use.
- Instagram Nodes: We’ll use two ‘Instagram’ nodes (which are actually part of the Facebook Graph API integration in n8n). One to prepare the image for publishing (think of it as packaging the content) and another to actually hit the ‘publish’ button.
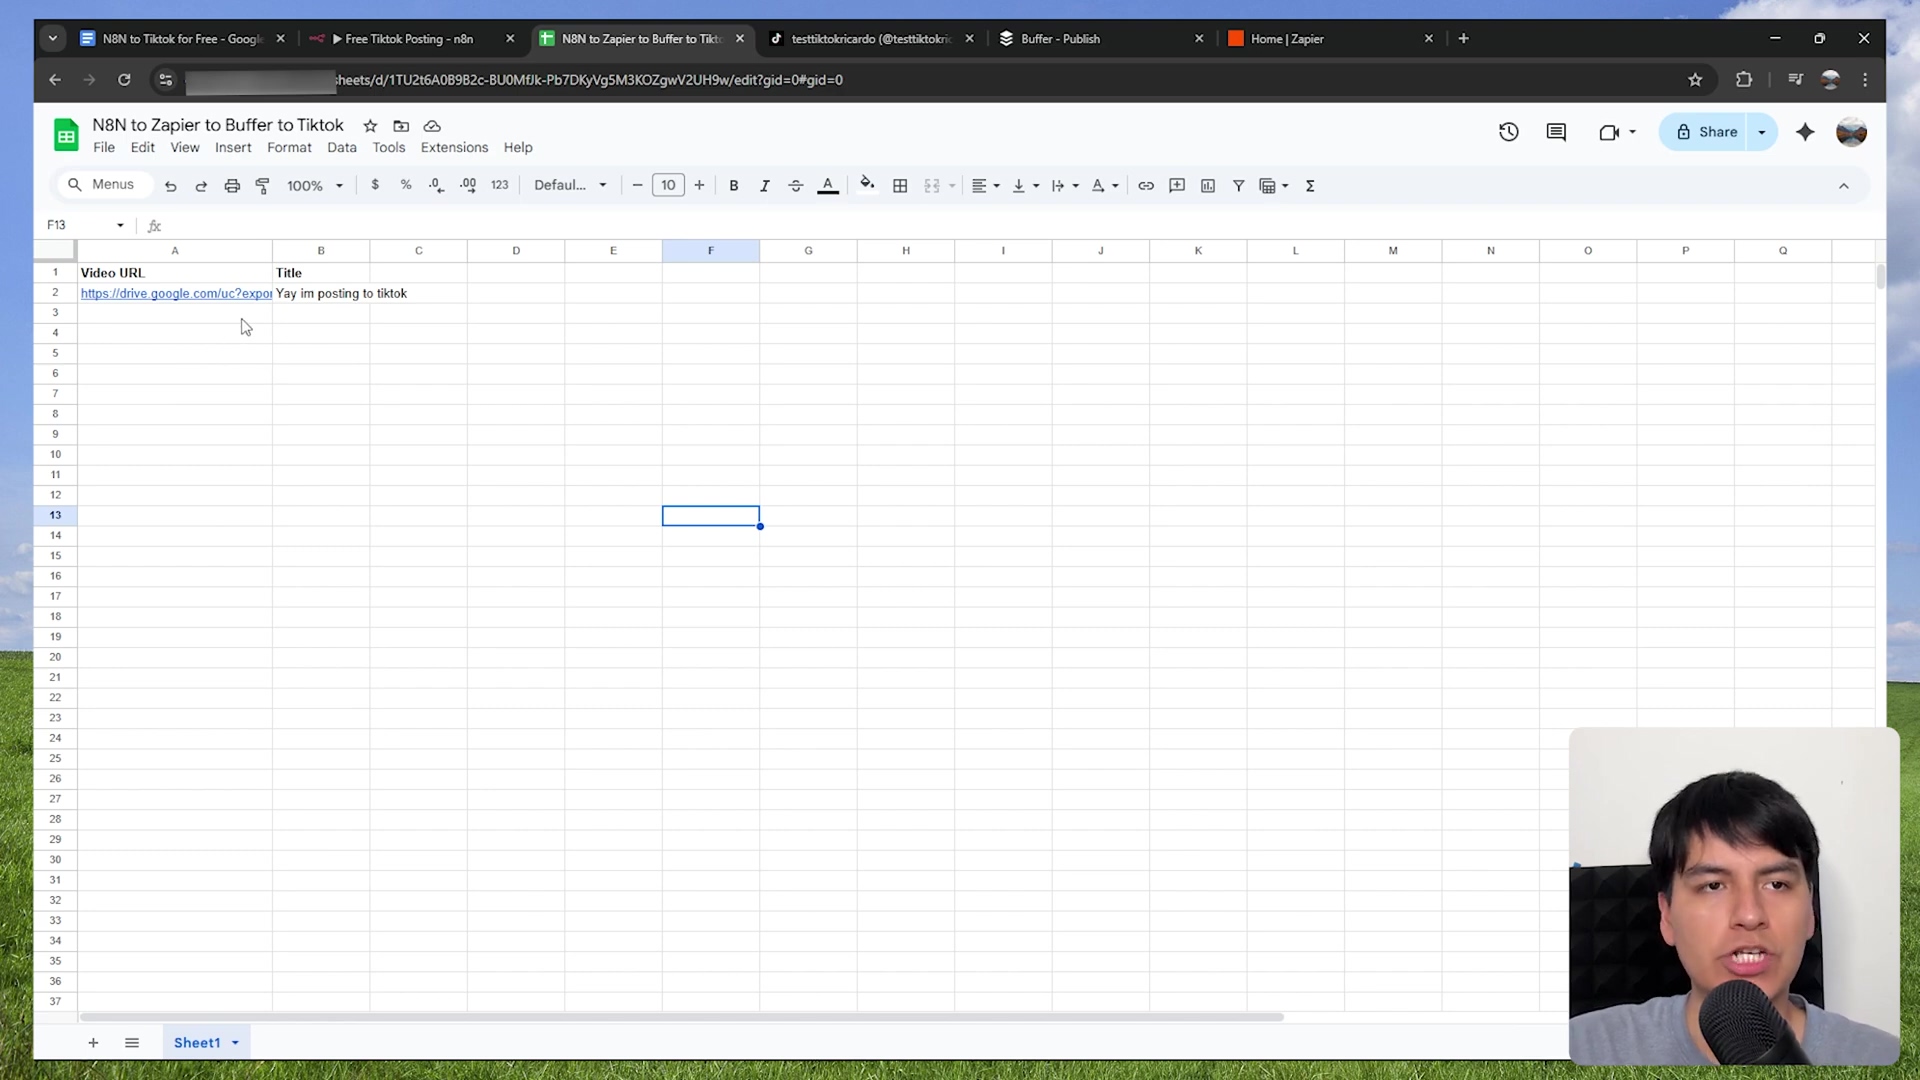
Configuring the Set Node
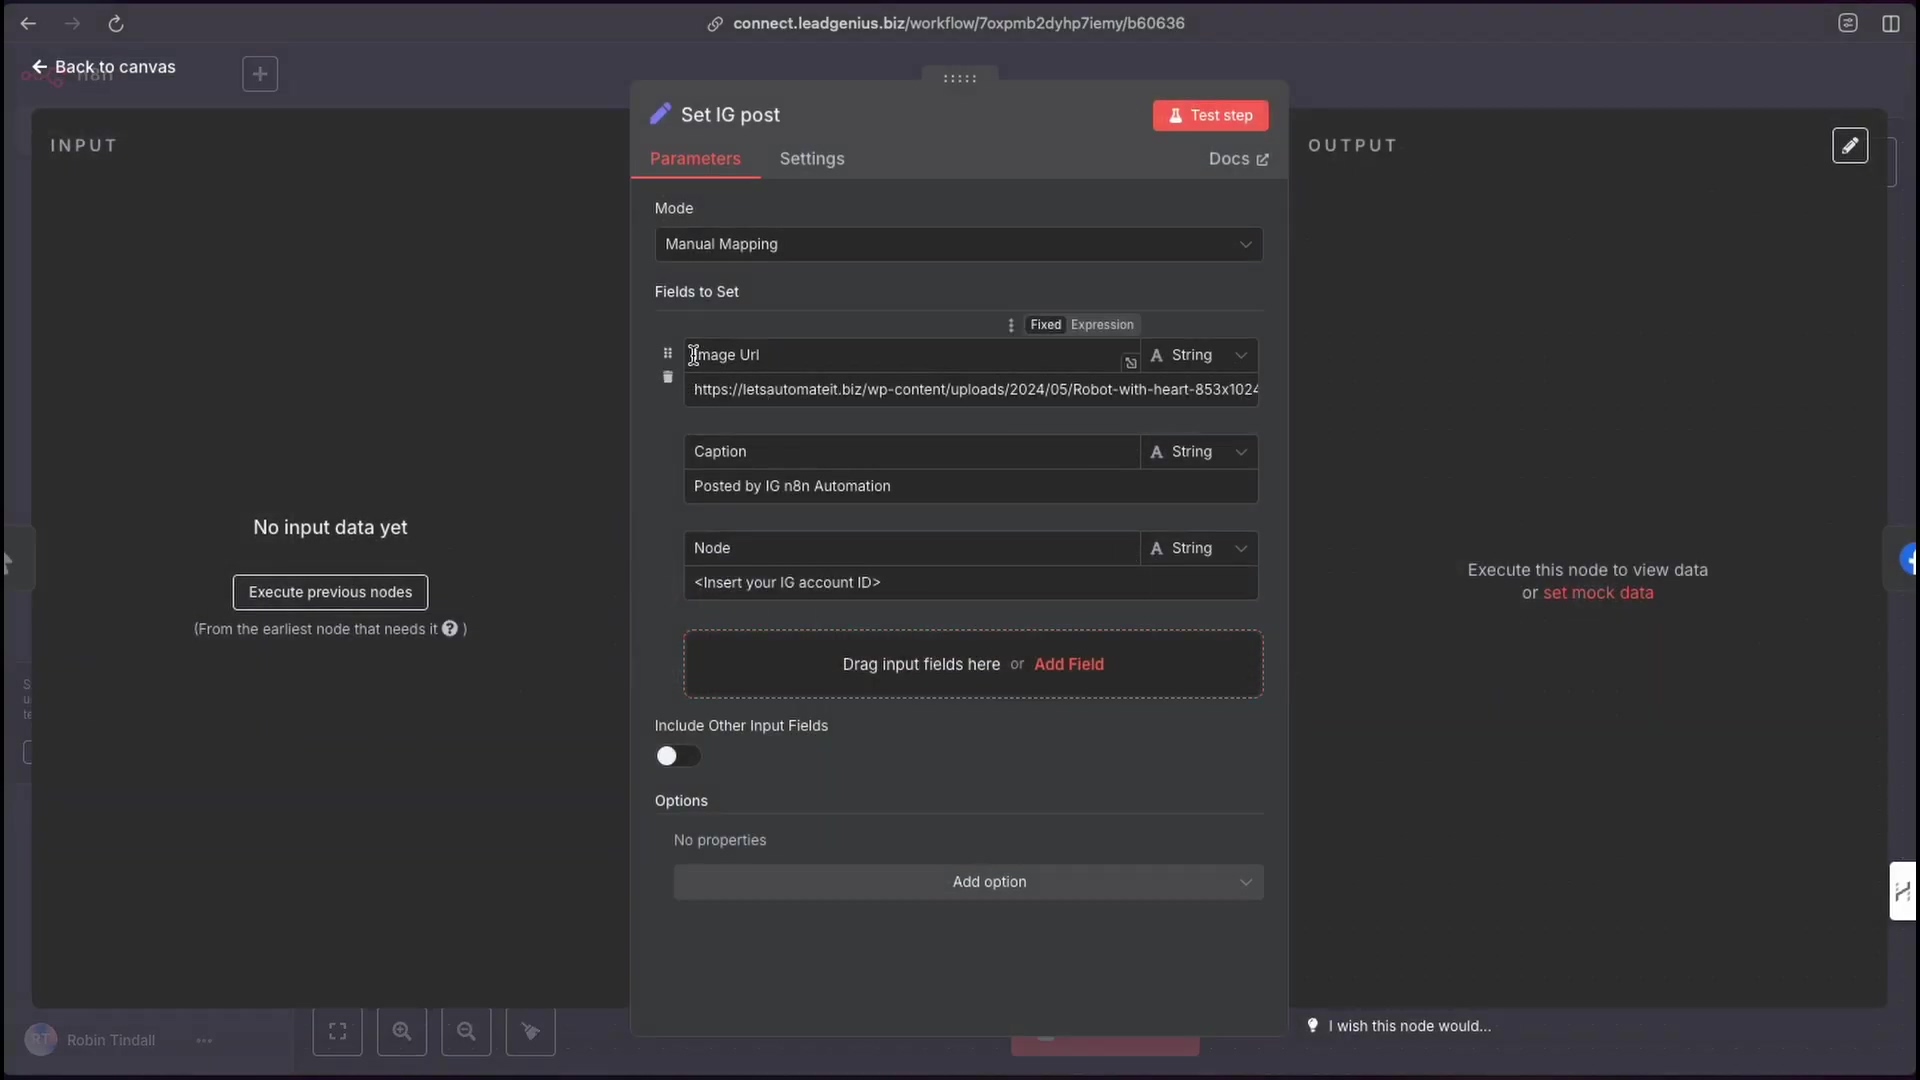
Let’s get our content ready! In the ‘Set’ node, you’ll define the specifics for your post. Here’s what you’ll need:
- Image URL: This needs to be a direct URL to the image you want to post. Make sure it’s publicly accessible! For example:
https://letsautomateit.biz/wp-content/uploads/2024/05/Robot-with-heart-853x1024.png. If your image is stored somewhere private, you’ll need a way to make it temporarily public or use a different n8n node to handle file uploads. - Caption: This is the text that will accompany your image. You can write it directly in the node or pull it from a previous node if you’re building a more complex workflow.
- Instagram Account ID: This is a unique numerical ID for your specific Instagram account. You can find this in your Meta app’s Instagram API setup dashboard, usually listed right next to your Instagram account under the ‘Generate access tokens’ section. It’s a long string of numbers, so copy it carefully!
Instagram Nodes Configuration
Now for the heavy lifting – the actual Instagram nodes. We’ll use two of them in sequence:
-
Create IG Container: This node is like a staging area. It prepares your image and caption for publishing. In this node, you’ll select your Instagram account ID (from the credential we set up earlier), provide the image URL, and the caption (both from your ‘Set’ node). The ‘Edge’ field should be set to ‘media’. What’s an ‘Edge’? In Graph API terms, it’s basically a connection point or a specific type of object you’re interacting with. For publishing, ‘media’ is what we want. If this node runs successfully, it will return a ‘container ID’. This ID is super important because it tells the next node what to publish.
-
Post to IG: This is the grand finale! This node actually publishes your content to Instagram. Its ‘Edge’ should be set to ‘media_publish’. Crucially, you’ll use the ‘creation ID’ output from the previous ‘Create IG Container’ node as an input here. This links the prepared content to the publishing action. It’s like telling the robot, “Okay, you’ve packed the box; now ship this specific box!”
Testing Your Workflow
Time for the moment of truth! Execute your n8n workflow. If you’ve followed all the steps and configured everything correctly, your image should magically appear on your Instagram profile. Go check it out! If it’s there, you’ve just automated your first Instagram post. High five! If not, don’t worry, we’ll cover some troubleshooting in the FAQ.

Required Resources List and Cost-Benefit Analysis
Alright, let’s break down what you’ll need to get this Instagram automation party started and whether it’s worth your time and effort. Spoiler: I think it totally is!
Required Resources
| Category | Item/Service | Description |
|---|---|---|
| Software | n8n (self-hosted or cloud) | Your go-to workflow automation tool. The brain of our operation. |
| Meta Developer Account | Essential for creating and managing those Meta apps we just talked about. | |
| Instagram Professional Account | This is non-negotiable for API access. Make sure your account is set to Business or Creator! | |
| Hardware | Computer/Server (for self-hosting n8n) | If you’re running n8n yourself, you’ll need a machine with enough juice. |
| Connectivity | Stable Internet Connection | Gotta have that reliable connection for API calls and n8n to do its thing. |
| Knowledge | Basic n8n Workflow Understanding | Familiarity with n8n’s nodes, triggers, and expressions will make this a breeze. |
| Meta API Concepts (basic) | Understanding app creation, permissions, and access tokens is key. |
Cost-Benefit Analysis
So, why go through all this when there are commercial tools out there? Let’s compare:
| Feature/Aspect | DIY n8n Automation (Self-Hosted) | Commercial Social Media Management Tool (e.g., Hootsuite, Buffer) |
|---|---|---|
| Upfront Cost | Low (n8n Community Edition is free!) | Varies (often subscription-based, can get pricey for advanced features) |
| Ongoing Cost | Server hosting (if self-hosted), your time for maintenance/updates | Monthly/Annual subscription fees – these can add up! |
| Flexibility | High (fully customizable workflows, integrates with almost anything) | Moderate (you’re limited to what the platform offers) |
| Control | Full control over your data and processes. You’re the boss! | Dependent on the platform’s terms and conditions. |
| Learning Curve | Moderate to High (requires some technical understanding) | Low to Moderate (they’re designed to be user-friendly) |
| Scalability | High (can be scaled by throwing more server resources at it) | Varies by plan, typically scales with subscription tiers. |
| Maintenance | Requires manual updates and troubleshooting (that’s you!) | Handled by the service provider (less headache for you). |
| Integration | Requires manual setup for each integration (but you can integrate anything!) | Often comes with pre-built integrations for popular platforms. |
Critical Safety & Best Practice Tips
Alright, before you go automating everything under the sun, a few words of wisdom from your friendly consultant. These aren’t just tips; they’re rules to live by in the automation world!
⚠️ Secure Your Access Tokens: Listen up! Access tokens are like the master keys to your digital kingdom. Treat them with extreme care, just like you would your passwords. Never, ever, ever hardcode them directly into publicly accessible code or share them with anyone who doesn’t absolutely need them. If you suspect a token has been compromised, revoke it immediately from your Meta app dashboard. Better safe than sorry!
💡 Rate Limits: Imagine trying to cram a whole buffet into your mouth at once. That’s what hitting API rate limits feels like for a server! Instagram’s API has limits on how many requests you can make in a short period. If you go overboard, they’ll temporarily block you. So, design your n8n workflows smartly. If you’re posting a lot, consider adding delays between posts or staggering your schedule. Patience is a virtue, even for robots.
⚠️ Professional Account Requirement: I’m going to say this again because it’s that important: your Instagram account must be a ‘Professional Account’ (Business or Creator). This isn’t optional; it’s a fundamental requirement for using the Instagram Graph API for programmatic posting. If you don’t do this, your API calls will fail, and you’ll be scratching your head wondering why. Just switch it, trust me.
Key Takeaways
So, what have we learned on this automation journey? A few critical things:
- API Evolution: Instagram’s API is like a living, breathing entity. It changes, it evolves (hello, 2025 updates!). This means we, as automators, need to be adaptable and ready to tweak our setups. It’s part of the fun!
- Meta App Centralization: Everything now funnels through a Meta app. This app is your central hub, and getting its permissions and roles configured correctly is paramount. It’s the control tower for your Instagram operations.
- Long-Lived Tokens are Key: Short-lived tokens are a pain. Extending their life is not just a good idea; it’s a critical step for any serious automation. It saves you from constant re-authentication headaches.
- n8n’s Flexibility: This is why I love n8n! It gives you the power to build custom automation workflows that can integrate with almost anything, including Meta’s Graph API. It’s like having a universal adapter for your digital tools.
- Professional Account: Yes, I’m repeating myself, but it’s that important. Your Instagram account must be a professional account to use the API for automation. No exceptions!
Conclusion
Automating Instagram posting with n8n in 2025 might seem like a bit of a puzzle at first, especially with Meta’s ever-evolving API. But trust me, the payoff in efficiency and consistency is huge! By following these detailed steps – creating that Meta app, configuring permissions just right, and snagging those long-lived access tokens – you’ve built a robust, reliable workflow for publishing your content programmatically. This is gold, especially for keeping your social media presence active and engaging without you having to be glued to your phone.
Sure, the initial setup might feel like launching a rocket, but the long-term benefits? They far outweigh the effort. Imagine all the time you’ll free up! For anyone who wants maximum control and customization over their social media game, the n8n and Meta API integration is an unparalleled solution. It’s like having a super-powered social media manager that never sleeps.
Now, armed with this comprehensive guide, go forth and transform your Instagram strategy! Implement these techniques, streamline your content delivery, and unlock new levels of efficiency. What are your biggest challenges when it comes to automating social media? Share your thoughts and questions below – I’d love to hear from you!
Frequently Asked Questions (FAQ)
Q: My access token expired really quickly. What did I do wrong?
A: You probably generated a short-lived access token! This is a common pitfall. Remember, tokens generated directly from the Instagram API setup dashboard are often short-lived. You must use the ‘Access Token Debugger’ in Meta for Developers to extend its life. Go back to Step 4 and make sure you click ‘Extend Access Token’ after debugging your initial token. This will give you a token that lasts for weeks or months, not just an hour.
Q: I’m getting an error about my Instagram account not being a professional account. What does this mean?
A: Ah, this is a classic! The Instagram Graph API, which we’re using for automation, requires your Instagram account to be either a Business or Creator account (collectively known as ‘Professional Accounts’). If your account is still a personal one, the API won’t let you post programmatically. You’ll need to switch your account type within the Instagram app settings. It’s usually a quick process, and Instagram often prompts you to do it when you try to connect via the API.
Q: Can I post videos or carousels with this n8n workflow?
A: Yes, you absolutely can! This guide focused on single image posts to keep things simple for beginners, but the Instagram Graph API supports video and carousel posts too. You’d typically use slightly different ‘Edge’ settings and payload structures in your ‘Create IG Container’ node. For videos, you’d specify a video_url instead of image_url, and for carousels, you’d create multiple containers and then link them together in a final ‘media_publish’ call. The n8n Instagram node is flexible enough to handle these, but it requires a bit more configuration.
Q: What if my n8n workflow fails to post? How do I troubleshoot?
A: Don’t panic! Troubleshooting is part of the automation journey. Here are a few common things to check:
- Access Token Validity: Is your access token still valid and long-lived? Use the ‘Access Token Debugger’ to check.
- Permissions: Does your Meta app have all the necessary Instagram permissions? Double-check Step 2.
- Instagram Account Type: Is your Instagram account definitely a Professional Account?
- Image URL: Is the image URL publicly accessible and correct? Try opening it directly in a browser.
- n8n Node Configuration: Are the ‘Instagram Account ID’, ‘Image URL’, and ‘Caption’ fields correctly mapped in your ‘Set’ and ‘Instagram’ nodes? Check for typos or incorrect expressions.
- n8n Execution Logs: Check the execution logs in n8n for specific error messages. They often provide clues about what went wrong.
Q: Is n8n free to use for this kind of automation?
A: Yes, the n8n Community Edition is open-source and completely free to use! You can self-host it on your own server or even on your local machine. There’s also a cloud version of n8n, which offers managed hosting and other features, but that comes with a subscription. For personal projects and learning, the self-hosted Community Edition is perfect and won’t cost you a dime (beyond any server costs if you choose to host it online).
Q: How often do I need to refresh my long-lived access token?
A: Long-lived access tokens for the Instagram Graph API typically last for 60 days. So, you’ll need to refresh them roughly every two months. You can do this by going back to the ‘Access Token Debugger’ (Step 4) and clicking ‘Extend Access Token’ again. It’s a good practice to set a reminder for yourself so your automation doesn’t suddenly stop working!