Watch the Video Tutorial
💡 Pro Tip: After watching the video, continue reading below for detailed step-by-step instructions, code examples, and additional tips that will help you implement this successfully.
Hey there, fellow automation enthusiast! Boyce here, your friendly neighborhood self-taught automation consultant. Today, we’re going on an epic adventure to build something truly awesome: a Telegram AI voice assistant! Think of it like giving your Telegram app a super-powered brain and a voice, making it way more than just a chat app. We’re talking seamless, intelligent conversations with AI, right in your pocket. How cool is that?
Table of Contents
Open Table of Contents
- TL;DR
- Introduction: Building Your Intelligent Telegram Companion
- Introduction: Why Build a Telegram AI Voice Agent?
- Setting Up Your Telegram Bot: The Foundation
- Connecting Telegram to n8n: Your Automation Hub
- Designing the Core AI Agent Workflow in n8n
- Mastering Audio Processing: Ensuring Native Playback
- Enhancing Your AI Agent: Advanced Features & Best Practices
- DIY vs. Commercial Solutions: A Cost-Benefit Analysis
- Conclusion: Your Intelligent Telegram Companion Awaits
- Frequently Asked Questions (FAQ)
- Q: Why is the Opus format so important for Telegram audio messages?
- Q: Can I use a different AI model instead of OpenAI for transcription or text-to-speech?
- Q: What if my bot receives an image or video instead of text or audio? How do I handle that?
- Q: How can I make my AI agent remember past conversations for better context?
- Q: What are the potential costs associated with running this AI voice agent, especially with OpenAI APIs?
TL;DR
Alright, let’s get straight to the good stuff, the ‘Too Long; Didn’t Read’ version, for those of you who are ready to jump in!
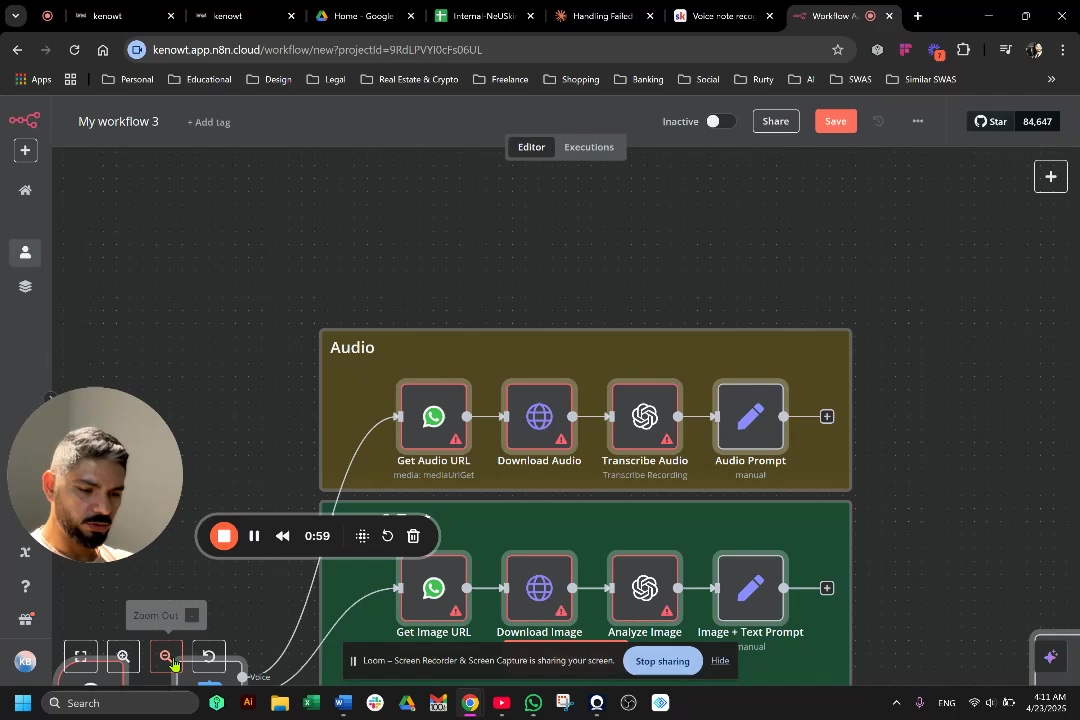
- Seamless AI Integration: We’re going to build a Telegram AI voice agent using n8n, a super handy low-code automation platform. This bot will handle both text and audio interactions, giving you a truly conversational experience. No more clunky, one-way communication!
- Optimized Audio Experience: Ever notice how some audio in Telegram just feels right, with a waveform and everything? We’re going to uncover the critical “opus” format trick to ensure your AI’s audio responses play natively in Telegram. This isn’t just a small detail; it’s a game-changer for user engagement and accessibility.
- Automated Workflow Mastery: You’ll master n8n’s low-code platform to design sophisticated workflows. This means transcribing audio, processing AI responses, and dynamically formatting replies, all without writing tons of code. It’s like building with LEGOs, but for automation!
- Beyond Basic Bots: This guide isn’t about creating just another chatbot. We’re empowering you to create an intelligent assistant that truly adapts to user input, offering a superior alternative to those generic, off-the-shelf commercial solutions.
- Empower Your Productivity: Get ready to transform your Telegram into a powerful productivity hub. Imagine an AI agent that understands and responds to you in the most intuitive way possible. Your future self will thank you!
Introduction: Building Your Intelligent Telegram Companion
Imagine a world where your messaging apps aren’t just for human-to-human communication, but also for seamless, intelligent interactions with AI. Pretty sci-fi, right? Well, we’re making it happen! With over 700 million active users, Telegram is a massive platform, perfect for integrating AI and reaching a huge audience. But here’s the kicker: it’s not just about connecting an AI; it’s about making that interaction feel natural and intuitive, especially when it comes to voice. I’ve seen so many solutions out there that just fall flat, offering clunky text-only responses or non-native audio that totally breaks the user experience. Ugh, no thanks!
This guide is here to fix all that! We’re diving deep into building an AI voice agent on Telegram using n8n, a powerful low-code automation tool that I absolutely adore. As someone who’s been knee-deep in automation and AI integration, I’ve seen firsthand how a well-designed AI agent can totally transform things. This article will arm you with all the knowledge you need to overcome common hurdles, like getting that audio just right for native Telegram playback. You’ll be able to create a truly intelligent, versatile assistant that responds to both text and voice with remarkable fluidity. Get ready to unlock a whole new dimension of interactive AI, boosting your productivity and user experience way beyond what those standard commercial offerings can do. It’s going to be epic!
Introduction: Why Build a Telegram AI Voice Agent?
The Power of Conversational AI in Your Pocket
In today’s super-fast digital world, being able to chat with AI agents seamlessly, especially on your phone, isn’t just a fancy extra; it’s becoming a must-have! A Telegram AI voice agent gives you this amazing mix of accessibility and intelligence, turning your messaging app into your very own personal assistant. We’re talking way beyond those simple chatbots you might have seen. This is about dynamic, natural language conversations that adapt to how you want to talk – whether you’re typing a quick message or speaking a complex question. It’s like having a super-smart friend always ready to help, right in your pocket!
Bridging the Gap Between AI and Everyday Communication
So, why is this such a big deal? Let’s break it down:
- Instant Accessibility: Your AI assistant is always just a tap away, living right inside the communication platform you probably use every single day. No extra apps to open, no switching contexts. Super convenient!
- Versatile Interaction: It supports both text and voice! This means it caters to your preferences and situations. Need to quickly type something? Go for it. Driving and need to ask a question hands-free? No problem! It’s all about making it easy for you.
- Enhanced Productivity: Imagine automating tasks, getting instant information, or even brainstorming ideas without ever leaving your chat app. This isn’t just about chatting; it’s about getting stuff done faster and smarter.
- Personalized Experience: You get to tailor the AI’s responses and capabilities to exactly what you need. It’s like having a bespoke digital companion, custom-made for you.
The Unmet Need for Native Voice Interaction
Now, here’s where we really shine. While there are tons of AI integrations out there, very few offer a truly native voice experience within Telegram. What does that mean? Well, often, other solutions mess up the audio formats, leading to clunky playback or forcing you to download files just to hear a response. Annoying, right?
This guide specifically tackles this critical challenge head-on! We’re going to make sure your AI agent responds with audio that plays directly within Telegram, complete with that cool visual waveform, just like a voice message from a friend. This might seem like a small detail, but trust me, it’s a huge deal for the user experience. It makes your AI agent feel so much more integrated and intuitive. It’s the difference between a clunky robot and a smooth, helpful assistant.
To really get a feel for how seamless and intuitive this can be, check out the image below. It perfectly captures what we’re aiming for – a natural, flowing conversation with your AI, making it feel less like talking to a machine and more like chatting with a human. That’s the magic we’re building!
Setting Up Your Telegram Bot: The Foundation
Creating Your Bot with BotFather
Alright, every great journey starts with a first step, and for our Telegram AI agent, that step is creating the bot itself within Telegram. This is super important because it’s how we get our bot’s identity and the keys to the kingdom, so to speak. We’ll be chatting with BotFather, Telegram’s official bot for managing other bots. Think of BotFather as the wise old wizard who grants you the magical credentials you need. Without a properly configured bot, n8n won’t have a way to talk to Telegram, and our AI won’t be able to do its thing. So, let’s get this foundation laid!
Step-by-Step Bot Creation
Ready? Let’s walk through it together:
- Locate BotFather: First things first, open up your Telegram app. In the search bar, type “BotFather”. Make absolutely sure you pick the one with the blue verified checkmark next to its name – we don’t want any imposters! Once you’ve found the real deal, tap on it and send the
/startcommand to kick things off. - Start New Bot Creation: Now, send the command
/newbotto BotFather. It’s going to ask you for a name for your bot. This is the friendly name users will see. Choose something descriptive and easy to remember, like “SGP AI Assistant YouTube” or “Boyce’s Super Bot”. - Define Bot Username: Next up, BotFather will ask for a username. This is super important: it must be unique across all of Telegram, and it must end with ‘bot’. So, if you picked “Boyce’s Super Bot” as the name, you might try “BoyceSuperBot” or “BoyceSuperAssistantBot”. BotFather will tell you if it’s available. For example, “SGPAssistantYouTubeBot” is a good format.
- Retrieve Access Token: If all goes well, BotFather will congratulate you and, most importantly, provide you with an HTTP API Token. This token is like your bot’s secret password and unique ID. It’s absolutely essential for n8n to communicate with your Telegram bot. Copy this token immediately and keep it safe! Seriously, treat it like gold.
To get started, you’ll be interacting directly with BotFather, just like in this screenshot. This initial chat is where your bot’s identity is born and you get that all-important API token.
This image shows the very first interaction with BotFather. You’d type /newbot to begin the bot creation process. Easy peasy!
Securing Your Bot’s Identity
Just a few quick but crucial tips on keeping your bot safe and sound:
- Token Security: I can’t stress this enough: treat your HTTP API Token like your most sensitive password. Never share it publicly or embed it directly into code that’s visible to others. Anyone with this token has full control over your bot, so guard it with your life!
- Unique Naming: Make sure your bot’s username is truly distinct. This helps avoid any confusion and makes it super easy for users to find your bot.
- BotFather Commands: While we’re here, take a moment to peek at other BotFather commands like
/setdescription,/setabouttext, and/setuserpic. These let you customize your bot’s profile, making it more engaging and professional for your users. It’s like giving your bot a personality!
After successfully creating your bot, BotFather will hand over that crucial HTTP API Token. The next image shows you exactly where to find this token and what it looks like. Don’t miss it!

This visual confirms your bot is created and points out the HTTP API Token. This is the key we’ll use to connect our bot to n8n. Got it? Good!
Connecting Telegram to n8n: Your Automation Hub
Establishing the Bridge: Telegram Trigger Node
Okay, you’ve got your shiny new Telegram bot and its secret token. Awesome! Now, it’s time to introduce it to its new best friend: n8n. Think of n8n as the central command center, the brain that will orchestrate all the cool stuff between Telegram, your AI, and anything else you want to connect. Our first mission here is to set up the Telegram Trigger node. This node is like a super-sensitive ear, constantly listening for any messages sent to your bot. It’s the bridge that connects Telegram to your n8n workflow.
Configuring the Telegram Trigger Node
Let’s get this connection made, step-by-step:
- Add Telegram Trigger: Open up your n8n workflow editor. Search for “Telegram Trigger” and drag it onto your canvas. This node is specifically designed to listen for messages coming into your bot.
- Create New Credential: Inside the Telegram Trigger node’s settings panel, you’ll see an option for “Credential”. Click on “New Credential”. This is where we’ll tell n8n how to talk to your specific Telegram bot. It will prompt you to enter the HTTP API Token you got from BotFather earlier.
- Save Credentials: Paste that precious access token into the designated field. Give your credential a name (like “My Telegram Bot API Key”) and then save it. This securely stores your bot’s token within n8n, so your workflow can authenticate and communicate with Telegram without you having to re-enter it every time.
- Test Connection: Now for the moment of truth! After saving, you can test the connection. The easiest way is to go back to Telegram, click on the link BotFather gave you for your new bot, and send it a simple message like
/startor “Hello!”. Head back to n8n, and if everything’s hooked up correctly, the Telegram Trigger node should light up and capture that message. You’ll see a green checkmark or some data populating. This confirms your connection is solid! Nailed it!
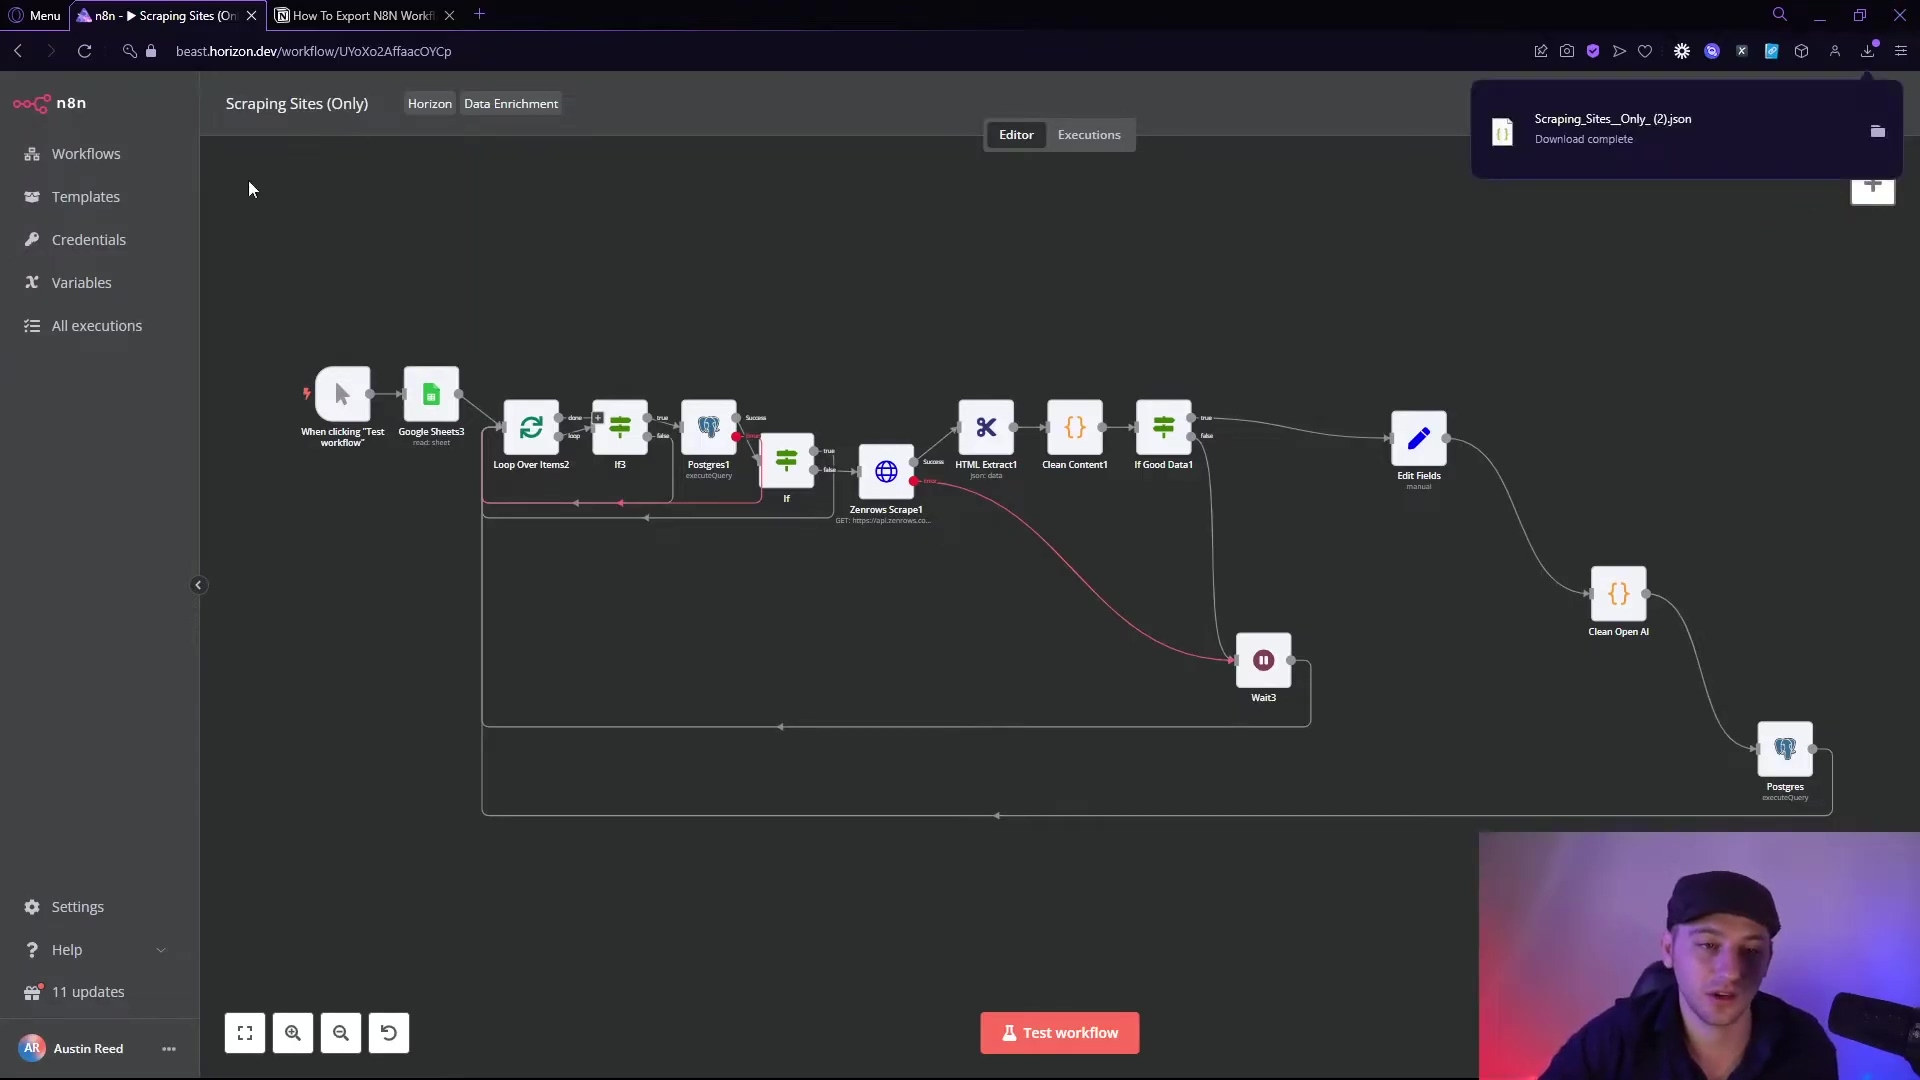
The image below gives you a detailed look at the n8n interface, specifically focusing on our Telegram Trigger node. Pay attention to the configuration panel and the JSON output – that’s where all the juicy message details live, like update_id, message_id, and chat_id. These are super important for knowing who sent what and where to send replies!

This screenshot clearly shows the Telegram Trigger node all set up. See that JSON payload? That’s the raw data Telegram sends us, including the chat_id (which is how we know who to reply to) and the text of the message. Super useful!
Understanding the Incoming Data Structure
When a message hits your bot, the Telegram Trigger node doesn’t just say “message received.” Oh no, it gives us a whole treasure trove of information in a JSON (JavaScript Object Notation) payload. Think of JSON as a neatly organized digital filing cabinet for data. Here’s what you need to know:
- JSON Payload: Every time a message comes in, n8n’s Telegram Trigger node spits out a JSON payload. This payload contains all the relevant details about that message. Key pieces of info include the
chat_id(absolutely essential for sending replies back to the right person!), thetextof the message (if it’s a text message), and if it’s an audio message, afile_id(which is like a pointer to the audio file itself). - Dynamic Data: This data isn’t static; it’s dynamic! It changes with every message and will be used to route and process subsequent steps in your n8n workflow. For example, that
chat_idis your golden ticket to making sure your AI’s response lands right back in the correct user’s chat. - Pinning Input: Here’s a super handy trick for testing and development! n8n lets you “pin” a specific input from the trigger. What does that mean? It means you can send a test message once, capture its data, and then tell n8n to always use that specific data for testing the rest of your workflow. This saves you from having to send a new message to your Telegram bot every single time you want to test a change. It seriously speeds up debugging and development. It’s like having a rewind button for your workflow!
Designing the Core AI Agent Workflow in n8n
Orchestrating Intelligence: The n8n Workflow Design
Alright, this is where the magic really happens! The heart of our Telegram AI voice agent beats within its n8n workflow. Think of this workflow as the meticulously designed blueprint for how your bot thinks and acts. It’s a sequence of nodes that dictates how your bot processes incoming messages, chats with our AI models, and then crafts its responses. The real genius here is making it smart enough to tell the difference between a text message and an audio message, send them down the right processing path, and then whip up a relevant reply, either as text or, even better, as native audio. Let’s build this brain!
Initial Message Processing and Confirmation
First impressions matter, even for bots! We want to make sure the user knows their message was received and is being worked on. This is a small detail that makes a huge difference in user experience.
- Acknowledge Input: Immediately after our
Telegram Triggernode, it’s a super good practice to send a quick confirmation message back to the user. Something like “Give me a second…” or “Processing your request…” This instant feedback lets them know their message didn’t just disappear into the digital ether. It significantly improves how users perceive your bot. - Reply to Message ID: To keep the conversation neat and tidy, we’ll use the
reply_to_message_idfrom theTelegram Trigger’s output. This makes sure your confirmation message (and later, your AI’s response) appears as a direct reply to the user’s original message. It keeps the conversation organized and contextually relevant, just like a human conversation.
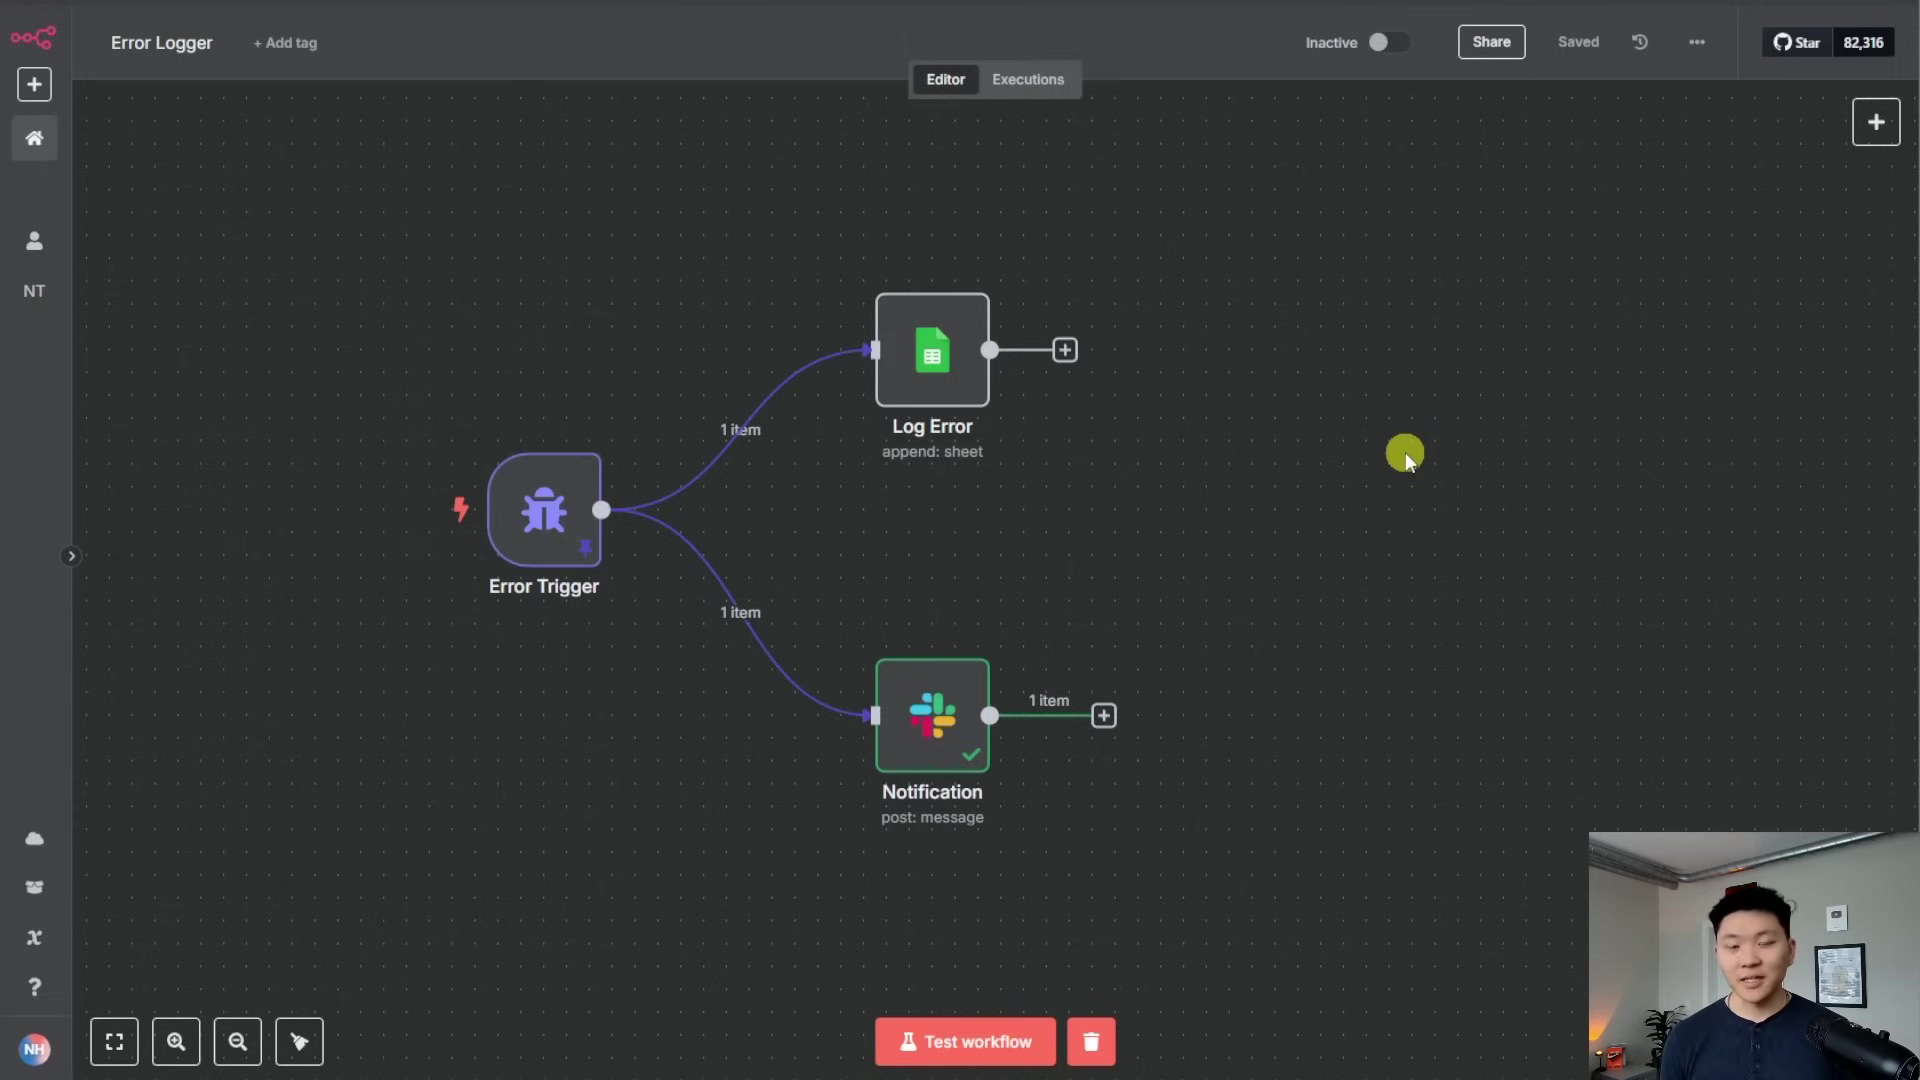
Before we dive into the nitty-gritty logic, let’s get a bird’s-eye view of our n8n workflow. This diagram is like our architectural plan, showing how all the different pieces – the Telegram Trigger, those helpful confirmation messages, and the AI processing – all fit together. It’s going to be a masterpiece!
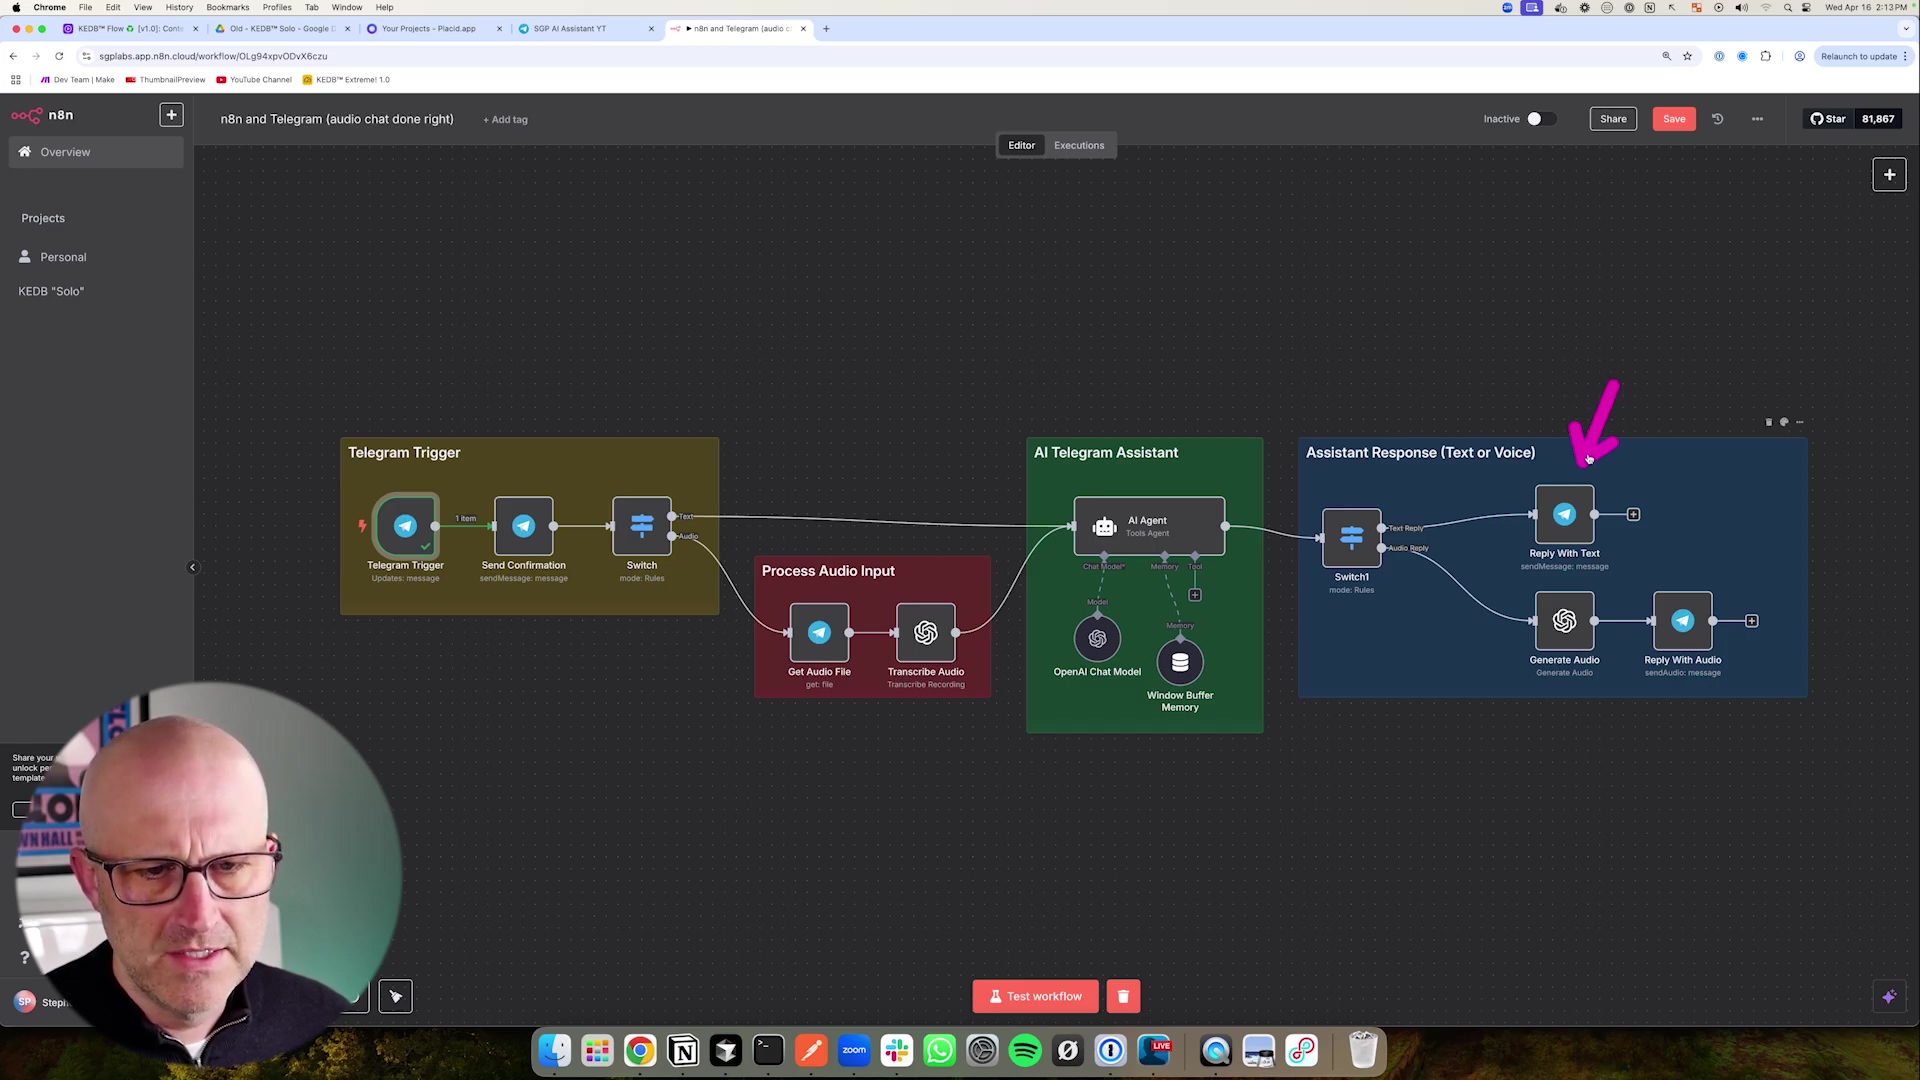
This comprehensive workflow diagram, aptly titled ‘n8n and Telegram (audio chat done right)’, gives us the full picture. You can see the logical flow, from receiving a Telegram message, through processing audio input, engaging the AI, and finally, generating a response. It highlights key nodes like ‘Telegram Trigger’, the crucial ‘Switch’ node (we’ll get to that!), and the ‘OpenAI Chat Model’. It’s a beautiful symphony of automation!
Dynamic Input Handling: Text vs. Audio
Here’s where our bot gets smart and decides what kind of message it just received. Is it text? Is it audio? We need to route it correctly!
- Conditional Routing with the Switch Node: Right after our confirmation message, we’ll drop in a
Switchnode. This node is like a traffic cop for our workflow. It’s going to examine the incoming Telegram message for a specific piece of information: the presence of afile_id. If afile_idexists, bingo! That means it’s an audio message. If there’s nofile_id, then it’s a good old text message. - Audio Path: If our
Switchnode detects afile_id, the message gets routed down the “audio path.” This path involves a few extra steps: first, we need to download that audio file (using thefile_id), and then we pass it off to an AI model for transcription. Think of OpenAI’s Whisper API – it’s like magic for turning speech into text! - Text Path: If no
file_idis found, the message takes the “text path.” This is simpler; the text goes straight to our AI agent. Now, while this guide focuses heavily on audio (because that’s the cool part!), in a real-world, production-ready bot, I’d totally recommend adding more robust checks. You’d want to make sure thatfile_idactually belongs to an audio file, not just any random image or document someone might upload. Better safe than sorry!
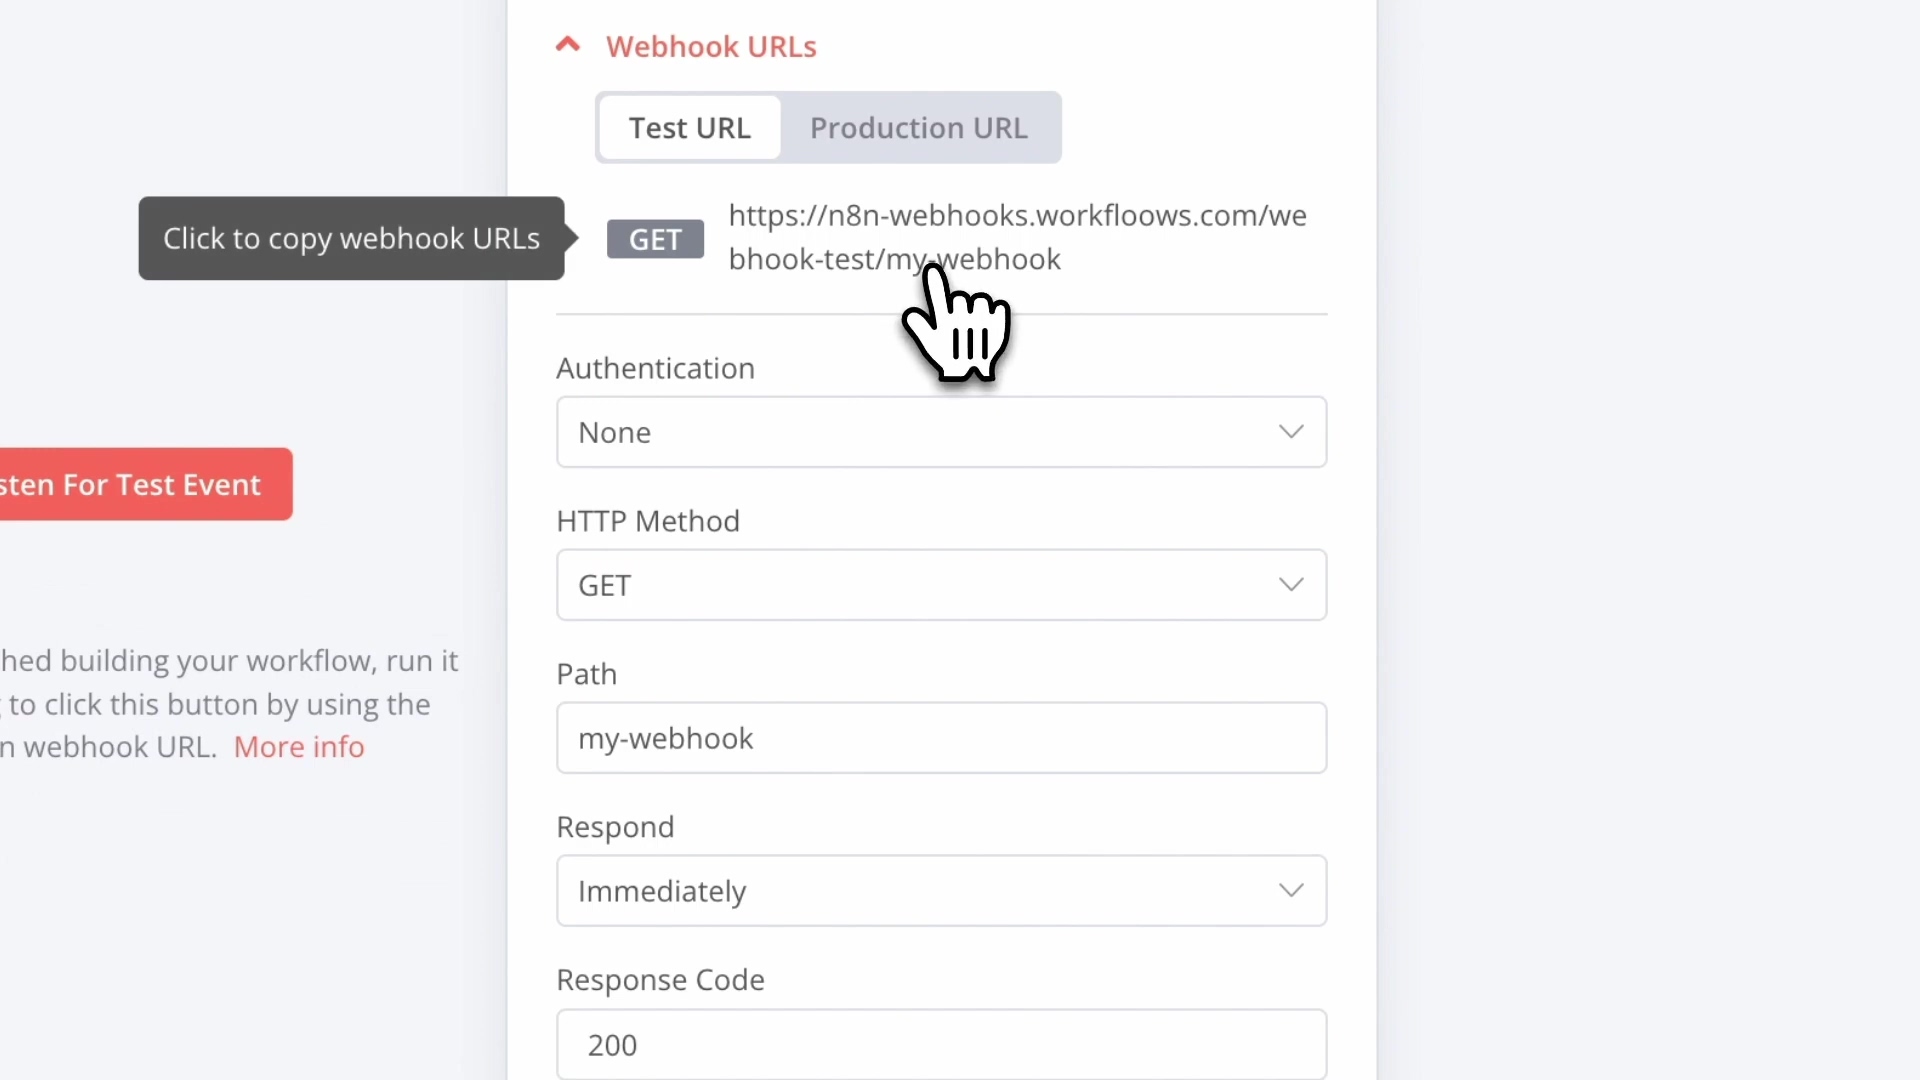
The Switch node is absolutely critical for making our workflow intelligent and adaptable. Take a look at the image below; it shows you exactly how to configure a Switch node to check for that file_id and send messages down the right path – either ‘Text’ or ‘Audio’.
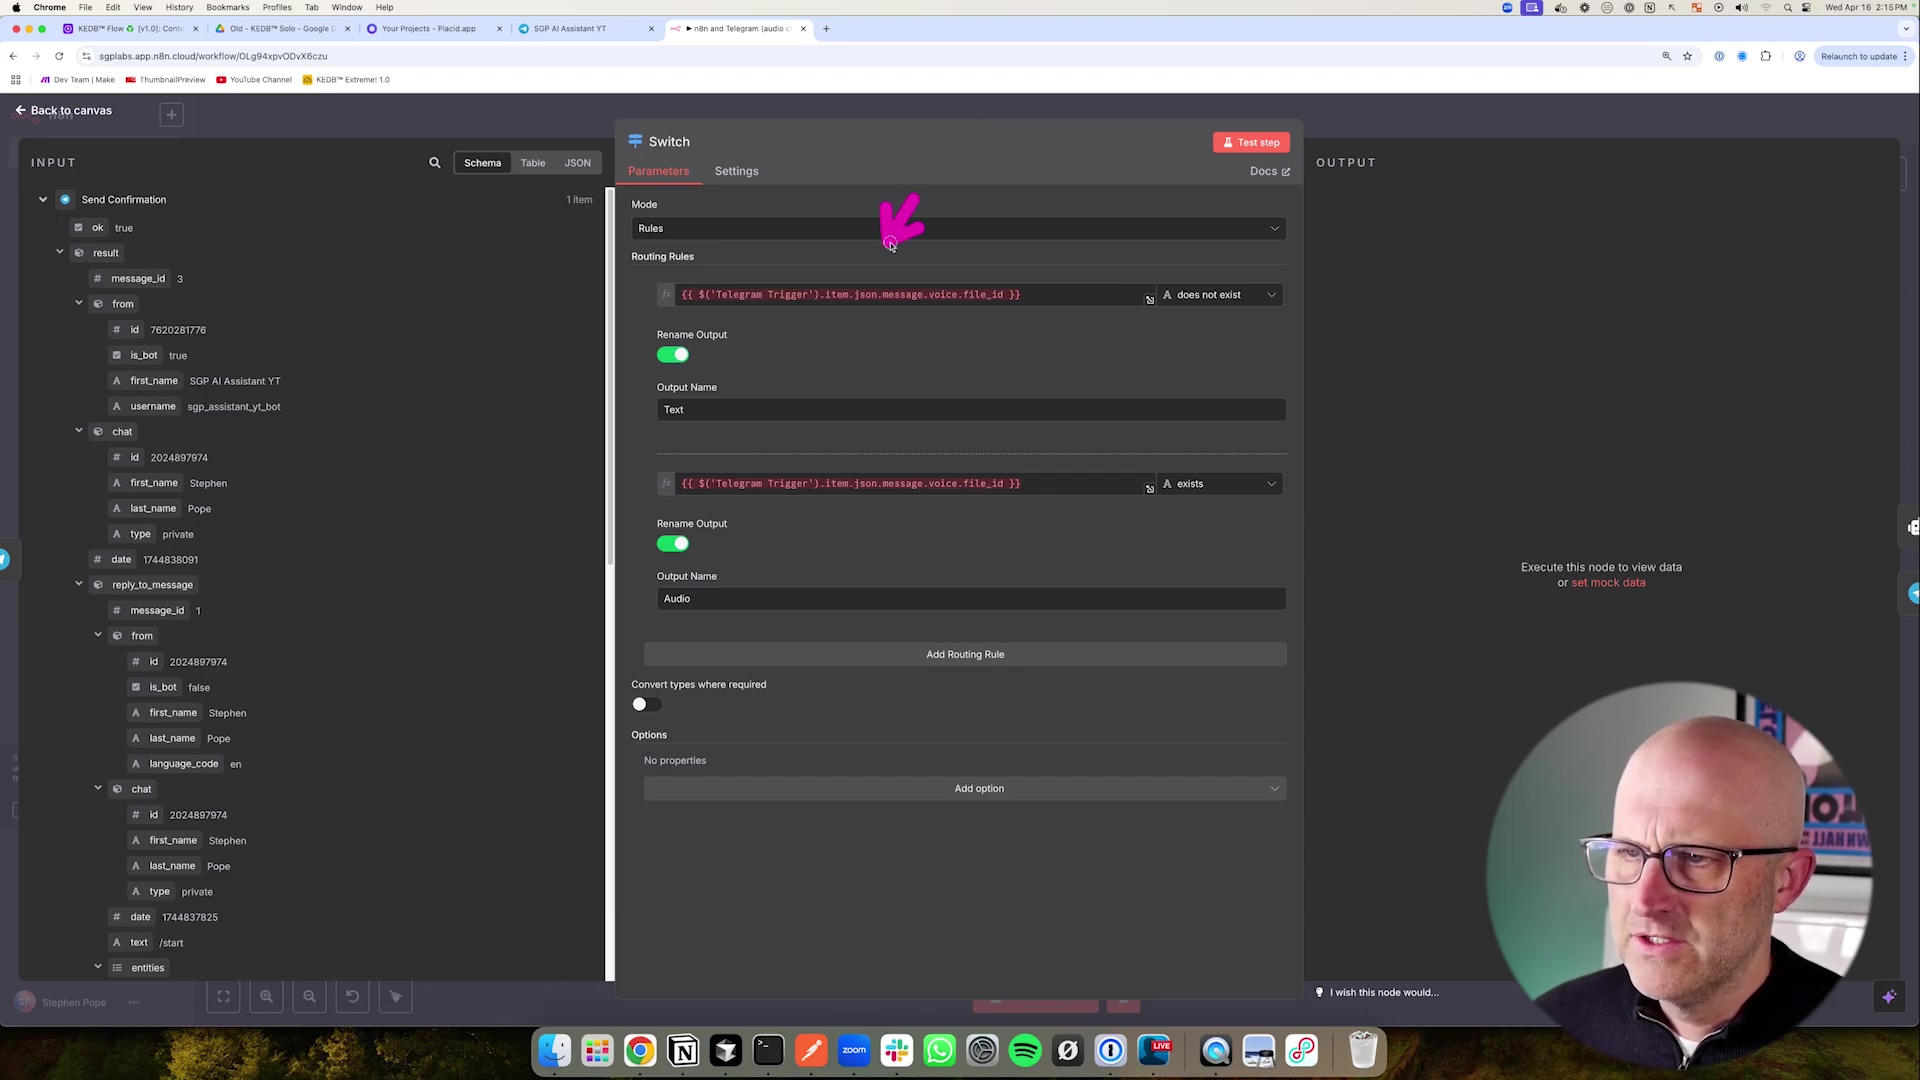
This screenshot of the Switch node’s configuration panel clearly shows how we set up the routing rules. We’re checking for json.message.voice.file_id. If it’s there, it’s audio; if not, it’s text. Simple, yet powerful!
Integrating the AI Agent and Response Generation
Now for the brain of the operation! This is where our AI actually processes the message and comes up with a response.
- AI Agent Node: Both the transcribed audio text (from the audio path) and the direct text input (from the text path) will funnel into an
AI Agentnode. You might use a pre-built AI agent node in n8n, or integrate directly with an API like OpenAI’s GPT models. The key here is that the prompt for this agent needs to be flexible enough to accept either direct text or the text that came from our audio transcription. It’s like teaching the AI to understand both typed words and spoken words. - Dynamic Prompting: We’ll configure our AI agent’s prompt to conditionally use the
textfrom the original Telegram message (if it was a text input) or thetranscribed_textfrom our audio processing step. This ensures the AI always gets the right input, no matter how the user communicated. - Conditional Response Formatting: After our AI agent has cooked up its brilliant response, we’ll use another
Switchnode. This one will look back at the original Telegram input to remember if the first message was text or audio. Why? Because we want to reply in the most natural way! If the original input was text, the AI’s response goes back as a regular text message. But if the original input was audio, we’ll take the AI’s text response, convert it into audio using a Text-to-Speech (TTS) model, and then send it back as an audio message. This creates a super consistent and intuitive conversational flow. It’s all about making the AI feel like a natural part of the conversation.
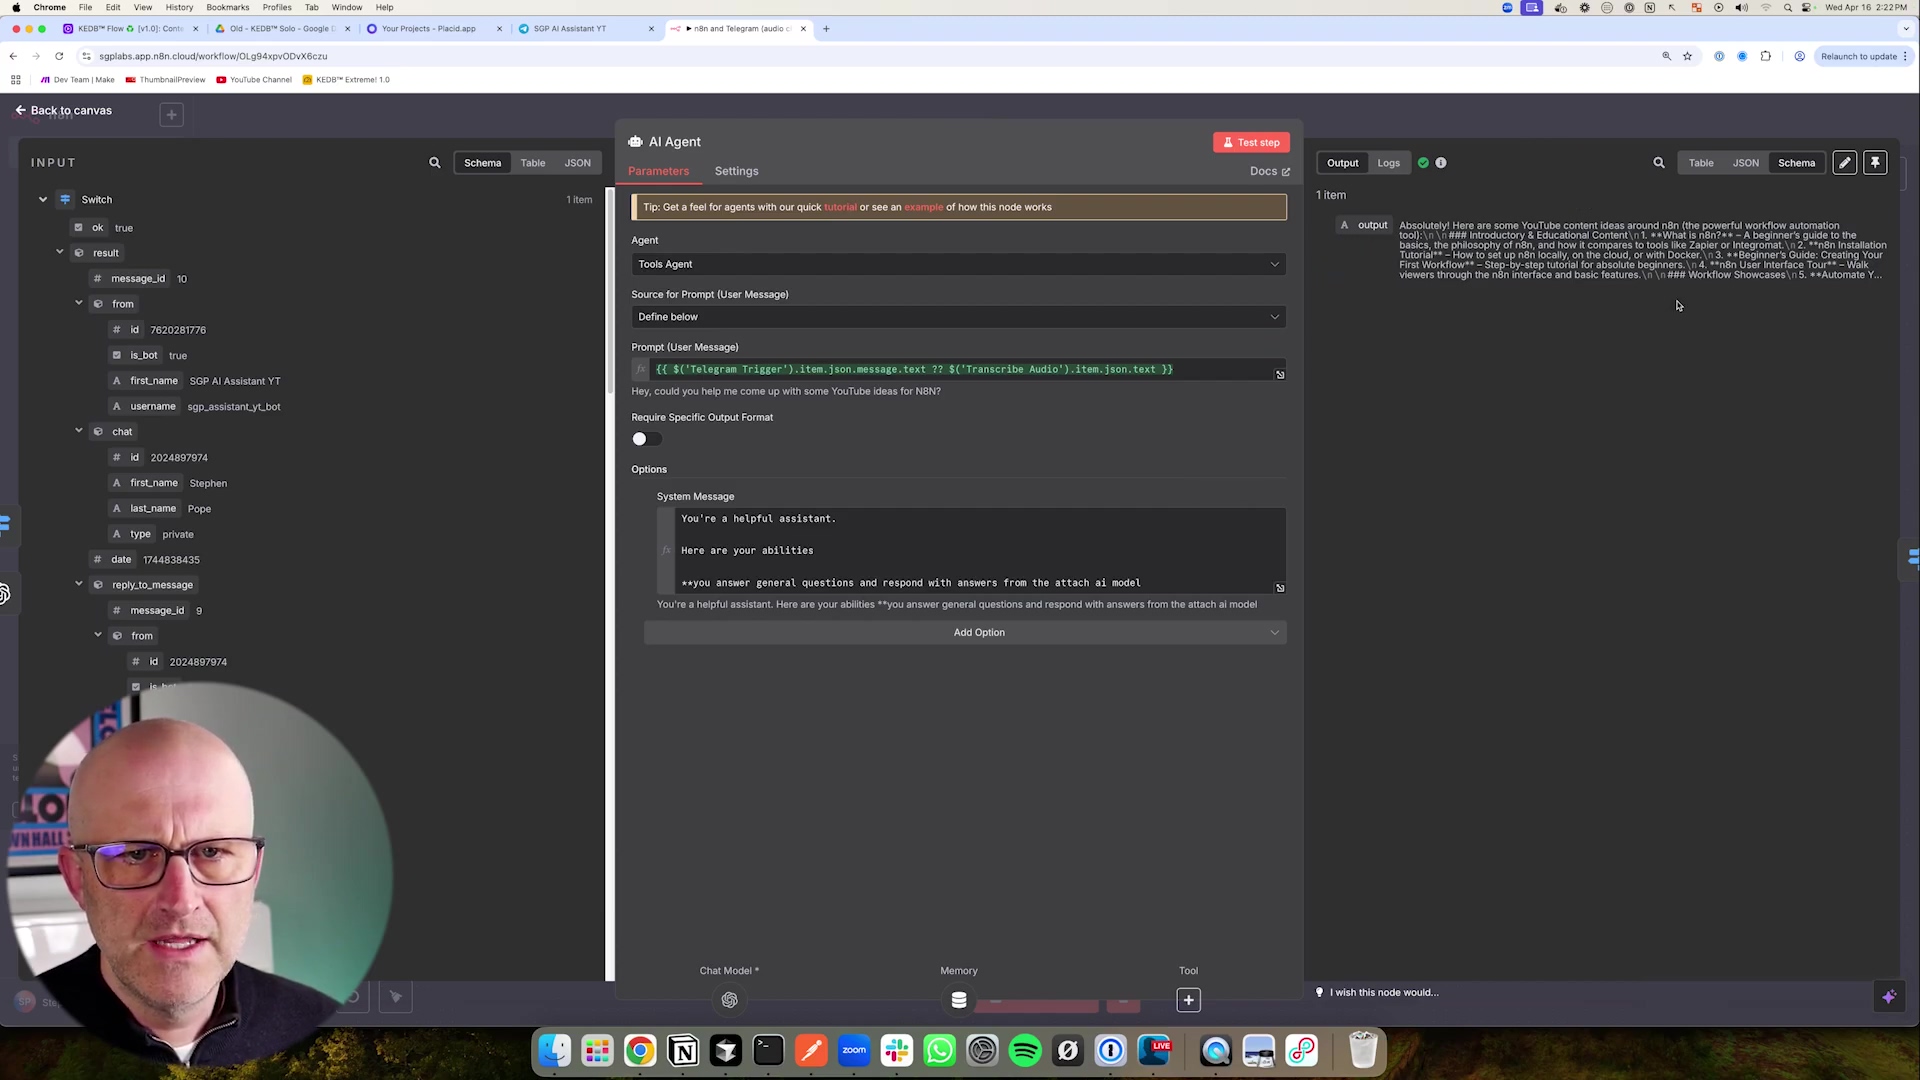
The AI Agent node is truly where your bot’s intelligence resides. Take a peek at the image below. It shows you how to configure this node, including how it dynamically pulls input from either the Telegram trigger (for text) or the transcription step (for audio). It’s pretty neat!
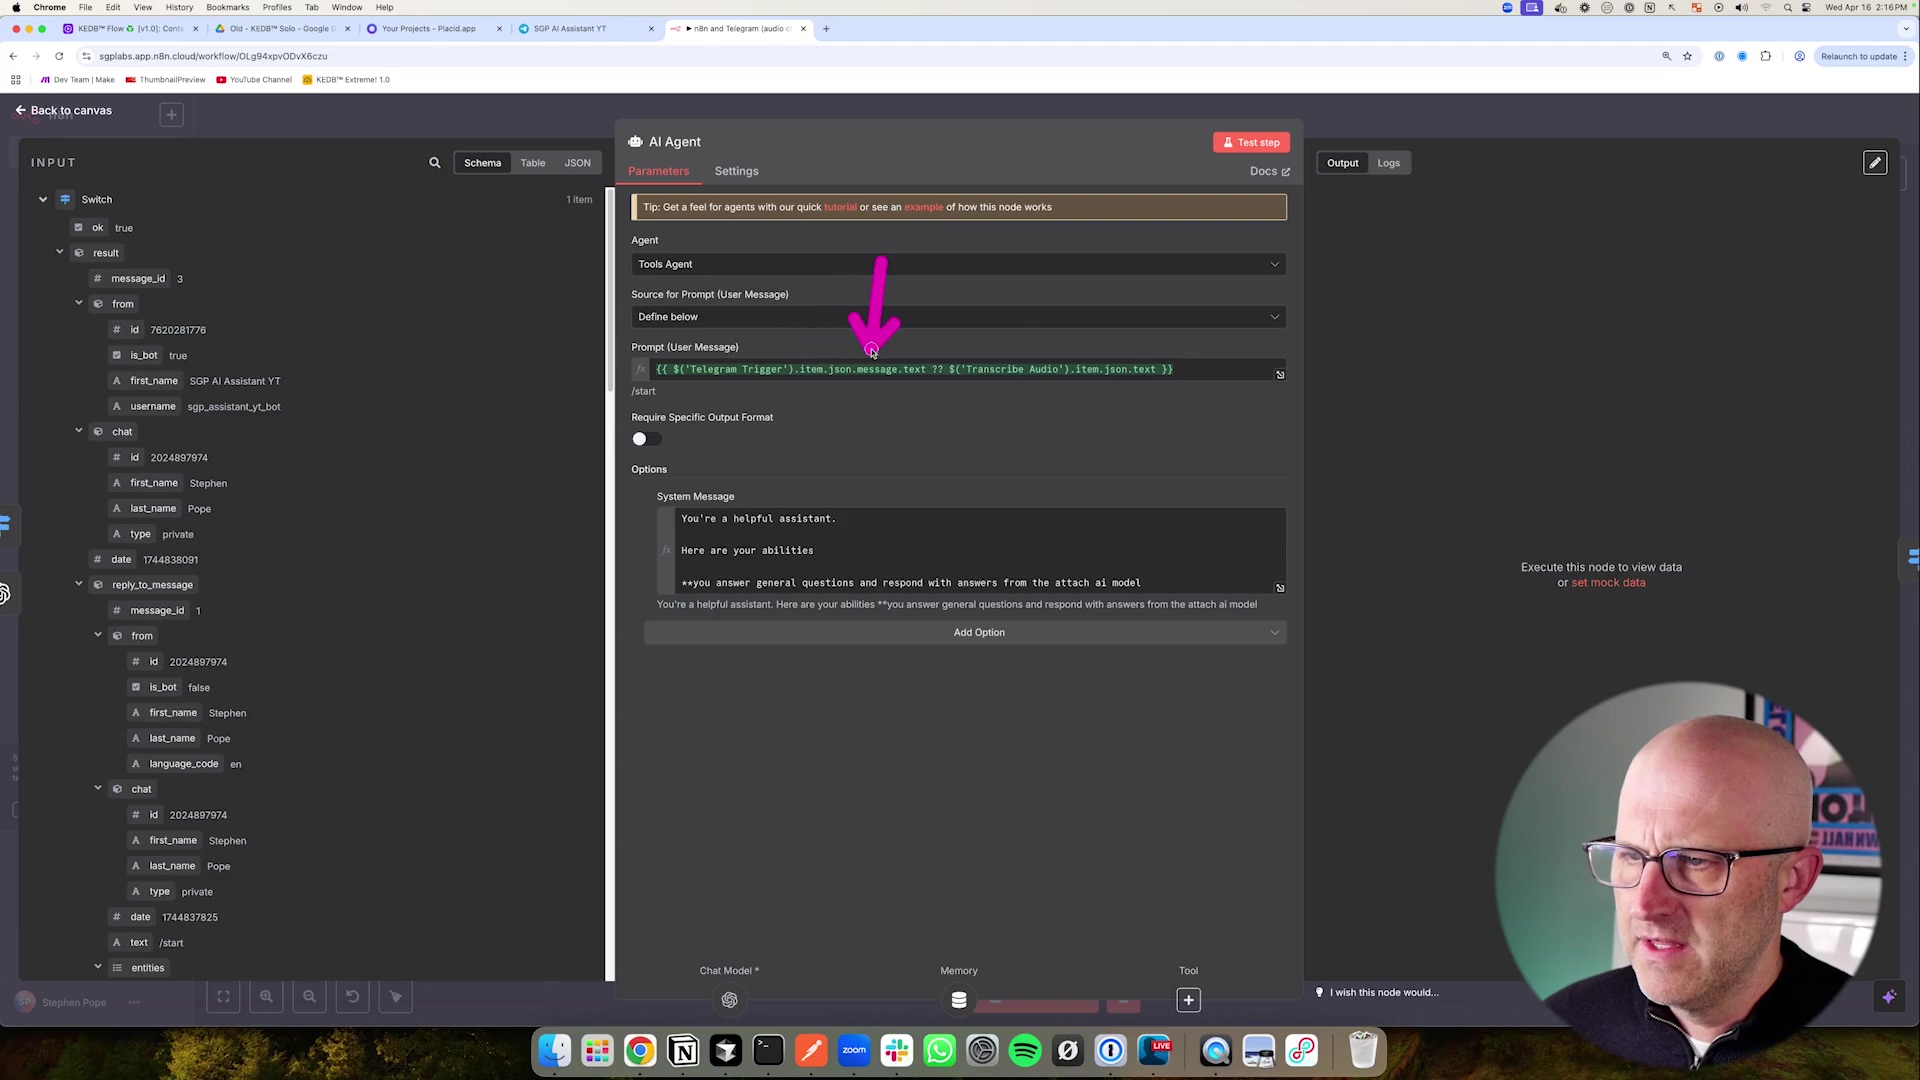
This screenshot gives you a close-up of the AI Agent node’s configuration. Notice the ‘Prompt User Message’ field – that’s where the magic of dynamic input happens, pulling from either the original Telegram message or the transcribed audio. The ‘System Message’ is also super important; it sets the stage for how your AI should behave, giving it context and personality.
Finally, let’s zoom out and look at the complete n8n workflow. This is the whole enchilada, showing all the interconnected nodes and a successful execution of a message. It gives you that satisfying, holistic view of the entire process, from start to finish!

This complete n8n workflow diagram is a thing of beauty! It illustrates the entire message handling process, from the ‘Telegram Trigger’ all the way through ‘Process Audio Input’ and ‘AI Telegram Assistant’ to ‘Assistant Response (Text or Voice)’. Seeing that successful execution means we’ve built a fully functioning, intelligent system. High five!
Mastering Audio Processing: Ensuring Native Playback
The Opus Format Trick: Unlocking Native Telegram Audio
Okay, listen up, because this is one of the most critical pieces of the puzzle for building a truly seamless Telegram AI voice agent. Many developers totally miss this, and it makes their AI-generated audio sound clunky, like a generic file attachment instead of a proper voice message. We’re not going to make that mistake! The secret sauce? It’s all about using the correct audio format: Opus.
Why Opus is Essential for Native Playback
So, why Opus? What’s the big deal?
- Telegram’s Native Format: Here’s the scoop: Telegram’s own voice messages are encoded using the Opus codec within an Ogg container. When you try to send a regular MP3 or a standard WAV file, Telegram sees it as just another file. This means users have to download it, open it externally, or play it through a less integrated player without that cool visual waveform. It’s a jarring experience.
- Enhanced User Experience: By sending your AI’s responses in the Opus format, they will appear with that familiar audio waveform, just like a voice message from a friend. Users can play, pause, and scrub through the message effortlessly. This isn’t just a minor improvement; it dramatically boosts the perceived quality and integration of your AI agent. It makes your bot feel like a natural part of the Telegram ecosystem, not an outsider.
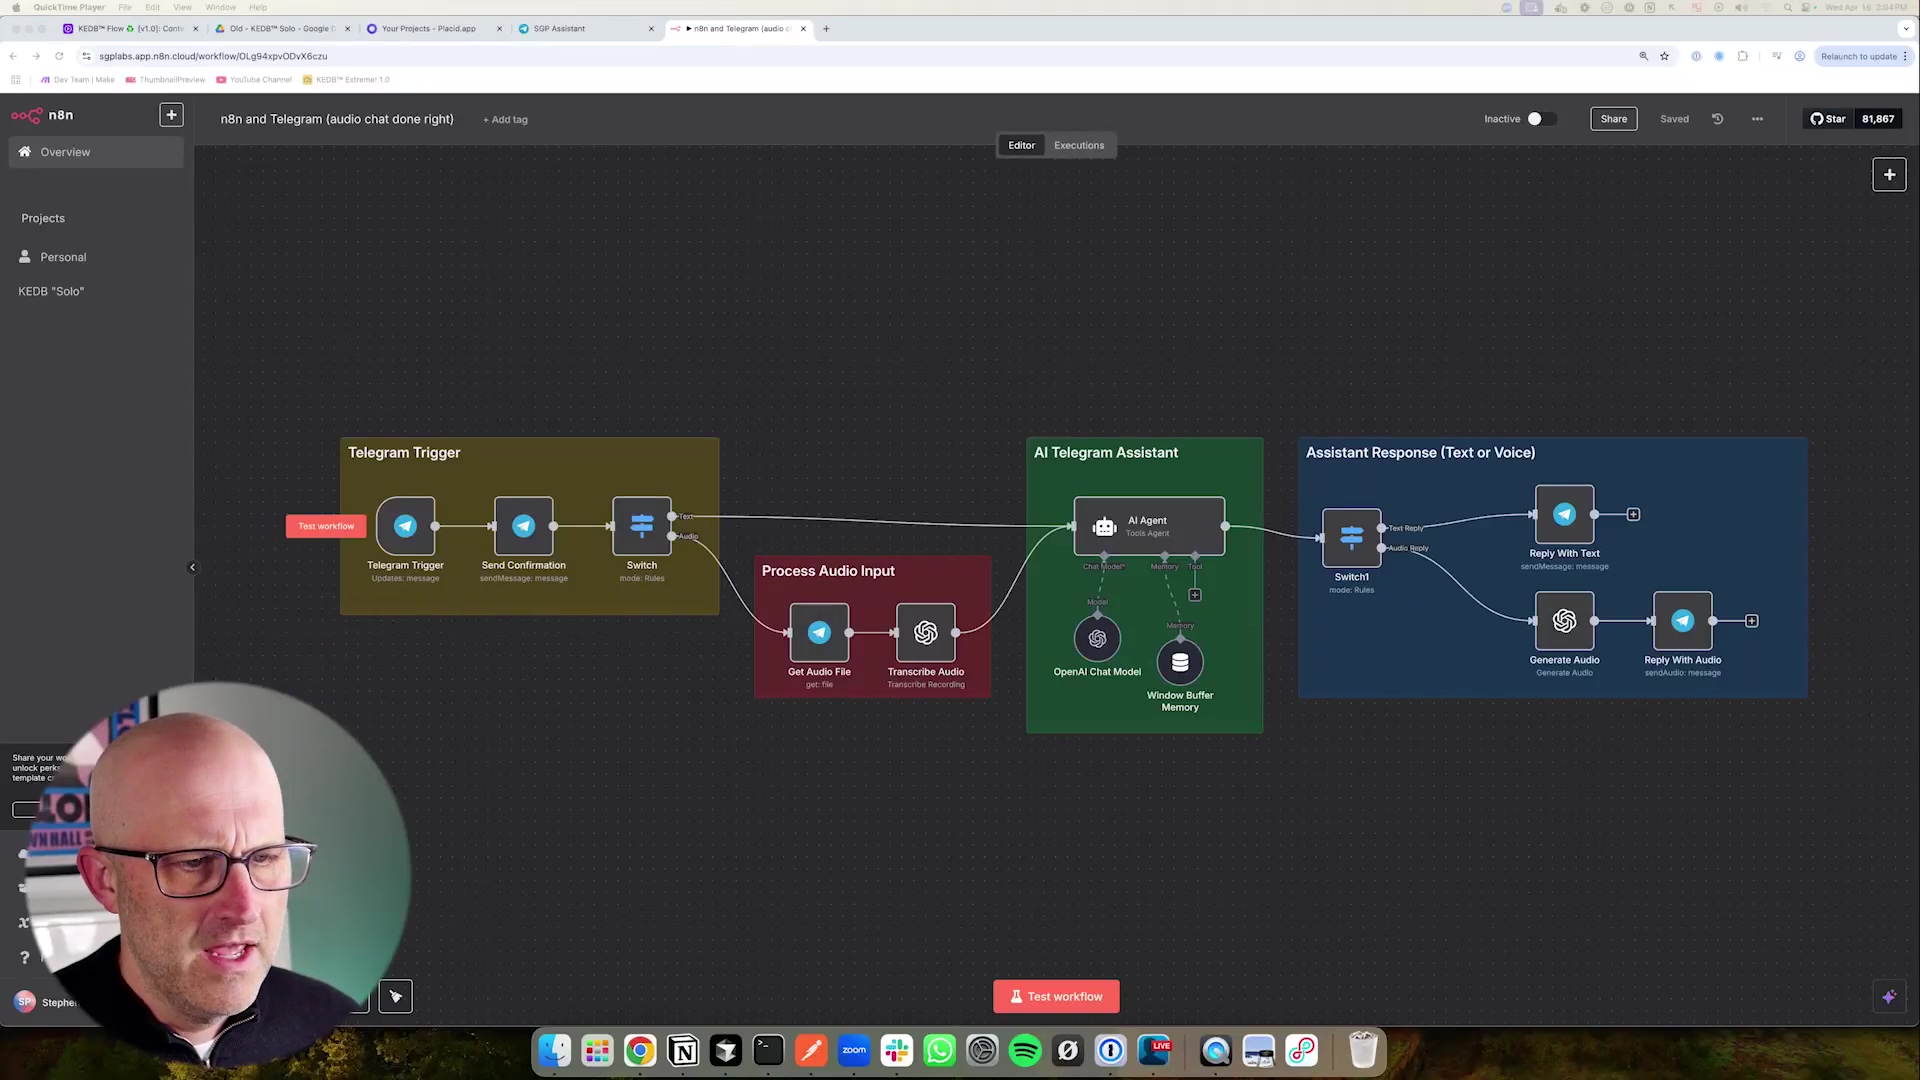
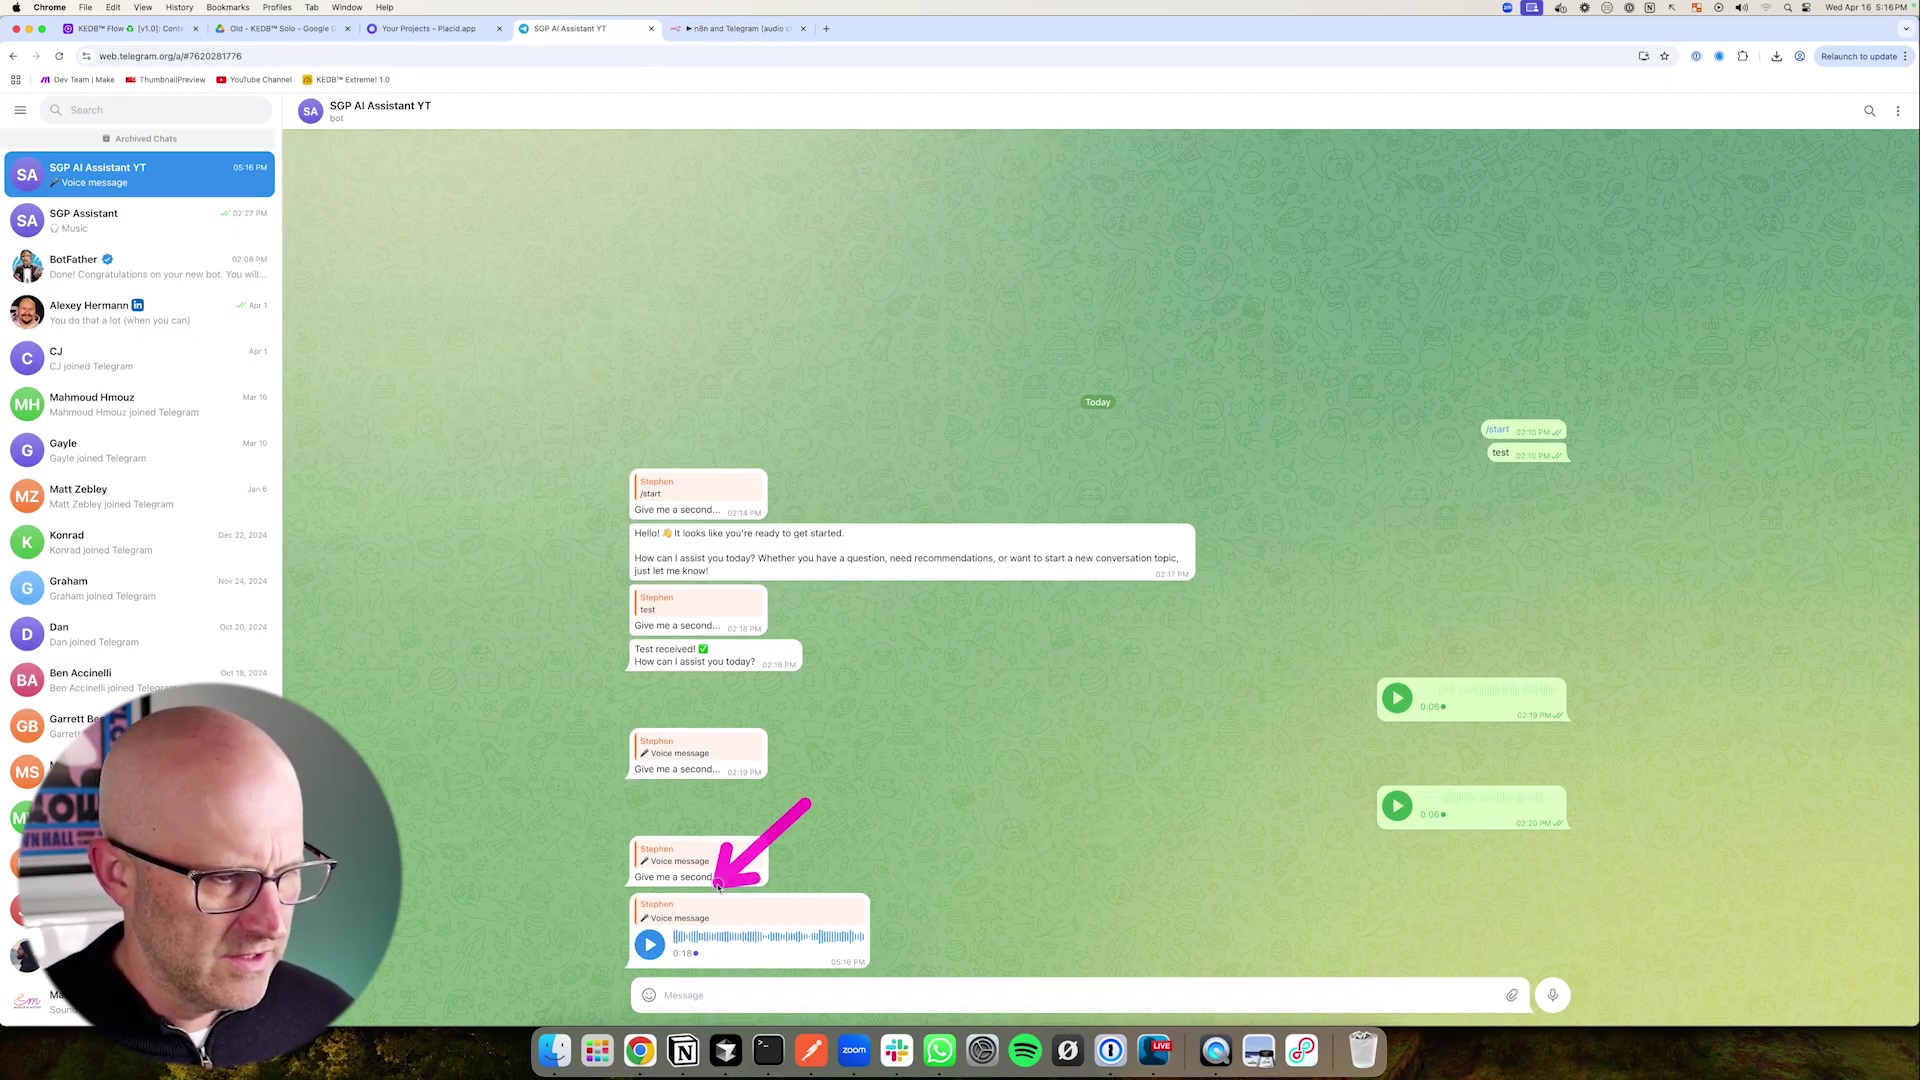
To really drive home the user experience point, imagine your Telegram chat. The image below shows exactly how a typical chat looks when your AI assistant sends a message. Notice that confirmation message, “Give me a second…”? That’s the instant feedback we talked about, and it’s crucial for a smooth user journey.
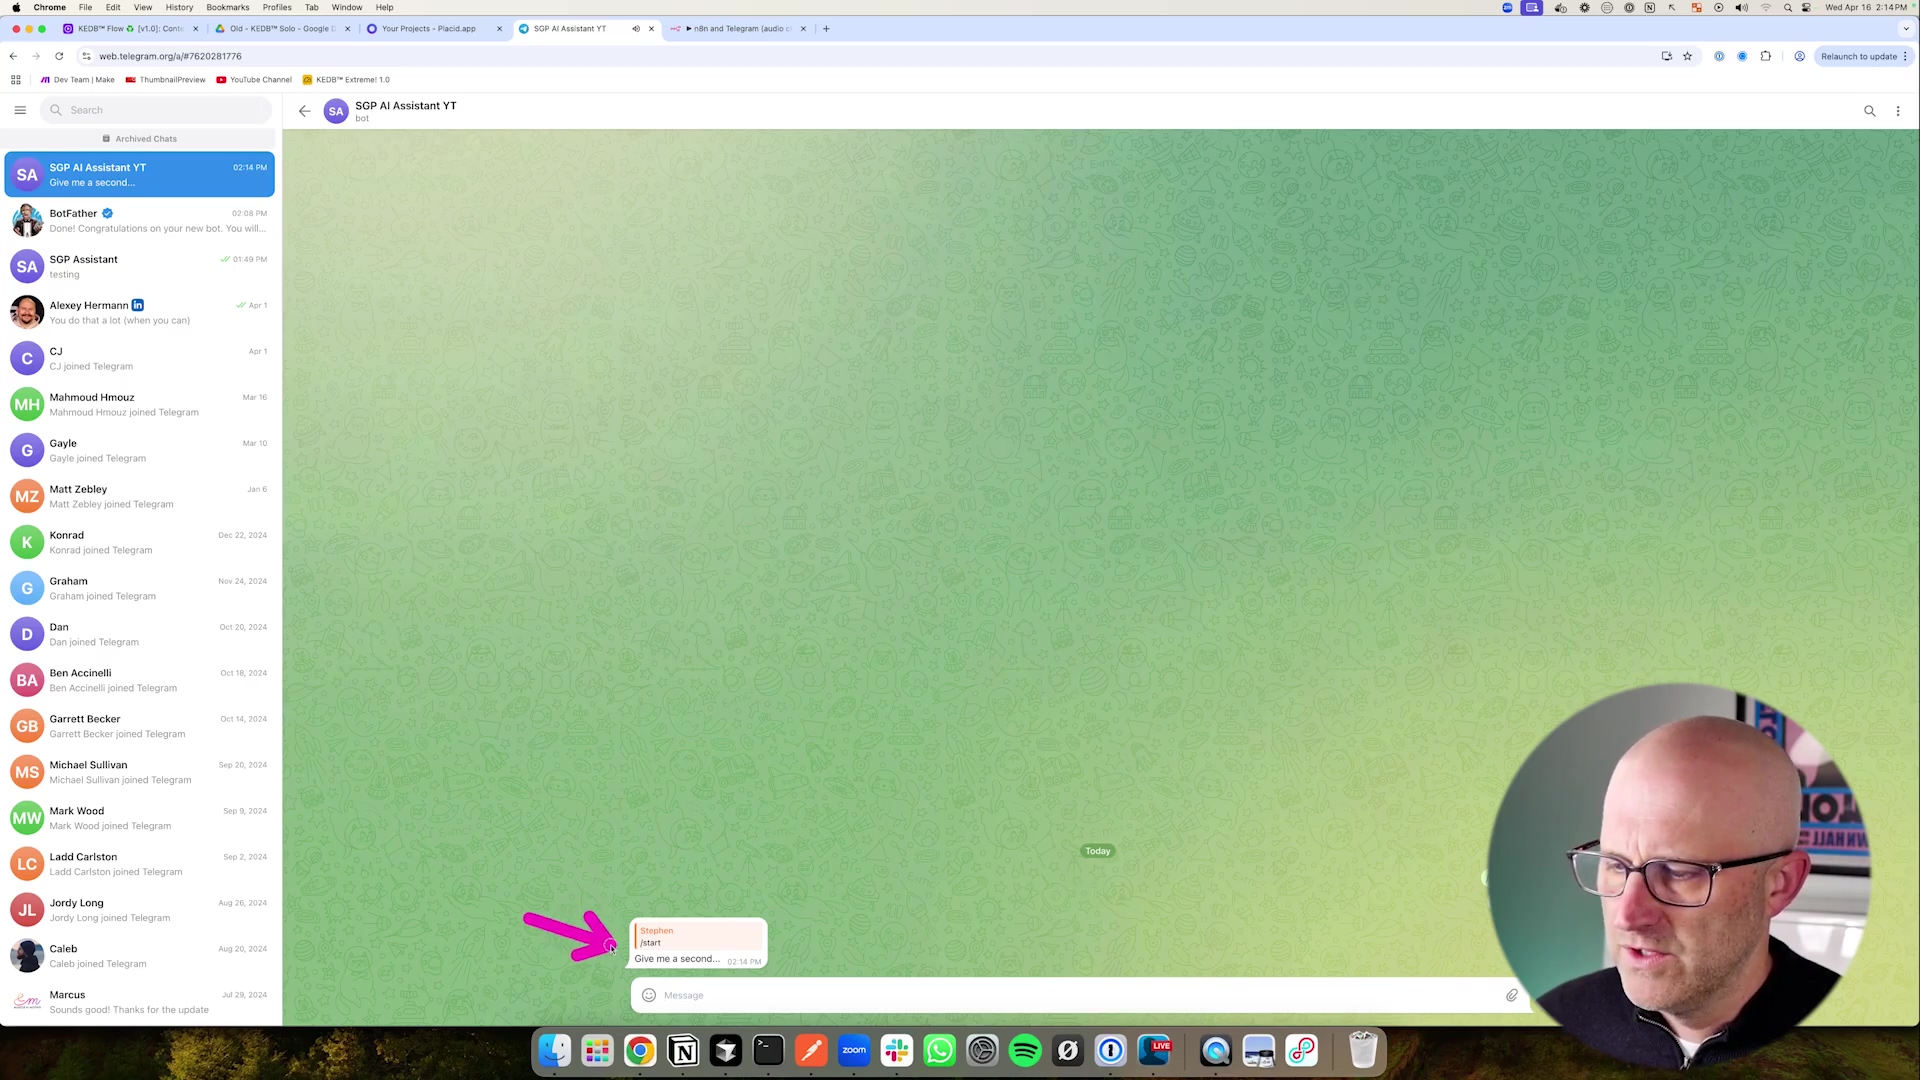
This Telegram chat screenshot perfectly illustrates the immediate feedback your AI assistant provides. That “Give me a second…” message is a small but mighty detail that makes a huge difference in user experience. It’s all about managing expectations and keeping things smooth!
Implementing Opus in Your n8n Workflow
Now, let’s get our hands dirty and implement this Opus magic in n8n!
- Audio Download and Transcription: Remember our
Switchnode that routes audio messages? Once the flow goes down the audio path, we’ll need to download the actual audio file using thefile_idwe got from the Telegram Trigger. After downloading, this file is then passed to an AI transcription service, like OpenAI’s Whisper API, to convert that speech into text. It’s like giving your bot super hearing! - Text-to-Speech (TTS) Generation: After your AI agent has crafted its brilliant textual response, if the original input was audio, we’ll use a Text-to-Speech (TTS) node. You might use something like OpenAI’s TTS API. This is where the Opus trick comes into play!
- Specify Opus Response Format: When you’re configuring your TTS node, you’ll need to look for an option like “response format” or “audio format.” This is the moment of truth! It is absolutely crucial to select
opus(or sometimesogg_opus, depending on the specific API you’re using) as the output format. This tells the TTS service, “Hey, I need this audio in Telegram’s native format!” Don’t skip this step! - Sending Native Audio Back: Finally, we’ll use a
Telegram Send Audionode. You’ll feed the Opus-formatted audio output from your TTS node into this, along with the originalchat_id(so it knows who to send it to!). Telegram will then correctly interpret this and display it as a beautiful, native voice message with that lovely waveform. Mission accomplished!
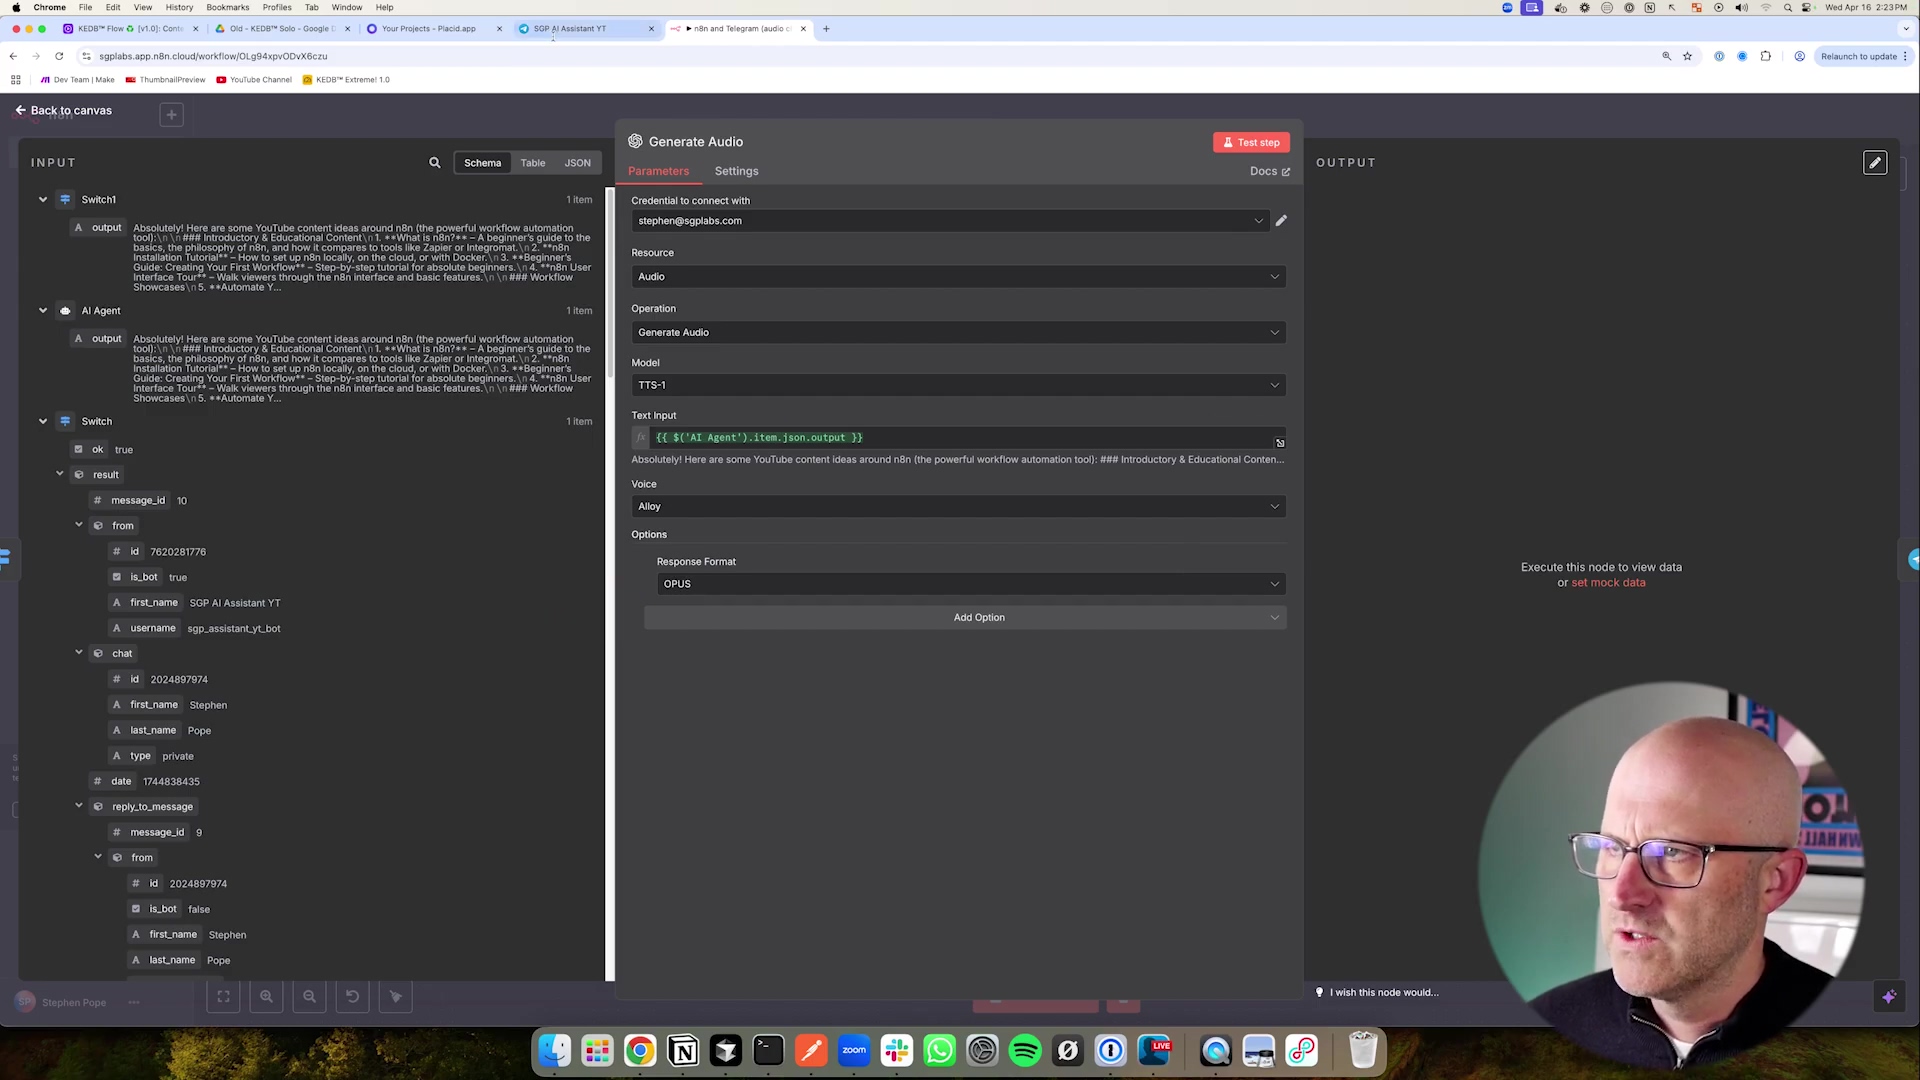
To really make sure your AI’s audio responses play perfectly in Telegram, the ‘Generate Audio’ node needs to be configured to output in the Opus format. Take a look at the image below; it shows you the exact setting within the ‘Generate Audio’ node where you select ‘OPUS’ as the response format. This is the secret handshake with Telegram!
This image highlights the critical ‘OPUS’ selection in the ‘Generate Audio’ node’s response format. See it? That’s the key to getting native Telegram audio playback. Don’t forget it!
Example: OpenAI TTS Node Configuration
Just to make it super clear, here’s a little snippet of what the configuration for an OpenAI TTS node might look like in n8n. Pay close attention to that responseFormat parameter!
`json
{
  "node": "OpenAI TTS",
  "parameters": {
    "model": "tts-1",
    "voice": "alloy",
    "input": "{{ $json.agentResponse }}",
    "responseFormat": "opus"
  }
}
responseFormat: "opus": See that? This specific parameter is the absolute key to achieving native Telegram audio playback. If you miss this, your audio responses will feel disconnected and lack that seamless integration users expect from a top-tier voice agent. It’s a small line of code, but it makes all the difference!
Enhancing Your AI Agent: Advanced Features & Best Practices
Beyond Basic Interactions: Elevating Your AI Agent
So, you’ve built a functional Telegram AI voice agent. Give yourself a pat on the back – that’s a huge accomplishment! But why stop there? The real power comes from making it even smarter, more reliable, and super secure. We’re talking about moving beyond just a simple Q&A bot and integrating advanced features that make your agent genuinely useful and robust. This section is all about leveling up your AI assistant with best practices and advanced considerations. Let’s make it truly next-level!
Implementing Advanced Features
Ready to give your AI some superpowers? Here are some ideas:
- Contextual Memory: For conversations that feel truly natural, your AI needs a memory! This could involve storing bits of your chat history in a database (like Redis for speed or PostgreSQL for more structured data). Then, with each new query, you pass that history to the AI agent. This allows the AI to remember previous interactions and build on them, making conversations much more fluid and less repetitive.
- Tool Use/Function Calling: This is where your AI goes from just talking to doing things! By integrating external tools, your AI agent can perform real-world actions. Imagine it could:
- Search the Web: Use a search API (like Google Search API) to fetch real-time information. “Hey bot, what’s the weather like in Paris right now?”
- Set Reminders: Connect with a calendar API (like Google Calendar API) to schedule events. “Bot, remind me to call Mom at 3 PM tomorrow.”
- Control Smart Devices: Link up to IoT platforms for home automation. “AI, dim the living room lights.”
- Data Retrieval: Access internal databases or APIs to provide specific user data. “What was my last order status?”
- Multilingual Support: Want your bot to be a global citizen? Integrate language detection and translation services (like Google Cloud Translation API) to allow it to communicate in multiple languages. Bonjour, comment puis-je vous aider?
- User Personalization: Store user preferences (e.g., their preferred voice, tone, specific interests, or even their coffee order!) and tailor AI responses accordingly. This makes the interaction feel truly bespoke and thoughtful.
When you’re configuring the ‘Generate Audio’ module, especially for these advanced, dynamic responses, remember that ‘OPUS’ selection is still paramount! The image below gives you a detailed look at this module, emphasizing that crucial ‘OPUS’ choice.
This detailed view of the ‘Generate Audio’ module within n8n really highlights that critical ‘OPUS’ selection for the response format. Even with complex, dynamically generated text inputs, this ensures you get native Telegram audio playback. Consistency is key!
Best Practices for Robustness and Security
Building a cool bot is one thing; building a reliable and secure bot is another. Here are my top tips:
- Error Handling: Things break. It’s a fact of life in tech! So, build robust error handling into your n8n workflow. Catch potential failures at every step – maybe an API times out, or the transcription service has a hiccup. Instead of a silent failure (which is super frustrating for users), provide graceful fallback messages like “Oops, something went wrong, please try again!” This makes your bot much more user-friendly.
- Rate Limiting: APIs often have limits on how many requests you can make in a certain time. Services like OpenAI or Telegram are no exception. Be mindful of these! Implement delays or queueing mechanisms in n8n to avoid hitting those limits and ensure your service stays consistent. Nobody likes getting throttled!
- Input Validation: While our
Switchnode is great for telling text from audio, you can get even more granular. Add validation checks for audio file types, message length, or even filter out inappropriate content before it ever reaches your AI. Think of it as a bouncer for your bot! - Security of Credentials: Always, always, always use n8n’s secure credential storage for your API keys and tokens. Never hardcode them directly into nodes or, heaven forbid, expose them in logs. And a pro tip: regularly rotate your API keys for enhanced security. It’s like changing the locks on your digital house!
- Monitoring and Logging: You can’t fix what you don’t know is broken! Set up monitoring for your n8n workflows. Use logging nodes to record interactions, errors, and performance metrics. This data is invaluable for debugging, continuously improving your AI, and understanding how users are actually interacting with your bot.
E-E-A-T Author Background and Safety Tips
As someone who’s spent years diving deep into low-code automation and AI integration, I can’t stress enough the importance of Experience, Expertise, Authoritativeness, and Trustworthiness (E-E-A-T) when you’re building and deploying AI solutions. It’s not just about the tech; it’s about responsibility. Here are some safety tips:
- Transparency: Be upfront with your users that they’re interacting with an AI. A simple initial message like “Hello, I’m your AI assistant. How can I help?” sets clear expectations and builds trust.
- Data Privacy: This is non-negotiable. Ensure all user data is handled in strict compliance with privacy regulations like GDPR or CCPA. Only collect the data you absolutely need, and be crystal clear about your data handling policies. Your users’ trust is paramount.
- Bias Mitigation: AI models, unfortunately, can sometimes inherit biases from the data they were trained on. Regularly test your agent for any biased responses and implement safeguards to promote fairness and inclusivity. We want our AI to be helpful and fair to everyone.
- Ethical AI Use: Use your AI agent responsibly. Avoid any applications that could be harmful, deceptive, or infringe on user rights. Always prioritize the well-being of your users and keep ethical considerations at the forefront of your design.
DIY vs. Commercial Solutions: A Cost-Benefit Analysis
Weighing Your Options: Build vs. Buy for AI Agents
Alright, so you’re thinking about an AI voice agent for Telegram. A big question pops up: should you roll up your sleeves and build a custom solution with tools like n8n, or just buy a pre-made commercial offering? It’s like deciding whether to cook a gourmet meal from scratch or order takeout. Both have their perks and downsides when it comes to cost, flexibility, control, and how much effort you’ll put in. Understanding these trade-offs is key to making a smart decision that fits your specific needs and resources. Let’s break it down!
The Allure of Commercial Solutions
Commercial AI agent platforms often sound super appealing. They promise easy setup, quick deployment, and a bunch of robust features right out of the box. They usually handle all the boring stuff like infrastructure, maintenance, and updates, which means less headache for you. But, and this is a big but, all that convenience often comes with a trade-off in customization and can get pricey in the long run.
- Pros: Super fast deployment, minimal technical overhead (they handle the heavy lifting!), managed infrastructure (you don’t worry about servers), and you get access to advanced features without writing a single line of code. Sounds great, right?
- Cons: Here’s the catch. You’re often stuck with limited customization options, which means your bot might look and feel like everyone else’s. There’s also the dreaded vendor lock-in (it’s hard to switch later!). Plus, those recurring subscription fees can really add up, especially as your usage grows. You also have less control over your data and privacy, and sometimes you pay for features you don’t even need (feature bloat!).
The Power of a DIY Approach with n8n
Now, building your own AI agent with n8n? That’s where you get unparalleled flexibility and total control. Yes, it takes a bit more time and some technical understanding upfront, but the long-term benefits are huge: we’re talking cost-efficiency, tailor-made functionality that does exactly what you want, and complete ownership. And the best part? n8n’s low-code environment makes this DIY approach totally accessible, even if you’re not a seasoned programmer. It’s like building your dream house with a super-smart toolkit!
- Pros: You get 100% customization – your bot, your rules! It’s super cost-effective, especially if you have high usage (those API calls are usually much cheaper than platform subscriptions). You have complete data ownership and privacy control – your data stays yours. No vendor lock-in means you’re free to evolve. You can integrate with any API out there, and it scales beautifully as your needs grow. It’s truly empowering!
- Cons: Okay, it’s not all rainbows and unicorns. It does require some initial setup and configuration time. You’re also responsible for ongoing maintenance and updates (but hey, that’s part of the fun of building!). There’s a learning curve for n8n and getting familiar with AI APIs. And yes, with advanced features, it can get a bit complex, but that’s why I’m here to guide you!
Cost Comparison: DIY vs. Commercial
Let’s talk money, because that’s often a big factor. Here’s a hypothetical scenario for a medium-usage AI agent (say, 10,000 interactions per month, including transcription and Text-to-Speech). These are rough estimates, but they give you a good idea:
| Feature/Aspect | DIY (n8n + OpenAI) | Commercial Solution (e.g., XYZ AI Platform) |
|---|---|---|
| Setup Cost | n8n instance (free/low-cost, you can self-host!), API key setup (free to get) | Subscription fee (often tiered, can be monthly or annual) |
| Monthly Cost | OpenAI API usage (transcription, TTS, LLM – you pay for what you use!) | Base subscription + usage-based fees (per interaction/feature – can add up fast!) |
| Customization | 100% control, integrate any service you can imagine | Limited to the platform’s pre-built features and integrations |
| Data Ownership | Full control, your data resides in your chosen services | Data typically processed/stored by the vendor (read their privacy policy carefully!) |
| Scalability | Scales beautifully with underlying API providers (like OpenAI) | Scales with subscription tier; higher tiers usually mean much higher costs |
| Maintenance | Self-managed n8n workflow, API key updates (you’re the boss!) | Vendor-managed, automatic updates (less control, but less work) |
| Typical Monthly | ~$10-$50 (depending on your actual usage and which AI models you pick) | ~$50-$500+ (this can vary wildly based on features, usage, and the vendor) |
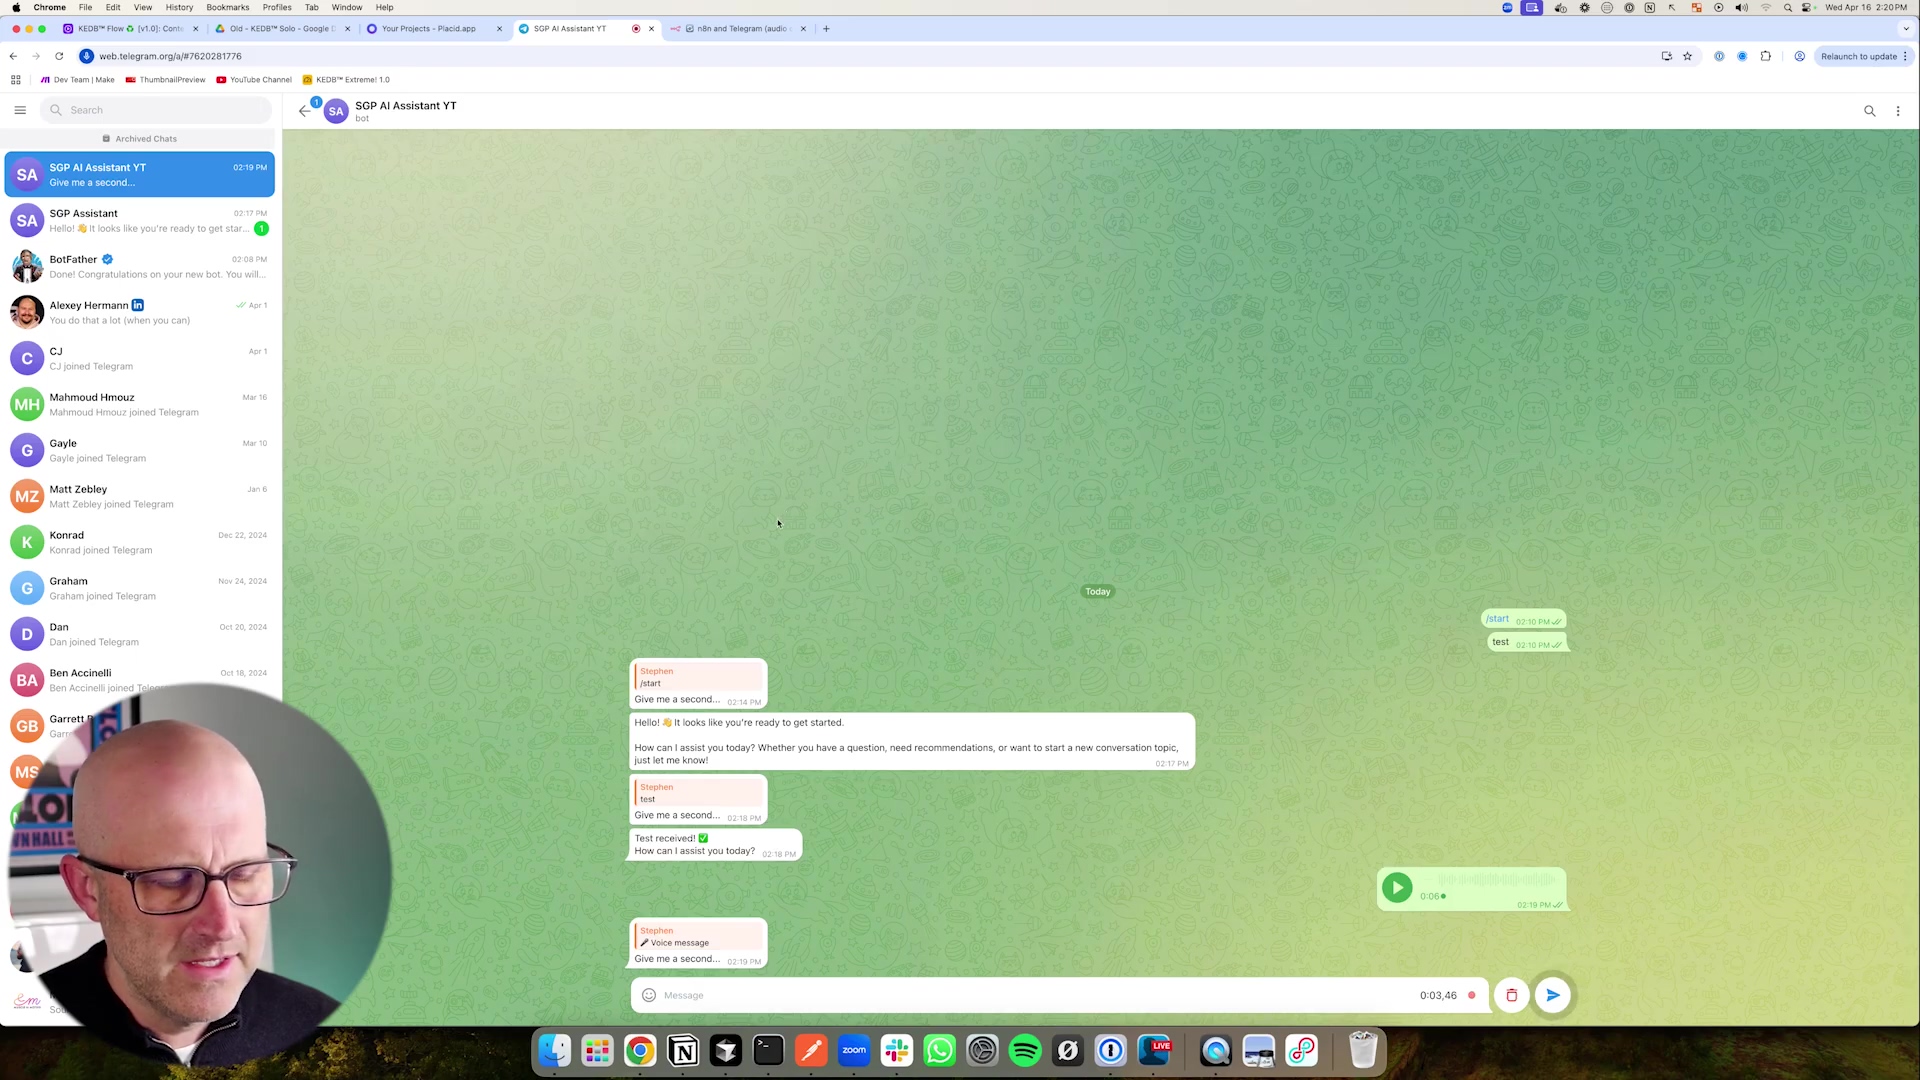
For those of you leaning towards the DIY approach (and I hope you are!), there are fantastic resources out there. Platforms like ‘No-Code Architects’ can provide invaluable support and a community of like-minded builders. The image below shows a glimpse of such a platform, full of courses and tools to help you build your custom solutions. It’s proof that you don’t need to be a coding wizard to build amazing things!
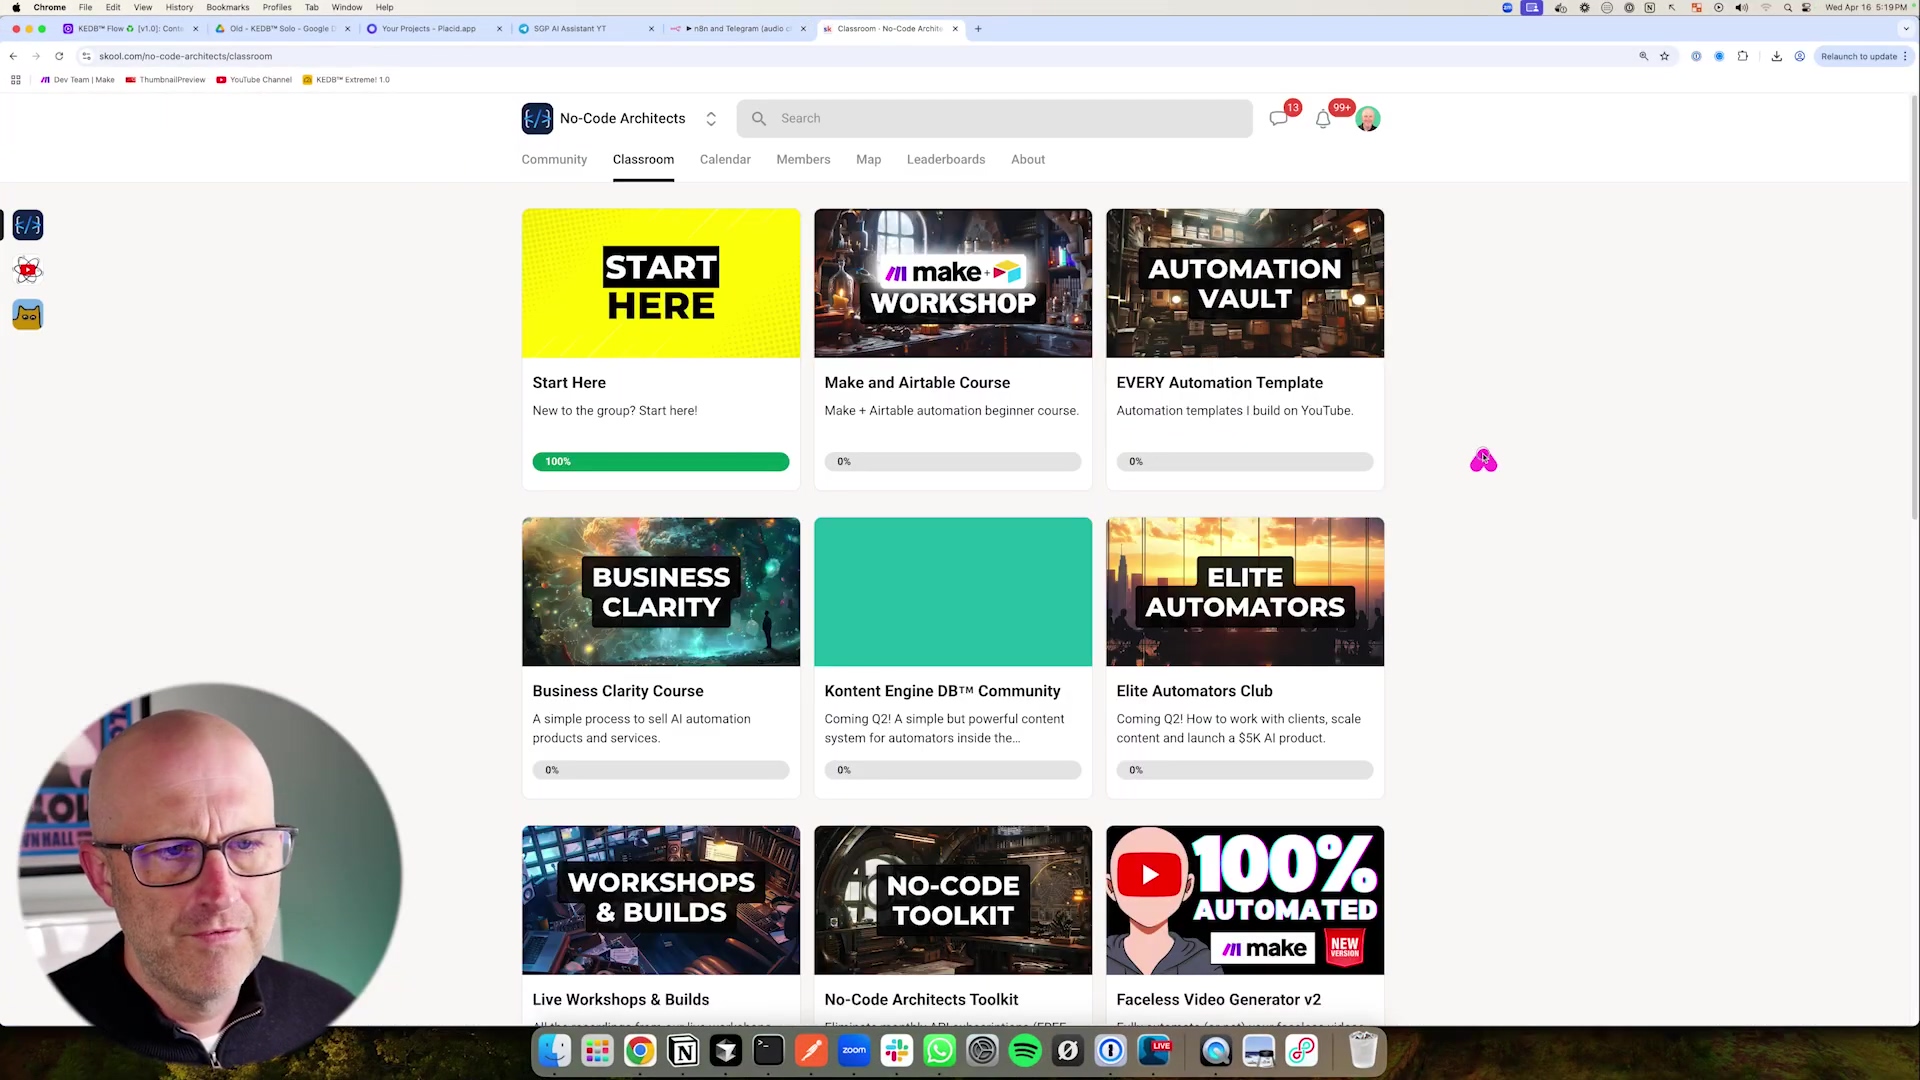
This image of the ‘No-Code Architects’ platform perfectly illustrates the kind of community and resources that are out there to support you in building your own AI solutions. It really reinforces that the DIY approach is not only viable but incredibly rewarding. You’ve got this!
Conclusion: Your Intelligent Telegram Companion Awaits
Recapping the Journey to an Intelligent Telegram Assistant
Phew! What a journey we’ve had, right? We started with a humble Telegram bot and, together, transformed it into a sophisticated AI voice agent. This isn’t just any bot; it’s capable of natural, intuitive interactions, understanding both text and voice. We walked through everything: from the very first step of setting up with BotFather, to the intricate dance of designing your n8n workflow, and even mastering that critical ‘opus’ format trick for perfect audio playback. Every single step was geared towards creating an AI assistant that’s truly intelligent and super user-friendly.
You now have the knowledge and the power to build an AI agent that not only understands what you type and what you say but also responds in a way that feels completely native and seamless within Telegram. This significantly elevates the user experience, making your bot stand head and shoulders above those generic commercial solutions. You’ve built something truly special!
The Future of Conversational AI in Your Hands
Honestly, the capabilities we’ve explored in this guide are just the tip of the iceberg. As AI models get smarter (and believe me, they are!) and low-code platforms like n8n become even more powerful and versatile, the potential for weaving AI into our daily digital lives is absolutely limitless. Imagine an agent that proactively anticipates your needs, gives you real-time info based on your context, or even automates complex, multi-step tasks just from a simple voice command. How cool would that be? By mastering these foundational principles, you’re now equipped to innovate and push the boundaries of conversational AI, making your digital interactions more efficient, personalized, and engaging. The future is literally in your hands!
Take the Leap: Build Your Own AI Voice Agent Today!
Don’t just sit back and watch the future of AI unfold; actively shape it! The tools and techniques I’ve shared in this guide empower you to move beyond just consuming technology and become a creator of intelligent systems. So, what are you waiting for? Start by setting up your Telegram bot, dive into experimenting with n8n’s incredible workflow automation, and integrate your favorite AI models. The satisfaction you’ll get from building a custom, intelligent assistant that truly serves your needs is immense. Dive in, experiment, and unleash the full potential of AI-powered communication. Your intelligent Telegram companion is just a few clicks away from becoming a reality. Let’s make it happen!
To wrap things up, take one last look at the seamless interaction with a fully functional AI voice agent in Telegram. The image below is the ultimate proof – native audio playback with that beautiful, familiar waveform. It’s a testament to your successful implementation of the Opus format trick. You did it!
Frequently Asked Questions (FAQ)
Q: Why is the Opus format so important for Telegram audio messages?
A: The Opus format is crucial because it’s the native audio codec Telegram uses for its voice messages. When you send audio in Opus, Telegram recognizes it as a voice message, displaying it with a visual waveform and integrating it seamlessly into the chat. If you use other formats like MP3 or WAV, Telegram treats them as generic file attachments, requiring users to download or open them externally, which breaks the natural conversational flow and user experience. It’s all about making your AI’s voice feel like a natural part of the conversation, not an outsider!
Q: Can I use a different AI model instead of OpenAI for transcription or text-to-speech?
A: Absolutely! While this guide uses OpenAI’s Whisper for transcription and their TTS API for text-to-speech as examples, n8n is incredibly flexible. You can integrate with many other AI services that offer similar functionalities, such as Google Cloud Speech-to-Text or Amazon Polly for TTS. The key is to find the corresponding n8n node or use the HTTP Request node to connect to their APIs. Just remember to check their documentation for the correct audio formats and parameters, especially if you want that native Opus playback!
Q: What if my bot receives an image or video instead of text or audio? How do I handle that?
A: That’s a great question and a common scenario in real-world bots! Our current Switch node checks for file_id to differentiate between text and any file. To handle images or videos specifically, you’d need to add more granular checks within your n8n workflow. After detecting a file_id, you could use another Switch node or an IF node to check the mime_type or other properties of the file object in the Telegram Trigger’s JSON output. For example, json.message.photo or json.message.video would indicate an image or video respectively. You could then route these to specific nodes for image processing, or simply send a polite message back to the user saying, “Sorry, I can only process text and voice messages right now!” This makes your bot more robust and user-friendly.
Q: How can I make my AI agent remember past conversations for better context?
A: To give your AI agent a memory, you’ll need to integrate a database or a memory service. A common approach is to store the conversation history (user input and AI responses) in a database like Redis (for fast, temporary memory) or PostgreSQL (for more persistent storage). Before sending a new user query to your AI model, you would retrieve the relevant past conversation history from your database and include it in the prompt. This way, the AI has the context of previous turns in the conversation, allowing for much more natural and coherent interactions. n8n has nodes for connecting to various databases, making this integration straightforward.
Q: What are the potential costs associated with running this AI voice agent, especially with OpenAI APIs?
A: The costs primarily come from the API usage of services like OpenAI for transcription (Whisper), text-to-speech (TTS), and the large language model (GPT). These are typically pay-as-you-go, meaning you only pay for what you use. For example, Whisper API charges per minute of audio transcribed, TTS charges per character generated, and GPT models charge per token (words/parts of words) processed. While individual interactions are very cheap, costs can add up with high usage. It’s crucial to monitor your API usage dashboards (e.g., on the OpenAI platform) and set spending limits to avoid unexpected bills. Compared to many commercial solutions, this DIY approach often offers significant cost savings, especially at scale, because you’re only paying for the raw compute, not platform overheads.
with various course and community offerings, while a person’s face is visible in the bottom left corner. The page features several large, visually distinct cards, each representing a different section like ‘START HERE’, ‘MAKE WORKSHOP’, ‘AUTOMATION VAULT’, ‘BUSINESS CLARITY’, ‘KONTENT ENGINE DB™ COMMUNITY’, ‘ELITE AUTOMATORS’, ‘WORKSHOPS & BUILDS’, ‘NO-CODE TOOLKIT’, and ‘100% AUTOMATED’. Each card has a title, a brief description, and a progress bar or percentage. The person in the bottom left is looking towards the screen with a neutral expression. The top of the browser shows multiple tabs open.](https://imghub.did.fm/6faccbf7d5f99208f47152578bfb6fa9.jpg)
This image of the ‘No-Code Architects’ platform perfectly illustrates the kind of community and resources that are out there to support you in building your own AI solutions. It really reinforces that the DIY approach is not only viable but incredibly rewarding. You’ve got this!
Conclusion: Your Intelligent Telegram Companion Awaits
Recapping the Journey to an Intelligent Telegram Assistant
Phew! What a journey we’ve had, right? We started with a humble Telegram bot and, together, transformed it into a sophisticated AI voice agent. This isn’t just any bot; it’s capable of natural, intuitive interactions, understanding both text and voice. We walked through everything: from the very first step of setting up with BotFather, to the intricate dance of designing your n8n workflow, and even mastering that critical ‘opus’ format trick for perfect audio playback. Every single step was geared towards creating an AI assistant that’s truly intelligent and super user-friendly.
You now have the knowledge and the power to build an AI agent that not only understands what you type and what you say but also responds in a way that feels completely native and seamless within Telegram. This significantly elevates the user experience, making your bot stand head and shoulders above those generic commercial solutions. You’ve built something truly special!
The Future of Conversational AI in Your Hands
Honestly, the capabilities we’ve explored in this guide are just the tip of the iceberg. As AI models get smarter (and believe me, they are!) and low-code platforms like n8n become even more powerful and versatile, the potential for weaving AI into our daily digital lives is absolutely limitless. Imagine an agent that proactively anticipates your needs, gives you real-time info based on your context, or even automates complex, multi-step tasks just from a simple voice command. How cool would that be? By mastering these foundational principles, you’re now equipped to innovate and push the boundaries of conversational AI, making your digital interactions more efficient, personalized, and engaging. The future is literally in your hands!
Take the Leap: Build Your Own AI Voice Agent Today!
Don’t just sit back and watch the future of AI unfold; actively shape it! The tools and techniques I’ve shared in this guide empower you to move beyond just consuming technology and become a creator of intelligent systems. So, what are you waiting for? Start by setting up your Telegram bot, dive into experimenting with n8n’s incredible workflow automation, and integrate your favorite AI models. The satisfaction you’ll get from building a custom, intelligent assistant that truly serves your needs is immense. Dive in, experiment, and unleash the full potential of AI-powered communication. Your intelligent Telegram companion is just a few clicks away from becoming a reality. Let’s make it happen!
To wrap things up, take one last look at the seamless interaction with a fully functional AI voice agent in Telegram. The image below is the ultimate proof – native audio playback with that beautiful, familiar waveform. It’s a testament to your successful implementation of the Opus format trick. You did it!
Frequently Asked Questions (FAQ)
Q: Why is the Opus format so important for Telegram audio messages?
A: The Opus format is crucial because it’s the native audio codec Telegram uses for its voice messages. When you send audio in Opus, Telegram recognizes it as a voice message, displaying it with a visual waveform and integrating it seamlessly into the chat. If you use other formats like MP3 or WAV, Telegram treats them as generic file attachments, requiring users to download or open them externally, which breaks the natural conversational flow and user experience. It’s all about making your AI’s voice feel like a natural part of the conversation, not an outsider!
Q: Can I use a different AI model instead of OpenAI for transcription or text-to-speech?
A: Absolutely! While this guide uses OpenAI’s Whisper for transcription and their TTS API for text-to-speech as examples, n8n is incredibly flexible. You can integrate with many other AI services that offer similar functionalities, such as Google Cloud Speech-to-Text or Amazon Polly for TTS. The key is to find the corresponding n8n node or use the HTTP Request node to connect to their APIs. Just remember to check their documentation for the correct audio formats and parameters, especially if you want that native Opus playback!
Q: What if my bot receives an image or video instead of text or audio? How do I handle that?
A: That’s a great question and a common scenario in real-world bots! Our current Switch node checks for file_id to differentiate between text and any file. To handle images or videos specifically, you’d need to add more granular checks within your n8n workflow. After detecting a file_id, you could use another Switch node or an IF node to check the mime_type or other properties of the file object in the Telegram Trigger’s JSON output. For example, json.message.photo or json.message.video would indicate an image or video respectively. You could then route these to specific nodes for image processing, or simply send a polite message back to the user saying, “Sorry, I can only process text and voice messages right now!” This makes your bot more robust and user-friendly.
Q: How can I make my AI agent remember past conversations for better context?
A: To give your AI agent a memory, you’ll need to integrate a database or a memory service. A common approach is to store the conversation history (user input and AI responses) in a database like Redis (for fast, temporary memory) or PostgreSQL (for more persistent storage). Before sending a new user query to your AI model, you would retrieve the relevant past conversation history from your database and include it in the prompt. This way, the AI has the context of previous turns in the conversation, allowing for much more natural and coherent interactions. n8n has nodes for connecting to various databases, making this integration straightforward.
Q: What are the potential costs associated with running this AI voice agent, especially with OpenAI APIs?
A: The costs primarily come from the API usage of services like OpenAI for transcription (Whisper), text-to-speech (TTS), and the large language model (GPT). These are typically pay-as-you-go, meaning you only pay for what you use. For example, Whisper API charges per minute of audio transcribed, TTS charges per character generated, and GPT models charge per token (words/parts of words) processed. While individual interactions are very cheap, costs can add up with high usage. It’s crucial to monitor your API usage dashboards (e.g., on the OpenAI platform) and set spending limits to avoid unexpected bills. Compared to many commercial solutions, this DIY approach often offers significant cost savings, especially at scale, because you’re only paying for the raw compute, not platform overheads.