Watch the Video Tutorial
💡 Pro Tip: After watching the video, continue reading below for detailed step-by-step instructions, code examples, and additional tips that will help you implement this successfully.
Table of Contents
Open Table of Contents
- Unlock Free Viral AI Video Creation with Google Veo 3 and n8n
- Step-by-Step Automation Pipeline
- Key Takeaways
- Conclusion
- Frequently Asked Questions (FAQ)
- Q: What is Google Veo 3 and why is it important for this automation?
- Q: Can I really do this for free, or are there hidden costs?
- Q: What if I’m not familiar with n8n or Google Cloud? Is this guide still for me?
- Q: How can I make my AI-generated videos more unique and less generic?
- Q: What are the limitations of using Veo 3 and n8n for video generation?
Unlock Free Viral AI Video Creation with Google Veo 3 and n8n
Ever dreamt of creating tons of viral video content but got stuck on how time-consuming it is? What if I told you we could automate that whole process, completely for free? Yep, you heard that right! This guide is going to walk you through setting up a powerful automation pipeline using Google’s cutting-edge video generation model, Veo 3, and the incredibly versatile automation tool, n8n. By the time we’re done, you’ll have a system that can transform a simple idea into a fully generated and stored video with minimal effort. It’s like having your own personal Hollywood studio, but in the cloud, and it works while you sleep!
Required Resources and Cost-Benefit Analysis
Alright, before we jump into the nitty-gritty, let’s talk about what you’ll need. Think of it like gathering your ingredients before cooking up a storm. The best part? This setup is super cost-effective. We’re going to leverage free tiers and credits to keep your wallet happy. Who doesn’t love free stuff, especially when it’s this powerful?
Resource Checklist
| Tool/Platform | Purpose | Cost/Access |
|---|---|---|
| Google Cloud Console | Access to Google Vertex AI Studio (Veo 3) | Free account with $300 credit for 90 days |
| n8n | Automation workflow orchestration | Free and open-source |
| Google Sheets | Data storage for ideas, prompts, and links | Free with Google account |
| Google Drive | Video file storage | Free with Google account |
| Google Gemini | AI model for idea/prompt generation | Integrated with Google Cloud |
DIY vs. Commercial Solutions: A Cost-Benefit Comparison
Now, you might be wondering, “Boyce, why go through all this setup when I can just use a commercial tool?” Great question! Let’s break down the pros and cons. Think of it like building your own custom LEGO spaceship versus buying a pre-built one. Both get you a spaceship, but one gives you way more control and satisfaction.
| Feature/Aspect | DIY Solution (Veo 3 + n8n) | Commercial AI Video Platform (e.g., Synthesys, Pictory) |
|---|---|---|
| Initial Cost | Free (leveraging Google Cloud credits, n8n open-source) | Typically starts from $20-$50/month, scales with usage |
| Customization | High (full control over prompts, workflow logic) | Limited to platform’s pre-defined templates/features |
| Scalability | High (can be scaled with Google Cloud resources) | Depends on subscription tier |
| Learning Curve | Moderate to High (requires some technical setup) | Low (user-friendly interfaces) |
| Output Quality | High (Veo 3 offers cinematic quality) | Varies, often good but can be generic |
| Data Ownership | Full control over your data and generated assets | Data often resides on platform’s servers |
| Maintenance | Requires self-management of workflows and APIs | Handled by the platform provider |
Critical Safety and Best Practice Tips
Before we dive into the actual building, let’s talk about some crucial tips. These are like the safety goggles and hard hat for our automation construction project. Trust me, you don’t want to skip these!
⚠️ API Key Security: This is super important, folks! Your API keys are like the master keys to your digital kingdom. Always handle them with extreme care. Never, ever, ever expose them in code that’s visible to the public (like client-side code on a website) or in public code repositories (like GitHub). Instead, use environment variables or secure credential management systems. It’s like hiding your house key under a rock vs. putting it in a safe.
💡 Prompt Engineering: Ah, the art of talking to AI! The quality of your AI-generated videos heavily depends on the prompts you give it. Think of it as giving instructions to a super-talented artist. The more detailed, descriptive, and cinematic your language, the better the masterpiece you’ll get. Don’t be afraid to experiment! Also, consider adding “negative prompts” – telling the AI what not to include. It’s like telling the artist, “Please, no clowns!” to refine the output.
⚠️ Credit Monitoring: Remember those sweet Google Cloud credits? They’re awesome, but they don’t last forever. Keep a close eye on your usage to avoid any unexpected charges once that free trial period is over. Set up billing alerts in Google Cloud – it’s like setting a reminder for your parking meter, but for your cloud spending!
Step-by-Step Automation Pipeline
Alright, let’s get to the fun part! We’re going to build this automation pipeline in three main phases. Think of it as a three-act play: Act 1, we brainstorm; Act 2, we create; Act 3, we organize. Each act builds on the last, creating a seamless flow.
Phase 1: Idea and Prompt Generation
This is where the magic begins! We need ideas, and then we need to turn those ideas into detailed instructions for our AI video generator.
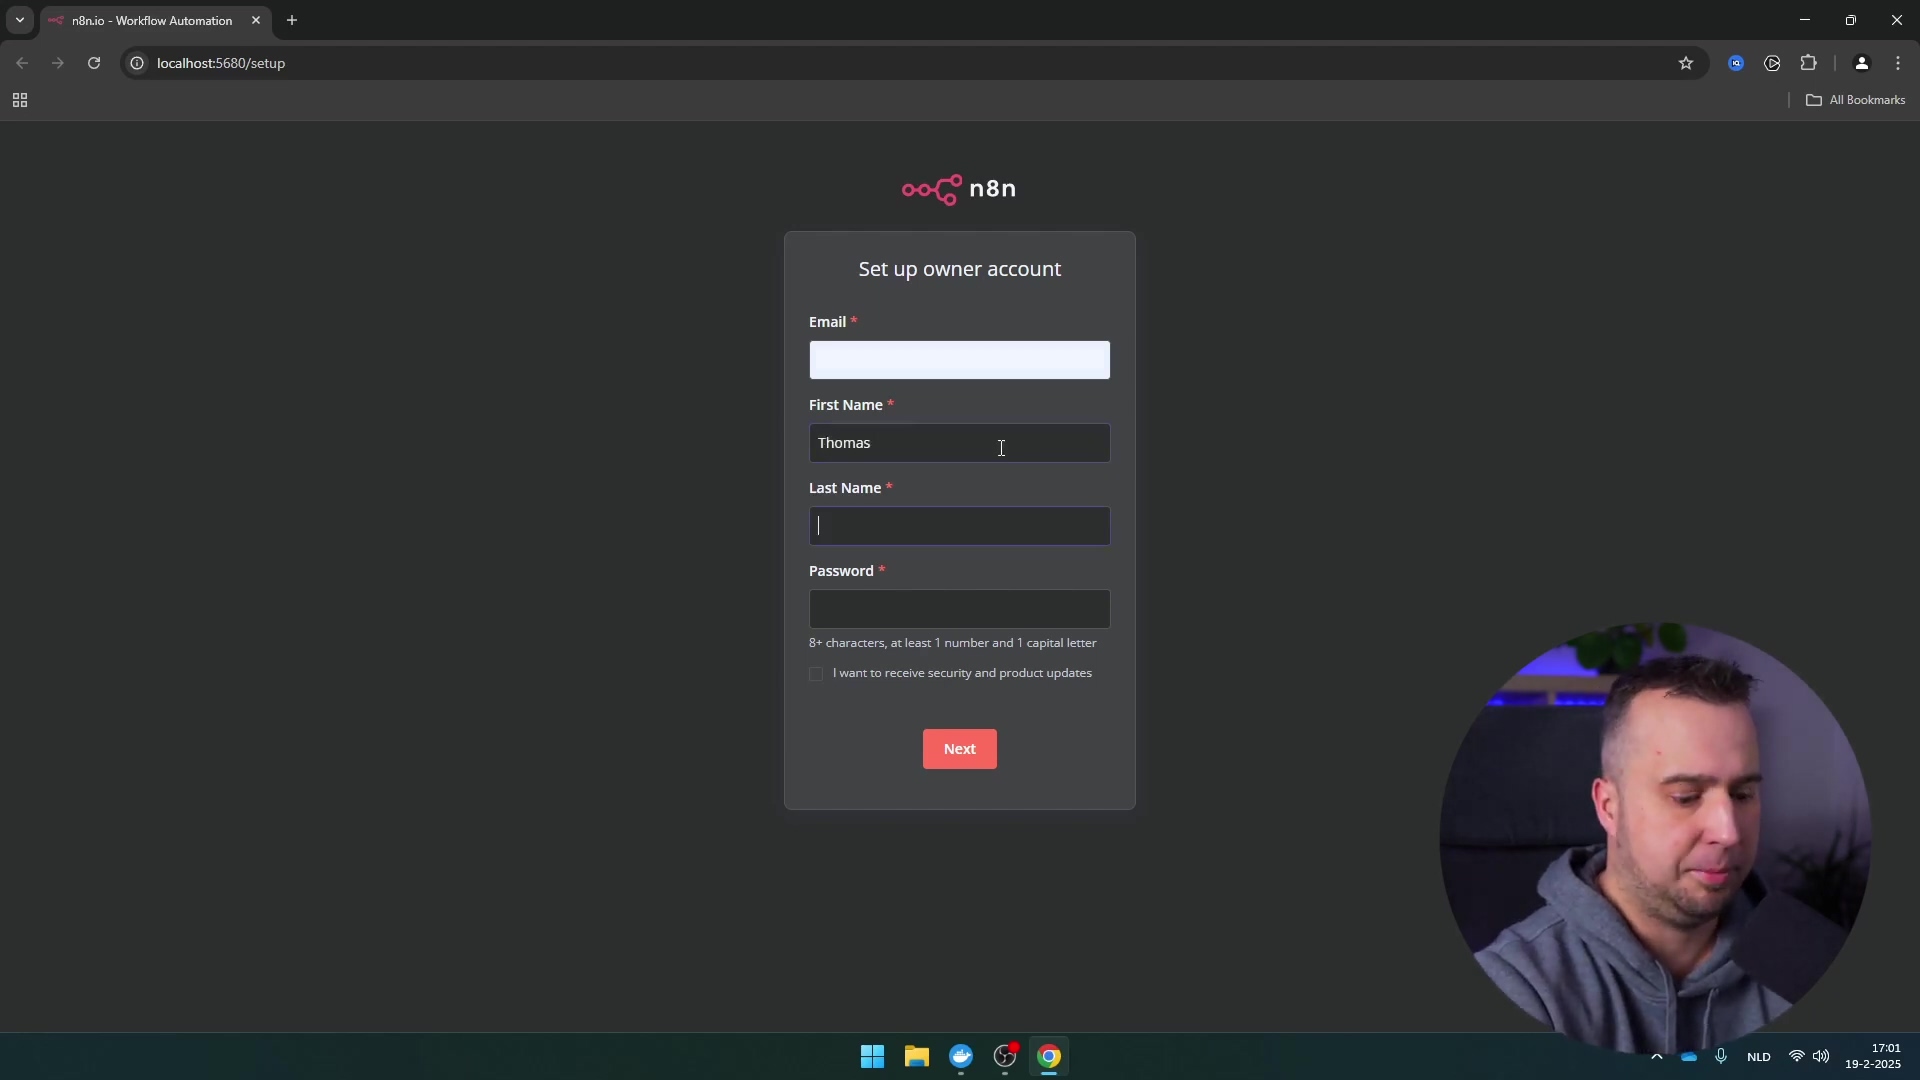
Setting Up the Trigger
The very first step in any automation workflow is setting up a “trigger.” This is what tells your automation, “Hey, time to get to work!” You can choose a manual trigger if you want to kick things off yourself, or, for a truly hands-off experience, a schedule trigger. For our fully automated viral video pipeline, a schedule trigger is perfect. It means your workflow will run at predefined intervals, like every morning at 8 AM, generating fresh content while you’re still sipping your coffee.
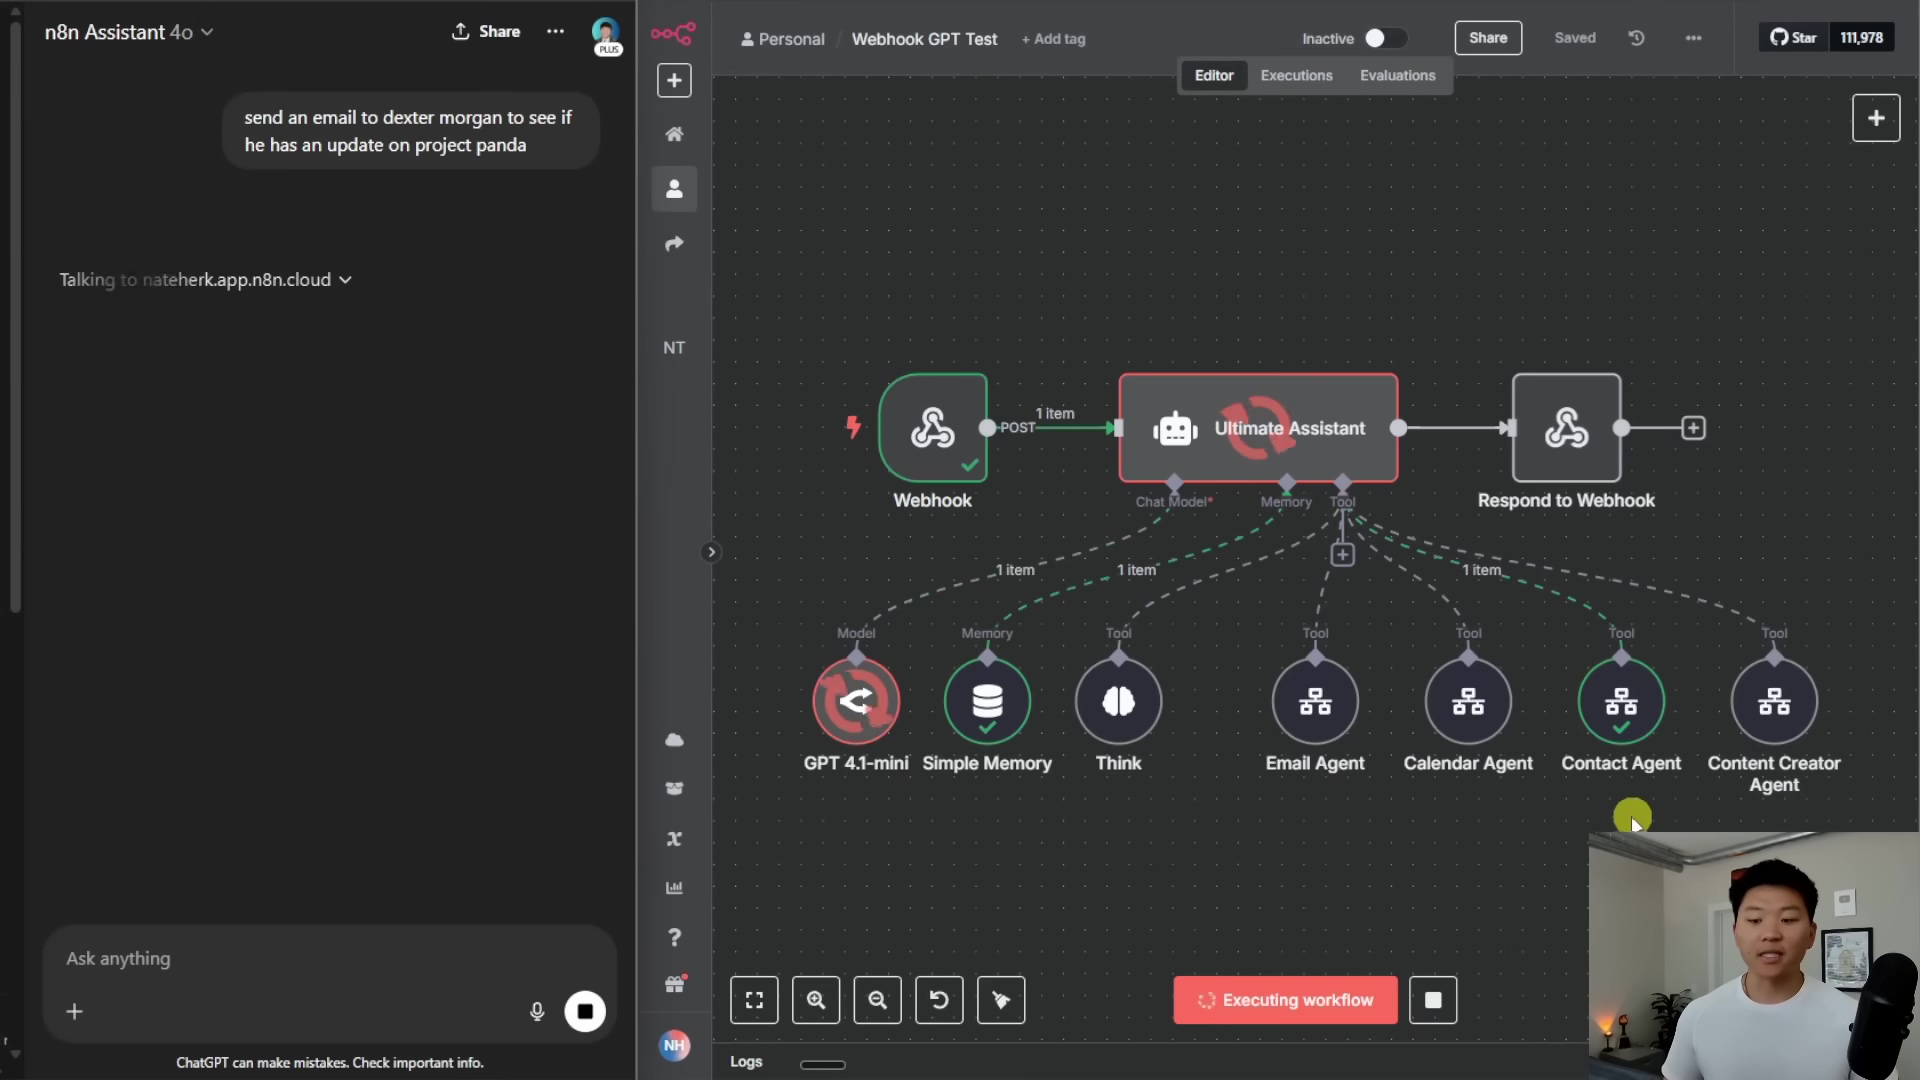
Integrating the AI Agent for Ideas
Once our trigger fires, we need an AI brain to start brainstorming. This is where our AI Agent node in n8n comes in, powered by Google Gemini. This agent is like your personal creative director, responsible for coming up with fresh, viral-worthy concepts based on whatever criteria you feed it. It’s going to be the idea factory!
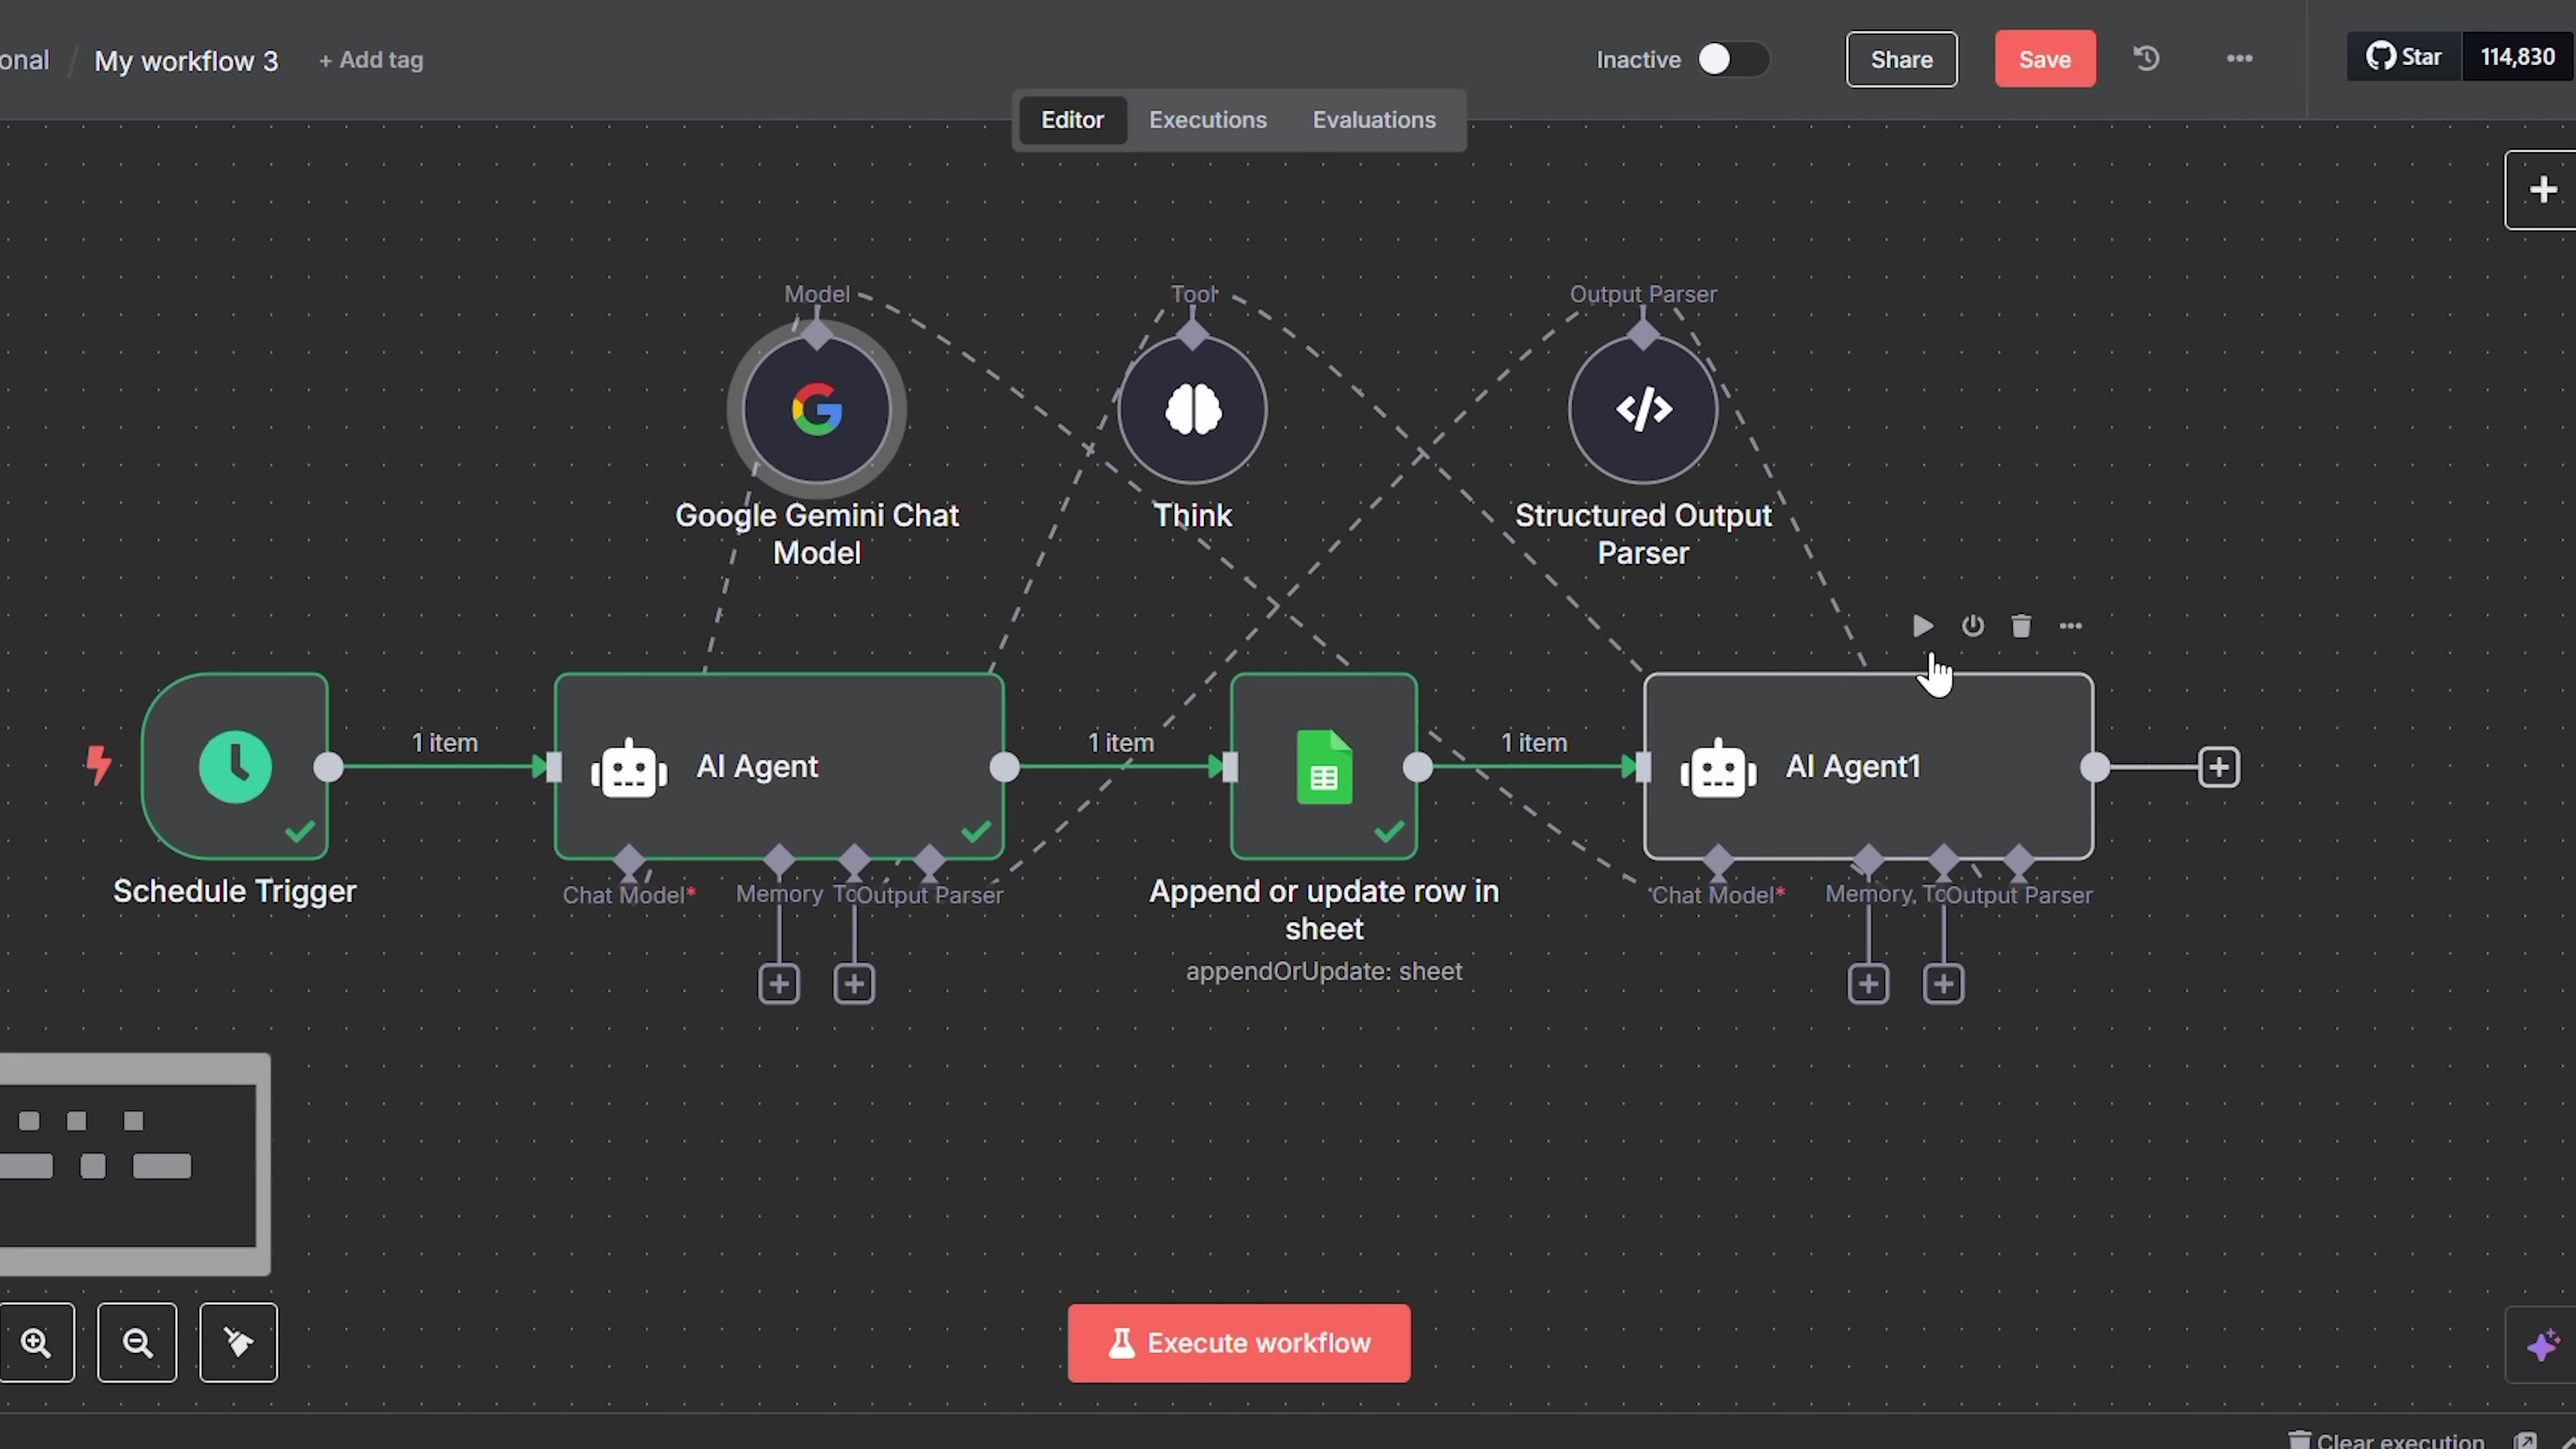
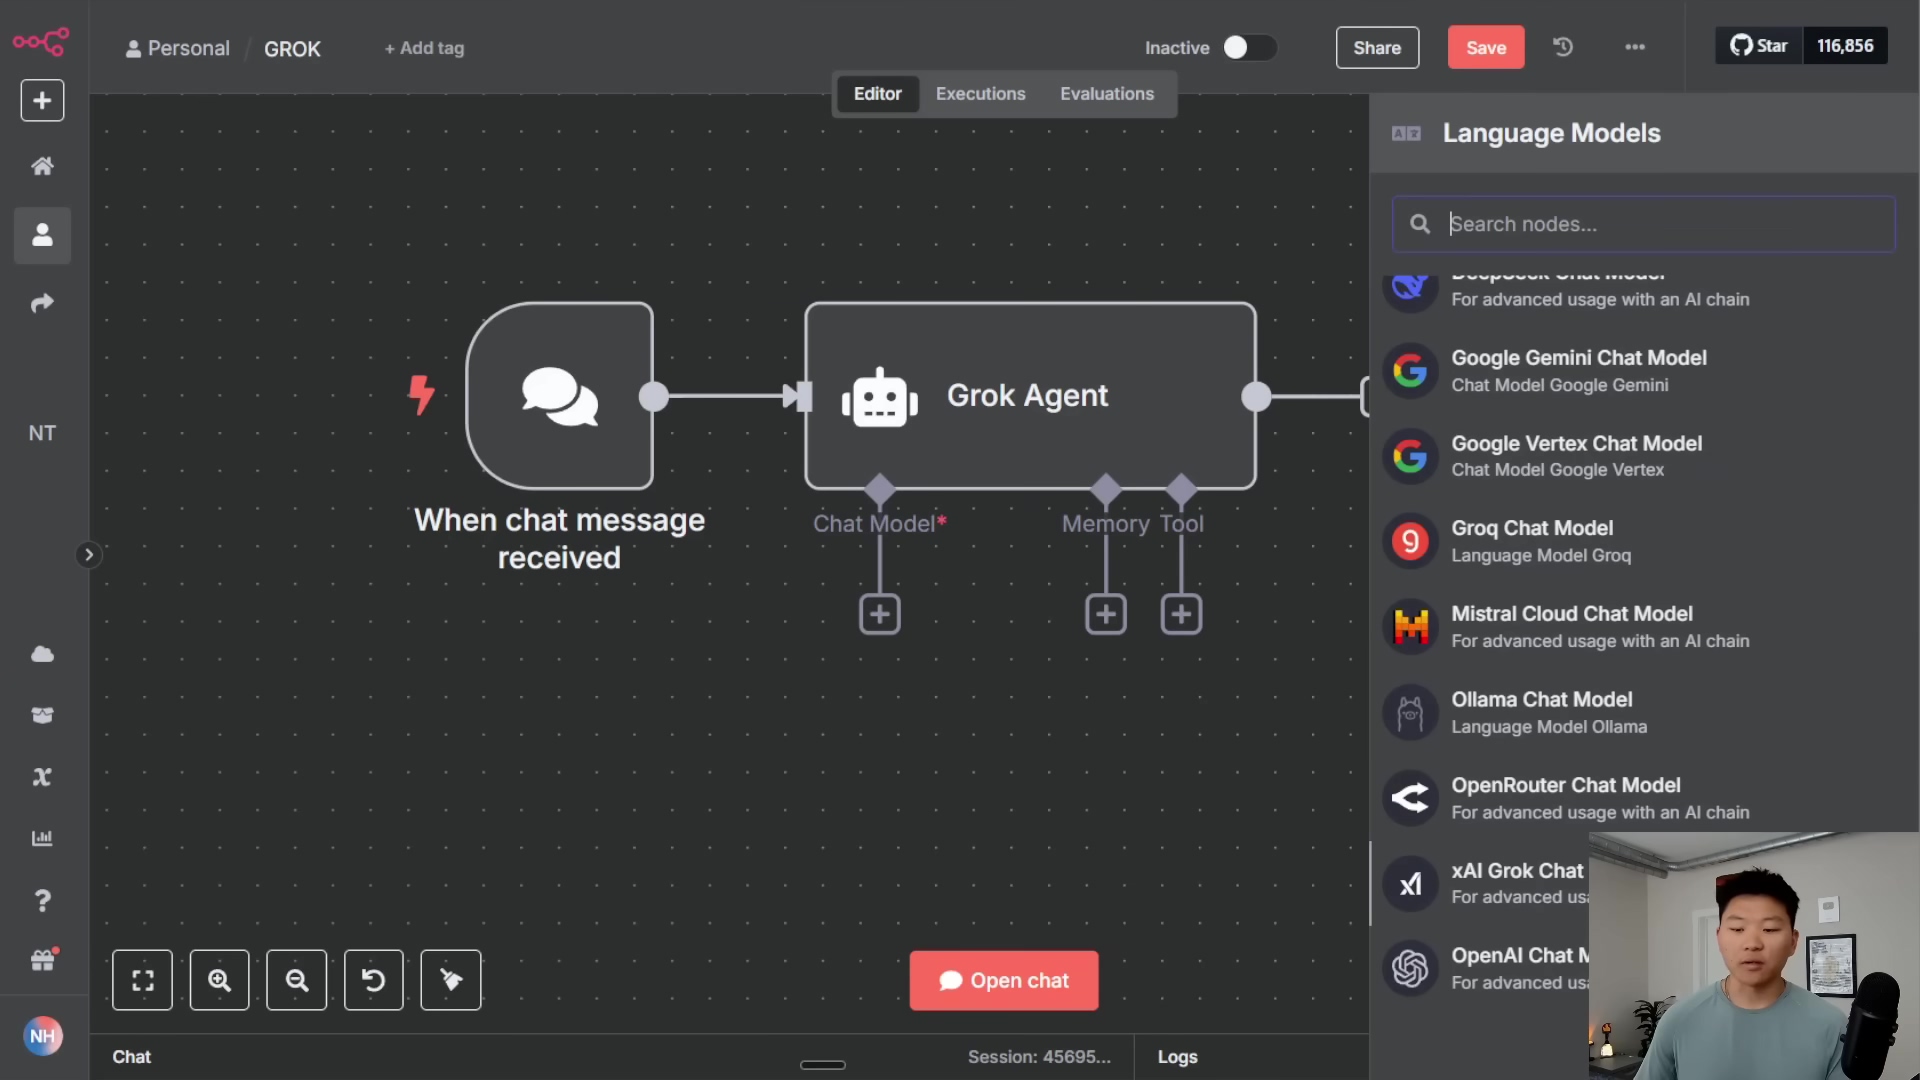
See that? This workflow shows how the ‘Schedule Trigger’ kicks things off, and then the ‘AI Agent’ node takes over. These are the backbone of our automated video generation. Pretty neat, huh?
Enhancing AI Thinking with the ‘Think’ Tool
Now, we don’t just want any old ideas; we want good ideas. To make sure our AI generates high-quality, relevant concepts, we’re going to add a special ‘Think’ tool. This node is super handy because it prompts the AI agent to internally process and refine its thoughts before spitting out an output. It’s like telling it, “Hey, take a moment, really chew on this, then give me your best.” This is especially useful for complex prompts where you need the AI to do some serious heavy lifting.
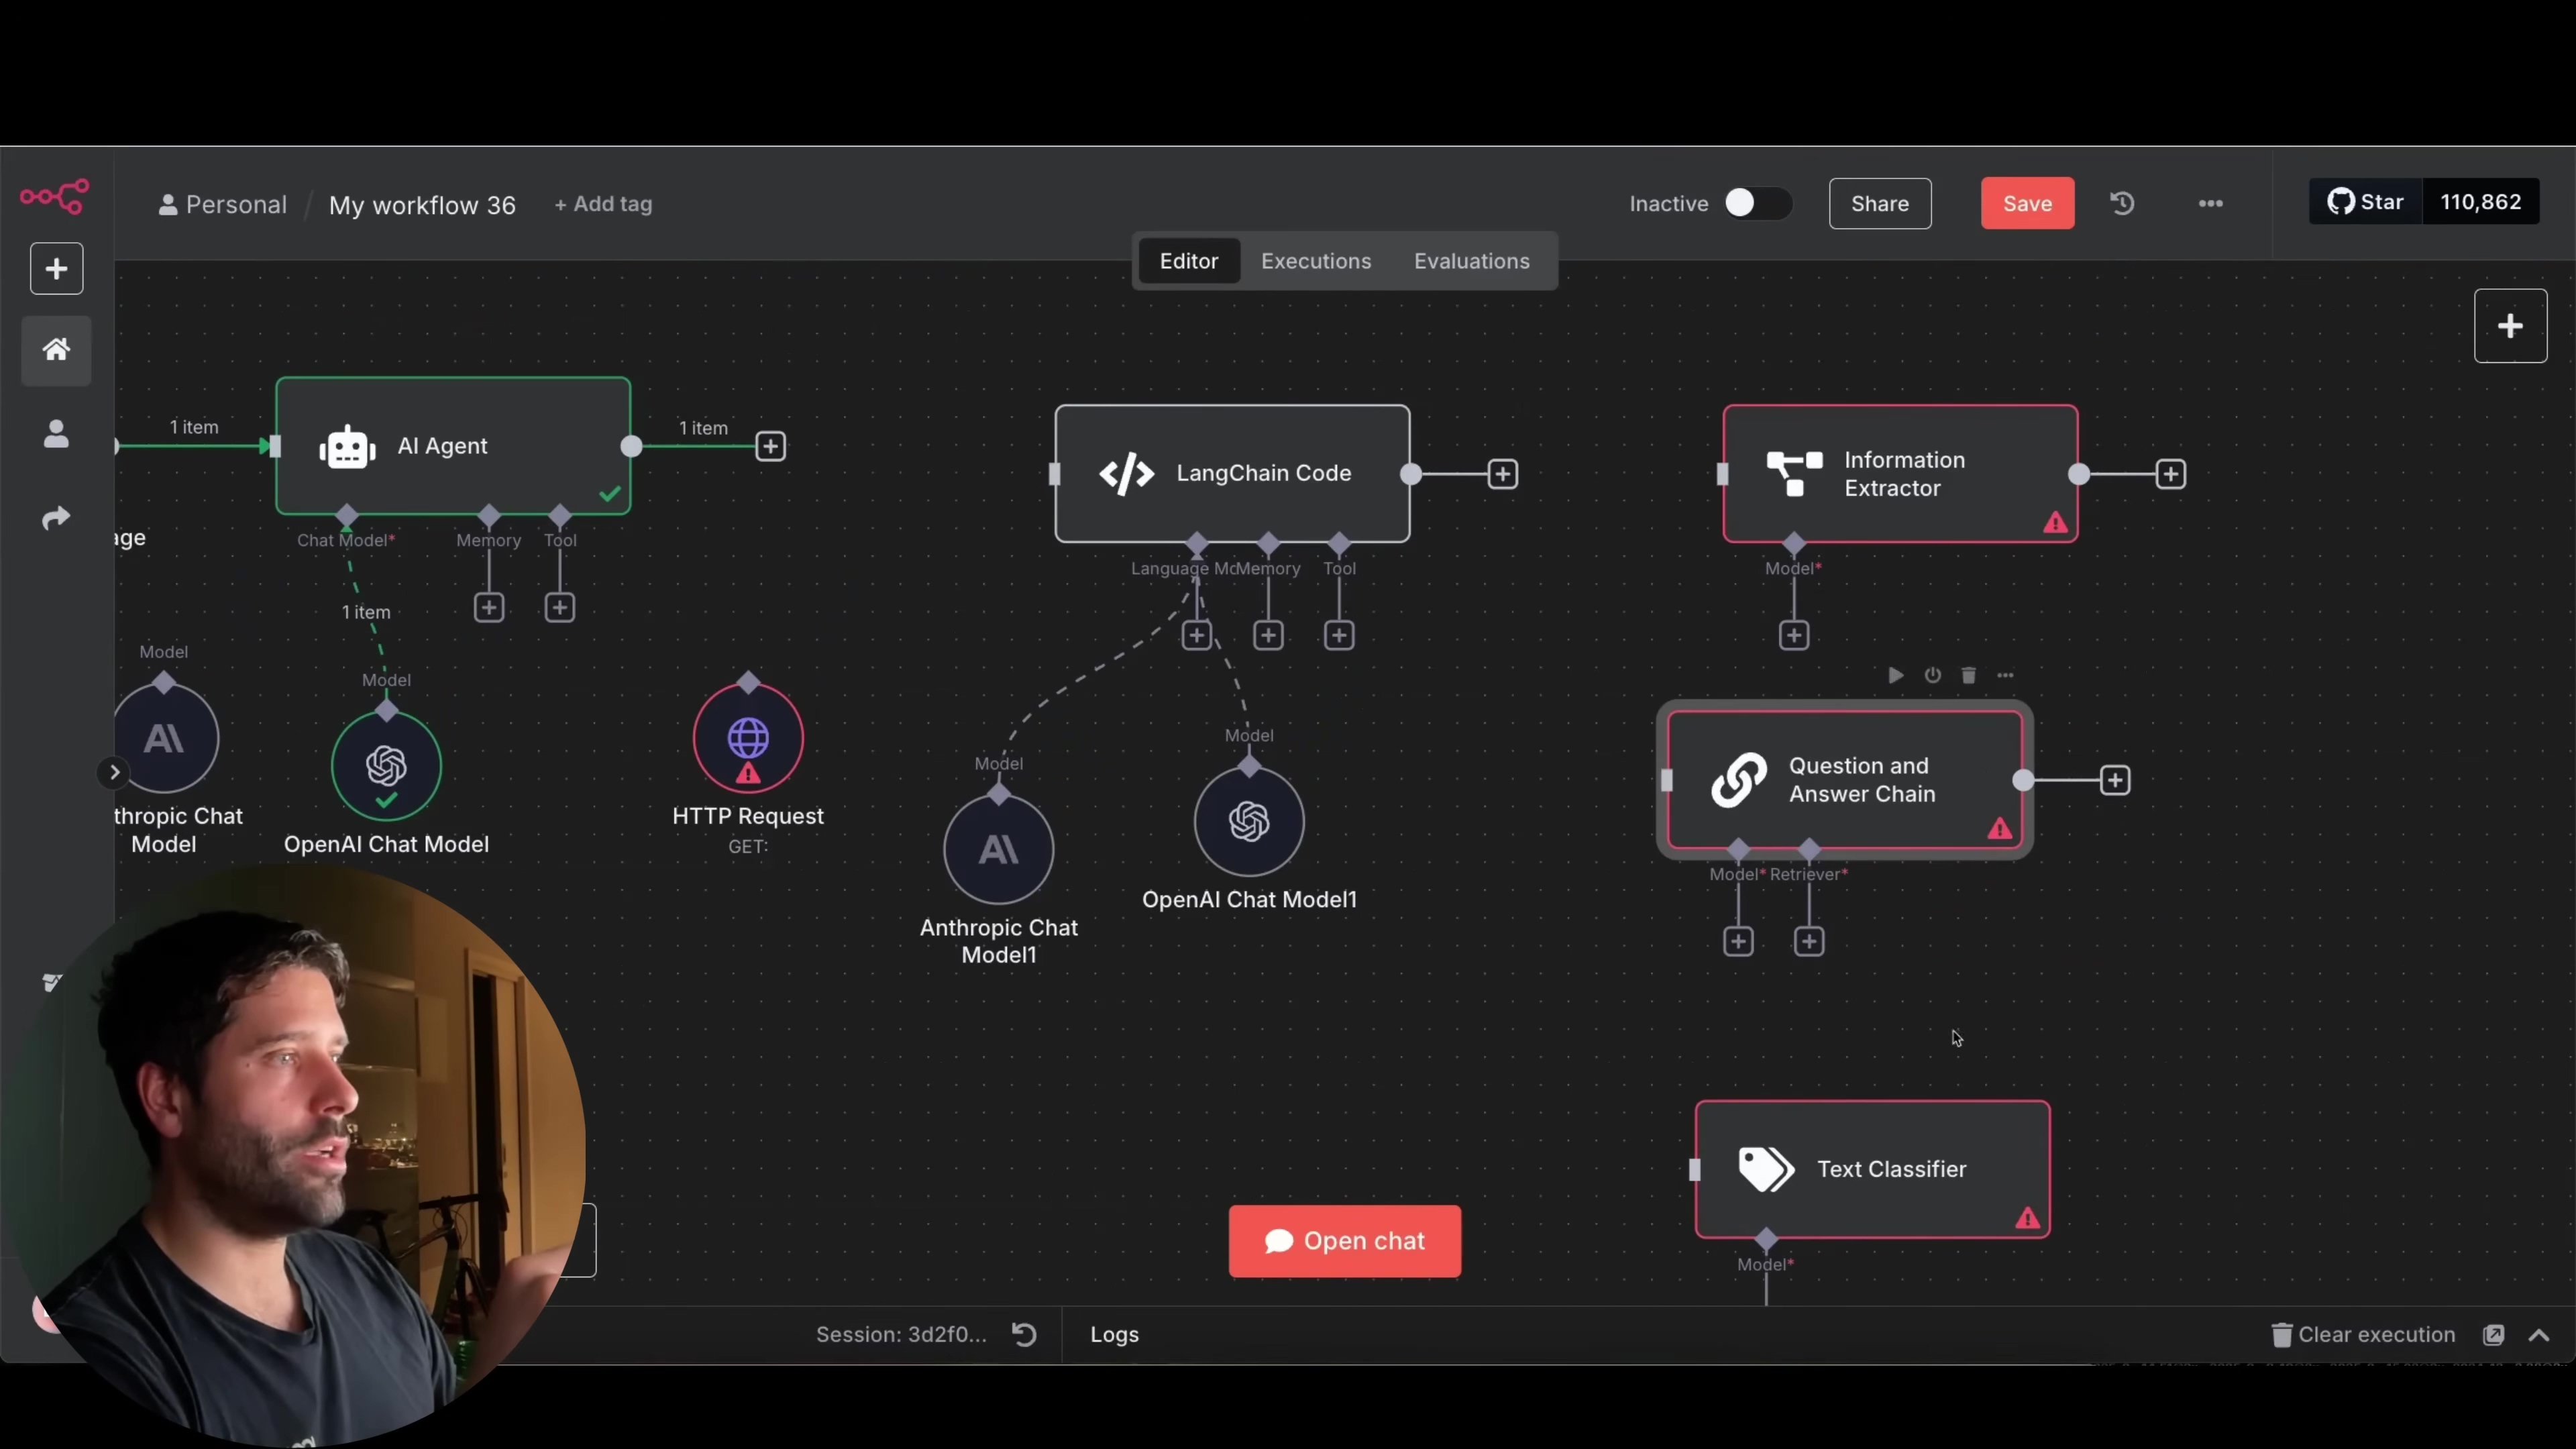
We’ll also configure the AI to output its ideas in a structured JSON format. Why JSON? Because it’s like giving us a neatly organized list instead of a jumbled mess. This makes it super easy for n8n to parse and use those ideas in the very next steps.
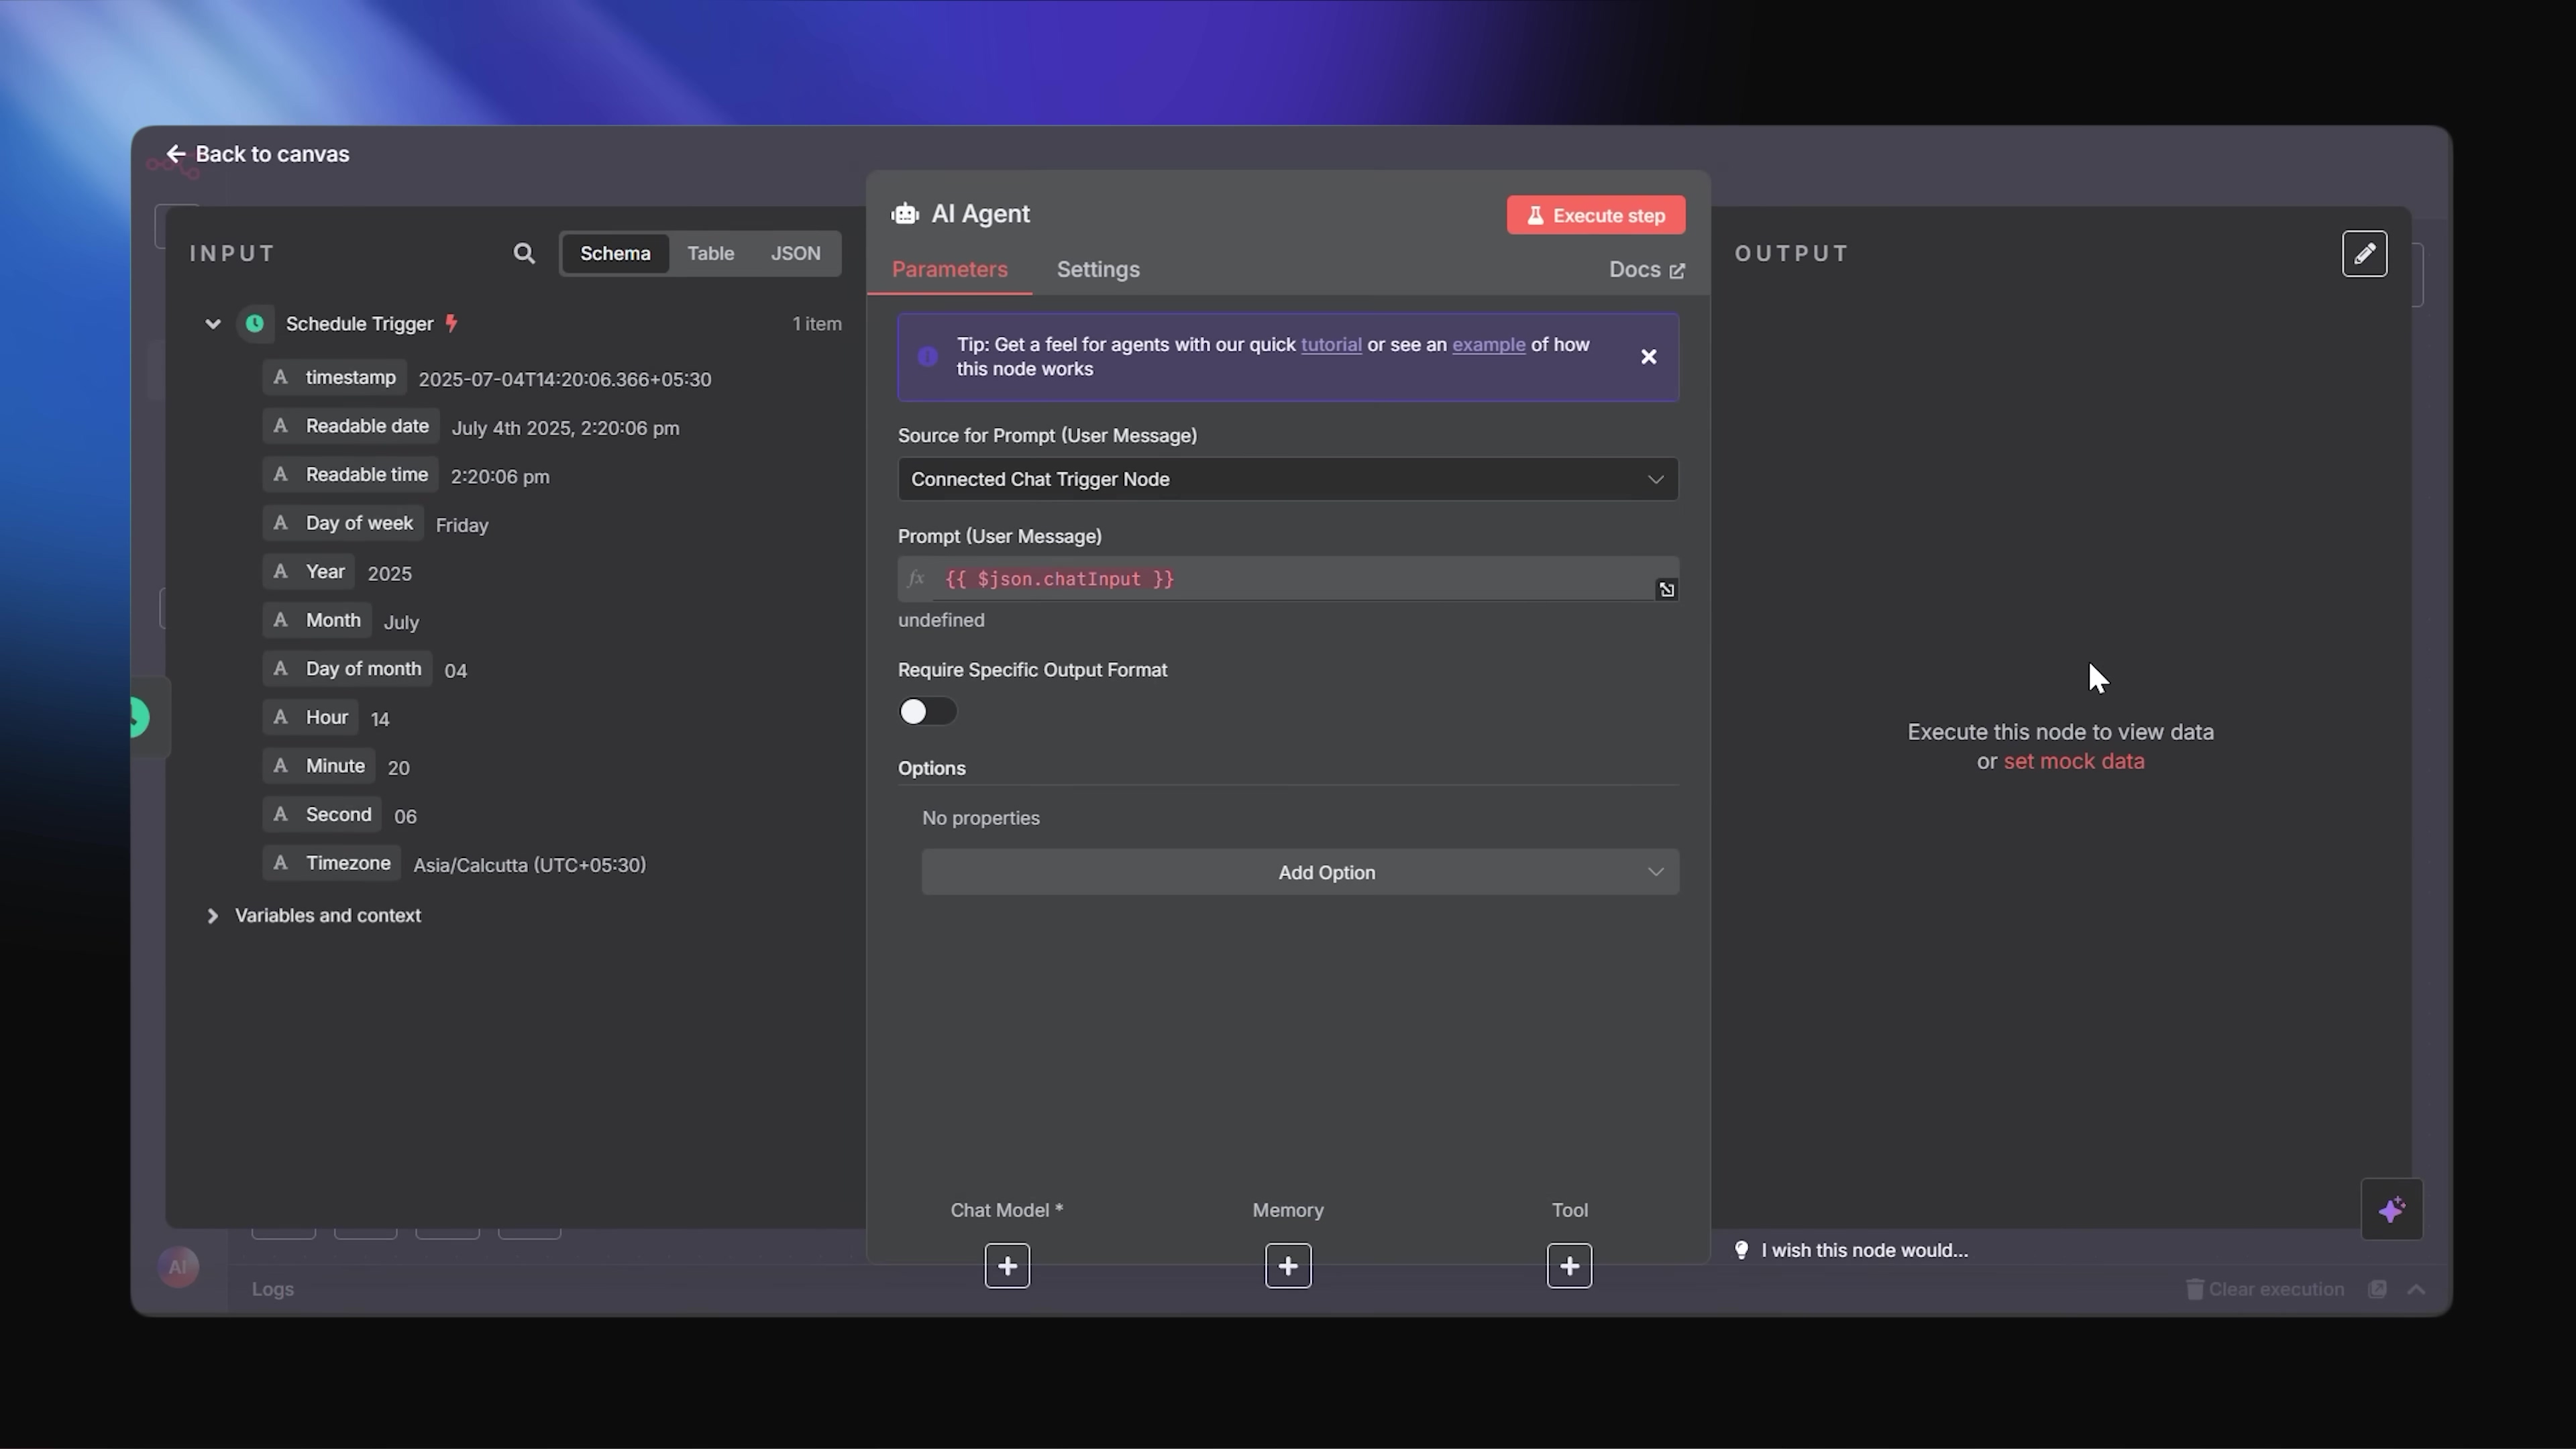
This detailed view of the ‘AI Agent’ configuration in n8n shows you exactly how we feed prompts to our AI and how it processes them. And that ‘Schedule Trigger’ you see? That’s what ensures this whole operation runs continuously, like a well-oiled machine.
Storing Ideas in Google Sheets
What good are brilliant ideas if they just disappear into the digital ether? We need to store them! So, all the ideas our AI generates will be neatly tucked away in a Google Sheet.
First, go ahead and create a new Google Sheet. You can name it something like “V3 n8n Automation” to keep things clear. Then, define your columns in the sheet. These columns should match the expected JSON output from your AI agent. For example, if your AI outputs an “idea” and a “theme,” you’d have columns for “Idea” and “Theme” in your sheet. Simple, right?
Then, the Google Sheets node in n8n will do the heavy lifting, automatically appending new rows or updating existing ones in this sheet. This creates a centralized, easy-to-access repository for all your fantastic video ideas. It’s like having a digital filing cabinet for your creative genius!

See? This image shows your Google Sheets interface, all ready to store and organize those brilliant AI-generated video ideas. It’s going to be a treasure trove!
Generating Prompts for Veo 3
Okay, we’ve got our raw ideas in Google Sheets. But Veo 3, our video-generating powerhouse, needs more than just a vague idea. It needs detailed, cinematic instructions – a script, if you will. So, we’ll bring in another AI Agent node, let’s call this one “Prompts AI Agent.”
This agent is going to be a master wordsmith. It’ll take those general ideas from your Google Sheet and transform them into specific, rich, and compelling video prompts that Veo 3 can really sink its teeth into. This step is absolutely crucial for translating a simple concept into the kind of detailed description that allows Veo 3 to create truly compelling video content. Think of it as turning a rough sketch into a detailed blueprint for a Hollywood blockbuster!
![The image displays a dark-themed user interface of an automation workflow tool, similar to the first image, focusing on an 'AI Agent' node. On the left, an 'INPUT' panel shows an 'Append or update row in sheet' node and an 'AI Agent' node, followed by a 'Schedule Trigger'. The 'AI Agent' node's configuration is central, with the 'Parameters' tab active. It includes a 'Source for Prompt (User Message)' section and a large text area for the prompt itself, containing dynamic variables like {{ $json.veo3 }} and {{ $json.environment_prompt }}. A toggle for 'Require Specific Output Format' is present. Below, an 'Options' section contains a 'System Message' with detailed instructions for an AI agent to write hyper-realistic, cinematic video prompts for Google VEO. On the right, an 'OUTPUT' panel shows 'output[0]' with a 'Caption', 'Idea', 'Environment', and 'Status' for a generated video prompt. The interface is designed for building complex AI-driven workflows.](https://imghub.did.fm/e227ee8b769412d3b1ef325dc5b1e3b5.jpg)
This n8n interface showcases our ‘Prompts AI Agent’ hard at work. You can see how it processes those initial ideas and then generates those super detailed prompts specifically for Google Veo 3. This is where the magic of turning text into stunning visuals really begins!
Phase 2: Video Generation with Google Veo 3
Now for the main event! We’ve got our detailed prompts, and it’s time to unleash the power of Google Veo 3 to bring them to life.
Accessing Google Vertex AI Studio
Google Veo 3 isn’t just floating around on the internet; it lives within Google Vertex AI Studio, which is part of the broader Google Cloud Platform. If you don’t have a Google Cloud account yet, no worries! You can create one for free, and Google will even hook you up with a generous $300 in credits for 90 days. That’s more than enough to experiment, play around, and generate a ton of videos without spending a dime. It’s like getting a free trial to a super-advanced video production studio!
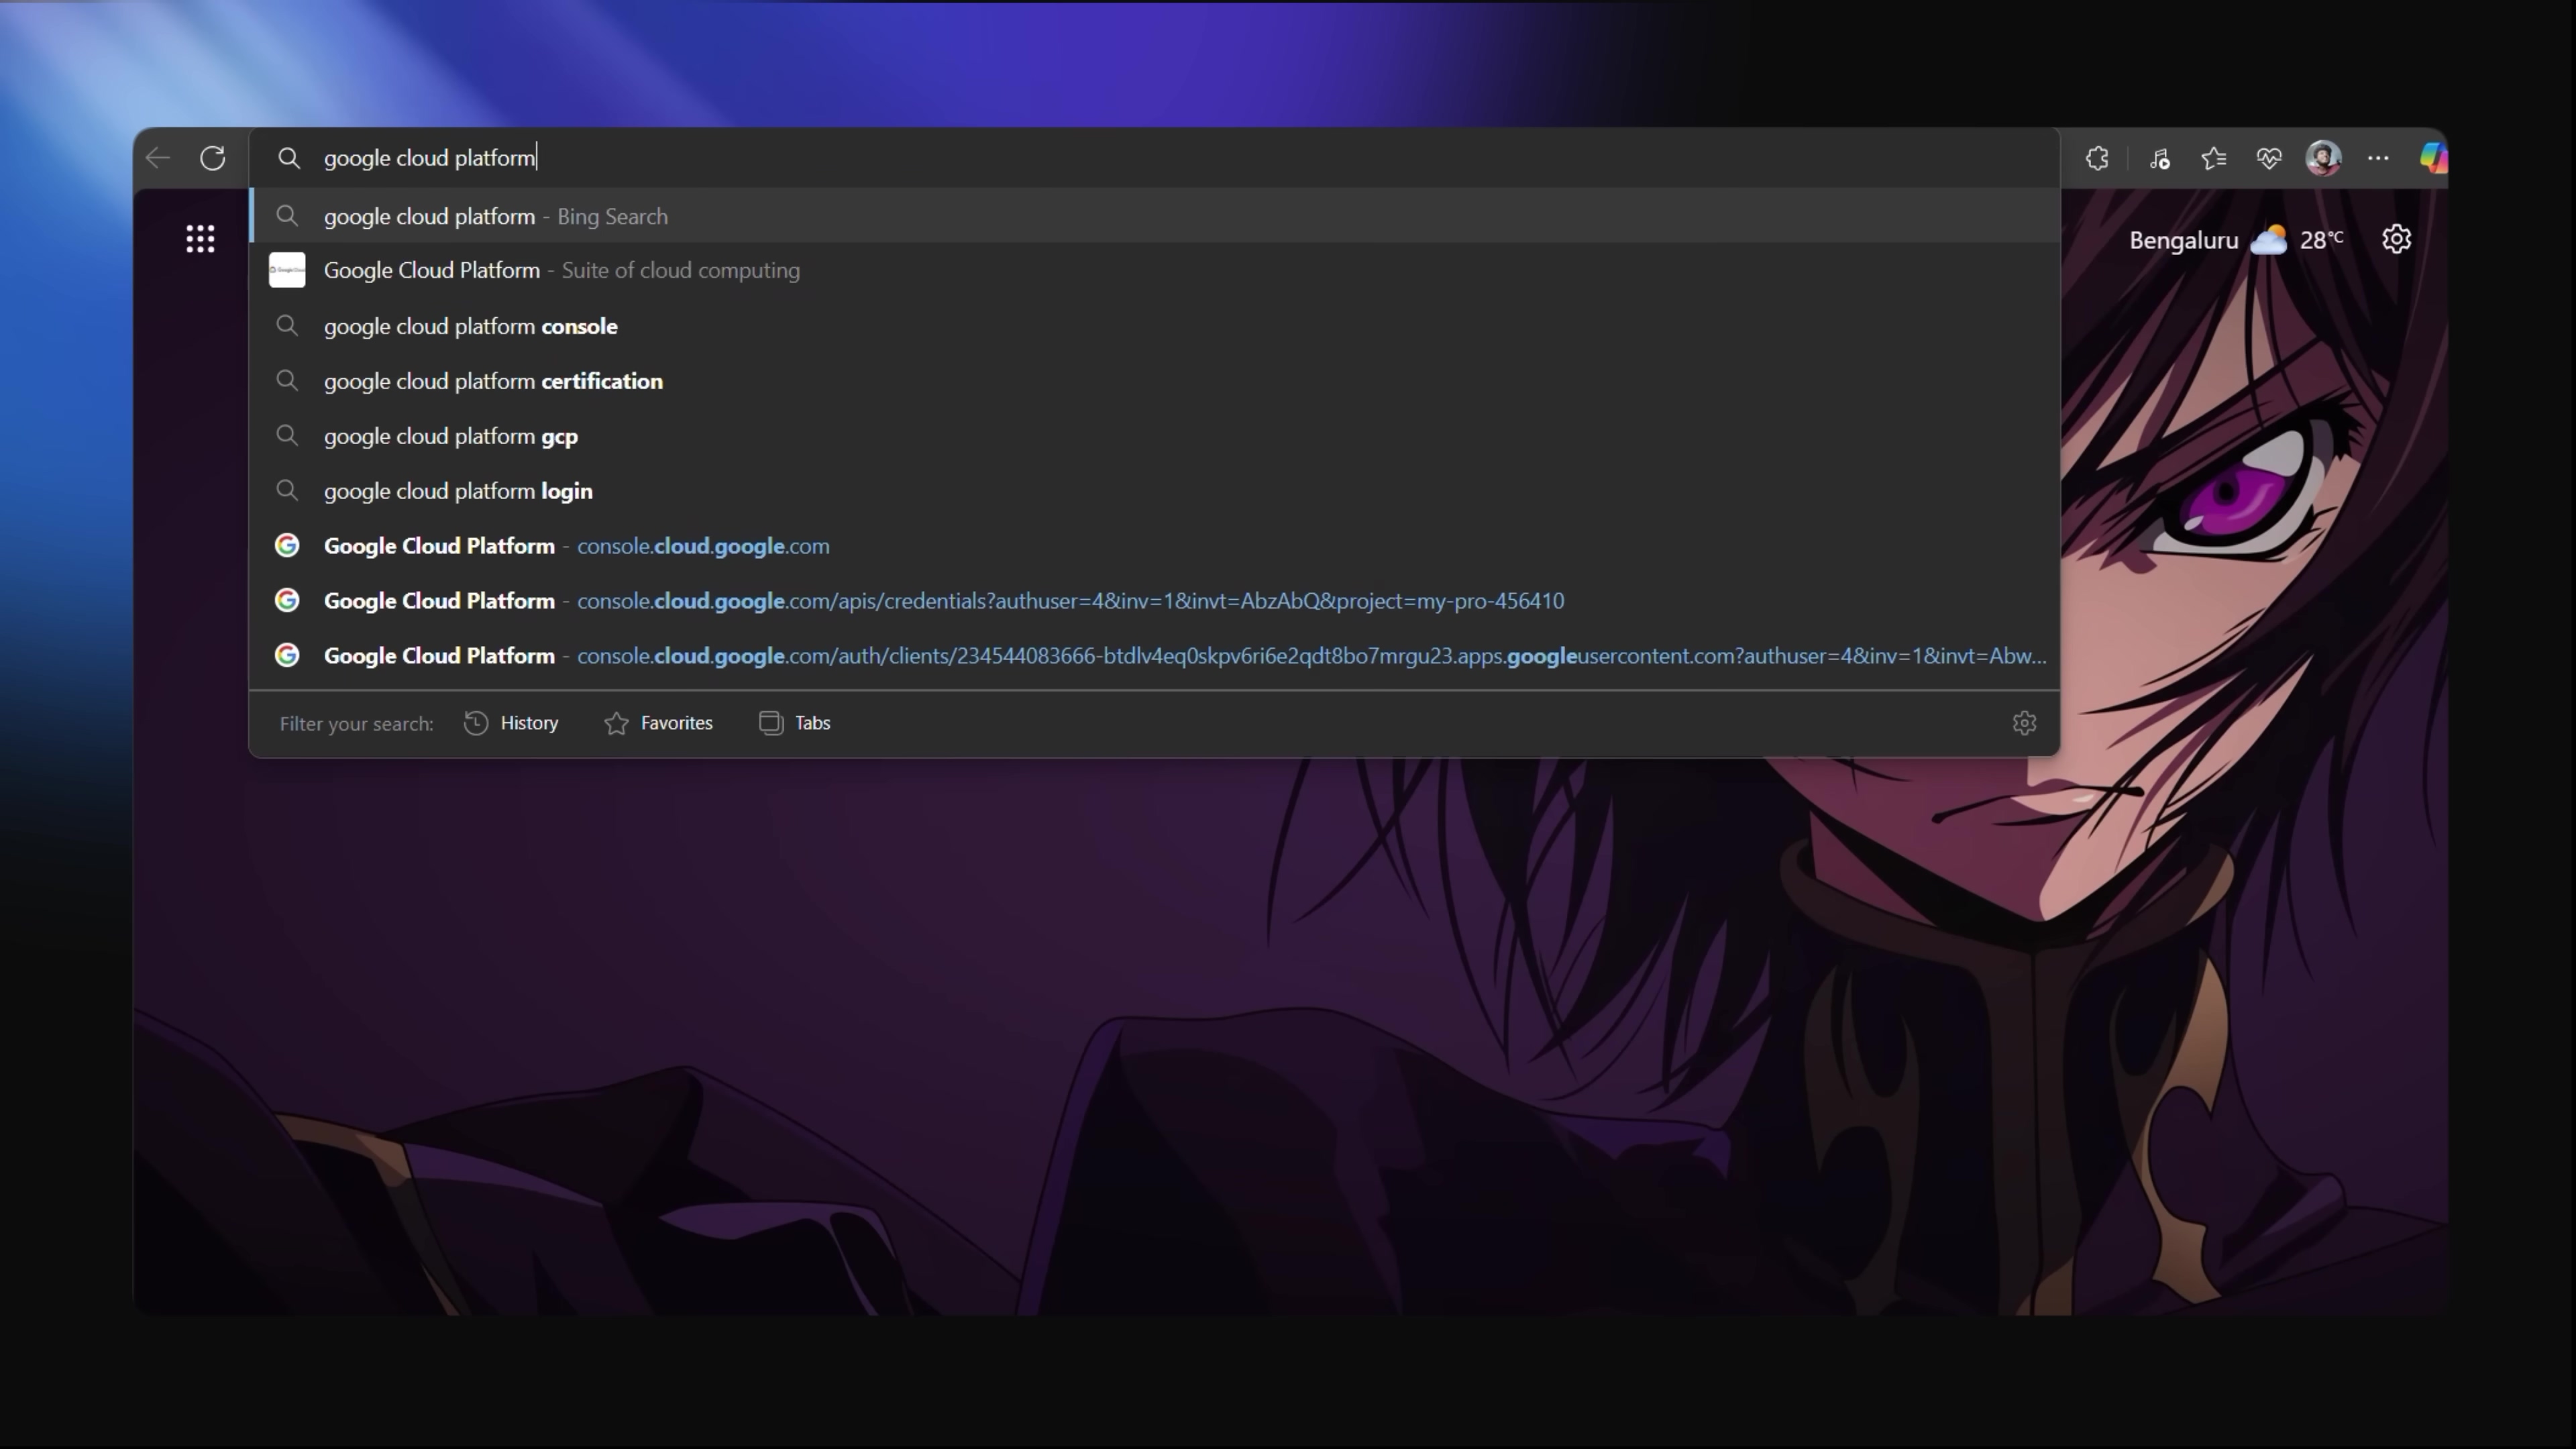
This image shows you the initial step: getting into Google Cloud Platform. It’s your gateway to using Google Veo 3 and all its video-generating glory.
Integrating Veo 3 via HTTP Request
Here’s a little technical hurdle, but nothing we can’t handle! As of now, Google Vertex AI (and thus Veo 3) doesn’t have a direct, pre-built integration node in n8n. But that’s okay! We’re self-taught automation consultants, right? We’ll create a manual integration using HTTP requests. Think of HTTP requests as sending a very specific letter to a server, asking it to do something.
To do this, you’ll need to gather a few pieces of information from your Google Cloud project:
- Your Project ID: This is a unique identifier for your Google Cloud project.
- The Location: This refers to the Google Cloud region where you’re running your services (e.g.,
us-central1). - The Model: This will be
text-to-videofor Veo 3. - The API Endpoint: This is the specific web address where Veo 3 listens for requests.
And here’s the big one: an Access Token. This is like your digital passport, proving you have permission to use Veo 3. You can get this token via Cloud Shell, which is Google Cloud’s command-line environment right in your browser. Don’t worry, it’s not as scary as it sounds! You’ll run a simple command to generate a temporary token for authentication. This token ensures only authorized requests can generate videos.
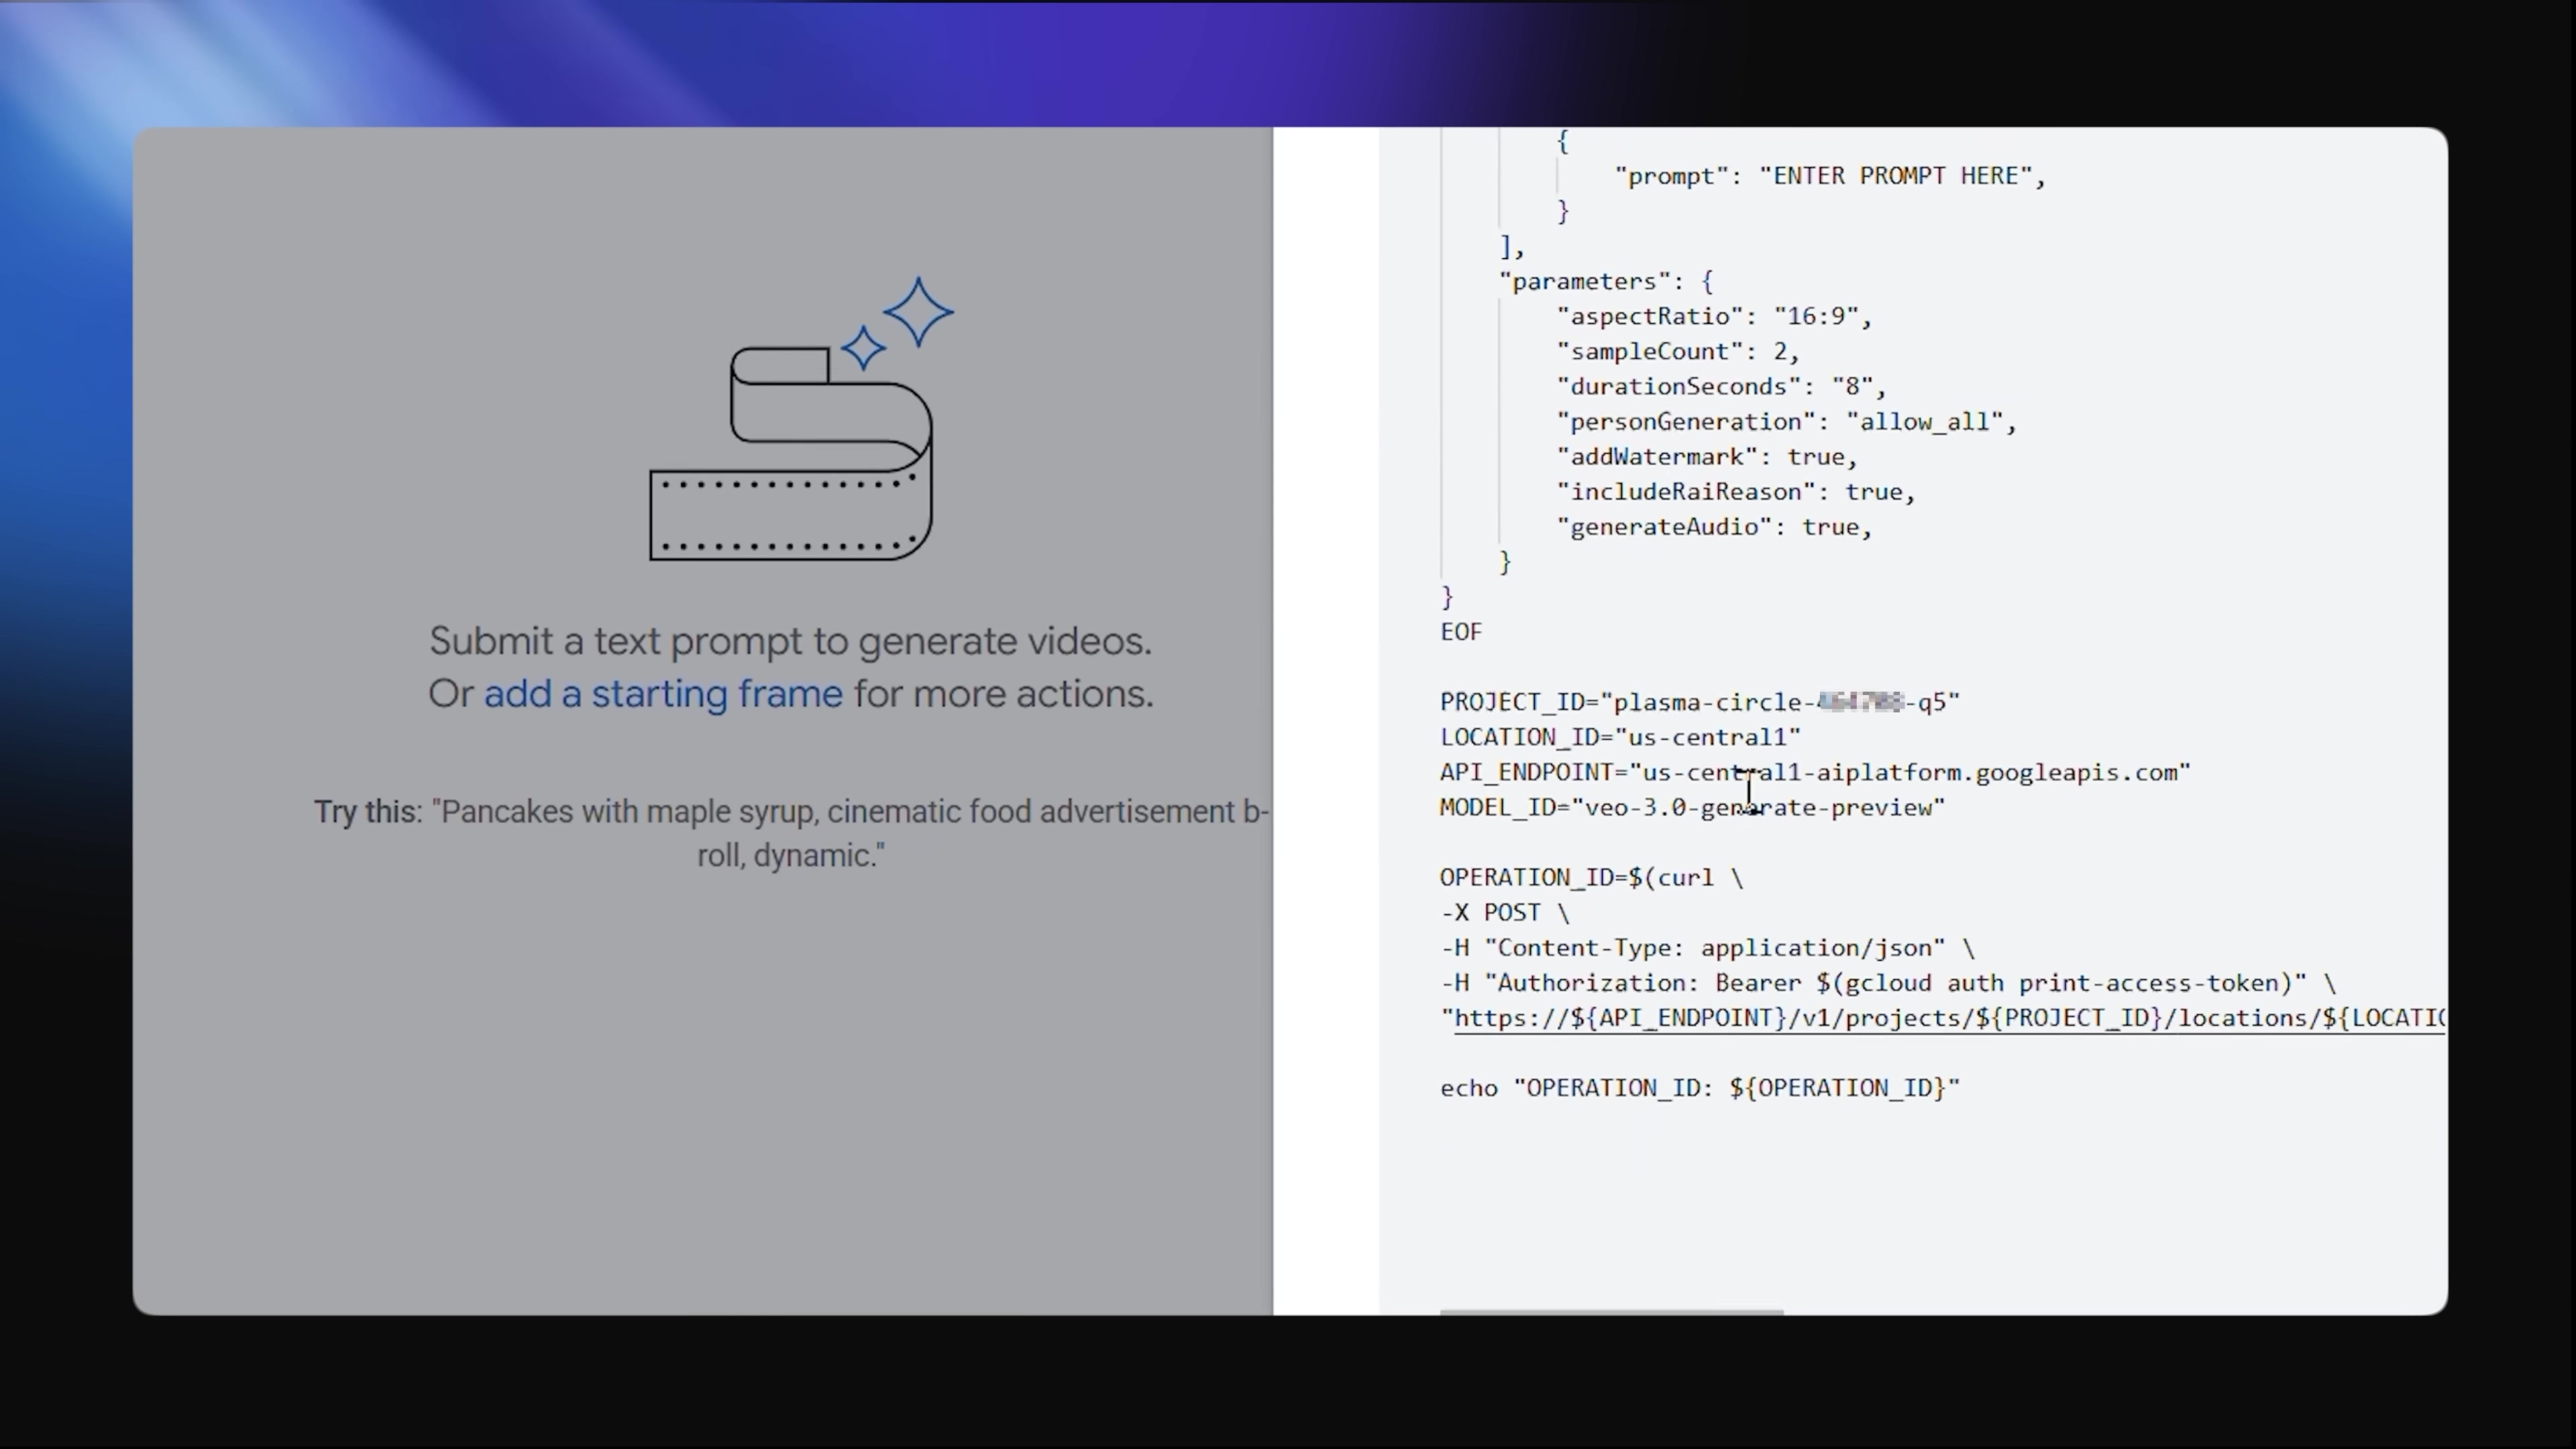
This split-screen view is super helpful! On one side, you see the user interface for text-to-video generation (where you’d type your prompt). On the other, you see the underlying API request code. This is what we’ll be mimicking in n8n to talk to Veo 3 programmatically. It’s like seeing both the car’s dashboard and its engine!
Fetching and Decoding the Video
Once we send our prompt to Veo 3, it’s not instant. Generating a video takes a little time (usually under 60 seconds, which is pretty fast for AI!). So, we’ll add a ‘Wait’ node in n8n. This node tells our workflow, “Hold on a sec, let Veo 3 do its thing.” It’s like waiting for your pizza to cook.
Once Veo 3 is done, it sends back the video. But here’s the catch: it’s not a ready-to-play MP4 file yet. It’s in a base64 encoded format. Think of base64 as a way to represent binary data (like a video file) as plain text. It’s like sending a secret message in code.
No problem for n8n! We’ll use another HTTP request node to fetch this encoded video. Then, n8n has built-in functions that can easily decode this base64 string back into a proper MP4 file. Voila! Your video is now ready for storage and sharing. It’s like receiving a coded message and then having a secret decoder ring to turn it into a readable document.
Phase 3: Storing and Logging Results
We’ve generated a video! Now, what? We need to save it and keep track of everything. This is where we close the loop on our automation pipeline.
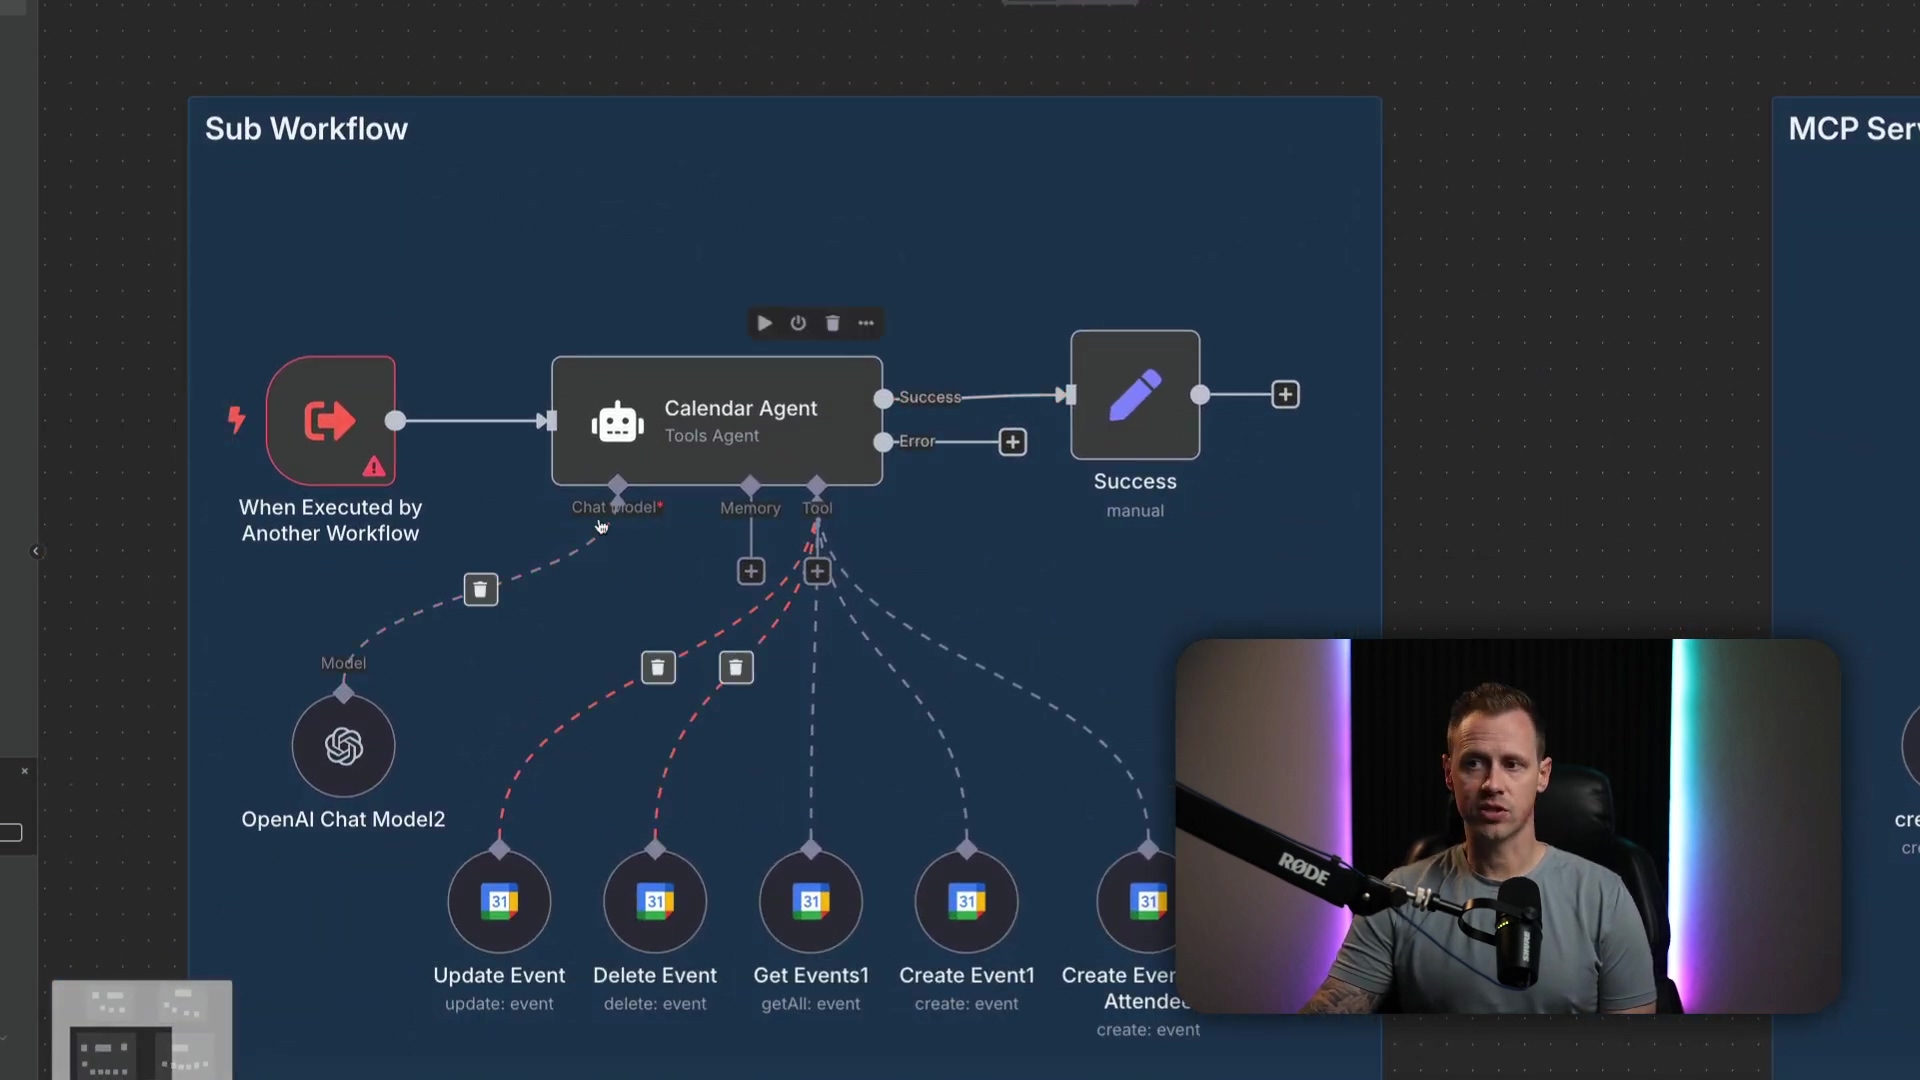
Uploading to Google Drive
To complete our pipeline, we’ll add a Google Drive node in n8n. This node is super straightforward: it takes our newly decoded MP4 file and uploads it directly to your Google Drive account. You can even name the file based on the original idea or prompt, which makes organizing and finding your videos a breeze. It’s like having an automated assistant who saves your work in the right folder every time.

This image shows the n8n interface for configuring the Google Drive upload. See how we prepare that generated MP4 file for storage? It’s all about getting your digital assets organized!
Updating the Google Sheet with Shareable Links
Finally, to make sure everything is perfectly logged and easily accessible, we’ll update our original Google Sheet. Remember that sheet where we stored our ideas? Now, we’ll add the shareable Google Drive link to the corresponding row for each generated video. This means all the information – the initial idea, the detailed prompt, and the final video link – is centrally logged and just a click away. This completes your fully automated, AI-powered video generation pipeline. You’ve built a content creation powerhouse!
Key Takeaways
So, what have we learned from this epic journey into automated video creation? A whole lot, I hope!
- Free and Powerful: We just built a robust AI video automation pipeline using Google Cloud’s free credits and n8n’s open-source nature. No upfront costs, just pure automation power!
- Full Automation: We literally automated the entire process, from brainstorming ideas and crafting prompts to rendering the video and storing it. Talk about hands-free!
- Scalable Content Creation: This setup means you can rapidly produce a high volume of unique video content. Perfect for those “faceless” YouTube channels or if you just need a continuous stream of fresh content.
- Customization: You’re in full control! You can tweak your creative prompts and workflow logic to get highly customized video outputs. It’s your vision, brought to life by AI.
- Easy Deployment: The best part? You can get this entire workflow up and running in less than 10 minutes using provided JSON files. It dramatically simplifies deployment, so you’re not starting from scratch.
Conclusion
Through the clever integration of Google Veo 3 and n8n, we’ve not only demonstrated a powerful, free, and automated solution for generating cinematic AI videos but also built something truly special. This pipeline doesn’t just streamline content creation; it ensures a high degree of fidelity from that initial spark of an idea all the way to the final polished product. And having a centralized log for everything? That’s just icing on the cake for easy management.
Looking ahead, this methodology isn’t just for viral videos. Think about it! You could adapt this for automated marketing campaigns, creating personalized educational content, or even dynamic news summaries. While traditional video production demands significant resources (and often a small army of people), this automated approach offers an unparalleled advantage in speed and cost-efficiency. It’s like having a superpower for content creation!
Now, armed with this knowledge, I dare you to experiment! Share your wildest video channel ideas in the comments below – make them weird, make them original, just don’t make them boring! Let’s see what amazing things you can build!
Frequently Asked Questions (FAQ)
Q: What is Google Veo 3 and why is it important for this automation?
A: Google Veo 3 is Google’s advanced text-to-video generative AI model, accessible through Google Vertex AI Studio. It’s crucial because it’s the engine that actually creates the high-quality, cinematic videos from our text prompts. Its ability to generate compelling visuals from detailed descriptions is what makes this entire automation pipeline possible and powerful.
Q: Can I really do this for free, or are there hidden costs?
A: You absolutely can get started for free! Google Cloud offers a generous $300 credit for 90 days for new accounts, which is more than enough to experiment and generate many videos. n8n is open-source and free to use if you self-host it. Google Sheets and Google Drive are also free with a Google account. The main thing to watch out for is your Google Cloud credits expiring; make sure to monitor your usage to avoid unexpected charges after the free trial.
Q: What if I’m not familiar with n8n or Google Cloud? Is this guide still for me?
A: Yes, this guide is designed for beginners! While it helps to have a basic understanding of how web services work, I’ve tried to break down every step and explain the “why” behind each action. We’re building this together, step-by-step. The learning curve for n8n is quite friendly, and Google Cloud’s free tier allows you to explore without commitment. You’ve got this!
Q: How can I make my AI-generated videos more unique and less generic?
A: The key here is “prompt engineering.” Don’t just give simple prompts. Experiment with detailed, descriptive, and even poetic language. Think about the mood, lighting, camera angles, and specific actions you want to see. Also, consider using “negative prompts” to tell the AI what not to include. The more specific and creative your prompts, the more unique and tailored your video output will be.
Q: What are the limitations of using Veo 3 and n8n for video generation?
A: While powerful, there are some limitations. Veo 3 is still evolving, so complex narratives or very precise character actions might require multiple generations or careful prompt refinement. Also, the video length is typically limited (often under 60 seconds per generation). For n8n, while incredibly flexible, setting up custom HTTP requests requires a bit more technical understanding than using pre-built integrations. However, the benefits of cost-effectiveness and customization often outweigh these limitations for many use cases.