Watch the Video Tutorial
💡 Pro Tip: After watching the video, continue reading below for detailed step-by-step instructions, code examples, and additional tips that will help you implement this successfully.
Table of Contents
Open Table of Contents
- Why Use n8n Cloud for WhatsApp Chatbots?
- Step-by-Step: How to Build a WhatsApp Chatbot with n8n
- 1. Setting Up Your n8n Workflow to Receive WhatsApp Messages
- 2. Getting WhatsApp Business Cloud Credentials from Meta
- 3. Integrating an AI Agent with OpenAI for Intelligent Responses
- 4. Configuring Memory for Conversational Context
- 5. Setting Up WhatsApp to Send Messages
- 6. Ensuring Valid Message Input with an ‘If’ Node
- 7. Testing Your WhatsApp Chatbot
- Conclusion
- Frequently Asked Questions (FAQ)
- Q: What if I don’t have a Facebook Business Manager account?
- Q: I’m getting an error message when trying to connect to OpenAI. What should I do?
- Q: My chatbot isn’t responding to messages. What could be the problem?
- Q: Can I use a different AI model instead of OpenAI?
- Q: How can I improve the chatbot’s responses?
- Q: Is there a cost associated with using n8n Cloud, WhatsApp Business Cloud, and OpenAI?
Why Use n8n Cloud for WhatsApp Chatbots?
When creating chat applications like a WhatsApp chatbot, using an n8n cloud account is highly recommended. A cloud setup simplifies the process by handling SSL configuration and security protocols automatically. Think of SSL as a digital bodyguard for your data, ensuring it travels safely across the internet. Cloud accounts also offer better API performance and stability, which are crucial for real-time chat integrations. This prevents common issues that can occur with local setups. Basically, n8n cloud takes care of the techy stuff so you can focus on building your awesome chatbot. Plus, it’s like having a super-reliable engine under the hood!
Step-by-Step: How to Build a WhatsApp Chatbot with n8n
Alright, let’s dive into the fun part – building our WhatsApp chatbot! We’ll take it one step at a time, so don’t worry if it seems a bit daunting at first. I promise, you’ll be amazed at what you can achieve.
1. Setting Up Your n8n Workflow to Receive WhatsApp Messages
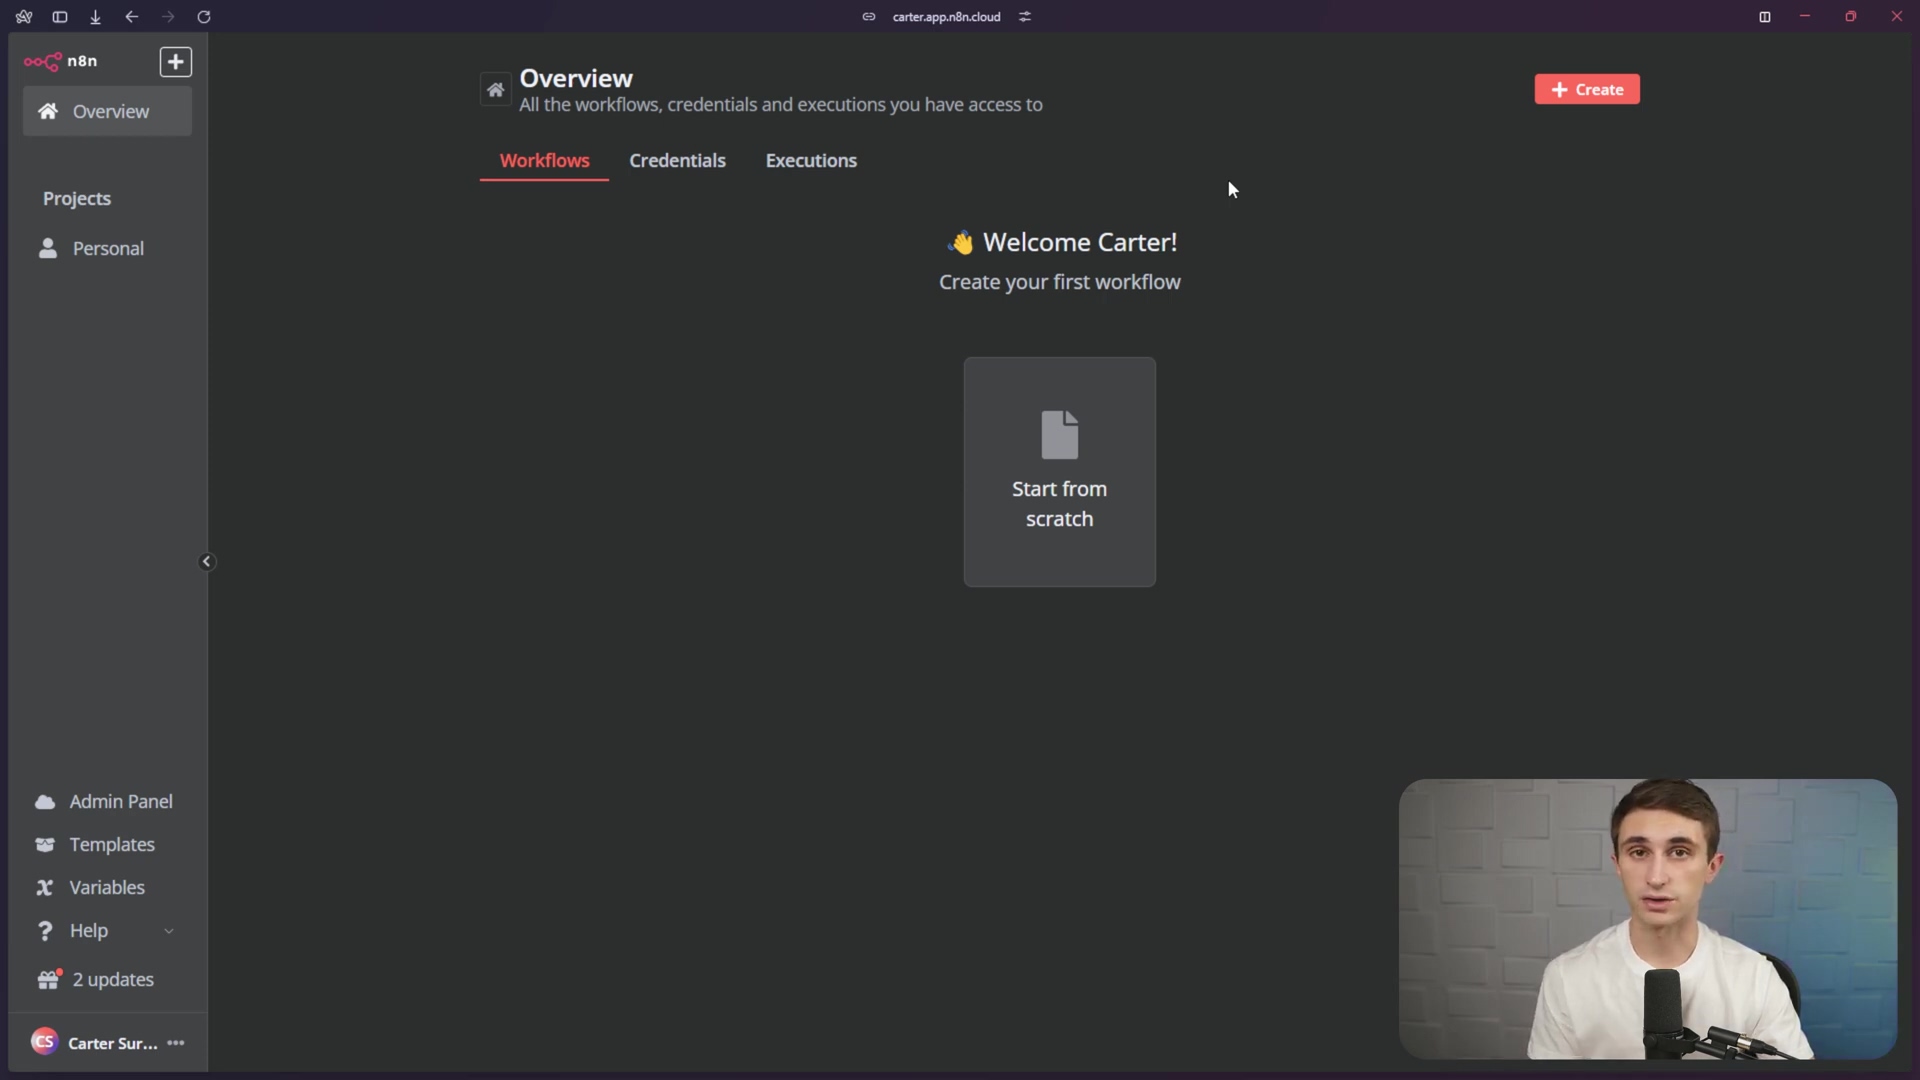
First, create a new workflow in your n8n cloud account. The initial step is to set up a trigger that listens for incoming WhatsApp messages. This will be the starting point for all conversations with your chatbot. Think of this trigger as the ‘ears’ of your chatbot, always listening for new messages.
- Add First Step: Click ‘Start from scratch’ and search for ‘WhatsApp Business Cloud’.
- Select Trigger: Choose ‘On messages’ under the ‘Triggers’ section. This node will activate each time a message is received via WhatsApp. It’s like setting up a sensor that detects when a new message arrives.
- Name the Node: Rename the node to ‘Chat Received’ for clarity. Trust me, clear naming conventions will save you headaches later on!
- Create New Credential: You’ll need to link your Facebook Business Manager account, as WhatsApp is part of Meta. This involves obtaining a Client ID and Client Secret from your Meta App Dashboard. This is how n8n proves it has permission to access your WhatsApp account. Think of it as showing your ID to get into a club.
2. Getting WhatsApp Business Cloud Credentials from Meta
To connect n8n to WhatsApp Business Cloud, you need to set up an app within your Meta Business Manager. This process provides the necessary Client ID and Client Secret. It might sound complicated, but I’ll walk you through it. These credentials are like the keys to your WhatsApp Business Cloud account.
- Access Business Facebook: Go to
business.facebook.comand log in with your Facebook account. Make sure you’re logging in with the account associated with your business. - Create Business Portfolio (if needed): If you don’t have one, navigate to
business.facebook.com/settingsand create a new business portfolio. A business portfolio is like a container for all your business assets on Facebook. - Create a New App: In your selected business portfolio, go to ‘Apps’ under the ‘Accounts’ section. Click ‘Add’ and then ‘Create a new app ID’. This is where you’ll create the app that will connect n8n to WhatsApp.
- Configure App Details: Name your app (e.g., ‘n8n WhatsApp Bot’) and provide your email. For the use case, select ‘Other’, and for the app type, choose ‘Business’.
- Set Up WhatsApp: After creating the app, click ‘Set up’ on the WhatsApp product.
- Retrieve Credentials: Go to ‘App settings’ > ‘Basic’ to find your ‘App ID’ and ‘App secret’. Copy these values. These are the precious keys we need!
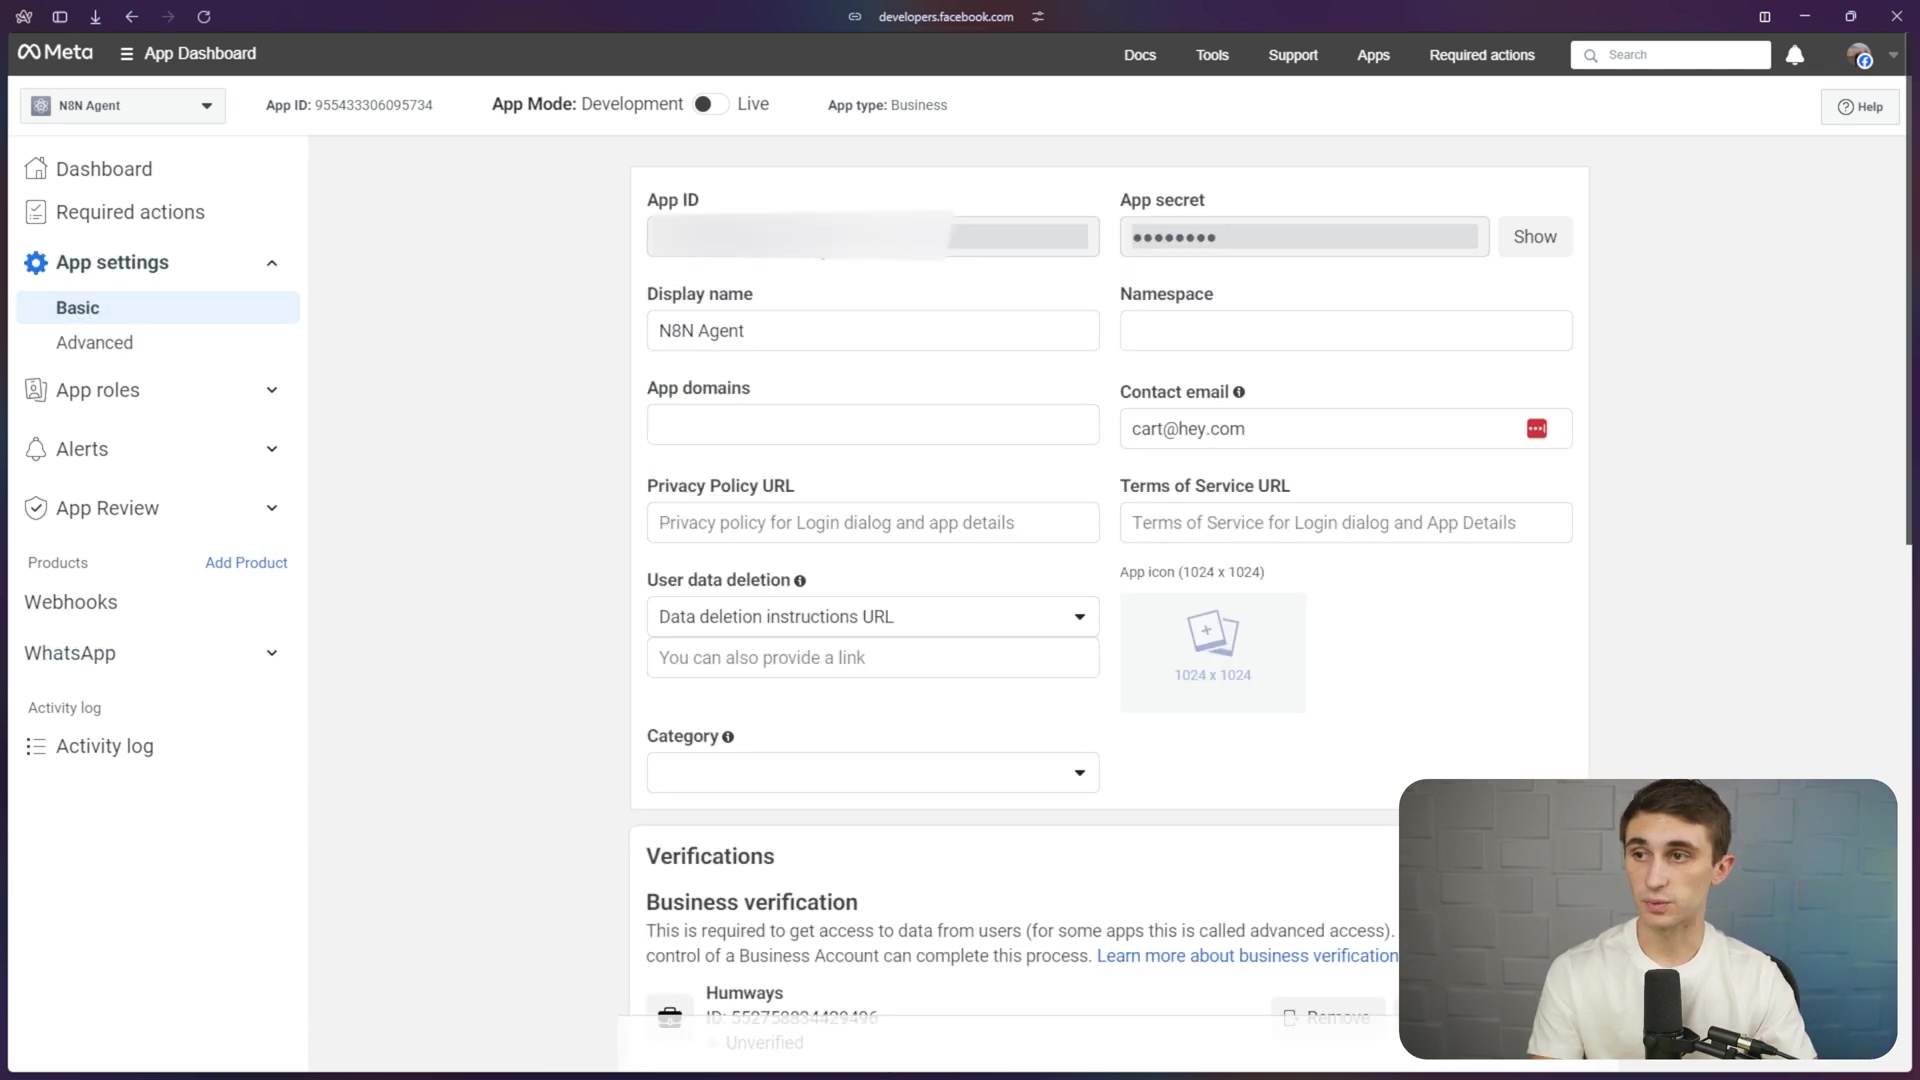
- Input Credentials in n8n: Paste the copied ‘App ID’ into the ‘Client ID’ field and the ‘App secret’ into the ‘Client Secret’ field in n8n, then save. A ‘Connection tested successfully’ message should appear. This is the green light – it means n8n can now talk to WhatsApp! If you don’t see this message, double-check that you’ve copied the credentials correctly.
3. Integrating an AI Agent with OpenAI for Intelligent Responses
Now, you’ll add an AI agent to your n8n workflow to process incoming messages and generate intelligent responses. This involves connecting to a language model like OpenAI. Think of this AI agent as the ‘brain’ of your chatbot, capable of understanding and responding to messages. We’re leveling up our chatbot from simple replies to actual conversations!
- Add AI Agent Node: In your n8n canvas, add an ‘Advanced AI’ -> ‘AI Agent’ node.
- Connect Chat Model: Click the ‘Chat Model’ button and select ‘OpenAI’.
- Create OpenAI Credential: This requires an API key from OpenAI. Go to
platform.openai.com. OpenAI Platform - Fund Your Account: Ensure you have credits (e.g., $5-$10) in your OpenAI developer account for API usage. This is separate from any ChatGPT subscriptions. OpenAI isn’t free, but a little goes a long way. It’s like fueling your spaceship – gotta have the juice to explore the galaxy!
- Generate API Key: Navigate to ‘API keys’ and click ‘Create new secret key’. Name it (e.g., ‘n8n WhatsApp Agent’) and select a project. Copy the generated key. Treat this key like gold – keep it safe and don’t share it!
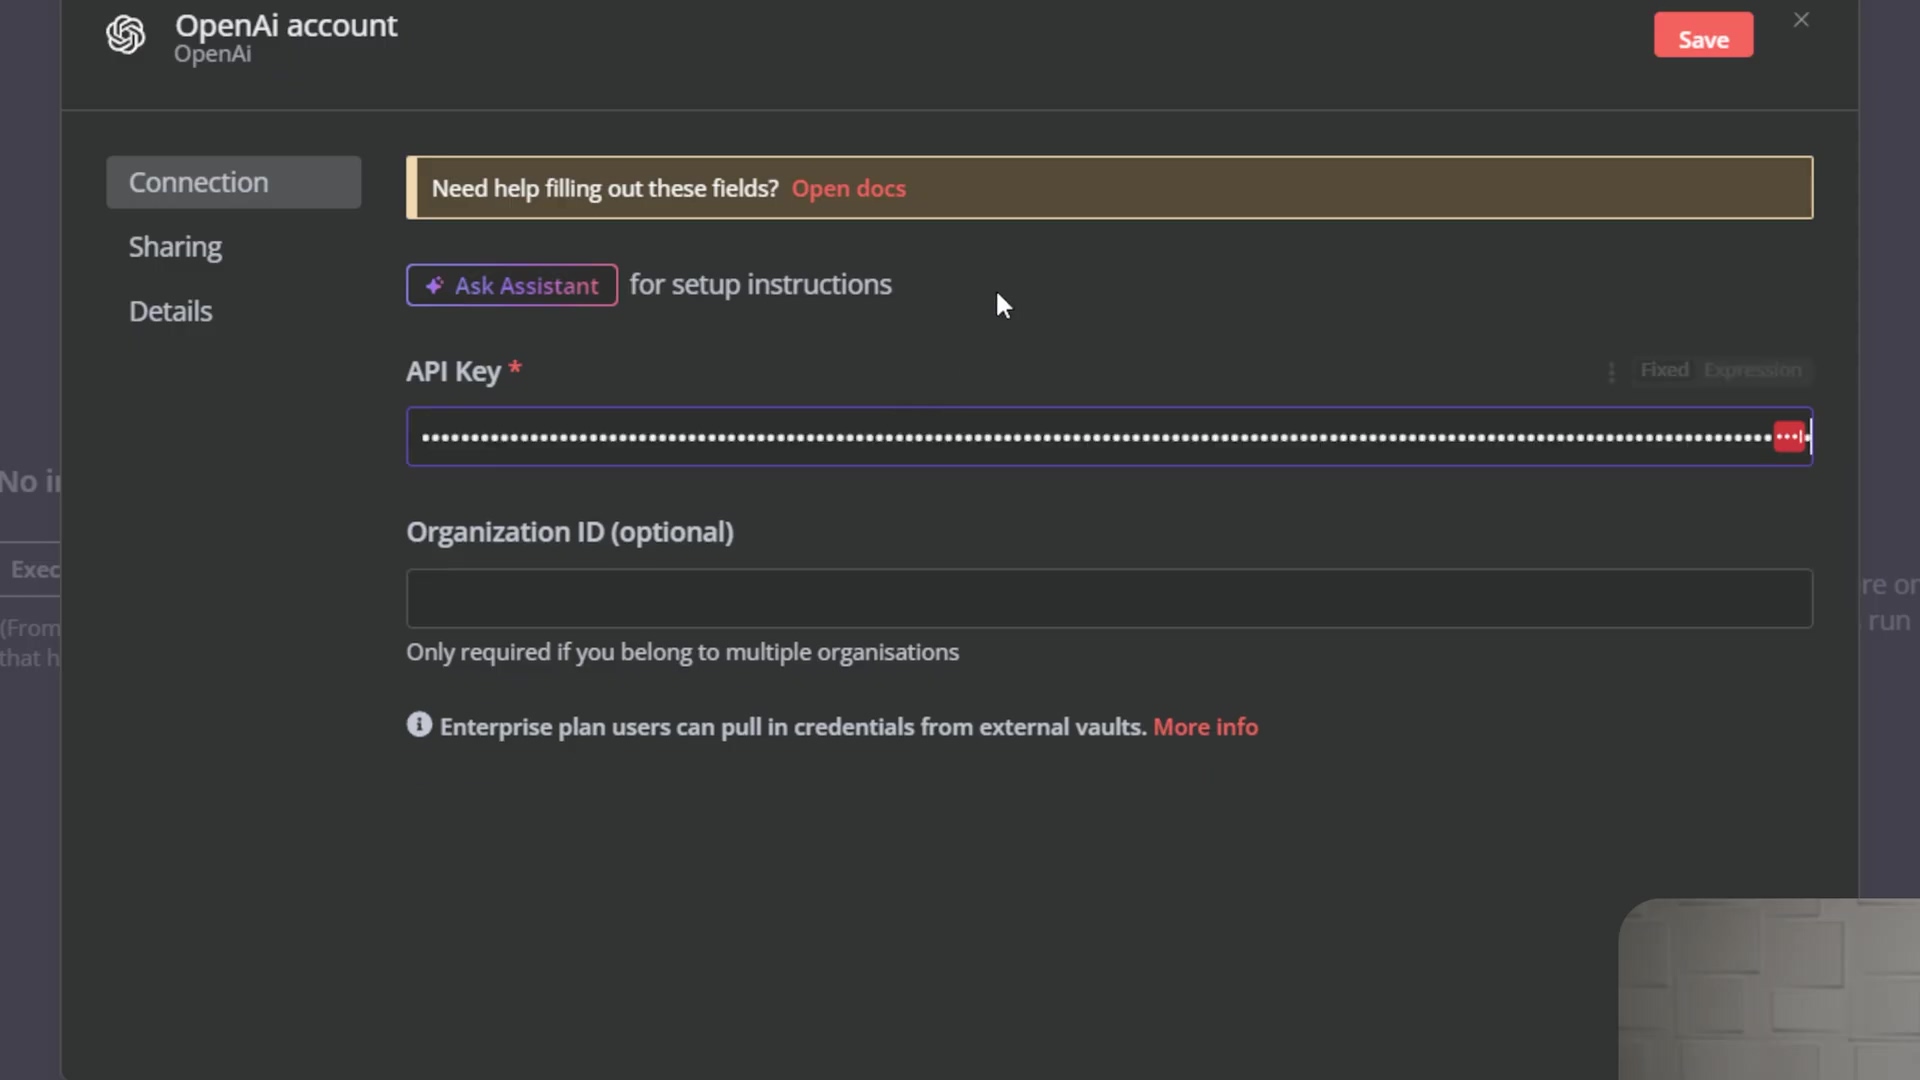
- Input API Key in n8n: Paste the OpenAI API key into the n8n credential setup for OpenAI and save. Now n8n can use OpenAI’s powerful language models to generate responses. You should see a confirmation message that the connection was successful. If not, double-check your API key!
4. Configuring Memory for Conversational Context
For your chatbot to maintain context during a conversation, you need to add memory. A ‘Window Buffer Memory’ node is a simple yet effective solution. Without memory, your chatbot would forget everything after each message – like a goldfish! Memory allows it to remember previous messages and provide more relevant responses.
- Add Memory Node: Connect a ‘Window Buffer Memory’ node to your AI Agent.
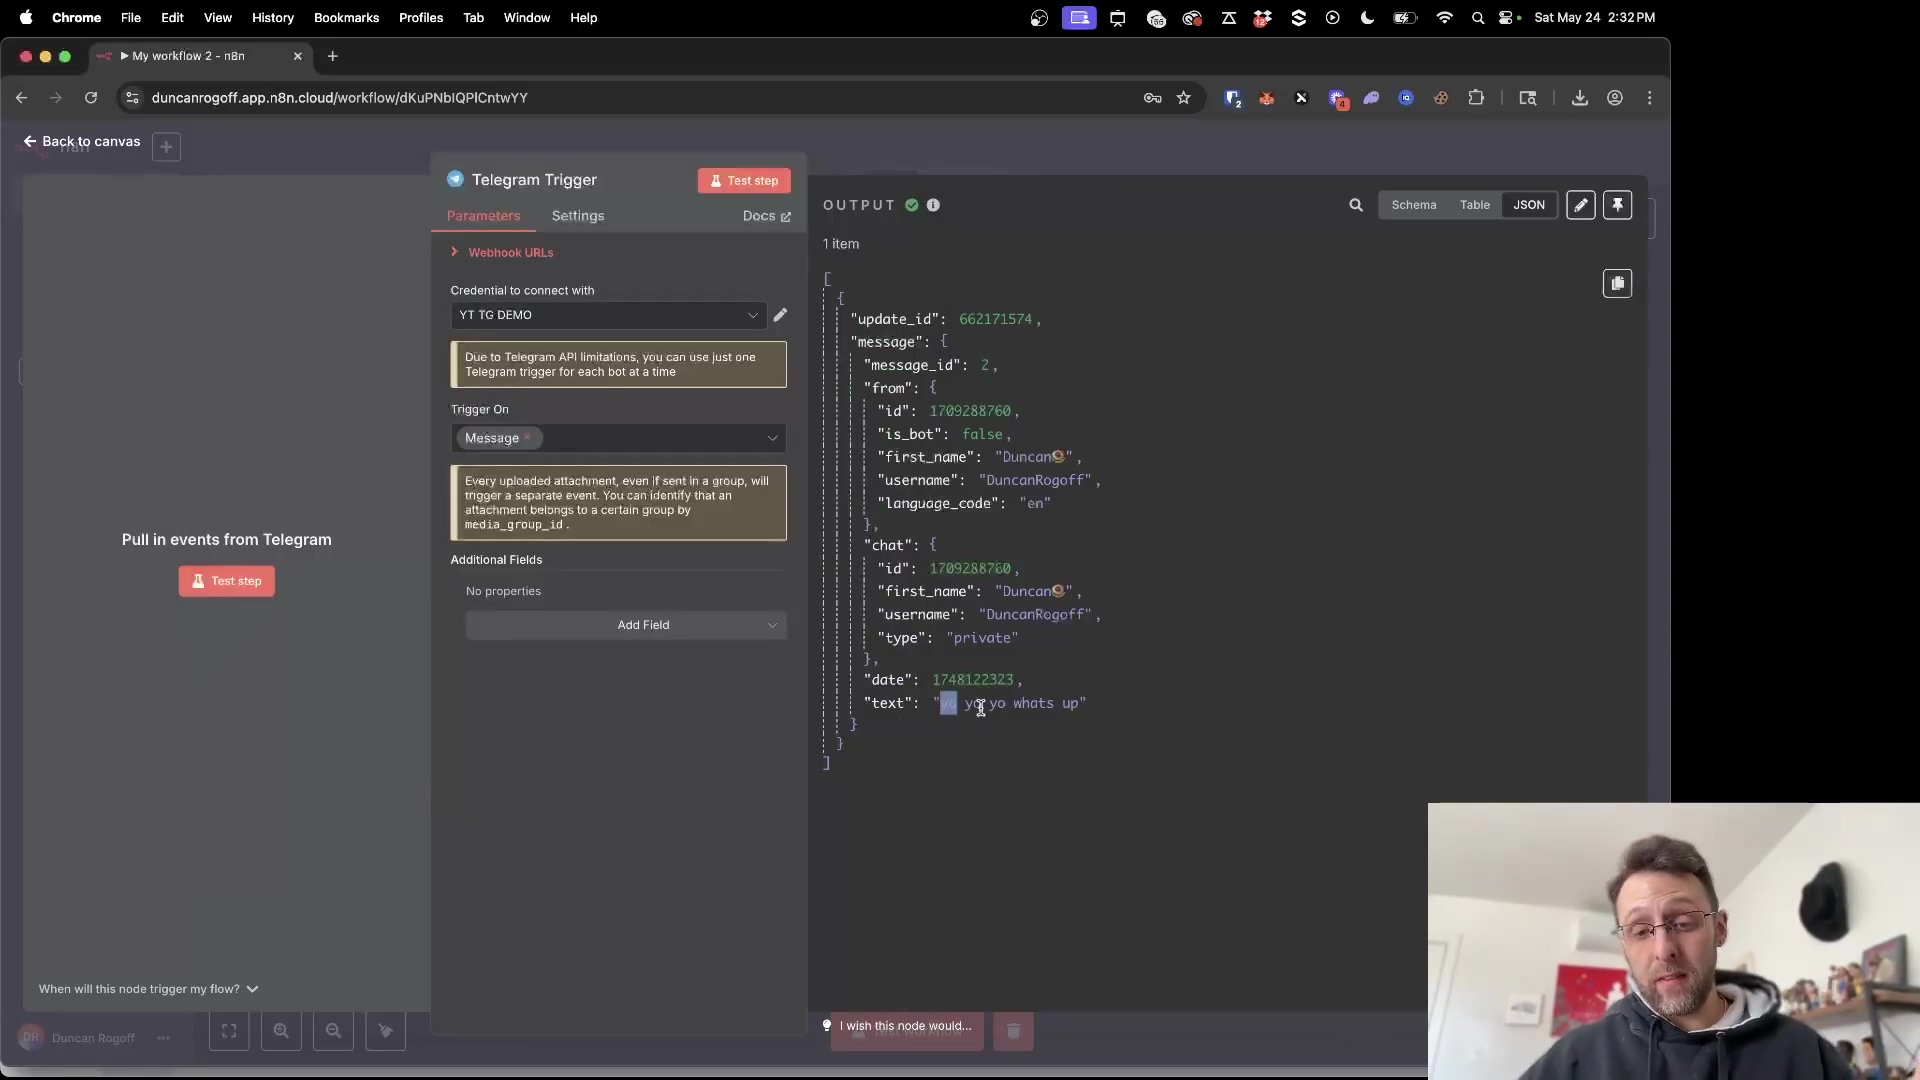
- Map Session ID: Crucially, configure the ‘Session ID’ for the memory node. Change it to ‘Define below’ and use an expression to pull the WhatsApp ID from the incoming message. A common expression is
{{ $('Chat Received').item.json.contacts[0].wa_id }}. TheChat Receivedpart should match the exact name of your WhatsApp trigger node. This Session ID is how the memory node knows which conversation to associate the messages with. It’s like giving each conversation a unique name tag. - Set Memory Depth: Adjust how many previous messages the agent should remember (e.g., 5 messages for testing). This determines how far back the chatbot can ‘remember’ in the conversation. Experiment with different values to find what works best for your use case.
![The image shows a split screen. On the left, an n8n interface is displayed, focusing on the ‘Window Buffer Memory’ node’s parameters. The ‘Parameters’ tab is active, showing a ‘Session ID’ field with a JavaScript expression: ”{{ $(‘Chat Received’).item.json.contacts[0].wa_id }}”. Below it, a ‘Key’ field is visible. An error message at the bottom right of the n8n interface states “Error in sub-node Window Buffer Memory: No session ID found”. On the right, a WhatsApp chat interface is open, displaying a conversation with ‘+1 (555) 159-0941’. The chat shows a sent message ‘hello’ at 5:44 PM. The person in the video is visible in the top right corner, looking at the screen.]
5. Setting Up WhatsApp to Send Messages
After the AI agent processes a message, the chatbot needs to send a response back to WhatsApp. This requires a separate WhatsApp Business Cloud node configured for sending. We’ve got the ‘brain’ working, now we need the ‘mouth’ to speak!
- Add WhatsApp Send Node: Add another ‘WhatsApp Business Cloud’ node to your workflow, this time selecting ‘Send message’ under ‘Actions’.
- Create New Credential (Access Token): This credential is different from the first one. It requires an ‘Access Token’ and a ‘Business Account ID’.
- Generate Access Token: Go back to your Meta App Dashboard. Under the WhatsApp product, navigate to ‘API Setup’. Here, you can generate a temporary access token and find your Business Account ID.
- Test Number: You can use a test number provided by Facebook or add your own phone number to receive messages.
- Generate Token: Click ‘Generate Access Token’, select the appropriate WhatsApp accounts, and save. Copy the generated token and Business Account ID.
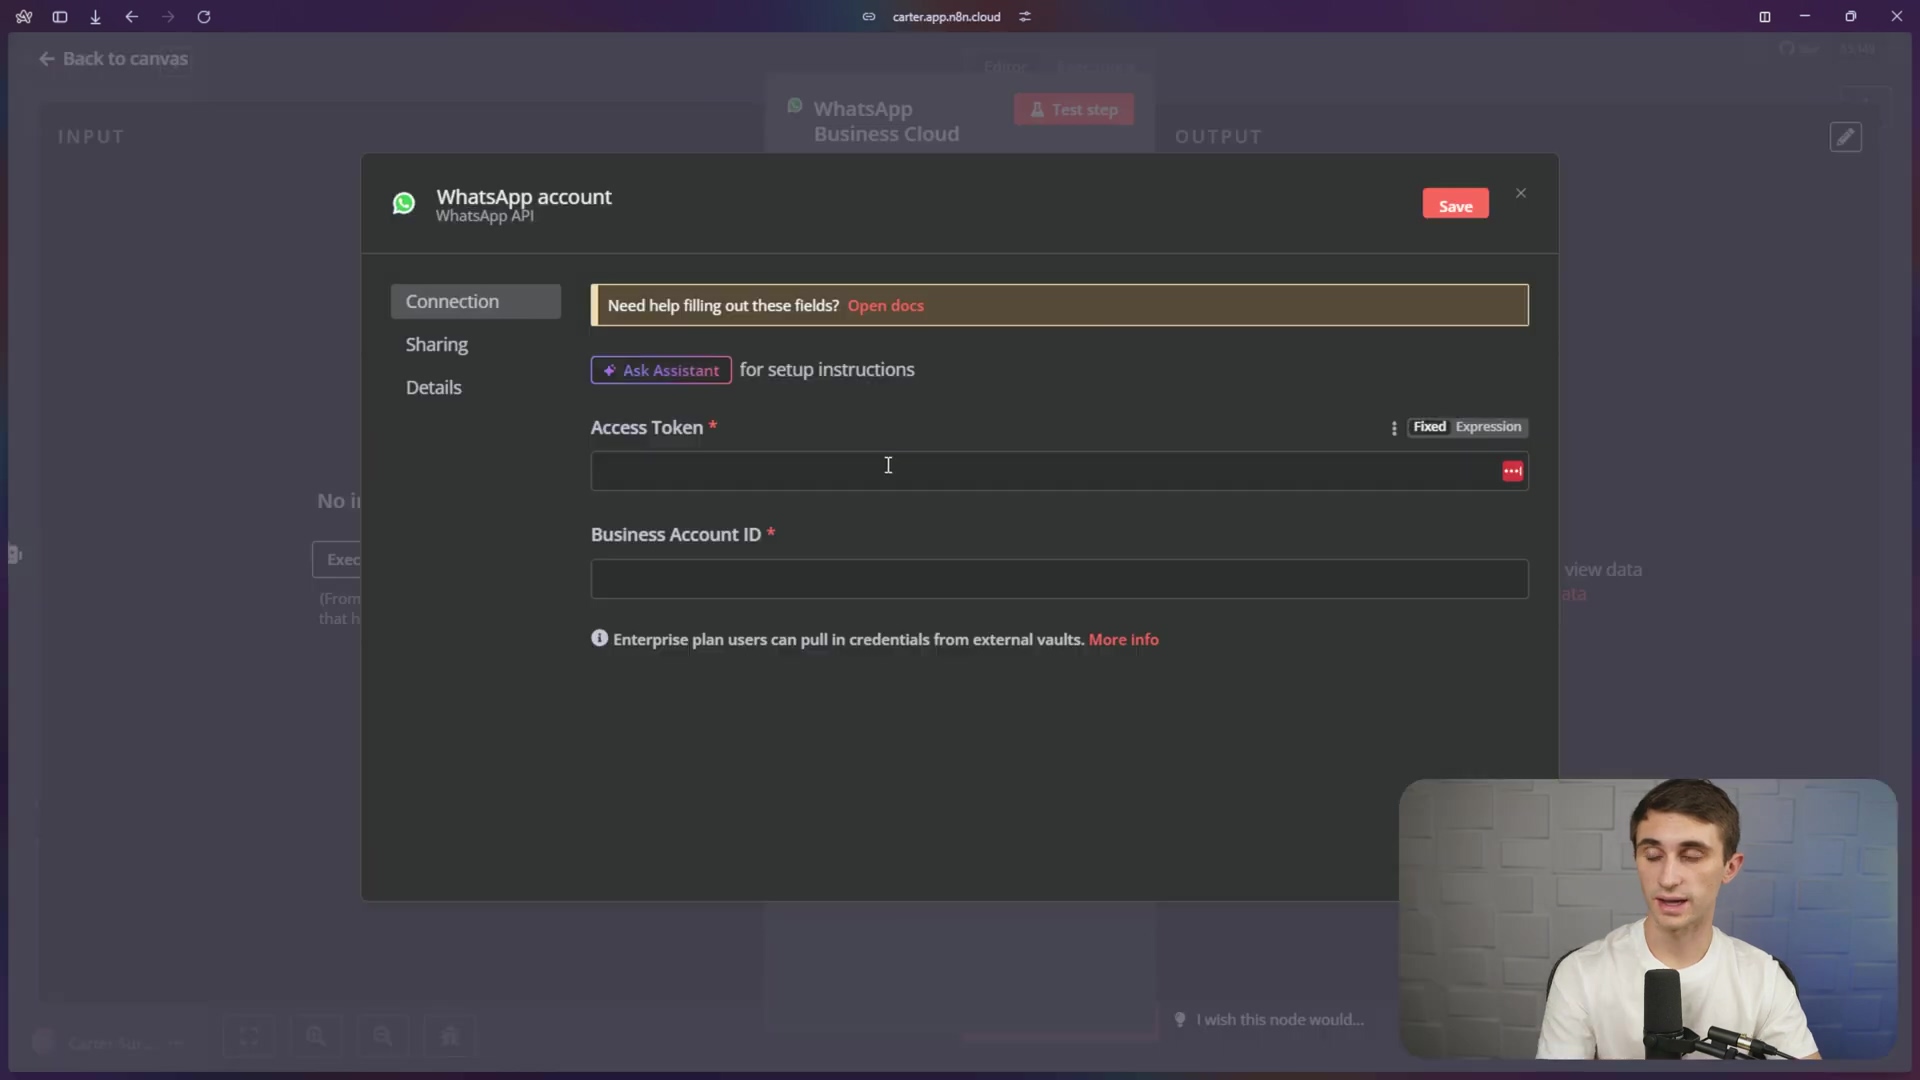
- Input Credentials in n8n: Paste the Access Token and Business Account ID into the n8n credential setup for sending WhatsApp messages and save.
- Configure Send Parameters: In the ‘WhatsApp Business Cloud: Send message’ node, select the ‘Sender Phone Number’ (the test number you configured) and the ‘Recipient’s Phone Number’ (your phone number).
- Map AI Agent Output: For the ‘Text Body’, drag the ‘output’ variable from your AI Agent node. This will ensure the AI’s response is sent as the message. We’re connecting the AI’s ‘brain’ to the WhatsApp ‘mouth’!

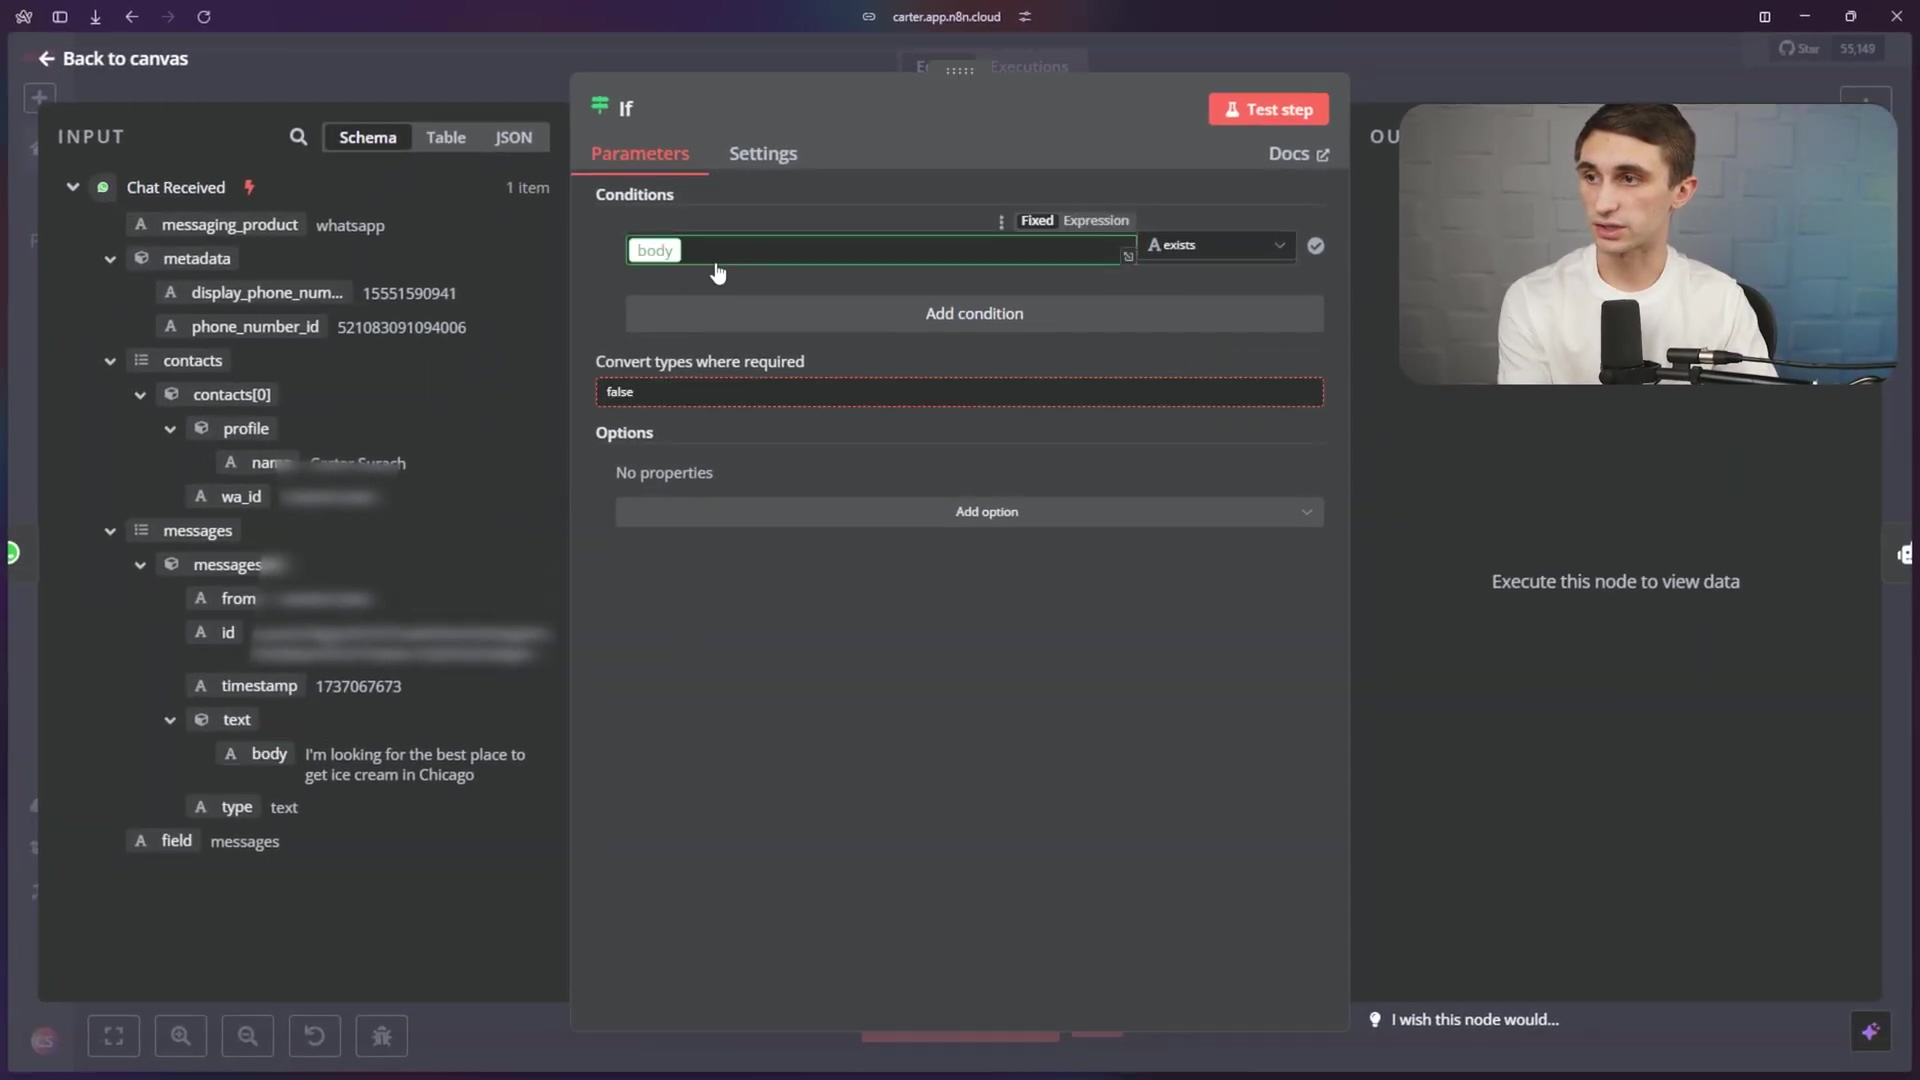
6. Ensuring Valid Message Input with an ‘If’ Node
To prevent the workflow from processing irrelevant data that WhatsApp might send, add an ‘If’ node to filter messages. Sometimes WhatsApp sends things that aren’t actual text messages, and we don’t want our chatbot to get confused. This ‘If’ node acts like a bouncer, only letting in the real messages.
- Add ‘If’ Node: Insert an ‘If’ node immediately after the ‘Chat Received’ node.
- Configure Condition: Set the condition to ‘body’ ‘string exists’. Drag the ‘body’ string from the ‘Chat Received’ node’s output into the condition field. This ensures that only messages with actual text content proceed through the workflow.
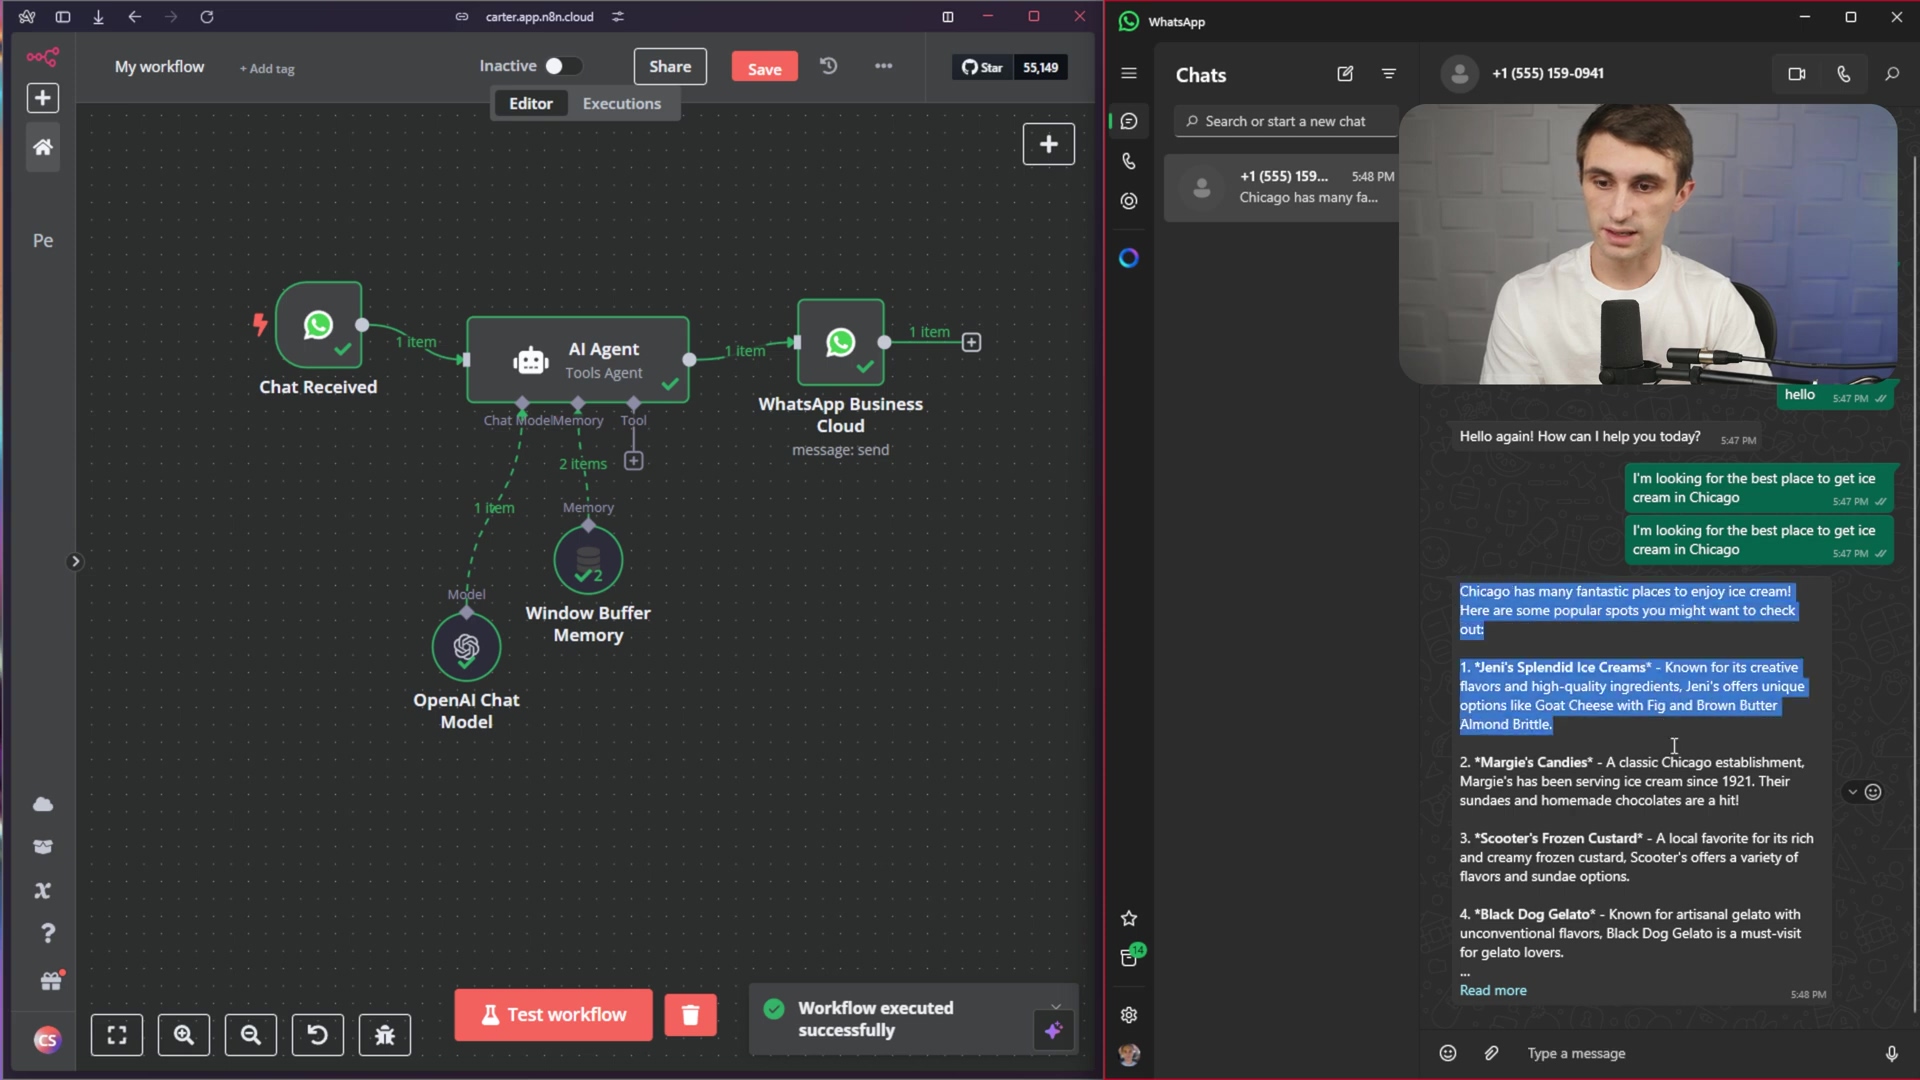
7. Testing Your WhatsApp Chatbot
With all components in place, it’s time to test your n8n WhatsApp chatbot. This is the moment of truth – let’s see if our creation comes to life!
- Activate Workflow: Turn the workflow from ‘Inactive’ to ‘Active’. It’s like flipping the switch to power on your robot.
- Send a Message: Open WhatsApp on your phone or computer and send a message to the test number you configured.
- Observe Response: The AI agent should process your message and send an intelligent response back to your WhatsApp. If everything works, you’ll see your chatbot replying to your messages! If not, don’t panic – just go back and double-check each step.
Conclusion
Following this build WhatsApp chatbot with n8n tutorial, you can create a robust and intelligent communication system. This setup automates responses and uses AI to provide dynamic, context-aware interactions, significantly enhancing engagement. The flexibility and control of this DIY approach are unmatched. Unlike off-the-shelf solutions, an n8n-powered chatbot can be tailored precisely to your unique needs, integrating with virtually any service or data source. This empowers you to own your automation, adapting it as your requirements evolve, making it a future-proof investment for your communication strategy. Now you can build WhatsApp chatbot with n8n easily.
Frequently Asked Questions (FAQ)
Q: What if I don’t have a Facebook Business Manager account?
A: You’ll need to create one to use the WhatsApp Business Cloud integration. It’s free to set up, and it’s essential for managing your business presence on Facebook and WhatsApp.
Q: I’m getting an error message when trying to connect to OpenAI. What should I do?
A: Double-check that you’ve entered your OpenAI API key correctly. Also, make sure you have sufficient credits in your OpenAI account to cover API usage.
Q: My chatbot isn’t responding to messages. What could be the problem?
A: There are several possibilities. First, ensure that your n8n workflow is active. Then, check that your WhatsApp Business Cloud credentials are correct and that the ‘If’ node is configured properly to allow valid messages through. Also, verify that your OpenAI connection is working.
Q: Can I use a different AI model instead of OpenAI?
A: Yes, n8n supports various AI models. You can explore other options in the ‘AI Agent’ node settings. However, this tutorial focuses on OpenAI.
Q: How can I improve the chatbot’s responses?
A: Experiment with different prompts and memory settings in the ‘AI Agent’ and ‘Window Buffer Memory’ nodes. The more context you provide and the better you fine-tune the AI model, the more relevant and helpful the responses will be.
Q: Is there a cost associated with using n8n Cloud, WhatsApp Business Cloud, and OpenAI?
A: Yes, each of these services has its own pricing structure. n8n Cloud offers various plans, including a free tier with limitations. WhatsApp Business Cloud charges based on the number of messages sent. OpenAI charges based on API usage. Be sure to review the pricing details for each service to understand the costs involved.